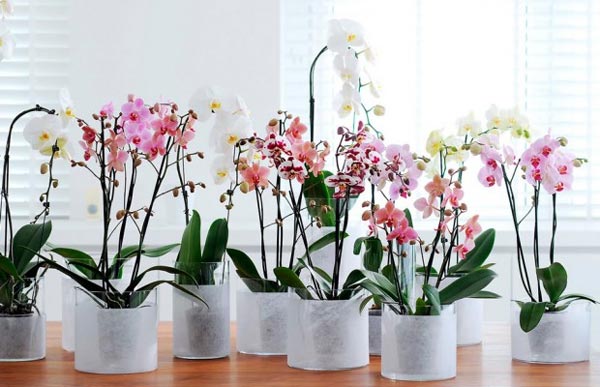
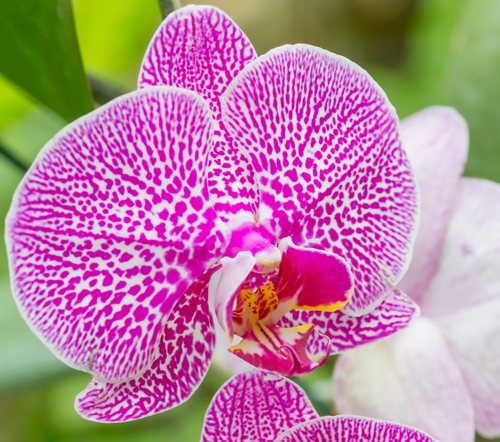
Plants »Flowers
0
1391
Article rating
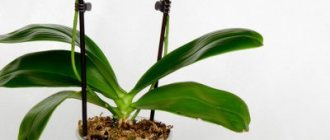
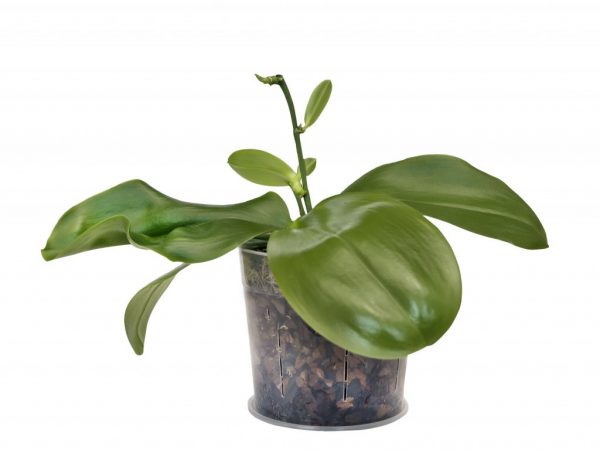
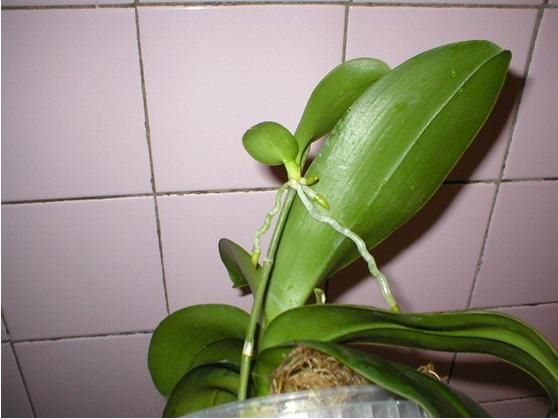
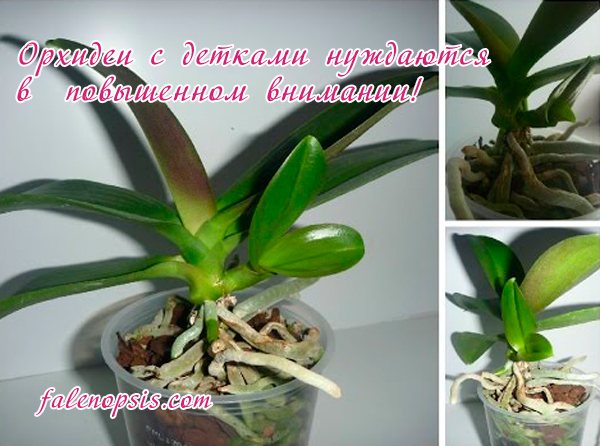
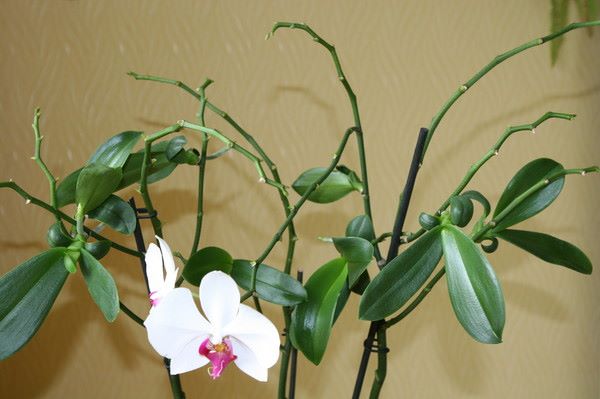
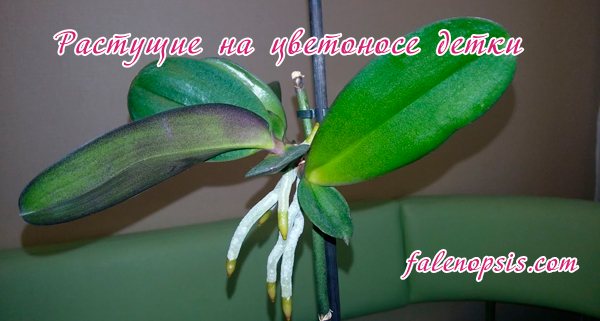
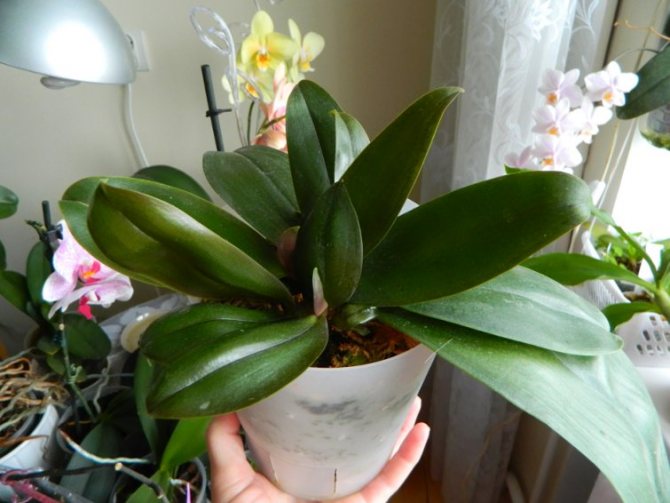
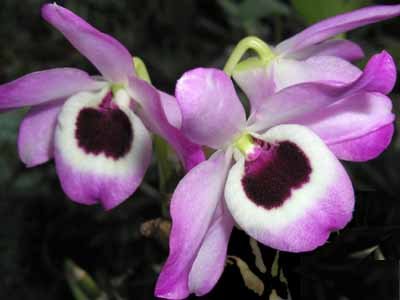
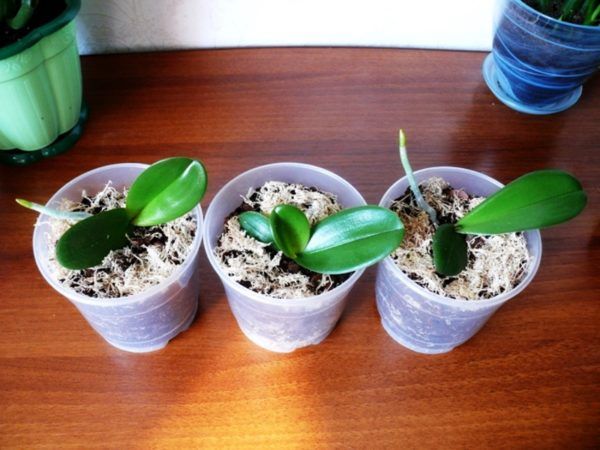
Orchid babies are small shoots that appear on peduncles, at the root collar, or on stems. They grow for 5-6 months, release leaves and roots. They are then separated from the mother plant and transplanted. In this way, a new plant is obtained that retains its varietal qualities.
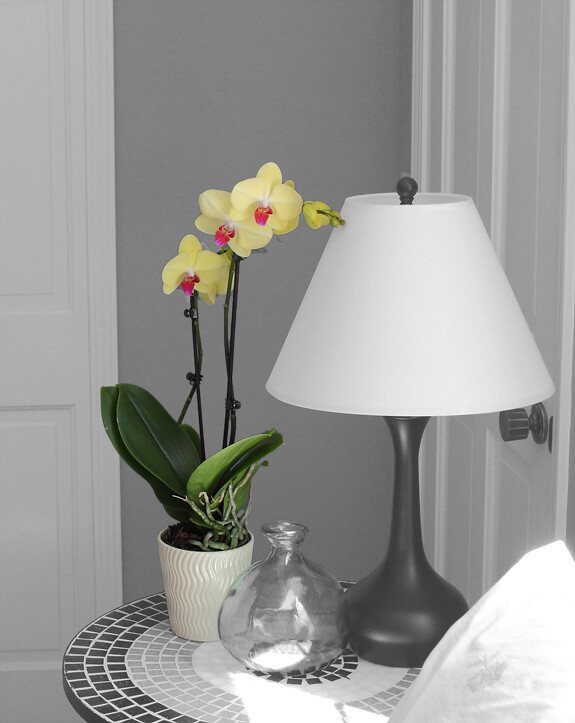
Orchid babies
How to root a phalaenopsis orchid without roots
First you need to clarify why you need to root an orchid at all. There may be several reasons for this. For example, this procedure is necessary if the plant is sick, and its roots have rotted. In such a situation, the damaged part of the roots is removed, and even if not a single root could be saved, the flower can still be saved from death. This is where knowledge of the rooting procedure will come in handy, because with its help the plant will be able to grow new roots and how to gain a foothold in the new substrate.
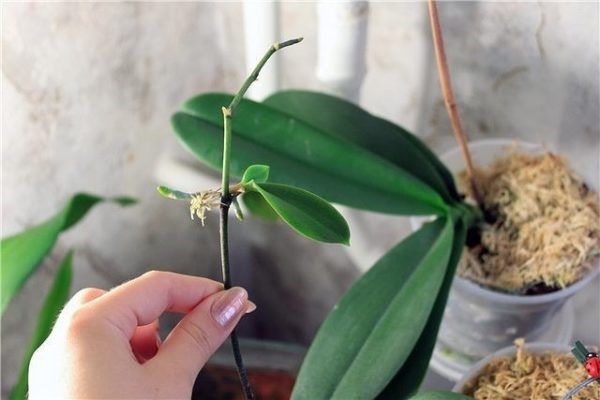
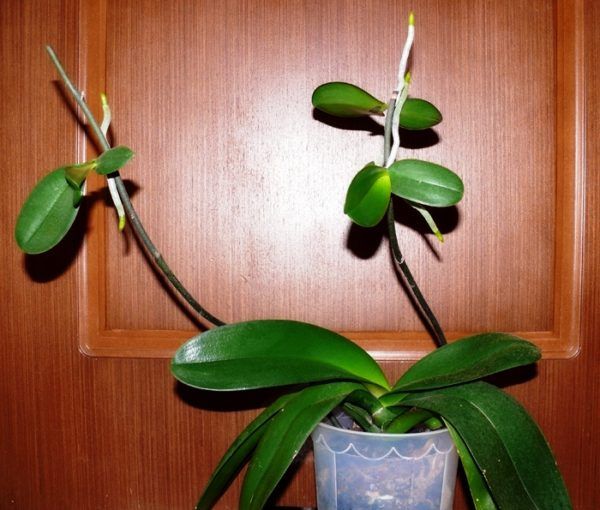
In addition, it is necessary to root the orchid babies from the peduncle. When an adult flower grows, new cuttings begin to appear on its peduncle, the roots of which simply hang in the air. Such children need to be cut off and planted in a new pot, but if a lot of time has passed and the roots have not appeared, then a rooting procedure will be necessary.
Thus, there are two main ways of rooting: rooting cuttings and babies from the stem of an orchid. Below we describe detailed instructions for each of them.
Stimulation of the emergence of roots
Some orchid babies do not give roots, in such situations, plant lovers are interested in the question of how to deal with this problem.
First of all, it is necessary take sphagnum moss, strong thread and cling film.
In order for the moss to swell, it is necessary soak in water for 30 minutes.
We make a nest from the moss obtained, which is attached with a thread to the peduncle with the baby. You need to fix it so that it does not disintegrate.
In order for the orchid not to overturn and the baby from the peduncle does not break off, the "nest" from the moss can be additionally attach with a stick with clips.
To create greenhouse effect in a dry room, The moss nest is additionally wrapped with cling film.
"Nest" from the moss is sprayed with water every day. To stimulate root growth, into the spray water added "Kornevin".
Video "How to grow an orchid baby?"
From this video you will learn how to grow a baby on a cut orchid stalk.
Cherenkov
As we have already said, this procedure is resorted to in the event that most of the roots of the plant were damaged, and they had to be cut off. There is no need to despair, because you can separate the stalk and try to grow new roots on it using the rooting procedure.
To get started, you will need to cut the stalk. For this, a healthy adult plant is taken, and its top is cut off. It is good if several strong roots remain at this top, because then the procedure for rooting the cutting is doomed to success.After the cut has been cut, be sure to sprinkle the cut with charcoal to prevent possible contamination.
The resulting stalk must be transplanted into a new pot that is suitable in size and placed in a greenhouse. After some time, new roots will begin to form on the handle, and the plant will properly anchor in the ground.
If it seems to you that the roots are not growing fast enough, you can try to speed up the process by treating the orchid with a special solution of plant hormones. To do this, you need to cut off a leaf near the bud and carry out processing. Secondary treatment is carried out after 5-10 days to consolidate the effect.
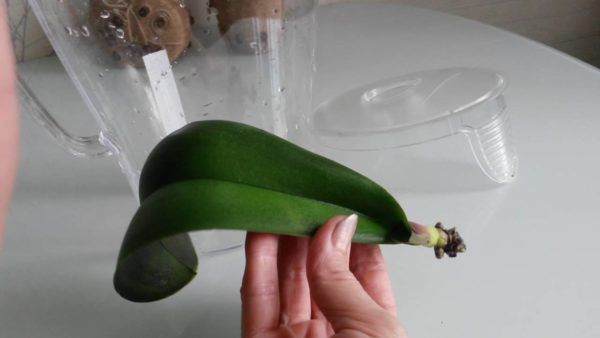
Peduncle babies
Very often, small children grow on the stems of orchids, which must be cut off and planted in a separate pot. However, in some cases, the leaves themselves appear, but there are no roots for a long time. This is due to the fact that the care of the mother plant is carried out incorrectly. It may lack light, moisture, or fertilizer. This is where the rooting procedure will help you.
The first method is by rooting in foam. To do this, do the following:
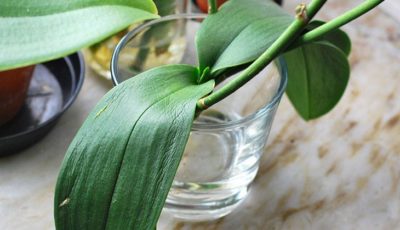
- Separate the baby very carefully from the mother plant, not forgetting that along with the flower itself, you need to cut off the part of the stem to which it is attached.
- Take a thick piece of Styrofoam, punch a hole in it, and attach a scion in that hole.
- Collect some water in a small container and place the foam with the orchid baby there, making sure that the base of the flower does not touch the water, but is 2-3 mm above its level.
- Roots should appear soon.
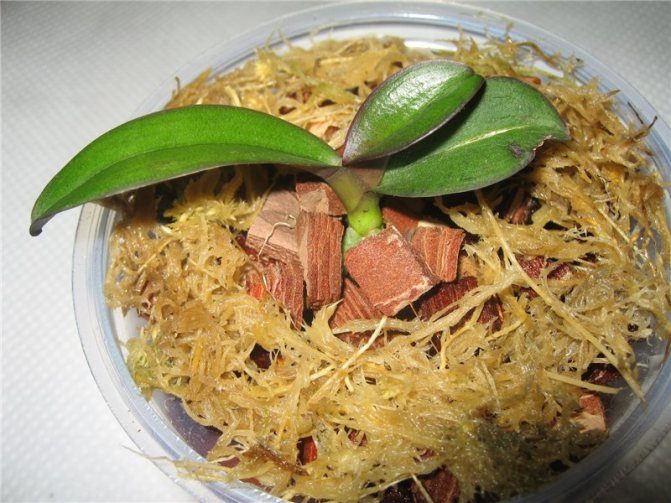
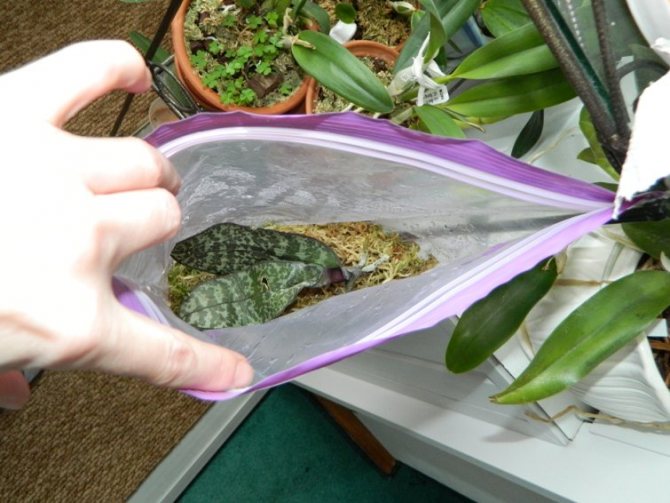
The second method is rooting in a home greenhouse. A flower baby cannot be immediately placed in a growing medium if it does not have roots.
For the procedure to be successful, the following recommendations must be followed:
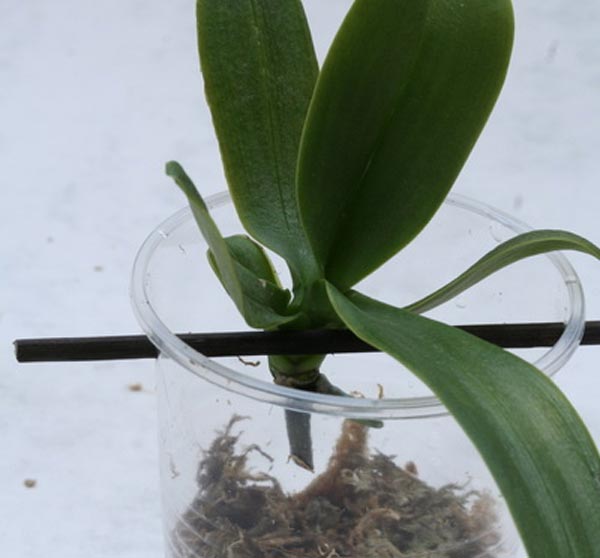
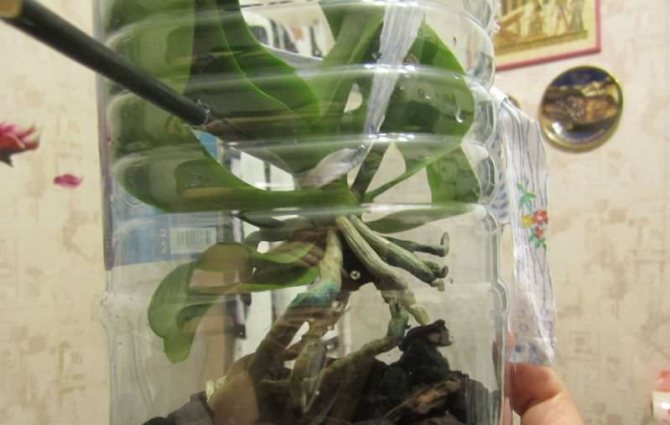
- Collect everything you need: sphagnum moss, drainage, plastic cup, plastic bag, plastic bottle.
- Make several holes in the glass for air circulation.
- We put the drainage, and on top - moss. It is also worth making two opposite holes in the upper part of the glass in order to stretch the supports for the baby through them.
- Cover the glass with a bottle and place in a lighted place. Do not forget to remove the bottle at least once a day so that there is an influx of fresh air.
- Spray the plant a couple of times a week.
- After a short period of time, new roots will appear on it.
How to stimulate the appearance of children
To get a new cake, a number of conditions are met:
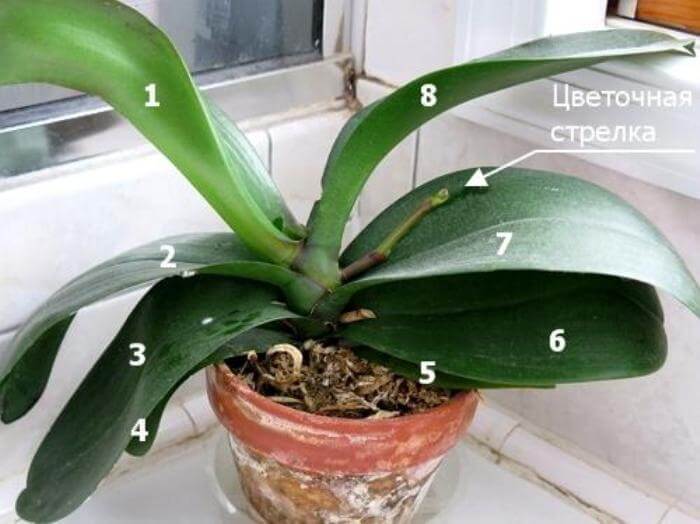
- After flowering is complete, the peduncle is carefully cut off at a height of 2 cm above the sleeping bud. In this case, sterile scissors or a special sharp knife are used.
- Provide optimal lighting, expose the pot on a windowsill or balcony. Artificial lighting is arranged in winter.
- The room temperature is set at 27 ° C-30 ° C. It is with this regime that dormant buds give growth to children. If the temperature is around 24 ° C, new flower stalks will grow from the buds.
In most cases, such actions give a good result, accelerate the formation of shoots on the branches. If the phalaenopsis baby has not grown, they resort to additional stimulation.
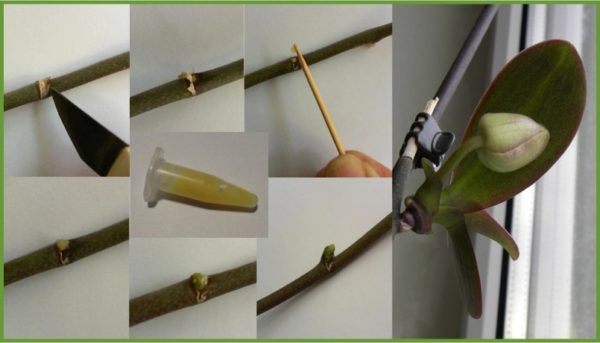
Germination with cytokine paste
Cytokine paste is a hormonal agent for stimulating plant growth. It is sold in many flower or farm shops. With the help of the drug, it is easy to get several children of the phalaenopsis orchid on one peduncle.
Terms of use:
- The peduncle is cut at a distance of 1.5-2 cm from the dormant bud.
- With a sharp, sterile needle, a small scratch is made on the surface of the kidney. If necessary, remove dry scales.
- Apply 1.5-2 g of paste (small pea size).
- They put the pot in the light and in a warm place.
The bud awakens in 7-10 days, depending on the variety.In the same way, they stimulate the birth of new kidneys. To do this, a place is determined on the peduncle where a new bud will grow. Then they make a small scratch and smear it with a paste. After 2 weeks, the formation of a new kidney is observed, from which a cake will then appear.
The paste can only be used on healthy plants
They make sure that one peduncle does not give more than 3 processes, the buds do not grow from one point (the optimal distance between them is 5-6 cm). If the arrow has released more, it is better to carefully detach the weakest from the branch and discard. The plant is fed all this time, the condition of the soil and the temperature in the room are monitored.
Do not use the paste to resuscitate a dried plant. It is also contraindicated if the flowering vine is sluggish, sick, or attacked by pests. It is not recommended to apply it to young flowers and shoots, as well as to basal buds. If the home beauty has started up the arrows of new peduncles, it is already useless to carry out stimulation.
During the procedure, make sure that the paste does not get on the leaves, stems and roots.
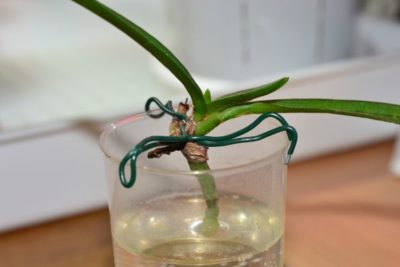
Procedure in water
Above we described the method of rooting an orchid in the ground, however, a flower without roots can also be rooted in water. This process is a little faster and requires little effort:
- You will need a plastic cup and water.
- Disinfect the glass before the procedure.
- Place the orchid in a glass so that it does not touch the water, but is close to it. To secure, you can use scotch tape, gluing half of the top of the glass with it, so that the flower fits well.
- Change the water once a week.
- In 2-3 months, the plant should grow new roots, and you can transplant it into a pot.
So, we looked at several ways of rooting an orchid, each of which you can easily try at home. They are absolutely safe for the plant and will help it grow an excellent root system in the near future.
Baby care
Phalaenopsis and other types of tropical flowers take a long time to develop. Planting and growing them requires patience. Throughout the year, young seedlings require greenhouse conditions.
Then, for another 1-2 years, it is recommended to care for the baby of a home orchid in the same way as for an adult plant. Only after that will it bloom.
What rules are recommended to adhere to:
- The humidity in the room where the cake is growing should be increased.
- The temperature is maintained at 27 ° C-30 ° C during the day and 18 ° C-20 ° C at night.
- To create ideal conditions, the pot is covered with a plastic or glass cover to create a mini greenhouse. From time to time, the sprout is ventilated by removing the cap for 2-3 hours, humidity and temperature are controlled.
- The cake is watered as the substrate dries.
- Once a small amount of growth stimulants and fertilizers are added to the water. Make half the dose from a special top dressing, a few drops of root or epin.
- When leaves begin to grow intensively on the seedlings, growth stimulants are canceled.
Caring for orchid babies in a small pot continues for 6-10 months. Then they are transplanted into a large container. If everything is done correctly, in 2-3 years it is easy to get an adult blooming beauty. One home flower can easily make a whole greenhouse. The main thing is to have patience and not lose interest.
Eliminating the consequences of improper orchid care: how to grow roots in phalaenopsis?
An orchid is a finicky flower, the consequence of improper care of which can be the loss of the root system: the roots will rot or dry out. However, you should not get upset ahead of time - this, of course, is unpleasant, but not fatal, and if you quickly take the necessary measures, the phalaenopsis will recover. In our article, we will tell you in detail how to grow the roots of a flower.
Possible problems
There are not so many difficulties in growing the roots of the processes and they manifest themselves, first of all, in drying or yellowing of the leaves.
Yellowing and drying of the appendix
In this case, constant monitoring of the baby's condition is necessary, and if the problem persists, make changes to the conditions of detention:
- add more light;
- provide a comfortable temperature;
- regularly make nitrogen fertilizing and watered.
Care and adherence to the technology of growing roots will soon allow you to acquire a small orchid.
How do you know if the root system is not functioning?
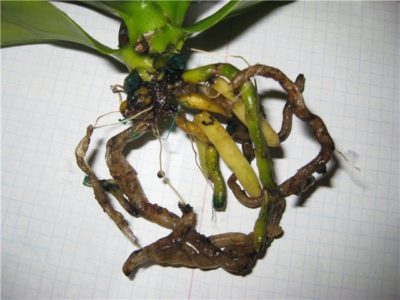
Phalaenopsis is a pretty viable plant, therefore, that something is wrong with him, you can not suspect for a long time. If you notice any changes in the condition of the flower, for example, yellowed leaves, it is worth removing it from the flowerpot and examining the root system.
Living and healthy roots should be green or white, with a lack of light, they can be brownish, necessarily hard and dense to the touch, while rotten roots crumble under the fingers, become hollow. If you click on them, moisture will stand out, and if the situation is completely neglected, they will creep under your fingers. In this case, the root system can no longer be saved.
What sprouts do Phalaenopsis have?
Depending on how the orchid gave birth to the baby, babies are classified as:
- baby on the trunk;
- root baby;
- division;
- seedlings.
We will not consider the process of developing and caring for seedlings and cuttings, since in the first case this process is quite laborious and time-consuming, and in the second we will talk about plant resuscitation.
In general, a young orchid on the peduncle and at the base looks the same, both of them can bloom while still on the mother plant, but there is still a difference in how to care for the little Phalaenopsis orchid. It is quite simple to do this at home, the main thing is to know their features.
Basal baby: developmental features
As already mentioned, such a baby appears in extreme conditions for the mother plant. The appearance of a root baby is always a reason to reconsider the conditions of keeping your tropical beauties.
Important! If your blooming orchid produces offspring, this does not mean that it is good! Perhaps she will use every opportunity to reproduce.
Another reason for the appearance of a baby on the trunk of an orchid is flowering from the point of growth of the mother plant. After the release of the peduncle from this place, the phalaenopsis will no longer be able to grow new leaves, and in order to extend its life cycle, it can produce offspring.
The root babies of the Phalaenopsis orchid develop rather slowly. In the first few weeks, they release 2-3 leaves that will develop over 3-4 months. The growing organism receives nutrients from the mother, therefore, you need to pay attention to the condition of the root system.
The roots should be green when wet or silvery when dry, a good sign of the appearance of bright green tips, indicating the development of the plant. Mother's leaves should be well turgid and free from dry or wet spots.
Unlike stem babies, root babies do not need to be planted, but we will talk about this a little later.
Features of the stem baby
Before thinking whether it is already possible to separate the baby from the mother's orchid, you need to know when it can exist separately:
- Stem babies should grow roots 5 cm or more in length.
- A young orchid on a peduncle must have at least 3 leaves, from 5 cm in size.
Next, let's talk about how to raise a phalaenopsis orchid baby in order to quickly and correctly plant it from its mother.
Why might this situation arise?
Too much watering. The most common cause of root rot.In conditions of constant humidity and poor ventilation, velamen - the tissue that covers the roots - begins to rot and over time this process spreads to the entire root system.- Lack of lighting. The orchid needs light for photosynthesis, without it the flower cannot form new cells, which means it stops developing, almost stops absorbing moisture and its roots begin to die.
- Hypothermia. If the temperature drops, the process of assimilating moisture from the substrate is disrupted, due to which the flower receives a cold burn and the root cells die.
- Chemical burn. Too strong a concentration of fertilizer, watering with fertilizer on dry soil and too frequent fertilizing can burn the delicate root system.
- Diseases. If the soil of the orchid was first dried out, and then it was flooded, an infection may occur, and at first the leaves of the plant will become lethargic, and later the death of the roots will begin.
- Unsuitable substrate. In no case should an orchid be grown in ordinary soil - in it the roots will rot due to lack of air. Hydrogel or sphagnum as the main substrate can also only harm the root system of the plant if watering is incorrectly calculated.
- Lack of moisture and heat. This dries up the roots of the plant.
- Hard and saline water. Such water cannot be used for irrigation, it has a bad effect on the general condition of the phalaenopsis and on its root system in particular.
Formation features
Orchid babies - this is not an oddity, but a fairly common phenomenon.
Do not follow immediately after flowering cut a peduncle... Over time, with proper nutrition and lighting, either a lateral peduncle grows out of it or a baby is formed.
On the development of a lateral baby it takes more than one month.
Exists three types of breeding orchids:
- Children at the root;
- Stem;
- Children on a peduncle.
The most common type of reproduction by children is on the peduncle.
Reproduction by children at home is the most popular among orchid lovers. The bottom line is that kids on the orchid appear in different parts of it, between the leaves, on the trunks and on the peduncle.
Some sources say that the orchid gives offspring just before its death. On the one hand, this is true, but only in cases where baby is formed on the trunk... Such situations can be observed only in those cases when the top or trunk of the orchid dies.
With the formation of offspring on a dying plant, reproduction takes place due to division and the formation of new cells, and not from a dormant flower bud.
Not recommended use hormonal paste for artificially provoking the development of stem babies.
Even with the education of a little kid its further growth cannot be provoked hormonal paste, as it will not help.
Orchid stem offspring after her injury does not give roots. Such a plant should be fertilized and given the most usual care.
Such an orchid can even transplant into a large pot together with the baby. Phalaenopsis can even bloom with its offspring.
At home when caring for phalaenopsis watering, lighting, humidity, temperature and fertilization are very important:
- Orchids are quite demanding on lighting. In summer, it is not recommended to put the orchid on the south-side windowsills to avoid overheating the plant and sunburn.
- Apartment orchids not very demanding on humidity, unlike those plants that grow in nature. The plant should be "bathed" or watered only if the air temperature is very high, especially in summer. It is not recommended to place plant pots near heaters or over central heating radiators;
- Temperature conditions are very important for phalaenopsis. In the cold period of time (in winter), it is necessary to remove the plants from the windowsills and put them in a warmer place.Do not allow cold air to enter the plant;
- Orchids don't need to be fertilized often, they take useful substances from sphagnum and decaying bark. In many specialty stores, you can find fertilizers for phalaenopsis, which must be purchased from time to time for the plant.
What is needed for this?
How to save your favorite plant?
Carefully remove the orchid from the flowerpot.- Remove soil residues from the root system by rinsing it in warm water.
- Carefully examine the roots and cut off all rotten and dried out areas, leaving only healthy roots (read about why the roots, leaves and other parts of the plant dry out here).
- Cut off the peduncles, as they take a lot of energy from the plant.
- In case of rotten or dry spots on the leaves, cut to healthy tissue.
- Treat the cuts with crushed charcoal or activated carbon or cinnamon.
- For additional prevention of the development of fungal diseases, it is necessary to soak for 15 minutes in a solution of fugnicides, reducing the dosage by 2 times.
- Dry the flower from half an hour to 4 hours, you can leave it for a day.
For successful resuscitation, phalaenopsis needs a sufficient amount of light, therefore, in winter it is necessary to use a phytolamp.
How to properly separate the offspring from the mother plant?
Exists a range of recommendations to separate the baby from the mother plant.
Recommendations:
- It is necessary to trim the peduncle clean and sterilized scissors or a garden pruner. In this case, you need to leave a gap of 1.5 cm on the sides of the plant;
- Slices must be sprinkled crushed activated carbon, cinnamon or iodine;
- Slices should rest and dry within a few days. Then a small pot is taken with a special substrate for growing young plants or children. Observe the development of leaves on a young plant. If the turgor of the leaves is lost, this is a sign that the root system is not strong enough to support the life of the entire plant and they do not have enough moisture.
Step by step instructions on how to root
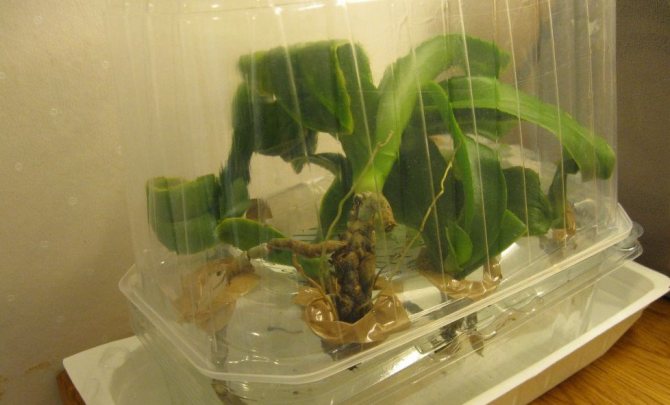
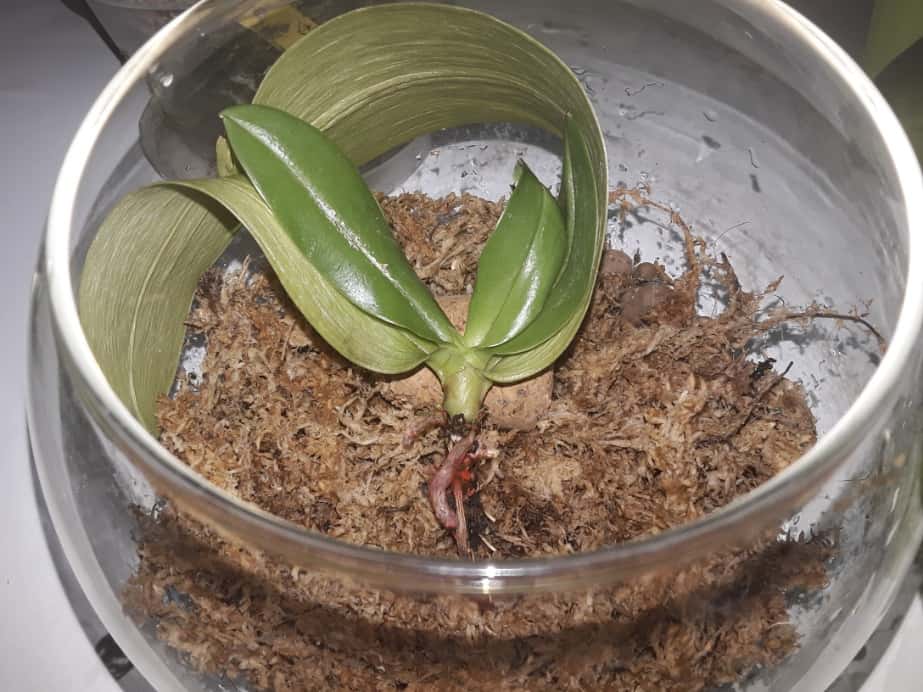
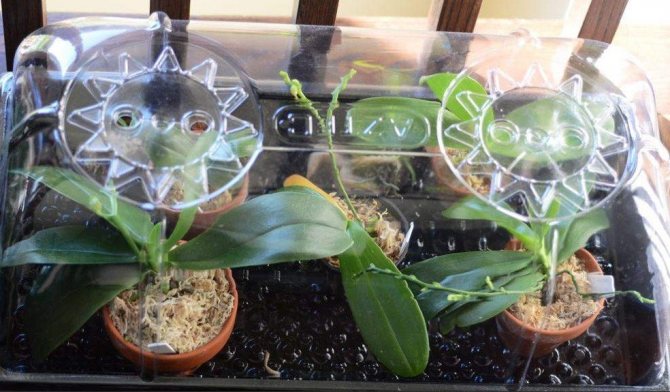
In the greenhouse
You can buy a ready-made greenhouse or make it yourself. For this, a plastic bottle, an aquarium, a plastic bag with a clasp, a plastic cake box are suitable.
- Expanded clay should be poured into the selected container, wet, but not wet sphagnum moss on top of it.
We offer you to watch a video about resuscitation of an orchid without roots using a greenhouse:
At home
Alternating soaking and drying
- For this method, you need to choose a transparent container in which the base of the orchid will fit freely and place the plant in it so that the base of the root is slightly higher than the bottom.
- Every morning you need to pour a little warm (about + 24-25 degrees) water so that the base is slightly submerged in it, and after 4-6 hours drain it and dry the orchid until the next morning. Lighting should be abundant, but it is necessary to exclude the possibility of direct sunlight.
Leaves dipping
When using this method, you need to immerse not the base in water, but the leaves of the phalaenopsis.
- It is necessary to fill the container with water with the addition of crushed coal and immerse the straightened leaves of the plant in it by a third.
- The roots remaining in the air must be sprayed daily with water with the addition of succinic acid or vitamin B, from time to time a root growth stimulator should be used.
- After the first roots appear, you need to place the plant in a transparent pot with sphagnum moss.
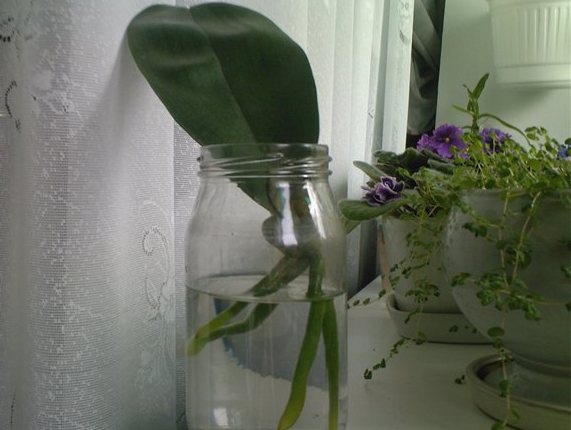
Build up in water
To do this, you need to immerse the phalaenopsis in a solution of warm filtered water. with the addition of "Kornevin", iron or glucose chelate, which should be changed every 5 days.
This method is the least suitable for an orchid, as root growth is slow, they often rot and do not take root well in the substrate.
In the video, you can familiarize yourself with the method of resuscitation of an orchid in water:
Resuscitation of orchids over water
This will require a transparent container and cool boiled water.
- It is necessary to place the phalaenopsis above the water so that it does not touch it, and put the container in a well-ventilated place with an air temperature of at least +23 degrees.
- It is necessary from time to time to wipe the leaves of the plant with a solution of succinic acid and make sure that the water does not evaporate completely.
Video about resuscitation of an orchid without roots above water:
How to properly care for an orchid
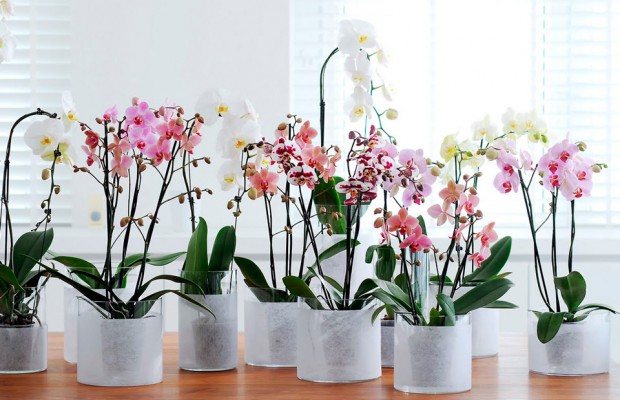
Looking at a blooming orchid, many growers do not even think about buying this extraordinary plant or not. Buy, of course! But will it bloom just as well at home?
Everybody knows that orchid is a rather capricious plant and requires scrupulous care. You can achieve re-flowering from it if you know all the factors contributing to this and follow a certain care regimen. Then the flowering of the orchid will last from 2 to 6 months. And some genera, like Phalaenopsis or Wanda, can bloom all year round.
For the orchid to bloom ...
The frequency of flowering of an orchid depends on the observance of certain rules of care. In order for a plant to bloom, there are 9 important conditions to remember.
1. Find out the age of the orchid
If you bought a non-flowering plant and it is in no hurry to please with a flower arrow, it may be too young. Different types of orchids bloom at the age of 1.5 to 3 years.
To determine if the orchid is old enough, you need to count the number of shoots. An adult plant, ready to bloom, should have from 5 to 8. If flowers appear on an orchid earlier, this is not always good. The fact is that a plant that is too young may not have enough strength to recover from flowering, and the orchid may die.
2. Don't move the pot
Many people know that moving for an orchid is a real stress. But this flower does not like even minor movements. The orchid reacts to position in relation to light. Therefore, if there is a need to rearrange a pot with a plant, it is necessary to place it on the same side to the light source as it was before. Also, do not move the orchid while watering. Movement adversely affects the growth of the flower, especially at the time of the appearance of the peduncle.
3. Pay attention to the roots
As you know, the roots of orchids are actively involved in the process of photosynthesis, so it is important to ensure that they have enough light. Since it is not recommended to move the orchid once again, it is worth taking care of the roots in advance. For example, instead of ceramic pots, it is better to use transparent plastic containers with a lot of drainage holes.
It is not recommended to take containers with corrugated walls for planting this flower, since its roots tend to grow to an uneven surface. In addition, sharp edges and elements can injure the root system, which will harm the entire plant as a whole.
4. Take care of lighting
Sunlight is a very important factor in orchid bloom. Without full daylight hours (10-12 hours a day), these plants will not bloom. Therefore, in autumn and winter, when there is very little natural light, flowers should be supplemented with lamps.
Phytolamps are special lamps designed for supplementary lighting of plants: they give a lot of bright light without drying out the air around the flowers.
If the orchid has released a peduncle in the fall or winter, then care should be taken to ensure that it does not die due to the short daylight hours. Without additional lighting in the dark season, the peduncle may stop developing or dry out. If it is not possible to supplement the entire plant, it is enough to organize the illumination only for the tip of the peduncle. The main thing is to make sure that neither he nor the plant itself is heated.
5. Ensure the allowable temperature difference
The catalyst for flowering many orchid species is the slight difference between daytime and nighttime temperatures. Therefore, for the orchid to bloom, the temperature should be 4-6 ° C lower at night than during the day. Of course, it can be problematic to create such conditions throughout the year. But from late spring to early autumn, orchids can be kept outdoors, where the temperature difference is achieved naturally.
In cooler times, when the flowers should already live at home, rooms with orchids need to be ventilated. Only this should be done very carefully, remembering that these plants are very afraid of drafts.
6. Water your orchid properly
It is necessary to water the orchid after the soil dries out - this will make it possible to avoid root rot. These requirements apply both in summer and in winter and apply to both children and adult plants. However, there are some exceptions here. After the orchid has faded, watering should be reduced by about a month.
In nature, after flowering, orchids begin to set seeds, which should fly in different directions for several kilometers. This is possible only during dry periods, but not during the rainy season. Therefore, it is necessary to provide the orchid with conditions as close to natural as possible - then the flower will grow healthy and often bloom.
Before and during flowering, the orchid needs more watering than usual. Further, during the dormant period, specimens with hard leaves and the presence of pseudobulbs must be watered according to the basic principle (after about 10-12 days).
7. Moisten the air around the plant
Another important condition for flowering is air humidity. If it is not enough, the orchid may stop growing or unblown buds and flowers will dry out prematurely on it.
To increase the humidity in the room where the orchid grows, you can put a plate of water next to the flower. Also, in very dry periods (when the heating is turned on in the houses), the plant should be sprayed. Suitable humidity for orchids is 60% or more.
8. Choose the right fertilizer
For feeding the orchid, it is recommended to use formulations based on phosphorus and potassium, since they stimulate the appearance of flower buds. In addition, the use of such fertilizers guarantees the formation of healthy and strong flowers in the plant. But it is better not to get carried away with fertilizing based on nitrogen: this element, on the contrary, inhibits the development of peduncles.
9. Do not be afraid to "scare" the plant
Sometimes it takes a little stress to make an orchid bloom. It so happens that all the conditions for flowering are met, and the flower stubbornly does not want to shoot the arrow. This sometimes happens because the orchid is too good. In this case, the plant directs all its forces to the growth of green mass. One way to stimulate flowering is to "shock" the orchid a little: reduce watering or move the plant pot to a cooler place.
Dormant period in orchids
After flowering, the orchid begins a dormant period when it begins to accumulate strength for a new flowering. Leaving at this time is no different from leaving during other periods. The flower still needs good watering, high humidity, adequate lighting, and regular prevention against diseases and pests.
As for dressings, their frequency and volume during the rest period should be reduced. If there is a need to transplant an orchid, then it's time to do this procedure right now, when the plant is no longer blooming.
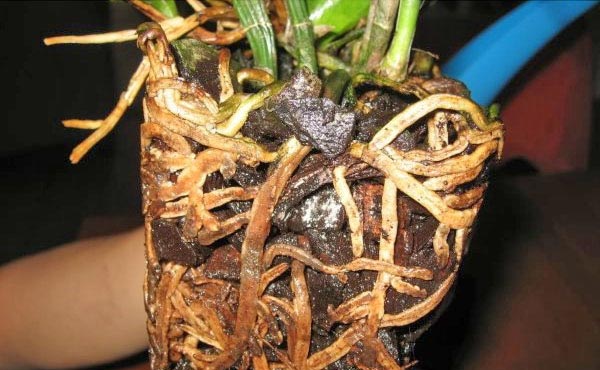
A transplant is necessary if roots protrude from the drainage hole, or the soil dries out quickly after watering. As a rule, the need for this procedure appears after 2-3 years.
Are orchids suitable for cutting?
What could be more beautiful than a bouquet of orchids? But these flowers do not live long, and not every species is suitable for cutting. Let's try to figure out how to prolong the life of an epiphytic bouquet and which orchids to choose.
Phalaenopsis, cymbidiums and pafiopedilums can stand in a vase and retain freshness and aroma for several weeks (and sometimes a month). Other orchids run the risk of not standing for an hour, literally withering before our eyes.
If you are purchasing cut orchids, look primarily at the petals and sepals. They should be shiny, as if covered with wax, and tough - then the orchid will stand for a long time.
How to extend the life of a bouquet of orchids
If the flowers were brought from the store, then they need to update the cuts. Cut the stems obliquely. The procedure is recommended to be carried out under running water. It is advisable to update the slices every 2-3 days.
Water for keeping cut orchids must be soft and clean: you can use boiled or filtered water. It needs to be refreshed periodically by adding fresh one.
Cut orchids, like potted home orchids, are afraid of too high and very low temperatures. It is also recommended to protect them from drafts and bright sun. published by
Did you like the article? Then support us push
:
Many orchid lovers interested in the question of how to breed them at home.
In order to get phalaenopsis babies at home, there is three breeding methods:
- Bottle seedlings (flask);
- Root baby;
- Reproduction on the buds of the peduncle.
In this article, you will learn what Phalaenopsis babies look like and how to care for them.
How to speed up the process?
All the described methods of resuscitation of phalaenopsis take quite a long time, to stimulate this process, you can:
- Wipe the leaves and mix in the water a solution of succinic acid at the rate of 4 tablets per liter of water.
- Dilute one ampoule of vitamin B1, B6 and B12 in a liter of water and lowering the part of the orchid from which the roots will grow into the solution, leave it overnight.
- Feed the plant daily with glucose, sugar, or honey.
- Feed with iron chelate every 2-3 days, and fertilizers containing potassium and phosphorus - every 20 days.
It is necessary to alternate feeding, otherwise you may not notice that some of them are ineffective and the plant will die.
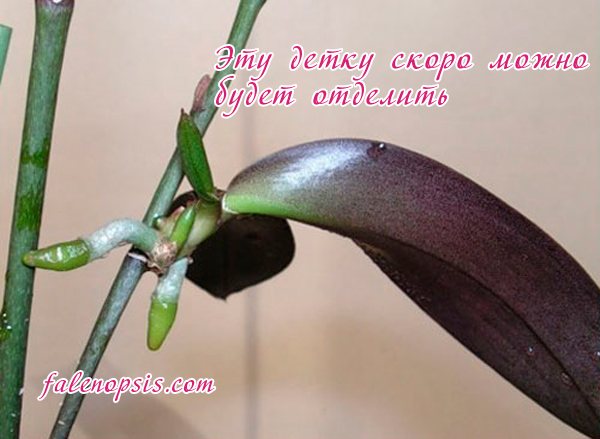
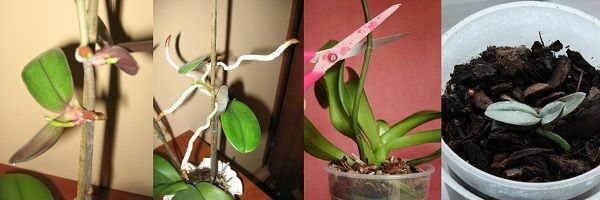
Separation and transplantation of children
Separation of children from the mother's orchid is carried out when 4-5 leaves and 2-4 roots are formed. The length of the roots should be about 5 cm. Such a young plant is strong, has every opportunity to grow independently. The growing season depends on the species, variety, and conditions of detention.
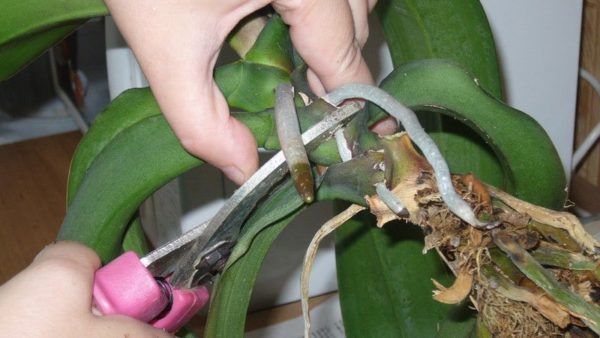
If the cake has formed on the peduncle, it is advised to cut it off with a sharp knife or scissors along with a branch. On both sides, 1 cm of the maternal peduncle is left.
The root baby on the hemp of the mother orchid is more difficult to separate. First, remove the top layer of the substrate and see if the root system is well formed. Then the spine is determined from which the cake grows. It is cut off, stepping back 1 cm from the base of the appendix. Carefully removed from the pot so as not to damage the young seedling. Phalaenopsis babies that have formed on the stems are simply removed. There are no roots on them and they are not able to live independently.
Transplant of orchid babies
In order for the planting of orchid children to be successful, the soil and the container for growth are prepared in advance. The substrate is prepared from pine bark, cutting it into small pieces about 1 cm in size. Sphagnum and a little peat are added to it. Specialty soil is also sold in stores. Use a clear plastic cup or cut bottle as a pot. Drainage holes are made in the lower part.
The cut offshoot is dried in the open air for 30 minutes. Then sprinkle the roots with crushed charcoal with cinnamon, half of the substrate is poured into the pot. They try to plant the orchid baby there so that its root collar is at the level of the upper edge of the container. Carefully add the substrate, but do not tamp it: this will harm the roots. Cover the top with a thin layer of sphagnum moss.
Immediately after planting, you cannot water the flower - it is irrigated after 4-5 days.
When to plant a plant in the ground?
Phalaenopsis can be transplanted into the substrate only after the roots have grown at least 3-5 mm.
- To do this, you need to take a flowerpot no more than 8 cm in diameter so that the plant quickly absorbs water and dries out quickly.
It is better to use a peat pot, then in the future it will be necessary not to transplant the plant completely, but only to rearrange it in a new flowerpot and add a substrate.
- When the roots are 7-8 cm long, you need to transplant the phalaenopsis into a larger pot and fix it on a support.
Reproduction methods of the phalaenopsis species
In the wild, the life cycle of a phalaenopsis is similar to that of an ordinary flower. It consists of six stages:
- flowering plants;
- pollination;
- germination of seeds;
- seed formation;
- ripening of seeds;
- germination.
The pollination stage occurs with the help of insects flying to the fragrant bloom, after which the plant develops seed capsules. The seed pod usually matures within 6-8 months, after which it bursts, and small seeds fly through the air and germinate on tree bark, stones and other stable surfaces.

But how does an orchid give babies at home? There are 4 ways:
- Budding / grafting.
- Root propagation.
- Division.
- Seed propagation / sexual method.
Answering the question where do the babies from orchids come from, we emphasize: babies appear on the peduncle or from the point of growth.
Budding
Most often, this species reproduces at home by budding, although experienced florists also practice the sexual method. This process is quite time consuming and not suitable for beginners.
In order for a phalaenopsis baby to appear on the orchid, or rather on the stem of the peduncle, the plant in most cases needs to go through a flowering cycle. This method is called grafting.
The plant does not dry out the stem, and after a while the dormant buds wake up and swell. Often lateral shoots appear from them, forming new buds, but sometimes 2 small leaves first appear there. Within 2-3 months, the leaves will increase in size, gain strength and feed on the resources of the mother plant.
After a few more months, roots appear on the baby, and as soon as they reach 2-3 pieces 5 cm or more long, the phalaenopsis baby can be planted.
Root propagation
In critical situations, a root shoot appears on the flower. Why critical? Because the phalaenopsis will try with all its might to continue its cycle in babies, but the orchid will not have the necessary conditions for flowering.
A basal baby appears at the bottom of the trunk: at first it will resemble a growing peduncle, but after 7-14 days it will become clear that this is offspring.
Division
In fairness, one more method of reproduction of orchids should be mentioned, however, it is in no way connected with the natural processes of the plant and is quite rightly considered barbaric. This is a method of dividing the trunk and it consists in the following.
After the orchid gains good tops and aerial roots, it is cut horizontally along the growth point, separating the top from the bottom, leaving only 2 leaves. It is here that a future orchid can appear, and the upper part is dried from below and planted in a new pot along with aerial roots.
Quite often, orchid lovers try to provoke reproduction, force them to give birth with the help of hormonal paste. This method is considered to be quite effective, but it should only be used on healthy plants.
It is also possible to get 2-3 children from 1 kidney at once, united by one growth point. Such "Siamese twins" are characterized by low viability and often die before transplantation. And, of course, the owners of such plants then ask why the orchid does not bloom, does not grow roots, does not grow leaves.The reason is in violation of the genetics of the plant and its natural qualities.
Follow-up care
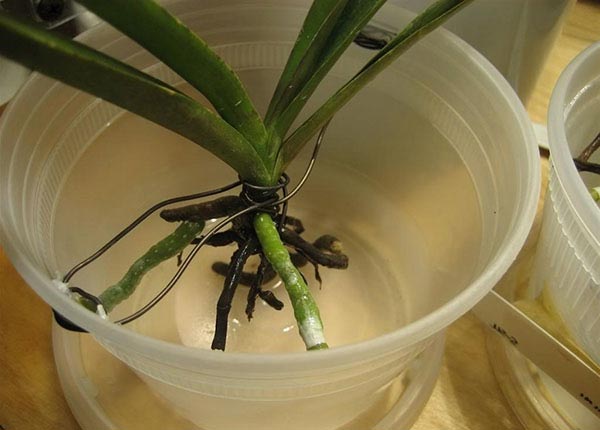
When the plant grows roots and gains turgor, it is necessary to accustom it to dry air after greenhouse conditions. This will require a new greenhouse made from a clear bag or the bottom of a plastic bottle. It is necessary to put it on the plant for 5-6 hours a day in such a way that it is 10 cm to the bottom from the tips of the leaves.
After a few weeks, the phalaenopsis fully adapts.
Do not rush to part with a flower, even if it has lost all roots. - just choose the most suitable method for growing a new root system, follow the instructions and the phalaenopsis will recover and start delighting with its flowering again.
If you find an error, please select a piece of text and press Ctrl + Enter.
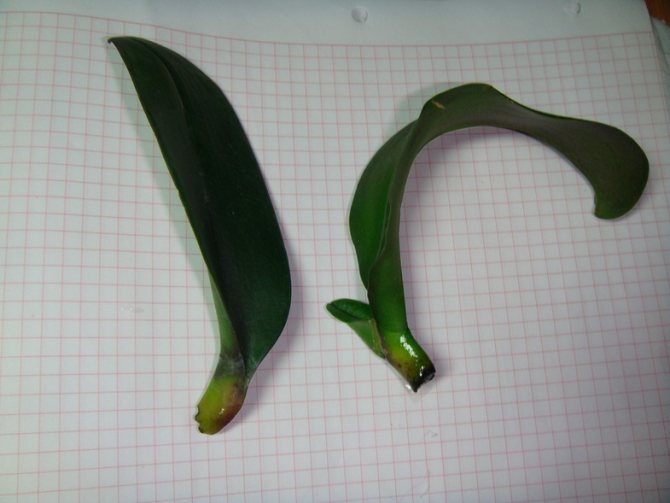
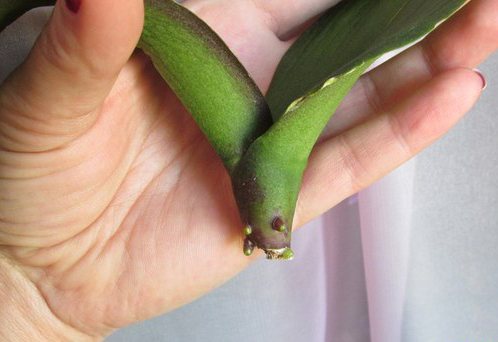
Baby without roots
The main reason for the absence of roots in the cut is considered to be the incorrect maintenance of the mother plant, because it is from it that the young shoot feeds. The negative factors affecting the plant include:
- lack of light;
- irregular use of dressings (or their unbalanced composition);
- insufficient watering.
To stimulate their growth, first of all, it is necessary to eliminate the listed disadvantages. If this does not help, root development can be stimulated in a number of ways.
Why do you have to reanimate orchids. One of the main reasons is overflow.
From my point of view, Phalaenopsis is the easiest orchid to care for, and if you have even the slightest skills in indoor floriculture, then this species will gratefully bloom on your windowsill all year round. But we all tend to make mistakes. And sometimes our negligence can end in the death of a beloved plant. Watching a withering flower, most people send it to the trash can, and often the plant's life is worth fighting for.
How to care for a root sprout
The basal baby in the scientific literature is called basal. This once again confirms that this plant is wholly and completely dependent on the mother, and, therefore, it needs similar care. In fact, this is an orchid without its own roots and if you decide to separate two plants, then only one can survive.
In this situation, opinions can be very controversial. Most growers consider it reasonable to separate them only when the mother has a diseased root system. Since the new growth is located in close proximity to the growing point, no matter how you separate the two plants, one of them will be damaged.
It is worth noting that there is also a successful experience in dividing such plants, but this is rather an exception that proves the rule!
Next, we will look at how to grow an orchid from a baby on a peduncle.
How to save an orchid without roots. Orchid resuscitation.
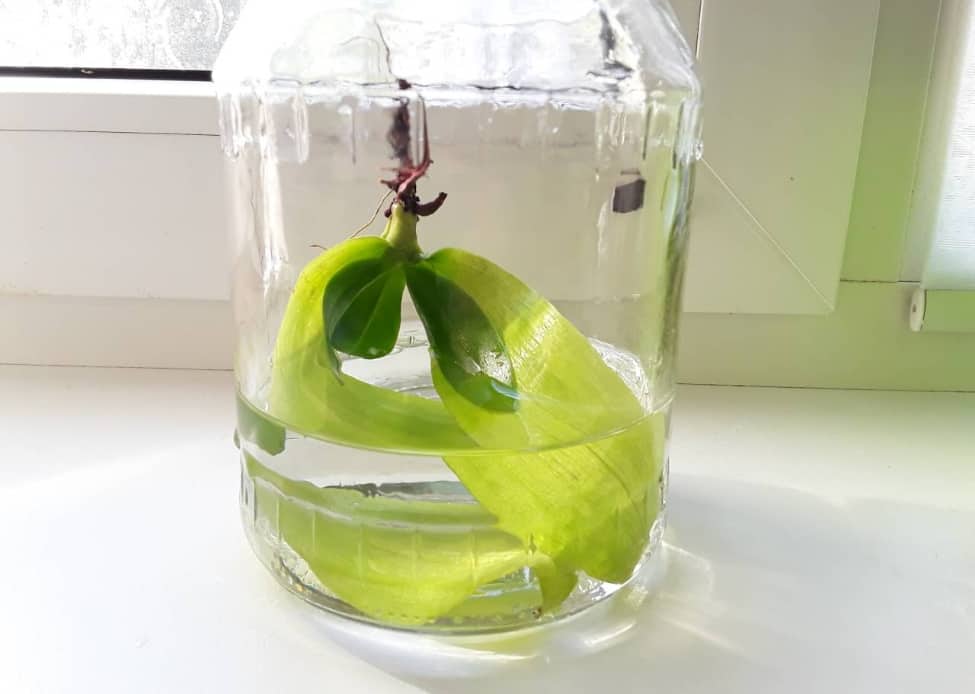
The most unusual way to resuscitate the Phalaenopsis orchid is to grow roots from the neck of the plant in a vessel above the water.
So, for the resuscitation of the Phalaenopsis orchid, we need:
Before starting rescue manipulations with our ward, you need to wait until the cut site is slightly tightened, for this it is enough to leave the plant in a warm shady place for several hours. If you notice symptoms of rot, treat it with a fungicidal preparation, then dry it.
Then pour boiled chilled water into a convenient vessel and place the plant above the water. It is advisable to put the container with the upper part of the orchid on diffused lighting in a well-circulated warm place, the recommended temperature is 23-25C.
Periodically, orchid leaves need to be wiped with a sponge dipped in a solution of succinic acid, this will help the weakened plant gain strength and energy. Or dilute the drug Dr. Foley vitamin (containing succinic acid) in a reduced concentration (three times) and process the leaves.
Over time, the moisture in the vessel with the plant will evaporate, so this must be monitored, and as needed, top up with boiled water at room temperature.
After two months, the roots of the reanimated Phalaenopsis will noticeably grow back and as soon as they reach a length of 5-7 cm, the orchid can be transplanted into the substrate.
It should be borne in mind that in this case the plant has adapted to an unusual way of existence for it, therefore, the appropriate soil must be selected. Based on personal experience, in the first few months, I would recommend planting the plant in sphagnum moss. This type of moss has long been used as one of the main components of the substrate, and many Orchid growers even grow most of their collection in it.
This substrate has many positive factors. Firstly, it is a breathable, environmentally friendly and natural material, secondly, it is light in weight, which is important if many plants are on one rack, thirdly, it is much cheaper than other components of the substrate, well, you can collect it yourself, if enjoy walking in the spring forest.
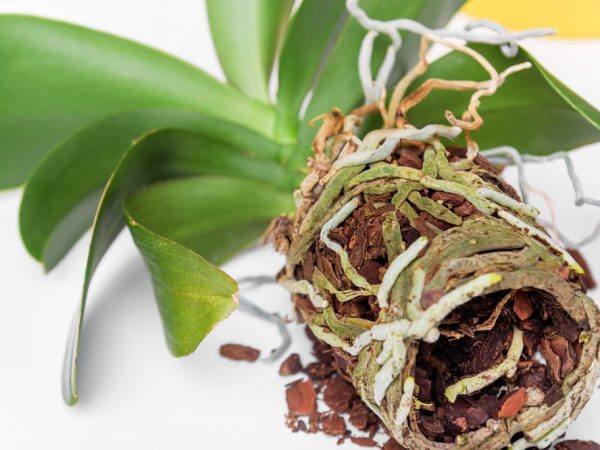
After the plant has adapted and the roots have grown enough, the Phalaenopsis orchid can be transplanted into a pine bark or into another soil mixture convenient and familiar to you. You can see the result of a successful experiment in photo # 8.9. Such stories prove that saving an orchid even without roots is possible!
Department of babies
From the peduncle
First of all the material is being prepared for transplant:
- Small pieces of bark;
- Sphagnum;
- Small transparent plastic pot;
- Garden pruner;
- Activated carbon or cinnamon.
Technology:
- It is necessary cut baby from the maternal peduncle with a gap (1.5 cm);
- Time is given in half an hour to dry all cut points, and only after that they are treated with cinnamon or activated carbon;
- Take plastic transparent dishes, in which drainage holes are made for draining water;
- When placing a young orchid in a pot, you must look to ensure that root system was just above the edge of the dish;
- Holding the phalaenopsis by the neck, fill the pot with soil (small bark);
- Not recommended tamp the substrate... You just need to knock on the edges of the pot;
- Water the orchid can be done in a few days.
From the roots
In order to see how the root system develops in the offspring of an orchid, it is necessary just raise the substrate.
If the baby has own root system 5 cm long, then the baby is carefully cut off from an adult orchid and transplanted into a separate pot.
From the stem (trunk)
Baby on the trunk of the mother does not let go of its own roots, it feeds on an adult orchid and its common trunk. In no case should such offspring be separated from the mother orchid.
Most often, the basal offspring appear exactly in those places where the point of growth dies off mother orchids.
It is recommended to just wait until adult orchid will dry up and only a little baby will remain in the pot.
Until the baby orchid grows roots at least five centimeters long, it cannot be placed in the soil.
No roots
There are situations when the offspring on the mother-orchid actively developing, grows, and sometimes even blooms, but does not want to give roots.
Many growers ask themselves: what to do in such a situation? How in such a situation can the process be deposited?
The answer to these questions is very simple: need to root in greenhouse conditions. The shoot with a part of the peduncle is cut off with a secateurs.
With a blooming peduncle after circumcision, it is removed.
Root system buds can be seen if the covering scales are opened from the outlet. It is still impossible to plant a young plant in the ground, since it will not receive a sufficient amount of moisture due to the lack of roots.
The roots of such children grown outdoors in a greenhouse... It is necessary to make the air humid and warm.
Reanimation of an orchid by the greenhouse method after insufficient watering.
We considered one of the options for the death of an orchid due to excess moisture. Probably, I will not open America if I report that an orchid can disappear from both waterlogging and lack of moisture. How to save the orchid in this case?
Once I had to be absent from work for a long time and the employees forgot about my orchid, which stood alone on the windowsill, for about a month no one watered it.
Returning to the workplace, I was horrified to see that the leaves of Phalaenopsis were hanging like "spaniel ears." Through the transparent pot, it was seen that the root system of the orchid was completely dehydrated and looked like a reptile skin dried up after molting. No matter how I tried to water the half-living plant, the leaves of the turgor stubbornly did not restore, the orchid needed reanimation.
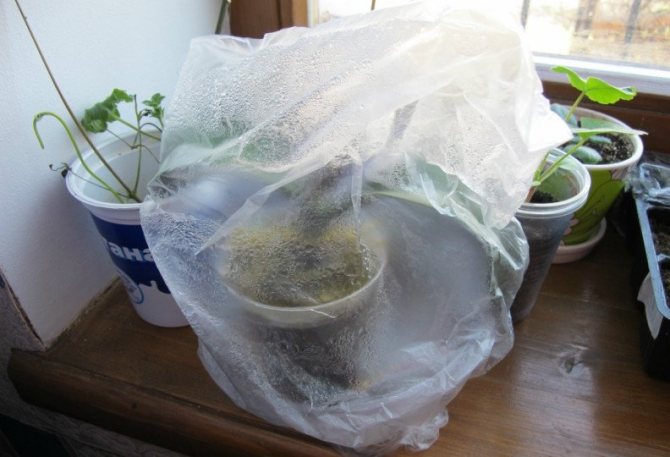
Then I decided to shake the flower out of the pot and arrange something like a greenhouse for it. A plastic bag with a horizontal lock and sphagnum moss were found from the available means.
Before the ward is placed in the greenhouse, it must be properly prepared. To begin with, you need to purchase any B vitamins in the pharmacy and dilute in a ratio of 1 ml per 1 liter of water, then dip the plant together with the leaves into the vitamin solution prepared by us for half an hour or an hour, you can also use succinic acid as a stimulant (also a ready-made solution of Doctor Foley Vitamin is suitable, it contains both vitamins and succinic acid, they can simply be sprayed with the plant).
After the orchid has absorbed the necessary amount of life-giving moisture, we pull it out of the liquid, and put sphagnum moss in the same solution for a couple of minutes. Moss can be used both freshly harvested and pre-dried, the antiseptic property of moss will prevent putrefactive processes, but only if the greenhouse is ventilated daily. Then we let the moss drain well so that it is not wet, but slightly damp and cover the bottom of the greenhouse bag with it, on top of the moss we put the orchid prepared for resuscitation. If you use Dr. Foley vitamin - moss should be sprayed with this solution until it is slightly damp.
The package can be hung in a place convenient for you, but you must definitely choose partial shade or slightly diffused lighting so that the plant inside the greenhouse does not boil, a comfortable temperature is 22-25C.
Condensation will appear on the walls of the bag, and saturate the orchid with moisture in the process of restoring turgor and growing roots. Be sure to open the bag several times a day for at least half an hour for airing and make sure that the moisture does not completely evaporate.

In a month or two, the plant will pick up the old turgor, grow new roots, and it can be transplanted onto free bread. The first time after the transplant of our "patient" it will be necessary to gradually accustom him to the dry air of the room.
Care features
In all cases of rooting baby needs:
- in regular ventilation;
- every two to three days, the layering is sprayed, making sure that moisture does not stagnate in the root outlet;
- every second time the plant is sprayed with water with dissolved fertilizers containing nitrogen.
In this period we must not forget about the mother orchid, which also needs regular watering and feeding.
Layers with formed roots about 5 centimeters long are planted in a prepared substrate.
A baby with regrown roots is planted in a substrate.
Orchids
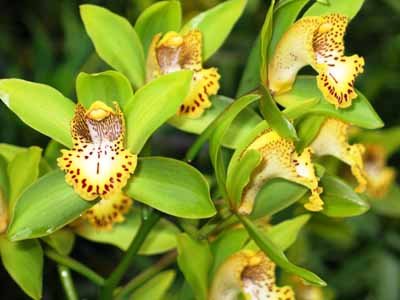
Favorite greenhouse plants are orchids, which captivate everyone with their extraordinary originality and fabulous beauty of their flowers. There are 36 species and varieties in the collection, of which hybrid cymbidium has 12 varieties. The first varieties of it were received by us from Estonia in 1982, and only three years later we saw their flowering.Then, in 1999, the collection was replenished with varieties from Kiev - "Burgundian Chate", "Thomas" and others. They bloom from October to April, mass flowering is observed in February. Their amazingly beautiful flowers are collected in large inflorescences. The duration of flowering of one inflorescence is 25-35 days, and of some varieties from 90 to 100 days. A three-year-old plant has up to 3 peduncles, from 11 to 19 flowers bloom on each peduncle. The color of the flowers is varied, lemon, terracotta, salad, ash-lilac and cherry.
Cymbidium Thomas
| Cymbidium Islander Joisse | |
| Cymbidium, Lemon Beauty grade | Burgundian Chateau |
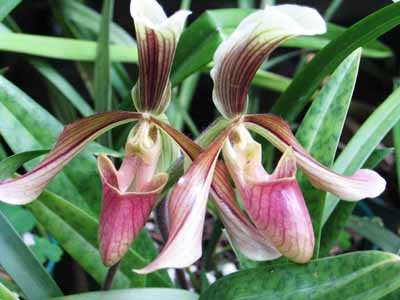
Rarely, among other plants, one can find such a flower strength as that of an orchid. Non-pollinated orchid flowers, even when cut and placed in water, remain fresh for a very long time (up to 3-4 weeks). These qualities have made orchids very valuable ornamental greenhouse plants. The classic flower shape for orchids has papiopedilum (slipper), the lip of which has a shoe-like shape, hence the name of the genus.
Cymbidium |
Callous paphiopedilum |
Orchids bloom in January - February. Fantastic flower shapes with delicate colors often resemble a butterfly, like that of a hybrid phalaenopsis: they breathe thoughtfulness and sophistication from them. Hence the name: butterfly orchid ... In the conditions of our greenhouses, the beginning of flowering in Phalaenopsis falls on the first ten days of August. Duration of flowering of one inflorescence with 5-7 flowers is from 75 to 100 days.
| Phalaenopsis hybrid - Butterfly Orchid |
Celogyne comb |
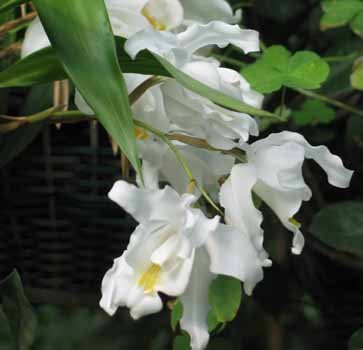
Orchids are epiphytes (from the Greek words “epi” - na and “phyto” - plant). At home, they settle in cracks in the bark, in forks of branches, in tree hollows, where fallen leaves, fragments of branches, dust and other plant mineral residues accumulate. In our collection, they are grown in baskets. Their inflorescences are usually hanging, penetrate through the weaving of the basket or are thrown over its edges (as in comb cellogy , above), giving it an exotic look. Also in the basket is cultivated and dendrobium king , whose flowers are inconspicuous, but have a delicate aroma. The name of the genus comes from the Greek. “Dendron” - tree, “bios” - life, and reflects the epiphytic way of life of plants. Of the dendrobiums, the most beautiful flower has e. noble .
Dendrobium King |
Dendrobium noble |
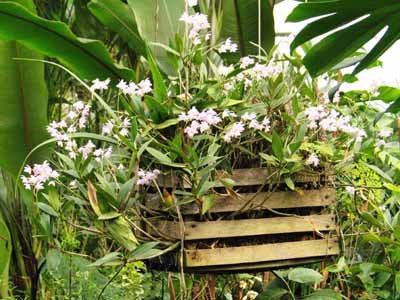
In culture, orchids are more likely to die from excessive constant watering than from insufficient watering. If the substrate in which the plants grow is kept very moist all the time, the roots will not receive enough oxygen and will begin to die off. Epiphytic orchids require a very porous substrate.
Do you need to take action?
The florist will make the decision on his own. Observe the baby, and if after 4 months after the appearance of the layer, the rudiments of the roots do not appear on it, then it is time to think about how to help the young plant.
You should not put the baby in a separate pot without roots, since it will not survive in 80%, therefore, before separating the layers, try to make sure that roots appear on it.
But if this option seems impracticable, then you can try to grow roots already on a separated plant... At the same time, the process, although laborious, gives very good results. Moreover, there are several ways. Therefore, you need to consider several options and choose the most suitable one.
Most common rooting mistakes
To avoid mistakes, a novice florist needs adhere to the basic rules of resuscitation:
- The plant is placed in a well-lit place;
- The room temperature should be at least 23 degrees Celsius;
- There must be high humidity;
- Do not pick off yellowing leaves.
By adhering to these rules, you can be sure that the orchid will grow roots.
Why is the lack of a root system a problem?
An orchid, a flower is not simple, and therefore, as soon as a baby appears, any grower begins to rejoice - he will be able to get another magnificent plant. But don't forget that without a strong root system, the baby cannot take root and start its development in the substrate. If you do not grow the roots of the layering, then you can simply lose the young plant, but you should not leave the baby on the mother's flower either, since over time it will take all the strength from the mother and the plant may die.
Errors
- The main mistake when rooting an orchid is the removal of leaf blades that fade during rooting. Cutting off the leaves that have begun to die off is categorically contraindicated.... The fact is that a plant that has lost its root system is forced to look for alternative ways to obtain energy. In order to survive, the orchid consumes nutrients that are reserved in other parts of the plant, including the lower leaf plates, as a result of which they begin to wilt and turn yellow. With the leaf removed, the plant is deprived of its only possible source of nutrition, therefore, the chances of recovery are significantly reduced.
- Another common mistake is insufficient light intensity during resuscitation. Many growers place the plant away from the light source, mistakenly believing that the orchid needs less sun during rooting. As a result, the process of photosynthesis becomes more difficult, as a result, the plant experiences oxygen starvation, which negatively affects not only the formation of new roots, but also other vital functions.
An easy way to save an orchid
It is recommended to resort to it exclusively under conditions favorable for the tropical beauty. This implies that it is kept at an optimal level of humidity and good sanctification. Both of these factors must be appropriate for the orchid variety. No deviations are allowed. The stalk, left without leaves, is planted directly in the moss. Watering must be correct. For each, only one tablespoon of settled water is enough. Moss is absorbed by the moss and evenly distributed, and, therefore, the plant receives the amount of liquid it needs. This method is quite simple, but not always effective, since it is very difficult to recreate ideal conditions. They resort to it most often when the plant was simply flooded or already taken by a stem without leaves.
It is possible to plant the saved plant in a new container when the stem gets stronger, the root system begins to grow, which indicates that the orchid feels great in the moss. The main thing is that the container is located correctly, that is, in the place where the tropical beauty will not be threatened by overheating, hypothermia or drafts.
Care errors
The plant loses its root system due to systematically improperly organized care. The main mistakes can be:
- Improperly organized watering... Too frequent leads to decay and loss of roots, and too rare dries out the roots, and the plant still loses them;
The orchid loses its root system due to improper care. - Wrong place - the plant is too dark;
- Applying fertilizers, the florist did not act according to the instructions and burned the roots;
- Too dense and unsuitable soil.
IMPORTANT! We must not make mistakes when caring for the plant, and then everything will be all right with it.
Diseases and prevention
Orchids get sick sometimes. Disease is caused by overprotectiveness.
Infectious diseases slow down the growth of the flower, the leaves wither, sometimes burns are visible.
Frequent watering leads to decay of the roots, and poor lighting leads to stretching of the stem and underdevelopment of buds.
Direct sunlight causes yellowing of the leaves. Other reasons:
- Viral diseases are manifested by spots on the leaves.It is better not to treat such plants, but to burn them so that the rest do not get infected. Sometimes it is worth trimming the damaged foliage and doing cauterization with iodine at the cut points.
- Anthracosis is manifested by blackening on the leaves. It is caused by a poorly ventilated room and high humidity. Leaves with spots are cut off and discarded, the cuts are cauterized.
- Powdery mildew appears as a purple-white bloom on the surface. The disease is dangerous and requires urgent treatment. The reason for its occurrence is high humidity and temperature. For prevention and treatment, sprinkle with phytosporin or a solution of colloidal sulfur.
What parts does it usually grow on?
The baby can appear on the stem of the mother plant in the axils of the leaves or from dormant buds on the peduncle. The process can be located closer to the root - the basal baby (at the base), or located on the stem above - the basal baby. Read more about how to get a baby on an orchid here.
It is possible to separate a baby from an adult orchid if a small flower has 3-4 leaves and roots that have grown up to 5 cm.
The development of the baby takes a long time - up to six months, and during all this time the mother flower will need careful careful care, since the presence of offspring is an additional load on the plant. Most often, keiki is given by phalaenopsis, less often they can be seen on:
The main components for the growth of the root system of a young plant
For the growth of a young root system, additional forces and substances are needed that need to be helped to get the baby. To stimulate root formation use different stimulants:
- Auxins - highly active substances, stimulate the growth and development of the stem and roots. If you exceed the dosage, you can get the opposite effect and slow down the growth of all parts of the plant;
- Gibberelin - acids of organic origin. Actively accelerate root growth and accelerate the flowering period;
- Cytokines - hormonal growth activators. Stimulates the formation of children, roots, peduncles and leaves.
Various hormonal pastes are used to stimulate growth.
In the flower shop you can find various forms of these drugs:
- Pills;
- Gels;
- Powder;
- Ampoules;
- Solutions.
The main ones are:
- "Kornevin" - usually powder, sometimes found in tablets;
- "Maxim" - ampoules or solution;
- Cytokinin paste;
- Succinic acid - tablets.
Resuscitation of an orchid baby is often carried out with the help of these drugs.
Important! Stimulation is an effective method in different cases, but you need to strictly follow the instructions, especially pay attention to contraindications.
Orchids on the windowsill
Most orchids love the climate, which we also perceive as pleasant, namely, a lot of light, sufficient air humidity and fresh, clean air. Therefore, many of the orchids grow well in a sunny window, they only need to be shaded to protect them from the midday sun. If your orchids do not have enough space on the windowsill, you can increase its size. To do this, you can attach another window sill, lower, and equip it with appropriate, large-sized plant trays.
Is it necessary to separate from the mother
You can leave the shoots on the mother plant until roots grow. Usually the orchid takes care of the sprout itself. After 60-90 days, the rudiments of the roots appear.
It will take six months to form a full-fledged process on an orchid peduncle. By this time, the cuttings will have roots and the necessary maturity for transplanting into a separate container. The offspring is planted when the roots are at least 5-6 cm and 4-5 full leaves. In this case, the layering no longer allows the orchid to develop normally, taking away the strength from the flower, therefore, in order to save the plant, the baby is separated.
Important!
If one root is formed in a young plant, it may be damaged during transplantation, there will be nothing to replace it. Therefore, there must be at least 2 developed roots.
Root up position
The essence of the method:
- Dissolve activated carbon in water (1 tablet per 1 l)
- Fill the container by a third with the resulting solution.
- Dip the orchid into a container with the top down, submerging it in water up to half of the leaf.
- Irrigate the base (where the roots are expected) daily with a spray bottle.
- After the formation of root buds, transplant into the moss in a normal position.
In the process of resuscitation of the orchid "upside down" not only all the old leaves are preserved, but new ones can appear.
Greenhouse: features of use
A greenhouse is needed to maintain the greenhouse effect in a specific space. Gardeners use this effect to get seedlings and harvest vegetables early.
Orchid growers use a mini greenhouse to grow orchid babies or to keep a diseased plant in it. In an enclosed space, orchids do not lose moisture.
Friendship of a greenhouse and a fungicide: how to revive an orchid
Before putting the plant in a greenhouse, it is treated with a fungicide (except for growing young orchids). Treatment of the plant is mandatory and is needed in order to suppress the development of pathogens in open wounds.
Fungicides are characterized by a long-lasting protective effect. That is, being in a warm and humid environment (a favorite environment for pathogens and fungi), the treated orchid will be completely protected. This is an excellent solution in the case when we are engaged in the resuscitation of orchids without roots: the fungicide helps to stop the decay processes of an already developing fungus.
Fundazol is recommended as such a remedy in many flower grower forums. I will not advise this to my readers for one simple reason: in 2001, the production of foundationol (the original name is benomyl or benlate) was stopped by its creators - the famous company Dupont de Nemours (USA) after a series of scandalous litigation. It turned out that benomyl benlate easily causes the reproduction and selection of resistant forms of pathogenic fungi (suppresses some, causing a number of others).
To apply or not to apply the foundation is a personal choice, but knowing these disappointing facts, I would advise refraining from using it, of course, not in a categorical form. I also want to clarify that foundazol is very difficult to find on sale, and if you come across it, then know that in 80% of cases it is a very good fake (usually prepackaged chalk). But our growers still get it somewhere and use it. I read a lot of good reviews on the forums, but I don't use it myself. Maybe in vain)))
What do manufacturers recommend to us now? There are a lot of drugs, but two are recommended for use in indoor floriculture. How to reanimate an orchid with their use will be discussed in more detail in another post.
1. "Vitaros" (JSC) - water-suspension concentrate. On sale can be found in ampoules of 2, 10 and 50 ml.

2. "Maxim" (Switzerland) - concentrate suspension. On sale - a bottle of 40 ml or in plastic ampoules of 2 ml, 4 ml. Protected against counterfeiting with red dye. Protective effect - 12 weeks.

In addition to these drugs, colloidal sulfur, phytosporin (biofungicide) and trichopolum are also used.
Conditions for transplanting to a permanent place
How to transplant an orchid baby? When the baby already has 2 cm roots and there are more than four of them, you can safely transplant it into a temporary glass with a crushed substrate. But it is transplanted to a permanent place a little later.
For orchid babies, it is necessary to create favorable conditions for growth.
For a successful orchid transplant into the smallest permanent pot need to grow plant roots up to a size of 5-7 cm, and the number of roots should be at least 5 pieces. Of course, it all depends on the type of flower: if it is a mini orchid, then the size of the roots for planting in a temporary place will be 1 cm, and in a permanent pot - 3 cm.
Phalaenopsis resuscitation is required when the plant has lost 95 to 98% of its roots, or when there are no roots left at all. In this case, the plant can no longer recover on its own and needs some help in growing roots. How to grow roots in phalaenopsis? There are many different ways. Let's talk about them further.
Regardless of the method of resuscitation of phalaenopsis, you first need to carry out the procedure for cleaning the plant from everything unnecessary. If the roots of phalaenopsis have rotted completely or began to rot at the base, they must be removed, if the rotted edge is cut to living tissue and the cut is sprinkled with cinnamon or crushed charcoal (you can also use powdered fugicide). Dry roots are cut according to the same principle. Be sure to disinfect the tool over a fire or hold it in alcohol for a few minutes before trimming. How to correctly determine which roots are alive and which can be safely removed, read here. Examine the neck and leaves of the phalaenopsis. If there are wet or other suspicious stains, they should be cut to living tissue and sprinkled with cinnamon or crushed charcoal. Be sure to make the sections with a sterile instrument so as not to infect the plant tissue.
In order to quickly grow the roots of phalaenopsis, it can be stimulated with special drugs. For this purpose, before cleaning the plant, you can soak it for 5-10 minutes in a solution of Radifarm (1 drop per 1 liter of water), Zircon (4 drops per 1 liter of water), Etamon (1 ampoule per 1 liter of water), or Ribav-Extra ( 2 drops per 1 liter of water). It is better to take warm water, about 30 C.
You can also use a solution of Carbomide (urea) (1 gram per 1 liter of water). The orchid is soaked in it for several hours, then taken out, allowed to dry, and re-immersed in the same solution. The procedure is repeated 2 to 3 times.
Next, the phalaenopsis must be dried for a day at room temperature and low air humidity, and after that you can proceed directly to resuscitation.
Phalaenopsis resuscitation without roots in a mixture of bark and moss
The plant is placed in a transparent small pot filled with a mixture of fine bark and moss. Drainage from expanded clay or pieces of polystyrene is placed on the bottom of the pot. Phalaenopsis must be fixed in the substrate with a circular support so that it does not stagger. Then we place the orchid in a bright, warm place, under special artificial lighting. It is necessary to provide the plant with increased humidity, you can put the pot on a wide tray with wet expanded clay or over a dish with water (but the pot should not come into contact with water). The substrate must be sprayed almost every day (the frequency of spraying depends on the room temperature and the season). From time to time, you can spray the leaves, but at the same time you need to try not to get inside the outlet. Once every 2 weeks, the leaf part is sprayed with a weak fertilizer solution. With this method of resuscitation of phalaenopsis, the leaves can lose turgor, become flabby. The process of growing roots takes at least 2 or even 3 months. But there is also one important advantage after the formation of roots, the plant does not need to be transplanted and accustomed to a new form of substrate. As the root grows, you only need to add pieces of bark.
Phalaenopsis resuscitation without roots in moss.
This method is similar to the previous one. Phalaenopsis is placed in a transparent container, but without bark, but filled with pure sphagnum.
Natural aging of foliage in orchids
Not all foliage problems are caused by inadequate maintenance. We must not forget about the natural physiological and inevitable aging of foliage. It is characterized by yellow discoloration of the plate. To be sure that aging is the reason for the shedding of foliage, it is necessary to consider what species the orchid belongs to. The sheets of an exotic beauty usually die off in the third month of their existence. Early abscission is characteristic only of dendrobium. It occurs during a dormant period.Monopodial species, among which phenopolis, the most common and grown on windowsills, as a rule, do not lose all their foliage. It is considered normal for them to die off only two leaves that are below the others. Any other fall is not natural, but serves as a signal to concern about the health of the orchid.
Yellowness, accompanied by lethargy and flabbiness, is not physiological aging, but most likely overheating. To prevent the orchid from losing its foliage, it is removed from the windowsill, and after three to four hours it is sprayed and watered with settled water. On the fourth or fifth day, the plant will come to its senses, but you need to put it in a new place.
The second way to resuscitate a plant
The orchid is pulled out of the water. They are waiting for the complete drying of the plant. The root system is examined and evaluated. Decayed shoots and leaves are removed with sharp scissors, pruning shears, and a blade. The instrument is pretreated for sterilization. Places of cuts are sprinkled with powder. It is made from ground cinnamon or charcoal. If you do not remove the inanimate elements, then the flowers will continue to rot. The damaged areas left will nullify all efforts to save the orchid.
The flower, cleared of leaves and damaged roots, is placed in a greenhouse. It can be purchased from a specialized store or made from a plastic container with transparent walls. The bottom is laid out with expanded clay and moss. The orchid is "planted" on top, covered with a lid. The main requirement for keeping an orchid in a greenhouse is the temperature regime. It should not be higher than +33 degrees.
All about the children of the phalaenopsis orchid: what they look like, planting and care
It is no secret that it is possible on the phalaenopsis peduncle raise "baby"... After the full flowering of the orchid, you should not immediately cut off the peduncle.
Flowering continues if from the "dormant" bud another peduncle grows (side). But sometimes, instead of a lateral peduncle, you can grow a baby or several processes.
If you keep the orchid under fluorescent lamps in order for it to have enough light, then on healthy peduncles can grow up to several children.
You can see the orchid babies from the trunk in the photo.
With the right lighting and nutrition, orchid babies grow healthy.
But for such a healthy flower, you still need proper lighting and nutrition... In order to raise a baby, an orchid takes a long time.
The baby is separated from the mother plant after about 6 months. Primarily in a small plant leaves grow.
After fully formed leaves in young phalaenopsis roots begin to grow... First of all, spherical neoplasms begin to form at the base of the baby.
But this is not enough to transplant a young plant from the "mother". In a young plant several roots must grow at least 4-6 cm long.
Conditions
Orchid lovers many times they ask the question, is it possible to breed it at home, and also what conditions are needed for this? With proper care and rooting of cuttings, the result will not be long in coming.
In order to speed up the result, you need to know the basic rules of plant care. First of all, it is necessary provide sunshine a placewhere the plant will be.
Requirements for the conditions for orchid reproduction:
- Temperature conditions. In the summer season from +21 0 C to +31 0 C. In the winter period +16 0 C - +27 0 C. There are critical deviations from +13 0 C to +33 0 C. Allow both the lower and upper critical threshold undesirable;
- Humidity. According to the standard, it should be equal to 50%. It is possible to spray and make an outdoor shower only if the temperature regime is violated. The flower "bath" is allowed only a few times a week. In winter, water procedures for the plant are contraindicated;
- Recommended short rest between flowering;
- Most often the process flowering can be observed in winter or spring... Sometimes there are phalaenopsis, which bloom all year round, taking a short break for rest. In order for the flower to bloom, it is necessary to adhere to a temperature regime of +19 0 С at night and +27 0 С during the day;
- Indirect illumination. In order for the plant to bloom in the winter, it is necessary to give it additional light.
Correct pruning
In order for the orchid to devote all its strength to growing new shoots, it is necessary cut off dried and withered parts.
If you cut the phalaenopsis during flowering, then you can ruin the flower. During peduncle formation the plant should not be disturbed generally.
Florists brought everything out two safe ways correct circumcision phalaenopsis peduncle:
- It is necessary to shorten the peduncle 2 cm above the sleeping bud;
- Leave a trimmed stump with a height of 3 - 3.5 cm.
At home, the orchid should be cut garden pruner... It is not recommended to use scissors and a knife, as you can harm the plant.
Disinfect the instrument before pruning an orchid.
If hangnails remain on the orchid or leaves are damaged, then maybe develop an infectious disease.
Before starting the circumcision procedure, you should disinfect the prunerIt is best to do this with a solution of bleach, boiling water or alcohol.
At the end, the sections are treated with brilliant green, iodine, cinnamon or crushed activated carbon.
There are phalaenopsis with a hollow stem inside. During watering, water and an orchid flow there. may start to rot from the inside... In order to avoid such a situation, you need to close the slice beeswax.
How to plant a shoot?
Before proceeding with this procedure, it is necessary to prepare the necessary tools and workplace. And one more piece of advice. If the roots on the processes are still very tiny (less than 5 cm), it is better to postpone this procedure for another time, when the young flower gets a little stronger and gains strength.
You will need:
- sharp scissors or pruning shears;
- suitable substrate;
- transplant capacity;
- cinnamon or activated carbon;
- latex gloves;
- alcohol to clean the instrument.
For what reasons there may be no layering
Flower lovers often refuse to grow orchids because of the whimsicality of this culture. However, having bought one plant and given due attention to it, you can then easily start reproduction, creating a whole greenhouse.
Note.
If you want to start special growing of orchids, you can stimulate the formation of children, which will later turn into full-fledged flowers. But children do not always appear, then this problem must be dealt with.
The process of the orchid from the stem appears under a number of conditions affecting the mother:
- Lack of light. The mother of the new orchid does not sprout due to the lack of sufficient light. Light is the basis for the existence of any plant. Photosynthesis is the main nutritional process for orchids. Flowers don't need fertilization so much as enough light. If the original crop does not receive enough light, babies will definitely not appear on the trunk of the orchid.
- Incorrectly selected fertilizer. The fertilizer used for feeding should be complex and contain the entire range of vitamins and minerals. With a lack of any element, the flower will not be able to develop evenly, and even more so, it will not be able to transfer enough strength to the newly formed process, therefore it is impossible to grow roots in the orchid baby.
- Lack or excess of moisture. Orchid babies appear when the flower has enough moisture, vitamins and minerals, but if there is too much water, the shoots begin to rot, the receipt of nutrients from the soil slows down, and soon stops altogether. Baby orchids cannot develop on the peduncle.With a lack of water, the roots atrophy and further development, as well as the emergence of new plants, becomes impossible.
- Unreadiness. If the orchid is too young, it is most likely not yet ready to sprout.
- Bad root system. Underdeveloped roots will not allow the processes to develop normally.
Having identified the cause, you can begin to eliminate it.
Care in progress
Often the process of growing roots does not cause any complications. But experienced florists advise:
- The first place is to ensure the baby when growing roots - a lot of light and the use of a growth stimulator instead of fertilizer.
- The baby must be constantly monitored, and as soon as the condition of the layer worsens, immediately review the conditions of detention and care.
- If the root build-up is carried out on polystyrene, then it is worth periodically checking the quality of the water in the container, since it tends to sour and evaporate, so it needs to be changed and added.
- Provide the plant in the greenhouse with timely spraying and airing.
Helpful hints
Here are some tips on how to save a rootless orchid and how to create a greenhouse:
- Maintain the temperature in the greenhouse + 22 ... + 28 ° С, and the humidity - 70-100%.
- Provide 12-14 hours of light.
- Instead of expanded clay, pieces of tree bark, which must be disinfected, can be laid on the bottom.
- It is better to fix the stem of the orchid in an upright position in the greenhouse using nylon tights, wire or rods.
Preventive measures to prevent foliage from orchids
Neither the leaves nor the root system will rot if the appropriate care rules are followed. The first and most important thing is that the orchid calmly tolerates the dryness of the soil, but decays when water stagnates at the bottom of the container.
It is quite difficult for novice gardeners to decide when the soil needs additional moisture. A plastic pot will be an excellent assistant in watering. Its transparent walls will be an excellent guide to control the condition of the rhizome, so as not to dry out or flood the soil.
Orchids get sick not only due to overheating, but also due to lack of lighting. In both cases, the plant needs a change of residence. Otherwise, the resuscitation of the flower will not be successful. You cannot place an orchid on a window without curtains or blinds, as well as next to heating appliances that are not covered by a shield. This will lead to overheating.
The most optimal choice would be to place the orchid on a special stand. It should be located close to a southeast or southwest oriented window. The main thing is that direct rays do not fall on the foliage of the flower. Otherwise, the plates will get burned, which will cause them to fall off.