Why are carrots thinned out?
Experienced gardeners know that it is not enough to plant carrots; they need to be carefully looked after from the moment the shoots appear. The most responsible and painstaking activities in the care of seedlings are thinning and weeding. If you do not thin out the shoots of carrots, then the harvest will turn out to be weak, the roots - small and uneven, ugly. If a vegetable is planted too densely, you can lose the entire crop.
Did you know? Previously, carrots grew wild and were bright purple, less often white and yellow.
Alternative fixtures
Seeder for carrots can be made from almost any medium. So, the available varieties of this device are as follows.
Plastic bottle
For these purposes, containers of any volume are suitable. You need to make a hole on the lid in order to install a cocktail tube in it. Fix it with tape for reliability. When sowing, shake the carrot seed bottle. Unlike tape, you still have to remove weak shoots, but in small quantities.
Preparatory work
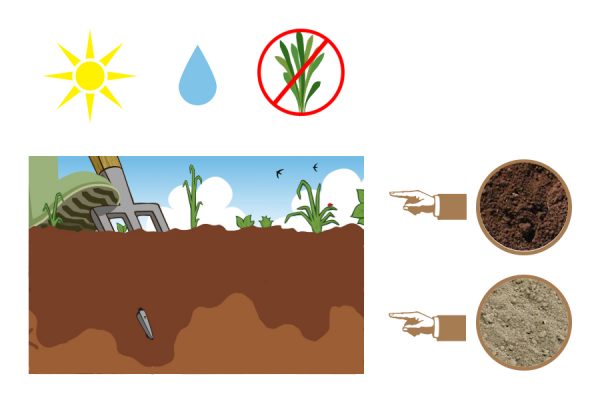
Before planting carrots, you should first select a site, prepare the soil and beds for planting seeds, and prepare the seeds. Carrots need loose sandy or loamy soil, sun and lack of excess moisture - grown in a too humid environment, the carrots will be deformed, the roots will not reach the expected size. The crop can be planted after potatoes, cucumbers or tomatoes.
Soil and bed preparation
Having chosen a suitable site, you should prepare it. The first stage begins in the fall: the earth must be dug deeply (with a full bayonet of a shovel) to saturate the soil with oxygen and add ventilated peat to it as fertilizer. Fertilizers from organic matter (for example, compost) can be applied in the spring, then you need to loosen and level the soil. Arrange the beds so that water flows freely from them.
Distance between landings
A bed for carrots is made 15–20 cm high (if the ground is highly moistened, for example, from groundwater, then it is raised even higher). The width of the beds should be 90–100 cm. You determine the length yourself, based on your needs and the size of the site.
Important! The furrow for the seeds should be neither too deep nor too shallow, otherwise the seeds will either be blown out by the wind, or they will not be able to germinate through the thickness of the earth.
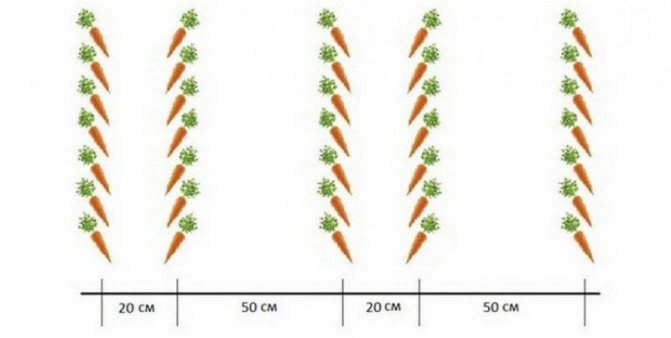
The furrows should not be more than 3 cm deep, the gap between them should be 20 cm. Keep in mind that the distance between the roots should be 2-4 cm.
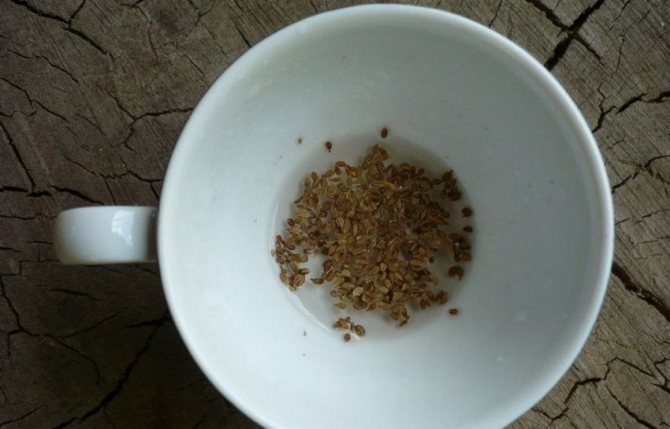
Seed preparation
Carrot seeds need preparation and processing before planting.
Each gardener chooses a convenient way for himself:
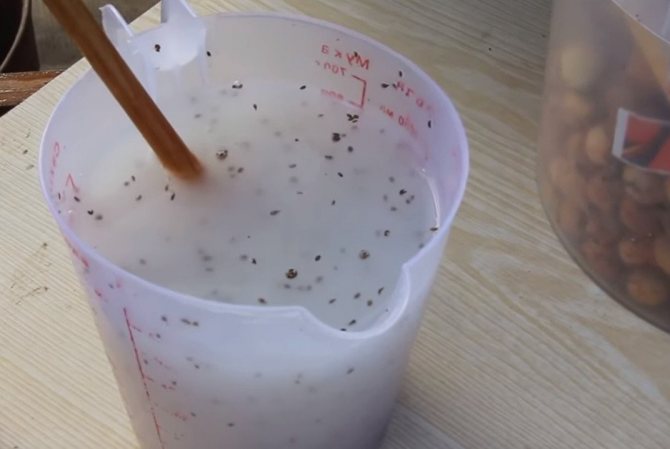
- Rejection of substandard... To do this, pour the seeds into warm water and stir. Surfaced ones are of poor quality, they need to be drained along with water. After that, leave high-quality ones in water for another day, then dry them, after which you can sow.
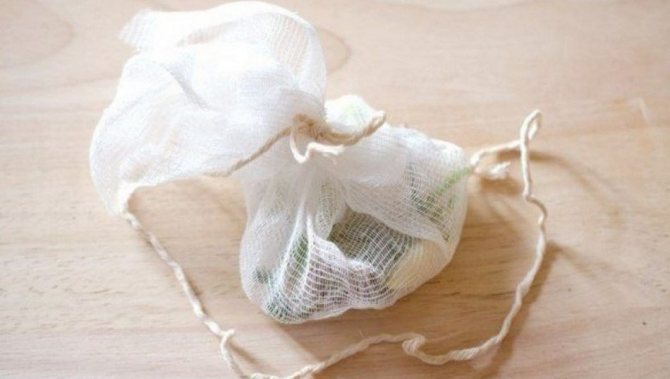
- Heat treatment... For this, the seeds in a gauze bag are immersed in hot water (+ 50 ° C). After that, they are immediately cooled with cold water and laid out to dry until free-flowing.
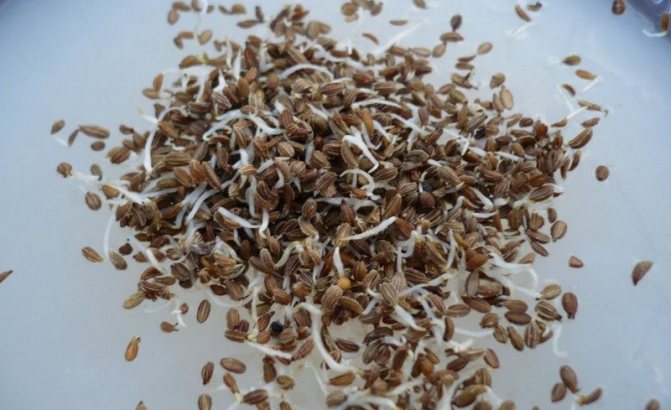
- Oxygenated water bubbling... The method allows you to get seedlings faster than the rest. The procedure is done using a bubbler, a device that resembles a compressor. The duration of the procedure is 24 hours. After the seeds are washed under running water, dried.
- Treatment with growth stimulants... Not required for purchased seeds (often the manufacturer has already completed the procedure, as evidenced by the information on the package).
Selection of variety and site
Before planting carrots, in order not to thin out, preparation is required - to choose a variety and planting site, prepare fertilizers, cultivate the land and seeds.

Varieties by type
Carrots are planted in open ground. Today there are hundreds of varieties that differ in a number of parameters.
- Early varieties (usually short-fruited) have low yields and are not stored for long. But they are suitable for food 2 months after germination.
- Mid-season varieties are stored until mid-winter. Their yield and usefulness are higher than those of the early ones. They winter well and sprout in spring.
- Late varieties can be stored until the next harvest. For long-term storage, it is worth sowing zoned varieties adapted to the climate of the region.
Important: the most delicious varieties usually do not look very attractive, so when choosing seeds for planting, do not be guided by the picture from the package.

"Queen of Autumn" - late
The date of planting depends on the variety of carrots. From the end of April, early varieties can be sown, mid-season varieties between April 25 and May 5, and late varieties from June 10 to 15. At the same time, during the day, the air temperature should stably reach + 15 ° С, and the soil temperature - up to + 7-8 ° С heat. In the southern regions, carrots can be planted earlier, starting from April 15th.
In the fall, choose an open, sunny area with loose, ideally loamy or sandy soil. In dense soil, carrots will take on a curved shape, they will be shallow. The plot should not be too wet, otherwise the carrots will rot, and not excessively dry - the root crop will be tasteless, "wooden". A minimum of weeds should grow on the site - they will sprout earlier and can drown out carrots.
Land requirements
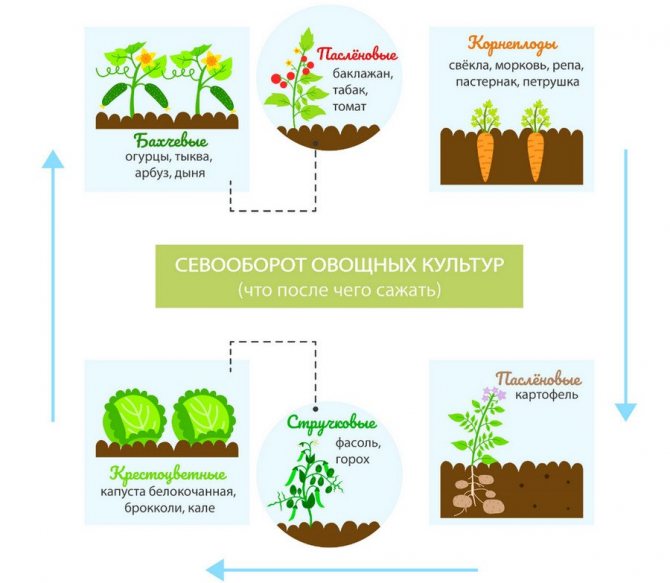
Important: carrots grow especially successfully in the place where beans, tomatoes, onions, cabbage, potatoes, garlic, peas or cucumbers were planted before. But in the ground after parsley and sorrel there are dangerous pests.
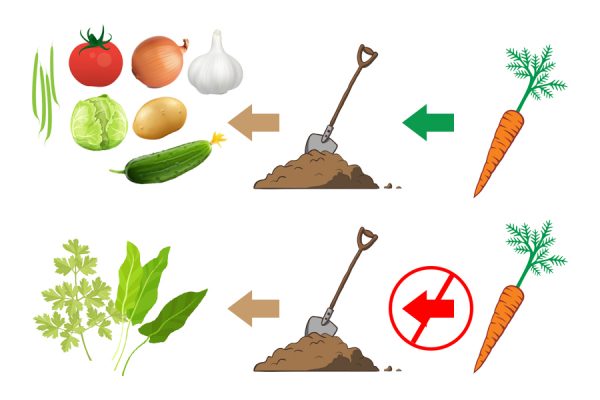
After which it is better to plant
Every year, carrots need to be sown in a new place, reusing the previously sown area only after 4 years.

Gaps between disembarkation
Carrot seed prices
carrot seeds
Ways to plant carrots without thinning
Thinning is the most painstaking and time-consuming job in carrot care. Gardeners try to sow carrots so as to avoid this, or thin out to a minimum. There are several ways to plant carrots so that you do not thin out the seedlings later.
Soaking and germination
To improve the germination of seeds, they are pre-soaked and germinated.
Get acquainted with the features and rules of sowing carrots in open ground.
You can soak the seed as follows:
- immerse in water at room temperature for 2 hours;
- put them in a wet napkin, which should be periodically moistened;
- if you wish, you can apply hardening - alternately staying in the warm (up to + 20 ° С) and in the cold (0 ° С) for 12 hours during the week;
- after seed germination, they can be sown outdoors.
Sowing with sand
Quite a popular method of sowing, which allows you to retain additional heat and trace elements in the soil. For sowing with sand, you need to mix pre-treated seeds (2 tablespoons) with sand (0.5 buckets). Then moisten the sand with water, prepare the grooves. Pour sand into them in an even layer, cover with soil, water.
Sowing in a bag
The method of sowing seeds in a bag is distinguished by its originality.
You will be interested to know when and how to harvest carrot seeds correctly.
For this:
- Place them in a linen bag.
- Wait for the snow to melt and, having marked the place, place the bag in a shallow hole.
- Stir in the sand (if possible, take a river one).
- Plant in open ground.
- Cover the area with a film so that the seedlings do not die from frost.
- Seedlings will appear in a few days.
Using this method, you will get large, juicy fruits that will be stored for a long time. Also, this method allows you to get a harvest in the middle of summer.
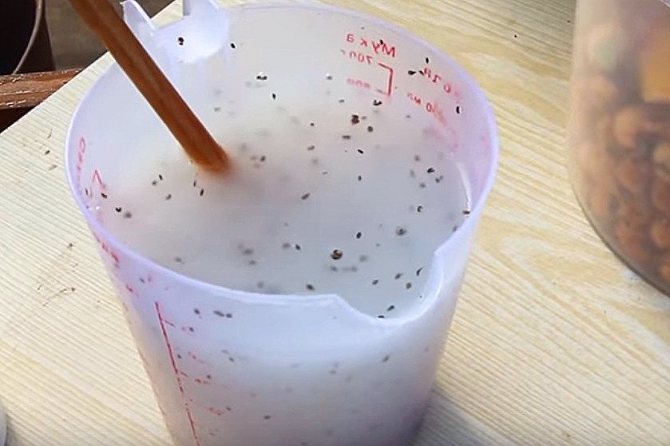
Using paste
Kleister is a great option for planting carrots. It is convenient, in addition, the paste dries much slower than water, which will create a special microclimate and give the seedlings additional nutrition. Seedlings when using this method will appear much earlier.
Did you know? In Germany, carrots were first roasted and then made into coffee, the recipe of which is still preserved in some villages.
You will need:
- water - 2 l;
- starch - 3 tbsp. l;
- watering can;
- plastic bottle (with a capacity of 2 liters);
- prepared carrot seeds 2 tbsp. l.
Prepare the beds in advance and water them.
Then you can proceed directly to the manufacture of the paste:
- Stir the starch in a cup of water and pour into a saucepan with boiling water, stir until the lumps dissolve.
- The finished solution should collect in a drop and fall off the spoon.
- After the paste has cooled, fill the bottle with it.
- Using a watering can, add the seeds.
- Twist the bottle and stir the mixture to distribute the seeds evenly.
Now all that remains is to pour the contents of the bottle evenly into the furrows. Planting frequency depends on watering speed. After planting, cover the grooves with earth.
Video: sowing carrots in paste
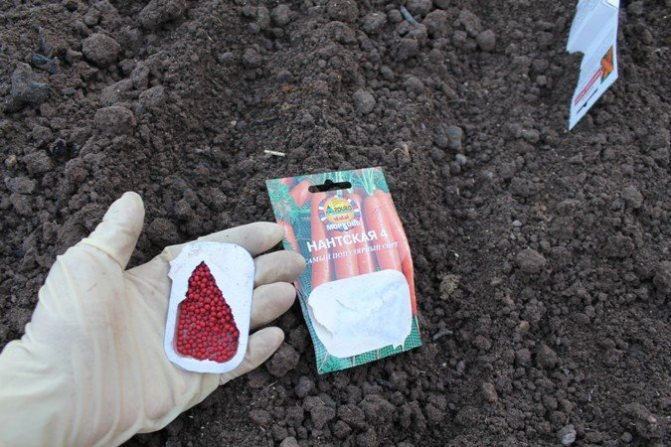
Seed pelleting
The method is convenient in that the seeds increase in size, which makes planting easier. The dragee mass is made from filler (humus or peat), fertilizers and adhesive. The filler is sieved through a fine sieve so that the particle diameter does not exceed 0.3 mm. Starch paste, gelatin or mullein can be used as an adhesive.
The adhesive is diluted with water 1:10, mixed and filtered through several layers of gauze, then micronutrient fertilizers are added to it. For pelleting 100 g of seeds, you will need 0.5-1 kg of filler and 0.3-0.5 liters of adhesive solution.
Find out how to get the yield of carrots from 1 are.
The process itself looks like this:
- Place the seeds in a 3 liter jar and add enough adhesive to keep them flowing.
- Add the filler a little at a time and shake the jar so that the seeds slide along the sides of the jar.
- By repeating these steps, you will gradually build up a shell on the surface of the seeds.
- As a result, their diameter should turn out to be 3-3.5 mm.
- After that, the casing must be sealed: roll the seeds in a jar without adding any adhesive.
- To prevent the seeds from sticking together, you can add a little sifted wood ash to the jar.
- Now you can start planting.
Video: pelleting carrot seeds
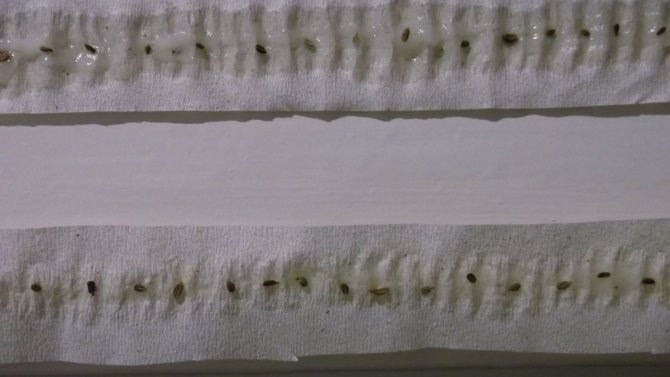
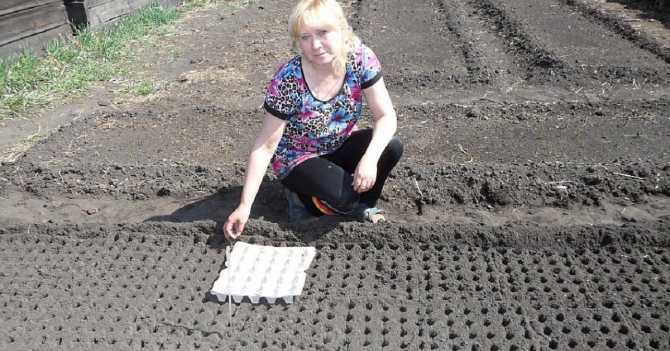
On toilet paper
This method is very popular. Its advantages are space saving, no constant humidity control, and you can see if seeds have sprouted or not.
Read more on how to plant your own carrots on toilet paper.
You will need:
- sprayer;
- toilet paper;
- small capacity;
- dense polyethylene.
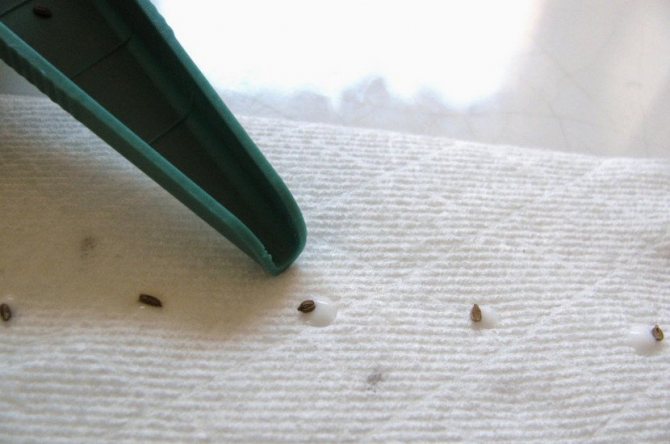
Procedure:
- Cut the polyethylene into strips 7-8 cm wide and of a convenient length.
- Place toilet paper on top of the strips.
- Dampen the paper well from the sprayer.
- Place the carrot seeds on this tape, 1 cm back from the edge.
- Carefully roll the tape into a roll and place it in the container with the free edge of the tape at the bottom.
- Add a little water to the container, cover it with foil and place in a warm place.
It remains only to wait for the shoots.
Video: carrots on toilet paper
Using duct tape
Another way to plant carrots is to use duct tape as an aid. You can buy ready-made ribbons at the store, but they are usually expensive.
Consider the option of making such a tape yourself:
- Cook the starch paste.
- Cut the toilet paper into strips 2-3 cm wide to any length.
- Lay out the strips of paper, apply paste on them.
- Place the seeds on paper at a distance of 3-4 cm with a match or any convenient means at hand.
- Dry the tapes.
- Before planting, make grooves, water them.
- Place the strips in the grooves with the seeds facing down.
- Optionally, you can cover it with fertilizer on top or just sprinkle it with earth.
- Water on top, cover with foil until shoots appear.
Video: planting carrots with tape
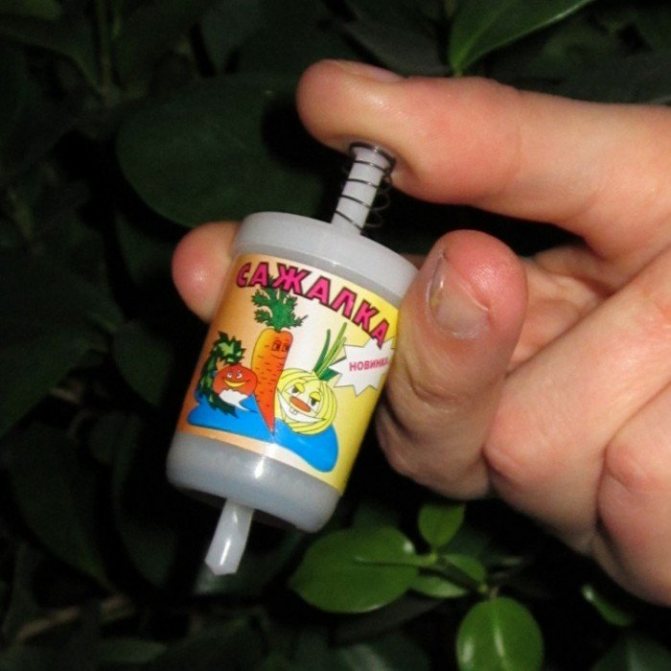
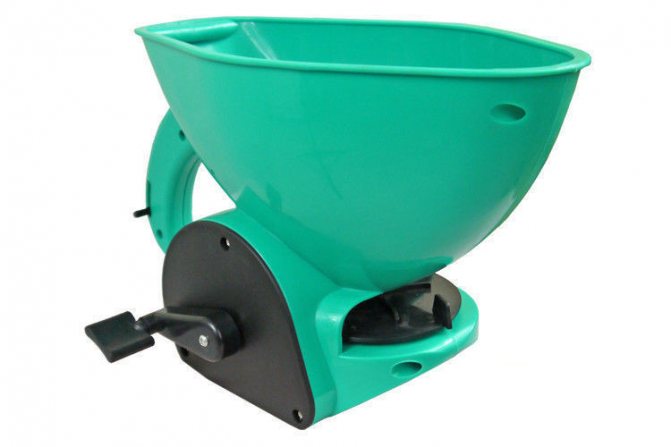
Homemade seeders
They speed up and simplify the seeding process of the seeder. Some gardeners make home-made devices, taking into account their needs and adjusting only for themselves, this is the advantage of home-made seeders over factory ones.
Advantages of a self-made seeder:
- sowing occurs evenly, as a result, even rows are formed;
- seeds are placed at the same depth, as a result, seedlings appear at the same time;
- the seeder allows you to form even row spacing and distance between plants, which facilitates further maintenance.
Important! If you decide to make a seeder with your own hands, keep in mind that the seed hole must be adjusted to different sizes.
The principle of assembly of all homemade seeders is reduced to the mandatory presence of:
- reservoir for seeds;
- systems for separating semen from the total volume;
- device for filling grooves with soil after sowing.
Details for the seeder are selected individually, then only the assembly takes place. Many gardeners also manage to assemble a seeder from available tools, such as a bottle, in which a hole the size of a seed is punched. But it is almost impossible to control the number of seeds dropped, so be prepared for the fact that the seedlings will be thicker than you expect.
Video: homemade seeder for small seeds
Landing in containers
For sowing, a variety of objects with suitable holes are sometimes used: salt shakers, strainers, containers from toothpicks, etc. These objects also provide a rarer sowing of seed into the ground, but they are very unreliable in use.
Garden bed preparation
Carrots are an unpretentious vegetable crop. It can even grow in sandy soil with a large amount of nutrients. On heavy clay soils, root crops bend in the process of growth and grow small. They fix the heavy soil before the start of sowing work, introducing a large amount of peat, rotted manure and, of course, coarse river sand. Preparatory work begins in the fall.
Carrots do not tolerate acidic soils. Therefore, it is important to reduce acidity prior to sowing seeds. To do this, add dolomite flour, slaked lime or chalk during the digging process. These substances deoxidize the soil.
Good to know. Large yields of carrots are harvested from a garden bed located on loam and light sandy loam. And if you add a little humus to the soil, the result will be even better.
The garden is being prepared in the fall. Dig up the soil to a depth of 30 cm with a bayonet spatula or garden pitchfork. Lumps are left on the surface to freeze in the winter. Thanks to the "heat treatment", weed seeds and pests are killed in the clumps.
In the spring, the soil is treated with a solution of copper sulfate (a mixture for irrigation is prepared from one bucket of water and 1 tablespoon of copper sulfate). Watered by sprinkling from a watering can. After processing, re-dug the bed with a pitchfork or carry out processing with a cultivator. Lumps are broken with a rake and level the topsoil.
A bed is formed: the ground is raised above ground level by 25 cm (carrots grow even and large in high beds). If possible, they make sides from boards or slate so that the earth does not crumble around the edges. In arid regions, low beds are organized (up to 10 cm). The width of the ridge depends on the individual preferences of the gardener, but it should not be made wider than 1 meter.
Carrot care
The main care for carrots is the fight against weeds, because the neighborhood with them is destructive for this vegetable. Any weeds must be destroyed as soon as they appear. If the seedlings need to be thinned, be sure to do this. Watch out for the soil in the garden - it must always be loose, otherwise the root crops will grow uneven, curved.
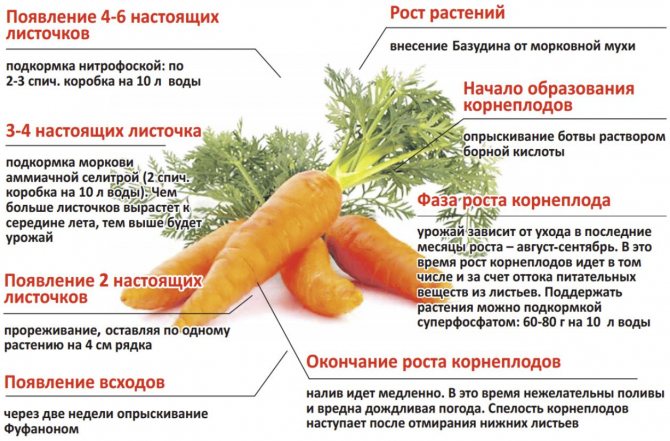
Throughout the season, you need to water the seedlings, then the carrots will be juicy and sweet when you remove them in the fall. By adhering to these simple tips and tricks, you can grow beautiful, sweet, large carrots in the garden that will delight you all winter.
How to do it yourself
It is possible to make a mechanical device for sowing small-seeded crops from metal, having previously prepared all the necessary tools and a drawing. This will be a prototype with a similar design to the factory units. In the process of pushing, the wheels begin to rotate, and together with them the shaft is set in motion, which performs the function of a metering unit. The seeds are distributed by the grooves located on the shaft. When the shaft rotates around the axis, it draws the rate from the reservoir.
At the moment of passing the brush, excess seedlings are removed from the recesses, leaving only one seed. When the wheels and the shaft are subsequently scrolled, they fall directly into a row.
The advantage of a hand-made hand-made carrot seeder is the possibility of sowing different crops. This is achieved by arranging grooves of various diameters in a checkerboard pattern.
Materials and tools
To make a manual carrot seeder, you need to prepare:
- Steel sheet (thickness 1.5 mm).
- A hacksaw.
- Soldering tool, hard solder.
- Bushings.
- Steel strip for the slider (1 mm thick).
- Metal plate (0.1 mm thick).
- Brass bar with a cross section of 15 mm.
- A nut with an internal thread diameter of 8 mm.
- Steel bar (section 18 mm).
- Bushings with a cross section of 1 mm.
- Power tool.
- Wooden handle.
Working drawing
A do-it-yourself carrot planter will not only reduce the time and labor costs for sowing an agricultural crop, but it will also be easier to assemble it if you follow the drawing. All manufacturing difficulties come down to the ability to competently cut metal and process elements of a homemade device
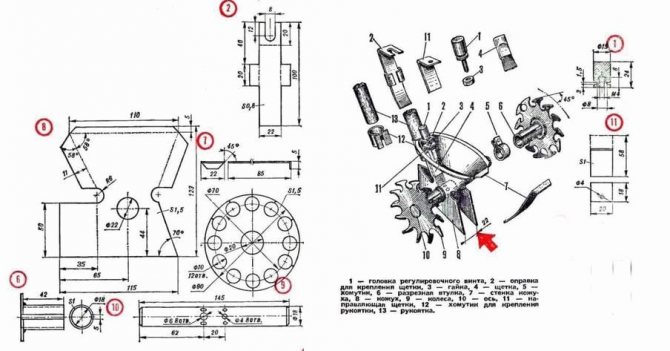
Manufacturing process
Technology for assembling a hand-held device from metal:
- Cut out all elements from the sheet with a thickness of 1.5 mm: tank walls, wheel rims and other parts.
- Solder the body components along the lines.
- Solder the sliding supports into the holes of the side elements.
- Leave the smallest gap between the shaft and the rear wall.
- Solder the sleeve for arranging the handle on the outside on the front wall, and on the inside at the top, mount the bracket for the fastener with a threaded hole on top. For the slide guide, it should be fitted at the bottom.
- The slider is made of a steel strip (1 mm), it is adjusted in accordance with the diagram. The brush is soldered to the part, it is made from a thin strip.
- The nut for adjustment must be made from brass on a lathe.
- From a steel bar with a cross section of 18 mm, carve a shaft with grooves (45 degrees on both sides).
- For carrots, it is enough to make 6-8 grooves with a diameter of up to 0.4 mm on the shaft. If large-seeded crops are to be sown, this diameter should be 0.6 mm. The optimal spacing between the rows is 20 mm, the indentations should be made in a checkerboard pattern.
- Saw off the wheel discs with a hacksaw. Proceed towards the center in the sections of the centerline of the holes, the diameter of which is 10 mm. You should have 12 cuts. To bend the petal, use pliers, the bend should be outward.
- Cut out the hubs from metal (1 mm), bend and solder into the holes of the discs with a diameter of 20 mm.
- The assembly of the device is carried out according to this principle: the body is put on the shaft, then the wheels, the parts are fixed and a wooden handle is installed.
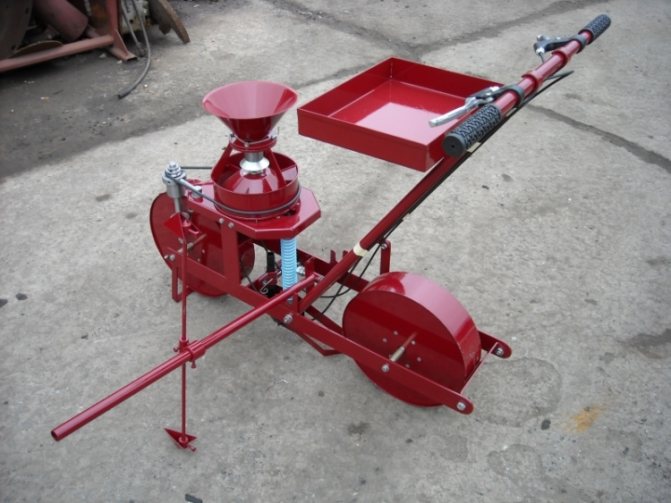
Manual
This device works and moves with the help of human effort:
- The wheel, on which special blades are located, creates grooves of a certain depth when moving.
- There is a spout from the bunker. The set volume of seeds is poured through it. Their supply is regulated by a valve.
- The rear wheel has a smooth surface. It fills the pits.
The manual seeder is suitable not only for planting carrots, but also for other small seeds. Usually used in summer cottages and greenhouses.
Pros of handheld devices:
- low cost;
- compactness;
- different seeds can be planted.
Minuses:
- suitable for a small amount of work;
- no automatic fertilizer addition.
Manual seeders can also vary. Allocate: piston, funnel-shaped, from a bar and a mini-rake.
The video shows a model of a manual seeder for greenhouses:
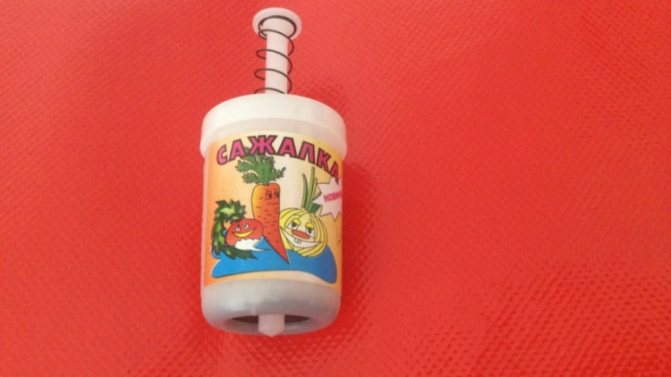
Reciprocating
The device is a cylindrical plastic container. Above is a piston with a spring. Seeds are poured inside. There is a tapered hole at the bottom of the device, it can be adjusted. Through it, seeds enter the soil. The seeder squeezes a certain amount into pre-prepared dimples. The device is placed 5 cm above the ground.
Advantages of the device:
- relatively fast landing speed;
- low price.
The disadvantages include:
- uneven seed supply;
- fuzzy furrow;
- the need to thin out the shoots.
Funnel-shaped
The funnel acts as a mechanism. The hole volume can be adjusted with an internally mounted diaphragm. The funnel is installed at a height of 15 cm from the ground. The apparatus is easily shaken, and the seeds are poured into the groove.
Advantages of the device:
- the possibility of self-production;
- low cost.
Minuses:
- uneven grooves;
- difficult to regulate.
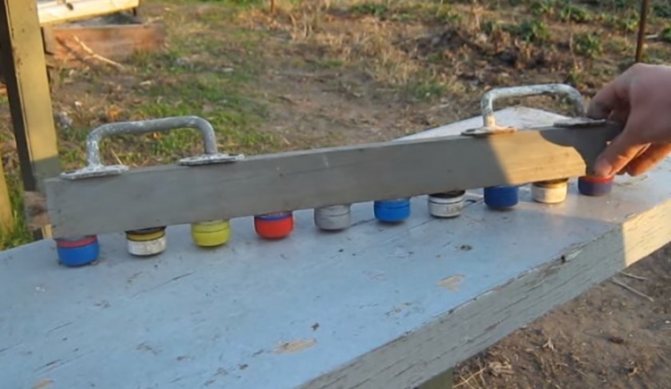
From a bar
They are made from bottle caps and a wooden block. It is required to loosen the soil well in advance. Covers squeeze holes in the ground for sowing. The seeds are placed by hand.
Pros:
- low cost;
- the possibility of self-production.
Minuses:
- low seeding volume required;
- manual landing;
- a lot of time wasted.
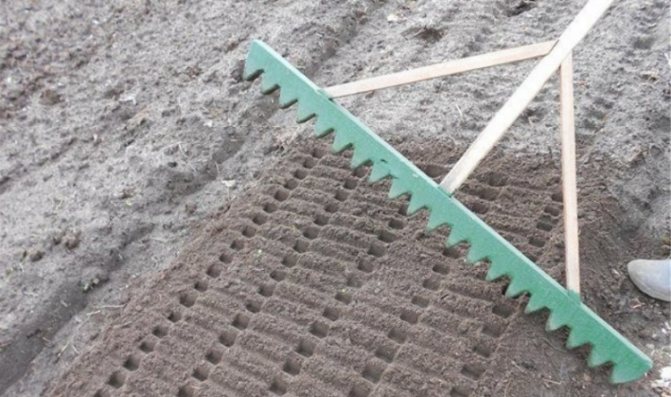
Mini rake
Consists of a long board, a handle, small planks. The teeth are cut out on the underside. This part of the rake is fixed perpendicular to the handle, which acts as a handle.
Pros:
- low cost;
- the possibility of self-production.
Minuses:
- small seeding volume;
- the soil must be prepared in advance.
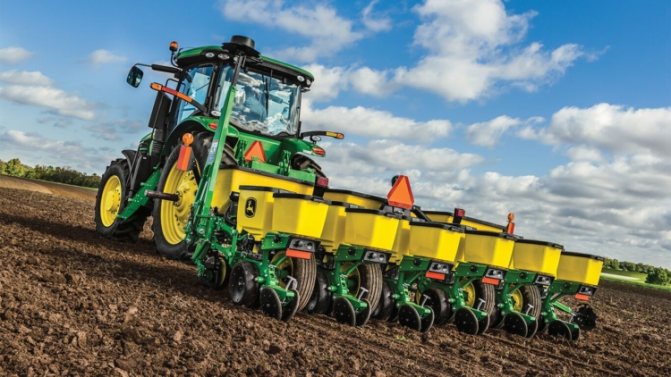
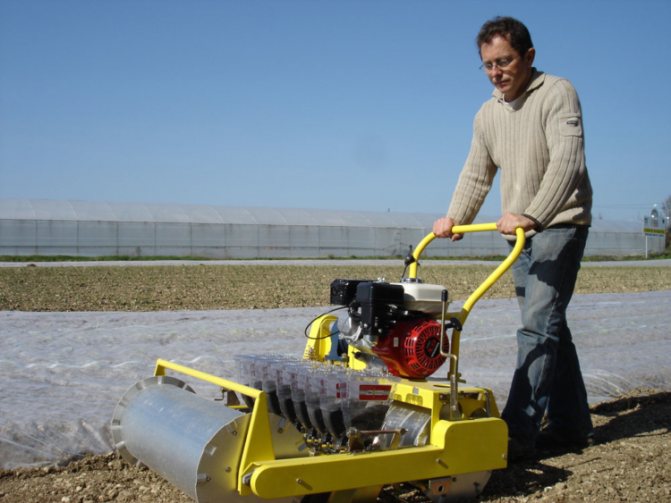
What is a small seed seeder for?
To get rid of such difficulties, amateur gardeners invented a device for planting carrots, with which you can evenly plant small seeds, then carrot sprouts will appear from the ground at the same distance from each other. Planting carrots using a seeder creates excellent conditions for the ripening of the crop, because as they grow, the root crops will increase in size and, when fully ripe, will not interfere with each other.In addition, the even planting of seeds with a seeder makes it much easier to grow this tasty vegetable, weed carrots and loosen the soil without the risk of damaging the plant.
Read also: How to properly prepare lemon water
The carrot planter greatly simplifies the planting of small vegetable seeds
It is advisable to mulch a bed with grown root crops with grass or compost. You can even slightly huddle the plant and sprinkle the root crop with earth. Such a simple measure will prevent the formation of green tips at the edges of the carrot.