Can you please tell me if it is possible to propagate thuja by seed? V. S. Sereda
Growing thuja by seed is a long and laborious process. It will take about 3-5 years to get small seedlings. With the seed propagation method, the seedlings will retain only species characteristics, and the shape and other parental characteristics will be lost.
Despite its laboriousness, the seed propagation method gives good results in obtaining healthy and high-quality planting material.
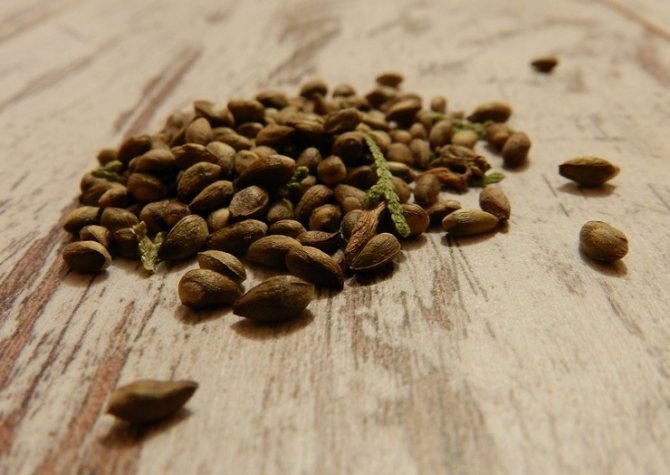
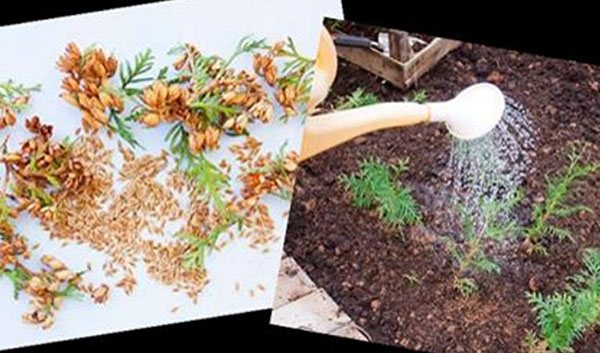
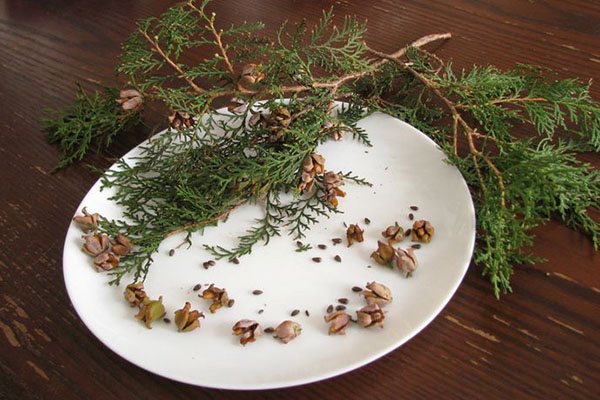
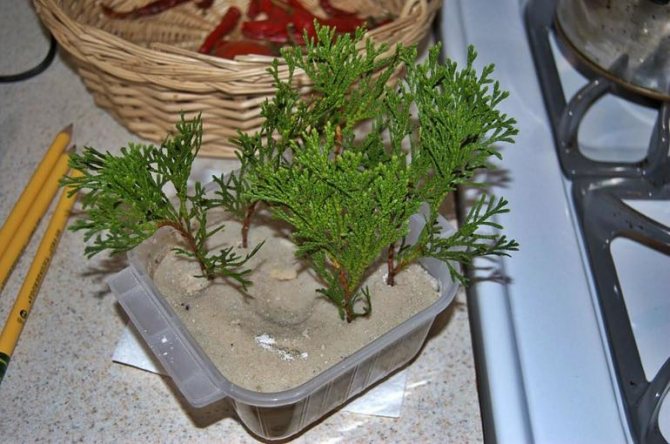
Thuja seeds for sowing are harvested in the fall from lignified cones. The collected buds are laid out in a warm, dry room, where after a few days they will open, and the reddish or brown seeds will fall out. Further, there are two ways to germinate them.
Natural germination of thuja seeds
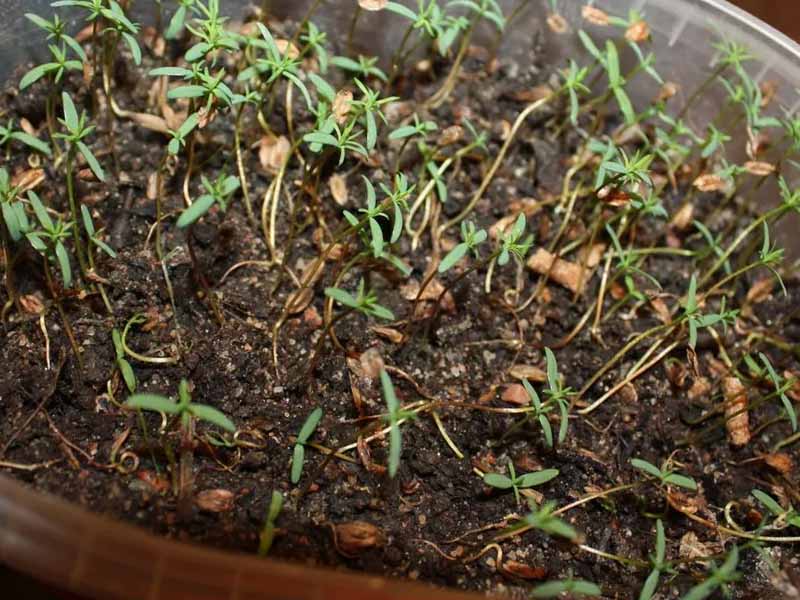
First method: seeds are harvested in the last month of autumn or in December and immediately sown in open ground. After sowing the seeds, the soil surface is mulched with sawdust. In the spring, after the earth warms up, seedlings appear. Young plants during this period must be protected from the bright sun, which can burn delicate plant tissues. For a year, small thuja will grow by about 7 cm. This method can be attributed to the natural methods of seed propagation of thuja.
Necessary materials
Reproduction of thuja by seeds is a rather laborious and painstaking way of raising a tree.
But at the same time, it gives almost 100% result, which is also important, because thuja is a rather expensive tree.
Therefore, it is best to be patient, because in a year a thuja can grow no more than 8 centimeters.
Well, if you count from the moment of planting the seeds, then you can transplant thuja to a permanent place only after four years. And before that, she needs special care all the time.
If such a time frame does not scare you, then the following materials will be needed to grow thuja:
- boxes for planting seeds;
- soil for conifers;
- pebbles;
- river sand;
- potassium permanganate solution;
- the seeds themselves.
The second stage is choosing a location
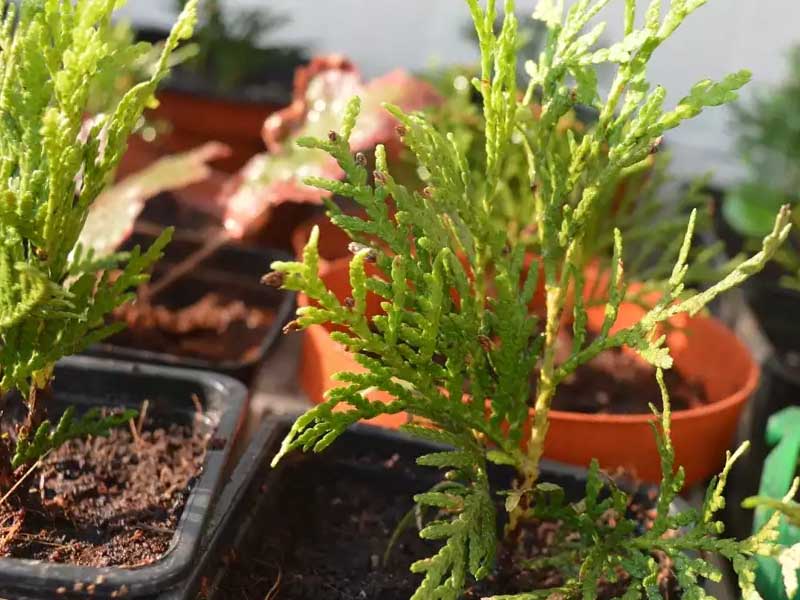
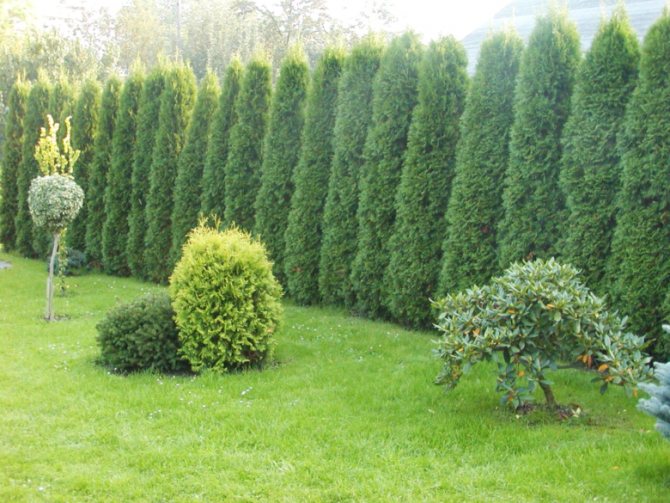
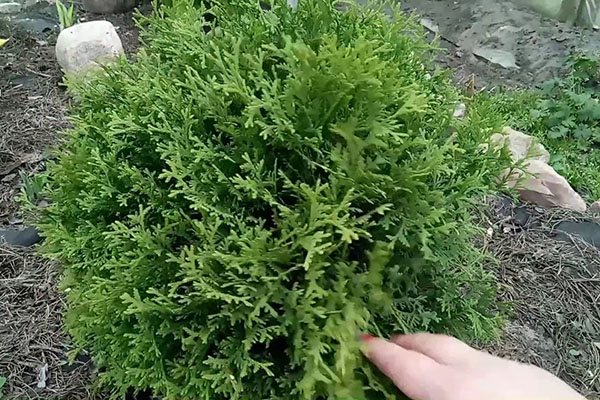
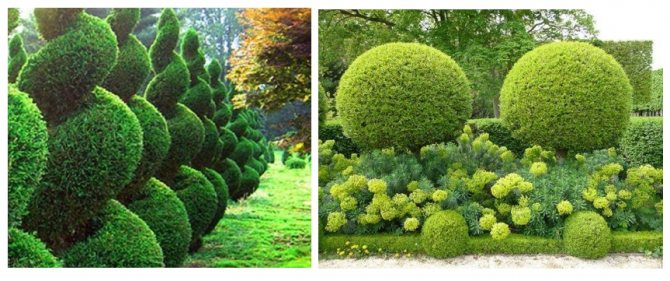
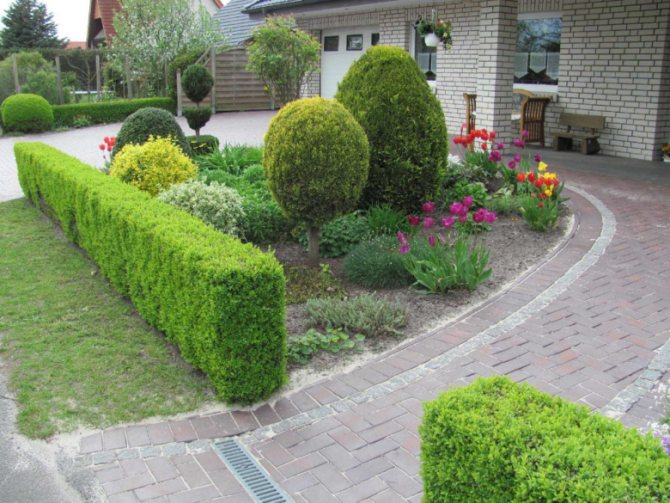
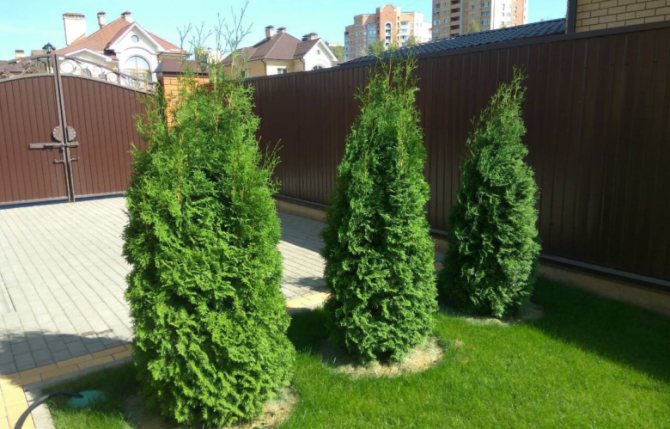
Thuja has a wide range of uses in gardening: pyramidal shapes are suitable for park alleys, undersized species fit well into miniature compositions. The coniferous tree looks great in separate groups and mixed with other evergreen species.
Evergreen curbs and hedges up to 4 meters high are created from it. Planting protecting from prying eyes can be trees located close to each other, either shorn or with tops directed upwards. Thuja is an excellent material for curly haircuts. After studying biology and having patience, skilled gardeners depict complex geometric shapes and even animal figures.
Thuja loves places that are closed from cold winds and sufficiently lit. The only place not worth planting is full shade: without the sun, the crown becomes sparse. This plant is so hygrophilous that it can grow near close groundwater, at the same time, well-developed adult trees normally survive short-term drought.
On a note:
although thuja is considered photophilous, it has been noticed that with proper care, certain species, for example, spherical thuja, feel great under the canopy of tall trees.
Preparing seeds for planting
It is not at all difficult to grow thuja from seeds, the main thing is to adhere to the basic rules.
Only fresh seeds should be used for planting.
They must be collected in the fall, from September to December, from the cones that appear on the thuja in the very first fruitful year.
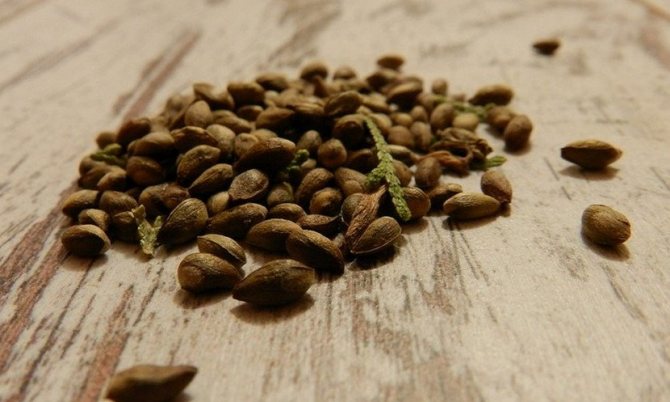
They are brownish-orange or light brown in color, so they can be easily spotted against the background of green needles.
To get the seeds out of the bud itself, there is no need to make an effort, just leave the buds in a warm place, spreading them on paper in one layer, overnight so that they dry and open, and in the morning the small-sized seeds will spill out on their own.
Then the seeds must undergo cold aging - leave them in the refrigerator for 3-4 months. This simple procedure will weed out diseased seeds and destroy diseases and all bacteria.
After that, the seeds must be soaked in warm water or wet sand for 10-12 hours and you can start planting.
Read about proper care for thuja in spring in this article.

Preparation and stratification
To awaken seeds and give them a signal for full development, regardless of the current season, it is necessary to carry out stratification. This is a procedure for simulating natural conditions that would survive seeds in winter and spring: cold, greenhouse effect of fallen leaves, moisture, due to which the shell and additional microelements necessary for full growth are soaked.
Did you know? In 1883, the Krakatoa volcano erupted in Indonesia, which destroyed all the plants on the island. After about 10 years, palm trees, ferns, various types of flowers and shrubs grew from seeds that were preserved in the ground.
It is not difficult to do this at home. First of all, dried and selected whole seeds without flaws must be kept in a humid environment with a low temperature. It can be gauze or matting placed in a refrigerator or subfloor for 4-5 weeks. Skipping this part of preparing the seeds for sowing can lead to the fact that, without waking up, they simply rot when they hit the ground.
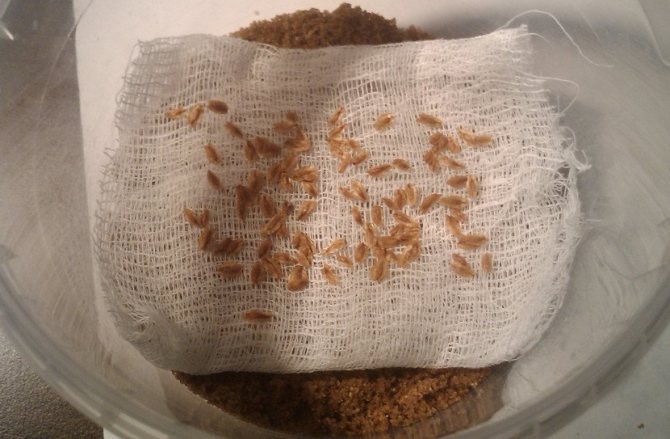
You need to be prepared that after such hardening, part of the planting material will be rejected. Some will be visually too dry, some will rot. Therefore, during the entire cooling period, it is important to check the condition of the seeds, to remove the weak and dead.
Even if you bought seeds from a trusted manufacturer, it will not be superfluous to carry out a disinfectant treatment. And for seeds independently collected from cones, this procedure is simply mandatory. For example, an ordinary solution of potassium permanganate with a concentration of at least 1 g / 100 ml of water is suitable, in which the seeds are placed for 1 hour. Don't be afraid of the dark cherry color of the resulting liquid. Fragile-looking thuja seeds, like all conifers, are sufficiently protected by a shell.
We recommend reading about diseases and pests of thuja.
The last step in seed preparation is soaking. To germinate seeds, place them in warm water for 10-12 hours. Depending on the variety, the soaking period can be extended to 24–36 hours. The readiness indicator for sowing is the sprout that has hatched.
How to plant
There are two different ways to plant seeds.
The first method involves the presence of a personal plot, since the seeds will be planted directly into the soil, and not into tubs.
If this option suits you, then you need to wait for the snow and even then spread the seeds on the ground, digging shallow holes for them at a distance of at least 10 centimeters from each other and covering them with needles and snow on top.
With proper care, the first shoots will sprout in a few months, but it will be possible to transplant the thuja to a permanent place only in the spring.
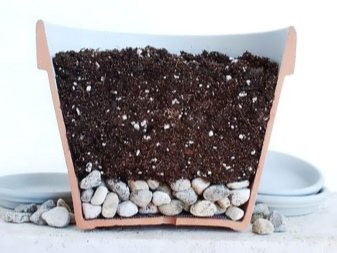
In the second option, boxes or pots will be needed, on the bottom of which pebbles are laid out and covered with a thin layer of river sand, and then the soil is already covered.
It is necessary to plant seeds, adhering to the 4x4 scheme. This must be done carefully, the root collar should be flush with the soil, since otherwise the seeds are likely to die.
Young plants should be sprayed regularly, and fertilized once a month. In addition, direct sunlight should be avoided.
Artificial breeding of thuja
The second way: the collected seeds go through a period of stratification. A glass container is prepared, which is filled with wet fishing line and sawdust, and seeds are added there. Then the closed container is sent to the lower shelf of the refrigerator and stored there for 2-3 months, sometimes checking the condition of the seeds.
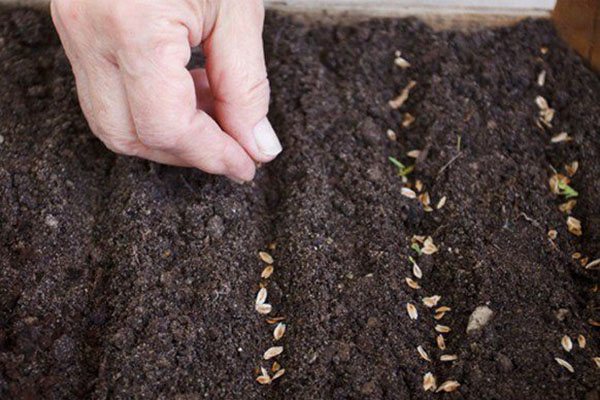
Sowing such seeds begins in February in pre-prepared boxes or pots. Drainage is poured onto the bottom of the selected containers, then prepared soil. It is better to purchase a potting soil mixture ready-made in a coniferous plant store. A layer of sand is poured on top of the soil, slightly leveled and compacted. Next, the surface of the sand is well sprayed with water, and then they begin to place the seeds at a distance of 1 cm from each other. Seeds need to be lightly pressed into the soil, then sprayed a little and covered with glass or film.
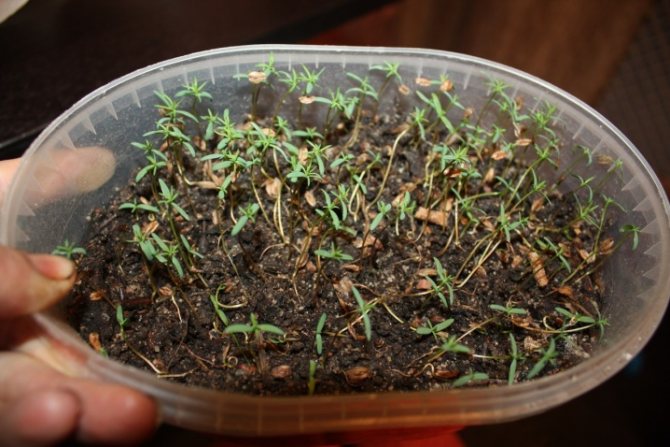
For better seed germination, an elevated air temperature of at least 20 degrees is required. After small shoots appear, the container with the plants is moved to a well-lit place with a slightly low temperature. If plant roots appear on the soil surface, they must be carefully sprinkled with sand. Crops must be examined every day and diseased plants must be removed, if any.
After 1.5 months, the shelter is completely removed from the plants. But be sure to spray it regularly so that the soil does not dry out. In the first year of the seedlings' life, they are not dived, but only fertile soil is poured into the container where they grow.
How to grow
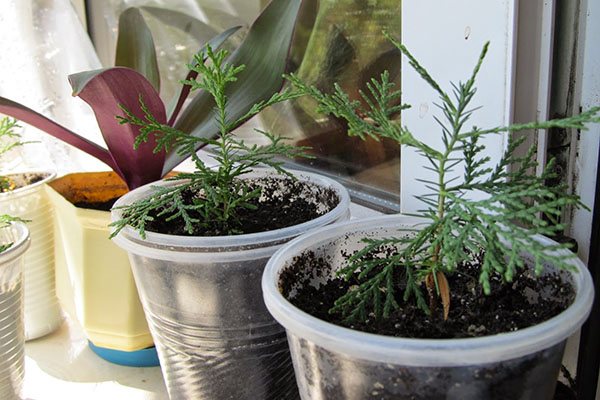
You can plant seedlings in specially prepared soil a year after the seeds have been planted.
During this time, the plant should become 7 centimeters high. By this time, the thuja will have already formed a dense trunk and root system.
The new planting site should be protected from direct sunlight and harsh gusts of wind, as otherwise the sensitive bark can dry out. It is necessary to plant young thuja at a distance of at least three meters from each other.
If everything is done correctly, and how to care for the thuja, then over the next year it should grow by about 15 centimeters, and by the end of the third year it should reach a height of half a meter.
In the fifth year, a young thuja can be transplanted to a permanent place, where it will grow in all subsequent years, pleasing the eye.
Read an article on using thuja to create a hedge here.
Thuja – one of the brightest representatives of evergreen conifers.
It is often used when planning landscape design. The beautiful slender pyramids of this plant are very unpretentious in care and have the useful property of releasing active substances into the air - phytoncides. This is what fell in love with the juicy green handsome gardeners and summer residents who know how to grow thuja. Thuja propagates by cuttings and seeds. Planting cuttings of various varieties can be purchased from the nursery or from an experienced grower. From the seed, it is quite easy to grow thuja on your own. Let's try to figure out exactly how you can grow thuja yourself.
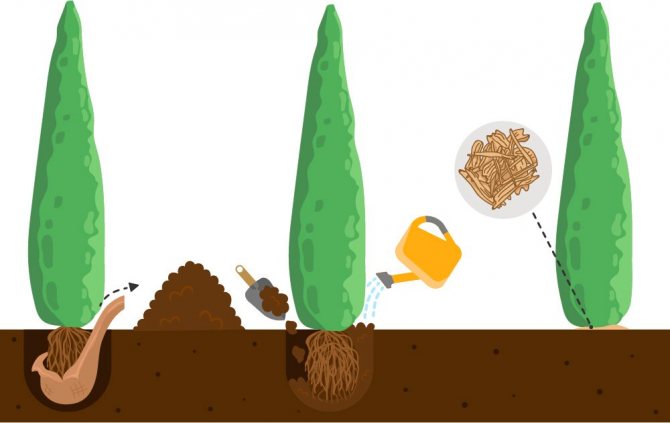
Stage four - growing
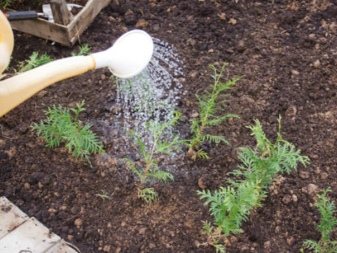
In the first month, the planted coniferous tree is watered every 3-4 days, alternating between root watering and crown irrigation - this requires 10–15 liters of water. Further care consists in abundant watering throughout the season.In subsequent years, the root system of the thuja will get water on its own, it is enough just to water it in dry weather.
Thuja western, like all conifers, does not really need mineral fertilizers - top dressing is applied on very poor soils.
In other cases, the own fallen needles are simply not removed, peat is gradually added. Sanitary pruning of damaged and diseased branches is carried out in the spring. Decorative haircut is carried out for no more than 1/3 of the shoot in April-May or at the end of summer.
On a note:
in some columnar varieties, a second crown may form during growth - in order to obtain a neat crown shape, it must be cut off.
Diseases and pests appear on the western thuja due to poor care, lack of nutrition. Various kinds of fungal pathogens affect the rhizome, branches and needles. Prevention consists in annual spraying with Bordeaux liquid, copper sulfate. In advanced cases, trees are treated in the spring every two weeks until complete recovery. Thuja aphids and false shields are fought by using karbofos, decis or rogor.
In general, all forms of western thuja survive well below freezing temperatures, but other winter factors can be harmful. Preparation for winter begins in the last autumn months before snow falls. Thuja care measures in winter are aimed at keeping plants healthy and beautiful.
In the first year of planting, the seedlings are covered with non-woven material ("Lutrasil", "Agroterm") - for convenience, a bag is prepared, which is put on the crown so that the branches are not tightly pulled together. Around the thuja, you can build a frame and cover it with the same cloth or burlap.
To protect the roots from frost, the trunk space is insulated - mulching is performed with leaves mixed with earth, pine sawdust or bark of coniferous trees. There are many types of mulch, every gardener is able to find his own acceptable option. It is completely necessary to remove the protection in the spring after the ground has thawed and a positive temperature has been established. Prior to this, partial ventilation is carried out from the north side.
On a note:
strengthened coniferous plantings do not need shelter for the winter, but protection from the bright sunlight of the last winter days - reflecting from the white snow, they burn the thuja needles.
With proper planting and good care of young plantings, western thuja requires less and less care over time and grows on its own. The main thing is not to overdo it with "courting", to try to create conditions close to the natural habitat.
You will need
- - container for planting seeds
- - seed
- - soil for conifers
- - small stones
- - river sand
- - solution of potassium permanganate
Instructions
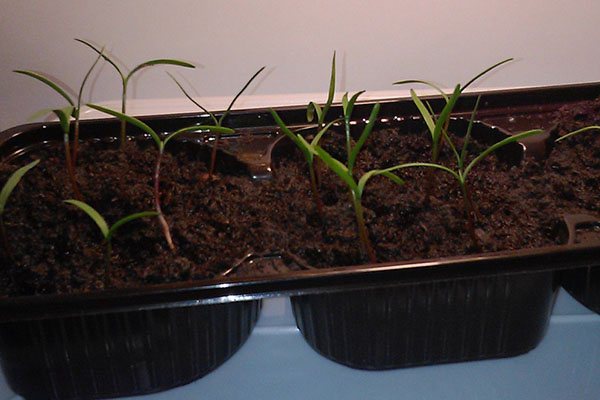
Many gardeners successfully practice thuja. This process is very long due to the slow germination of the seed. The first step in this matter is the acquisition or self-extraction of thuja seeds. In the latter case, you will need to stock up on cones of an adult plant. They need to be collected between September and December. With the beginning of winter, the cones open and the seeds from them spontaneously fall to the ground, so after December it makes no sense to stock up on planting material.
Having found a suitable mother plant, you need to carefully cut off the cones, which can be light brown or brown, and spread them in a thin layer to dry in a place where the air temperature does not exceed 7 ° C. The seeds are removed after the scales have dried.
There are two ways to plant a thuja. The first is to plant the seeds immediately without any pretreatment or soaking. If the seed has sufficient vitality, thin shoots will soon appear, resembling the stalk of young dill.The first branch of thuja will give in about six months, and until that time its growth will be very slow.
The second method of planting seeds involves their preliminary stratification. For this purpose, the grains are placed in a container filled with wet sand mixed with sawdust. Then the container with the planting material is closed and placed on the lower shelf of the refrigerator. Here he should be for 2-3 months. For home cultivation of thuja, the second method of planting seeds is rarely used, since there is no need to harden them.
The soil for planting is prepared as follows: first, drainage is laid on the bottom of the pot. You can use expanded clay, pebbles, coal or other small stones. The thickness of the drainage layer should be 2-3 cm. It is best to buy the soil from a gardening store. Preference should be given to soils for conifers. The prepared earth, slightly compacting, is poured into a pot so that at least 3 cm remains to its top.After that, river sand is spread on the ground in a thin layer. If you are not sure of the quality of the soil, it can be watered with a disinfecting solution of dark pink potassium permanganate.
Thuja seeds are spread in a checkerboard pattern at a distance of 1 cm from each other. The grains should not be immersed in the soil, it is enough to press them firmly against the soil, which must be moist. After that, the pot must be covered with a transparent film or glass and placed in a place where it will be provided with a temperature of at least 20 ° C.
The simplest and most convenient technology for reproduction of thuja is sowing seeds in the ground before winter. Seedlings come out strong, develop well. You can get any number of seedlings in a fairly short time. Here's how to do it:
Why is it convenient to propagate thuja by seeds
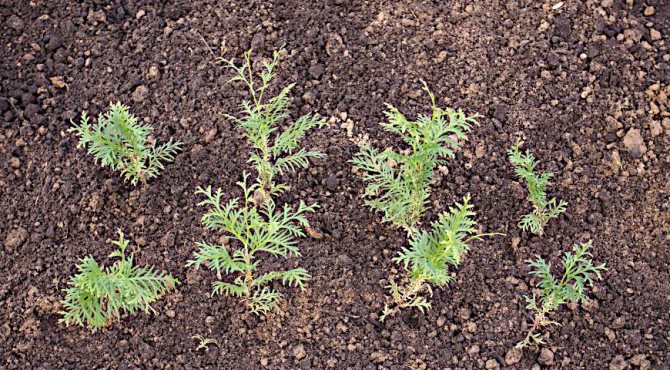
hardy and unpretentious. This is one of the best plants for: thanks to the evergreen needles, it protects the garden from the cold wind in both summer and winter. But for a hedge, you need a large number of very expensive plants. Where to get so many seedlings if you don't want to incur extra costs? Propagating thuja by seeds, you can get any number of seedlings in 3-4 years. And do not be afraid that in the first year of life, seedlings reach only 7 centimeters. After 2 years of cultivation, they will already grow up to 50 cm, and subsequently they will give an increase of about 30 cm per season.
How to prepare thuja seeds from cones
Thuja seeds ripen in late August - early September. You need to collect seeds before the cones open.
After planting, water and mulch with peat. Feed every 2-3 weeks in the same way as in the previous season, water in dry weather, loosen the soil after watering and remove weeds at the same time. In the third year of cultivation, when the thuja grown from seeds reaches a height of 50 centimeters, it can be planted in a permanent place.
For a hedge, a homogeneous planting material is needed, but when growing thuja from seeds, forms are split: seedlings from sowing are obtained with different outlines and density of crowns. There is a solution to this problem. At the age of 2-3 years, the future shape of the crown is already clearly visible in thuja seedlings. You can easily select the required amount of uniform planting material for a hedge or other purposes. In addition, the thuja tolerates a haircut very well, and the desired shape of the hedge can be obtained, even if the seedlings are slightly different.
If you notice an error or inaccuracy, please let us know.
Illustrations for the material: LLC "Publishing House" Gastronom "
3 1
August in the garden is the time for harvesting and feeding. Don't miss 19 August Apple Spas - a holiday ...
5 5
August is the last month of summer: days are getting shorter, nights are colder. Nevertheless, despite ...
4 2
August is the best month to divide and transplant perennial flowers. Plants will have time to grow ...
2 3
When the weather is pleasantly warm in September, a lot of things can be done in the garden. For example, …
1 3
In September, flower beds await no less care than in summer. It is necessary to plant bulbous plants, divide ...
1 0
Part of the crop is harvested and stored correctly. In September, you need to make sure that in ...
2 15
A hedge is much more beautiful than any fence, no matter what material you choose for it. If…
3 4
It is not so easy to create a beautiful green carpet under the trees: the trees are not only covered with grassy ...
5 8
The seeds of some plants give quick and friendly shoots, others need special preparation, without ...
Thuja from seeds: how to grow, transplanting into open ground
Thuja is an evergreen plant used in landscape design. As a hedge, it protects against drafts in summer and winter. The coniferous tree is propagated by cuttings. If you cannot find cuttings, plant seeds. This method takes patience and time.
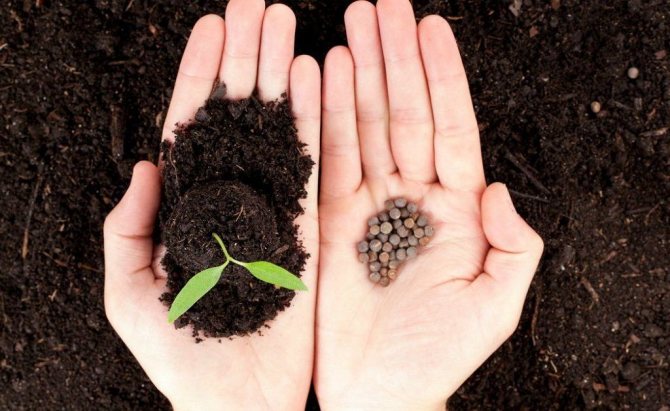
Thuja seeds: the pros and cons of this method
A huge advantage of growing thuja seeds at home is the ability to grow a large number of seedlings at the same time, while they will be of the same size and age. This is interesting for those who are planning to make a hedge or composition on a large plot. In addition, thuja grown from seed will be better adapted to the growing area.
This method is cheap to use, but it also has its drawbacks:
- long process of seedling development. The period from seed to planting in the soil lasts approximately 5 years;
- seedlings will be similar in appearance, but may lose the shape and quality of the variety of their predecessors.
Thuja planting and care
At home, thuja is a wonderful decoration of a balcony or terrace - it loves fresh air, does not tolerate content in the kitchen or in a smoky room. It also looks attractive in the garden: in the rock garden, rocky gardens, it goes well with other conifers.
Temperature
Plant frost resistance - zone 5b if you plan to grow thuja in a greenhouse or garden. At home, in the summer we have the temperature that is dictated by the weather, but cypress trees do not tolerate heat - they need 22-24 ° C for optimal growth. In winter, a cool content is required, + 8-10 ° C is enough, at least + 2 ° C. At the same time, the soil in the pot is almost completely dry. At the lower temperature limit, the plant must be insulated. You can put the pot in a box of sawdust, wrap it with foam rubber, put it in a large pot and fill it with dry earth between the walls. Coolness must be ensured with the onset of the heating season and until early February.
Lighting
Thuja is photophilous, prefers a certain amount of sunlight, preferably before lunchtime - the east or southeast side, or in the evening - northwest. In the period from February to May, from 12 to 15 o'clock, openwork shading is desirable - at this time the most active sun can cause burns (brown needles). By summer, the thuja gets used to the sun well and does not need shading if it has enough fresh air.
- Attention: at temperatures above 26-27 ° C, the direct sun is hard for thuja to endure. Therefore, if the pot is on an open balcony or near an open window (not micro ventilation, but a well-open window), shading is not required. If you close your windows, it's best to move the pot to a shady, but not hot, windowsill. Young plants especially need shading. In nature, thuja seedlings (from self-seeding) have been growing for decades in the shade of taller trees.
You may have heard that thuja is shade-tolerant - this statement applies only to garden conifers, at home the lighting is always one-sided, and growing on the north side can lead to the formation of uneven foliage of the crown. Therefore, if you have a north side, gradually rotate the pot on the window.
Watering
During the growing period, especially in hot weather, watering is abundant enough, with drying of the top layer of the earth.Do not leave water in the pan after watering. Thuja does not tolerate overdrying - as soon as the soil dries up, it deplorably lowers the branches, but after moistening it immediately restores turgor. If it is too dry, especially in the heat, it is irreversible. When the rainy season begins in the fall and a sharp cold snap, make sure that watering is infrequent and the soil has time to dry out almost completely in 3 days.
- Important: the correctness of watering is regulated not only by its frequency and volume of water, but also by the composition and structure of the soil.
- For reference: in nature, thuja grows in humid forests, especially abundantly in coniferous bogs, but at the same time it is a surface root, not completely submerged in water, but on a well-drained substrate. But the most famous long-lived thuja, up to 1000 years old, have survived on cliffs and rocky terrain. For thuja, air humidity is more important than soil moisture - avoid both waterlogging and overdrying.
Fertilization: Thuja fertilization is required two months after transplanting if the soil is too poor. You can purchase a special fertilizer for conifers or use a universal non-alkaline and chlorine-free fertilizer for common indoor plants.
Air humidity: Thuja loves very humid air, optimally 60-80%, humidity below 40% requires humidification - spraying 2-3 times a day or placing the pot on a wide pan with water (water should not come into contact with the roots). When the heating season begins, move the plant to a cool room.
- If there is no possibility of a cool winter, you have two options: fence the edge of the window sill from the battery with plexiglass or greenhouse film, put a humidifier and add artificial lighting. Or, if the size of the bush exceeds the size of the window sill, do not torture the plant - grow it in the garden.
Thuja transplant
Potted thuja is transplanted annually or every two years, very carefully, keeping the root ball as carefully as possible. When planting, it is important not to tamp the soil too tightly and not to deepen the root collar (the soil level is at the same level, without hilling). Healthy roots are brick-brown and firm in appearance. Soil: 1 part of clay-sod land, 1 part of leaf (or peat), 1 part of baking powder (zeolite granules or akadama, vermiculite or agroperlite can be used, coarse river sand - sifted up to 2-4 mm). The pot should not be too large - slightly larger than the root system. At the bottom, make many holes for water drainage, drainage if desired (in a tall pot, required). If the soil is closer to neutral in acidity, add a couple of tablespoons of pine needles or bark to the pot.
Thuja grows well on slightly acidic soils, does not tolerate alkalization and strongly acidic soil - the optimum pH is 5.5-6.5. If the substrate is caked and compacted, you need to carefully loosen it to a depth of 5-6 cm.If a salt deposit appears on the surface of the soil, it must be removed and the plant should be watered with softer water (filter, boil, soften with aquarium water agents).
If you use peat-based store-bought soil, keep in mind that it quickly depletes nutrients, and in its pure form is far from ideal for thuja (it dries quickly), but it can serve as one of the components. In addition, store-bought soils are often filled with a large dose of fertilizers, even specialized coniferous mixtures, as a rule, are based on pure peat and sand, while light loam will be the ideal soil base for thuja. But do not forget that growing in a closed system (limited by the walls of the pot) deprives the roots of an important element - oxygen. Excessive watering will suffocate the roots if the soil is not porous enough (clean loam). This is why we add baking powder. Drained soil does not mean drainage at the bottom, but drainage particles in the soil itself between the roots.
Topic on the forum: Bonsai from thuja - options for the formation of thuja, as well as the theme of Ephedra

How to prepare seeds and prepare the soil
If you have thought it over well and decided to propagate thuja by seeds, you need to seriously approach this issue. It all starts with collecting seeds in early autumn. To do this, ripe seed cones of brown or brownish color are removed from the parent tree and dried in a warm room for several days. When the bump opens, you need to lightly knock on it. This will make it possible to extract and collect small brown seeds. Having collected the seeds, it is necessary to carry out stratification.
Wrap the collected seeds with a rag and bury them in the ground, cover with fallen leaves or existing insulation. The overwintered seeds are removed from the thawed earth and poured into a container covered with sand on top, which must be refrigerated for a couple of months. The next important step is soil preparation. For good growth of thuja, a special nutrient mixture is needed: sod land and peat in equal parts and a double part of sand.
Second and third year of life
Starting from the second year of life, plants are planted in separate pots or cups. During the period of active growth, they are fed with complex fertilizer, excluding nitrogen in autumn dressings. In the summer, plants are grown outdoors in shade. Plants spend the winter period in a greenhouse or in a house.
In the third year of life, the next transplant is carried out by transferring plants into larger containers. In May, plants can be taken out into the garden, and in autumn they can be planted in a permanent place.
Below are other entries on the topic "Cottage and garden - do it yourself"
- : Reproduction by division This breeding method is suitable ...
- : How flowers are kept in salt
Tui are often used in landscape design. They are highly valued for their beautiful appearance, which lasts throughout the year.
Most often, thuja is grown by cuttings, but recently the seed method has become popular - it is more affordable and, moreover, quite effective. Undoubtedly, you need to know when to collect thuja seeds in order to be on time.
What do thuja seeds look like?
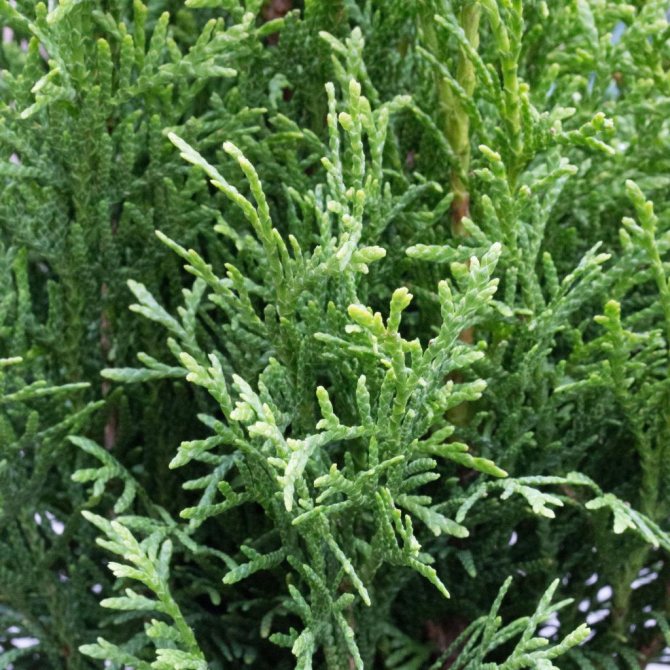
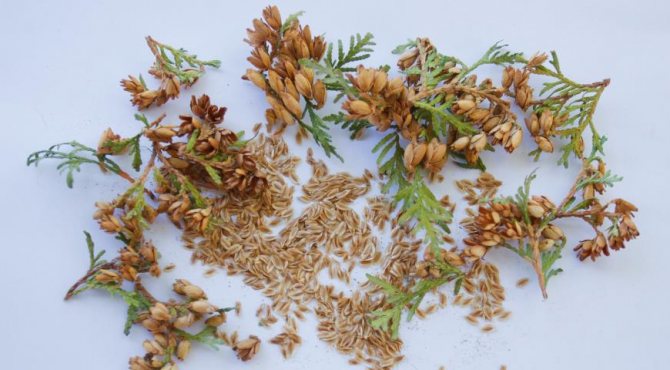
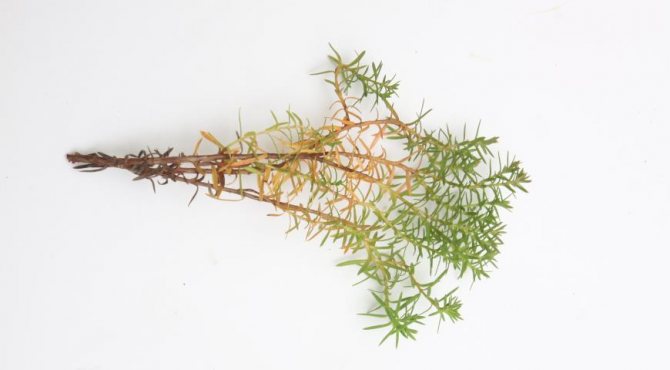
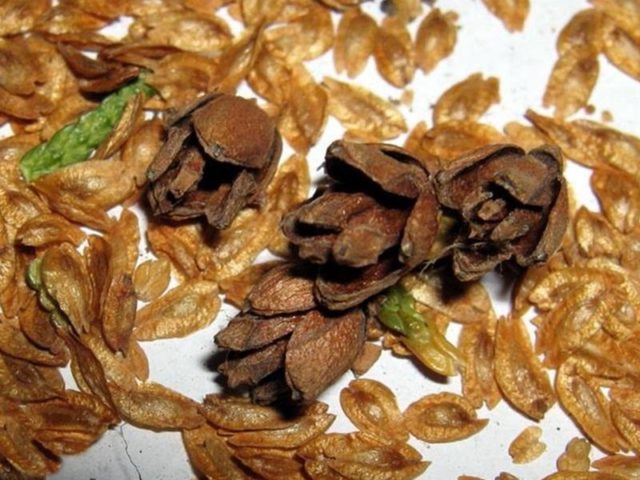
The seeds of an evergreen plant ripen in buds located at the tips of branches. These buds ripen in the first year of fruiting. It is not difficult to notice them on an adult tree - they have a brown-orange or light brown color, resembling branched branches that have turned brown from the cold.
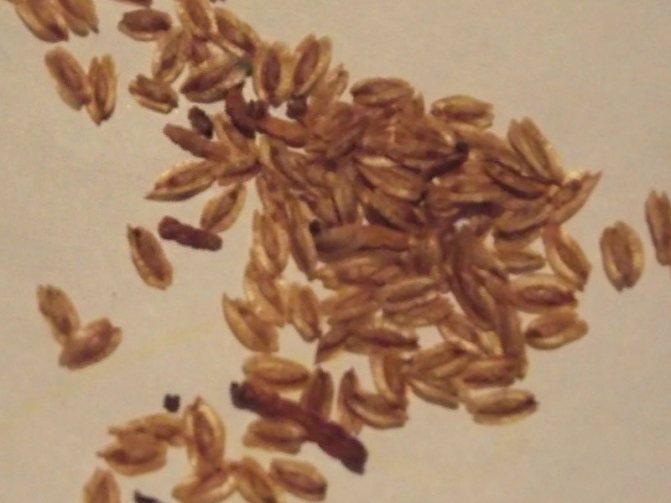
It is these brown seed twigs that are harvested to obtain thuja seeds. They break off easily from the tree. After drying at home, the cones open and the seeds themselves spill out of them - small winged and reddish seeds in color.
When do thuja seeds ripen?
The time for collecting thuja seeds and harvesting planting material is usually at the end of summer - early autumn. Collect the buds before they open, as dry and open buds spill out onto the ground very easily.
The collected buds should be laid out on a flat surface in a dry and warm ventilated area. Once the buds have opened, the seeds will be very easy to extract.
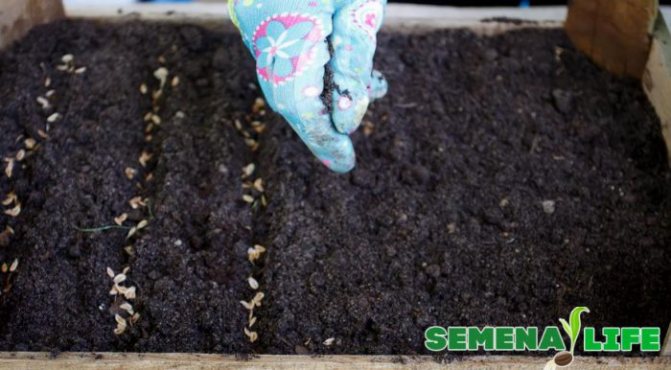
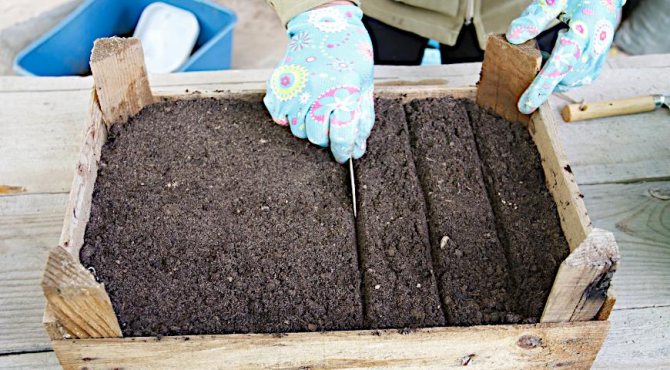
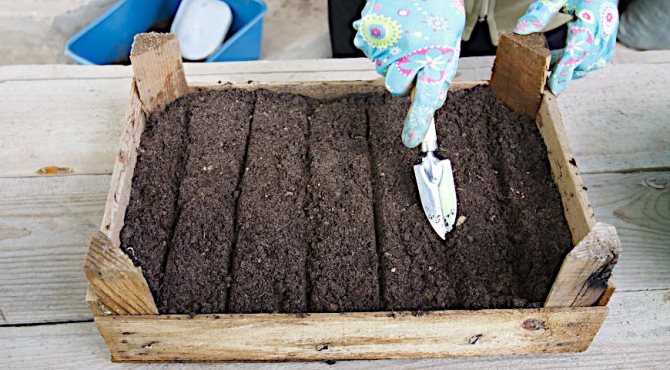
Sowing technology: how to propagate thuja with seeds
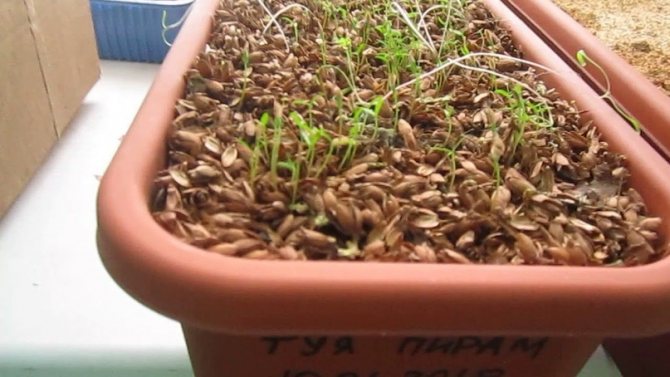
At the bottom of the wooden box, drainage is pre-laid at least 2 cm, the prepared nutrient mixture is poured on top, leveled and tamped. Then thuja seeds are evenly sown in the furrows made. The row spacing should be at least 6-7 cm. The seeds are slightly crushed with a peat-sand mixture, irrigated with a spray bottle, and the whole box is covered with foil or glass until shoots appear. Watering is carried out using a spray bottle to prevent seeds from washing out of the soil.
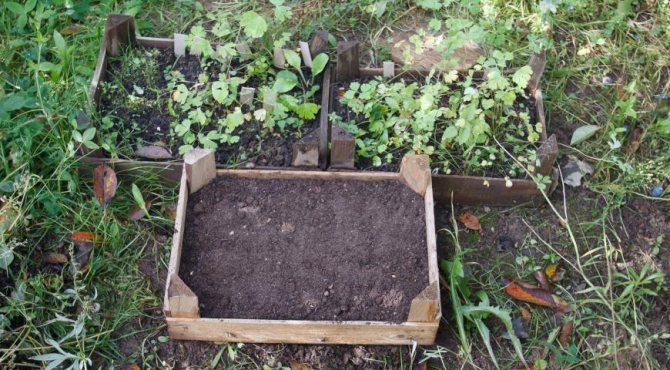
The pot should be kept in a warm place until the seeds germinate. After the sprouts appear, the thuja pot is moved to a cool place with sufficient lighting. In this case, it is mandatory to ventilate and remove spoiled sprouts. 40 days after planting, the thuja seedlings should sprout well, after which the film is removed.This method of growing thuja from seeds gives very good germination, but requires considerable effort and a pot for planting.
Thuja planting site, soil requirements, planting pit
Before planting the plant, determine where it will be placed. Best of all, a calm area in the shade, but not in the wilderness.
Leave the distance between seedlings about 1 meter or less, if necessary, to make a hedge. If you have a variety of large trees, then you can leave a distance of 3-5 meters.
Ideal soil should be light and nutritious because on dry soils, the plant may turn yellow and dry.
To prepare a planting hole, you need to remove the turf (grass with roots) with a shovel, shake off the soil from the roots - we still need it, and the roots can be disposed of.
Planting pit preparation
The size of the planting pit is about 40 cm in diameter and 30-35 cm deep. If it is necessary to plant the planting hole in rocky ground, then, if possible, make the planting hole a little wider so that the tree is already as strong as possible before the roots of the stones reach.
The planting land consists of peat, humus, fallen leaves or needles. If the soil is clayey, add sand; if it is sandy, add stones, clay, gravel or expanded clay to the bottom of the pit.
How to properly care for seedlings
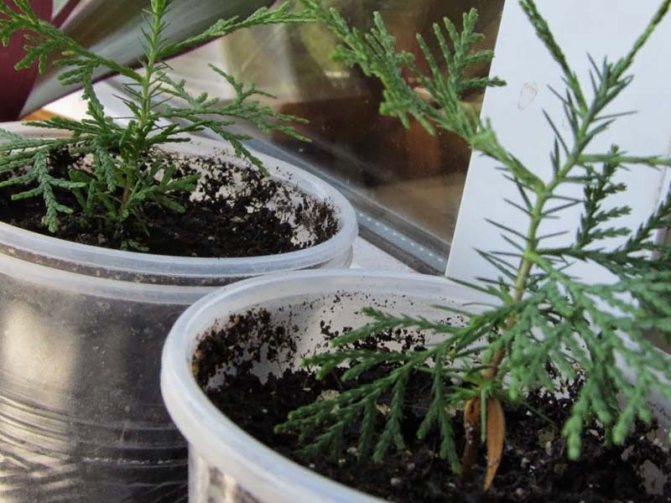
So, we figured out how thuja reproduces, and now we will study the process of caring for seedlings. If the so-called thuja seedlings are not very thickened and each plant has room for development, then in the first year of life the seedlings are not transplanted. You can put the potting mix into which the seeds were planted into the box.
In the second year of life, in the spring, you need to plant the seedlings in separate pots and put them in a semi-dark place on the street. Watering should be moderate. For the winter, the plants are transferred indoors. In the third year of life, from May, the seedlings are taken out into the street, and in the fall they are ready for planting in a permanent place of growth.
Temperature support
The plant should be in partial shade, the optimum air temperature for seedlings in summer is from +17 to +23 degrees. The pot with thuja should overwinter at a temperature of +15 to +18 degrees.
After planting in open ground for the winter, the seedlings must be wrapped.
Lighting selection
Seedlings need protection from direct sunlight. When storing a box of thuja seedlings at home, place it on a window on the north or west side. Plants will have diffused light ideal for development.
Top dressing of seedlings
To improve the growth of seedlings, you need to organize regular feeding with minerals such as potassium, phosphorus and nitrogen, molybdenum, boron and manganese will also be useful. Mineral fertilizers Agricol and Solution are well suited for such purposes.
Seedlings are fertilized twice a month.
Further care
Thuja needs proper care, because the plant is quite susceptible to the influence of pests and aggressive environmental factors. To protect it from disease, stimulate rapid growth and make it attractive, you must adhere to simple rules.
Learn about growing and maintaining a thuja hedge.
So, immediately after planting, you should not place the container with the planted seeds in the open sun. It is better to place the box under the crown of the tree, where the rays will be diffused. It is also best to protect the seedlings from pets, if any at home.
Watering and fertilizing
The soil should be moderately moist. Excess moisture can lead to rotting of seeds and seedlings. However, the substrate should also dry out no more than 3 cm in depth.
When to replant seedlings and how to do it
Transplanting seedlings into open ground is carried out no earlier than the third year, if necessary, but it is better to do this in the fifth year of life. First you need to select a shaded footprint and prepare it. To do this, it is necessary to fertilize every square meter of the area of the future garden with the following composition: a bucket of humus, 2 tbsp.spoons of "Nitroammofoski" and a glass of wood ash. This mixture must be mixed, spread over the ground and the area must be thoroughly dug up.
Now the most important point is how to grow tuuyu outdoors. Seedlings are planted so that there is free space for growth and development within a radius of 30 cm. After transplanting a seedling, it is watered and mulched with peat. Further care is simple, infrequent watering, loosening and weeding are required. After the thuja seedling reaches a height of half a meter, the plant is ready for transplantation to a permanent place of growth.
Now we know how to propagate thuja with seeds. Although this is a long process that takes more than one year, it is very interesting. Collecting the seed, preparing it, planting it, the first shoots, bewilderment - all of a sudden it’s dill, not a thuja, the appearance of the first needles, then “scales” characteristic of thuja, several transplants - and the plant pleases you with its succulent crown.
Since real gardeners are not afraid of difficulties, they use this method of reproduction of pyramidal and spherical varieties of thuja.
Thuja is a coniferous plant that not only has a stunning aroma, but also a beautiful appearance. That is why growing thuja from seeds is so popular. How exactly to grow a tree on your own, and what aspects of this procedure are important to know before planting, we will figure it out in the article.

The third stage - planting a western thuja with your own hands
A place is selected, taking into account what the tree will become in 5-10 years, so that it does not have to be replanted or cut down later. The planted seedling will reach a height of 3–3.5 meters in adulthood - it pretends that the crowns of neighboring trees do not interfere with its growth.
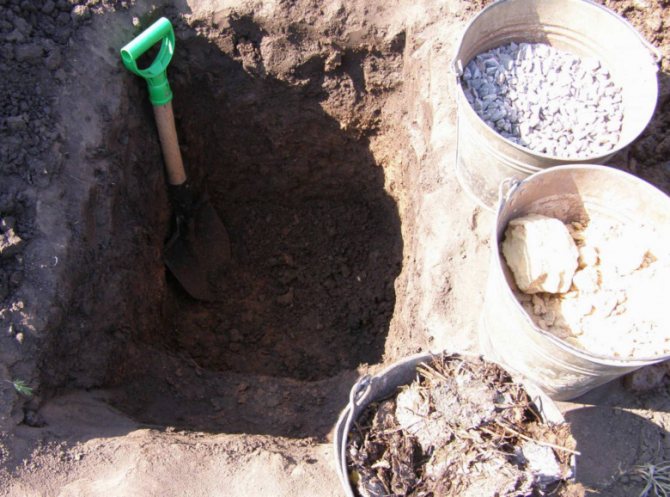
A hole is dug up to 1 meter in diameter and twice as deep as the size of the container.
Drainage is arranged on damp soils - half of the pit is filled with gravel, stone or broken brick.
Sour peat, leaves and needles are introduced into the planting pit. The optimal substrate for thuja is a light, fertile loam with a slightly acidic or neutral reaction (pH 4–5.5). Sandy soil is improved by organic matter, and clay soil is softened by sand.
The earth is poured in several layers, compacted with your feet. A pot is tried on, the placement of the root collar is calculated - the soil will sag slightly, so the thuja is planted two centimeters above the surrounding soil.
The plant is pulled out of the container. Twisted roots are often difficult to gut and can be trimmed slightly.
The seedling is placed in the center of the piled tubercle, fertile soil is poured around and crushed.
Young thuja is immediately mulched in an affordable way, abundantly watered with water from a watering can.
On a note:
planting and replanting western thuja is preferable in early spring, but container seedlings can be planted until mid-autumn.
Thuja breeding methods
There are several ways to propagate thuja. This is done using seeds and cuttings. The second method is most often used. It is simpler and faster.
But, it is not always possible to purchase healthy cuttings, or to acquire them in sufficient quantities. In addition, the seed-assisted breeding method is gaining in popularity. This ensures that the plant grows healthy and beautiful.
Types and varieties
Tui are very diverse in size, shape and color of scaly leaves, density of overlapping leaves. There are more than a hundred plant varieties, most of which are bred in European nurseries. Among them you can find both giant plants up to 20 meters in height and dwarf species not exceeding 1 meter. Thuja - an evergreen plant, but it does not have needles as we know it on pines and spruces. In the natural conditions of our country, thuja does not occur.
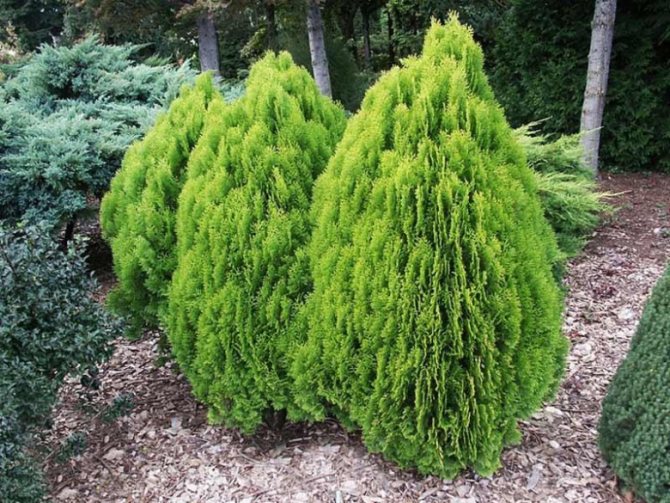
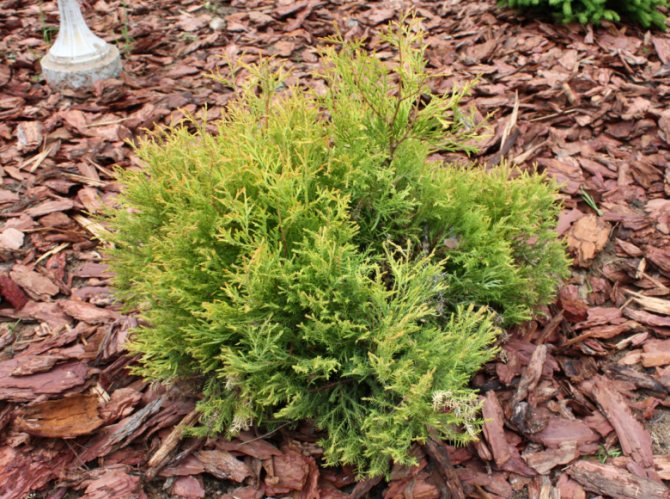
The most common is thuja western, native to North America. It has more than 120 varieties and has taken root well throughout our country. Western thuja - lush pyramidal tree up to 20 m in height, up to 70 cm in diameter. It is quite unpretentious to the soil, although in natural conditions it prefers mixed forests with clay soils.
Western thuja on the site. Variety Smaragd.
Plantings of western thuja give an unusually pleasant aroma of freshness, which indicates a rich content of phytoncides and physiologically active substances, which has an extremely positive effect in the presence of skin diseases, as well as in problems with the cardiovascular system. The tree itself lives up to 100 years.
Another popular type of thuja is arbor vitae... This plant is native to China, in nature the tree reaches a height of up to 8 meters, but it can also be a shrub. It differs from the western thuja in that the scale-like needles have resin glands. Essential oils are made from oriental thuja resins, which are also widely used in homeopathy as a powerful heart remedy.
Arbor vitae. Aurea Nana variety.
Eastern thuja has a weak frost resistance, therefore it is grown mainly in the southern regions.
Seed preparation
At the first stage, it is important to properly prepare the seeds for planting. Since the plant itself tolerates cold well and is considered frost-resistant, it is better to plant seeds before the cold comes.
Therefore, it is better to collect seeds at the end of summer. You need to carry out the procedure before the bumps begin to open. And the easiest way to get seeds will be from dry fruits.
To prevent the seeds from spoiling, they must be well dried. Therefore, immediately after assembly, lay them out on paper in a warm place. A window sill is perfect, which gets the sun's rays. The main thing is not to dry them out, otherwise nothing will work.
Choosing the right seedlings
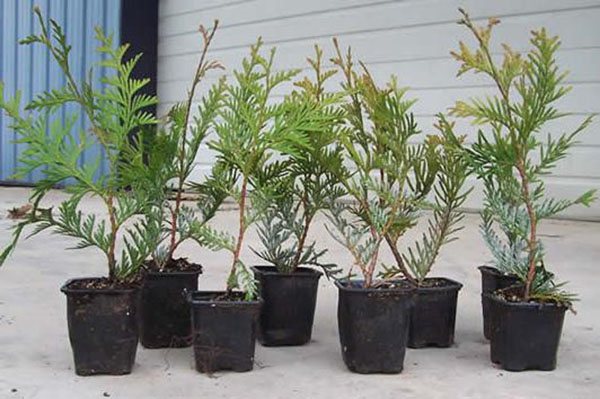
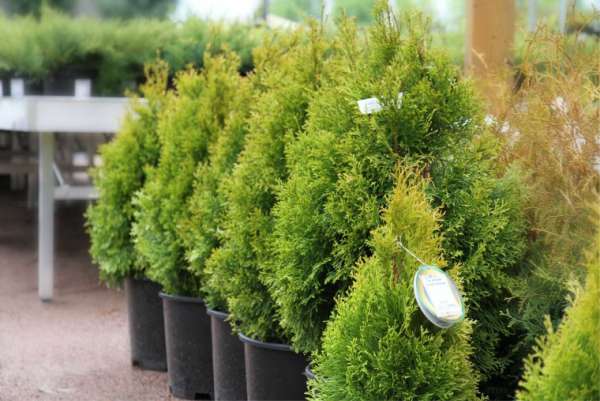
After you have chosen the type and variety that suits all your requirements, it is time to choose a seedling. Carefully examine the root system, the younger and more developed the roots, the better, the absence of damage is also a good sign. Check if the seedling is dry, inspect the plant before buying for the presence of diseases, harmful insects and various growths. If all these requirements are met, then purchase this seedling.

Thuja seedlings
Soil preparation and planting of thuja from seeds
There are two options for planting seeds: directly into the open ground or into small wooden boxes. In the second case, only a few months later, when all the seedlings appear above the surface and get a little stronger, thuja, propagated by seeds at home, will be ready for planting.
To plant thuja with seeds, you need to specially prepare the soil in the right place. To do this, mix in a box one part of peat and turf soil with two parts of sand.
The resulting mass must be mixed thoroughly.
After that, compact the soil a little, and make deepened rows at a distance of 6-7 cm, in which to plant the seeds evenly. After that, sprinkle them a little with a layer of earth, about 1 cm and moisten a little.
Make sure that the water jet does not wash out the seeds.
When to collect thuja seeds?
It is advisable to plant them immediately, since storage adversely affects the germination of seeds. If, for some reason, it is not possible to plant seeds in the fall, they must be stratified before spring planting. Thuja saplings sown before winter grow stronger and healthier than their counterparts sown in spring, grow earlier, winter better, which is especially important for them in the first years of life.
How to sow thuja seeds? Consider the most practical tips:
Reproduction of thuja
Growing thuja from seeds
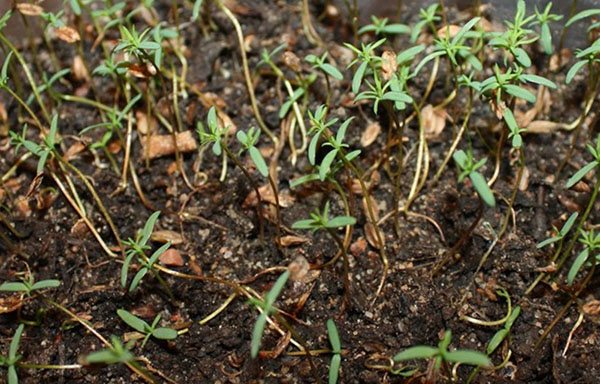
After planting, the cultivation of thuja from seeds continues. After 25 days, you can see the first shoots. In this case, the temperature should not fall below 15 ° C.
In order to stimulate the growth of thuja, you need to feed it every two weeks. This is the only way to grow a healthy tree. It is best to use mineral fertilizers for these purposes, which include nitrogen, potassium and phosphorus.
Thuja from seeds grows rather slowly, no more than 8 cm in the first season. The sprouts must survive the first wintering in the box, where they were sown.
Experienced gardeners say that in the first spring, it is better to plant thuja seedlings in open ground in rows on separate beds, so that they grow even more.
In order for the reproduction of thuja by seeds to be successful, it is better to choose a place in partial shade. It is important to additionally fertilize it before planting. For 1 square meter of soil, 1 bucket of humus, 45 grams of nitrophoska and 250 grams of wood ash should be added. Distribute everything evenly, and then dig up the bed so that all the components are mixed.


Care during germination
As soon as the first shoots have appeared, you will want to feed them, but you need to refrain from over-worrying for a week or two. If the soil was prepared with high quality, then there are enough nutrients in it for the first days of life, but it is dangerous to stimulate a fragile sprout that has not formed a minimum root system. This can lead to stretching and death. For the same reason, it is important for seedlings to spend the first weeks away from direct sunlight, in an evenly shaded place.
Important! Thuja is quite sensitive to various diseases. For disinfection of ordinary soil and peat base, it is necessary to use a strong solution of potassium permanganate.
Already after 10-15 days, when you see that the shoots have settled evenly in the ground, you can start regular feeding once every two weeks. Only mineral fertilizers are acceptable, namely nitrogen, potassium and phosphorus. The ash, loved by all conifers, will also be optimal.

But even with feeding and observing the temperature regime, the newly-baked seedlings will not grow above 8-10 cm per season. This is a feature of conifers that you need to take for granted and not try to argue with nature.
You may be interested in reading about the flowering of thuja.
It is important for seedlings to survive the first wintering at home, experiments even with planting in a greenhouse do not give a sufficiently good result. During the second season, the young grow up to 15-18 cm, and only by the third they will reach a selling height of 40 cm. By this age, young thuja need not only water and sprinkle, that is, spray the crown, imitating natural precipitation, since the evergreen plant evaporates a lot of moisture. Around the same time, it makes sense to start forming the crown, depending on the variety and the task at hand.
Thuja transplant
Further, the cultivation of thuja from seeds involves planting the shoots in open ground, at a permanent place of growth. This can be done in spring and autumn.
Thuja grows well on light sandy soils, especially with the addition of leafy and soddy soil. It is best to transfer a change of place by trees with a closed root system.
To grow thuja from seeds, you need to follow the following sequence:
- Thuja is planted in a recess, but no more than 70 cm.If you plan to make a kind of fence of coniferous trees, then the pit should be up to a meter deep. As for the width, it should be twice the diameter of the rhizome. Don't forget about drainage, which is essential for the plants. Its amount should be about half of the total depth.
- Planting thuja seeds in autumn, as well as in spring, requires fertilization. If it is not possible to perform all the manipulations on your own, you can buy a ready-made mixture for planting conifers.
- During landing, the distance must be at least 1 meter. It is best if it is equal to 2-2.5 meters. So, grown trees will not interfere with each other. When planting, the root collar should be aligned with the ground.
- Thuja tolerates drought well and an adult plant needs additional watering only in the hottest weeks of summer. But, a young tree that has recently been transplanted needs additional moisture twice a week.
- Before growing thuja from seeds, it must be fed regularly for 2 years. The soil around the conifers is loosened only occasionally, and no deeper than 10 cm. The main rule when growing thuja is dry soil and a lot of shade can lead to the tree losing its unique color.
- Particular attention should be paid to the first wintering of the tree. In preparation for it, it is better to tie the branches with a rope so that winter blizzards do not disheve them. It is very important to cover it with spruce branches to protect it from frost.
Of course, in order to get a beautiful tree in the end, you need to pay attention. But, following these simple rules will help you get things done.
Disembarkation to a permanent place
In a permanent place, the sprout must be planted in spring or autumn in the 3rd year of life, when it reaches about 50 cm in height. A place for this should be chosen sunny and spacious, without wind and drafts. It is recommended to choose an area where the sun will not shine all day long to protect the thuja from burns. A tree that grows in the shade may lose its decorative properties and shape, and the crown will turn yellow and fall off.
Video: planting a thuja
Soil preparation
Thuja grows well in light turf soil with the addition of peat and sand in a ratio of 2: 1: 1. It is recommended to use mineral fertilizers. It is best to use a nitroammophoska, based on the norm of 500 g per 1 adult tree.
Did you know? In 1954, the seeds of arctic lupine were found, which spent about 10 thousand years in frozen silt. 12 years later, a Canadian botanist has created a successful environment and grown healthy plants from these seeds.
When the soil is too waterlogged, heavy or clayey, before planting the thuja in the pit, it is necessary to equip the drainage system using broken brick, stones, rubble or sand.
Staged landing
This process is quite simple if you follow certain rules:
- It is necessary to prepare a pit for disembarkation. The size will depend on the clod of earth in which the thuja grows. It is recommended to make the depth about 70 cm, and the width - 2 times the soil. In order for the trees not to interfere with each other, it is recommended to plant the seedlings at a distance of about 2 m from each other or 1 m when the formation of a hedge is planned. Drainage should be laid on the bottom, if necessary.
- Thuja with a lump of earth should be lowered into the prepared hole so that the root collar remains at ground level. How thuja will take root in a new place and how easily the adaptation period will pass directly depends on this.
- Water the plant and compact the soil around the root a little.
Thuja care
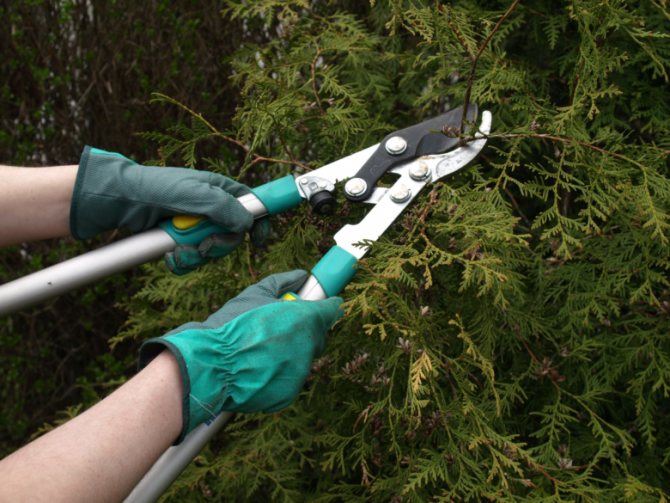
In order for the thuja to continue to please the eye, it is important to constantly look after it. It is important to form the crown from the very beginning; for this, excess branches are regularly trimmed.
Each spring, the branches are shortened by two-thirds, allowing new shoots to grow. A sharp pruner works best for this. In addition, dry branches are constantly removed to renew the plant.
Due to the great popularity of conifers, many are interested in how to germinate thuja seeds. The process is long, but not difficult. You just need to follow the instructions and use the tips given in the article.
Stages of growing thuja from seeds - video
Thuja, an evergreen tree, is widely used to create incredible landscaping, as it can be easily shaped into any shape.
It is actually not so difficult to grow thuja from seeds, therefore it is often planted in personal plots.
Reproduction is done either by seeds or cuttings.
Step-by-step process of planting thuja western
Among conifers, thuja western stands out for its docile disposition and readiness to put up with many growing conditions. An evergreen beauty helps out when you need to create slender columns, a low curb or a living screen in the garden. The widespread use of thuja in landscape projects is due to at least six reasons:
- unpretentiousness to soils;
- resistance to polluted air;
- simple reproduction and cultivation;
- a variety of forms;
- year-round decorativeness;
- good winter hardiness for the middle lane.
However, in order to see all the beauty of thuja, you need to choose the right seedling, plant it correctly, and then provide the necessary care. Let's divide the whole process into several stages and consider each one separately.
Selection and preparation of planting material
Growing thuja from seeds at home begins with the correct selection of seeds, they must be fresh. They are harvested in the fall; cones from any tree older than one year are suitable for harvesting.
In order to extract the seed from the cone, you do not need to try too much: you just need to leave the collected material warm overnight, spread out on a sheet of paper. In the morning, the cones will open, and the seeds will begin to spill out calmly.
To select only healthy seed, all seeds must be refrigerated for 3-4 months. Germination of the resulting raw material is carried out either in moistened sand, or using warm water. After 12 hours, you can land.
Care
Immediately after planting the thuja, it is advisable to mulch the trunk circle with dry needles, foliage, bark or straw 5 cm thick, with a radius of 30 cm.
Young thuja, just planted in the ground, water abundantly with water, and also spray so that they do not turn yellow. Water and sprinkle in the morning. For good rooting of ephedra in a new place, it is recommended to add Heteroauxin or Kornevin to the water used for irrigation.
In the first years after planting, make sure that the grass nearby does not suppress the growth of the seedling.
If your thuja is not planted in a shady place, then in the first 2-4 weeks after planting, as well as from February to May, you need to create shading for the plant, you can manually. For this, any materials that you have on the farm are suitable: mesh, lutrasil, spunbond, plywood, branches or thick cardboard. The main thing is not to use all kinds of films and polyethylene, because this can provoke damping of the plant.
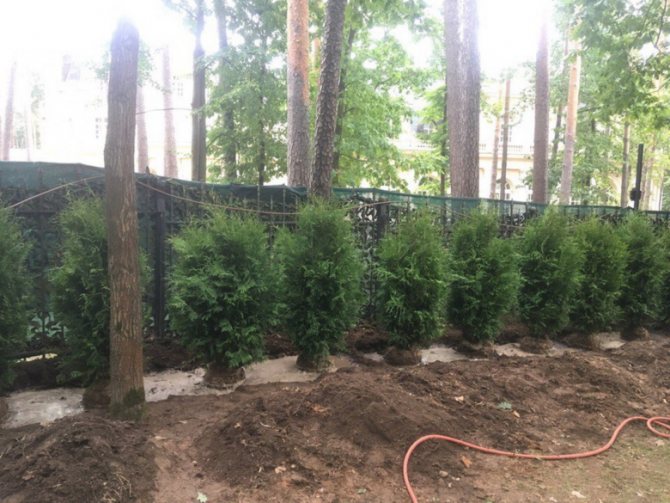
Planting a live fence made of tui
Watering and loosening
Thuja has a lush crown, so evaporation occurs from a large surface area. Therefore, in order to protect the tree from yellowing, the plant's near-stem circle should not be allowed to dry out. It is required to monitor this at any time of the year. You need to water the plant in spring, summer, and autumn. As a rule, once every 1-2 weeks, the amount of water is from 10 to 50 liters, depending on the size of the plant. It is worth doing this in the early morning or evening hours, when the heat has already disappeared.
After watering, to care for the plant, it is recommended to loosen the soil to a depth of 5-8 centimeters. When loosening, be careful not to damage the roots of the thuja, which are located close to the surface of the ground. Be sure to remove weeds while loosening.
Fertilization
Like other plants, thuja needs a balanced diet. This is especially important when planting or transplanting to a new location. In adulthood, when the root system is finally formed, the plant will already be able to independently extract the minerals it needs from the soil, but still you need to look after it and help it throughout its life.
With a shortage or excess of certain trace elements, various metamorphoses can occur with the plant.
| Trace element | Signs of lack or excess |
| Iron, copper | With a deficiency, the process of photosynthesis is disrupted; on individual branches, the needles can lose their greenness and acquire shades from light yellow to white. |
| Phosphorus | With a lack of phosphorus, young needles at the ends of the shoots turn red-violet. |
| Nitrogen | With a shortage, the growth of young branches during the growing season is greatly reduced. Signs of discoloration (chlorosis) appear. Excess nitrogen leads to increased growth of a large number of shoots, but such shoots do not have time to mature before winter, which is why they freeze out. |
| Potassium, magnesium | With a deficiency, nitrogen metabolism is disturbed, the top of the crown turns yellow. |
| Manganese | With a lack of manganese, the leaves of plants become yellowish due to interveinal chlorosis. |
The first fertilization is done the following spring after planting. Then it becomes annual and constant. Spring feeding includes a mixture of potassium and magnesium, superphosphates, ammonium nitrate, bone meal as a source of calcium. If young thujas did not survive the first wintering well, received burns and frostbite, then root formation stimulants are used.
In order for fertilizers and groundbaits to act as quickly as possible, use instant mixtures, they penetrate the root system more quickly.
In the summer, for the thuja's resistance to heat, you can process and spray the leaves with both ordinary water (in the morning or evening hours) and special compounds that will help the plant to “relieve stress” caused by heat.
Autumn feeding is carried out only in the southern regions, where frosty winters come quite late.
Any nitrogen-containing top dressing is applied no later than March. In the summer (and later), their use is impractical and even dangerous, because can cause growth of shoots during cold weather.
Pruning and shaping the crown
Since thuja has mainly a decorative function, it needs a regular "haircut" to maintain its beauty. Pruning serves two purposes:
- optional shaping - giving the crown the desired shape and limiting its growth;
- mandatory and important sanitary - cleaning the plant from diseased and dried branches.
Thuja sanitary pruning
It is recommended to cut thuja in spring or summer, the specific terms of work strongly depend on the task and phase of the growing season.
If you plan to thin out the crown of the plant and remove old branches, then prune before the plant blooms. If you need the plant to give new shoots and shoots, then it is better to cut the tree or bush after flowering.
To make it easier for you to plan these work, remember the following:
Dissolving buds in thuja, it occurs after the average daily temperature has stabilized at a level not lower than + 10 ° C. Flowering, depending on the region of Russia, from early April in the south to early June in the northwest.
It is important to follow several important rules when pruning.
- Immediately after planting the young thuja, remove the branches that grow near the ground at a distance of 2-4 cm.
- If you are not forming a "hedge", then trim the thuja no earlier than three years of age.
- Cut any branch by no more than 30%, and do not expose the branches, because conifers cannot grow leaves on bare branches.
- Do not cut branches close to the bud. Make the cut 1-2 cm above the kidney so that it does not dry out while the cut is healing.
- After pruning, the plant must be watered with water or a growth stimulant, as well as make the necessary fertilizing so that the tree has more strength to recover by the next season.
Mulching
After pruning, be sure to mulch the soil under the planted thuja. Such a procedure will protect the soil from moisture loss and maintain its breathability, helping to protect the roots of the tree from overheating.
Use sawdust, cut grass, dry foliage, bark, and other natural materials as mulch. If there was already a layer of mulch around the plant, then be sure to rake it a little at the trunk and check if the roots are not exposed. the soil can sometimes settle. If the roots are bare, then sprinkle them with a fertile mixture to the border of the root collar and fill them with mulch again. Be sure to periodically add mulch, because organic material degrades over time.
Thuja reingold mulched with bark
Sowing seeds
The planting of the material can be done in different ways. Plant directly into the ground or in boxes prepared in advance. In the first case, you need to take the seeds, wait for the snow to fall and sow them, keeping a distance of 10 cm from one another. Then just cover the top with coniferous branches and snow.
The first shoots should be expected after a couple of months, but the thuja is transplanted to a permanent habitat only in the spring.
Planting thuja with seeds in the second way is just as easy, the main thing is to properly prepare the soil and seed:
- Take boxes, put pebbles in them and fill it with river sand. Next comes the soil layer.
- Germinate the seeds and sow with 4 x 4 cm diamonds.
- Sprinkle on top with a small layer of earth.
It is important not only to know how to plant thuja from seeds, but also how to care for young plants. Caring for them will consist in regular watering, as well as in fertilizing once a month.
If you are interested in how to plant thuja seeds at home, then you can ask this question to specialists who believe that it is better to use moist peat or clay soil. To make the soil easier to absorb water and allow more air to pass through, it is recommended to lay not only pebbles on the bottom, but also a drainage layer about 3 cm.
Watering the seed should only be done when the topsoil dries up, otherwise the seeds may rot and the emergence of thuja shoots can not be expected. Growing from seeds is not so difficult, the main thing is to make a little effort and act carefully.
Sowing
The land for sowing thuja seeds must be prepared in advance. It should be rich, nutritious soil, flavored with ash and nitrophosphate. You can relieve it with sand or sawdust. If there is an opportunity in advance to enrich the land with humus on the site and let it sit for a season without load, this will have a good effect on the growth of young animals.
The container for planting can be either a pot or a box. The main thing is to provide drainage with pebbles and a thin layer of sand laid out on the bottom. The soil laid out on top must be spilled with water in advance and allowed to dry in order to avoid air nests, which can become a focus of decay.
Transplanting seedlings
When the slightly grown thuja is one year old, it can be transplanted into specially prepared soil. During the first year, the plant already reaches a height of 7 cm, its trunk and roots become dense.
To grow strong trees, you need to choose areas that will be protected from direct sunlight, and a sharp gusty wind should not penetrate here. If you do not comply with these conditions, then the bark of immature plants may simply dry out... Seedlings should be planted at a distance of about 3 meters between plants.
With proper planting and proper care, after a year, you can see that the thuja has grown by almost two-thirds. When another year has passed, it will already be 50 cm high. After 5 years, young trees are transplanted to a permanent habitat.
How to grow thuja: care and transplant
When the first shoots appear, transfer the boxes to a cool, lit place. Ventilate the room thoroughly.Remove the film after a month. For development, use chemical additives with beneficial trace elements.
Growing before transplanting into soil:
- in the 1st year, the sprouts will stretch by 10 cm, do not transplant them, just pour the earth into the box;
- in the 2nd year, divide the seedlings and transplant them into pots, take them outside in the shade, in winter move them back to the room;
- in May of the 3rd year, transfer to the street in a place excluding direct sunlight;
- by the fall of the 3rd year, the plants are ready for transplanting into open ground.
Fertilize the soil with ash, humus and nitroammophos before planting. Place the seedlings at a distance of 30 cm from each other. The width between the rows is 30 cm. Cover the soil with peat mulch. Water regularly as the top layer dries, remove weeds, fight disease and destroy pests. Fertilize once a month.
Thuja is an unpretentious plant that requires minimal time and effort. Green trees will decorate the site and protect it from the wind all year round.
Basic rules of care
First of all, you should remember that planting in the sun is unacceptable, but it is also impossible for them to grow in dense shade. When the plant begins to grow, then it is important to take constant care of him in order to get a beautiful and healthy tree:
- Be sure to water the seedlings regularly.
- In the morning, irrigate the crown of the plant.
- At an early age, start forming thuja, since it is at this stage that the plant can be accepted and adapted to any form. The main rule that you should not forget is that pruning should be carried out regularly.
- Be sure to take care of the soil, constantly loosen it. This must be done with care so as not to harm the root system.
- In winter, young trees should be wrapped so that their foliage does not freeze.
Thuja occidentalis Planting and care Growing from seeds at home Reproduction by cuttings Photo
Perhaps it was taken for a long time, irregularly watered - it is unlikely that it will survive.
Ask to lift the plant out of the container and make sure that the root system is well developed, the presence of young roots. The land lump must be intact
, a bare rhizome is like a wound in humans. With a slight scratching of the living root, the top layer is removed and juice is released.
Check for pests, diseases.
You cannot take seedlings with pronounced violations of the color of the needles and damage to the bark. The coniferous plant does not die immediately - for 3-4 years. If in doubt, switch to another copy.
Procurement of planting material
Thuja seeds can be bought in specialized garden stores or prepared on their own. They begin to prepare material for planting thuja seeds at home in the late summer or early autumn.
It is important to have time to collect the cones with seeds before the fruit opens. If it is difficult to pluck them from the tree, you can carefully separate the part of the shoot on which they are attached.
After the planting material is collected, lay it out to dry on any flat surface in a dry, warm and well-ventilated place, out of direct sunlight. Bright sun negatively affects seed germination. During the drying of planting material in the room, it is necessary to maintain the temperature no higher than 6 - 7 degrees Celsius.
Over time, the buds will dry out, open up and make it easier to extract seeds from them. It is best to spread paper under the cones, since the seeds, after fully ripening, begin to spill out of the cones on their own. It will be much easier to collect them from a sheet of paper. The most convenient way to collect ripe seeds is by holding the cone over a sheet of paper, lightly tapping on it.
Advice! The sooner the seeds are planted after collection, the higher their germination capacity. Already after 3 months of storage at room temperature, the percentage of seed germination is greatly reduced.
Choosing a variety for planting
Not all thuja varieties are easy to grow from seeds. We present varieties suitable for home cultivation:
- Filiformis. Differs in soft needles of two shades, flexible shoots. The appearance resembles a juniper.
- Woodward. Small spherical thuja of dark green color.
- Danica. This variety was bred by Danish breeders. It is valued for its dark green shiny soft needles.
- Erikoides. The crown is spherical, the shoots are filiform, long. Turns yellow in autumn.
- Emerald. A cone-shaped shrub with bright green needles.
- VIPcord. A unique variety with cord-like shoots. It grows slowly.
- Zebrina. Against the background of green needles, there are yellowish stripes, hence the name. It can grow up to 2.5 meters in 10 years.
- Kornik. This variety is the fastest growing. The needles are green with light tips.
All of these varieties feel comfortable when grown indoors.
Remember
- Fertilize for the first two years after planting... After planting a seedling in a permanent location, fertilize the plant about once a month.
- Water mature trees on hot dry days. In general, thuja tolerate dry weather well, so they need to be watered only with strong and prolonged heat.
- Remove weeds and shallow soil... Loosening will provide the root system with oxygen.
- Protect young trees from frost in winter... For their shelter, you can use spruce branches, leaves or other natural material.
Trimming the crown of a thuja is a real art. With a regular garden pruner, you can shape the tree head in a wide variety of shapes and transform your garden area.
Now you know how to grow thuja from seeds to mature plants that always fit well into any landscape design option.
How to prepare thuja seeds
At the end of summer, you need to think about harvesting seeds. Opened cones are collected from adult thujas, seeds are taken out and laid out in an even layer to dry in a dry room. If the seeds from the cones are reluctant to get, then the time has not come yet, they are not ripe.
Read also: Varieties of panicle hydrangea for Siberia
Do not store seeds for too long, they lose their germination. It is best to plant freshly harvested seeds for strong, healthy seedlings. After three months, seed germination will decrease significantly.
Before sowing seeds in the spring, it is necessary to stratify them. They are placed in a refrigerator for a certain time, where they are quenched.
But many gardeners prefer to sow thuja seeds in the fall so that they undergo natural stratification. Such seedlings will sprout faster, will grow actively, usually there are no worries with them. They easily tolerate frost.
Thuja in landscape design
Due to its properties, appearance, evergreen crown, as well as a variety of shapes, thuja is widely used in landscape design. In addition, it tolerates frosts without any problems, is unpretentious, lends itself well to haircuts, and also easily tolerates urban conditions. Many breeders believe that growing thuja is an art, but in fact, with the proper knowledge, there is nothing complicated in this process.
Spherical thuja in the landscape
The plant can be used in various types of plantings:
- Solitary plants - single plantings of plants,
- Clean group,
- Hedges,
- Mixed compositions,
- Rock gardens - planting plants on rocky hills,
- Rockery is an analogue of a rock garden, but with the arrangement of stones and planting in a horizontal arrangement,
- To strengthen the slopes.
Also, in addition to visual and aesthetic functions, thuja also performs protective functions, such as:
- Air purification from exhaust gases, soot and dust,
- Reducing drafts and curbing wind gusts,
- Absorption of city and street noise,
- Filling the air with medicinal and aromatic phytoncides.
Tui have various forms, thanks to which they can be used in different ways in the design of landscapes and territories. Their forms can be classified according to five types:
- Spherical - the growth of such crowns is very slow, the branches are dense, the size and color of the needles can change during the life cycle.
- Pyramidal - trees with such a crown can be from 2 to 20 meters high.
- Columnar - these forms are used mainly to create hedges and green walls. The height can be up to 5 meters.
- Umbrella - ideal for decorating flower beds, as a rule, the height of such a plant is no more than 1 meter.
- Keglevidnaya - plant height up to 2 meters, branches are very dense, it is good to form hedges from shrubs of this shape.
Thuja columnar
Due to its properties, and especially soft needles, thuja is safe to plant near schools and kindergartens.
Tui tolerates cutting and pruning well, so a real work of art can be created from the lush crown of a plant, they also perfectly accentuate and complement the lines of paths, gates or an entrance to the house, perfectly plays the role of a living, evergreen hedge.
Non-standard method of rooting in potatoes
Some gardeners practice rooting thuja cuttings in potatoes.
This unusual way of forming the root system in an immature plant is based on the presence of a large amount of nutrients in the vegetable.
Healthy tubers with a fresh, dense structure are suitable for the procedure:
- wash potatoes;
- all eyes are cut out with a knife;
- make a 4-5 cm depression in the pulp with a nail;
- cuttings are installed in the formed holes.
The potatoes stuffed with coniferous shoots are folded into a suitable container and covered with a fertile substrate.
From above, each stalk is covered with a plastic bottle or jar cut to the desired length from the bottom, creating a greenhouse effect. Watering is carried out through the lid.
Features of cuttings
The beauty of these evergreen trees, planted in even rows, almost always attracts attention. In addition to aesthetics, fragrant plants create coolness on hot days. At the sight of them, many people have a desire to plant thuja in the garden or near their home. To get a copy that is as similar as possible to the mother tree, it is recommended to use the method of propagation of thuja by cuttings in the fall.
Advantages and disadvantages
Vegetative breeding of this evergreen plant through cuttings in the fall increases the chances that the resulting seedlings will be of high quality and healthy. This method gives young animals more opportunity to preserve all maternal properties than seed reproduction.
Coniferous seeds need long-term aging at a certain temperature (stratification). Therefore, it will take 5-6 years to wait for a full-fledged seedling. And its formation by cuttings takes place within 2-3 years.
In addition to the advantages, thuja cuttings have some disadvantages. The planting material cut off from it requires systematic observation and care. Nevertheless, even with careful control over the planted shoots, the survival rate among them does not exceed 80. If agronomic norms are violated during the care process, this indicator becomes even lower.
Preparation of planting material
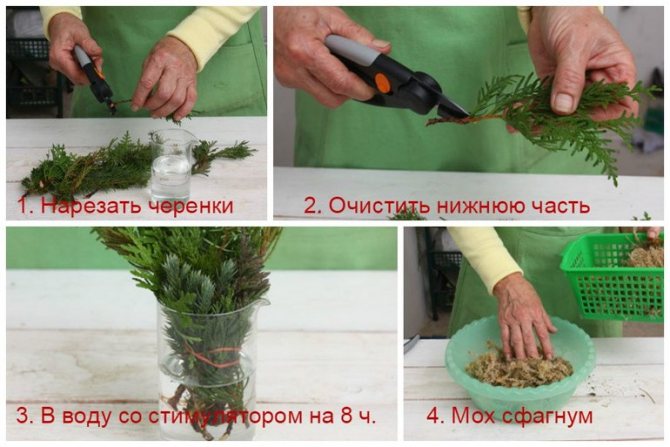
Before grafting thuja in the fall, you need to study the instructions, which describe this procedure step by step. You should not harvest material for planting in the first autumn days. One of the cloudy days of the second half of October is best suited for such an event. Preparatory work with thuja cuttings should be carried out precisely at the time when deciduous trees have active leaf fall. When cutting thuja in winter, this is done no earlier than December 20, in spring April is most suitable for such an operation, and in summer - June.
For harvesting, select the upper sections of an adult tree aged 4 to 9 years, the length of the branches cut from it should reach ½ meter. In this case, the crown of young trees will have the correct shape. For this purpose, cuttings with lignified bark that are less than 3 years old are well suited.
When choosing shoots, be sure to pay attention to their condition: all branches should be healthy, and the bark should not flake off the wood. It is best not to cut off the planting material, but simply break it off, thereby leaving a kind of "heel" at its end: wood and lignified bark. Scaly foliage is removed from a small area (no more than 3 cm), and places with exfoliated bark are also cut off.
How to sow?
Sowing thuja seeds can be carried out both in autumn and spring. Autumn is considered the best option, and immediately into open ground for natural stratification. Such seedlings will cope with the first winter with greater efficiency, and the first seedlings will actively develop. If the seeds are planted in spring, then preliminary preparation is indispensable.
Having decided to plant seeds at home, it is important to follow the instructions of the professionals step by step. The soil mixture can be taken ready-made, intended for conifers. Otherwise, the soil is mixed with his own hands from a couple of parts of sand, part of turf and part of peat. Seeds can be sown immediately on the beds, or in separate boxes, in order to monitor the development of thuja at home in the first years. First, the bottom of the pot or hole is filled with drainage, after which everything is covered with soil.
The surface is leveled and slammed so that its level is a couple of centimeters lower than the edges of the container. The grooves are formed so that there is between 5 and 6 centimeters. The seeds are laid out neatly along the length of the furrow. On top, everything is covered with a centimeter layer of earth and compacted. The plantings are sprayed with water and covered with a glass sheet or cling film.
For in order for the thuja seed to germinate, it is necessary to remove the box in a well-heated place and provide the necessary lighting... The emergence of sprouts signals that it is time to rearrange the container to a cool place. Glass or film is removed from time to time for ventilation and irrigation. Defective samples are eliminated immediately.
It will take Tue 40 days to achieve the necessary stamina and the ability to exist without shelter.
If the planting is carried out directly on the beds, it is recommended to immediately cover the bed with sawdust. In addition, you still have to wait until the soil temperature reaches the range from 10 to 15 degrees Celsius. In the spring, when the snow melts, the seedlings will sprout on their own. Natural cultivation guarantees an increase in planting height of 7 centimeters every year, if you do not forget about winter protection.
It is worth mentioning that containers are considered the most convenient for thuja, the height of which ranges from 10 to 12 centimeters. If the containers turn out to be too deep, then the unused soil will become sour, and if too low, then the roots will intertwine and thereby hinder the development of each other. Moreover, tangled root systems will be very difficult to separate for further planting in separate pots.
It is also recommended to disinfect the soil beforehand., which is easily accomplished by using a concentrated solution of potassium permanganate, easily recognizable by its bright pink hue. Before planting, the seeds still need to germinate, which will take no more than a day. The seed is left in warm water or moistened sand overnight, and in the morning it is already allowed to use it.
Thuja neighbors
Thuja feels great in "solo seating", the more the huge variety of species and varieties allows them to be most attractively combined with each other.
But when decorating your plot with thujas, there are always options for combining it with other plants, especially the thuja is a rather unpretentious neighbor, and in some cases it will even be a reliable support and "friend" for plants in the neighborhood.
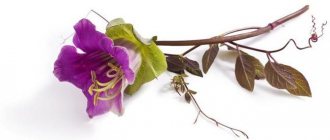
Of course, the most popular and interesting option is a combination with conifers: pines, spruces, junipers. Such plants can be interestingly combined with each other and build bizarre and unique combinations.
An interesting and non-standard decision can be to combine thuja with flower vines and climbing plants, while thuja can become a kind of support for such plants and flowers. Of course, the role of such neighbors can be species that do not differ in an aggressive character, for example, clematis, climbing roses and some other species, but it is important to take into account the needs of these plants, because some of them, unlike the coniferous neighbor, may not tolerate drafts and wind.
Another interesting option for combining thuja will be planting it in a flowerbed with flowers. In this case, phloxes, hydrangeas, pansies, lilies, geraniums, incense, primroses, poppies, petunias, tulips, and many other flowers can act as neighbors. In combination with stones of different textures, colors and sizes, you can create unique landscape objects.
Perennial flowers will become an extremely interesting neighbor, which can complement monochromatic coniferous shades with their bright colors and shapes.
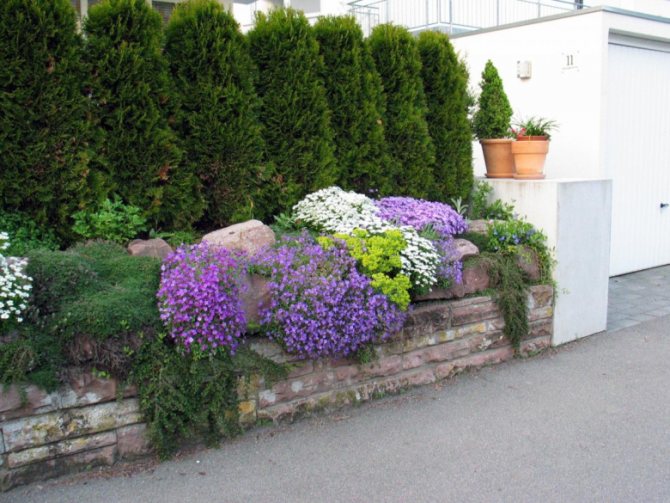
Thuja hedge next to different flowers
If thuja is the center of the composition in your garden, then you can supplement it with various cereals - feather grass, miscanthus, pinnacle, New Zealand sedge, flat-shot ophiopogon, spikelet, etc. But it is also important to take into account that not all cereals are frost-resistant enough.
Deciduous neighbors - trees and shrubs are also suitable for a friendly thuja.
When choosing neighbors, it is imperative to take into account all the features of plants, the time and duration of flowering, the color of leaves and fruits, the time of leaf blooming, etc. All of these factors affect the overall picture of your garden.
When choosing any neighbors for a thuja, rely on the following facts:
- Do not choose plants with a shallow and fibrous (tuber) root system, this will create competition with thuja.
- Under the thuja, the soil sooner or later becomes acidic, so the neighbors must tolerate slightly acidic soil.
Seed collection
If you want to grow thuja yourself, you need to collect the seeds. Only freshly harvested are used. To do this, you need to find a thuja and collect a few cones in late summer or early autumn. Be careful, take only those that did not have time to open it. Remove them from the tree, bring them home, and spread them out there. After a few days, the bumps will open. You will be able to collect small brown seeds.
The sooner you sow them, the better. then the germination percentage will be higher. As early as 3 months after harvesting, seed germination can be significantly reduced. Harvest a lot of seeds at once, because in conifers, seeds are often formed even without pollination; it is impossible to distinguish a full-fledged seed with an embryo from a "dummy" in appearance. In addition, you can grow plants with different crown shapes, so there should be a lot of seedlings in order to be able to select the one that you need.
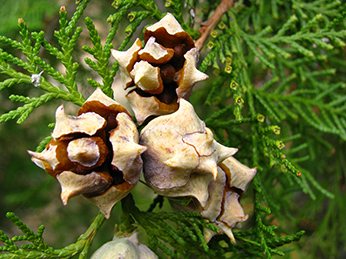
Description
Thuja belongs to the Cypress family. Came to Russia from North America. These trees delight gardeners all year round with their dense green crown. Each variety of this tree has its own specific coniferous smell. The average life expectancy is about 75 years. There are species whose age is over 100. Today, more than 35 species of this coniferous tree are known. They all differ in characteristics. The first visual difference to notice is color. The color palette is very wide: from deep blue to mustard.
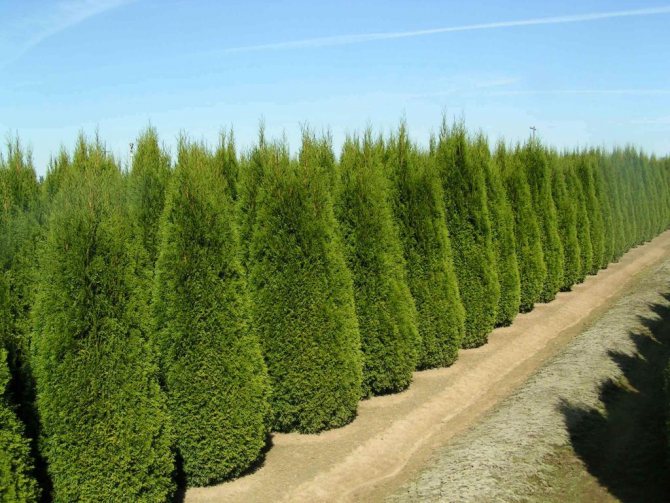
Thuja
The tree has increased winter hardiness, unpretentious to the soil composition, does not require constant care, drought-resistant. Often used to complement landscaping plants. Some varieties are used as independent decorations in landscape design.
The health of a tree can be judged by its needles. If the thuja greens are juicy, correspond to the color of the variety, then the tree is healthy and does not require additional watering and dressing. If the branches and needles are dry, have acquired a yellow-brown hue, the tree needs additional moisture and mineral fertilization.
You should also choose the right container in which you can plant the thuja. Since this tree is quite large, the pot in which it grows should increase by 1.5 sizes with each subsequent repotting. The root system should feel free in the container.
Important! Thuja propagates in places protected from winds and drafts. Very young seedlings require shelter for the winter period, for several years. The tree can be grown both outdoors and at home. It is recommended to observe the temperature regime for a tree that grows at home. The temperature should not drop below 8 ° С and rise above 20 ° С. That is, in an apartment, at room temperature, the seeds will develop well.
In addition to the fact that the tree is used in landscape design, its individual elements are used in traditional medicine recipes. Tinctures and decoctions are prepared from cones and needles, good medicinal teas are obtained from the bark, and essential oils help get rid of the initial signs of sinusitis and sinusitis.
Planting seeds in the ground
How to grow blueberries from seeds at home
The planting of seeds germinated by the second method takes place in early February. Containers with germinated seeds are placed under the lamp in order for the earth to warm up, and the seedlings were further developed. There should be a drainage layer at the bottom of the container, about 3-4 cm high. For this, you can use charcoal, expanded clay or even foam. The second layer is the soil mixture. Prepared soil for growing coniferous shrubs and trees is considered the best option for a soil mixture intended for growing thuja from seeds. On the soil packages, you can find step-by-step instructions for preparing the land for planting seeds and seedlings. The third layer should be sand. It should be about 2-3 cm high. Before sowing seeds in this soil mixture, it is treated with a weak solution of potassium permanganate. This is done in order to rid the soil of bacteria. The seed is seated in a checkerboard pattern. The distance between them should not be less than 1 cm. After planting, the seedlings are sprayed with warm water and covered with a greenhouse film or agrofibre. These containers should be located in a room that maintains a temperature regime of about 20 ° C. When the first shoots appear, the containers are removed to a cool place, which is well illuminated by the sun's rays.
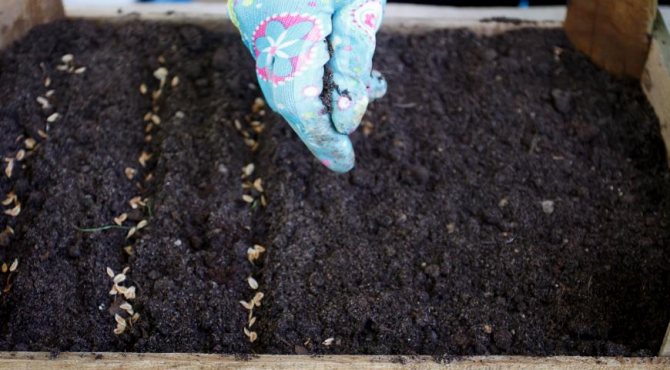
Planting thuja seeds in the ground
After 2 months, the greenhouse film or agrofibre, which covered the containers with thuja seeds, can be removed. If roots are visible on the soil surface, they must be sprinkled with sand. In the first year, plants need to be covered with soil.
A year later, in the spring, when the frosts leave and the ground warms up a little, the thuja seedlings can be dived. When picking, thuja seedlings need vitamin supplements. It is also necessary to apply fertilizers containing a large amount of nitrogen. It is advisable not to allow the land to dry out, but watering should be moderate. In their second winter, thuja seedlings are not yet ready to grow in the open air, even with the necessary shelter. The best option would be to place the seedling pots in a greenhouse. In the spring, the plants should be tempered.To do this, pots with seedlings are taken out into the open air. You can transplant them into open ground already in the autumn.
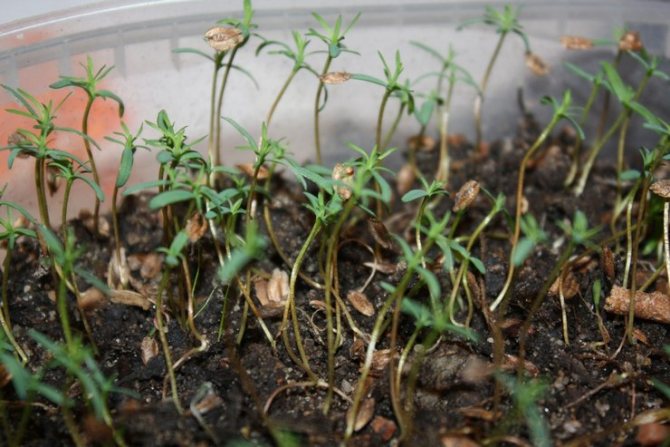
Sprouted thuja seeds
Diseases and pests, control of them
In comparison with other conifers, thuja is more resistant to various diseases. But still, some diseases, especially of fungal origin, can pose a serious danger to the plant. Such diseases affect the leaves, branches and even the trunks of plants, causing them to die off.
- Cabatine necrosis;
- Pestalocyopsis necrosis;
- Phomopsis necrosis;
- Cytosporous necrosis or osteoporosis;
- Diplodious necrosis or diplodiosis;
- Brown shute (rust).
Also, adult trees can be affected by root rot pathogens - wood-destroying fungi:
- Root sponge;
- Tinder flat;
- Tinder-bearer
- Autumn honeycomb.
All diseases usually occur against the background of weakening of thuja due to unfavorable factors, for example, such as damage by pests, imbalance of nutrients, inappropriate weather conditions, etc.
Also, 7 species of insect pests pose a threat to thuyas.
| Pest group | Group description | Representatives |
| Sucking | Juice is sucked out of unripe cones, as well as shoots and needles. | Juniper scabbard Thuya false shield Thuvaya aphid |
| Miners | The larvae of these insects make passages in the leaf blades of the shoot. | Thuvaya miner moth |
| Xylophages. Stem pests | Basically, they settle on already weakened and drying out plants. They feed on their bark, wood. | Thuja bark beetle Juniper bark beetle |
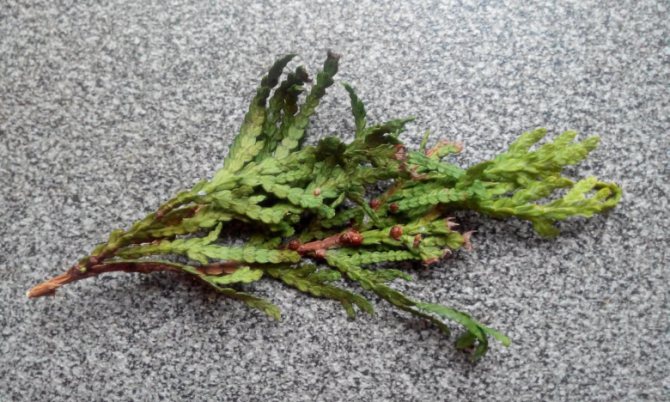
False shield on thuja
Treatment of diseases and pest control must be carefully thought out in each case, having understood in detail the "diagnosis". As a rule, treatment is spraying or watering with special agents and preparations, destruction and pruning of affected shoots, leaves and branches.
If the treatment does not help, then the complete destruction of the diseased tree may be required, as well as the replacement of the land on which it grew, because fungi can live in it for a long time and pose a danger to other plants.
Farm in the country: garden and vegetable garden, poultry, livestock, a house from a bar
Thuja is a beautiful coniferous tree, which is actively used by masters of landscape design to create amazing compositions. And in the home interior, flower growers successfully grow it, because it is believed that thuja gives longevity and returns vitality.
To plant a tree on your site, you can purchase a ready-made seedling. But planting thuja seeds is also possible, so we will tell you how to do it.
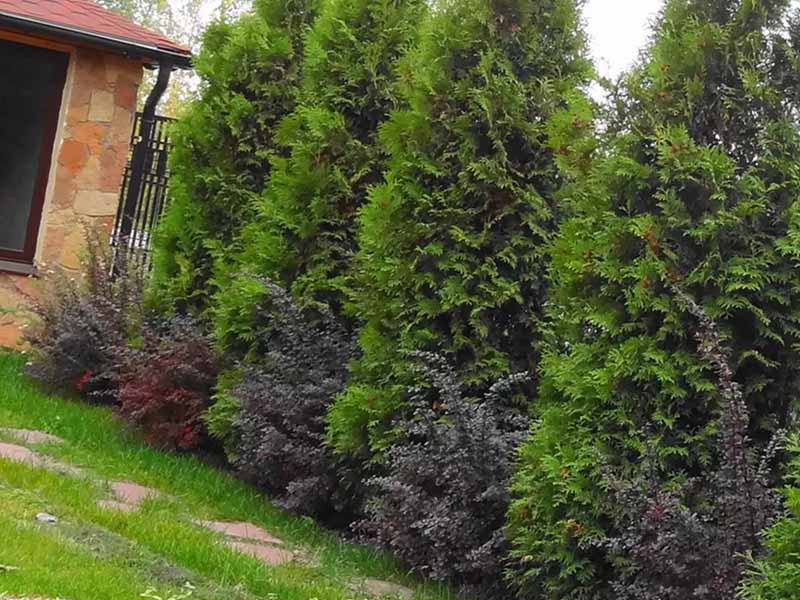
Transplant rules
If you need to transplant thuja from one place to another, then, in general, all the basic rules apply, as when planting, but there are some nuances that are important to consider when transferring a plant.
- It is worth replanting only an adult and strong plant without diseases and signs of insect damage.
- In order not to damage the root system, you need to step back 30 cm from the trunk and carefully dig out the thuja. But roots that are too long can be chopped off.
- If the "moving" of a tree within the same area, then it can be transferred together with the soil, without shaking it off, into a new hole, which must first be watered abundantly with water.
- If you need to transport the plant over a long distance, then you can shake off the soil a little and put on burlap on an earthen lump, which you can not remove when planting, but plant the tree with it.
- If the new place is far from the previous site, then it is better to prepare the pit in advance, 1-3 weeks before the transplant.
- Adult plants should be transplanted at least 1 month before the onset of cold weather, so that it has time to take root in a new place.
- After transplanting, the tree should be watered and the crown can also be periodically sprayed with water. You can also water with the addition of root or other stimulants.After transplanting, water the plant at least once a week.
- It is important to know that after transplanting the tree may turn yellow, and the tree in a new place may get sick. It's not scary, because next year, it will recover and again pick up its juicy green color.
- At the first time after transplanting, protect the plant from an excess of sunlight, as well as from a lack of moisture.
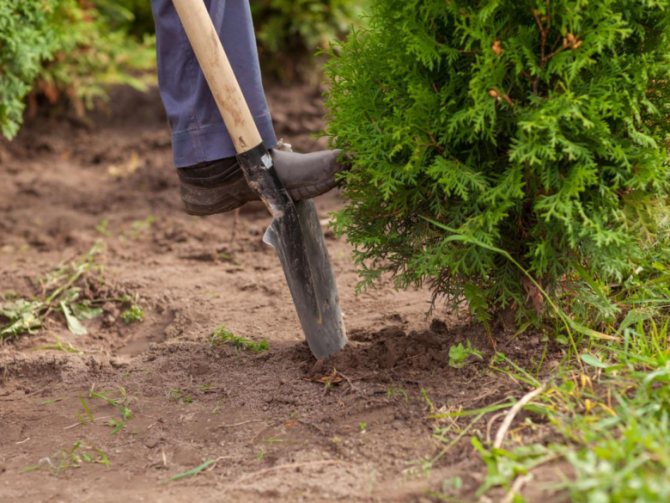
Thuja transplant
How to plant thuja seeds at home
In order for the plants to develop and grow well in the future, it is important to plant thuja seeds correctly.
There are a number of rules, following which, you can greatly facilitate the process of planting thuja from seeds and further care for it.
When to plant thuja seeds
At home, sowing thuja seeds is best done in the fall. In this case, collected with their own hands, they will still be fresh, with a high percentage of germination. Hibernating in the ground outdoors, the seeds will undergo natural hardening, which will have a positive effect on the germination of seedlings. When sowing seed in autumn, seedlings, as a rule, appear earlier than when planting thuja with seeds in spring, and young plants are more adapted to cold weather and require less care.
Advice! When growing thuja seedlings in a seedling way, you can start planting work in February.
Selection of containers and soil preparation
At home, thuja seeds can be planted in boxes or immediately on the garden bed. Growing in shallow boxes greatly simplifies the farming technique behind the seedlings, since, as needed, they can be rearranged to any convenient place.
The best option for thuja seedlings is containers, the height of which does not exceed 10 - 12 cm.In too deep containers, the soil located in the lower layer may begin to acidify, however, you should not choose too low containers: in them the roots of neighboring plants will intertwine with each other , thus suppressing the development of each other. It will be impossible to dive them without damage in the future. Cell containers are another more convenient option.
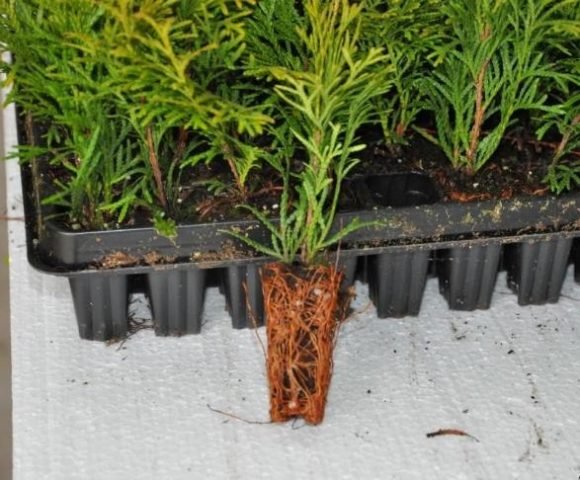
The soil for growing thuja must be very nutritious. Ready-made coniferous substrate sold in garden stores is ideal. To prepare a nutritious potting mix at home, it is recommended to mix:
- 2 pieces of sand;
- 1 part of sod land;
- 1 part peat.
Seed preparation for sowing
If thuja seeds are planned to be planted in the fall, during the winter they naturally stratify in the soil; they do not need to be additionally hardened. When planting thuja seeds in the spring, it is recommended to pre-stratify them. For this procedure at home, the seeds must be placed in a container with wet sand and left in the refrigerator for 3-4 months. The bottom vegetable rack is ideal.
Thuja seeds can be hardened at home and using another method:
- place the seed in a linen bag;
- for the winter, bury the bag in the ground to a depth of at least 30 cm;
- sprinkle with fallen leaves on top.
Immediately before sowing, you will need to perform one more procedure - seed germination. To do this, they are soaked in warm water overnight. By the next morning, the material will swell and be ready for planting.
How to plant thuja seeds at home
After stratification and germination of thuja seeds, you can start sowing them, for this you need:
- Place on the bottom of the box a drainage layer 2-3 cm thick, consisting of expanded clay or fine gravel.
- Pour some of the nutritious soil on top so that 2 - 3 cm to the edges of the box remain free. Level and slightly compact the soil.
- To disinfect the soil, it is recommended to spill it with a solution of potassium permanganate, which has a dark pink color.
- Form shallow grooves (up to 5 - 6 mm) at a distance of about 5 cm from each other.
- Sow the thuja seeds into the furrows, trying to distribute them evenly.Do not place seeds too close to each other.
- Sprinkle the crops with a layer of nutritious soil mixture no more than 1 cm thick.
- Slightly compact the surface with a plank or hands. Moisten with water from a spray bottle.
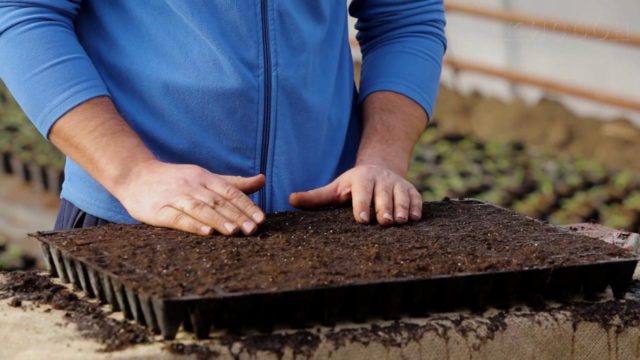
Important! Before the first shoots appear, the box with seedlings should be stored at home at a temperature of at least 20 degrees Celsius. In order for the thuja seeds to germinate better, the box must be covered with foil or glass, not forgetting to periodically air it.
The first shoots will appear after about 20 - 25 days. After their appearance, the cover from the film can be removed.
How to plant thuja seeds directly in open ground
When planting thuja seeds directly into open ground, it is important to take into account that the comfortable soil temperature for their germination is about 10-15 degrees Celsius. If the temperature is lower, seedlings may not appear.
Sowing seeds in open ground is best done in autumn, then seedlings will appear much earlier in spring, and young plants will be more viable and resistant to low temperatures.
Sowing seeds in open ground is done according to the same principle as sowing in boxes. You should not bury the seeds in the soil more than 5 cm. It is most convenient to first grow thuja seedlings on one bed, and only then plant them in separate areas.
Tips for growing and caring for thuja
Tui is afraid of direct sunlight and drafts.
Conical, pyramidal, egg-shaped, spherical - thuja will be a wonderful decoration for any garden if you provide them with proper care.
The landing site must be chosen such that:
- direct sunlight fell on the trees in the mornings or evenings, the hit of the daytime sun will dehydrate the needles, the plant will lose its beauty;
- thuja does not tolerate strong winds and drafts; if it is planted in such a place, it will be difficult for it to endure winters;
- a thick shadow will affect the density of the crown, it will be rare and unattractive;
- thujas love moist soil, but prolonged late spring flooding will destroy them.
- only a year after planting, when the tree is strong and well-rooted, you can start feeding it.
To preserve the correct shape, the trees need a decorative haircut: from the age of two, the branches are cut with a sharp pruner, which go beyond the shape of the design idea. Experienced gardeners find it best to prune lightly but often.
Temperature regime for the plant
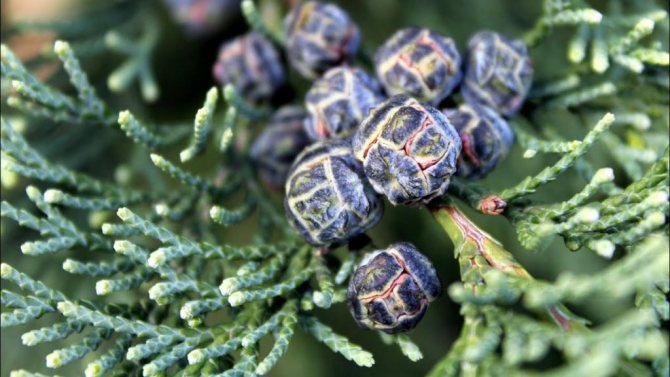
Thuja does not need high temperatures or bright sunlight. Quite absent-minded enough. While the plants are in one box, the room temperature should be maintained up to 23 degrees Celsius in the summer, and at +18 in the winter.
When growing seedlings in pots for the winter, they are brought into a cool room. Despite the fact that thuja is considered a cold-resistant plant, it is important to adhere to the temperature regime in the early stages of life. Only in this case the root system and crown will be in perfect order.
Rooting methods
There are several options for propagating thuja by cutting. The most common of these are the use of ordinary water, as well as cultivation with a special substrate and film. Gardeners are often interested in what method will allow them to quickly breed these evergreens. Each of them has its own specifics and requires a certain amount of time.
A vessel with water
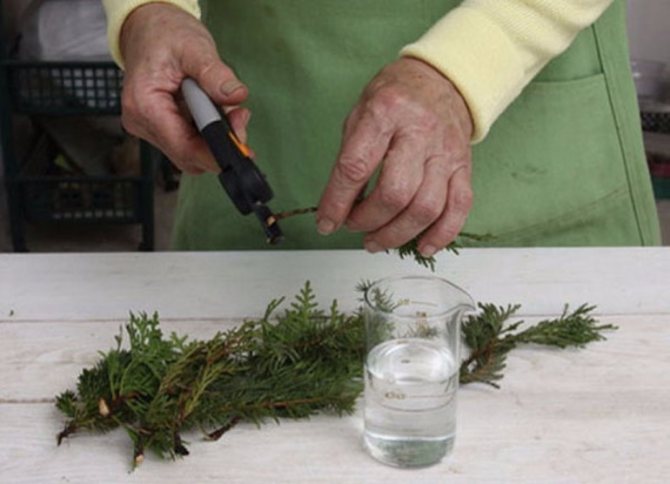
The easiest way to propagate thuja is by rooting its shoots in water. For this, it is necessary to prepare planting material and an appropriate container. In a vessel filled with water, the twigs are immersed in such a way that only the heel is in the moisture, while the leaves must be on the surface. Otherwise, the needles will begin to rot, which will lead to damage to the entire cutting. In one container, it is permissible to germinate no more than 3 branches.The vessel must be located in a cool place with good quality daylight.
The disadvantage of this method is the low survival rate of the planting material. This is due to the lack of the required amount of trace elements in the water required for seedlings. Weak cuttings do not take root well after planting in the ground and most often die.
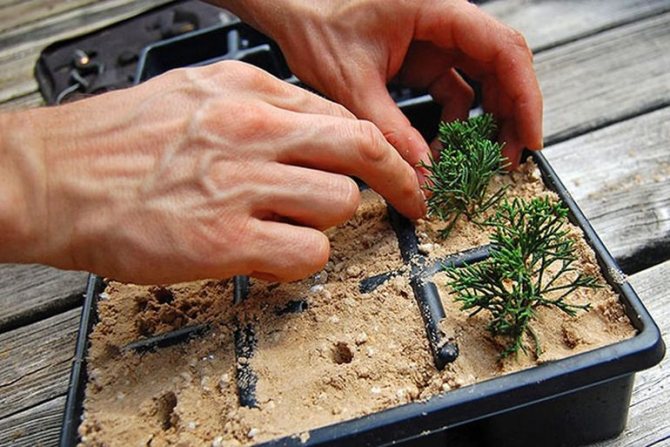
Before placing the stalk into the water, the long tail of its “heels” with the preserved bark is slightly trimmed. With the help of a secateurs, the lower parts of the shoot are cleaned from the needles (approximately from 3 to 5 cm), then they are lowered into water. Shoots should be set so that the liquid covers their base by no more than 2 cm.
In the process of caring for seedlings, the most important thing - timely replace the water, in no case waiting for it to become cloudy. The roots extracted from the water are wrapped with a damp cloth for this time. Water will require preliminary disinfection, which can be done with two crystals of potassium permanganate. Gradually adding fresh water to the jar rather than replacing it entirely is ideal when rooting. This method eliminates the disruption of the root system drinks, leading to a slowdown in growth or its cessation.
After the roots appear at the shoots, they are planted in a previously prepared ground. To do this, holes are made in it, the depth of which usually varies from 30 to 40 cm. The number of such indentations and cuttings should correspond to each other. The distance between seedlings should be 60 to 80 mm.
Substrate and film
Germinating cuttings using a substrate for this is considered the simplest, fastest and at the same time effective solution. Unlike water, this product contains a large amount of nutrients needed for seedlings. For the rooting of thuja, boxes will be needed in which the seedlings will be located; holes must be made in them for airing the soil and saturating it with oxygen (aeration).
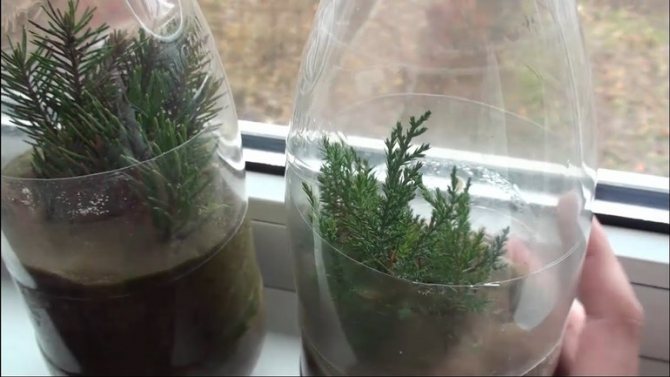
The bottom should have a drainage hole and be covered with a layer of fine gravel. As a primer, you can use ready-made compounds purchased in the store. It is also allowed to prepare a similar mixture with your own hands at home. To do this, you will need to mix the following components in equal proportions:
- peat;
- deciduous humus.
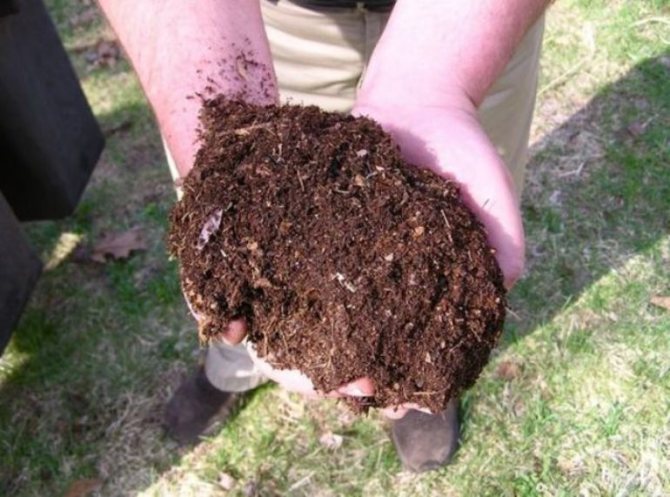
The resulting composition must be impregnated with a saturated solution of potassium permanganate. It also needs to be disinfected, for this purpose it is best to ignite it in the oven.
Before being placed in the ground, the seedlings are left in water for 10-12 hours, to which Kornevin, which has biostimulating qualities, is added. Before rooting thuja cuttings in the fall, you need to fill spacious containers with a substrate and make recesses in it for seedlings. The twigs are immersed approximately 1.5-2 cm and sprinkled on top with sand, also pre-calcined.
Containers with cuttings are covered with plastic wrap on top and placed in a sufficiently bright place, but so that direct sunlight is excluded. The air temperature in the room should vary from +18 to +22 ° С. When condensation appears on the film, it is opened so that the seedlings are aired. Watering must be carried out very carefully, excessive moisture of the soil, as well as its drying out, must not be allowed. It is recommended to use a spray bottle for this procedure. When irrigated in another way, a more powerful stream can press the soil and thereby expose the "heel" of the seedling, which will negatively affect its development.
Use of sphagnum
You can grow thuja by grafting using sphagnum (peat moss). This procedure is based on the creation of a kind of cocoon from wet moss and clean tissue, and this method is called reproduction in diapers. The initial stage of keeping seedlings in sphagnum is similar to the process of rooting in ordinary soil.In this case, when preparing planting material, certain rules must be followed. The cuttings are placed in water with a root stimulant diluted in it for about 12 hours.
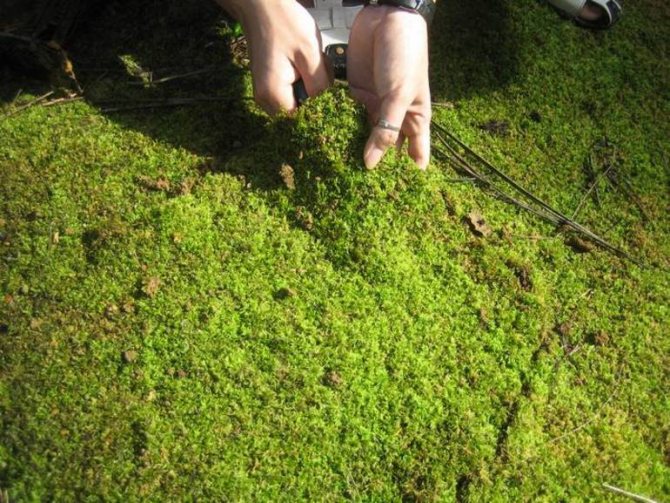
The moss used will require additional processing... For about 3 hours, the sphagnum is left in boiled water so that it is properly saturated with moisture. A large piece of fabric is laid out on a spacious surface, its width is mentally divided into two parts, into one of which moss soaked in moisture is laid out along the entire length. The other half of the fabric should be free to cover the seedlings and moss.
Thuja twigs are laid out from each other at a certain distance and placed in such a way that their "heels" are surrounded by moss on all sides. Then the planting material is covered with the second part of the fabric so that its green tops remain open, after which the fabric and its contents are rolled up. The resulting bundle is placed in a plastic bag and hung in a room with good lighting. In this case, direct sunlight must be avoided.
It is much easier to grow thuja by grafting in sphagnum than in ordinary soil, this process is easier and does not require much hassle. This is due to the ability of moss to maintain the required moisture level for a long time. Moisture deficiency is easily determined by the condition of the inner walls of the plastic bag. In this case, the appearance of dryness and the complete absence of condensation can be observed on them. It is permissible to correct this situation by moistening, resorting to the help of a spray bottle.
Features of the process of disembarking from boxes into the ground
Thuja can be equally planted both in spring and autumn. The soil, previously fertilized, is plowed up a little. The planting of shoots in dense layers of soil should not be allowed: the still not strong root system will poorly cope with its growth.
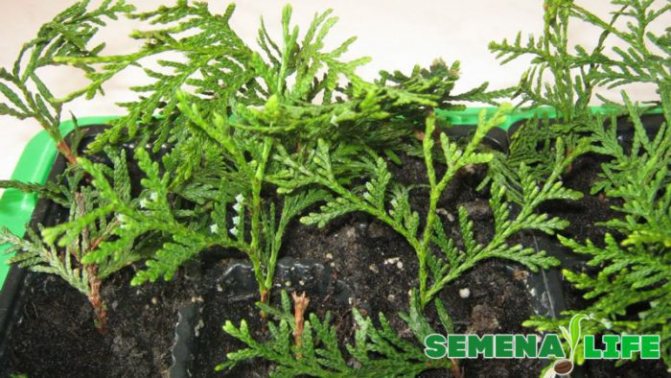
As for watering, you need to immediately understand - we water the young, but not the adults. About twice a week, the sprouts transplanted into the soil should be irrigated with plain water. When you reach the age of two, there is no need for watering. Now we resort to it only on hot summer days.
As an additional protection of the thuja for the winter, we cover it with spruce branches. We build something like a hut. Relevant for regions with low temperatures, where minus 30 ° C is considered the norm. To keep the branches in their elegant shape, we tie up the whole plant with a soft cloth.
Crowns are cut for their better formation. By about 1/3. The entire cutting process is done with very sharp pruners. It is necessary to cut off the excess, not to break it. This is the last of the tasks of the breeder. This is how the seeds can germinate up to several meter thuja, which will decorate any area with its lush forms.
Rules for caring for thuja sprouts from cuttings and twigs
After rooting of cuttings and twigs, they need regular watering (but not waterlogging), regular spraying of needles, 2-3 times top dressing with complex fertilizers, constant removal of weeds, and frequent surface loosening of the soil.
Before the onset of cold weather, insulate the ground around the trunks with bark, dry leaves, sawdust or spruce branches, and wrap the upper part of young trees with foil.
September next year is the time to replant the grown trees to a permanent place.
It is important not to bury the trees, leave the root collar at the soil level, a deeper planting will lead to the death of the plant.
Planting seeds in the country
Experts advise planting seeds in the fall, immediately after you have collected them, in your country house or garden plot. Why is such growing on the street thuja from seeds better than at home? Because they undergo natural stratification, the seeds germinate better. Already in the spring, friendly seedlings will appear, which will be less demanding to care and will more easily endure the cold. Plants will hatch in 2-3 weeks after the ground warms up. In appearance, they resemble dill shoots.The first branch will grow in about 6 months and will be covered with needles. For a year, the seedling will stretch by 7 cm.

Open ground transplant
Although planting seedlings in the beds is allowed already in the third year of thuja's life, many experts advise postponing this event until the plant has blown for a five-year period. Visually, you can navigate by the height of the thuja - it should be at least 50 centimeters. It is recommended to plant a tree either in spring or in autumn, but always in a darkened area of the site. The soil should first be dug up, at the same time saturating it with fertilizers. By itself, it should be loose and light.
Usually, one square meter of land uses a bucket of humus, a glass of wood ash and a couple of tablespoons of nitroammophoska... Turf, sand and peat in this situation will also be useful. The depth of the dug hole should reach 70 centimeters and approximately 1.5 times the width of the clod of earth formed on the roots of the plant. The drainage layer can occupy up to half of the entire depth of the prepared hole.
Pebbles, small gravel or even expanded clay are suitable for its formation.
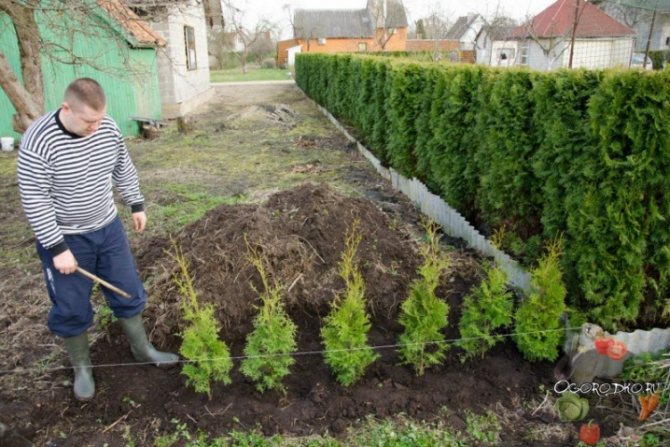
If several specimens are planted at the same time, then it is important to maintain a gap of approximately 30 centimeters between them (if we are talking about a temporary habitat) and from 1 to 3 m (in the case of a permanent place). Row spacings are usually 30 centimeters. When placing the thuja in the fossa, you will have to make sure that the root collar remains at the level of the surface, and the trunk does not turn out to be too deep. Otherwise, the plant will start to rot and simply die. Having slammed the earth, it should be watered and additionally mulched using peat or oak leaves.
After completing the transplant, for young thuja it is recommended to set an irrigation regime corresponding to 2 times a week. In addition, you will have to apply fertilizers (at first every month, and then less often), loosen, prevent the development of diseases, combat the appearance of insects and perform other standard care procedures. After some time, you should definitely add a procedure such as pruning (wellness, anti-aging or design). For the winter, trees should be protected from frost and animals. It will be enough to hide the seedlings under branches, hay and leaves, and fix the burlap on top. On average, thuja can grow by 30 centimeters per year, but the exact figure will certainly be determined depending on the selected variety.
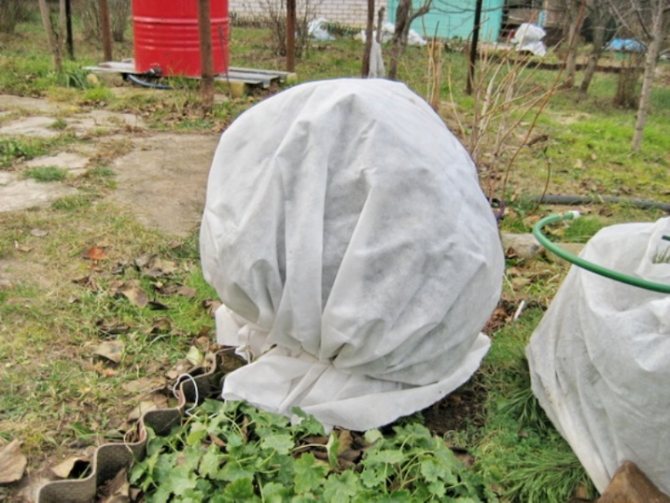
It is important to mention that leaving the thuja for growing in the container is logical if there is free space in it, and the seedlings have not yet thickened.
In this case, you only need to pour fresh soil mixture into the container. When thuja is planted in a permanent habitat, it may get a little sick, and its needles will change color to brown. But this effect is temporary, and you should not worry about it. In the event that the thuja remains in the pot, during the summer months it should always be taken out into fresh air, and during the rest of the year it should be constantly turned to achieve uniform illumination.
For information on how to grow thuja from seeds, see the next video.
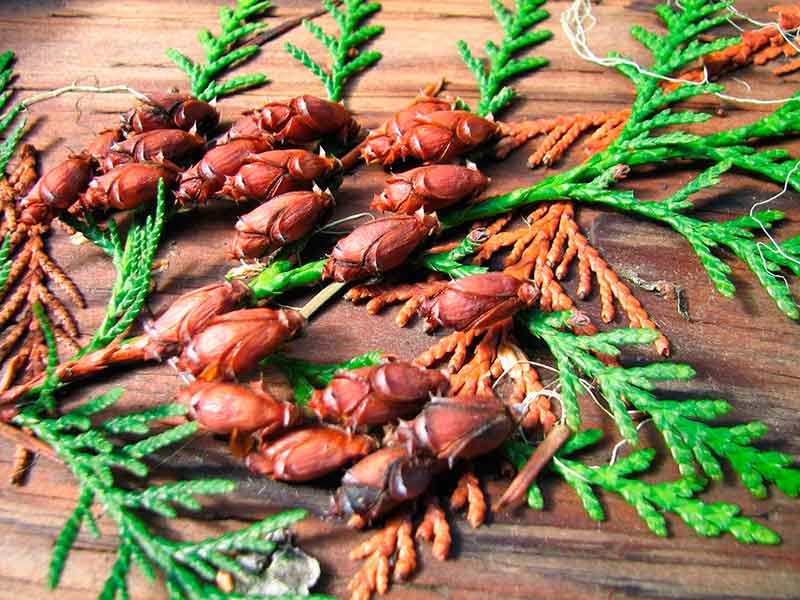
Thuja is a beautiful coniferous tree, which is actively used by masters of landscape design to create amazing compositions. And in the home interior, flower growers successfully grow it, because it is believed that thuja gives longevity and returns vitality.
To plant a tree on your site, you can purchase a ready-made seedling. But planting thuja seeds is also possible, so we will tell you how to do it.
Preparing seeds and soil for planting

If you decide to purchase a plant, you first need to know how to plant a thuja from seeds and then prepare it for planting. If the gardener does not plan to buy seeds from the store, then they need to be collected from a tree.In early autumn, when a dark-colored lump appears on the branches of an adult thuja, they need to be collected and dried in a warm place for at least a couple of days. The dried cone is opened with a light tap, so the seeds can be removed. Once the seeds are harvested, stratification is necessary.
The seeds are placed in a cloth and buried in the ground near a mature tree. From above you need to fall asleep with fallen leaves and leave for the winter. After the seeds have overwintered, they are taken out of storage and sown in a box or pot of sand. The seeds in the container are placed in a home refrigerator for another two months.
Planting a thuja from seeds will take a lot of time and effort. However, in the end, the gardener will receive a beautiful plant that decorates his site. Thuja, despite its unpretentiousness, prefers to grow in a special nutrient medium, which must necessarily include: sod land, peat additives and sand. A properly proportioned mixture can guarantee good plant growth from seed.
Preliminary preparations
Having purchased good seeds, they need to be prepared before planting. The best time for sowing is considered the eve of winter. Thuja is a frost-resistant tree, so sub-zero temperatures pose no threat to it.
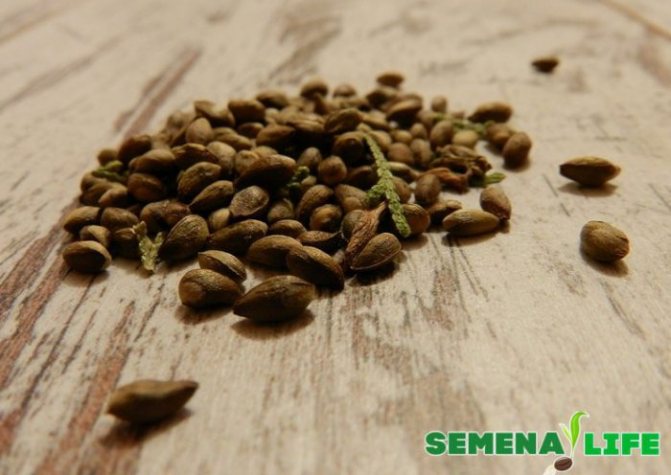
When collecting cones and obtaining seeds from them, you should wait for the shell to open. It is impossible to get grains roughly, since the risk of causing harm is very high. The seeds themselves, after extraction, should be dried at normal room temperature. The main thing is to adhere to the minimum humidity in the apartment, otherwise the seeds can infect the fungus.
Breeders are advised to always sow seeds for the winter. Thanks to natural selection, you can accurately see the amount of lost crops by spring.
Also, cold weather promotes better germination of thuja. Therefore, although the home growing method is used, the plant itself should be constantly exposed to cold places in the apartment.