
Hello dear readers!
Let's continue the conversation about phlox
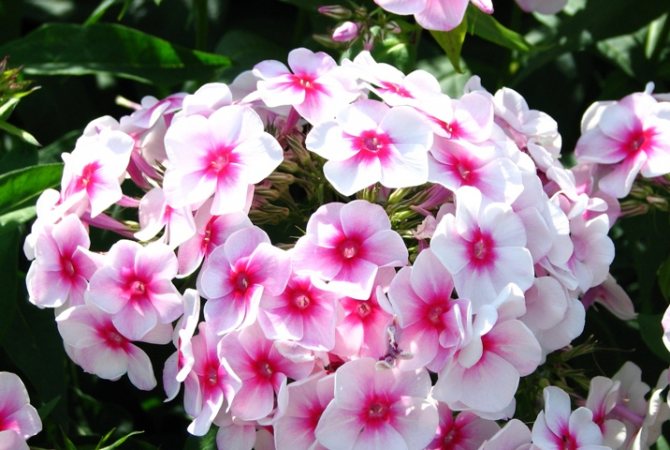
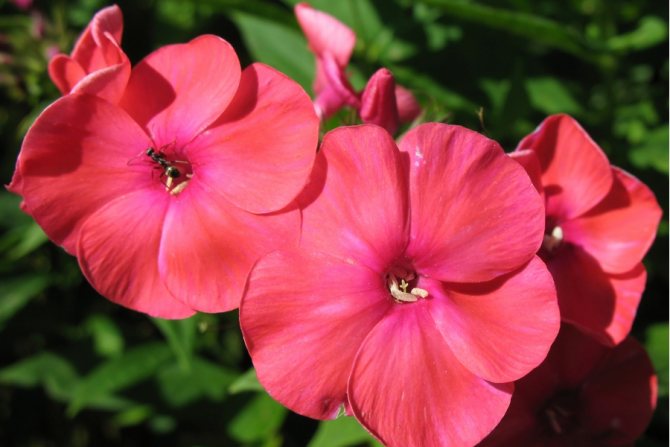
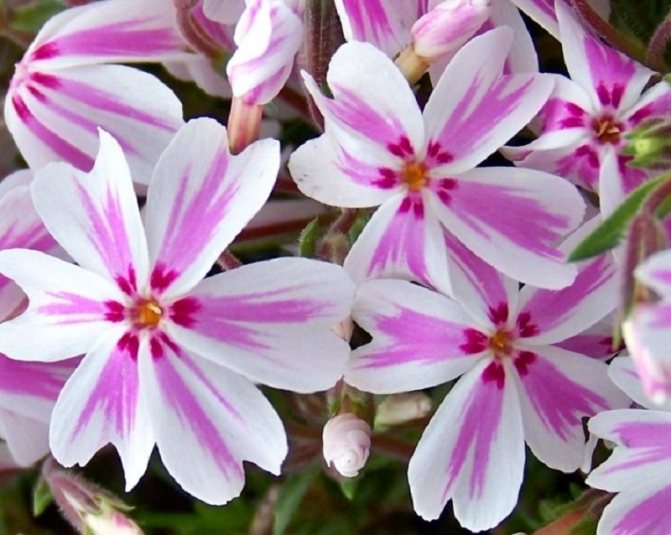
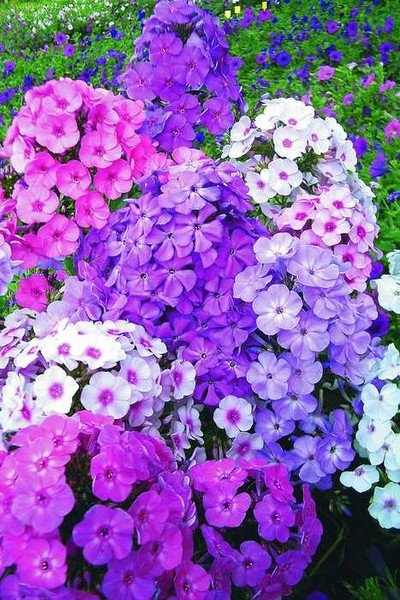
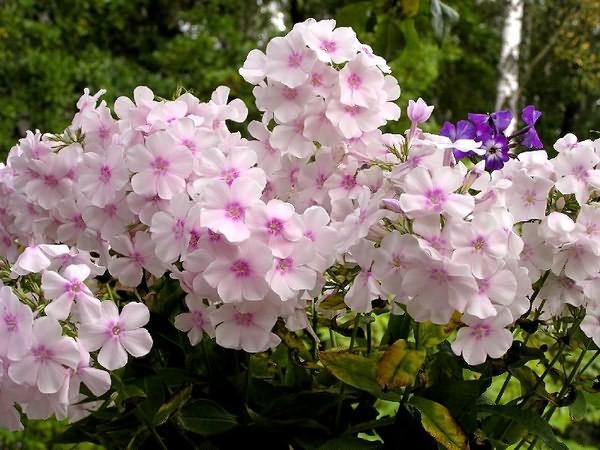
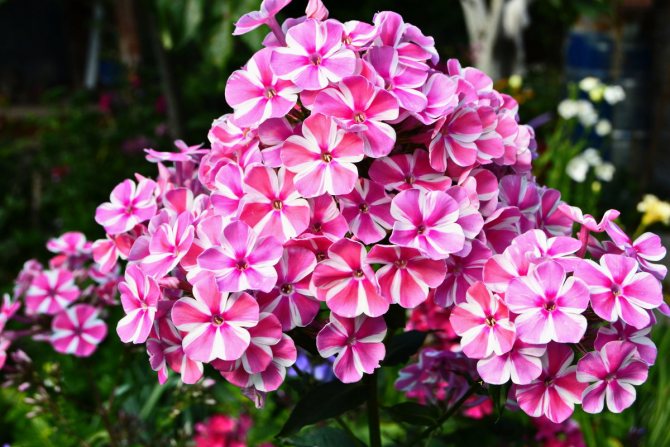
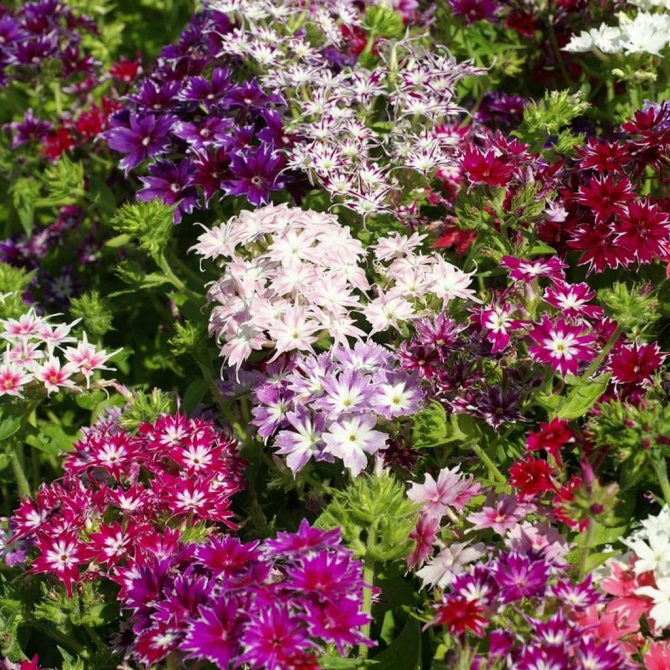
, about these most popular colors in summer cottages. They have no equal in the variety of colors.
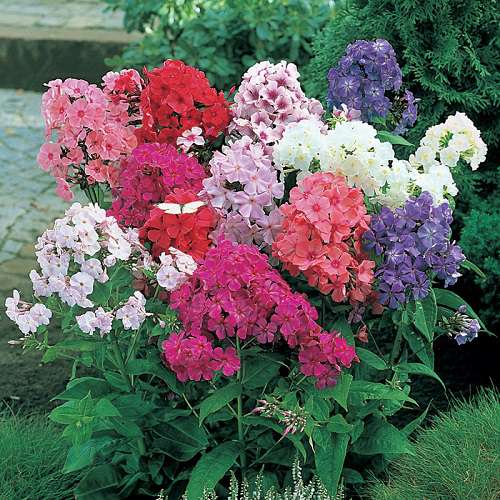
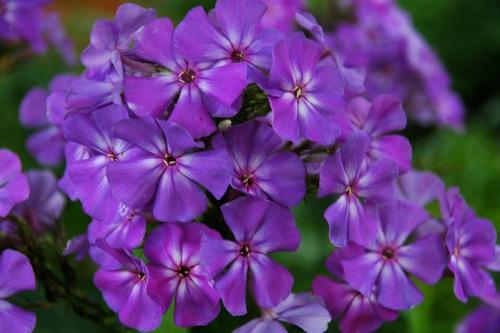
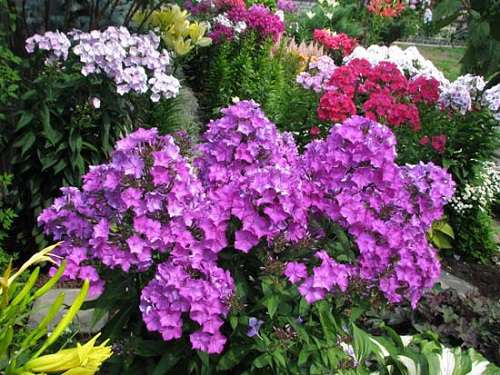
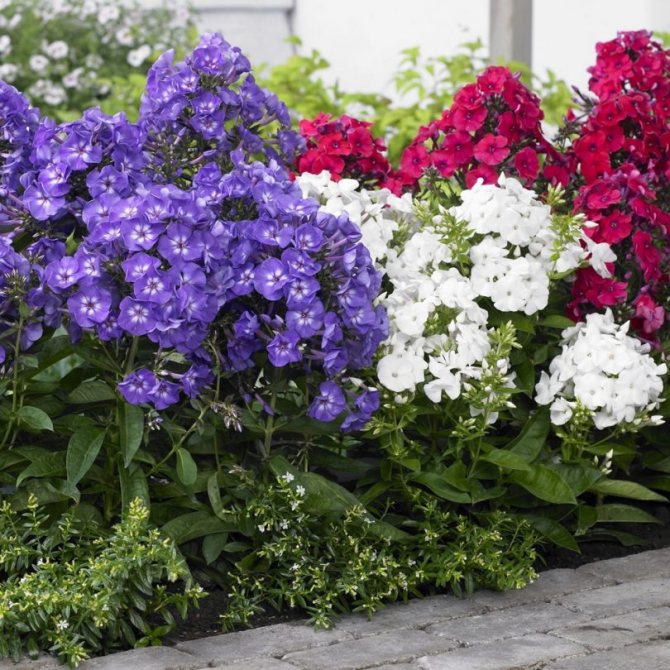
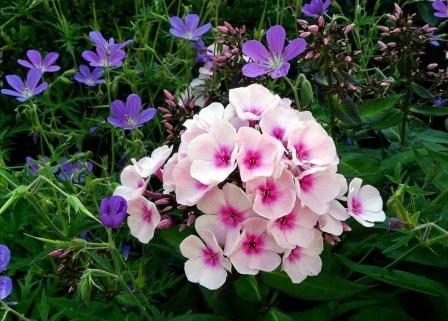
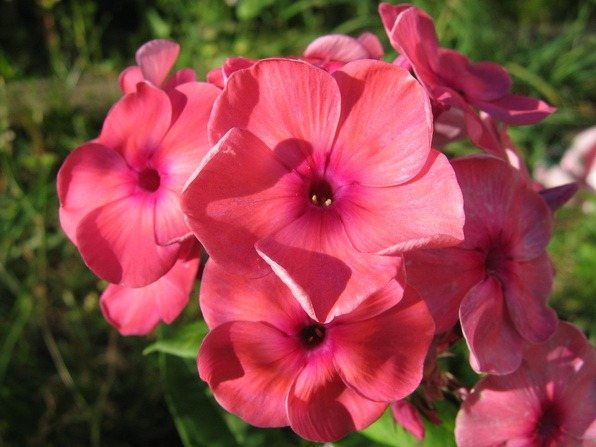
These flowers give us a wonderful aroma and a real feast of color: all shades of red, purple, lilac, white, the most delicate play of pink.
The articles published earlier talked about the variety of species and varieties of phlox and the secrets of their successful cultivation. Today we will talk about breeding methods
these colors.
This can be done in several ways, which we will now consider.
Diseases and pests
Diseases can appear not only in plants that are poorly cared for, but with poor care and the wrong planting site, diseases occur much more often. And without timely treatment, the bright and fragrant "inhabitants" of the flower beds will quickly turn into dried flowers.
The most common disease that overpowers phlox is powdery mildew. This disease begins to affect the stems and leaves of the plant in late July - August. The attractive appearance of phlox quickly deteriorates: the surface of the flower is gradually covered with a white bloom. The fungus first appears on the lower leaves. Then spider webs appear on the stems and upper leaves. Over time, the disease progresses, and the leaves affected by the fungus curl and dry out. So the perennial plant weakens and may die.
Treatment of perennial phloxes should be started immediately, as soon as you notice the first signs of the disease. Removing the affected leaves only partially helps; soon powdery mildew will appear on neighboring leaves. The main treatment is to treat the surface of the plant with a solution of soda and soap (dilute 2 teaspoons of soda and 40 g of soap in 10 liters of water). You can get rid of the disease only with the help of regular (once every 7-10 days) spraying with this solution.
These colorful flowers are also damaged by pests: wireworm, earwig and nematode. The wireworm damages the phlox root system, which makes the plants not only subject to various diseases, but also die. Slices of potatoes and carrots will help get rid of this malicious pest. They must be buried in a flower bed to a depth of 10 cm. Once every 5 days, the bait is dug up and destroyed along with the wireworms that have climbed inside. Earwigs provoke leaf diseases and spoil the buds, they are disposed of with drugs based on diazinon. And you can fight nematodes by planting calendula, marigolds or nasturtium next to phlox.
In order not to spend a lot of time on the treatment of plants, they need to be periodically carefully examined. Timely detection of diseases is necessary, pay special attention to newly acquired seedlings. If the shoots are curved, they are most likely susceptible to disease. It is not worth treating young bushes, they need to be destroyed so as not to infect healthy plants.
Phlox are beautiful and not very demanding plants. Breeders have bred a huge variety of varieties of different colors. This variety will make it easy to create a unique landscape composition in your garden.
Dividing the bush
This is the most commonly used breeding method.The best time for this is either spring or early autumn (at the beginning or end of the growing season), so that the cuttings take root well before winter.
Summer division of the bush is also possible, but only as an exception, for example, for some reason an urgent transplant is required and, preferably, in cloudy weather.
At the same time, the delenki should be large, with the preservation of an earthen coma and they need more careful care, regular abundant watering.
In the fall, we start dividing the bush only when the plants have already laid the buds of renewal. It is best to divide phlox bushes at the age of five to six.
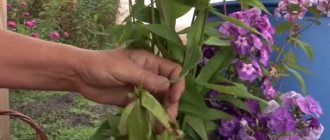
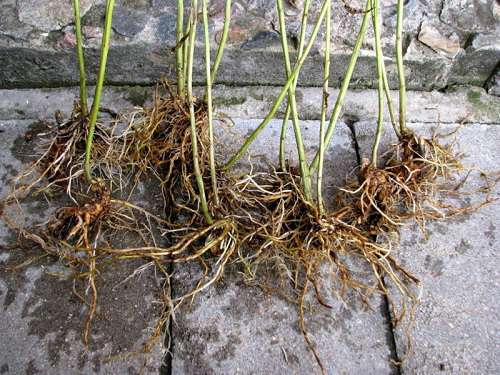
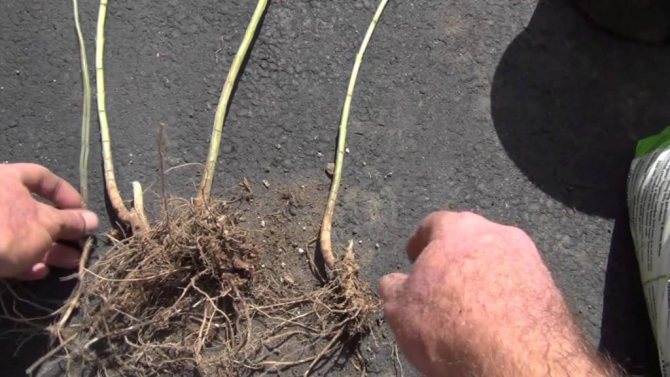
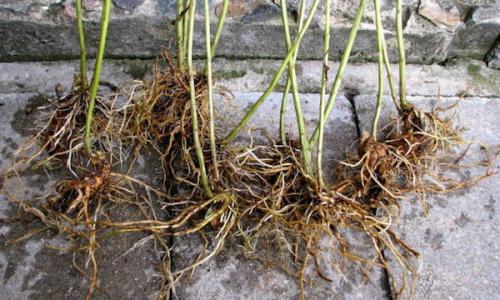
Having chosen a bush that we will divide, we dig it out, carefully shake off the ground and clean the root necks of it. Then we carefully separate the root collars from each other and also carefully disassemble the roots going to each stem. It is best to do this operation with your hands, but if the selected bush is very old, then you will have to use a knife or a shovel.
We divide the bush so that on each division there are eyes or rudiments of shoots and a small number of roots.
We plant the strips immediately in order to prevent the roots from drying out, but if the planting is delayed, then the roots must be dipped in a liquid clay mash or sprinkled with damp earth.
And you can, when dividing, a whole bush and not dig it out, but separate only half of it and then disassemble it into parts. We fill the resulting hole with good fertile soil.
The rest of the bush grows well during the summer, a full-fledged bush is formed, which can be dug up again the next year, but on the other hand, and divided.
Flower math
The easiest way is to divide the phlox bushes. This can be done both in spring and autumn. The only "but" - the best results are obtained by dividing the bushes at the age of 3-5 years.
If you are going to do this now, you will have to hurry: the optimal time of division is from the second half of August to the beginning of September. At this time, the buds of renewal are already laid on the rhizomes, so the delenki take root perfectly.
The next year we get a flowering plant.
You must have your own adult bush.
Photo: Natalia Zarucheyskaya
How it's done
Dig up a bush and shake off excess soil from the roots. You can also wash it off with a hose. Shorten the stems, leaving 1 / 2-2 / 3 of the height. Nachin
The knot is the place on the phlox stem, from which a pair of leaves departs and where the axillary buds are located. An internode is the part of the stem between two nodes.
dividing from the middle of the bush: stick a strong
a sharp scoop and, gently moving it, divide the bush into parts. Each should have 2-4 stems with well-developed renewal buds. You can additionally use a knife. Do not divide too finely - such plants hibernate worse. Immediately drop them off at the school or at a permanent place.
Propagation by stem cuttings
This phlox breeding method
quite simple and affordable even for novice florists. The best time for cuttings is considered to be the period of rapid growth of shoots to the stage of budding - this is approximately May-June.
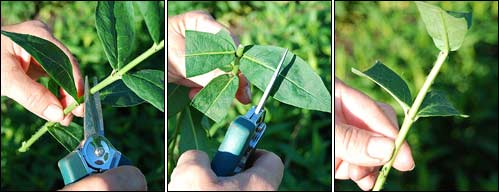
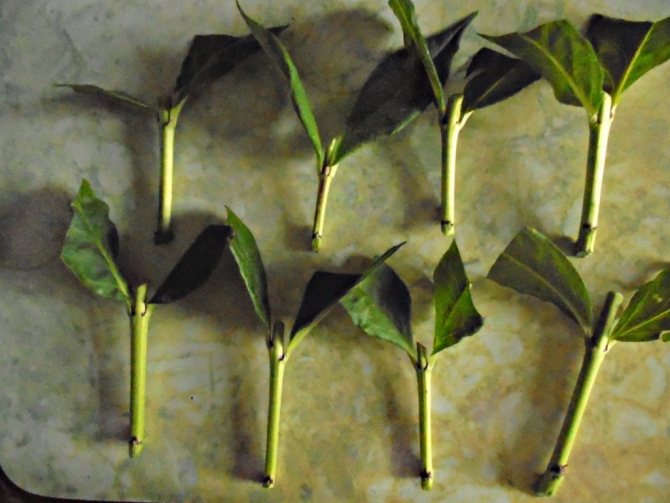
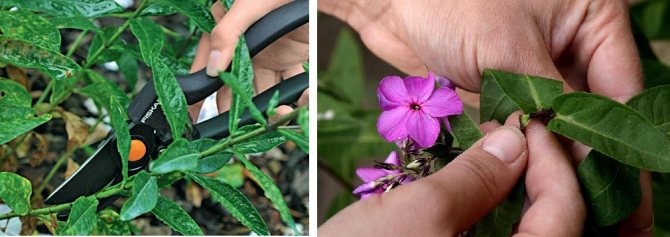
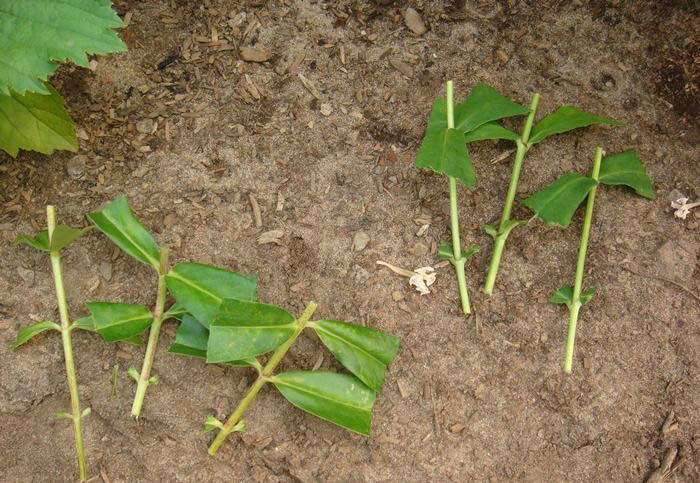
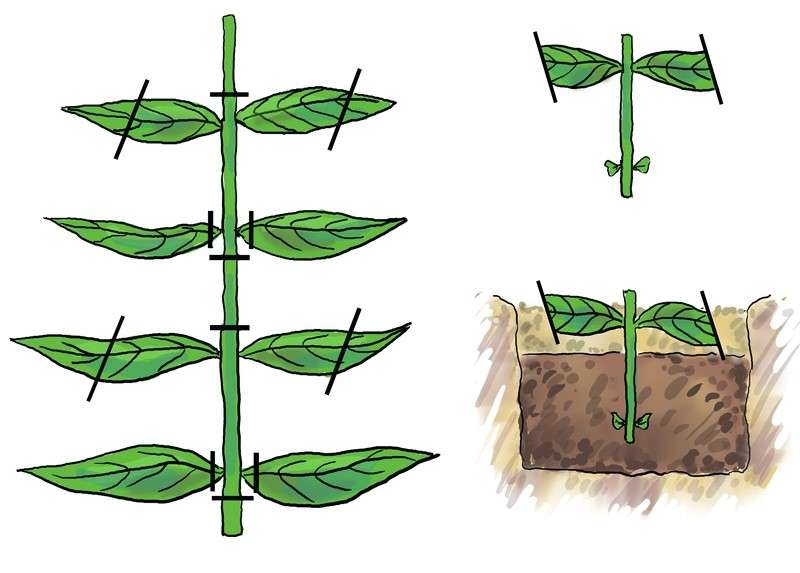
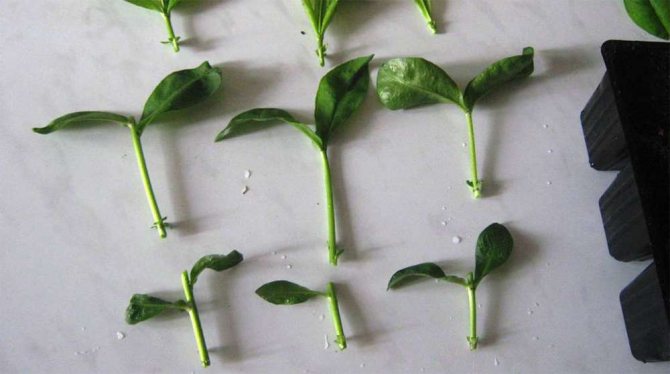
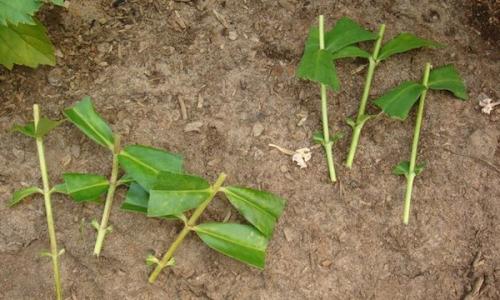
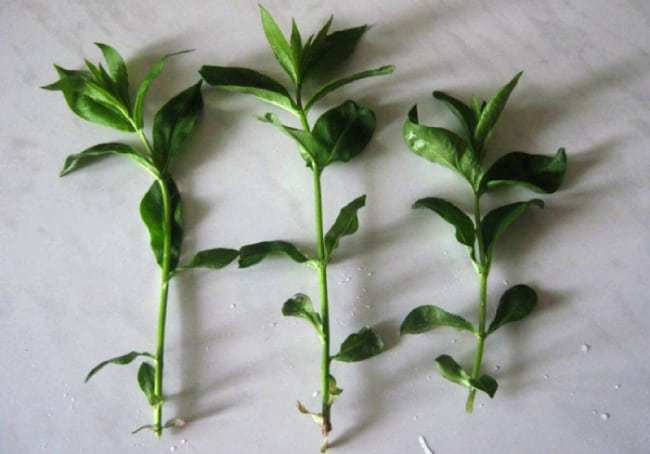
We take green, well-developed shoots for cuttings and only from healthy plants. Cut the shoots into several parts so that each stalk has 2 knots. In this case, we make the lower cut directly under the stem node, and the upper cut 2 cm above the upper node. Then we cut off the lower leaves completely, while the upper ones are cut in half.
We plant cuttings either in seedling boxes, or directly into open ground in loose fertile soil.
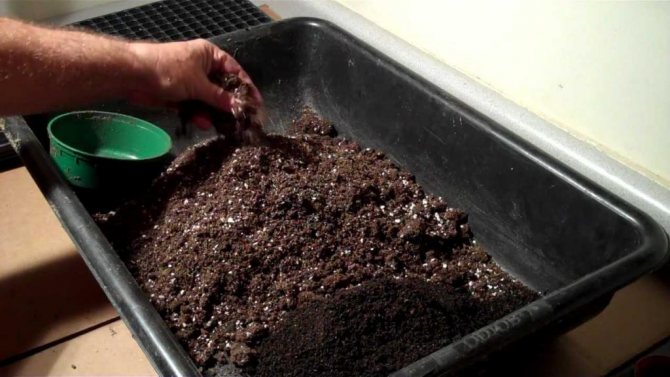
Pour vermiculite or sand into the boxes on top (with a layer of 2-3 cm), and first put leaf humus or peat on the beds (with a layer of 8-10 cm) and then, with a layer of 2 cm, - vermiculite or sand.
We moisten the soil and plant the cuttings to the upper node, pressing the earth tightly to them. In this case, the distance between cuttings in a row should be 4-5 cm, and between rows - 8-10 cm.
Then we put the boxes with the planted cuttings in the greenhouse. After planting, the cuttings are shaded from the sun's rays and, within 3 weeks, water them 2-3 times a day.
After about 2-3 weeks, our cuttings will take root and young shoots will begin to form in the leaf axils.
Then we transplant the rooted cuttings for growing in a school (special planting bed) so that they feel more spacious. The distance between plants in a row is already about 15 cm, between rows - 20 cm.
Here, the cuttings can be left until next spring. In this way, phlox can be propagated throughout the summer season.
So, for example, as soon as in early spring the plants appear from the ground and grow 10-15 cm, the shoots can be carefully broken off at the base with a "heel" and planted on a growing bed. Just keep in mind that no more than 40% of the seedlings can be broken without damage to the bush.
This method of grafting is the most productive, since when using it, we can achieve almost one hundred percent rooting. Cuttings cut from mid-July to mid-August (summer cuttings) are planted in a greenhouse under a half-open and shaded frame.
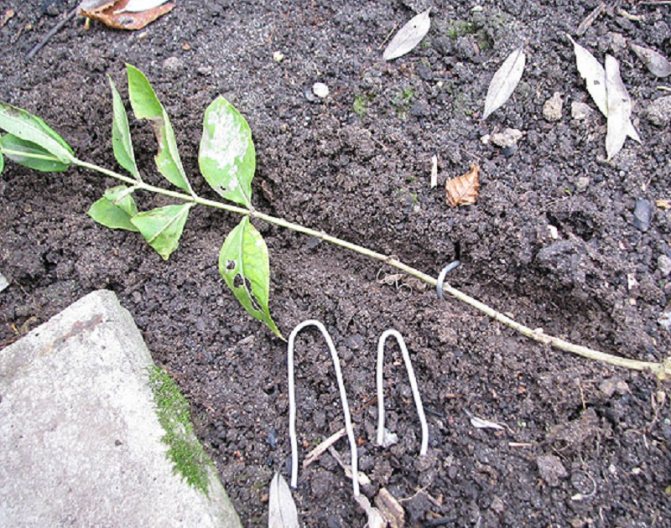
And cuttings of autumn cutting (the second half of September), it is best to plant them directly in open ground, placing them obliquely at an angle of 35-45 ° to the surface of the earth.
We mulch planting for the winter with semi-fertile soil, peat or fallen birch leaves. In summer and autumn cuttings, only the upper part of the stem is used (approximately two-thirds of its length), since at this time the stems at the bottom are already lignified.


"From scratch"
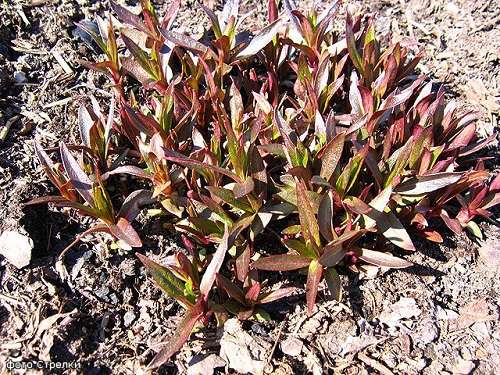
Experienced phlox growers know that young shoots often appear in the place of a dug or frozen phlox bush. This happens because phloxes are able to form renewal buds on thick, but not yet lignified roots. This property served as the basis for another original breeding option.
The method gives the best results in September, when the maximum amount of nutrients is stored in the roots, or in early spring. The selected phlox bush (at least 3 years old, but not too large) is dug in with a groove at a distance of about 6-8 cm from the extreme stems, the roots are cut with a sharp tool at a depth of about 8 cm and the bush is taken out of the ground. In the future, it can be transplanted or divided as usual. The resulting hole is filled with fertile soil and the area is generously mulched from above with organic materials (peat, compost, etc.). In the spring of next year, young shoots of phlox appear in this place in abundance. Until mid-summer, the shoots must be fed with mullein infusion (1:15) or complex fertilizers in order to accelerate its growth and development. In August, young plants are dug up and planted in a school for growing, and in the middle of next year they are transplanted to a permanent place.
The British recommend the use of phlox propagation by roots in exceptional cases, for example, when you need to get rid of a dangerous pest - a stem nematode. They dig up the bushes in the spring, at a time when overwintered nematodes emerge into the stems. In addition, this method can help save the plant in case of severe damage to its aboveground part, or even "magically" restore a stolen bush.
Phloxes are diverse. The parade of their flowering begins in spring, when ground cover species flare up with bright pillows, captures the whole summer and lasts until October. Probably no one looking at them. The only difference is that one of these
the flowers seem old-fashioned, while others are so in love with them that they collect collections of different varieties and species on their plots.
Paniculate, broad-leaved, spotted, subulate, spread apart, Douglas, stolon-bearing - these are only the most common. Reproduction of these species will be discussed in this article.
Dividing rhizomes or cutting off parts of bushes is the simplest and most often used method. The procedure is best done in spring or early autumn, so that the cuttings can take root before winter. It is advisable not to divide bushes under 5 years old. Having dug up an overgrown plant, it must be cut with a sharp knife or shovel so as not to break a significant part of the shoots. Before planting in a new place, old roots must be shortened so that young ones develop better. And, of course, water abundantly.
Situations often arise when the plant is young, but you want to have several bushes
In spring, as soon as the plant emerges from the ground and grows up to 12 cm, the shoots at the base can be broken off, but always with a "heel", part of the rhizome. Up to 40% of seedlings can be removed from an adult bush without harming it. Reproduction of phlox by cuttings in this way gives almost 100% rooting. In this case, callus (an influx of tissue at the site of damage, on which roots appear over time) forms in about a week.
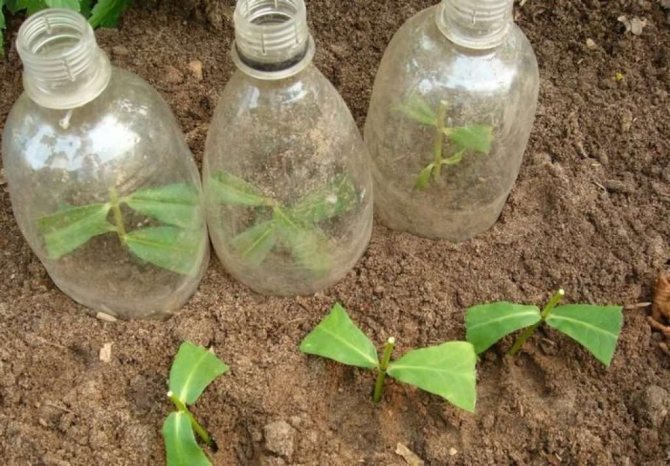
In summer and early autumn, phlox can be propagated by stem cuttings. To do this, you need to choose healthy, well-developed shoots. The stem should be divided into parts with two pairs of buds. Remove the lower leaves, and cut the upper ones by half. Until the end of July, rooting is high, later the stems begin to lignify, only their upper parts can be used. In this case, you will need glass jars to create mini greenhouses.
Closer to autumn, the reproduction of phlox by cuttings is possible, but those that are formed in the axils of the leaves, especially after cutting off the faded stems. They need to be cut with a sharp knife, put in a solution for 5 hours, and then planted in a prepared place, covered with a jar. For the winter, these plantings should be insulated.
Amazing and tenacious phlox plants. Reproduction by cuttings is possible and leafy. Around the middle of summer, you need to cut off the leaves with a shield from the middle of the shoot with a sterile blade. Plant them in a cuticle to a depth of 1.5 cm, placing them vertically and covering them with any non-woven material. Treatment with a rooting stimulant is desirable. This method is laborious because requires increased attention in the form of watering, spraying, airing. When dry and condensation builds up, cuttings can dry out or rot.
Reproduction of phlox by cuttings is a useful, interesting and varied process. Every florist will definitely find his own way, there would be a desire.
For many plants, cuttings are the most acceptable propagation method. Simplicity, good survival rate and germination, preservation of maternal traits are the undoubted advantages of this technique. When breeding phlox, it is actively used, and cuttings can be obtained from different parts of the plant. From early spring to late autumn, amateur growers obtain viable seedlings using different grafting methods.
Propagation by leaf cuttings
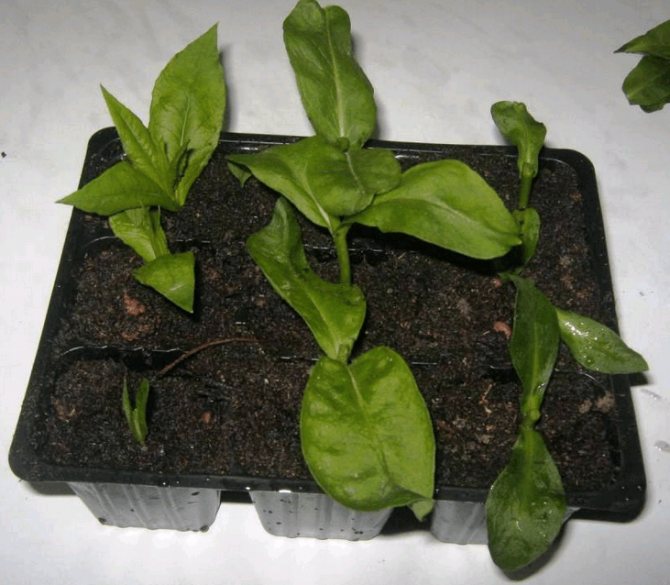
At the end of June - the first decade of July, you can start reproduction of phlox with leaf cuttings. To do this, with a sharp blade, cut off a leaf with an axillary bud and a thin piece of the stem from a mature stem.
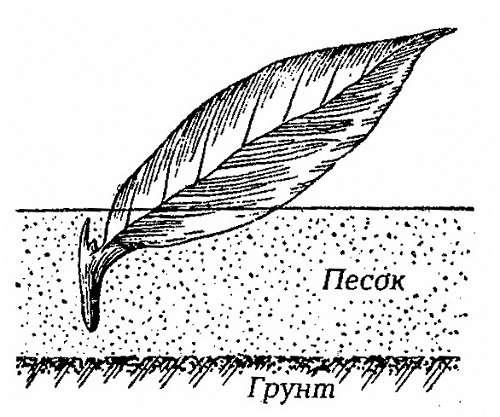
Then we plant the leafy cuttings in boxes with light nutritious soil. After that, on top, with a layer of 1-1.5 cm, pour vermiculite or sand. We plant the cuttings at a distance of 5 cm from each other and to a depth of 2 cm, so that the axillary bud with a piece of the stem is in the soil, and the leaf is on the surface in an inclined state.
Read also Pie with onions recipe
After planting, we cover the boxes with glass and put them in a semi-warm greenhouse, where we maintain a temperature of 18-20 ° C. Vermiculite or sand should be constantly moist.
Further care of the plantings is as follows: daily spraying with warm water, ventilation and shading on hot, sunny days.
Leafy cuttings will take root in about a month. To enhance bushiness, the tops of rooted plants must be pinched. The subsequent care of the plantings is the same as for propagation by stem cuttings.
This method of reproduction, of course, is more laborious, since it requires constant attention to planting, because when dry, the cuttings can dry out, and with excessive moisture, accumulation of condensation, they can rot. Leafy cuttings can also be rooted outdoors.
Cutting methods
There are several ways to cut phlox. Moreover, each method gives good results: the survival rate of this plant is quite high. The choice of method depends on the season.
Stem cuttings
This breeding option is used from late May to mid-July. The survival rate of the planting material obtained at this time is almost 100%. Please note: stems cut before the budding period, at the stage of active growth of young stems, will take root best. An additional advantage will be their flowering by the end of summer. Planting material can be planted in open ground, a glazed veranda or a cold greenhouse. Material is obtained from young shoots, which are carefully cut off. The stem is divided into several parts so that there are two internodes on each segment. The lower cut should be located under the lower internode. All leaves are carefully removed from it, and the axillary buds are preserved. The upper cut should be 0.5 cm above the second internode. The top leaves are cut by half. After that, the resulting planting material is immediately placed in the ground.
In August - September, you can also use this technique. Only not the entire stem is used as seedlings, but only that part that has not yet become lignified. At the same time, it is better to plant the phlox cuttings obtained at this time in a greenhouse. There they are left to winter, and in the spring they are transplanted into open ground in a small school for growing. You can even get planting material from a donated bouquet. For slicing, the upper non-lignified part with two internodes is used. If the bushes are transferred to the greenhouse in the fall, then there is a chance to get planting material even in March. To begin with, the bush is transferred to a warm room in February and provided with standard care. Within a month, young stems will appear, which can be used for grafting.
Side shoots
Lateral shoots of phlox appear in August - September. It is quite easy to cut them off: they just break off along with the "heel". Such shoots have only 1 - 2 internodes, so you do not need to cut them. They are simply placed entirely in the soil. The first time (before rooting), the seedlings need standard care. For the winter, mulching is used in cold greenhouses: young shoots are covered with a layer of dry foliage (up to 10 cm). After wintering, the mulch should be removed, the young shoots should be gradually hardened and transplanted into open ground in May.
Growth shoots
This breeding method is rarely used. In April, phloxes begin to grow rapidly. If the bush needs thinning, then you can propagate the flower with the cuttings obtained. The procedure is standard: the growth shoots are gently broken off with a "heel" and planted in the usual way. Thus, two problems are solved at once: a strongly thickened bush is thinned out, removing about 50% of growth shoots, and high-quality planting material is obtained. It is placed immediately on open beds. By the end of summer (with proper care), the young plant usually blooms.
This method is used in the middle of summer, when the leaves are fully developed. The technique is pretty simple:
- a shield 1 cm long, together with an axillary bud and a leaf, is carefully cut off with a sharp knife (you can use a blade);
- it is placed in a box with fertile soil and sprinkled with sand;
- the flap is placed vertically, and the axillary kidney is buried no more than 1.5 cm;
- instead of watering, the leaf is gently sprayed with warm water;
- the boxes are covered with glass and kept at a temperature of 25 - 28 0;
- the greenhouse is opened by autumn, when the seedlings take root and young shoots appear;
- for the winter, the box is transferred to a cold greenhouse, and in the spring the seedlings are transplanted to the school.
The survival rate with this reproduction method reaches 80%.
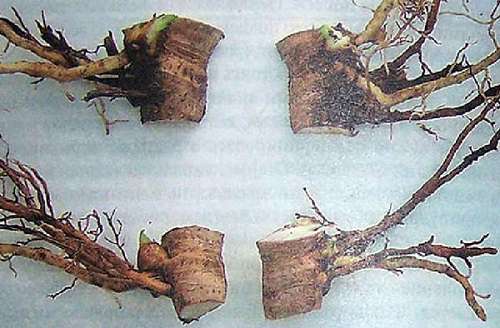
Root cuttings
The breeding procedure is carried out in the fall. The bush is dug out, and non-lignified long thick roots are carefully separated from the main rhizome. They are cut into pieces up to 5 cm long. A standard soil mixture for the cultivation of these flowers is poured into the seedling box in advance. The cut roots are stacked obliquely with the thick end up. Then they are sprinkled with earth, and on top - with sand (layer up to 4 cm). The boxes are placed in a cold dark greenhouse and kept at a temperature of + 2-3 0 throughout the winter, not forgetting to constantly moisten the soil.
Towards the end of winter, the box is transferred to a warm greenhouse, gradually increasing the temperature. In March, after the emergence of young growth, it must be taught to light. After the onset of heat, the seedlings are transferred to a school for growing. If this method of breeding phlox is planned, then the division of the bush can be carried out in early spring before the period of active growth. Then you do not need to worry about storing the cut roots, they are immediately placed in the ground or germinated in a greenhouse. To do this, first, the boxes are kept in a dark place at a temperature of 10-15 0 for about two weeks. Then they are transferred to a warmer place and wait for the appearance of young shoots.
A variety of vegetative propagation techniques allows growers to choose the most suitable one. From early spring to late autumn, you can use various methods of propagation by cuttings.
Phlox is a soil perennial that has won the hearts of a huge number of gardeners. The secret of his success is simple. This is an unpretentious plant that requires a minimum of maintenance. In return, this flower gives the garden all the bright shades of white, pink and purple flowers, a pleasant aroma and a long lush bloom. Several types of these flowers grow in my garden, I am engaged in the reproduction of phloxes myself.
Propagation by root cuttings
Phloxes are rarely propagated by root cuttings, since this method is even more laborious than the previous one. It is recommended for use when it is necessary to get rid of pests such as stem nematodes.
To do this, in late autumn or early spring, we dig up the plant and select the thickest fleshy juicy roots, which we cut into pieces of 5-6 cm.
Then we plant them in boxes with earth, while making sure that the thickened end of the root is higher than the thin end. We cover the planted cuttings with a layer of sand 4-5 cm thick.
If we do this work in the fall, then for the winter we put the boxes in a dark basement with a temperature of 2-3 ° C and monitor the moisture content of the soil, not letting it dry out. In February - March, we take out boxes with cuttings into a heated room and cover them from the light with some dark material.
Then we begin to gradually increase the air temperature every day, and when the sprouts hatch, we will gradually accustom them to the light. We plant cuttings in open ground for growing in May. It is best to determine the seedlings for a permanent place as early as next spring.
But it will be much easier if we start propagating phlox by root cuttings in the spring. In this case, the stage of storage in the basement of the planted cuttings is excluded, and the boxes are simply closed from light and for two weeks we maintain the air temperature of 10-15 ° C. Then we increase the temperature to 18-25 ° C and, as soon as the shoots appear, we remove the shelter, teach the plants to the light and plant for growing.
Seed reproduction of phlox
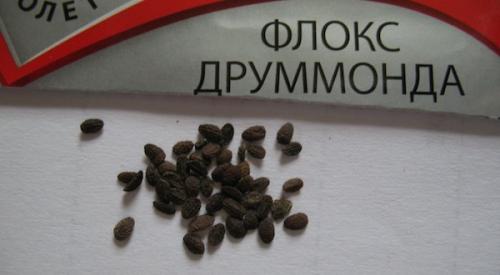
It is used primarily in breeding or when the goal is not to preserve the variety with its basic qualities. Brown bolls and wilting leaves are the signal to collect seeds. The stems should be cut, tied in bunches and hung outdoors in the shade. You can also collect the pods in a paper bag, where they dry and "give away" the seeds.
It is better to clean the capsules before sowing or store the cleaned seeds in a cool room, mixing them with sand. It is better to sow in November or even in winter, removing snow from the garden and then covering it with sifted earth or sand, and from above with snow. The closer the sowing is to spring, the lower the percentage of seed germination.
Reproduction by layering and ... leftovers
The method for propagating phlox by layering is very simple. Phlox bushes are covered with fertile soil high.
After a while, roots begin to appear on the stems covered in this way.
Then, when the roots develop well, we carefully release the layers from the ground, cut them off and plant them in the ground.
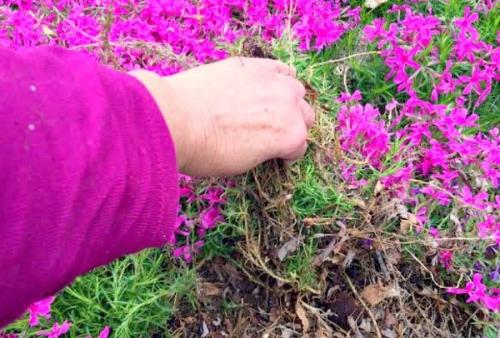
There is another way of reproduction, it is even simpler. When digging a phlox bush for subsequent division or transplantation, we prune the roots, leaving a good half of them in the ground, and fill the hole from under the removed bush with fertile soil and water.
If we carry out this procedure in the spring, then after 3-4 weeks young plants will appear in this place, which have grown from the left roots. In the future, they can be dug up and, having divided, transplanted to a new place. If you start breeding the remains in the fall, then the shoots appear, of course, in the spring of next year. In August, we dig it out, divide it and plant it on a distribution bed for further growing.
Seedlings become full-fledged only by the fall of next year.
Vegetative reproduction of phlox
Reproduction of phlox by cuttings can be carried out in spring, summer or autumn. Depending on the time of year and the stage of development of the plant, one or another method is chosen. With any breeding method, the general principles of planting the resulting material in the ground and primary care during the development of the root system are preserved. For good germination, it is recommended to observe the following rules:
- The cut parts of the plant must be immediately placed in the prepared soil. They should not be kept outdoors, but should be planted immediately after cutting.
- The optimal composition of the soil is prepared in advance. It is best to plant in a soil mixture consisting of fertile garden soil, leaf humus and purified river sand (in equal shares). It is allowed to replace the garden soil with sod; instead of humus, weathered peat can be used. Such soil can be used when planting directly in the garden and in greenhouse conditions. Its thickness should be at least 10 cm. An additional layer of sand (2 cm) should be poured on top, which will protect the soil from drying out.
- When planting in an open area, you should choose an area with sufficient lighting; during the day, the plant needs protection from direct sunlight. At first, it is better to close the beds completely by building a greenhouse.
- The optimal distance between the beds is about 10 cm, between seedlings - at least 5 cm.
- It is recommended to use a dive peg when landing. With its help, the maximum adhesion of the soil is ensured.
- Immediately after planting, the beds are shaded and the first week is watered with warm water 5 times a day. Then the watering regime is reduced. Until the emergence of shoots and the development of the root system (this usually takes 3 to 4 weeks), the seedlings are left in a greenhouse and watered as needed.
- The plants are then transferred to the nursery school. In the school they are planted more freely: the distance between the beds is up to 20 cm, between the seedlings - 10-15 cm. The composition of the soil does not change, but it is no longer sprinkled with sand on top.Standard care: watering as needed, weeding, top dressing.
These are the general principles of phlox propagation by cuttings. Seedlings are sent to the school both after open planting and after greenhouse cultivation. There she can remain for the second year, and after the bushes are fully formed and stronger, they are transferred to a permanent place.
Advice. For better rooting, stimulants can be used. These can be ready-made solutions of growth stimulants, growth powder or growth paste. There is evidence of the successful use of aloe juice as a stimulant. Chopped stems are dipped in clean fresh juice (without dilution) before planting.
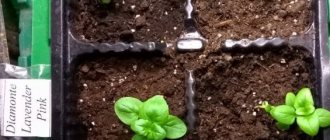
Seed propagation
Phloxes can also be propagated by seeds, but at the same time, the seedlings split in the offspring, and the varietal characteristics of plants are often not preserved. As a rule, plants are obtained with completely different quality characteristics and a different color of flowers.
Therefore, seed reproduction of phlox is used only for selection. There are several nuances when phlox propagates by seeds.
- To increase the germination of seeds, we clean them of the capsules just before sowing.
- Since phlox seeds quickly lose their germination, it is best to sow them before winter.
- We select the darkest full-weight seeds and in September - November we sow them in open ground or in containers, which we then drop in the garden.
- In winter, phlox seeds will undergo natural stratification and friendly shoots will appear in spring.
In the spring (April - May), when the first pairs of true leaves appear on the seedlings and they grow up to 8-10 cm, it is necessary to start transplanting them to the planting bed.
So that the plantings are not thickened, we plant the seedlings at a distance of 10-15 cm from each other. With good and proper care, plants grown from seeds will grow vigorous and vigorous.
In this article, dear summer residents, we have analyzed in detail how to propagate the most common paniculate, bush phlox. I hope that you will find useful information for yourself in it.
Phlox are unique herbaceous plants belonging to the Cyanus family. Today the species has more than 70 varieties, of which approximately 40 are cultivated. For the first time, Europeans began to breed phlox in the 18th century. Thanks to the painstaking work of breeders, there are already more than 1.5 thousand varieties of phlox. The predominant features of the species are not only bright flowering, but also unpretentious care. They also have long flowering and incredible aroma. Features of flowering plants and the reproduction of phlox by cuttings in summer is the topic of today's article.
Types of phlox
A few words about what types of phlox are very popular with flower growers.
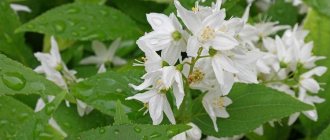
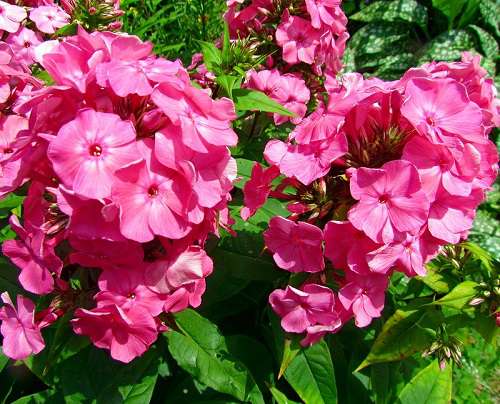
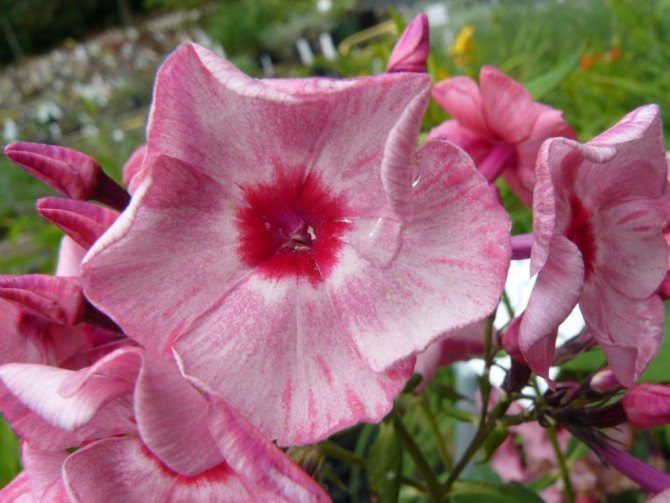
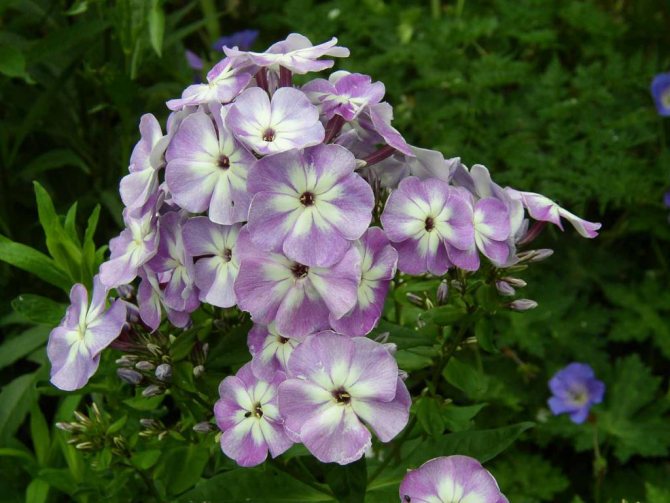
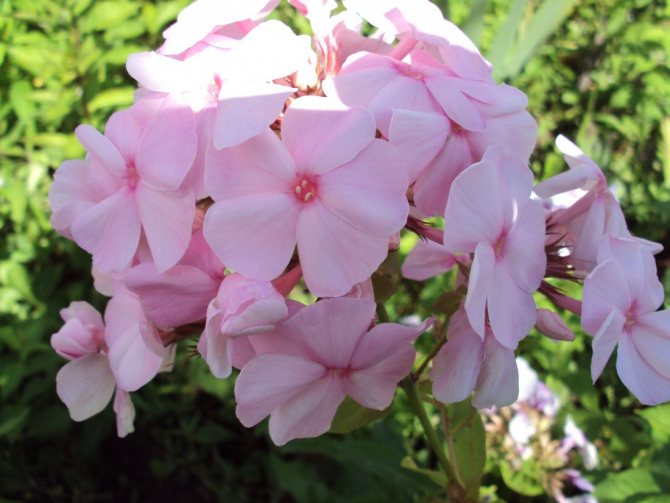
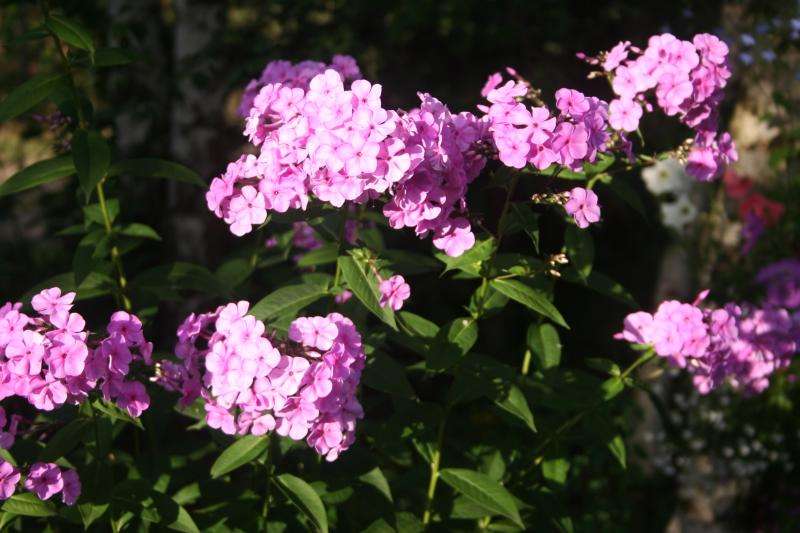
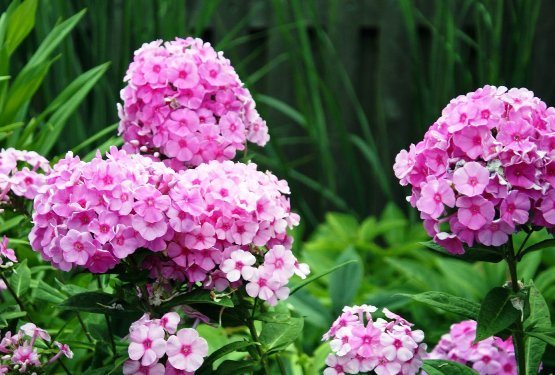
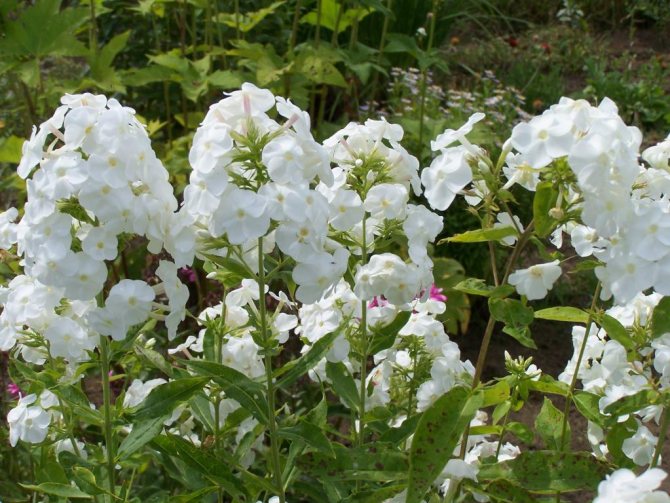
First of all, it is phlox paniculata or paniculateblooming in August - early autumn. This species has large inflorescences and fragrant flowers of very different colors: white, a variety of pink shades from pale to bright, lilac, dark purple. There are no yellow tones in the color palette. There are hybrids with flowers painted with colored stripes.
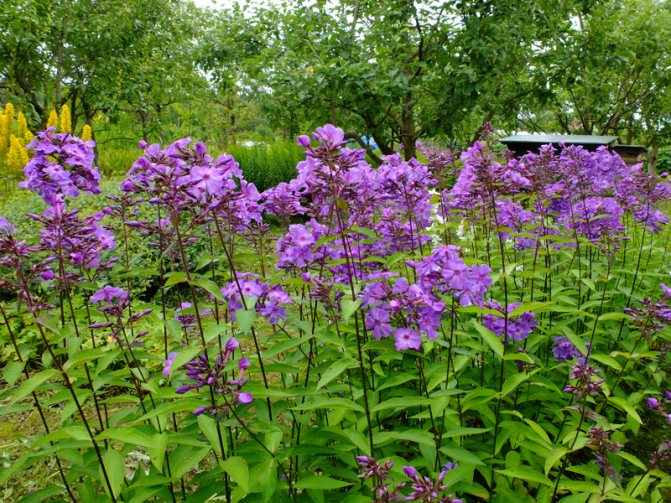
The bushes are tall, from 40 cm to 1 m or more, with a very decent amount of leaves on the stems, lush. The number of shoots on plants can reach twenty or more after a certain time.
Phlox paniculata blooms almost all season. Among the many varieties and hybrids, choose both summer and autumn ones, which bloom in September.
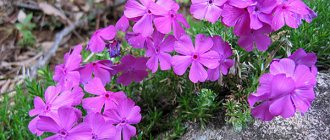
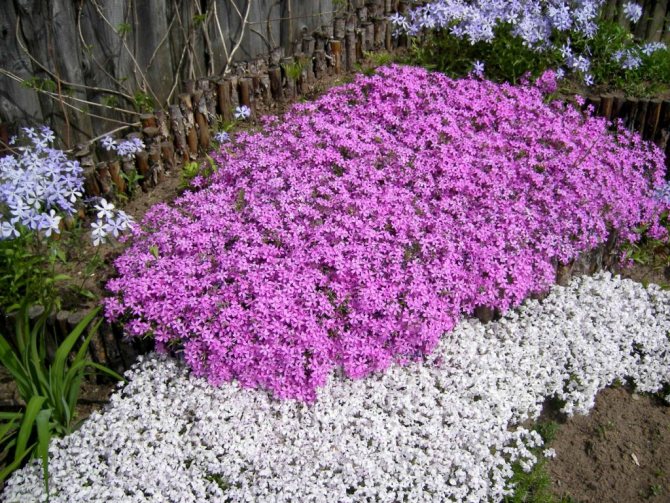
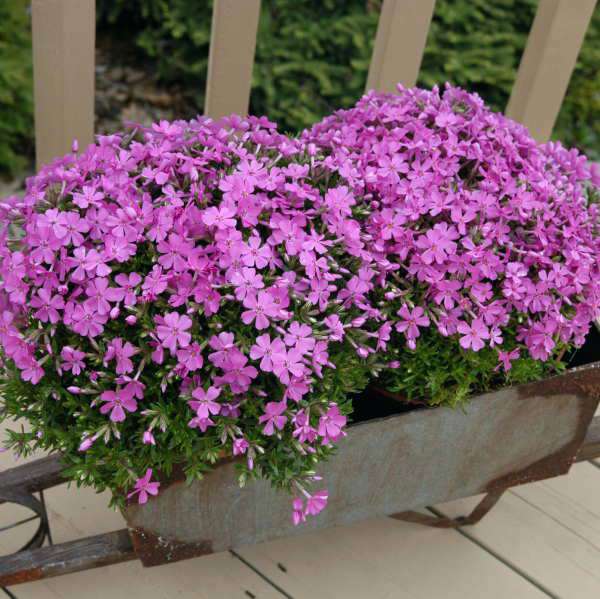
Phlox subulate or subulate... Plants of this species form a small inflorescence of 2-4 flowers of a delicate lilac or pink-lilac color on a low stem 10-15 cm high. Each stem branches well and each shoot produces flowers, thanks to which the planting of a phlox subulum forms a continuous flowering carpet of a neutral shade of dense soddy bushes. From here comes the second name of the species - sod phlox. It blooms early, in May-June.
This species has peculiar leaves - very small, leathery, pointed, like needles.
Phlox subulate is perfect for borders, flower beds, perennial clumps or for growing in pots and flower baskets. Excellent hairstyle, thanks to this, from these phloxes it is easy to form a geometric fit.
Phlox Douglas - undersized, about 5 cm tall, carpet form. Blooms 2 times during the season... The first time in May - June, then again in the fall. This type of phlox has narrow gray-green leaves, flowers are white, blue, lavender, pink.
Creeping phlox - another small early flowering species. The height above the soil surface is 15-20 cm. It is distinguished by abundant branching of stems and umbellate inflorescences; in many species, up to 10 of them can arise. Blooms in May - early June. The flowers are brightly colored: pink, red and purple.
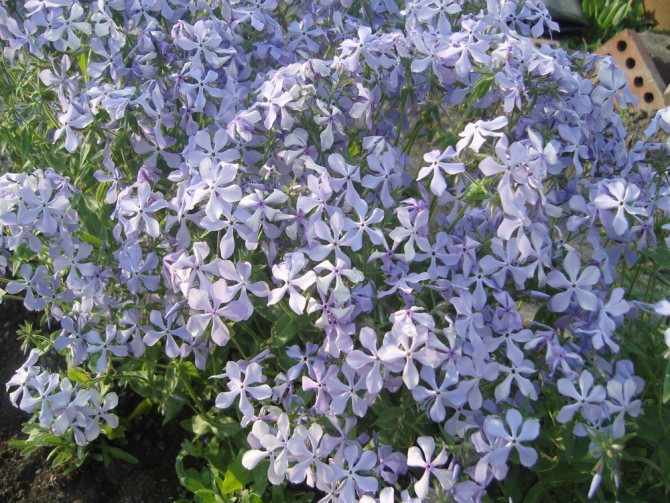
Phlox canadian or splayed... This is a medium-sized phlox, with a stem height of 15-40 cm, the flowers are very large than those of the species described above. They have a white or bluish-lilac neutral color, collected in large umbrellas with a diameter of about 10 cm. Does not form seeds. It also blooms in May - early June.
This kind of phlox more demanding on the ground, when compared with the rest. It grows poorly on peat and forest soils. For long-term cultivation, light soils with the addition of humus are suitable for him. Fresh manure, peat and sheets should not be added to the soil.
Very often, gardeners grow paniculata phlox, but it is necessary to pay attention to the other types described above... So undersized early flowering phlox are perfect for spring decoration of plots in the country, located in a variety of climate zones. They form long-lasting and well-blooming carpets and meadows, their greenery retains its decorative effect until the prolonged autumn. These phloxes are great for decorating stone gardens and rock gardens.
Description and characteristics of the species
Phloxes are quite diverse even within their own species, due to the climatic and weather conditions in which they grow. For example, when growing a crop at an altitude of about 4 thousand meters, an agronomist gets undersized bryophyte plants: their height does not exceed 25 cm, the stems branch and are abundantly covered with evergreen leaves.
In favorable conditions, it is possible to contemplate erect bushes, the height, depending on the variety, can vary from 30 to 180 cm. There are also half-shrubs that can surprise with their lush color.
By flowering time, the following varieties are distinguished:
- Early (spring).
- Middle (summer).
- Late (summer-autumn period).
In nature, erect varieties prevail. They are abundantly covered with foliage, while the plate of each leaf has an elongated ovoid or oval-lanceolate shape. The diameter of phlox flowers, as a rule, reaches a size of 2.5 to 4 cm, the shape is characteristic of a tubular-funnel-shaped. Complex inflorescences are formed, each with about 90 flowers. After flowering, an oval capsule is formed - the fruit.
Read also Dacha newspaper fresh issue read for free
Note! Most varieties are perennial.
Beautiful but unpretentious
Along with peonies, spray types of phlox
(in particular, paniculata phlox) remain the most popular ground perennials in horticultural culture. Not only because of its long flowering, its beauty and aroma, but also because of its resistance to frost, ease of cultivation and exceptional unpretentiousness.
True, planting phlox in areas not protected from cold winds, as well as leaving them without a reliable snow cover in winter, is not recommended. Semi-shaded places
, in loose loamy soil of which moisture retains well, is a great option for phlox.This does not mean that these flowers are afraid of the sun: in brightly lit areas they bloom more luxuriantly, are less susceptible to diseases, but they somewhat shorten the flowering period and may fade slightly.
The height of phlox bushes can range from 30-180 cm, and the stems of low-growing creeping species reach a length of 5 to 25 cm. Their flowering time is also diverse.
All this allows gardeners to create whole phlox compositions on their plots that can delight with their beauty and aroma
from spring to autumn: in May, ahead of all other varieties, subulate and spread-out phlox begin to bloom, a little later, in June, Drummond phlox join them; from July, paniculate and spotted phlox will add colors to the flower garden.
The main thing is that along with the right choice of place and soil, its preparation, top dressing, regular loosening and hilling, this is the right phlox transplant
and their reproduction.
General rules for caring for phlox at home
Basic rules for planting and caring for annual and perennial phloxes, which should be followed.
- Phlox willingly grow on any type of soil, but most of all they like light loamy ones. If the soil is enriched with lime, then the flowering will be lush and the greenery will be powerful.
- Plots before planting phlox must first be prepared. In the fall, they should be dug deeply. For early undersized varieties, it is required to remove all rhizomes so that they do not “strangle” the culture in the future.
- Phlox are light-loving plants, so the site should be sunny. However, there are hybrid varieties that lose their bright color under the influence of direct sunlight; they are recommended to be grown in partial shade.
- It is recommended to alternate phlox with dark flowering with light varieties. Thus, at any time of the day they will complement each other favorably.
- These plants are extremely easy to care for. It is regularly required to loosen the periosteal circle, but not deeply, so as not to damage the root system, as well as weed from weeds. For lush flowering, it is recommended to regularly apply organic and mineral fertilizers to the soil.
- Paniculate phlox grow well in the sun and in partial shade. Low-growing varieties are best grown in well-lit areas, otherwise abundant and prolonged flowering cannot be expected. To build up green mass and abundant flowering, do not forget about fertilizers.
- The plant does not need frequent watering, but they should be abundant, especially if there is a sultry heat. It is recommended to water in the afternoon, in the late afternoon.
- When preparing for the winter, perennial plants are covered with soil and covered with rotted manure or humus. The thickness of the layer should be at least 12 cm, it will protect the root system from freezing.
- To prevent the defeat of infectious, viral or fungal diseases, in the fall the plant must be treated with a solution of fungicides, not forgetting also the soil near the bushes.
- If the plants have formed fruits, but the seeds did not have time to ripen before the onset of cold weather, the bushes can be dug up and transplanted into pots for home flowers. The plant will feel comfortable enough growing on the windowsill.
Attention! Phloxes have average cold hardiness. In a frost of -10-15 degrees, the entire above-ground part of the bush will die, and when it drops to -20-25 degrees, the root system will freeze too.
To prevent this, it is necessary to cut off the entire aboveground part, and mulch the root with a layer of peat, manure or humus. If the winter is snowy and the thickness of the snow cover is more than 50 cm, the plant will calmly survive frosts below -30 degrees.
Planting and leaving
Choose an area that is sheltered from the wind to plant phlox. In summer, moisture in such an area will remain longer, and in winter, the snow that has fallen will remain on the flowers and thereby protect them from frost.Phloxes love the sun, and bloom more magnificently in the sun, but some bright species fade or even get burned by the sun's rays. Therefore, a light partial shade will be an ideal landing site for phlox. They prefer loamy soil, but the peculiarity of the plant is that it also grows on poor soils. In addition, phlox is the only decorative perennial that is able to transfer the transplant during the flowering period.
Phlox care is simple. It consists in the destruction of weeds, periodic loosening of the soil and mulching with humus every year in the spring. Water phlox in the evening and cut in the morning. To make the plant bloom with caps of inflorescences, leave no more than 7 stems on the bush.
How to propagate phlox cuttings in summer
Phlox are one of the most common flowering plants in summer cottages. Consequently, many novice agronomists are concerned with the question of how to cut phloxes in the summer, how to breed perennial phloxes with cuttings. There are several ways, about each in more detail.
Stem cuttings phlox
This method of reproduction of phlox is considered one of the simplest, even a novice agronomist can implement it. For better rooting of phlox cuttings, manipulation is best carried out in the third decade of May - the first two decades of June.
Stem cuttings phlox
For cuttings it is necessary to select the most developed green shoots. In this case, the plant must be inspected in advance for the presence of pathologies, damage or pests. Each shoot used must have 2 knots. The bottom cut is immediately after the knot, and the top cut is a few centimeters higher. From the bottom side, it is imperative to remove all the foliage.
Planting material can be planted in wooden boxes or immediately open soil, which should be fertile and loose.
It is best for a plant to propagate in this way, since rooting occurs in 100% of cases. Planting material that was cut in July - August must be planted in a greenhouse.
Note! If the cuttings are prepared in the fall, then they must immediately be planted in open ground at an acute angle relative to the ground. In order for phlox to survive the winter successfully, the soil must be mulched with dry foliage or peat.
Propagation by leaf cuttings
Cutting phlox in July is best done using the sheet method. To do this, you will need to cut off a leaf from a strong stem with a sharp knife, along with a small piece of the stem and an axillary bud.
After that, the prepared seed is planted in boxes filled with fertile nutrient soil. Cuttings must be planted at intervals of about 5 cm, the immersion depth is not more than 2 cm.
Important! After planting, the leaves should be located above the soil surface, and the axillary bud and a piece of the stem, directly, in it.
After planting, the plants must be watered, covered with glass or plastic fiber, and placed in a dark but warm place. The optimum temperature is + 18-20 degrees. The soil must always be moist.
Further agrotechnical manipulations are as follows: irrigation from a spray bottle with warm water and airing.
It will take about a month for the cutting to take root. For the active formation of bushiness, the top should be pinched off. Otherwise, further care is the same as for stem propagation.
Attention! Leafy cuttings can be planted directly into open soil, but they are less likely to take root.
How to propagate phlox by root cuttings
Reproduction of phlox by cuttings in August is best done by the root method. This method is not so common, since it is even more laborious than the two previous ones. This method is usually implemented when it is necessary to get rid of pests, for example, stem nematodes.
To do this, in the third decade of August - the first two decades of September, they dig out the culture and separate several of the most powerful roots, the length of each fragment should be at least 5-6 cm.
Then they are planted in pre-prepared boxes with fertile soil. It is necessary to ensure that the thickened part of the spine is located above the thin one. Pour a layer of sand no more than 5 cm thick on top of the root cuttings.
Read also Chicken fillet polandvitsa
How to propagate phlox by root cuttings
At first, the boxes can be stored outside, but when the temperature drops, they should be transferred to a dark basement. The temperature should not fall below + 2-3 degrees, the soil should be constantly moistened. As a rule, already in February - March, the boxes need to be moved to a warmer room and prepared for the upcoming transplant into open soil.
Phlox are amazing plants that, during flowering, create a feeling of a fairy tale around them. Recently, this species has been in demand for decorating bouquets and other flower arrangements, phloxes are often combined with chamomiles, chrysanthemums, etc.
Phloxes are relatively easy to care for, they are distinguished by a huge variety of flowering and the ability to decorate any area. There are several ways to vegetatively propagate them, allowing you to increase the collection of your favorite flowers. This article will answer the question of whether phlox can be propagated by cuttings, and will tell you how to carry out a similar procedure.
How to propagate phlox by layering
The mother bushes are spud with moist and loose soil and are very often watered abundantly. Underground shoots gradually take root and grow. Closer to August, the plant is transplanted to the main garden bed, where it continues to grow.
Plant propagation is a long and difficult process. You can choose any variant of cuttings that you like the most, whether it is propagation by root or stem cuttings. It is also worth remembering that if phlox is propagated by seeds or other methods, the plant may simply not take root. Therefore, vegetative propagation is the best option, since the chances of plant survival are usually 90%.
Types of cuttings and their advantages
Each grower chooses the most suitable method for him. There are main types:
- propagation by stem cuttings;
- leafy;
- root.
The essence of each of them is approximately the same. The difference in the origin and size of the cuttings used. In any case, breeding phlox with cuttings gives a similar result. Among the advantages of such a reproduction of phlox is worth highlighting:
- large full-fledged phloxes are obtained from small parts of the plant;
- the decorativeness of the mother plant is preserved;
- in itself, this method is quite easy and suitable even for beginners.
Each of the types of cuttings should be discussed separately.
Reproduction methods
How to propagate perennial phloxes? Unlike annuals, which can only be diluted with seeds, there are several ways for perennials:
- Vegetative. That is, it is necessary to take some part of an adult specimen and grow a young plant from it. The main methods are dividing, layering and rooting cuttings.
- Germination of seeds. It is carried out in two ways - by sowing the planting material directly into the ground or by seedlings.
This plant is distinguished by its unpretentiousness and vitality. Therefore, the reproduction of perennial phloxes can be carried out in any way.
Propagation by stem cuttings
Exceptionally healthy, unhealthy and undamaged phloxes are suitable. Well-developed stems are taken and cut into several parts so that each of them has at least 2-3 internodes. The upper cut is made straight, and the lower one - oblique, so that excess moisture does not get on it and does not provoke rotting processes. In this case, the lower foliage is completely removed, and the one that grows in the upper part of the cuttings is cut in half. It is recommended to plant cuttings immediately after cutting them.If the planting material was transported or just lay for a long time, it must be treated with a growth stimulant.
Next, planting takes place - in open soil, or in special containers, with a pre-prepared substrate, in which there should be a sufficient amount of nutrients. It is advisable to sprinkle it on top with a thin, about 2 cm layer of sand. Neat pits are made in the soil with a knife or peg, into which the cuttings are immersed up to the second internode. Best of all, when they are planted in several rows at a distance of at least 8 cm from each other.
how to grow perennial phlox from seeds or wake up seeds. so that they germinate
Reproduction by seeds. The advantage of phlox seed reproduction is that plants grown from seeds are better adapted to the local soil and climatic conditions, healthier and more actively growing when compared with vegetatively propagated plants.
Reproduction of phlox by seeds, especially those collected from plants near which other varieties grow, in many cases leads to the appearance of characteristics in seedlings that are different from the initial variety.
Thanks to this, the seed method of propagation can be used when it is best to get more bushes, and they do not pay much attention to the preservation of the initial varietal characteristics.
Most varieties of perennial phlox produce seeds in abundance. For most of them, especially the first ones, the seeds ripen on the root, and so that they do not spill out on the beds, they need to be collected on time. The readiness of the seeds for collection is determined by the browning of the capsules and the beginning of wilting of the leaves on the stems. The methods of sowing seeds and the specificity of growing seedlings are described in the chapter “Breeding new varieties”.
With seed reproduction, perennial phloxes are sown immediately after collecting the seeds, that is, the seeds must be freshly ripe, since they quickly lose their germination. The exception is cultivated as annuals. In autumn, in October or November, depending on the development of the variety, seeds are collected from the plants and sown in boxes or soil to a depth of 2-3 cm. Freezing them: during winter does not reduce germination.
With seed reproduction, flowering comes after a much longer period, and the varieties, due to hybrid origin, lose their inherent decorative properties.
You can break up a plot with ornamental plants with phloxes from the west, east, south-west and south-east sides. The least good spot is on the north side and in the shade of coniferous trees. Phloxes will be able to live in such conditions, but it will not be so easy to achieve flowering. Phlox is a cold-resistant culture.
The most suitable soil for phlox is medium loamy, loose and moist, close to neutral (pH 5.5-7.0). The introduction of manure, leafy soil, compost and ash in combination with organic-mineral mixtures and mineral-based fertilizers has a good effect on the growth and flowering of plants.
in order to wake up the seeds, you need to soak them in warm and boiled water for 5-7 hours, you can add Epin or Zircon to the water for better germination.
Propagation by leaf cuttings

Perennial phloxes - propagation by leaf cuttings occurs in approximately the same way as by stem cuttings. The most elastic stems filled with juice are selected, on which at least 8 cm leaves should be. It can be a little longer, but shorter is undesirable. They are removed directly from the axillary kidney and scutellum. The upper part of the leaves is cut off.
Cuttings of phlox in summer with leaf cuttings occurs in nutritious, well-moistened soil, sprinkled with sand. The shield is completely immersed in the ground, and the lower part of the leaf remains above the upper sand layer. It is very important that it does not touch the ground, otherwise the plant will start to rot. The position of the planting material should be vertical, with a slight slope.Immediately after planting, sprinkle the soil with warm water, cover the container with cuttings with polyethylene to create the effect of a greenhouse.
Powdery mildew on phlox
A little bit about the most popular and most damaging disease of phlox. This, of course, is powdery mildew, which covers the plants with a dense, unpleasant white bloom. Phloxes begin to hurt in mid-July - August. Little by little, the affected sheets curl up, dry and fall. How to deal with this nuisance?
Better to start with a warning. In October, before winter, treat phloxes with a solution of copper sulfate (1%) or Bordeaux liquid (1%), and from the beginning of summer, carry out periodic (at least 2 times) spraying with fungicidal preparations (fast, topaz, foundationol, green soap, etc.) ).
When the first signs of the disease appear, it is necessary a couple of times (after 7-10 days) to treat the plants with a solution of soda ash and soap (2 tablespoons of soda, 50 g of soap per bucket of water), Bordeaux liquid (1%) or copper-soap solution (200 -300 g of soap, 20-30 g of copper sulfate per bucket of water). In autumn, after flowering, diseased plants must be cut shortly and treated with drugs one more time.
Phlox are ideal and grateful flowers, they will decorate your garden very well, and caring for them will require a minimum amount of effort and care.
Propagation by root cuttings

This method is no less effective than the previous ones, but growers resort to it in exceptional cases. For example, when a part of the phlox growing above the ground has been damaged and the variety needs to be rescued. To carry out cuttings using this method, you will need well-developed roots. They must be perennial and thick enough. They are cut into small pieces, no more than 6 cm long. It is important that each segment has growth buds. The cuttings are planted in the soil and sprinkled on top with a thin layer of sand.
Planting cuttings
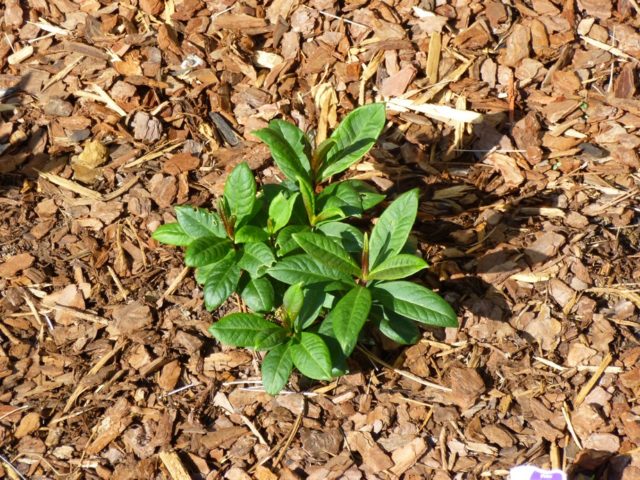
Plant the cuttings in flower pots, sprinkle the top layer of soil with sand or vermiculite so that it does not dry out too quickly. Wait for the results. Very soon, small green shoots will appear from the upper internode. A month will pass, and the cuttings will have small roots. They will be still thin and weak, but, nevertheless, these are already real roots. You can transplant them into the garden - the experience was a success, and wonderful phloxes will bloom in your flower garden. But first, it is better to grow the rooted plants on a separate bed so that other adult flowers do not interfere with them. A sufficient distance between young phloxicas when growing is 15 cm. And next spring they can already go to the flower bed.
Terms of cuttings and further care

For propagation by stem and leaf cuttings, the growing season is best suited. This is approximately the end of spring - the beginning of summer, when the budding of the plant has not yet begun. Root - mid-spring, when the root system is saturated with nutrients. Cutting phlox in August or early autumn runs the risk of being unsuccessful. If it nevertheless happened in the fall, then the cuttings should be kept in a warm room throughout the winter, only occasionally moistening the soil. With the onset of spring, they must be gradually accustomed to light and natural temperature conditions, after which the seedlings are sent to the open ground.
Regardless of whether phlox propagated by cuttings in summer or spring, care for them is approximately the same:
- the soil is regularly watered and kept moist;
- cuttings (when it comes to leaf or stem) are constantly sprayed with water;
- the container in which the planting material is located is systematically ventilated.
To maintain high humidity, you can use a special fogging installation, and cover the boxes not with film or glass, but with non-woven material. In this case, moisture will not so actively leave and at the same time air will be able to flow to the cuttings.After a few weeks, watering should be reduced, but continued to ensure that the top sand layer is not dry.

Over time, young shoots will begin to form from the axils of the cuttings. Approximately in the fourth to fifth week from the day of planting, full-fledged rooting occurs, but this process is very individual for each of the varieties. Knowing how to root phlox with cuttings, every grower can successfully experiment with breeding these flowers. Also read our article "Annual phlox - planting and care."
How phlox reproduce vegetatively
Experienced gardeners say that phlox propagation by cuttings in summer is the most convenient.
All types of vegetative reproduction have several advantages:
- full-fledged flowers grow from small parts;
- the appearance of the mother plant does not deteriorate;
- minimal risk of plant disease;
- a simple technique suitable for beginners.
Phlox Drummond is a wonderful representative of the genus
Therefore, cutting phlox in summer is the best breeding method.
How to transplant rooted phlox cuttings
Shortly before planting in the soil, watering must be reduced in order to prepare the plant for natural growing conditions in the soil.
The timing of planting cuttings in open ground depends on when the planting material was prepared:
- Stem cuttings prepared in May or early June can be transferred to a temporary bed in August. The same applies to sheet material harvested in the first half of summer.
- Root cuttings are traditionally germinated in spring immediately after harvesting or winter storage. They are transferred to the ground in late May or early June.
- Leafy and stem cuttings of late harvesting periods are germinated in a pot or greenhouse until autumn, and left in a cold greenhouse for the winter. Transplanting into the ground is carried out in the spring, also at the end of May.
The transplant is carried out in May or August.
According to the rules, young phloxes are planted first on a special bed for growing. In this case, the composition of the soil should be standard - leafy earth, diluted with humus and sand. The holes for the sprouts are made shallow, 2 times the size of the root system. When transplanting, they try to preserve an earthen lump.
During the growing season, the sprouts are actively watered and fed twice with nitrogen-containing fertilizers - mineral or organic. For the winter, phloxes are carefully covered with mulch, and grown perennials are planted on a flower bed only the next year.
Benefits of cuttings growing
The easiest way to propagate phlox is by planting bushes separated from one large bush. Cutting flowers is more difficult, but this method also has its advantages:
- You don't need a lot of planting material. It is enough to collect a few stems to get several dozen cuttings. This is convenient if you have nowhere to take a lot of phlox to divide the bush.
- Phlox can be cut all year round: in early and late spring, throughout summer, early and late autumn.
- This is the only way to save phlox if the roots have died. If the root system was burnt with concentrated mineral fertilizers, or it simply rotted, you can root the surviving stems.
- This is the only way to save flowers if they are attacked by stem nematodes. In this case, the aboveground part of the plant is burned to prevent contamination of healthy plants. And phlox roots are used as cuttings.
Despite the difficulty of cuttings, this method of phlox propagation is still easier to obtain flowers by sowing seeds. It also allows you to maintain varietal qualities, but makes it possible to grow viable seedlings in a shorter time.
Root cuttings
Root cuttings implies the preparation of bushes in the fall and their storage at low positive temperatures. In April, powerful roots without signs of disease are cut into cuttings of 2-3 cm.When planting, root cuttings are oriented with the upper part up. Cuttings are planted in boxes in dense rows with a row spacing of 10 cm. Cuttings are lightly sprinkled with soil on top. After this, care consists in moderate watering. After about a month, young shoots appear. With normal development and observance of all conditions in the third decade of May, cuttings can be planted in open ground. By this time, shoots with a length of 10 cm and a well-branched root system should have formed. Propagation by root cuttings is used for varieties that, after cutting off the shoots during stem cuttings, form curved shoots, lose their attractiveness, and change the shape of the bush.
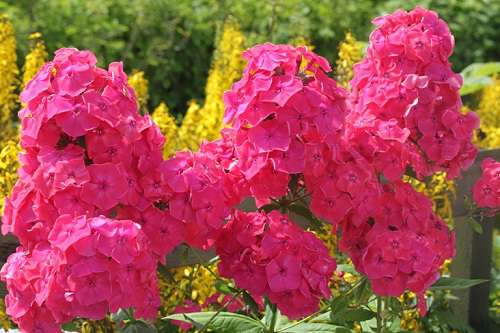
Phlox tall paniculata - Phlox paniculata ‘Bright Eyes’
How to plant a perennial phlox correctly?
I want to plant a perennial phlox, but I don’t know how to do it correctly, what methods of reproduction are?
| Granny 0 this decision Better to do this in the spring, about regrowth of shoots. If there is a need to do this now, then you will have to sacrifice flowering, cut the stems in half. You need to dig out the plant, rinse the roots for it, clean it of the remnants of dried stems so that you can clearly see where you can cut the rhizome. If the rhizome is old and large, then cut it with a sharp shovel into several parts, if it is small, then into two parts. The advantage of spring division is that the awakened buds are clearly visible and it is easy to determine how many parts can be cut. wait until the cut is slightly weathered, sprinkle with ashes and plant, deepening 2-3 cm. Too long roots can be cut so that it is convenient to distribute them in the planting hole. Water immediately after planting. |
And the landing pattern? I looked at a friend's flowerbed made of phlox alone. She constantly removes it. Before that, they grew up close to each other. Last year, I planted them with a distance of about 1 meter from each other. The rainy summer may have affected, but the flowers fell apart. It looks untidy. How to find a middle ground?
Granny (author of the answer) Aug 6, 2019
The planting pattern depends on the variety, but on average it is 50 cm. Some varieties require a garter, especially if the summer is rainy. Before flowering, I tie a bush at a height of 30 cm along with a low support stick, it is completely imperceptible and the bush is dense and beautiful. The support does not even need to be removed for the winter.
The use of phlox in landscape design
These flowers are becoming more and more popular every year. They look great in group plantings, not just singles. Bushes consisting of seedlings of different colors look especially attractive. Phloxes create original compositions with exotic plants, with knifophy, for example, or conifers.
Phloxes of the same color are used to create a bright spot on a green lawn - such a planting looks fresh and original. To create a rhythmic composition, they should be planted using the mixborder technique.
Splitting the bush
This representative of the plant world is a real champion in reproducing itself repeatedly in any conditions. And over time, the bush grows very strongly, and it has to be limited geographically. About once every 4-5 years, the plant needs to be updated and thinned out. To this end, the bush is divided, excess stems with roots are removed, which can later be used as planting material.
This requires:
- Dig up the plant.
- Soak and shake a clod of earth with intertwined roots.
- Separate single stems with roots to transplant to a new location.
- Remove old dried roots.
- Plant a thinned bush in the old place, and separated specimens in a new one.
Phlox paniculata.
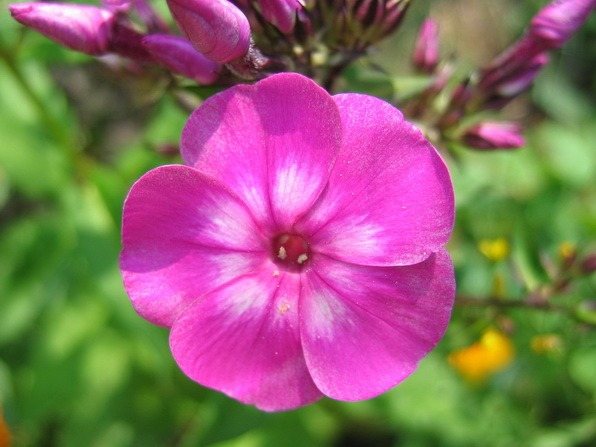
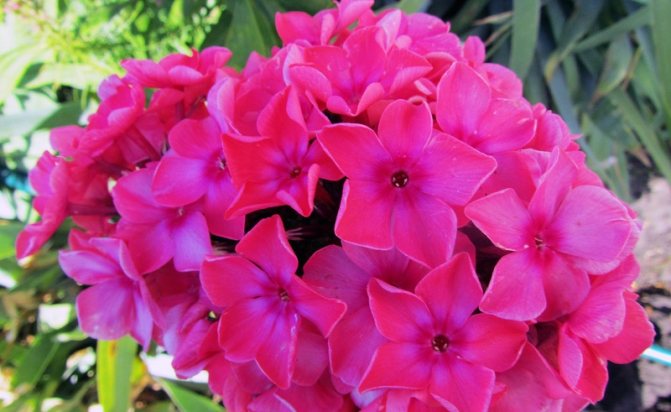
Paniculata phlox, flower When fragrant flowers of paniculata phlox bloomed in my garden, I admired them and breathed in a delicate aroma. They bloomed in turn, revealing delicate pastel petals. Phlox blooms luxuriously.Well, how can you resist not to take numerous photos. Opened pink, then coral, lilac, with a pink center ... And now all 8 varieties are blooming. They bloomed in July and some delight me until the beginning of October. The best part is that the reproduction of paniculata phlox is not difficult. Moreover, this is done in various ways.
Phlox paniculata - the most beautiful perennial flower of the garden, the best decoration of flower beds. Its advantages include: beautiful flowers with a pleasant smell, long flowering, a variety of bright and juicy colors, unpretentiousness, winter hardiness and ease of reproduction. A huge number of different varieties allows you to choose plants with different flowering periods, different heights and colors. The main value of these spectacular flowers is that they bloom when peonies, delphiniums and other perennial flowers have faded, and dahlias and gladioli bloom later.
Phlox paniculata
How to plant phlox in the fall. How to plant phlox in the fall
For planting a plant, it is preferable to choose a not hot day, in the summer it must be cloudy or plant flowers in the evening. Phlox can be planted with roots (cuttings), cuttings and seeds.
Choosing a landing site
Phlox is planted in a sunny area of the garden, lacy shade from trees is allowed. Varieties with dark colored petals can burn in the bright sun, they are planted in partial shade.
Flowers must be protected from strong gusts of wind, placing them under the protection of buildings and shrubs.
The soil
The preparation of the soil in the flower garden for phlox begins 3-4 weeks before planting. The root system of a perennial does not penetrate deeply, so they dig up the ground by 15-20 cm.
Phlox loves loose, fertile and moisture-absorbing soils. Suitable for him are loams enriched with sand, peat and humus. More sand is applied to clay soils, and more humus to sandy soils. Average doses of additives per 1 sq. m:
- river sand 6 kg;
- high moor peat (not sour) 2 kg;
- humus (compost or rotted manure) 8 kg;
- ash 2 cups;
- phosphorus-potassium fertilizers for perennials 100 g.
Important! Nitrogen fertilizers are not applied during autumn planting. They stimulate the growth of green mass, which is not necessary before the onset of cold weather.
For better dissolution of fertilizers in the ground, a few days before planting the plants, the garden is spilled with water. It is necessary to wet the ground to a depth of at least 20 cm.
Operating procedure
How to plant perennial phloxes in the fall:
- Planting holes for phlox are planned at a distance of 50-70 cm from each other - the flower grows quickly and the bush needs a lot of space. The depth of the fossa is 20-25 cm, but it must be made wide, since the phlox roots are straightened to the sides, and not down.
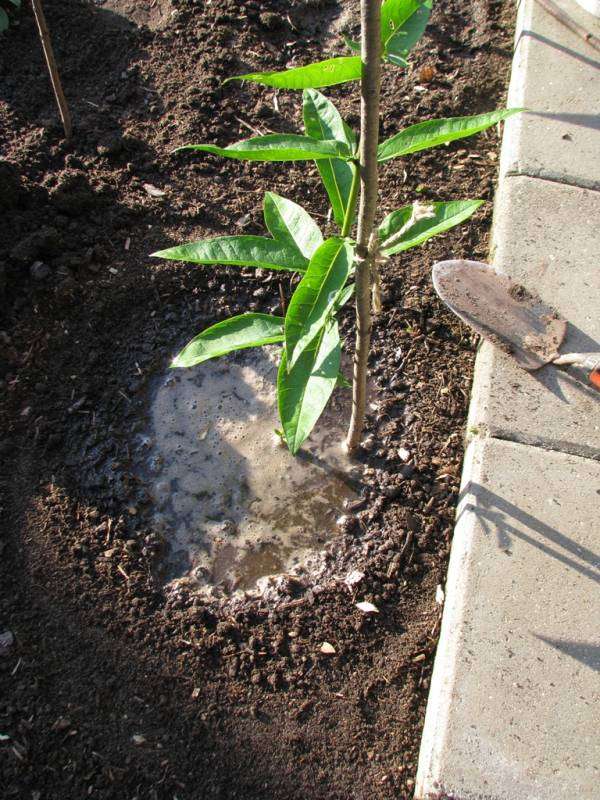
- The seedling is placed in the center of the hole so that the root collar of the flower drops 3-5 cm below the soil surface. The roots are gently spread to the sides.
- The plant is covered with fertile soil, pressing the earth with palms to the roots. A mound of 12-15 cm is made above the root collar for protection from the cold.
- Water the bush abundantly.
When the air temperature drops to minus marks, phloxes are mulched with peat or sawdust, with a layer of 20 cm.
The method described above is suitable for paniculata phlox, the most common type of phlox.
Features of planting phlox subulate
The plant does not tolerate high humidity in the root zone. A drainage layer (crushed stone or expanded clay) of 5-10 cm is poured into the landing holes for it.
The distance between the bushes of the styloid phlox is maintained at 30-40 cm, since the size of an adult plant is modest - a height of about 20-30 cm.
For better survival, the seedling or stalk is kept in a solution of root or heteroauxin.
How to plant by cuttings
Cuttings from phlox are harvested in late spring - early summer. The twigs are broken off from the base of the root, trying to get a stalk with a "heel" - a piece of part of the root.The twig is cut to a size of 10 cm and planted in a shady place on a bed with fertile and loose soil. So that the cuttings do not rot, they are sprinkled on the garden bed not with earth, but with sand.
For better survival, phlox is watered with a root former and covered with a film greenhouse or plastic bottles.
Before the onset of autumn, cuttings are sprayed with warm water, watered, loosened the ground. In the fall, at the time set for planting, the plants are transplanted with a lump of earth to a permanent place.
Important! The phlox from the cutting must be deepened by 2-3 cm, compared to its growth in the garden. In winter, planting is mulched with shavings or foliage.
Planting phlox seeds
It is not difficult to propagate phlox by seeds, but this method is not often used. The fact is that the seedlings may not repeat the characteristics of the parental forms. During vegetative propagation, young plants are exact copies of adult flowers.
For reference. Many experienced flower growers specially sow perennial phlox seeds, claiming that the seedling turns out to be stronger than with vegetative propagation. A plant obtained from seeds is more adapted to the climate of the area where it grew, and is less sick.
Phlox seeds are sown in the fall directly into the ground or, after mandatory stratification (cold treatment), in the spring for seedlings.
Sowing in winter is the easiest, but you should only resort to it if the seeds are obtained from plants adapted to the local climate.
You should not risk the purchased seeds of rare varieties, they are planted in the spring.
How to plant perennial phloxes in the fall:
- A phlox bed is prepared by digging up the soil and adding sand to the soil - about 8 kg per square meter.
- Poor sandy soils are cultivated with crumbly humus - up to 5 kg.
- The land is leveled and left alone until the onset of frost.
Phlox seeds are sown in the garden when the frost has already grabbed the ground - in November or even December. The fallen snow is swept away from the garden. The seeds are scattered over the surface, adhering to the 15 by 20 cm scheme.They are sprinkled with a pre-stored earthen mixture from garden soil and sand, with a layer of 2 cm.
In this form, the crops are left until spring. The germination rate of perennials under winter sowing is 70%. In the school, seedlings grow until autumn, when they are planted in flower beds.
When and how to plant phlox. Why and when phlox transplant is needed
0
Most gardeners grow perennial phloxes, and they live for a long time at the planting site. However, replanting phlox is an integral part of the growing process. Despite the fact that perennials are planted once, they need to periodically change their place of residence, especially chic phlox. What is the reason for this and when and how to transplant these plants?
Transplant value for phlox
A feature of the structure of the root system of phlox is that every year they build up new roots on top of the old ones. This means that in a few years a well-developed rhizome begins to literally bulge out of the ground. Each year, the buds rise closer to the soil surface. This affects both the general health of phlox and their flowering. In general, frost-hardy plants can freeze during a particularly cold and snowless winter. In addition, their shoots become thinner and often break under the weight of the inflorescences. And the flowers themselves are noticeably smaller.
That's why phlox needs to be transplanted in order to avoid such problems and preserve large flowers.
When is it better to transplant phlox?
Autumn is the best time to transplant all garden plants. During this period of the year, the soil is no longer as dry as in summer. Autumn rains managed to saturate it with moisture, and the air itself became more favorable. The temperature dropped to comfortable values, and the humidity became higher. All this is the best way to ensure that the transplanted crops are easier to adapt and take root faster. Phlox is no exception - it is also better to replant them in the fall, around October.
Phlox transplant, if necessary, can be combined with reproduction. If the bush is very dense, it needs to be cut into pieces with a shovel.
Phlox transplant step by step
The first step is to carefully dig up an adult bush. It should be borne in mind that the root system of phlox is quite powerful. It grows well both in depth and in width. Therefore, the shovel should not be placed close to the shoots, but well backed off, and dig deeper.
A landing pit should be prepared in a new place:
- its diameter should be larger than the circumference of the bush so that it can easily enter;
- you need to dig deep enough so that the young buds are below the soil level.
In order for the flowering to be abundant and large, manure, compost or humus should be put at the bottom of the planting pit.
Set the phlox in the center into the finished recess and cover it with earth, leaving a shallow hole for watering. It remains only to water the transplanted phlox and lightly fill the moist soil with dry so that a crust does not form. And in conclusion - break off the shoots, shortening them in half, so that the bush does not waste energy on setting seeds.
Sowing
The opinions of different growers about the conditions for the reproduction of phlox seeds differ. Some believe that they can be sown before winter, others are categorically against it. The former argue that early planting strengthens and heals the plants. Others rely on their experience and say that cold and frost ruins young shoots. Here you can use the following recommendation: if the seed was obtained from mother bushes from your own garden, then you can plant it in the winter, since it is sufficiently adapted to the existing conditions. Otherwise, the seeds must be planted in the spring - in the ground or in a special greenhouse for seedlings.
Seasons
When and how to propagate perennial phlox by separation? When asked when? the answer is even simpler - these flowers can be planted at any time of the year, except for winter. Each season has its merits and demerits, and they are worth considering in more detail:
- Spring. Plants root well and bloom in the first year. In the first two weeks, they need abundant watering.
- Autumn - September and October. Reproduction of phlox in autumn by vegetative methods provides many advantages. For the short remaining period of heat, the flowers gain a supply of nutrients and take root. The main development begins with the arrival of spring, and by summer the bush becomes more mature and strong, blooms longer and more abundantly. It is necessary to transplant the plant with all the green mass, you can slightly shorten the stem.
- Summer. Phlox seedlings can also be purchased in a flowering state. But when transplanting, the inflorescences will have to be cut off, and the bushes themselves should be planted in a shaded place and regularly, but not abundantly, water. They will bloom only next summer.
A short summary: phlox can be transplanted in any warm month, but it is best to do this in the fall, since the plant will grow and bloom better next summer.
Layers
Reproduction of phlox by layering is carried out in two ways:
- vertical shoots;
- stalks pinned to the ground.
Reproduction of phlox in autumn by vertical shoots is based on the formation of additional roots on the stem. The method is easily carried out with a sparse planting of flowers. If you correctly pin the stems to the ground, the rooting of the layering occurs at its nodes. Algorithm for plant reproduction by vertical shoots:
- spud the bush with an earthen embankment 10 cm high (the best period is May – June);
- keep the earth of the embankment moist to form roots on the covered part of the stem;
- check the formation of a viable root system under the soil in August;
- cut off the rooted cut at the base of the stem;
- immediately transplant it to a new location.
Phlox layering
Technology of reproduction of culture by pinned stems:
- press the young, well-bending stem of the plant to the ground at the beginning of the growing season;
- fix it to the soil with metal brackets along its entire length;
- sprinkle with a mixture of earth and peat (1: 1), leaving only leaves on the surface;
- in the fall, cut off the rooted part of the cut from the mother bush;
- transplant parts of the stem with roots to a new place.
How to plant phlox in the fall. The best varieties of phlox for autumn planting

In order to transplant or plant phlox in the fall, early varieties are best suited, such as:
- Bright Ice is a tall pink phlox with large inflorescences.
- Hesperis is a meter-tall plant with a dense purple large inflorescence.
- Childhood (75 cm stem height, salmon-pink flowers, large inflorescences).
- North (70 cm high, large pure white inflorescence).
- Tenor (large raspberry inflorescence, plant height 70 cm).
- Blue joy (light purple color, plant height 80 cm).
These varieties will be able to bloom by August, and at the end of summer they can be prepared for transplantation. Phloxes are not only annual, but also perennial, and grow in the same place for 5-7 years. But only in the second or third year, the flowers can become smaller and lose their splendor. To prevent this, phloxes need to be rejuvenated: divided and transplanted to another place.
Many gardeners argue that the best time to plant phlox is spring, but the practice of experienced flower growers proves that autumn planting is no less effective and even has some advantages.
Benefits of planting phlox in autumn:
- The first advantage is considered to increase the planting time to one and a half months, while the spring dates are reduced to two weeks, because the plant stems grow quickly and transplanting will be risky.
- The second advantage is getting the most beautiful full-fledged flowering plants in the new spring-summer season, of course, provided that the autumn transplant is correct. And at the end of the phlox flowering season, it is easier to identify the transplanted variety of the shared bush.
The autumn transplantation of phlox assumes strict adherence to the transplantation rules, otherwise you can not wait for abundant flowering in the spring.
How to plant perennial phlox. Landing

Perennial phloxes can be planted both in autumn and spring. The key to the duration, lush flowering of phloxes is the correct choice of the time and place of their planting, soil cover, agricultural techniques.
The main requirement for proper planting is soil fertility per shovel bayonet. This is due to the shallow occurrence (up to 30 cm) of a powerful, branched root system and the location of the bulk of its nutrients up to 20 cm from the soil surface.
Where to plant
The planting site should be free of moisture stagnation. Therefore, it is better not to choose damp, low-lying areas of the plots. The best option is the flower beds slightly raised in relation to the surface of the site. Despite their light-loving nature, they are more like a slight partial shade than bright sunlight or thick shade.
The place should not be "open to all winds", especially during wintering. Therefore, it is not recommended to plant phlox on the north side. Planting flowers in the shade of large trees should also be avoided due to unequal forces in the struggle for light, moisture, nutrients.
When determining the "place of residence" of plants when planting, it is important to take into account their growth, color range, harmonious combination with other plants.
Soil preparation
Site selection also requires attention to the composition of the soil. For planting phlox, light soil with a neutral or slightly acidic reaction is suitable. If the soil is too acidic in suitable places for it, then it is neutralized with quicklime (200 g per 1 m²).
Clay soil is mixed with sand, and sandy soil with peat. Loamy soil can be "refined" by mixing it with mature humus, ash, bone meal in proportions of 100 g per 1 m². Such "intervention in nature" + regular moderate feeding will make phlox cultivation effective.
Phlox diseases
Perennial phloxes are susceptible to almost all diseases that are characteristic of flowering plants. Let's dwell on the most common pathologies.
- Fomoz.
The disease is manifested by twisting and yellowing of the foliage, the stems are cracked and covered with brown spots. To get rid of these symptoms, the bushes should be sprayed with Bordeaux liquid four times. The interval between procedures is 10 days.
- Powdery mildew.
This fungal disease manifests itself as a white bloom on the foliage. To combat it, it is necessary to use fungicides ("But", "Fundazim", "Raek"). For preventive purposes, it is recommended to spray the shoots in the spring with a weak solution of potassium permanganate.
- Spotting.
Brown or yellow spots appear on the leaves of phlox. The disease is treated by spraying with 1% Bordeaux liquid.
Phlox are very beautiful plants that need careful care, the right choice of planting site. With proper care, they will delight you with lush flowering for many years.
Tips & Tricks
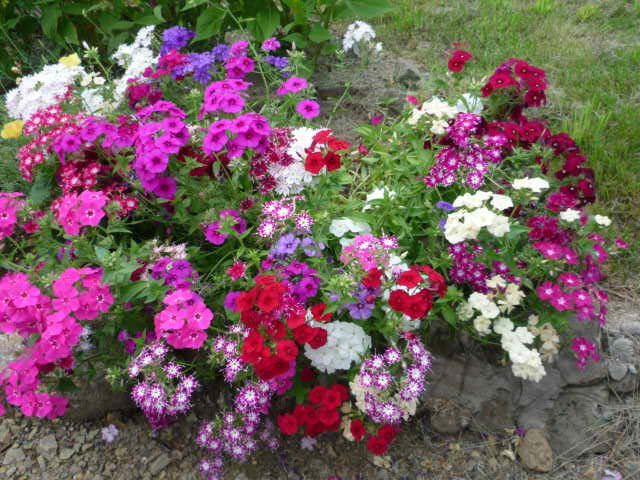
It will be better to root stems or leaves, as well as form new shoots, if:
- Harvest cuttings in cloudy weather. If it's a hot day outside, cutting the stems or leaves is better in the shade.
- Before planting in a box, store the harvested stems in a container covered with a rag soaked in water.
- Treat the cuttings with growth stimulants. For this, a solution of heteroauxin (0.5 grams per bucket of water), Kornevin (3 drops per liter of water) or another drug is suitable. Leaves or chopped shoots are dipped in the lower part into the solution and kept in it for about 10 hours (you can put it in the evening, keep it all night and plant it in the morning).
- Treat the cuttings with aloe juice. It is a natural growth stimulant. Dilute the agave juice in water in a ratio of 1 to 1. Dip the cuttings in the resulting solution before planting.
Advice! To maximize the effect of aloe, prepare biostimulated juice in advance. To do this, collect 2-3 year old agave leaves, put them in a plastic container and refrigerate for 2 weeks. During this time, many biologically active substances are produced in them, which are necessary to maintain the viability of the plucked leaves of the plant. Now take out the container and squeeze the juice out of the leaves. It will be several times more useful than usual.
Breeding phlox with cuttings is a laborious job. But in one season you will not receive a few units, but several dozen bushes, ready for wintering and planting in a flower garden. With early cuttings, you can enjoy the first flowering in early autumn. But it is better to wait for the next growing season. Then the bushes will be stronger, and they will bloom more magnificently and abundantly.
Phlox paniculata. Reproduction of phlox paniculata
The phlox genus has about 60 species of this plant, whose homeland is considered to be North America. All species are divided into two large groups: bush phlox and creeping phlox. We have the most common phlox paniculata (bush).
Phlox paniculata (or garden phlox) -
perennial herb from 30 cm to 1.5 m tall, erect stems, fragrant flowers (from 2 to 4 cm in diameter): pink, white, red, lilac, blue, two-colored - with an eye in the center, and only no yellow tint in this whole palette. Flowers are collected in paniculate or corymbose inflorescences. According to the flowering period, phloxes are early, middle and late. The earliest bloom in June, and the latest in August.
Personally, I associate phlox with a village, where in almost every front garden you can see lush bushes of pink, white or lilac flowers. The villagers love them for their unpretentiousness: they planted and forgot. And indeed it is. In my old distant dacha, where I had been getting out only on vacation for almost ten years, a flower bed with white phlox bloomed gorgeous, despite my absence.In the spring I came for a couple of days to weed the beds with my perennials, and then my flowers took care of themselves, not giving the grass and a chance to press them.
I planted white phloxes from one bush (divided it) into a round flower bed about 1.5 m in diameter. She planted the roots in a checkerboard pattern and rarely enough that it was possible not to transplant for a long time.
But the main secret that phlox not only grew almost without care, but also bloomed magnificently, growing up to 1.5 m, is that when I laid the flower bed, I brought in a lot of rotted manure. I managed to order a whole car, and I was not greedy, adding such a top dressing for all my plants. I put 10-12 buckets under the phlox, mixed it thoroughly with the earth, and only then planted the flowers.
Reproduction
Phloxes reproduce very easily. dividing the bush
and traditional
by cuttings.
The division of the bush gives almost one hundred percent survival rate of new plants. An old thickened phlox bush is dug in from four sides and pulled out onto a flat surface. It is impossible to separate this root ball with your hands, so it is better to use a shovel, chopping it into several parts, and then you can take a knife or pruner and cut the rhizome into the required number of seedlings. I divide in such a way that at least 3-5 shoots remain on each new plant.
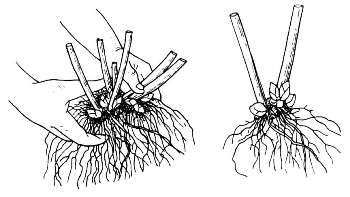
In principle, phloxes are propagated by this method in autumn or spring. I am an adherent of spring transplants, so I carry out this work in May. But if you came to visit someone on a country hacienda and saw gorgeous blooming phloxes, then you can ask to separate 2-3 stems with a root for you in the summer. They will not only take root, but, most likely, will continue to bloom, and such a procedure will go completely unnoticed by the owner's bush.
Last fall (at the end of August) I brought seedlings of panicle hydrangea and phlox from the Pskov region. To prevent them from drying out on the road, I put them together in a coffee can and poured them. I got to the dacha only two days later. I planted my plants, watered them and hoped only that before winter they would take root well and survive the frosts. Imagine my surprise when I returned to the dacha a week later! .. When I left, the phlox stood with withered wilted flowers and leaves. I didn’t pick them off or break off the stems, so that in the spring it would be immediately clear from the old shoots that something should sprout in this place. And then I saw that the leaves on the phlox straightened and stretched towards the sun, the flowers became dense and elastic without any hint of lethargy. So my phlox bloomed for two more weeks, delighting me with its love of life.
Phloxes love fertilized soil, so humus from a compost heap, rotted manure, ash mixed with garden soil is an excellent breeding ground for growing these wonderful flowers.
The store will help us
By the way, now there is no shortage of planting material: all kinds of nurseries, shops and just grandmothers near the metro will offer you a lot of interesting things. But if I'm going to buy something specific, then, of course, I go to the point of sale from the nursery. The prices there, however, are biting, but there is a minimum of chances to buy not what you wanted.
In February of last year, I changed my principles and bought phlox rhizome from a chain store. Yes, exactly in February! I don’t know what those who came up with all this thought. I saw the price tag: "Phlox paniculata pink". I was very surprised: where can I dig a phlox cut in winter? I began to examine the packaging. In a plastic bag about 10 × 10 cm in size, there was a small root covered with dry peat. If you twist the bag a little in your hand, you could see that the roots are separate, and the peat is separate. And then I noticed small green loops of seedlings - and this is in such and such conditions!
Of course, I bought such a bag (in principle, it is not known with what), because I understood that literally in a week all living things in these packages would die.I also took a risk because the price was simply ridiculous: 50 or 70 rubles.
At home, I pulled out from captivity what was in the bag - a small root with sprouted shoots - and put it in a flower pot. The plant quickly adapted and began to grow actively. By the end of May, I already had a fat bush of phlox with shoots about 20 cm tall.
My mistake was that I immediately planted my phlox in the open ground without hardening, and at the beginning of June the night frost hit -4 °. That night I lost my phlox, hydrangea and royal pelargonium.
True, although the upper part of the phlox froze, it quickly recovered and began to grow again. By the end of August, even buds appeared. I, of course, did not hope for flowering. But he bloomed in September: on thick dark green shoots (and he had 6 of them), there were pale pink flowers, collected in lush hats.
Phlox bloomed until early November, when severe frosts began. This is how I became the owner of a very beautiful flower for a small amount. So don't be afraid to experiment and always consider options.
Phlox cuttings
Phlox is cut in May-June. Young shoots are taken - still without buds or at the initial stage of budding - and cut into stem cuttings. The lower cut is made below the node with a pair of leaves, and the upper cut is made through two internodes above the node with the upper pair of leaves (retreating 1 cm). The lower leaves are shortened, the cuttings are treated with a rooting stimulator and planted in some shady place, in fertile soil mixed with sand, and covered with a jar. If you have a dozen cuttings, then it is better to make a small par-nichk according to the same principle as I have already told you for cutting other plants. The cuttings are sprayed several times during the day, moisten the earth, and after a month the process of root formation begins. By the fall, you will already have small, but your own phlox seedlings. It is better not to transplant them, but to leave them like this until spring, sprinkling them with peat, leaves for the winter or covering them with spruce branches.
You can also cut cuttings from a bouquet of phlox presented to you. The middle part of the shoot is most suitable for rooting. And then they do with them, as with other stem cuttings.
Even lateral shoots that grow on phlox stems in the second half of summer are used for reproduction. They are broken out (with a heel) and planted for rooting. Cuttings harvested in July can still be planted in open ground - in a cuttings or under a jar, but August cuttings must be planted in a greenhouse - otherwise they will not have time to take root before the onset of frost and die. Young plants, both in the open field and in a cold greenhouse, must be covered for the winter.
Leafy cuttings
Using the method of rooting leaf cuttings is even more difficult than obtaining seedlings from stem cuttings, but nevertheless it has a right to exist. Indeed, thanks to this technology, a sufficient number of very rare varieties can be multiplied.
They take a still non-lignified shoot (before the formation of buds) and cut off pieces of the stem with a leaf about 1-2 cm long.The lower cut is made under the knot, and the upper one above it is 1 cm. and on top of this mixture is covered with a layer of sand, into which the cuttings are planted. For personal needs, 50 cuttings are much more than enough, even taking into account the fact that it will not be possible to achieve one hundred percent rooting. Therefore, it is most convenient for these purposes to build a small box of four boards, for example, 70 cm long. Even in such a seemingly small space, 49 cuttings will fit well at a distance of 10 cm from each other. Therefore, if you plan to root only a dozen cuttings, then the nursery may be smaller.Why is the box more convenient? There is less hassle with him: the boards were knocked down with each other and placed on a prepared plot of land, a piece of glass, an old frame or a piece of polycarbonate was placed on top of the boards directly (it is better to fix glass or polycarbonate by placing two bricks around the edges so that the wind does not blow it away).
If such a small piece of land is covered with a film, then, firstly, you will have to cut off an unformatted piece of film, which will later be useless, put some small arcs, somehow strengthen them so that they do not collapse, and every time, if necessary, watering disassemble this structure and reassemble.
We plant the cut cuttings in the prepared greenhouse, deepening the place of leaf growth into the ground. A bud sleeping in the bosom of a phlox leaf, covered with earth, is capable of giving roots. This breeding method was tested in the Botanical Garden of Moscow State University back in 1940 and gave good results. To reduce moisture evaporation, the leaf on the handle can be shortened by a third or even half.
To improve the result of rooting, cuttings can be treated with root formation stimulants before planting: either soak in a solution of heteroauxin, or dip in a growth powder made from heteroauxin and talc. Some gardeners use a stimulating growth paste: a mixture of crushed charcoal and aloe juice (for 1 tablespoon of juice you need 0.5 cups of finely crushed and sifted coal). The stalk is dipped in the resulting paste and immediately planted.
If there is no coal, take 1 tbsp. l. freshly squeezed aloe juice, add another 1 tbsp. l. water, stir. This solution also stimulates the rooting of cuttings.
Shank with heel
In the spring, as soon as the shoots of the phlox reach about 5 cm, you need to take and break off the stem with the heel (a piece of root). Plant in well-fertilized soil, shade for the first time and constantly moisturize. Since the phlox branch has not yet become woody, it may even wither, dropping its leaves to the ground. You can use a 1 liter jar or a cut from a 2 liter plastic bottle to provide the moisture you need. But make sure that the seedling is not too hot there. The jar can be whitewashed with chalk or lime, and from the bottle you can take the part where the cork is located, then you can simply unscrew it, and, albeit small, air circulation will occur.
We sow phlox seeds
Phlox, like other plants, of course, reproduce by seed. If you want to experiment, then try this option as well. But remember that from the seeds collected from one phlox, you can get different plants (some will have the characteristics of the mother bush, while others will go to the father's "relatives").
After flowering, boxes with seeds are formed on the peduncles of phlox. In fine dry weather, they can even ripen right on the bush. But, in order not to take risks or when breeding late varieties, it is better to cut off the stems with seed bolls, put in some kind of fabric bag (a bag, as my grandmother used to say) and hang somewhere in the barn or on the veranda. As the bolls mature, they will turn brown and open, and the seeds will spill out into the bag.
Phlox seeds quickly lose their germination, so autumn (late November - December) is the optimal time for sowing them in the garden. Even if there is already snow, don't let that scare you. Rake or sweep the snow, sow seeds on the freed soil (try to sow not very thickly), and sprinkle them on top with sand or peat with a layer of 1 cm.And the swept snow can be returned back. Wait for the shoots in the spring, and by the fall, the strongest of your pets will bloom. And it will be very interesting to watch, because no one knows how they will look. You can keep all the specimens you like, and distribute the rest of the seedlings to your friends. Plants grown from seeds in your area will be the most resistant to all adverse conditions.
Agrotechnics
Phlox are frost-hardy and grow well even in the North-West - in the zone of risky farming. They love bright areas, but on the south side, being in direct sunlight for most of the day, they can fade. Phloxes require frequent watering, wind protection, and regular feeding. If all these conditions are met, they will delight you with annual lush and long flowering.
In early spring, if the plantings were covered with peat or covered with spruce branches, all this is removed to allow the earth to warm up and awaken the plants after winter sleep. They are fed with ammonium nitrate - about 30 g per sq. m, fertilizers are embedded in the ground, loosening it, and then watering phlox. When shoots begin to grow, feeding with mullein infusion is very effective. During the period of bud formation, organic and mineral fertilizers are useful for plants: superphosphate and potassium salt. At the beginning of flowering, they give a complex top dressing: superphosphate, ammonium nitrate, potassium salt (a matchbox for 10 liters of water). After flowering, phloxes need phosphorus and potassium to recuperate.
The acidity of the soil for growing phlox should be neutral, although they tolerate slight acidification well.
How to determine if your soil is acidic or alkaline? Very simple: look at what plants are growing around. If you see horsetail, sorrel, willow herb, sedge, then you have acidic soils. Mother-and-stepmother, wheatgrass, nettle, meadow clover - lovers of neutral soils. There are still several more complex methods for identifying the acidity indicator of the soil. Take a little earth (a teaspoon), pour it on something (even on a saucer, even on a wooden board) and drip ordinary vinegar onto it. A lot of foam has appeared - the soil is alkaline, there is foam, but not abundant - the soil is neutral, there is no foam at all - the earth is acidified.
Throw a lump of earth into a small amount of grape juice. If the sap changes color and bubbles appear on the surface, this is a sign of neutral soil.
We take a little chalk, dilute it with water, put the same amount of earth in another container (in the same proportions) and dilute it with water, we defend everything for a day. Then we pour the transparent liquids into different containers. If about 5 drops of water settled on the ground are dropped into lime water (a solution of water from chalk), and it becomes cloudy, then the soil in your area is very acidic.
Phlox magic
Phlox is not in vain so loved, because they are also endowed with magical properties. Of course, the plants you grow in your garden are peaceful and happy. And a bouquet of seven multi-colored phloxes strengthens the marriage union. White phlox, placed in a vase in the kitchen and living room, give peace and harmony in the house. Lilac phlox will help creative people see the unusual in the ordinary and will help to reveal all the facets of their talent.
Marina Ivanova
Preparing for winter
Phloxes, like the vast majority of perennials, reject the weakest shoots in winter. So that the plant does not suffer too much, it is necessary to prepare the bush for winter sleep. This work is carried out in several stages:
- Feeding phlox in the fall with fertilizers containing potassium phosphate substances.
- Pruning bushes, which is carried out to rejuvenate the plant.
- Mulching phlox. For this, horse manure is used. Covering material can be laid on top of the mulch soil, which traps snow and prevents the soil from freezing.