Growing fresh herbs at home is easy. This is especially true of dill, because this plant perfectly tolerates cold, is resistant to disease, easily adapts to new conditions and requires minimal maintenance.
We will tell you how to plant dill on the windowsill and in the open field, we will reveal the secrets of growing greens in winter and the cultivation technology in hydroponics.
- Timing
- Growing dill on a windowsill in winter
Features of growing dill at home
Growing dill on a windowsill from seeds is simple compared to other green crops. But, if you do not take into account some of the features of the plant, the harvest will not be plentiful and of high quality.
To obtain fresh greens, you need to select the right seeds and process them, and after the emergence of seedlings, carefully look after them.
Features of the
How to grow dill at home? First of all, pick up quality planting material. If you plan to make a garden bed on the windowsill, it is better to buy early varieties (Gribovsky, Richelieu or Grenadier). They sprout quickly and produce lush greenery in a short time.
Fertilizer
For normal growth, plants require a balanced amount of nutrients delivered in the form of fertilizers. They are sold in stores and nurseries, where you can always choose the mixes that are right for your garden. Fertilizers are added to the soil, and then they are absorbed through the roots, or they are used to spray the leaves - the so-called foliar dressing.
Determine which plants you would like to fertilize and read about what they need for normal growth and development, then select the appropriate fertilizer.
Growing dill outdoors
Sowing is carried out in early spring, even in the presence of frost. Since the plant is cold-resistant, lowering the temperature will not affect its germination (Figure 5).
Note: If you want to constantly receive fresh greens, sowing is carried out every two weeks, from spring to late summer. The plot for the garden is dug up in the fall. Fertilizers can be omitted, but the choice of the predecessor and neighboring crops must be taken responsibly. It is best planted after cabbage, beets, cucumbers and legumes. It is not recommended to place the garden next to carrots or parsley, and potatoes and garlic are considered the best neighbors.
In the spring, the soil is loosened and, if desired, mineral fertilizing is applied. The seeds are pre-soaked in warm water to speed up the germination process.
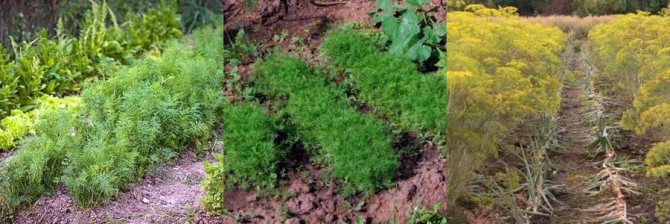
Figure 5. Sowing and cultivation in the open field
You can also treat them with potassium permanganate. After that, the seeds are dried and sown in shallow grooves (no more than 2 cm). The beds are sprinkled with soil and watered. The optimum germination temperature is 5 degrees, but if this figure is lower, you can cover the area with film. As a rule, the first shoots appear within one to two weeks.
Substrate method
With this method, the roots are placed in a thick layer of substrate. It can be fine gravel, expanded clay, coarse sand, vermiculite, etc.
With this method, the watering system is a little more complicated. They use drip irrigation - in which water drops from time to time under each plant, backwater - in which the nutrient solution is constantly located only at the bottom of the roots and flows through them to the entire plant, and the method of periodic moistening, in which a tank with plants is periodically saturated with a nutrient solution , after which it is raised and waited for complete drying. The process is then repeated.
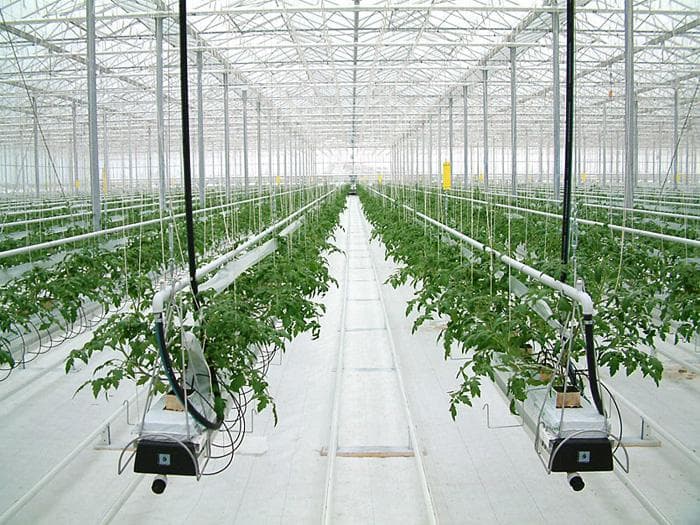
Growing dill in a greenhouse
Planting and caring for dill in the open field and in the greenhouse is practically the same. However, in structures of closed ground, certain rules must be followed (Figure 6):
- Choose varieties that are resistant to a lack of light (for example, Anker, Almaz, Grenadier or Kutuzovsky).
- To speed up germination and remove essential oils from seeds, they are soaked in warm water two days before sowing. The fluid is changed every 8 hours.
- The soil in the garden should be loose and moist. Shallow grooves are made in it at a distance of 15 cm from each other.
- Seeds are sown in rows, sprinkled with earth on top and watered with a spray bottle.
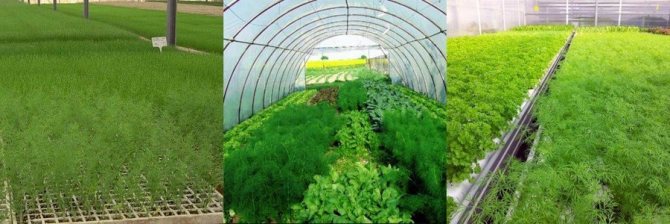
Figure 6. Methods of growing a plant in a greenhouse
You can simply scatter the seeds over the greenhouse bed and distribute them with a rake, but in this case the seedlings will be thicker, and they will have to be thinned regularly. When grown in a greenhouse, dill should be fed with ammonium nitrate every two months. But if the soil is fertile, this may not be necessary.
You will find more details on growing greenery in a greenhouse in the video.

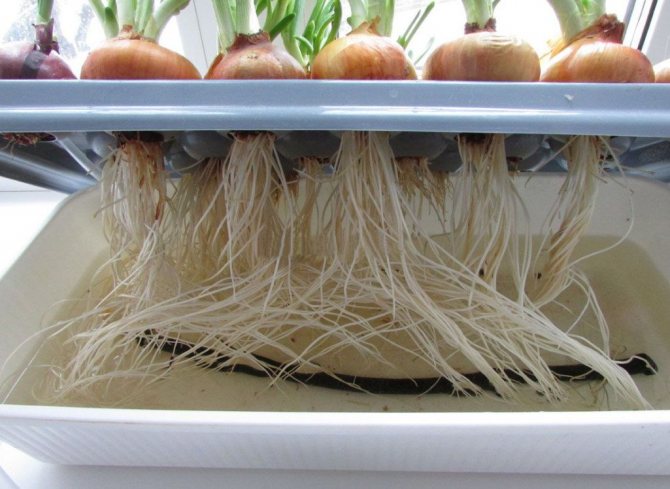
Growing onions by seeds
They can also be grown hydroponically.
From the very beginning, seeds are germinated in any convenient way - most often in special cassettes with mineral wool or other similar substances. Each of the cells of the cassette can accommodate 4-6 seeds.
Freshly sprouted seeds cannot be "fertilized" or fed with anything - this will only harm them. The seeds use the substances that were laid in them at the embryonic level, and the additional nutrition received from the outside will chemically burn them.
Healthy onion seeds germinate on average in a week.
They do not like too high temperatures, germination takes place at 18-19 degrees.
It takes about 3-4 months from the moment of germination to technical maturity.
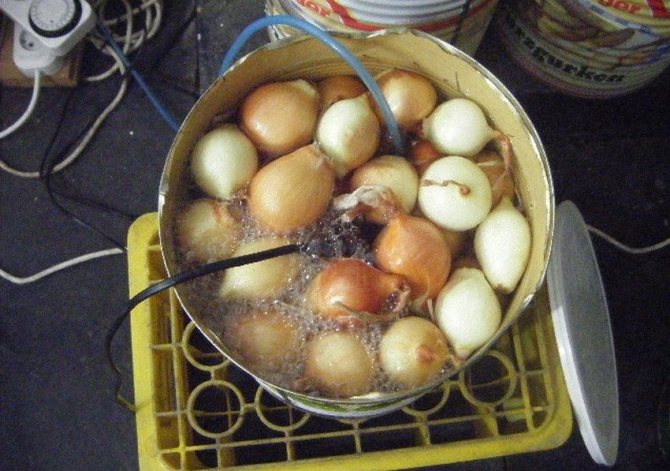
For germination of seeds, plastic egg packaging is suitable.
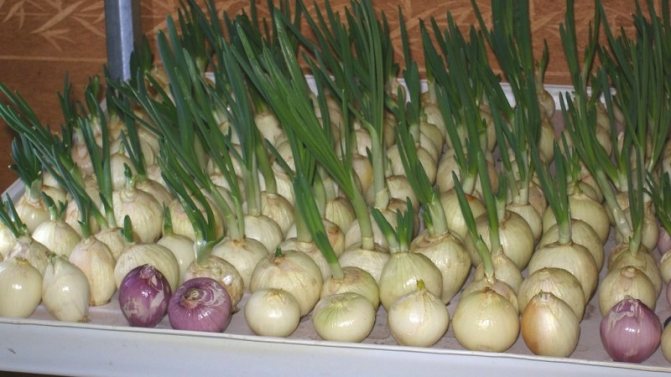
They also practice planting onion seeds directly in trays. In this case, it is necessary to adhere to this formula - for every 3 cm of the garden there are 10 seeds, there is also a distance of 3 cm between the rows. They must be sealed to a depth of 1.3-1.5 cm.When watering from below, rot and other diseases of seedlings are unlikely to appear.
When its height is 7 - 7.5 cm, the seedlings must be transplanted to a permanent place.
It has been noticed that seedlings take root better if they are planted in the evening, especially if the weather is cloudy. The rules for planting seedlings - there should be 10 cm between the plants and between the rows. Everything is well compacted with vermiculite. You can't embed it too deeply, it should be on the surface all the time. It is necessary to loosen the nutrient solution every day and make sure that it is constantly moist. Be careful, the bulbs have very delicate roots, they are easy to damage, and this is unacceptable, the bulb may die.
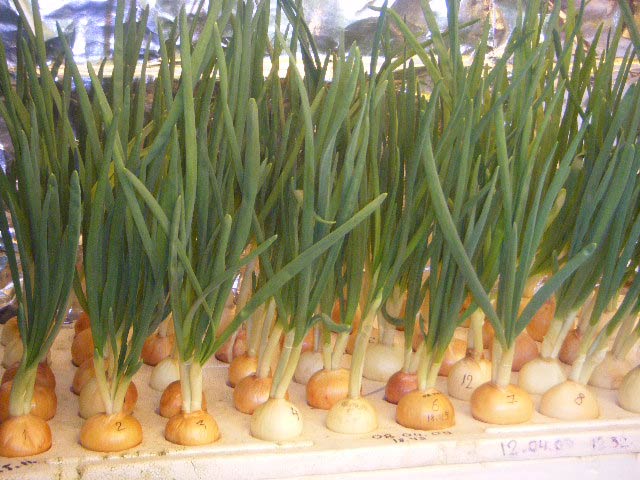
The nutrient solution is fed until the onion reaches the desired size, after which the onion matures in dry vermiculite. When it ripens, it is removed from the nutrient medium.
Other types of onions, such as leeks, are grown in the same way.
Growing dill hydroponically
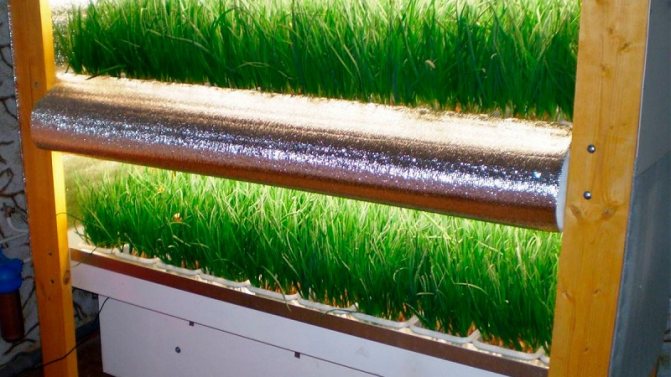
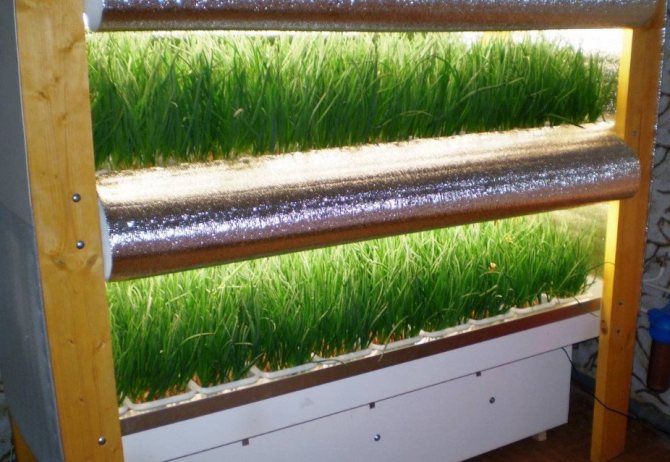
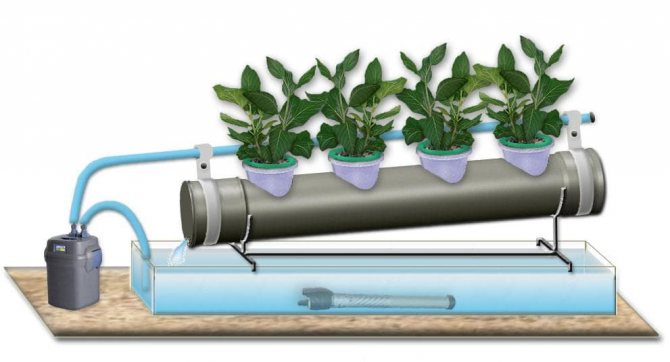
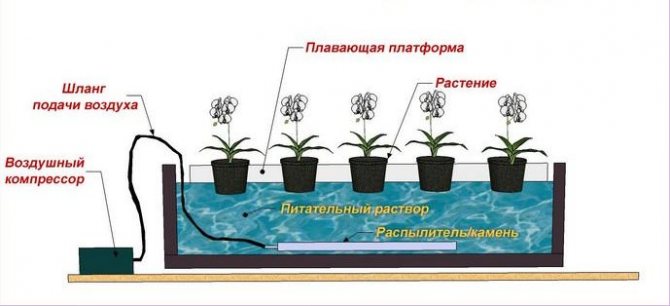
Using a hydroponic installation for growing dill will allow you to regularly get a crop with minimal investment and labor costs. An example of such an installation is shown in Figure 7.
Note: Hydroponics is a method of cultivating crops without soil. A special nutrient solution is poured into the installation, from which the plants receive all the necessary substances. Dill is undemanding to growing conditions, so hydroponics can be one of the best options for getting fresh greens not only in summer, but also in winter.
You can make a hydroponic plant with your own hands. This requiresabout:
- Take several plastic pipes (length and size depend on the area of the room) and cut holes in them to fit the size of the pots.
- We close the ends of the pipe with plugs with holes for the hose.
- Pour the nutrient solution into a separate container, which will flow through the hoses into the pipe. Optionally, a compressor can be installed to oxygenate the liquid.
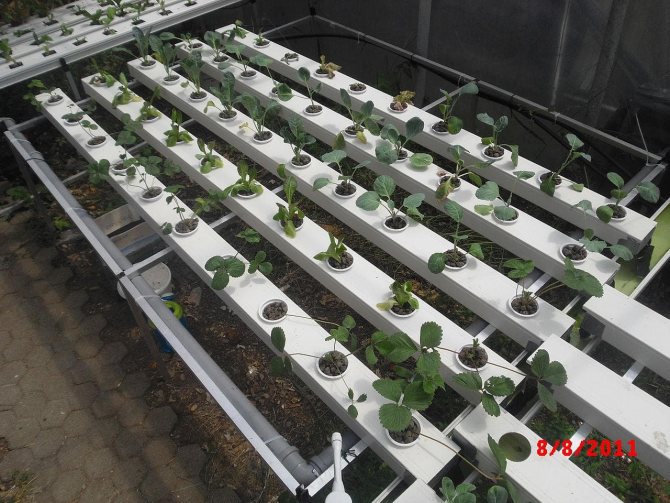
After preparing the installation, proceed directly to planting. The seeds are sown in separate pots with large holes in the bottom. A layer of expanded clay or other drainage material is placed in the container, and on top of it we randomly spread the seeds.
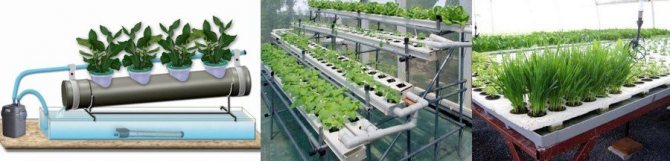
Figure 7. Growing technology in hydroponics
Until sprouts appear, the nutrient solution can be left out of the system. Seeds are watered from above and covered with foil to create an optimal microclimate. When shoots appear, liquid is launched into the pipe. It is advisable to install a timer and an automatic pump that will supply water at a certain time. This method allows you to collect greens without interruption all year round.
Advantages and Disadvantages of Hydroponics
- Hydroponics has many benefits:
- economical water consumption compared to forcing in the ground;
- the nutrition of the plant is under the control of the farmer;
- no need for pesticides and herbicides;
- with subsequent reproduction, a high viability of daughter plants is observed;
- potential products fully assimilate nutrients;
- the grower has access to the roots and can constantly monitor the condition of the rhizome;
- year-round cultivation of crops is possible;
- vegetables, fruits and greens can be "obtained" even in extreme conditions;
- a small amount of space is used.
- However, the method has several disadvantages:
- the crop can die at the slightest deviation from the technological process;
- it is necessary to carefully monitor the microclimate in order to prevent overheating;
- many crops, such as root crops, cannot be grown hydroponically;
- hydroponic systems are expensive, so the method is financially costly.
Winter and subwinter sowing of dill
Sowing in the winter allows you to get the first harvest in early spring. To do this, the garden bed is dug up in the fall, mineral fertilizers are applied to the soil and seeds are sown until the first frost.
Note: Podzimny sowing assumes a deeper seeding (up to 3 cm), as well as a higher concentration of seeds. This is the only way you can get enough greenery, since part of the planting material may die in winter.
The bed is covered with a layer of mulch, which will ensure sufficient heating of the culture and prevent moisture evaporation. It is advisable to put a layer of covering material on top.
Winter sowing is also possible. For this, the site is prepared in the fall (dug up and loosened), and in the winter it is cleared of snow and simply scattered the seeds on the surface. From above they are covered with humus or a layer of earth mixed with manure. In the spring, when the snow begins to melt, the seeds will grow into the soil along with water and humus, and seedlings will appear in a few weeks.
Growing dill on a windowsill in winter
The technology of growing dill at home in winter is no different from other times of the year. The only problem is that the plants will lack natural light. To extend daylight hours, fluorescent lamps are installed next to the pots.
You can also feed the crop in winter (about once a month). Under natural conditions, this is usually not required, but in the cold season, plants may lack nutrients, which will negatively affect their growth. It is desirable to maintain a stable temperature up to 19 degrees, although a slight decrease in this indicator is also tolerated normally.

How to prepare a solution
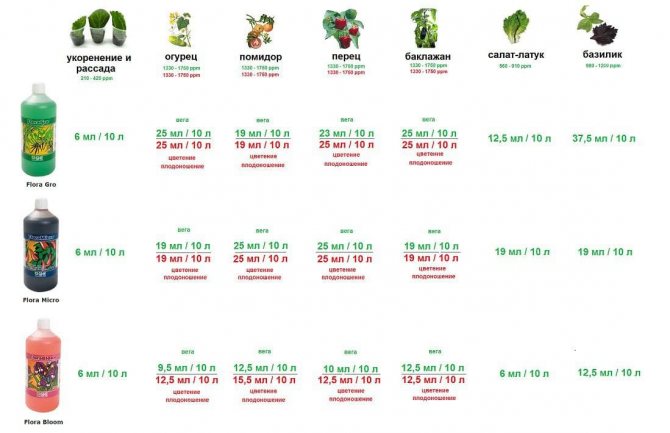
Some growers who want to delve into the biological and physical processes of plant development in more detail prefer to prepare a nutrient solution for hydroponics with their own hands at home. All the ingredients you need are freely available in almost every garden store.
To prepare the desired solution from a store concentrate, you must adhere to the following recommendations:
- Strictly observe the dosage indicated on the label by the manufacturer.
- During the feeding period, the fertilizer concentration is raised by a quarter relative to the usual proportion.
- Saltpeter is diluted in a ratio of 0.25 kg per 1 liter of water. This solution includes fertilizer at the rate of 2 ml. per liter of liquid.
- It is convenient to use a conventional medical syringe to prepare the components.
If you plan to make the basis for hydroponics with your own hands, then the proportions of mineral elements should be selected according to the existing formulas, which were developed on the basis of many years of research by scientists. All salt components are stored in separate vessels and mixed in a strictly defined sequence. The best recipes for mineral fertilizers that are suitable for most types of greens will be presented below.
Water requirements
To prepare a solution for a soilless plant growing system, a specially formulated water is needed. The ideal option would be distilled liquid or passed through modern filtering installations. If one is not at hand, then you can take an ordinary tap, the main thing is to let it settle for several days.
For quick and high-quality absorption of nutrients by greens, it is important to closely control the pH level. Its indicator should be in the range from 5.5 to 6.5. For accurate measurement, use a special pH meter or a liquid tester.
If the study shows an overestimated pH level, then you can use a special concentrate that can significantly reduce and equalize the pH values. It is called "pH Down".
Also, the above-described electrical conductivity of the feed water should be normal. With its high-quality regulation, it is possible to both reduce and increase the sweetness, size and appearance of the fruits obtained.
Important!
If something went wrong with the plant, its biological parameters began to deviate from the norm, then a complete replacement of the nutrient solution with pure water is recommended.
In it, the culture, without additional nutrition, should stand for at least a few days, after which improvements will be visible.
Ingredient List
In order for the greens to be healthy and develop actively, they need to receive all the vital components evenly, namely:
phosphorus; nitrogen; magnesium; potassium; zinc; sulfur; calcium; iron; boron; copper, etc.
How to make a DIY hydroponic plant
My husband and I are not the most rugged people, so we chose the simplest model. To create it, we needed:
- Plastic container;
- Foam sheet;
- Compressor for aquarium air.
Our hydroponic plant is a plastic container that is filled with a special solution, and on its surface is fixed a foam sheet that holds the hydroponic pots. It is best to take the container light-proof, matte and black. Transparent is bad because light can get into the solution and provoke the growth of algae. However, you can also paint it in the black selected container. You can also wrap it with food foil: it will not allow the solution to overheat and will repel the rays of light.
Next, we take a foam sheet and drill as many holes in it as you have pots of herbs. Pay attention to the diameter: it should be such that the pots are well secured and do not fall through. However, a container with a lid will also do - then the foam is not needed, and holes can be made in the lid itself.
But it is better to take special pots. A hydroponic pot is a kind of "string bag" made of plastic strips. However, you can also use disposable plastic cups, but you need to make a lot of holes in them. This will allow the greens to be kept in moisture at all times. It is also important that there is sufficient distance between the pots and that the leaves of the greenery do not interfere with each other.
There is one more important point. The roots of greenery in hydroponics have an increased demand for oxygen. If there are few air bubbles, the roots may die. To prevent this from happening, use an aquarium compressor. It is he who allows the roots to receive oxygen. And to obtain uniform saturation, spray stones for the aquarium are also used.
Installation device methods
To grow plants in this way, the installation itself is used, as well as the substrate and a special solution. The unit can be purchased in a specialized store, or you can build it yourself.
It includes a certain number of containers in which the soil and seeds of the plant can be placed, as well as a whole system that allows the nutrient solution to be supplied to their roots. On the market you can find a huge number of such devices that have individual characteristics, advantages, and disadvantages.
If you want to do the installation yourself, then you will need:
- suitable containers for plants;
- water tank;
- solution supply tube;
- pump for an aquarium;
- a timer that controls the entire system.
These materials will be enough to equip the simplest installation, which will be designed for growing greenery on a balcony or windowsill in the winter season.
If you lack the proper level of skills, time or desire, then you can not bother with making the installation yourself and order the device on the Internet.
Next, you need to purchase a substrate with which the pots are filled, its task is to support the roots of greenery. It contains no nutrients and is completely sterile. It is imperative to ensure that this substance is not exposed to chemicals.
You will also need a hydroponic solution for greenery. It will not be possible to make it with your own hands; you can buy it in specialized stores. This is a special liquid that contains the nutrients necessary for plant growth. A separate solution is required for each type of greenery.
Is it possible to grow greens hydroponically
Many types of greens can be grown using hydroponics. This is not a complete list of green crops that grow well not in ordinary soil, but in a nutrient solution:
- dill,
- parsley,
- basil,
- cilantro,
- Melissa,
- mint,
- watercress.
Of course, the correct organization of the hydroponic installation is necessary, for example, onions on a feather do not like excessive moisture - the flow-through method does not suit him.But this method is good for dill, lavender, basil and many other spicy annuals.
The parameters to consider when growing greenery are described below. If an ordinary gardener is interested in lighting, temperature, soil, watering, temperature, then a hydroponist is interested in equipment and nutrient solution. These are two whales that will provide automated cultivation of the desired crop.
Types, varieties of greens and features of their cultivation
Dill is grown both for greens and for the sake of seeds for harvesting, so the choice of varieties is quite wide. There are no special restrictions on species for hydroponics, usually an early ripening period is preferred, but this is not a strict rule.
Table: the most famous varieties of dill for growing in hydroponics
The Russian giant is good for the balcony culture - it bushes luxuriantly, very tenacious. Gribovskiy has a strong bright aroma, suitable for salting. Kibray is successfully grown hydroponically on an industrial scale. More or less proven hydroponic varieties of dill are Alligator, Hoarfrost, Gribovsky, Amazon, Preobrazhensky.
There are technologies that make it possible to reduce the maturation period of dill, indicated in the table, to 30 days: carefully calibrated artificial light, a specially selected solution. But the practitioners keep their achievements secret. At the amateur level, it is also enough to choose an early maturing, well-bushy variety.
Any early ripening leafy varieties are suitable from salads, for example, Lola Rosa or Emerald Lace. Likewise with varieties of parsley, arugula, basil - choose the earliest. Lettuce, mint is completely cut off 1 month after sowing. Parsley is ready to be harvested in 35–40 days from the moment of sowing in expanded clay.