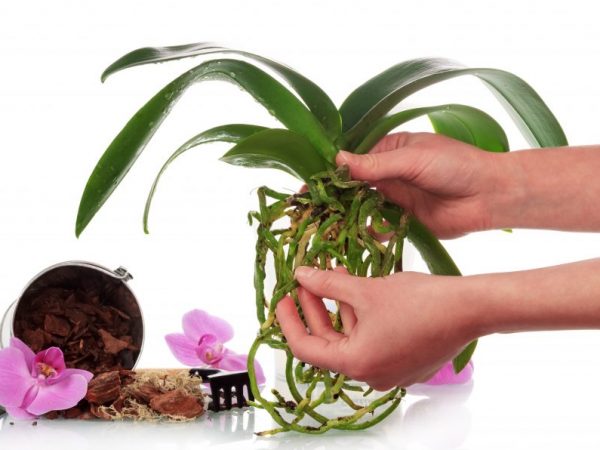
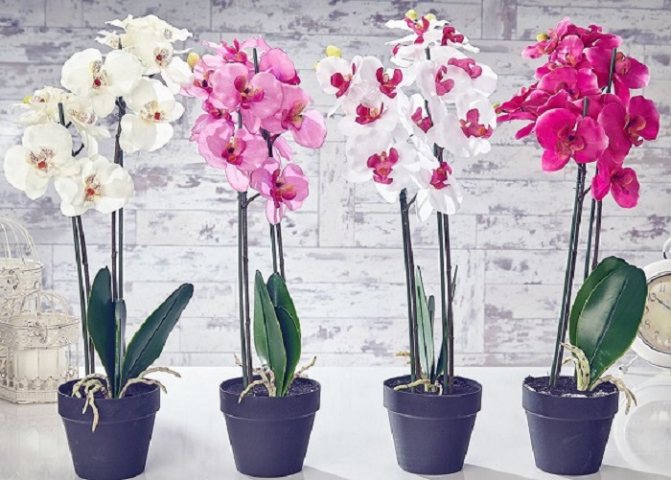
Phalaenopsis is a wonderful and beloved type of orchid, which nowadays can be easily purchased in specialized stores. If you already have this exotic plant at home, you can propagate it yourself.
One of the simplest and most affordable ways to grow phalaenopsis is vegetative reproduction by children. This article is about how to separate a baby from an orchid.
Methods of origin
Orchid sprouts appear at the site of the growing point dying off. If a new plant spontaneously appeared on the stem, then it is not recommended to separate it immediately, since it does not have its own roots. With illiterate handling, the plant can be lost.
In order for the orchid to give good offspring on its own, you must strictly follow the instructions and observe the following conditions:
- 1Pot is better to choose not very large. Calculate so that the container allows moisture and air to pass through.
- 2Allowable temperature differences - from + 15 ° C at night and during the day - up to + 30 ° C. This is the most comfortable temperature for orchids if you want to get a high-quality shoot.
- 3The room must constantly maintain excellent humidity and optimal illumination.
- 4To obtain good growth, it is worth reducing watering for 21 days.
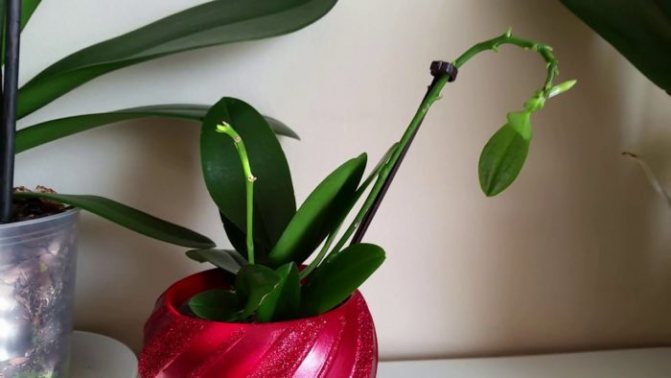
- 5After flowering, the peduncle must be shortened by about 2-3 cm above the upper bud.
- 6 It is recommended to constantly feed the orchid with nitrogen-based fertilizers.
Experts recommend the use of hormonal cytokinin paste, which stimulates the awakening of the buds in the plant and accelerates the formation of shoots. It is applied to the bud on the peduncle, previously cleaned of scales. After such a departure, the long-awaited process begins to form. This manipulation is recommended in March, when the plant wakes up and begins to grow rapidly.
During the period when the orchid has faded, you may notice some changes. The peduncle forms new stems with buds. In this case, new processes are also capable of appearing.
When the roots reach a size of about 5 cm, questions may arise about how, without damaging the beautiful flower, remove the children from the stem. If the roots are small and have not reached a size of more than 5 cm, then it is better not to rush with cutting and transplanting, to transfer such manipulation. It is worth waiting for the processes to get stronger and grow a little.
It is noticed that when a person does not interfere with the natural process of development, the roots of children appear and grow much faster.
Stimulation: application of cytokinin paste
A paste based on the phytohormone cytokinin is a drug that is widely used in floriculture. It actively affects the division of plant cells, awakening dormant buds, stimulates growth and flowering.
Its application is as follows:
- on a faded peduncle, a dormant bud is chosen, the uppermost or the lowest, since they give a more predictable result;
- with a sharp object (knife, scalpel, needle), cut a dense scale on the kidney;
- with the help of tweezers, remove the cut parts of the scales. A small bright green dot will open under them - a kidney with which we will work;
- a little paste is applied to it with a cotton swab (a ball about 2 mm in diameter).For better penetration of the drug, the kidney can be slightly scratched with a needle. All manipulations are carried out very accurately;
- paste completely evenly lubricate the surface of the kidney.
Attention! It is not recommended to treat more than two dormant buds on a peduncle with cytokinin.
7-10 days after applying the paste, you can expect the first signs of a growing baby or a flowering shoot.
Correct manipulation
Before you start the process of separating a sprout from a flower at home or in a greenhouse, you need to prepare a number of tools and delimit a place of work for yourself.
Useful for the transplant procedure
- scissors, preferably sharp, but it is better to use a pruner;
- a small and transparent container with holes on the bottom;
- suitable substrate;
- cleared crushed earth;
- rubber gloves so as not to get your hands dirty;
- cinnamon, or activated carbon to process the cut of the plant;
- alcohol for processing instruments.
All this is necessary to separate the formed baby in order to carry out the procedure correctly and not harm the main plant.
What soil is suitable for an orchid
The separated process is transplanted into a new container. They fall asleep in a new pot in a previously prepared soil. It is easy to get it from a flower shop or make it at home. This requires pine bark. It is crushed into pieces no more than 1 cm in diameter. The bark must not be peat or pine dust.
Another version of the soil into which it is allowed to transplant a new orchid baby is moss. Based on the recommendations, it is better to use it as a substrate. This is due to the fact that the bark is characterized by good moisture holding capacity and air permeability.
In rooms with a dry microclimate, sphagnum moss is an irreplaceable assistant, making the soil moisture-absorbing. If the climate is temperate or too humid, moss should be avoided. To plant a baby of a decorative orchid in an overly wet soil is fraught with consequences. After a while, the first signs of abnormal development will appear: wilting of the leaf plate, loss of color, etc.
Separation process
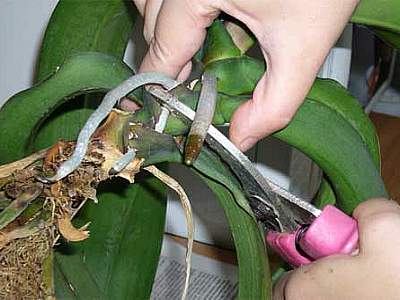
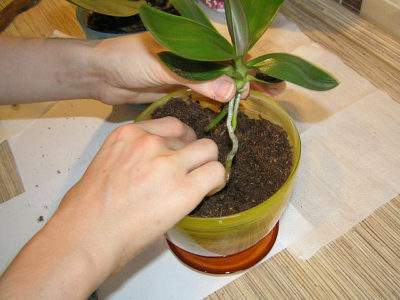
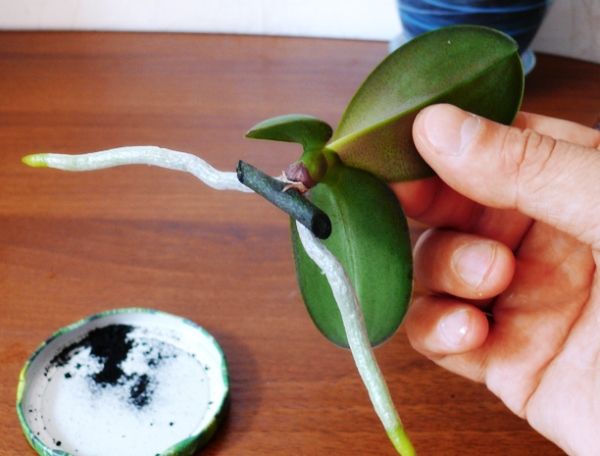
The baby should be cut off from the trunk of the orchid with pruning shears or scissors. It is worth eliminating the segment from the plant without removing it to the end, leaving more than 1 cm of the peduncle. Then it is recommended to put the shoot in a dry place for 40-50 minutes in order to tone its base. It is advisable to sprinkle the cut area with activated charcoal, which must first be crushed, or cinnamon powder.
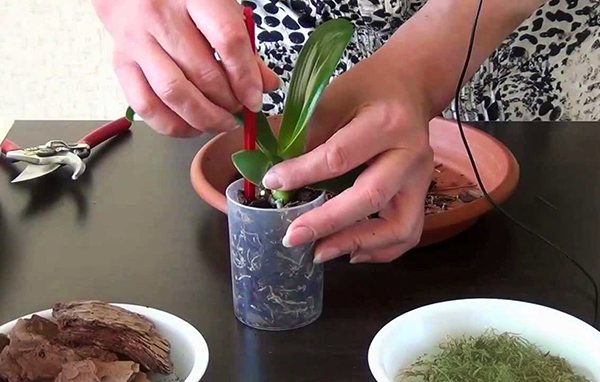
A small plastic container is useful for disembarkation. Small holes should be made in the bottom of the cup. Next, you should lower the process into the container so that the root is at the level of the edge of the glass. Advice! It is recommended to distribute the roots evenly over the surface. Holding the sprout with your hand, it is worth carefully filling the space around it with a special substrate and earth. You can use ready-made soil with a specialized composition. There should be small pieces of bark in the correct soil.
It may happen that the roots of the plant do not fit completely in the glass. Do not be afraid of this. It is quite permissible not to sprinkle them with earth, but to leave them on top of it. It is advisable to thoroughly compact the soil in which the new plant is planted.
Even experienced gardeners recommend planting orchid babies in sphagnum moss. Further, it is important to irrigate the land daily, but not to oversaturate too much moisture. For an orchid with such a soil, it is more favorable to be in a drier room, because in a humid place, waterlogging may soon begin, which will lead to the appearance of a fungus, rotting of the roots and the plant as a whole.
Immediately after the planting process, it is strictly forbidden to water the plant with water.The planted process must be saturated with moisture only a couple of days after being placed in a new environment for it. Otherwise, an infection will penetrate into the untightened cut. After transplanting, an adult flower should be watered after a week.
When will it bloom?
As much as you would like to see the flowers of your young plant as soon as possible, do not rush to do it. Blooming too early can harm the plant. Outwardly, everything can go well enough. But the consequences will appear a little later: the orchid will weaken and begin to hurt. This will happen because the phalaenopsis will give all its strength to the opening buds, and there will simply be no health left on the roots and leaves. After all, for the "child's body" this is a huge burden.
Therefore, in any case, do not stimulate the formation of buds on the orchid. This should happen by itself, and not earlier than one and a half to two years after the transplant. Remember: everything has its time.
Perhaps we talked about all the stages of growth and development of the phalaenopsis orchid babies. We hope this information will be useful to you and you will heed our advice.
Transplanted plant care
Such a shoot has practically no roots, and the leaves do not have enough water and nutrients. Watering your new orchid should be moderate and at intervals of no more than once every 3-4 days. It is important to pay attention to the fact that watering should be done only after the soil in the container has completely dried out.
When the transplant was successful, do not calm down. The condition of the flower should be closely monitored. It is advisable to feed the plant. This should be done with the beginning of a new growth, each time during the 2 watering period. Don't overdo it with fertilizers. This will have a bad effect on the condition of the flower.
To speed up the growth and flowering of an orchid at home or in a greenhouse, botanists have developed a number of specialized vitamins, fertilizers and even pastes. The planted plant will begin to bloom in about a couple of years after renewal. If the seedlings are not entirely healthy, then a certain favorable atmosphere should be created for them. This is moderately humid air, regular watering. Do not forget about frequent ventilation of the room. Plants require fresh air, 12-15 hour daylight hours are desirable. It is better to place the flower closer to the window, but place it so that the sun's rays do not fall directly on the leaves.

Follow-up care
A small orchid should be looked after in the same way as an ordinary adult. Let's briefly talk about all aspects of phalaenopsis care:
Watering. Please note that you do not need to water the offshoot right away (do not forget that you planted it in a moist bark). It is better to carry out this procedure for the first time on the second or third day after the transplant, and then everything is as usual - once every seven to ten days.- Air temperature. It should be high at the beginning - at least 22 degrees above zero. Adhere to the condition of maintaining the difference in daily temperatures.
- Air humidity. At first, it is advisable to raise its level to 70-100 percent. And in the future it will be possible to keep this figure at the level of 60-80 percent.
- Lighting. It should be constantly long and at a sufficient level. Stick to the criterion of 10-12 hours a day.
- Top dressing. Start fertilizing a young plant in the second week after transplanting. The rules are the same as for an adult phalaenopsis.
A little about orchids
Orchids are a common indoor and greenhouse plant. They have gained such popularity because of their unusually attractive appearance. The tubers of these plants are sometimes used in medicine as a coating agent due to the starch they contain.
The pollination system in representatives of the species of orchids is very diverse. Insects play a very important role in pollination. Scientists have already developed a number of mechanisms for high-quality pollination of a flower.
Many growers, even experienced growers, fear that this magnificent and sophisticated plant requires tremendous attention. It is worth carefully studying all the nuances of caring for such a beautiful plant.
So, orchid propagation is a very difficult process, but very exciting. It helps to expand the collection of beautiful plants indoors or in a greenhouse. If you act carefully, you can get a lot of shoots and many more beautiful flowers of this species.
Growing an orchid from a cut peduncle
Florists are often interested in whether it is possible to grow orchid babies from a cut peduncle. Can. For this:
- the peduncle is cut off and placed in a container with settled water so that its base is submerged in water by 4-7 cm. Instead of water, you can use a 0.005% solution of a complex mineral fertilizer;
- do all the manipulations to awaken the sleeping kidney with the help of cytokinin paste. In this case, the peduncle is taken out of the container, then the cut is updated, the water in the vessel is changed;
- the flower-bearing arrow together with the vessel is covered with a plastic bag.
The plant is placed in a well-lit place. The further development of the baby takes place in the same way as on the mother's orchid.
And a little about secrets ...
The story of one of our readers Irina Volodina:
Especially depressing for me were the eyes, surrounded by large wrinkles plus dark circles and swelling. How to remove wrinkles and bags under the eyes completely? How to deal with swelling and redness? But nothing makes a person look older or younger than his eyes.
But how to rejuvenate them? Plastic surgery? Recognized - at least 5 thousand dollars. Hardware procedures - photorejuvenation, gas-liquid pilling, radiolifting, laser facelift? Slightly more affordable - the course costs 1.5-2 thousand dollars. And when to find all this time? And it's still expensive. Especially now. Therefore, I chose a different way for myself ...
Orchids are demanding flowers. They need constant care, feeding, suitable soil, proper lighting and air humidity. The correct process of transplanting an orchid at home is very important.
Adhering to the advice of experienced florists and general rules for caring for the plant, your orchid will delight the eye with its lush bloom. Transplanting an orchid baby at home is not a difficult process, so do not be afraid and start separating the shoots if they have already started their roots.
How does the transplant take place
After the sprout has grown and the maternal part of the plant has given it everything it needs for independent functioning, an attempt is made to transplant the resulting orchid baby.
For this:
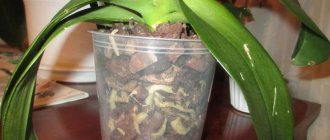
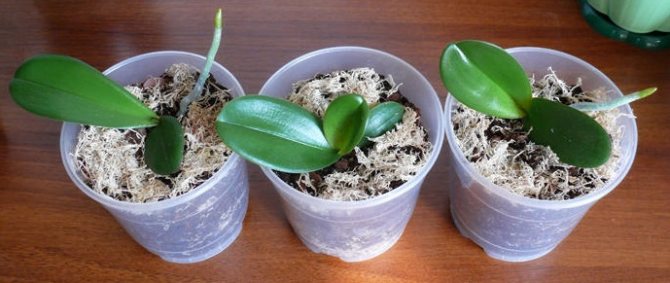
- Take a transparent pot (if there is none, a container from under a cotton swab is suitable). Holes are made at the bottom so that excess water does not accumulate.
- It is important to plant the sprout strictly in the middle, so that its root collar is flush with the edges of the container. The roots are carefully placed on the ground surface.
- Then, gently holding the young phalaenopsis, the pot is filled with a substrate.
- The soil is carefully tamped so as not to add the substrate.
Orchid baby transplant rules
Orchid propagation by children
Reproduction of the Phalaenopsis orchid by children
There are several ways to reproduce orchids at home:
- reproduction by seeds;
- side shoots (children);
- dividing an adult plant into two equal parts, but this or that method is not suitable for every species, be vigilant.
Some types of orchids are propagated by rhizomes, but this method is not suitable for the Phalaenopsis orchid. At home, it is best to use the vegetative method, separating the rooted side shoots (babies).
Orchid baby
It is important: if a shoot has formed on the peduncle, and the orchid has just faded, it is impossible to separate the shoot. Let the plant rest for one to two months after flowering. You need to plant only those shoots that have leaves and roots, about 5 centimeters in length.
The roots are a clear confirmation of the child's readiness to independently obtain the necessary substances from the soil without the help of the mother's plant. The main thing is not to let the children outgrow, this can harm the mother's outlet. After separating the shoot, before planting, you need to dry it for a day and plant it in the prepared mixture.

In Phalaenopsis, the appearance of lateral processes is not the norm. This means that in caring for the plant, you are doing something wrong, and the plant makes it known in this way. If the orchid does not have children, they can be awakened artificially.


In what cases is deposition not recommended?
The processes that appeared on the peduncle and root can be separated, but this can be done only when you see the first 2-3 roots five centimeters long. But this must be done with utmost care so as not to damage the maternal parts of the plant.
But the children formed on the stem are not advised by experienced flower growers to cut. They do not have their own root system, and if the processes are improperly manipulated, the chances of harming the mother plant increase.
How to separate the baby correctly
Materials for transplanting babies
As soon as the roots appear, it is time to separate the process. But what if the roots never appeared? There are times when a baby grows for a long time without roots. In such a situation, you need to wrap the place where the shoot attaches to the mother's plant with moss and constantly moisten it with water until the roots sprout.
Prepare everything for transplant:
- clean (if possible) land, preferably shallow;
- moss;
- a small plastic pot with a diameter of about eight centimeters;
- scissors;
- knife;
- hydrogen peroxide;
- crushed coal or cinnamon.
Almost all types of plants require a pot with large drainage holes for water to escape. Each flower needs a different drainage and this must be taken into account in order to choose the right one. So, for cacti, orchids and succulents, a fast drainage system is needed. It can be created in a small pot with a porous substrate and lots of drainage holes.
Here are the main recommendations for separating orchid babies:
- cut the baby together with the peduncle particle. Leave a peduncle about 1 centimeter in length for the baby. On the plant of the mother and the plant of the child, the places of the cuts must be dried for half an hour, then sprinkle them with chopped charcoal or cinnamon;
- it is necessary to transplant a baby with a sprouted root system into a small (transparent) plastic pot. Small holes should be made in the bottom to drain excess water after watering;
- place the baby plant in the middle of the pot so that the root collar is at the level of the edge. Place the roots carefully in the ground and in no case tamp, otherwise damage the plant and its roots;
- hold the plant by the root collar and carefully pour the soil into the pot. The roots themselves must be carefully covered with earth;
- water the plant a couple of days after planting. During these days, the cut made on the peduncle will have time to heal and the risk of infection will be minimized.Note: an adult orchid after transplantation should be watered only after four to six days, and the transplanted shoot after two. Since the baby simply cannot withstand such a long period without watering.
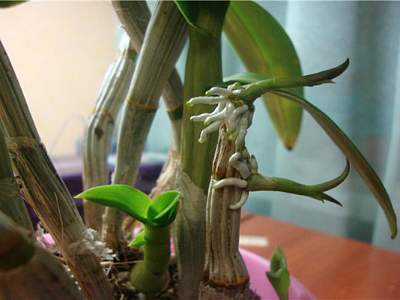
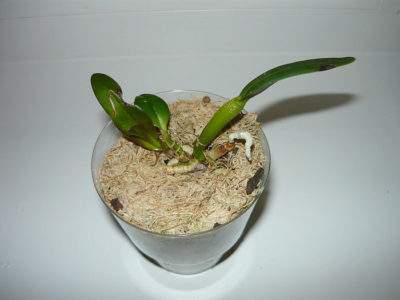
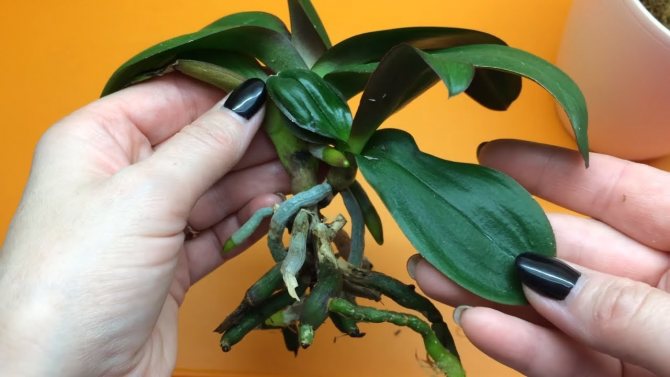
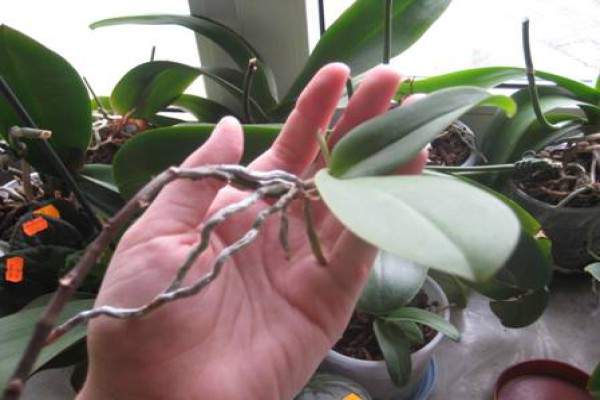
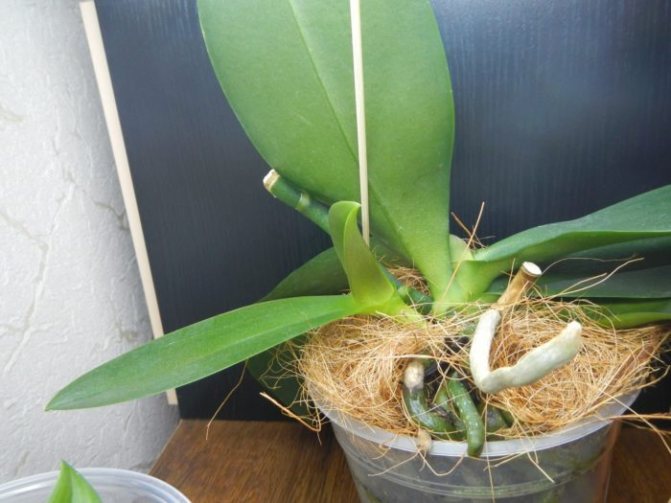
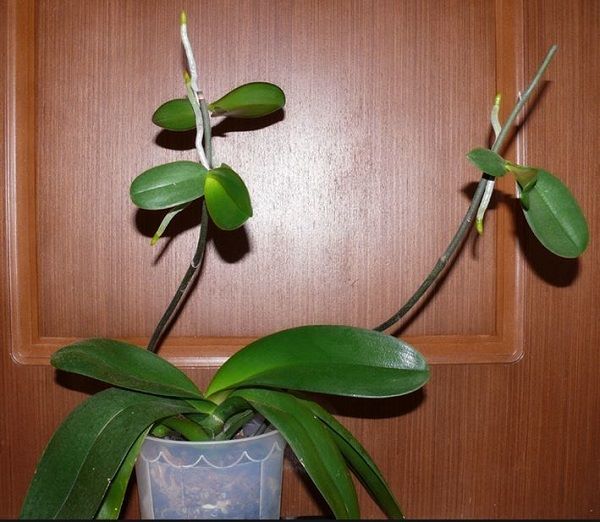
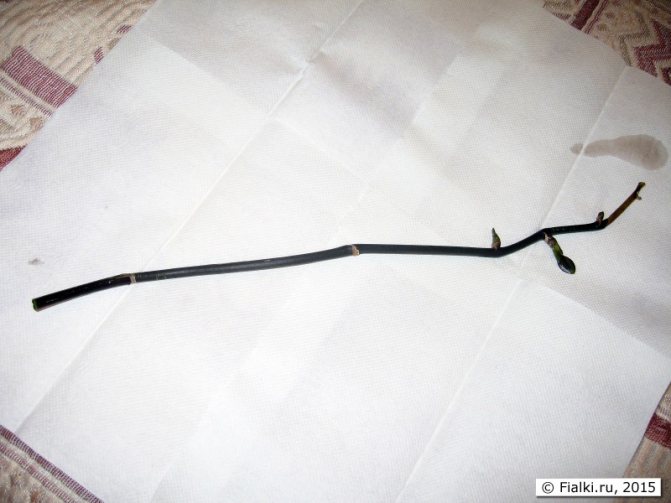
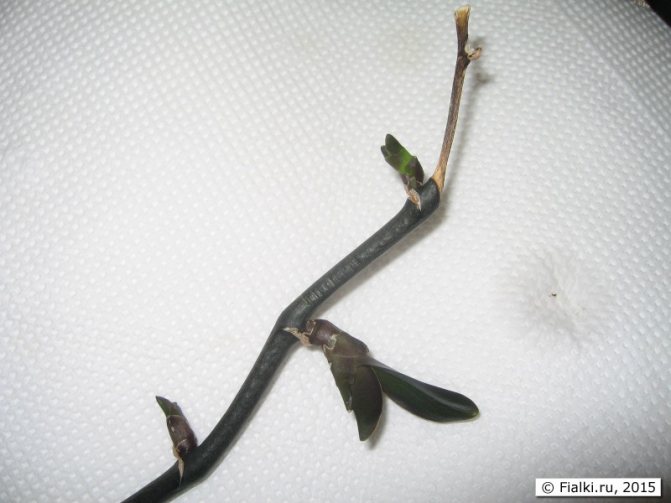
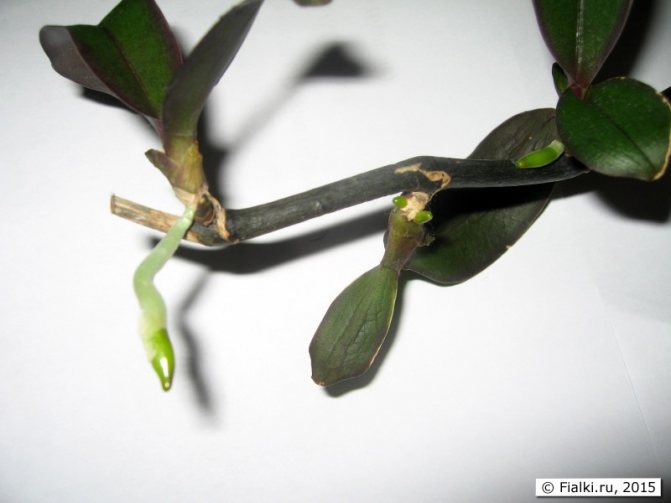
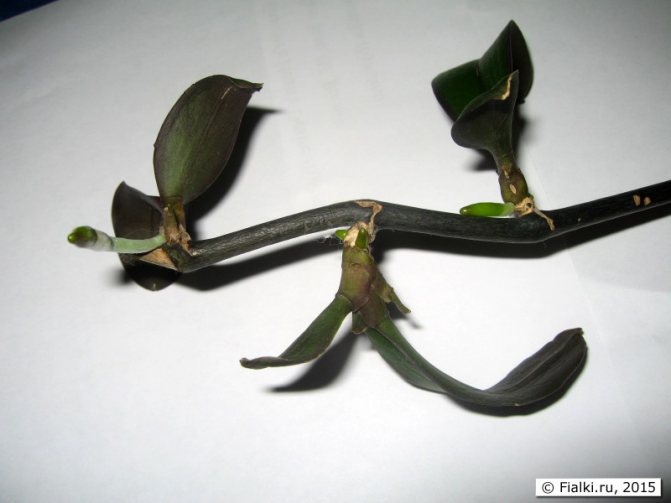
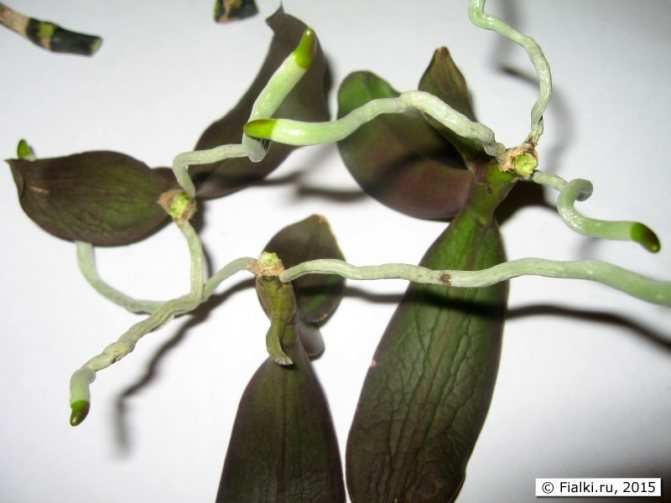
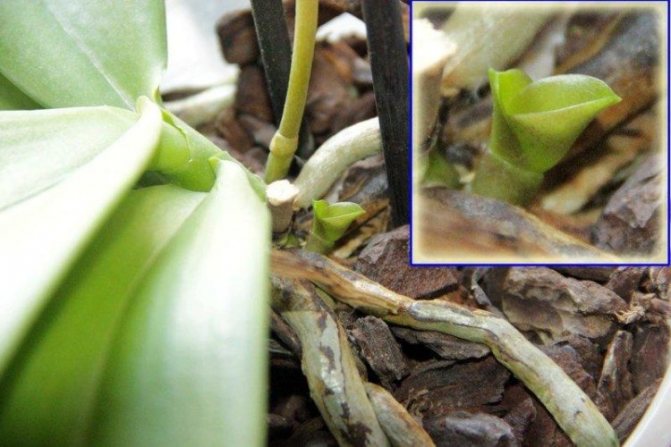
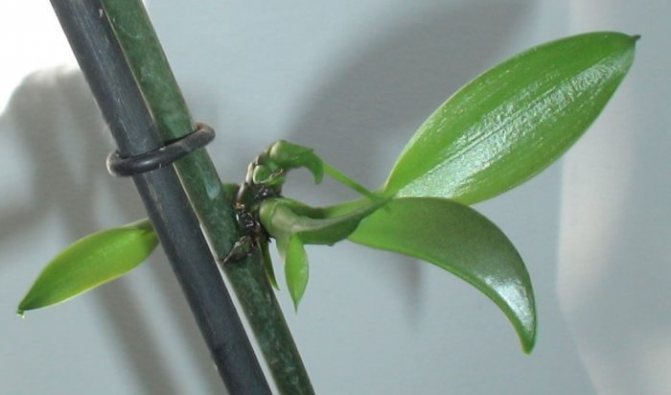
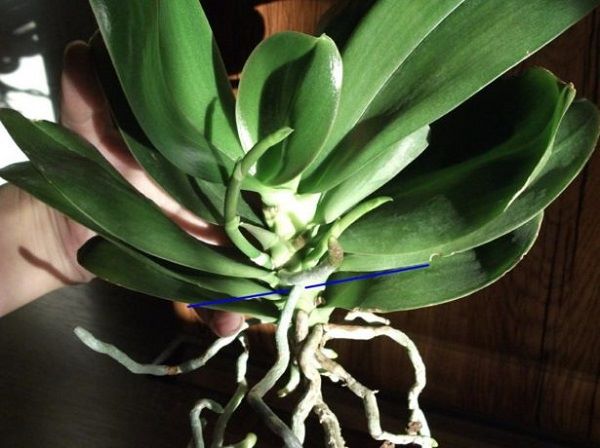
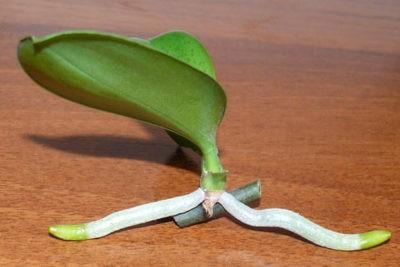
In the example photo, the shoot managed to acquire roots, but when they are not there, it is necessary to help the plant and independently stimulate the process of germination of the root system.
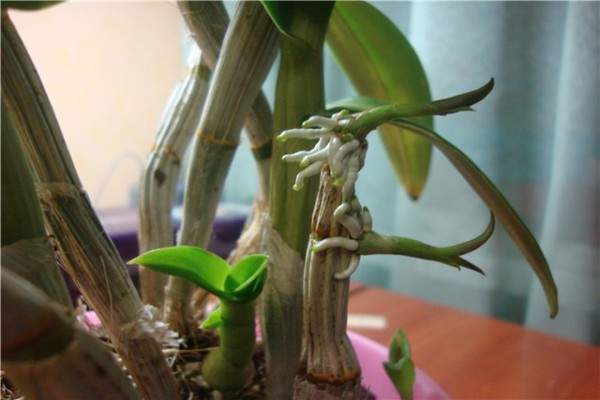
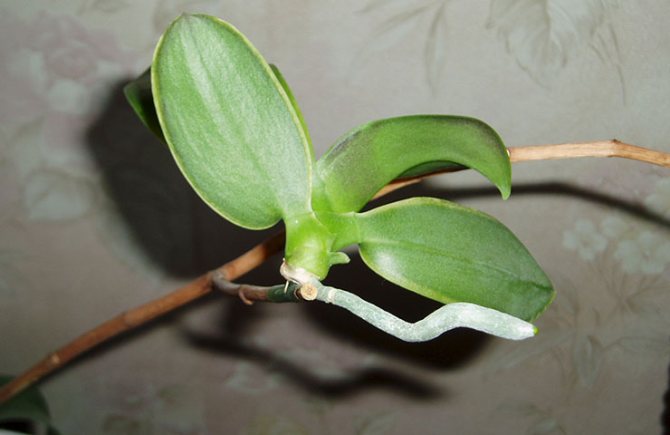
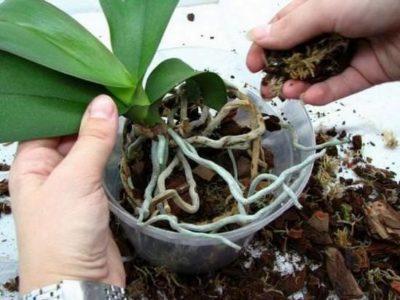
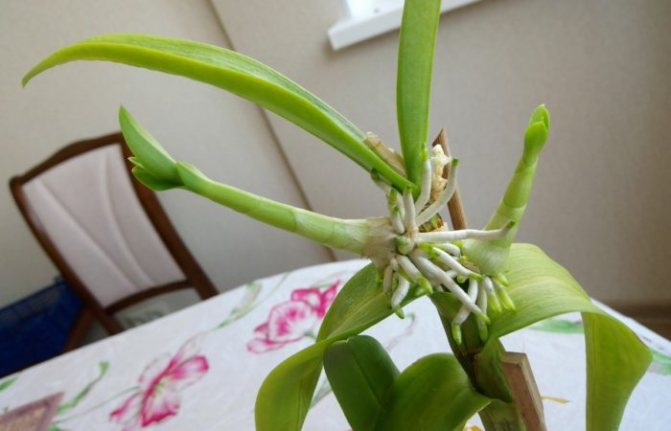
Side shoot (baby) with sprouted roots
Such an escape (as in the photo) can be safely separated. Do not forget to process the cut site on the mother plant and on the baby itself.
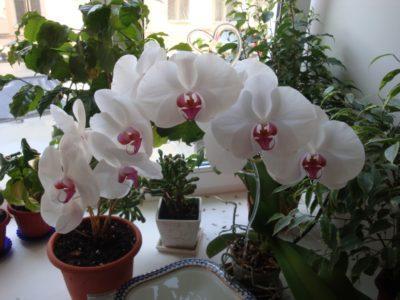
Thus, the planted orchid will be exactly the same as the mother plant, and will begin to bloom two years after separation.
Mature babe shaping
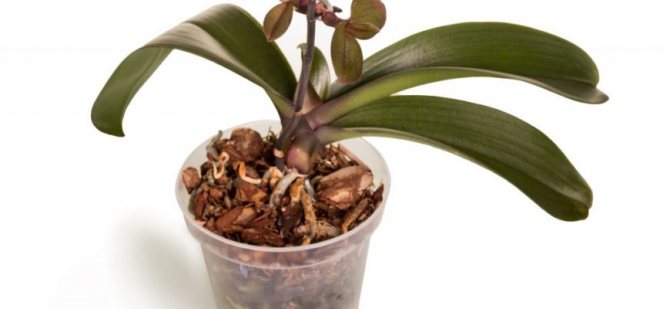
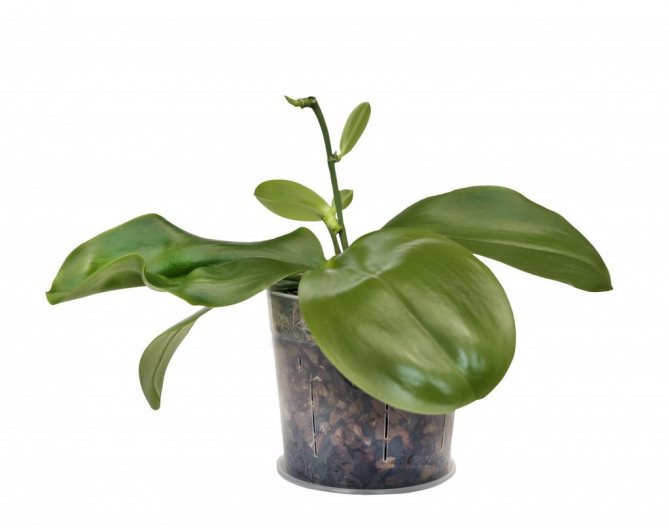
Phalaenopsis baby is natural clone of the mother plant and after transplantation it will have the same characteristics as an adult orchid (color of flowers, their size, etc.).
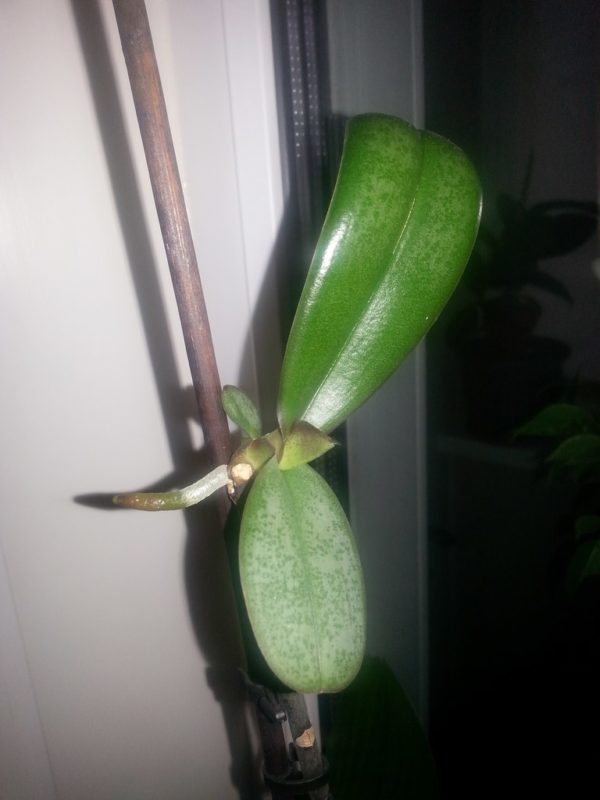
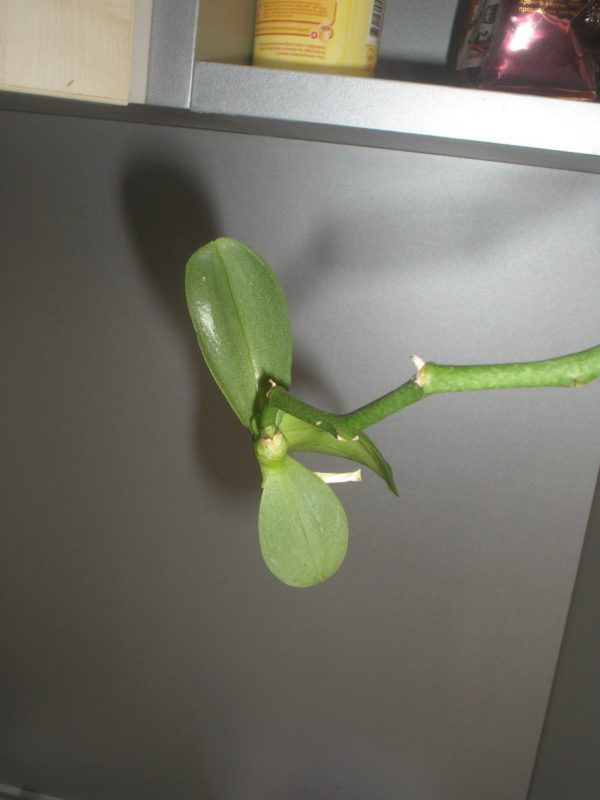
It is a miniature, fully formed orchid: it has leaves, stem and roots, and sometimes, being on the mother plant, even releases a small flowering shoot.
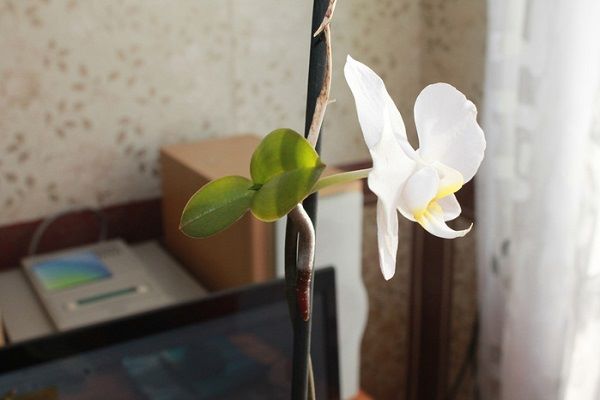
The baby can bloom while on the mother plant.
Conditions
Sometimes from dormant buds, which are located on the flowering arrow, leaf axils or at the roots of the orchid, babies are formed. There are enough of them easy to use for vegetative propagation of phalaenopsis.
If such a baby appears as a lateral process on the stem of an orchid, it is called basal.
Very often, vegetative processes are formed on the flowering arrow... This method is most convenient for orchid propagation, it consists of several stages:
- activation of dormant buds located on the flowering arrow;
- the phase of germination and development of layering (babies);
- separation and transplantation of the formed layer.
The most favorable period for the formation of children comes after prolonged flowering of the orchid.
But for them to appear, the plant also needs certain cultivation conditions:
- the orchid must be an adult, with a well-developed root system, have at least 4 large leaves;
- orchid flowering should be in its final phase;
- the optimal time of the year is spring or early summer;
- relatively high air temperature;
- air humidity at the level of 50-60%;
- sufficient light intensity in the room.
At low humidity, as well as in winter, when the illumination drops significantly, phalaenopsis babies are not formed.
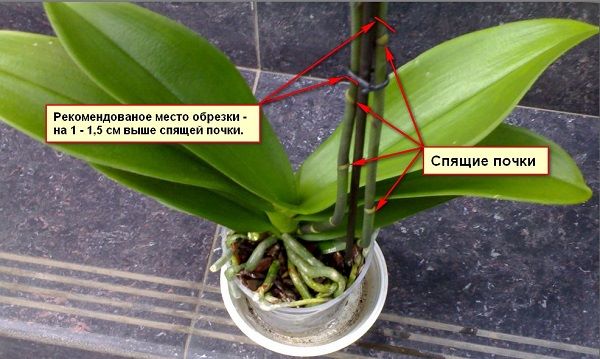
In order for children to form on the flowering shoot, after the end of the flowering phase, it is not cut off, but shortened by 1.5-2 cm above the upper dormant bud. it stimulates the awakening of the rest of the sleeping kidneysthat are on the peduncle.
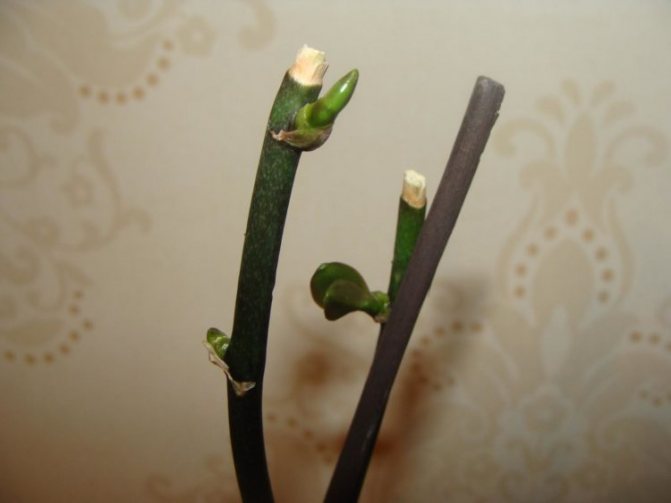
Stimulating orchid babies.
Sometimes the shoots form by themselves, but in some cases, even if the plant is in optimal conditions, stimulation of their distillation is necessary. This is facilitated by:
- daily temperature fluctuation. It should be cool at night - up to + 17-18 ℃, in the afternoon - up to + 27-30 ℃. These conditions in the spring and summer are most favorable on a glazed balcony;
- poor watering of phalaenopsis should be combined with high relative humidity. In an apartment, this requires regular spraying and installation of the mother plant on a stand with wet moss or pebbles;
- a large amount of intense scattered light.
Having provided the necessary cultivation parameters, it is enough to simply cause the appearance of vegetative layers at home.
Advice! When buying an orchid from a store, be sure to find out what type of orchid it belongs to. This will allow not only to properly care for the plant, but also to learn the secrets of its flowering and reproduction.
Period
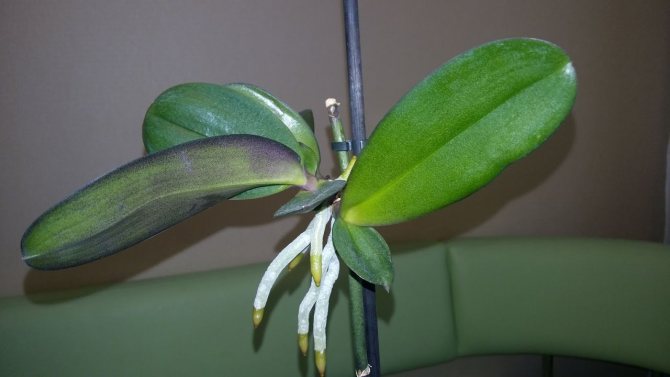
On the peduncle or stem of the phalaenopsis may develop from one to several small plants... First, they form leaves, and after a certain period, the roots.
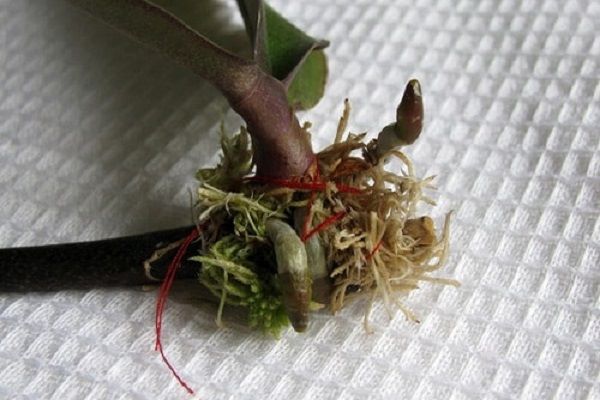
If the roots do not form for a long time, their development can be stimulated. To do this, prepare sphagnum moss, cling film and strong thread:
- moss for half an hour is soaked in water until it swells completely;
- they form a lump of moss and wrap it with thread so as not to disintegrate;
- the formed lump, carefully, so as not to injure the plant, is attached to the base of the peduncle with a thread;
- at low humidity indoors, the moss is additionally wrapped with cling film to create a greenhouse effect inside. The film must be opened daily to air the baby;
- since a plant with moss can tip over, it is better to attach it to a support;
- moss should be sprinkled daily with water, to which you can add the root growth stimulator "Kornevin".
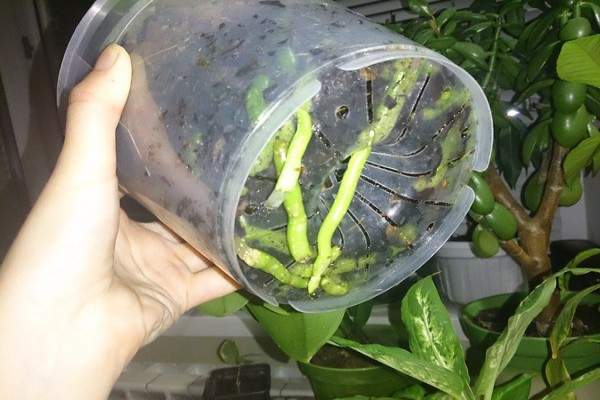
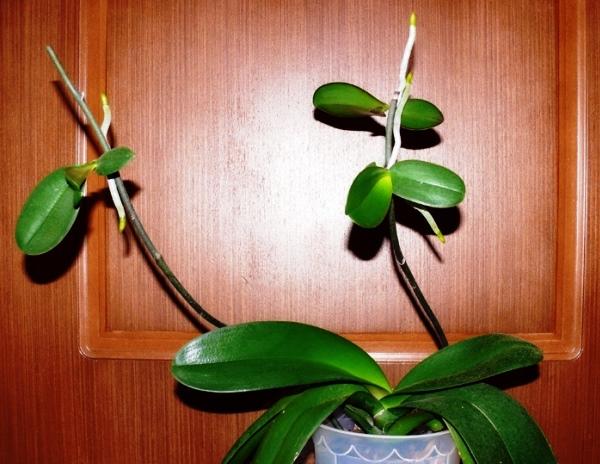
After the baby's roots have grown, it can be placed in a separate pot. On the mother plant, layers develop, as a rule, within six months.
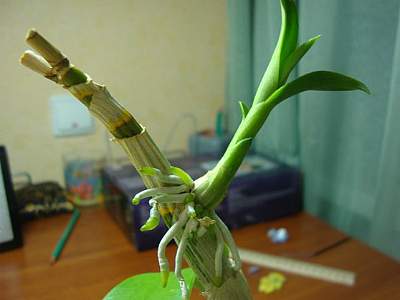
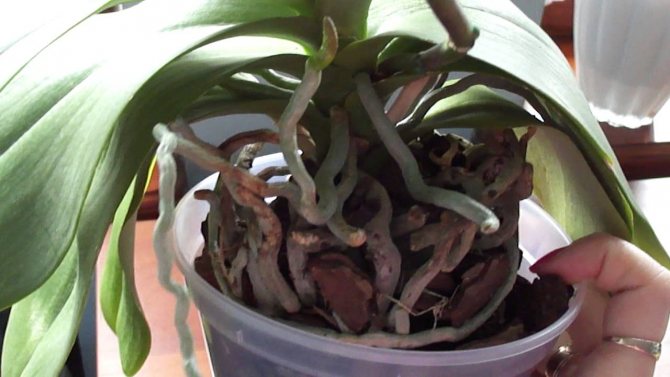
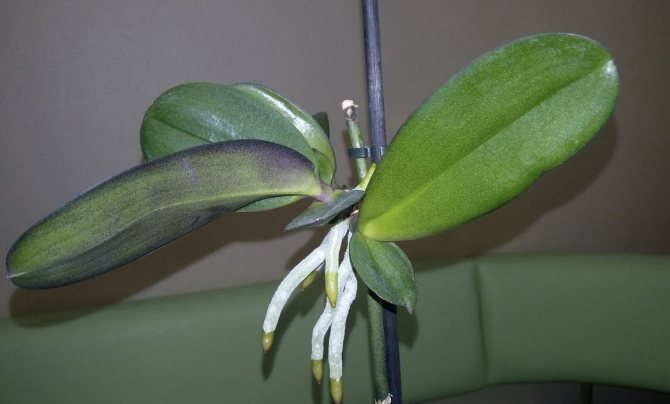
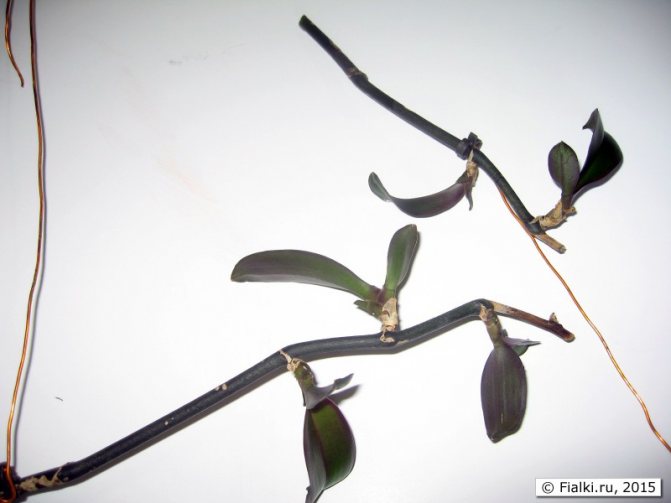
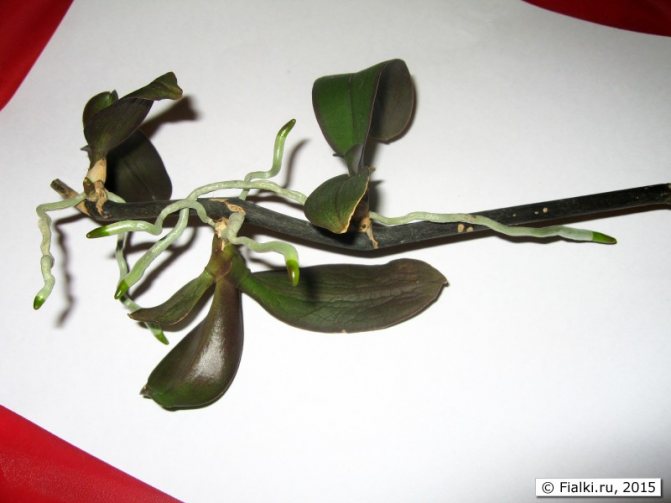
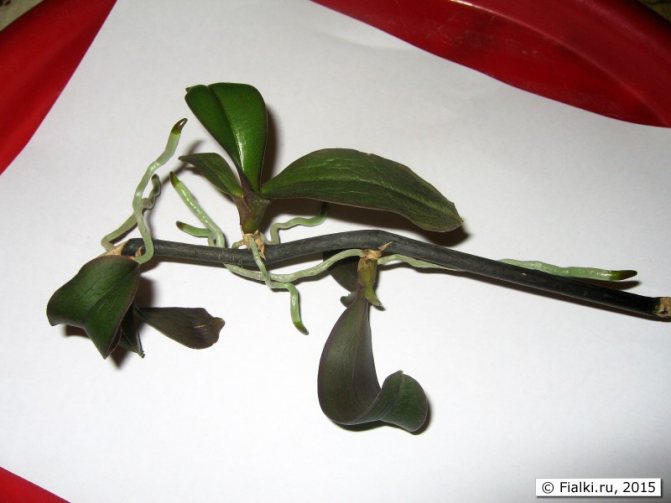
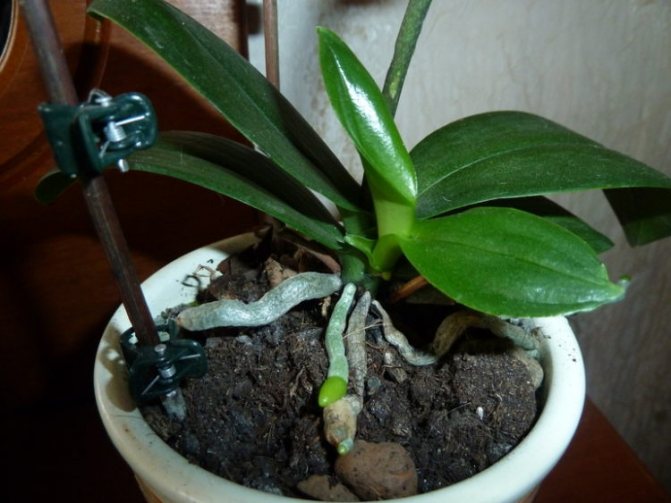
Several babies on peduncles.
Determination of readiness for transplant from the mother plant
In 6 months in a small child, 2 pairs of leaves are formed and roots will form.
Attention! If the roots of the baby are too small, after transplanting the plant will take root for a long time and hurt. In this case, it is better to postpone its separation and wait for the roots to grow.
After the emergence of 3-4 roots about 5 cm long in a formed baby, it can be separated from the maternal phalaenopsis and transplanted into a separate pot.
Preliminary preparation
In order not to severely injure an adult plant when separating a formed baby, it is necessary to prepare the tool and related materials for work:
- garden pruner, scissors or knife;
- any disinfectant (such as alcohol);
- a few tablets of crushed activated carbon or cinnamon;
- a small transparent glass or pot for transplanting layering;
- soil mixture for planting a small orchid.
You can use as a pot clear or frosted plastic cup, in which to preliminarily do drainage holes... The glass should be small enough to fit the roots.
Soil mix can be prepared with your own hands from the following components, taken in equal proportions:
- pine bark, pre-boiled and cut into pieces of about 1 cm;
- sphagnum moss;
- charcoal.
Also ready-made high-quality potting mix can be purchased from a specialist store... The main thing is that the pieces of bark in it are also no more than 1 cm.
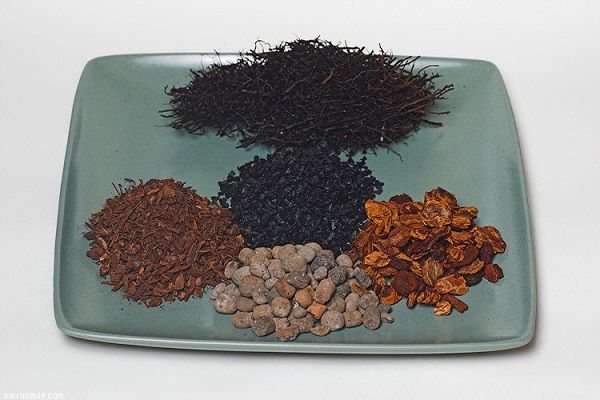
Phalaenopsis substrate composition.
After the orchid grows up, the pot should be replaced with a larger pot.

Post-transplant care
After a successful orchid transplant, keep a close eye on the condition. Strong and healthy shoots can easily be transplanted into a new pot and begin to grow rapidly. Water your orchid in moderation (see this article for more information on how to properly water your orchid at home).
You need to start feeding the plant with the beginning of a new growth, during every second watering. But do not get carried away with fertilizers for orchids, the main thing here is not to supplement, than to overfeed.
Unhealthy seedlings need special care. First of all, for such plants, you need to create a certain atmosphere, namely: the required air humidity, regular moderate watering, a special greenhouse.
Pay attention to the air condition in the room where the plant is located.... Remember to regularly ventilate the room. Take flowers to the balcony: let them bask in the warm summer sun, but in the shade so as not to burn the leaves.
To stimulate growth, water the orchid on time, feed and take care of the plant. There are a variety of vitamins and orchid pastes that will speed up not only the flowering of the orchid at home, but also the process of the appearance of the baby. Plants feel cared for, and in return they will delight you with their beauty.
From this video You will learn how to transplant an orchid baby:
Orchids are wonderful flowers that get along well at home next to a person. Since the century before last, there have been many changes in the methods of care and reproduction of these wonderful tropical beauties. Now there is no need for laboratory conditions for the orchid family to reproduce.
Among several methods of home breeding, one is distinguished.To implement it, you need patience and the ability to properly care for an orchid, and these qualities should be in abundance for flower growers who have chosen orchids.
In this article, we will talk about transplanting an orchid baby at home.
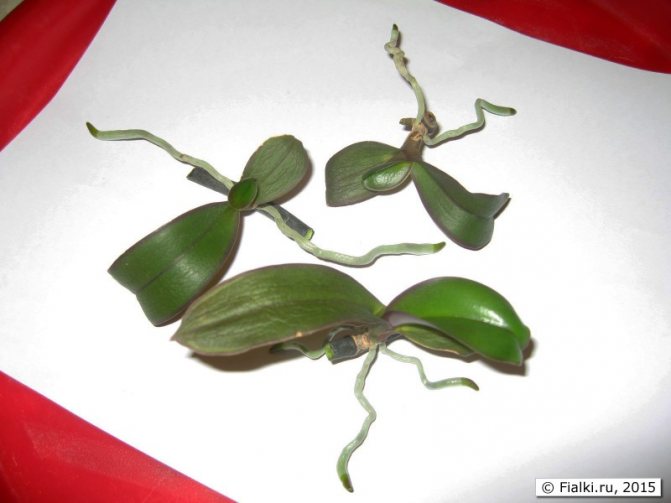
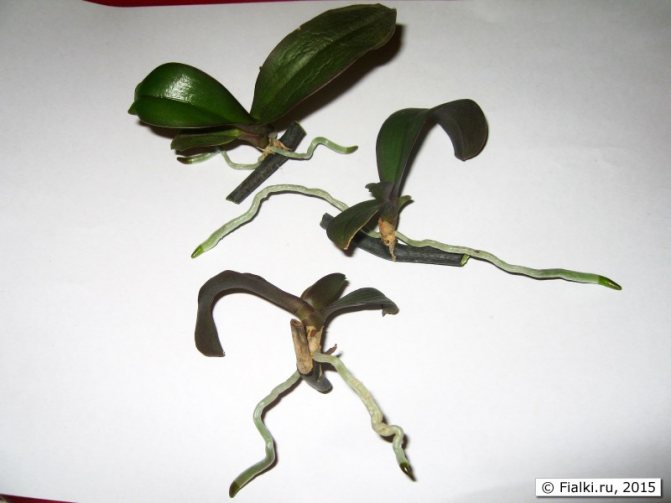
Photo
The photos below will help you figure out how to distinguish a phalaenopsis baby growing from the trunk, from the peduncle and from the root zone.
General Provisions
Reproduction by children begins with the correct approach to the entire process.
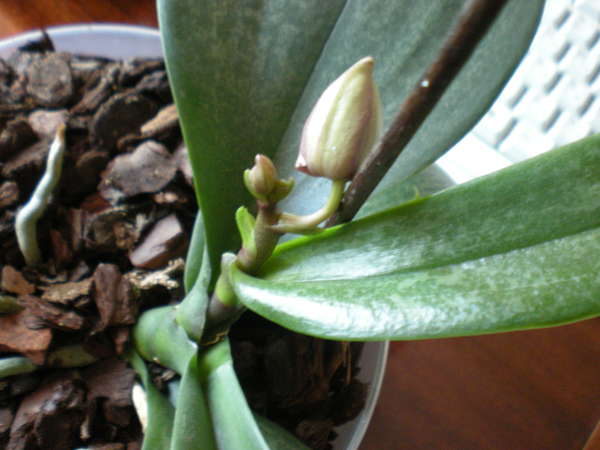
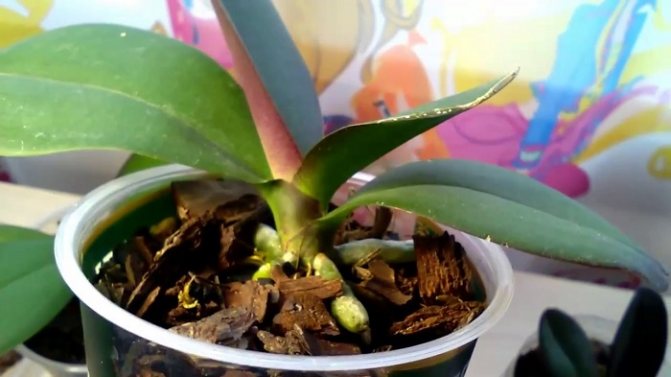
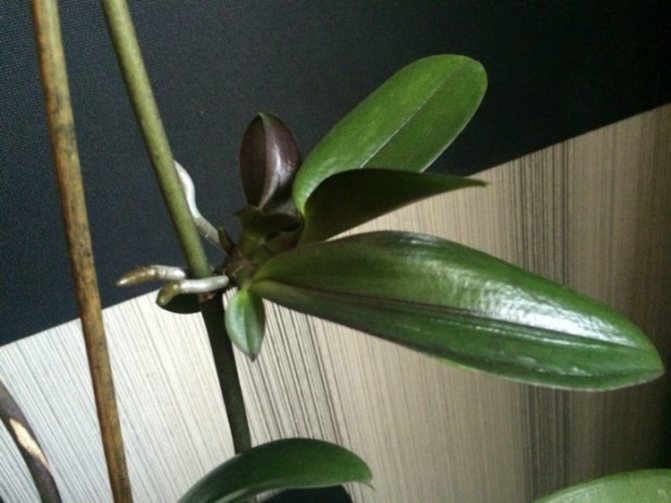
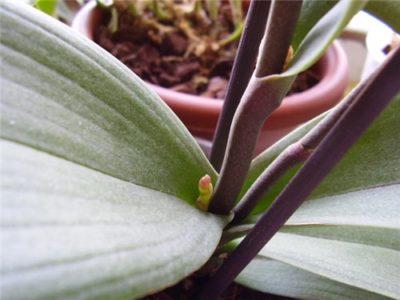
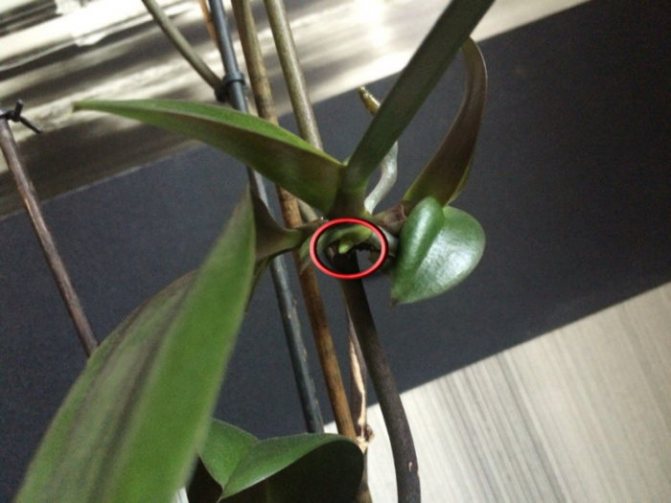
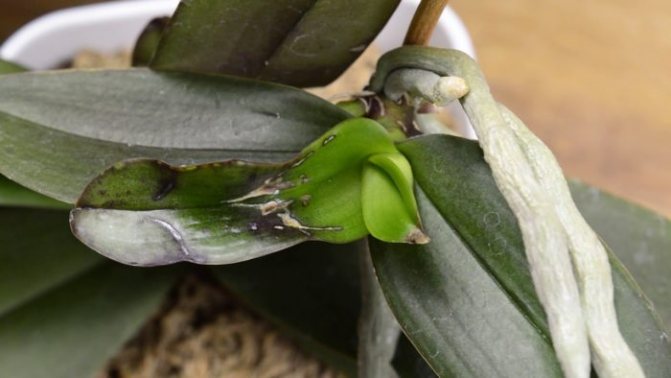
An orchid baby grows on a peduncle after a flowering period. If you look closely at the stem, you can see small bumps covered with scales. These are dormant kidneys. It is from them that the orchid baby begins to grow, but not always. It can also grow from the leaf axils. Although in fact these are root processes, which are a new round of flower development.
If, after the flowering of the orchid, the peduncle remains green and viable, then it is likely that a new shoot will appear from the dormant buds. If the peduncle begins to dry out, then the new stem will begin to grow from the root.
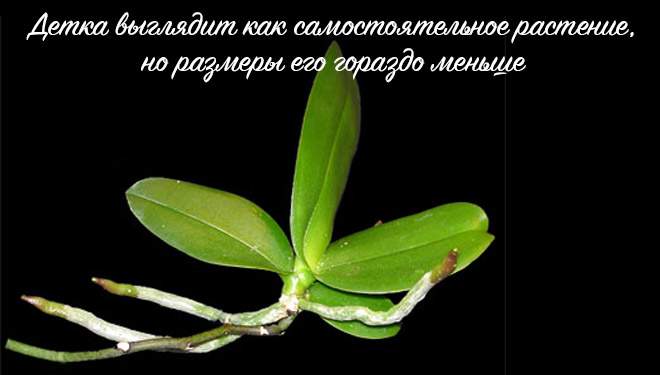
The baby looks like an independent plant in miniature. First, a stalk appears, then several leaves are formed on it, a little later their roots appear.
Important! Over time, these leaves may dry out, but don't worry. They give nutrients to young roots.
Plant structure
This type of orchid belongs to the monopodial type. It always grows exclusively upward. When the phalaenopsis is young, each subsequent leaf is larger than the previous one. But when the orchid becomes an adult, all of its leaf plates acquire the same size. The more light, the longer the leaves will be, the less illumination, the shorter the leaves.
Roots can even grow between leaves - this is normal for phalaenopsis. One of the structural features of orchids is the presence of children. Here we will talk about them further.
Care rules

During the flowering period, the rules of leaving are somewhat different from the usual ones, and when it ends, then changes are again needed. In order for the orchid to give the baby, follow the following care rules:
Watering
After the color and reset of flowers and buds, the standard watering of the flower is resumed, which implies moistening the substrate once every 7-10 days. The need for manipulation can be determined visually. If condensation has collected on the walls of the pot, then it is too early. If it is completely dry, then it's time. You can determine this by touch. When the soil is practically dry, it's time to water. Water is chosen warm and not hard.
The method of "bathing" under a warm shower is well suited to awaken the babies on the peduncle. The increased water temperature improves the metabolic processes in the flower, which contributes to the growth of the baby. After such watering, it is necessary to thoroughly wipe the axils of the leaves to avoid decay.
Temperature control and lighting
It is very important to ensure the daily temperature difference. At night, not lower than +18 ° C, during the day, not higher than +28 ° C. Constantly high or constantly low temperatures cause stress in the plant, diseases and attracts various parasites.
Lighting... The daylight hours for a pet should be at least 12 hours, preferably 14.
After the flowering period, the top of the peduncle is cut. The location of the cut is very easy to determine; it is located several centimeters above the still unawakened kidney. The cut must be rubbed with charcoal. The instrument must be sterilized. In order for the awakening of the kidneys to take place and the children to develop well and quickly enough, the orchid is fertilized.

In order for a baby to appear, you can use cytokinin paste. This is a phytohormonal agent that is applied to a de-scaled kidney in a small amount. It stimulates metabolic processes within the kidney and accelerates its growth. If the plant is large and healthy, then you can apply the paste to several buds at once to get several babies.
A triad is also used, that is, nitrogen-phosphorus-potassium fertilizers, which are combined with mineral fertilizers. They begin to make such dressings immediately after flowering. This gives the orchid strength to develop new babies.
Important! The baby is very sensitive, so extremes in grooming and fertilization should be avoided.
Care features
For better growth of the transplanted baby, it is recommended to buy a greenhouse or florarium in advance. An orchid baby requires a humid environment and a temperature of at least 25 ° C. In the greenhouse, a young plant is up to a year, and then transplanted into the ground.
Then the baby is looked after as an ordinary orchid. First, the water is enriched with a growth stimulant and minerals. Now you know how to raise an orchid baby. With proper care, it will develop into an adult orchid in 3-4 years.
Escape handling rules
Before planting an orchid shoot from the stem, it must go a long way of development and strengthening.
In the case when changes occur with the kidney, you can notice this with the naked eye. First, the tubercle on the orchid becomes large, then a stem begins to develop from there. The roots do not grow immediately. Leaves may appear first. A little later, when the stem becomes up to 7 centimeters in length, roots begin to form.
Read about how orchids are grown and grow at home in detail here.
While the baby is on the peduncle, you do not need to do anything with it. Just carefully observe its development and measure the length of the roots. Usually the baby develops within six months.
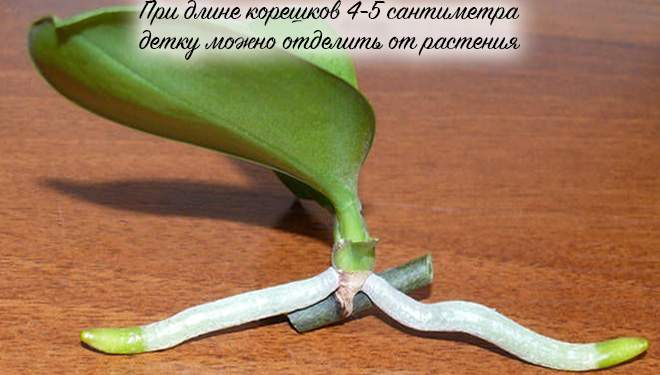
Once the roots have reached a length of 5 centimeters, the shoot can be planted.
The separation of a young shoot requires care and accuracy. Before separating the baby from the orchid, some materials are prepared. The soil for a new flower needs a new one. Before transplanting the orchid children into the substrate, all its components are well crushed and mixed evenly.
And they are as follows:
- Pine bark - 5 parts;
- Moss - 1 part;
- Charcoal - 1 part;
- Expanded clay and pumice - drainage.
Simple substrate:
- Charcoal - 1 part;
- Pine bark - 5 parts.
Medium substrate:
- Charcoal - 1 part;
- Moss - 2 parts;
- Pine bark and chips - 5 pieces.
Important! In order for the flower to develop fully, the new soil must have good drainage properties and provide air access.
Usually, the separation is carried out as follows:
- A small amount of moss is prepared separately.
- Pot. It is better to choose a transparent container in order to be able to control the condition of the soil and the need for watering. If the container has already been used before, then it is well cleaned and sterilized. Read more about what kind of pot you need for an orchid.
- Cutting tool. They choose scissors, pruning shears, and a knife. They are sharpened so that the separation passes without injuring the orchid baby. Before making a cut, the instrument is disinfected so as not to introduce any bacteria.
- Activated charcoal or a bactericidal preparation, with which sections are processed after separation.
Stimulating the emergence of roots
First of all, you need to try to stimulate their growth, and force them to give roots. To do this, eat one simple trick. You need to take a small amount of sphagnum moss, moisten it, and fix it in the place where the roots of the child should grow. Wrap the outside with a foil or a bag so that the moisture does not evaporate.
Periodically moisten the moss so that it does not dry out, you can use not just water, but Kornevin's solution. After 2-3 weeks, you can evaluate the result. Of course, there will be no roots yet, but one can understand whether they have begun to develop, or there is no result.
Separation procedure
- The baby orchid is carefully separated from the mother plant. Some growers separate the baby itself from the peduncle, which is strictly forbidden to do, because she will die. It is necessary to separate the process along with part of the peduncle.1-2 centimeters above the shoot growth point and the same distance below.
- All sections in the orchid baby and on the mother plant are treated with activated charcoal or a bactericidal preparation. Slices should be processed immediately.
- The baby is left to dry for 30 minutes.
Then the young shoot is strengthened on the ground. This must be done carefully (
Substrate transplant
After separating the cuttings from the mother plant, it can be immediately planted in the substrate, but it is still better prepare for landing:
- for this, the layers are soaked for 15 minutes. in water in which growth hormone is dissolved. This will ensure faster root growth;
- moistened roots are less traumatized during planting and are easier to fit into the pot.
Before planting the children, a layer of drainage is laid out on the bottom of the pot (expanded clay, vermiculite or ceramic shards), after which the plant is lowered into it:
- the baby in the container is positioned so that the lower leaves are above the surface of the ground;
- the substrate is poured in small portions by shaking and tapping the pot so that the soil is evenly distributed between the roots. It is not necessary to additionally compact the substrate;
- the first few days, the plant should not be watered so that the sections dry out.
It is better to put the planted orchid for a while in penumbra, then can be rearranged to diffused light.
Attention! The phalaenopsis root collar should be at the level of the edge of the pot.
In the future, a small phalaenopsis needs a regular watering and lighting regime.
What if the cuttings do not give roots during the growth process?
This situation can arise if, when the baby appears, the mother plant is not properly cared for. Therefore, if the baby does not have the rudiments of air roots for a long time, then some points in the care need to be revised:
- increase daylight hours;
- revise the irrigation regime;
- feed the plant with special fertilizers.
If this does not help, do not despair, as below we will consider how to help the child grow roots.
How to grow and root roots
When the bud has woken up, you need to know how to grow an orchid baby from a peduncle. To do this, it is necessary to help it grow roots of the required length. There is an opportunity to accelerate their growth.
Orchid aerial roots: transplant and other options
For this, Phalaenopsis baby must be moistened with stimulating solutions: Kornevin or Heteroauxin. Perhaps, for this purpose, also use natural remedies: a solution of honey in water or aloe juice.
In order to enhance root growth, sphagnum moss can be used. It must be moistened in a solution of one of the stimulants and, with the help of a thread, attached to the baby in the place where the roots should grow.
Note! Watering must be done daily with a spray bottle. When the roots begin to grow, the moss is removed. If this is not done, then waterlogging may occur.
After the roots grow up to 4-6 cm, the baby must be separated. This can be done by cutting off a part of the peduncle several centimeters long along with the sprout.
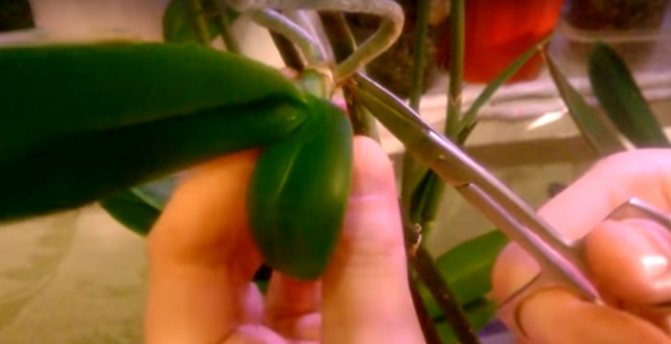
Sometimes several shoots form on one branch. In order to cut them off, you can use sharp scissors or a scalpel, carefully separating the baby from the peduncle less than 1 cm above and below its location.
Important! It is recommended to disinfect the instruments before use. To do this, it is enough to dip them in boiling water.
Now you need to plant and root the shoots. To do this, it is recommended to do the following:
- The cut point is lubricated with coal dust for disinfection.
- For planting, you need to prepare plastic bottles with a cut off top. Their depth should be such that the roots fit freely. Several holes are made at the bottom in order to provide drainage.
- Plants need to be kept in water so that it covers the roots. Do this for 20 minutes.This is to ensure that they are not overdried when placed in plastic pots.
- Now you need to prepare the substrate in which the children of Cattleya or Phalaenopsis will grow. It is prepared in a separate container. A small piece of charcoal is placed there, crushed bark is poured, then sphagnum moss is added in small pieces.
- After that, you need to place the children in plastic containers, cutting them so that their depth matches the root system. Then the substrate is poured so that it covers the roots.
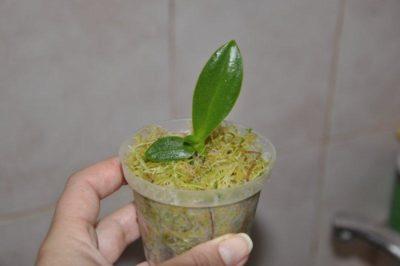
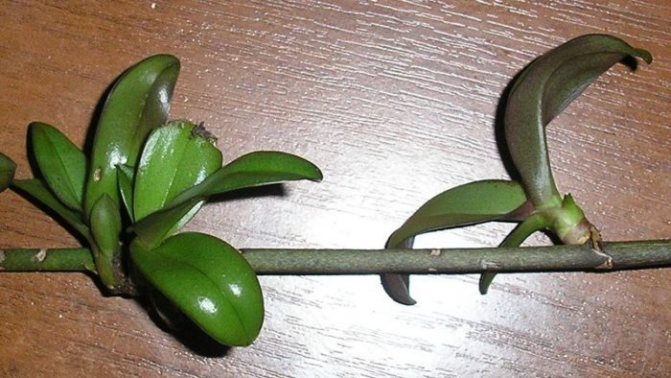
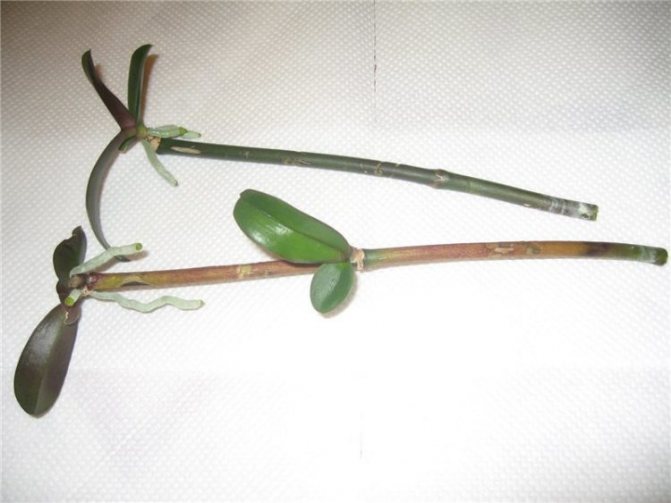
Cut baby
When the root system develops and the orchids take root, they can be planted in their permanent places.
How to care for a flower?
For, for the orchid to give "offspring" in the form of children, it is important for it to provide the necessary conditions for this: a large amount of light, high temperature during the day and low at night (+ 15C - + 30C), high humidity, systematic application of nitrogenous fertilizers, which can be purchased at a specialized flower shop.
When the peduncle has already released the baby, the plant should be transferred to a warm and more shaded place. It is also necessary to provide him with systematic watering according to the basic rule: as the substrate dries out. On average, the interval between waterings can be 5 - 10 days.
After every second watering, it is recommended to continue to apply fertilizer with a high percentage of nitrogen content. It is better if this top dressing is foliar, that is, the baby herself will be irrigated from the spray bottle. Sometimes it is possible to irrigate the plant under the shower, which will only contribute to the formation of healthy and strong children.
After the baby is cut off from the peduncle, it must be cut off completely, since it will no longer give any buds or new shoots. And the plant needs to be at rest for some time - to restore its strength.
Possible complications
Infection... This is fraught not only with disease, but also with the death of plants. Moreover, both the baby and the mother plant can be affected. That is why it is recommended to sterilize the secateurs and process the cut site, as well as process the soil.- Decay of the cut point... Prevention of this is the treatment (sprinkling) of the cut site with activated carbon or crushed cinnamon.
- The baby takes root badly, dies. This often happens if: the shoot is cut off too early, the transplant rules were violated, the rules for keeping the orchid were not followed.
- Sometimes the mother plant dies or gets sick... This happens if several children were cut at once. In this case, the mother plant receives significant injuries. And if an infection has also joined, then there is a risk of losing the orchid.
Read more about what problems may arise after transplantation and how to deal with them here.
Conditions for the education of children in orchids
It is very difficult to determine any strict conditions under which orchids begin to form children. Most often, flower growers who want to propagate plants in this way are advised to do the following:
- wait for the orchid to fade;
- feed the plant with nitrogen fertilizer;
- raise the temperature;
- increase air humidity;
- stop watering for 2 weeks, then resume it.
But even these measures do not give one hundred percent probability that the orchid will release the children. Much depends not only on external factors, but also on the type or variety of the plant. For example, the species orchids Phalaenopsis equestris (Phalaenopsis exvertis) reproduce completely independently, abundantly, almost without paying attention to the environment fans. And vice versa, no matter what ideal conditions are created for orchids of the genus Cattleya, they are extremely reluctant to give children.
Where do kidneys appear?
Babies can appear on different parts of the plant:

On the peduncle, after the plant has faded, a young sprout appears.It is worth noting that not one baby may appear, but several, while they can be located anywhere on the peduncle, both in the middle and at the very end. But usually only one process appears.
Do not rush to remove the peduncle, create the correct temperature regime and proper air humidity so that the orchid sprouts, which can later be transplanted. At first, the processes are very small, but over time, small seals will appear on the sides - roots will begin to form.- At the roots - babies also appear quite often, in this case, when separating, you need to act with extreme caution, since there is a possibility of damaging the roots of an adult plant.
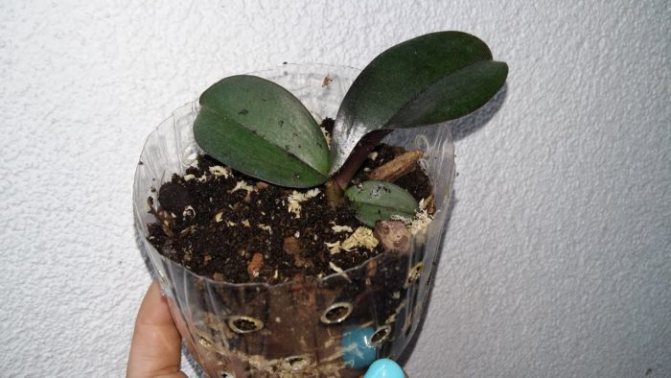
- On the trunk - these processes are not recommended to be removed. They do not have their own root system. In addition, during separation, the stem of the plant can be damaged, from which it can simply die.
The baby can appear on the stem if the growing point begins to freeze. After the mother plant dies, the baby will continue to grow.
Required tools
Before you start planting sprouts, you should prepare everything you need. You will need sharp scissors or pruning shears. Take care of the substrate in advance, as the further development of the plant depends on it. It should be loose and highly aerated.
Next, purchase a transparent container, preferably a plastic one, so that it is convenient to observe the plant's root system. Cinnamon or activated charcoal is used to treat the sections to prevent infection. Take care of gloves to protect your hands from the poisonous beauty. The instrument should be disinfected with alcohol.
Detailed step-by-step instructions and photos
With root system
If the baby is already rooted, then replanting a small plant will be quite simple.
The algorithm of actions is as follows:
- Take a plastic container with holes.
- Lay a layer of drainage on the bottom, then the substrate mixed with moss. Moisten the mixture. But before that, it is worth spilling the soil with a pink solution of potassium permanganate or calcining in the oven for disinfection.
- Place the baby in the cup very carefully, so that the growth point is at the level of the edges.
- To fill up the substrate, this process must be carried out with extreme caution, since the roots of a young plant are very delicate.
- The roots should be completely covered with the mixture.
- Do not water after transplantation, as an infection can get into the unhealed wound.
- Cover the plant with a transparent plastic bag - this will be a mini-greenhouse for better rooting.
Important! The substrate should not be too waterlogged, as there is a risk of tear decay. At the same time, in the greenhouse, it is necessary to ensure the optimal level of humidity for the young plant.
No roots
There are situations when the baby grows well and develops on the mother plant, it can even bloom, but does not want to give roots. What to do in this case?
You need to act as follows:
- Put some drainage and moss in a plastic cup with holes.
- In the side of the cup, make two holes opposite each other - for support.
- Install the support.
- Place the baby's socket on a support - it should not touch the ground.
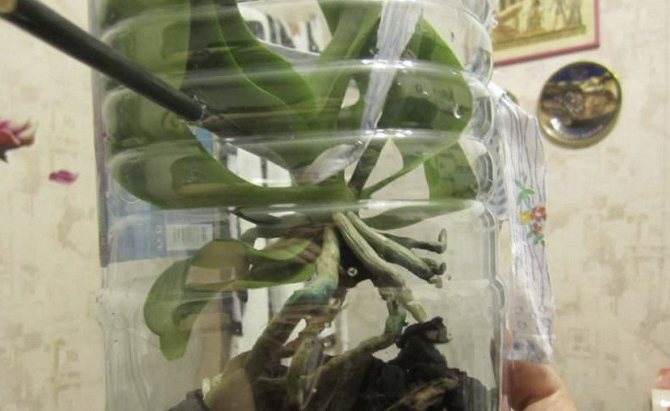
- Install a plastic bottle with a cut bottom on top.
- The young orchid will remain in this state until the roots appear.
It is worth observing the plant, as ideally the transplant should be carried out only after the roots grow by at least 5 cm... You should be patient, as this process is quite lengthy and can take 4-6 months.
If it grows on a peduncle
If the orchid has escaped on a peduncle, then the procedure is as follows:
- Use a sterile pruning shears to cut the baby off the peduncle.
- At the base of the outlet, we find a scale that should be removed, since it is it that prevents the roots from developing.
- Now you can start growing roots in the air, since you cannot place a plant in a substrate without roots.
- We equip a plastic cup with holes under the pot.
- Lay drainage on the bottom, place moss on top.
- Make two holes at the top for support.
- Place the baby so that it hangs in the air without touching the moss.
- Cover the structure with a young orchid with a cut plastic bottle or plastic bag - to create greenhouse conditions. The microclimate in the greenhouse should be close to the tropical one.
How to recognize a pseudobulb?
The growth of an orchid is an extremely fascinating sight. Many flower growers try to observe the changes in their favorites every day. And adjust the feeding and watering schedule in accordance with the periods of growth and flowering.
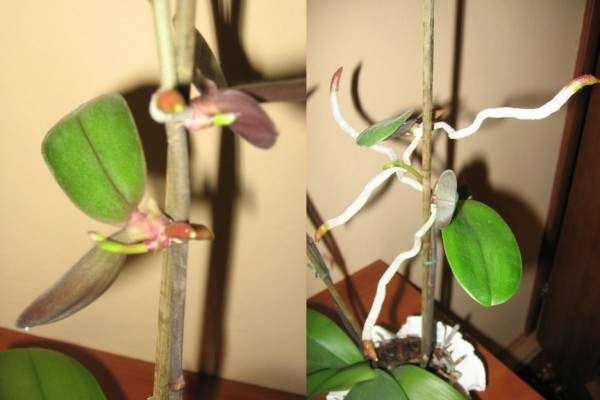
As a rule, there are no problems with a baby that forms on a peduncle from a bud. It is difficult not to recognize it. The difficulty is with the so-called root cake. Therefore, when an inexperienced collector notices a neoplasm on the root part of a flower, he is confused, trying to guess the baby is it, a peduncle or a new root.
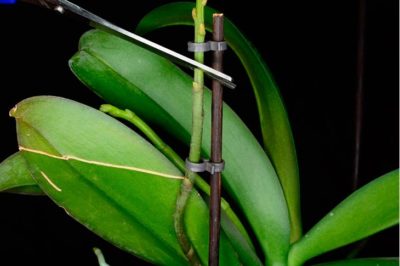
If the root from the peduncle and the baby is relatively easy to distinguish. A new growing root is formed next to the old roots. As it grows, the root breaks through the leaf. And after 2-3 weeks a dull "nose" appears at the root. It is peculiar only to the root system. And it will help to dot the I.
Peduncle, or in the common people an arrow. It also develops quite specifically. As a rule, the tip of the peduncle is shown "from the bosom" of the leaf. But, there are frequent cases of peduncle formation in the root part. Then it becomes not so difficult to confuse him with a root baby.
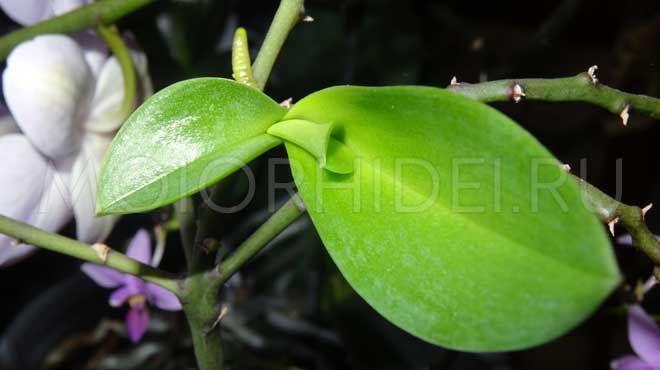
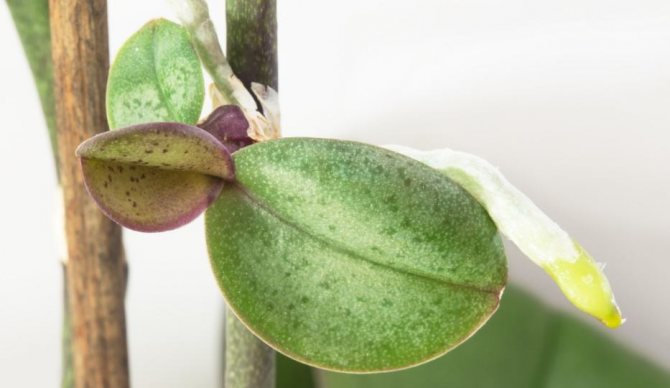
The main signs of a growing basal baby are:
- the baby, like the peduncle, can be formed "in the bosom" of the leaf;
- the baby has a sharp tip;
- oval shape;
- after a few weeks, it should acquire the shape of a "boat";
- if a flower suddenly has another growth point, it is safe to say that a new baby has formed.
Curious! Often, a florist can observe the development of a peduncle for several weeks, which later turns out to be a baby. These are the surprises nature gives us!
Watch a video about how the root differs from the peduncle on an orchid:
Also useful will be materials about growing orchids from seeds and about Thai orchids.
How to transplant a baby after separation?
Regardless of the method of separation of the process, several steps should be followed:
- sterilize the cutting tool or treat it with a disinfectant;
- cut off a shoot from an adult plant;
- treat the cuts with any antiseptic;
- prepare the soil marked "For orchids".
Before planting, lay a drainage layer on the bottom of the flowerpot, and then lower the flower into it so that the soil is significantly lower than the leaves. When pouring the substrate, it is necessary to tap the flowerpot, this will contribute to an even distribution of the soil between the roots.
Place the young plant in a shaded place. The first watering of the flower should be no earlier than a few days later.
How to properly plant a baby without a root?
It often happens that young orchids grow and develop fully, but their roots do not. For this, they resort to various methods of germinating the root system. Most often it is wet sphagnum and water.
You can plant a shoot without a root in the following way:
- make a mini-greenhouse: lay a layer of drainage and sphagnum;
- make a support for the baby so that it does not come into contact with sphagnum;
- put the greenhouse in a warm, slightly shaded place.
What if they don't grow up?
If a florist needs a baby, and Phalaenopsis is in no hurry to build it up, stimulation will be required. The flower needs to create certain conditions.
Two factors can affect the appearance of a shoot:
- Ideal conditions of maintenance and care.
- An extreme situation in which a culture "panics" and seeks to grow its continuation.
Caution! Simulating extreme conditions is a risky method. Events can develop in such a way that an adult plant will die, but the shoot will not give. Experienced flower growers advise using this method when the culture already needs resuscitation.
To stimulate the development of the appendix, it is necessary to provide the following conditions:
- stable temperature in the range of 20-28 degrees;
- air humidity - 80-85%;
- intense lighting (12-13 hours);
- watering with drying of the substrate for 2 days.
Formation features
When ideal conditions are created, additional buds are formed, which are dormant at an early stage. If, when creating ideal conditions, they are in no hurry to wake up, additional efforts are made to form:
- The covering scales are removed from the kidney with tweezers or a toothpick.
- The visible green tubercle is smeared with cytokinin paste. Lightly spray the treated areas with water from a spray bottle every day.
- After 7-10 days, an shoot begins to develop at the site of the bud. For the entire period of its formation, the temperature in the room is maintained at the level of 27-28 degrees, humidity - 85-90%.
- As soon as the first roots appear, they are covered with wet sphagnum moss and wrapped in foil.
Important! One of the main conditions for the rapid growth of a baby from a sleeping kidney is regular feeding. The predominant substance in fertilizers is nitrogen.
Under what conditions are the processes of an orchid formed and where are they located
Vegetative offspring appear in the orchid soon after full and long flowering. New shoots indicate that the plant is healthy, well developed, has a powerful root system and at least four large leaves.
Children are formed:
- on peduncles,
- at the roots,
- on the stems,
- in the axillary kidneys.
Babies begin their formation at the final stage of orchid flowering.
Most often, they form in the spring, at the beginning of summer, at the last stage of flowering, when the buds have fully blossomed, but have not yet wilted. At the end of flowering, the rudiments of the future process become visible on the stems. The process of formation and formation of leaves and roots takes about 5 - 6 months.... That is, from the moment of appearance to separation, it takes about six months if development takes place under conditions optimal for the orchid:
- At temperature conditions +220 - +280,
- Average air humidity 60%,
- In sufficient light, but not in the scorching sun. Openwork shading is preferable.
- Free air movement, but no draft.
At the slightest failure in the environment, the process may fade.
In addition to the basic conditions, there is one more important circumstance. Children can form only when the daily temperature changes, not less than 50. For example, if during the day +280, then at night it should be +230 - +210. Typically, such conditions occur on closed northeastern balconies without drafts.
Experts argue about the reasons for the appearance of processes. At the same time, two opposite versions are put forward:
- Babies appear under conditions unfavorable for the orchid. If a plant “thinks” that it might die, it begins to produce offspring.
- Another hypothesis is excellent care and a favorable environment, thanks to which the plant is provided with resources for full growth and reproduction. The way it happens in natural conditions.
Oddly enough, both sides are right. Although, every florist would like to think that he takes good care of his favorite exquisite plants.
How to help grow the underground part of the flower?
If the orchid layer does not build up the root system, then it needs help. The algorithm of actions is as follows:
- Buy sphagnum moss, prepare a thread and a plastic bag.
- Soak the moss in warm water and leave to swell for 30-40 minutes.
- Next, remove the moss from the water and squeeze it out a little. Make a small nest, and place the base of the baby in it, secure with a thread.
- The peduncle will become heavy, and you need to prevent the plant from overturning, for this, take a support and secure the peduncle.
- You can organize a greenhouse effect - put a plastic bag on the peduncle with the baby.
Important! Moss needs to be moistened every day, and the baby should be ventilated. Kornevin can be added to the water to stimulate the growth of the root system.
How to grow roots in a layer that is separated from the mother:
Organize a small mini greenhouse. In a plastic cup, make several holes in the bottom and on the sides from opposite sides, closer to the edge. Pour drainage into the container, a little wet moss. Install a support in the side holes that will not allow the base layer to come into contact with the substrate. Place the baby on a support and cover the entire structure with a cut plastic bottle. Spraying and daily airing are mandatory.- On a piece of styrofoam that will float in a container of water. To do this, take a piece of the desired size - make a hole in it. The foam must be thick enough so that from the base the cut to the water is at least 2-4 mm. Place the baby in the hole and secure it well on a piece of material. Lower
We suggest watching a video on how to help an orchid baby grow roots:
When and how babies appear
At the initial stage of growth, it can be difficult to distinguish a baby from a peduncle or aerial root.
Children on different parts of the flower are outwardly similar and their development is the same, but there are features in each case that are worth paying attention to.
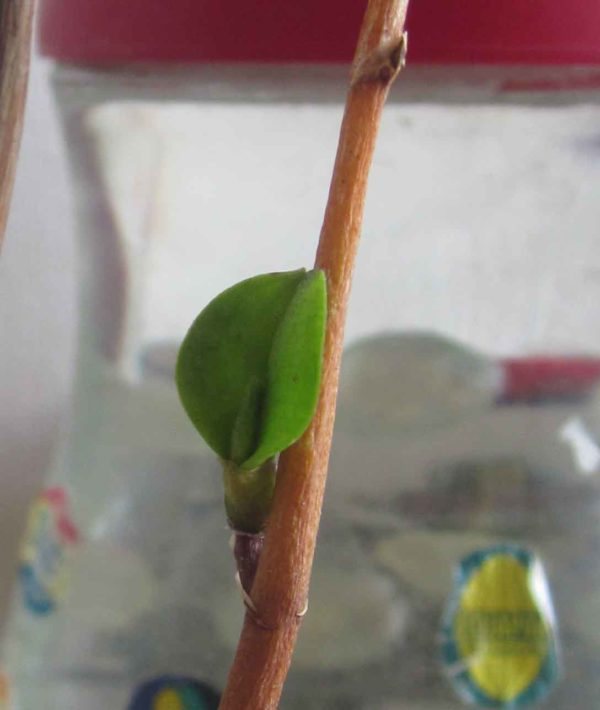
On the peduncle
The point of growth or peduncle is the most common case of the location of the offspring. After the flowering of the orchid at elevated temperatures and humidity, a baby appears on the peduncle. As a rule, such babies successfully develop into an independent plant without additional help. If the offspring does not appear without intervention, then special stimulation methods can be used: the application of hormonal cytokinin paste awakens dormant kidneys.
At the root
It is not worth planting a new flower until it has acquired its own root system. You can check if the baby's roots are growing by removing the upper part of the substrate. In this case, the separation of a young orchid should be carried out as carefully as possible, since there is a risk of damage to the roots of both the mother plant and the baby orchid. Many growers, especially beginners, prefer in this case to leave the young flower in the same pot with the "mother". With proper care, both beauties will give good flowering.
On the stem
Some experts believe that the appearance of a "kindergarten" on the stem (and trunk) is an indicator of improper care, when a flower, dying, directs its last forces to reproduce in order to fulfill a biological task. However, in practice, it happens that cakes on the stem also appear in quite healthy flowering specimens.
Florists also note that the appearance of offspring on the stem occurs when the stem is injured or the growth point dies. A feature of basal babies is the absence of their own root system.
A baby on a stem for nutrition uses the roots and stem of the mother plant. Due to the peculiarities of the development of such a baby, it is undesirable to separate from an adult orchid - a young flower will not always be able to develop on its own due to the inability to receive nutrients. In this case, over time, there will be two beauties in one pot. Gradually, the mother flower dies off, and a young plant takes its place.
On the other hand, some orchid lovers share their experience of planting a rootless baby:
- the place of the cut is sprinkled with crushed charcoal;
- a small orchid is dried during the day and planted in a fine-grained substrate;
- after which roots are expected to appear.
With good care, phalaenopsis very often gives birth to babies or so-called cakes. Babies are small, well-developed young plants. They can be used for breeding. In order for a baby to appear on an orchid, she needs to create the following conditions:
- Provide the plant with sufficient sunlight during the post-flowering period.
- Maintain the temperature not lower than 25 ° С both in the daytime and at night.
- Trim the peduncle to the level of the first dormant bud.
After the phalaenopsis gave birth to a baby, its development on the mother plant continues for six months. During this time, she grows 5-6 sheets and her own root system. After the size of the roots reaches 5 cm, the orchid baby is planted in a separate pot.
How to grow orchid babies without a root system
In some cases, for example, when the mother plant dies or for other reasons, an orchid baby without roots is caught. How to plant an orchid shoot in this case, so that it successfully takes root in a new place and begins to develop the root system?
Under normal conditions, transplanting an orchid baby without roots is not carried out. It is left on the mother plant until the root system develops. But if time passes, and the roots do not appear, you can try to stimulate their appearance.
For this you can use sphagnum moss. It is applied to the root zone of the appendix and secured with a bandage or any other available material. After that, the moss is moistened daily, it cannot be allowed to dry completely. Usually, in this way, the root baby is forced to grow roots.
But what is the right thing to do if there is no way to wait for the natural formation of roots. In this case, you need to act as follows:
- Cut off a small piece of the peduncle with the baby.
- Disinfect the cut sites with 70% alcohol.
- Dry and powder the slices with crushed sulfur or charcoal powder.
- Rinse live sphagnum moss with boiled water.
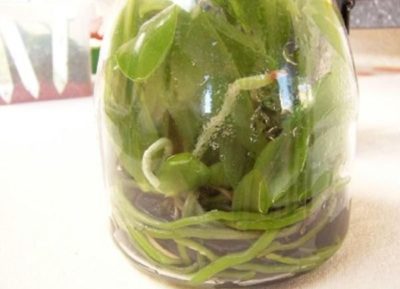
- Place a layer of moss in a suitable sized glass jar.
- Place the baby in the center of the moss layer.
- Cover the jar with a lid.
- Place the jar in a warm, well-lit place.
During rooting, the jar must be ventilated. If, after 1.5-2 months from planting, the rudiments of the roots are still not visible, then you can try growth stimulants. For example, dust the junction of the baby with a piece of peduncle with Kornevin powder, and spray the leaves with Epin solution.
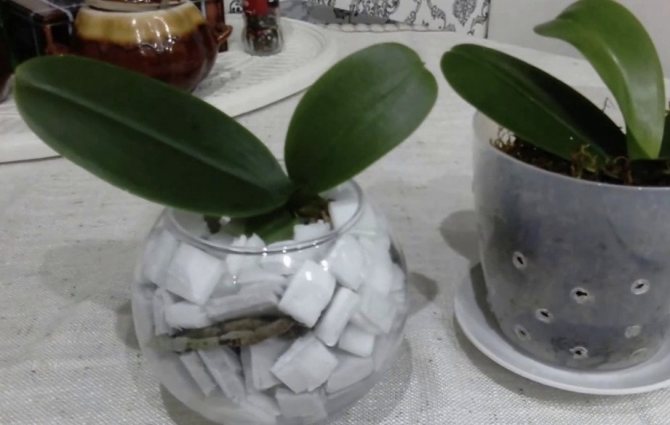
After the roots develop on a young plant with a length of at least 3-5 cm, they begin to transplant it. In a plant such as an orchid, roots develop slowly, so the babies are first planted in a small plastic cup.
After planting, the glass with the sprout is again placed in a glass jar. In conditions of high humidity, the process of root formation is much faster. Planting a baby orchid correctly is only half of the problem, but how to grow it to an adult flowering plant?
How to stimulate the appearance?
Children are good breeding material for orchids, flower growers are pleased with their independent development. However, not every adult plant tends to form such shoots. Experienced growers say that cuttings are not formed in a flower that does not receive everything necessary during the cultivation process or is kept in inappropriate conditions.
Reasons for the absence of children:
- lack of lighting;
- improper feeding;
- irregular watering.
To get shoots, the orchid must be stimulated to form them.
When can a small plant be planted?
When can a small plant be planted? Several babies can be formed on one maternal specimen. At first, they will have leaves, and over time, roots. If the root system does not develop, it can be stimulated. What is needed for this? Prepare cling film, sphagnum moss, and sturdy string. Next, you need to act like this:
- Soak the moss in water. It should swell well.
- Roll a lump out of the moss and wrap it with string. This will prevent decay.
- Next, attach the lump to the peduncle with a thread, but proceed carefully so as not to injure the plant.
- If necessary (if the room has low humidity), wrap the moss with cling film to create a greenhouse effect inside. But keep in mind that the film will need to be opened daily for the baby to breathe.
- It is advisable to attach a support to the peduncle with moss. This is to prevent the plant from tipping over.
- Spray moss with water every day. Can be used for spraying "Kornevin" (means for stimulating root growth), which is diluted with liquid according to the instructions on the package.
Now all that remains is to wait for the formation of the roots. This can take up to six months. Remember that it is possible to separate the baby from the mother's specimen only if it has formed 3-4 roots 5 centimeters long. If this does not happen, there is a high probability that the plant will not take root well in a separate pot and may even get sick. It is better to wait a little for the roots to grow.

The main mistakes when breeding orchids: roots, stem
- introduction of infections
into the stem with non-sterile tools or through wet soil; - insufficient care of young shoots
, an adult plant after transplantation; - incorrect separation of shoots from the mother plant
- damage to an adult orchid.
Typical transplant errors can lead to the death of an orchid.
Carry out reproduction as carefully and carefully as possible, depending on the chosen method. Orchids will grow, multiply and look great
, if you give them the care and the necessary care.
Orchid is one of the most beautiful indoor flowers. Many growers are happy to grow them at home. To reproduce a flower, it is enough just to plant the phalaenopsis process in a separate pot. In order to get a beautiful plant, you need to know how to properly plant an orchid baby.
What it is?
Orchid baby or scion - this is a new young plant, formed on the mother flower. It can have its own roots, leaves and peduncles. Sometimes babies not yet separated from the mother plant are already beginning to bloom (for details on whether it is possible to transplant an orchid, if it blooms and how to do everything correctly, read here).
Places of formation
They can appear:
- on the roots;
- like a shoot on the trunk;
- on peduncles.
In the beginning, a kidney is always formed, like a small seal. And after that, a young orchid grows. Most often, children are formed on peduncles.
Why is it important to share with the parent?
Many novice florists have questions:
- Is it worth separating the baby from the mother's flower?
- When and how to seat?
Note! A successfully planted and grown baby is a new independent flower in the collection.
But be that as it may, it is possible and necessary to remove the baby from the mother's flower. Since when it appears, the load on the mother flower increases significantly. And if the deposition is not brought in time, then the orchid can get sick or die. In some cases, if the flower has sprouted, the florist is faced with a choice: a mother plant or a baby?
When is it correct to plant a flower?
If he has sprouts, then how to determine when they can be transplanted? There are several signs that children are ready for a transplant:
Regrown roots. You should not leave the baby earlier than they are formed. The roots must be strong, healthy and fairly long (at least 5 cm). The more roots, the more likely a young orchid will survive. There must be at least three roots.- A young orchid should grow at least 5 leaves. Otherwise, her chances of survival are reduced. After all, due to the sheets, nutrition from the sun's color occurs, as well as the respiration of the plant.
- The maturation time of the baby on the mother's flower is 5–6 months. Do not separate them earlier than this.
Do not rush to put the baby away. Growing roots with a young plant is a long and tedious process. It is much easier to let the baby grow stronger on the mother's flower.
When can a grown baby be dropped off?
Six months later the baby forms 2 pairs of leaves and forms roots.
Attention! Very small roots cannot provide a good survival rate for the baby after transplantation. It is better to delay its separation from the peduncle until the roots grow.
When the baby will form 3-4 roots about five centimeters long, it is separated from the peduncle and planted in a separate pot.
Breeding an orchid at home: when is it better to transplant
Start breeding best in the spring season
, since after winter the plant wakes up and is ready for active growth with renewed vigor. You can divide the plant during transplantation or, if the roots are cramped in the pot and they come out.
How to breed an orchid by dividing a rosette
Large healthy orchids with 7-8 leaves are suitable for this method. With a disinfected knife, cut off the top with 4-5 leaves and aerial roots
... The resulting shoot is planted in a new pot. Slices are necessarily processed.
Only mature large orchids are suitable for dividing the rosette.
Escapes planted in a mixture of pine bark and sphagnum moss
... This is the most suitable soil for germination. Keep the bark dry, not wet.
Carefully look after the shoot. As soon as the roots grow, transplant into a deeper container
.
Propagation by lateral layers
Orchid babies are young shoots of a plant that periodically appear on the stem and roots, but more often on the peduncle. They have their own miniature stalk, nascent roots and leaves.
Reference! With proper care, babies can appear on their own, but you can wake up the "sleeping bud" on the peduncle - remove the protective scales and gently process with cytokinin paste.
The role of children in the life of an orchid can hardly be overestimated, since this is their continuation. It is quite easy to propagate a plant with side layers - this is the fastest way.
Possible difficulties
When transplanting, the following problems may arise:
- Infection
.This can not only lead to disease, but also to the death of the plant, so the pruner or knife must be sterile.
- Decay
.Before planting the baby, you need to let her lie in the air for 30 minutes, then treat the slices with ground cinnamon or wood ash.
- If you cut off the process too early, it will die.
... If there are several children on the orchid, then it is strictly forbidden to cut everything at once, the mother plant will simply die from the injuries received.Attention!
First, separate one baby, the second can be planted as soon as the cut from the first is completely tightened.
How to get an orchid to sprout?
In order for an orchid to have a need to produce offspring, its conditions of existence must be a little uncomfortable. If the flower is in ideal conditions, it will give offspring very reluctantly or not at all.
Among the natural methods of stimulating an orchid to reproduce, the following are recognized as the most effective:
- constant scattered light for 10-12 hours;
- consistently high temperature during the day and its drop at night with a difference of up to 10 ° C;
- limited watering;
- permanent humidity at the level of 50-60%;
- increased nitrogen content in the fertilizer.
Attention! Some growers recommend giving the flower a warm shower to wake up the sleeping bud.
If natural methods of enhancing reproductive activity do not help, chemical preparations can be used. There are various phytohormonal agents on sale that, when used correctly, can awaken several kidneys at once.
What to do to get a peduncle?
In addition to creating conditions suitable for breeding, the appearance of the baby can be stimulated by pruning the peduncle. It is believed that after flowering, the peduncle should not be cut off, because the plant can independently control its condition. But practice shows that most often the orchid simply dries the peduncle in order to save nutrients.
Peduncle pruning is carried out as follows:
- two centimeters above the second from the bottom of the kidney, the place of the cut is outlined;
- the cut is made with a sharp sterile instrument;
- the cutting site is treated with an antiseptic.
How to grow it on a stem?
The appearance of babies on the stem in most cases is the result of unfavorable factors or abnormal development of the flower. It is impossible to separate such a baby and the mother plant. Often, a new sprout appears as a replacement for an old one, which can no longer give color. If an adult plant develops normally, then both flowers will live in the same pot, but the bush will become more lush.
Among the reasons that cause the appearance of the offspring on the stem, the following can be distinguished:
- the stem was injured;
- the growth point of the flower has died out;
- the plant was in a state of drought for a long time;
- a peduncle has grown in the center of the rosette.
Scion problems
Stayed on the maternal shoot for a long time, but did not give roots
In this case, you can still give more time for the process to sprout. If there are no shifts, then you can try to wrap the place where the baby is attached to the arrow with pre-moistened sphagnum moss, fixing it with a bandage or strong thread. Every day for a month it is necessary to irrigate the moss with water with the addition of the drug "Kornevin".
To create greenhouse conditions, the moss nest can be additionally wrapped with cling film, but do not forget to remove it daily for a while in order to prevent plant decay.
Placed on a curved arrow
In some orchid species, the peduncles are quite flexible. In the case of flexible and curved peduncles, the baby does not need to be cut off. The orchid's arrow with the baby is simply attracted to the bark pot so that the roots of the young plant go into the ground. The peduncle itself is fixed on the wall of the pot with a wire. In such cases, the baby develops especially quickly, as it receives nutrition from the mother plant and from its own root system. You can not use the greenhouse here.
All the main points for raising children and separating them from their mother - orchids have been outlined above. It remains to add that the obligatory components of success in this troublesome, but still rewarding business are love, patience and care. With these feelings and qualities, you can easily cope with the task and not be afraid, but look forward to the appearance of a shoot on the peduncle of your favorite orchid.
If you find an error, please select a piece of text and press Ctrl + Enter.
Separating the baby from the orchid stalk
The simplest and most gentle option is to separate the offspring, which has formed on the peduncle. It can be done in two ways:
| Way | Step-by-step instruction |
| With peduncle pruning |
|
| Without pruning the peduncle |
|
Both methods are used quite often. However, the second allows you to save the kidneys on the arrow, which are located above the baby. There is a high probability that these buds will start growing.
After removing from the parental orchid, the baby is placed on a napkin and left for a couple of days before the cut is dried.
Important! There are two opinions about watering the mother orchid before separating the babies. According to the first, the mother plant is dried for 2 weeks before the procedure. This reduces the risk of rotting of the slices. According to the second, a day before separation, the parent specimen must be saturated with water. This will allow the baby to get the moisture reserve necessary for a smooth transition to feeding from its own root.
The cut should be as even as possible, without creases or torn skin. In this case, it will tighten well and will not rot.
When is it too early to disconnect?
Children with roots less than 3 cm are not advised to remove... An underdeveloped root system will not allow a young flower to grow actively. But there is an opinion that at the same time the parent plant does not develop enough, the onset of flowering slows down. In this case, the children are cut off and the roots are grown.
However, the listed manipulations often do not give the desired result, therefore it is better to let the new formation finally grow stronger on the flower. But it is also not worth delaying the transplant. In this case, you can harm the long roots.
How to determine that a scion is ready for "independent life"?
Keiki is a treasure for orchid lovers. They can help to obtain another flower that is identical to the mother plant. Great luck to find such a shoot on your pet. Many flowers may not give children at all for the entire period of their life. therefore the task of orchid lovers is to correctly transplant the baby and not destroy the young plant. To do this, it is important to know how to correctly take a shoot from an orchid, root and plant it.
Attention! The main thing is not to rush. Timeliness is the key to successfully separating the cake from the mother orchid. It is necessary to give a young flower to gain strength and release roots.
Many flower lovers are advised to think about a transplant, no earlier than the baby will give the first 3-4 leaves. And its roots will grow at least 5 millimeters. However, you should not delay with a transplant. Roots that are overgrown can also be difficult. They are difficult to place in a pot and not be damaged.
Step-by-step instructions on how to get offspring
An orchid will begin to form "offspring" only if it is provided with proper care and optimal conditions for reproduction are created.
- Prepare a peduncle that has faded, but is still green: it must be cut off, 2 cm away from the second "sleeping" bud from the bottom.
- Treat the cut site with a crushed activated carbon tablet or cinnamon.
- Provide the plant with changes in night and day temperatures (+ 15C- + 30C). To do this, the orchid can be placed on a windowsill or on the veranda of your home.
- Watering should be meager: the stressful state that the epiphyte will experience will make it possible to wake up the "sleeping" kidneys.
- Spray epiphyte daily from a spray bottle, thereby ensuring a high level of humidity in the room.
- Promote air access to the roots of the orchid: make additional holes in the walls of the pot.
- Provide access to a large amount of intense scattered light to the epiphyte (south and southeast windows).
- The orchid should be systematically fed with fertilizers with a high nitrogen content.
Reference. You can often find information about the stimulation of "dormant" kidneys with hormonal drugs in order for the peduncle to throw out the baby. One of the most famous of these drugs is cytokinin paste. Having opened the kidney, it should be spread with this paste on top.
This procedure can be repeated 3 to 5 times. Babies may appear in 2-3 months, but a lateral arrow may also appear from the "dormant" kidney. But it should be remembered that this method of raising babies greatly depletes the mother plant.
Main problems
If we grow babies from a peduncle, then we may face various problems.
Regular watering of the plant stimulates the growth of leaves, so a change in climate is necessary for the formation of a peduncle. First of all, a period of drought is created:
- the air temperature should not exceed 30 ℃;
- double the interval between waterings to achieve complete drying of the roots. After that, the orchid should stand without watering for up to 4-5 days in a warm place, and up to 7 days in a cool room;
- at this time, the plant is not sprayed or fed.
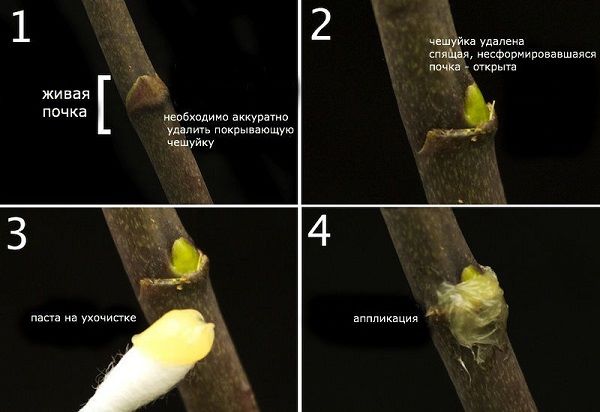
The appearance of a flowering arrow means the resumption of care, excluding feeding.
The formation of children can be considered as the orchid's response to unfavorable conditions. By creating a scanty watering mode against a background of high temperatures and humidity, you can achieve the development of children. If this does not help, the sleeping kidney is treated with cytokinin paste.
Such a baby on a peduncle is removed. If there are other dormant buds on the peduncle, then you can try to awaken them by processing with cytokinin paste, and then create the conditions necessary for the development of the plant.
To stimulate the re-development of roots, a special technique is used using sphagnum moss, thread and film for food:
- moss is soaked in water until it swells;
- form a ball out of it, fastening it with a thread;
- the resulting lump is attached with a thread under the base of the baby;
- every day a ball of moss is sprinkled with water, where it is recommended to add "Kornevin" to stimulate root growth.
Attention! An orchid with moss tied to a peduncle can tip over, so it is better to tie it to a support.
Usually, the roots of the baby are formed within six months, after which the small plant is ready for transplantation.
Separating the baby from the old pseudobulb
Many growers try to remove old, shriveled and bald pseudobulbs and stems from sympodial orchids, as they spoil the appearance of the bush. However, it is in these ugly areas that children may appear.
The offspring on pseudobulbs sit very tightly, so they can only be separated with a piece of the mother plant. This should be done with a very sharp and thin knife, slipping the blade under the roots of the baby. The sections are then treated with an antiseptic, as in other cases.
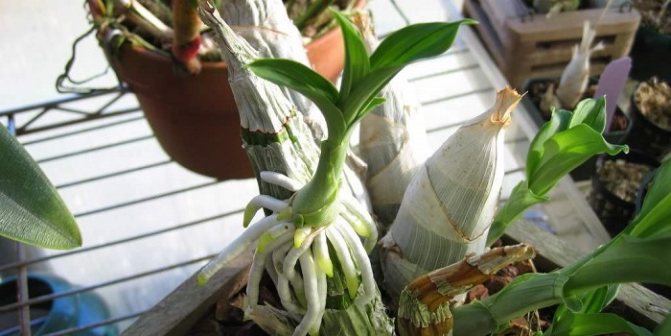
After separation, the old pseudobulb must be treated with brilliant green and left alone. First, it provides nourishment to the rest of the bush. Secondly, other children may appear on it.
Appearance conditions
In order for children to form on the arrow of the orchid, it is necessary after the plant has faded, not to cut off the peduncle completely (about what to do with the arrow when the orchid has already faded, read here). It should simply be shortened, the cut point is 2 cm above the "sleeping" kidney. In addition the plant needs to provide a sufficient amount of intense light, awakening the kidney from sleep, and high temperature.
Reference. If, after flowering, the arrow is left intact, then the orchid can "dry" it completely in order to save nutrients.
Find out in this material about whether it is worth worrying if the flower stalk has dried up and what to do in such a situation.
The cut must be done with a disinfected secateurs. This must be done with great care, as the trunk and leaves of the plant can be easily damaged. In addition, if any burrs, roughness remain, this can lead the orchid to become infected with infectious diseases. It is recommended to treat the cut site with cinnamon or crushed activated carbon.
A visual video on how to stimulate the appearance of a baby on a peduncle after the orchid has faded:
How long can it take to bloom?
The first flowering of an orchid grown from a baby occurs in 3-5 years. Although the shoot can form the first flower buds at the age of 1 year, it forms only 2-3 small flowers. A young plant needs ideal conditions and careful care.
It is not difficult to get a baby and grow a new orchid out of it for your home collection. The main thing is to follow the technology and listen to the recommendations of experienced florists.

5 / 5 ( 1 vote)
Dendrobium Scion Transplant - A Beginner's Guide
The Dendrobium orchid is capable of giving children much more often than its popular relative, Phalaenopsis. The sprouts can grow on their own on the mature pseudobulbs of the mother flower. In this case, it is enough to wait for the appearance of leaves and good strong roots. You can separate the baby from the trunk when its root processes reach 5 centimeters in length. They grow for about 5 months.
Demanding and moody orchids need proper care. In comfortable conditions, orchids grow and delight their owners with bright flowering. If you want to multiply your copies, then this is quite possible at home. You can plant a flower in different ways, or plant an orchid baby
.
The main thing is to comply with certain rules and all the necessary conditions. This process is as distinctive as the orchids themselves.
How to plant by cuttings-plant with a peduncle
Suitable for monopoid orchids
(with a growing straight shoot).
After the orchid has bloomed, cut off the peduncle with a fat-free knife
or lateral escape. Next, we divide it into parts so that there is a kidney in the middle of each. Cut the trunk of each part with coal.
Activated carbon or wood powder can be used. Greenhouse conditions are required for bud germination
: put the cuttings on wet sphagnum moss, cover with plastic or glass dishes and put in a warm place.
Remember to maintain moisture
so that the cuttings germinate successfully and take root.
The sprouted stalk is planted in the ground with the cut down
.
How can you multiply by division
Suitable for large plants with 4 or more false bulbs
... Consider how to plant such a flower correctly.
Carefully take the orchid out of the pot. Check first that the soil in the pot is not dry. Next, we clean the roots from the ground, cut the rhizome in half. Each half should have at least 3 pseudobulbs.
It is better to replant the plant if the soil begins to deteriorate.
Slices must be processed with charcoal powder.
and put each piece in a pot with fine bark. For young plants, special conditions are required: high temperature and a small amount of light.
Highly finely divide the plant
not necessary
so it will slowly grow.
Correct rooting of pseudobulb-care of the trunk after the appearance of the leaves
In the process of transplanting sympodial (with many growing shoots) plants get rid of darkened soft pseudobulbs
, and dense and rounded are used for reproduction. At the base of the bulb is a kidney, from which a new Phalaenopsis appears.
Difference between sympoidal / monopoidal species leads to different modes of reproduction
After the pseudobulb has faded, it is cleaned, part of the roots is cut off. Then the bulb is rooted in a container with a bark substrate or a mixture of sphagnum with coarse sand. Deepen the bulb to the base of the bud.
In order for the bulb to germinate, it must be sprayed, kept in a warm place and keep it away from direct sunlight
... When the leaves appear on the bulb, they can be planted in a regular pot with regular orchid substrate.
Propagation of phalaenopsis by seeds - how to plant seeds and care for them
This way of growing complex and requires special conditions and a lot of effort
.
Orchid seeds are very small and lack any protective and nourishing tissue. Growing shoots in this way requires an extremely careful approach. For seeds to sprout outside of nature for them it is necessary to create a suitable built environment
.
Microcloning is only possible under laboratory conditions
Completely sterile conditions can be created only in the laboratory
... This process takes a long time: it takes 1.5-3 years for the sprout from the seed to turn into a plant ready for planting.
At home, you can also try planting seeds. For soil, use chopped moss and leafy soil. Plant the seeds in rows, sprinkle with earth on top. The soil needs to be moistened. To do this, it is enough to spray the ground with seeds with warm water. Maintain the temperature at 22-25 degrees
.
As soon as the first leaf appears from the seed, it is transferred to the soil from moss and peat.
(diluted 50/50). After the appearance of the second leaves, they are transplanted again. When the seedling has already formed four leaves, you can finally transplant it into a regular pot and grow it.
Meristem reproduction - how to grow and get many sprouts quickly
More simple this process can be called cloning
... Only specialists can sit in this way. This way
exclusively laboratory
, this type of reproduction is impossible at home. Here, special cells of the mother plant are involved, which are able to divide. They are placed in a nutrient-rich environment.
The cells divide to form clumps. Then they are transferred to a new kind of environment, in which the plants themselves are already growing. In a short time, it is possible to grow a large number of identical orchids
.
How an orchid can reproduce by baby shoots
The formation of children occurs either at the base of the root collar, or from the bud on the peduncle.
What to do for the appearance of children
:
- after orchid bloom the peduncle is not completely cut
; - plenty of daylight
; - heat
in room; - end time of flowering.
In order to separate the grown baby from the mother plant, you need cut it off along with part of the peduncle
(about 1 cm). Treat all sections with charcoal powder or cinnamon, let dry.
Rules for planting babies at home:
- For landing take small pot
, a glass or a round container. Better that it is transparent. Drainage holes are made in the container. - Baby place in the middle of the pot
, the root collar should be flush with the edge of the container. - Pot fill with soil, holding the orchid baby by the root collar
.
To allow air and moisture to pass through, use pine bark soil or special soil mixture
for orchids.
- The roots do not need to be located in the soil itself.
... You can leave them on the surface or cover them with sphagnum moss.
There is no need to tamp the substrate in the pot
so as not to damage the delicate roots. To make the soil settle, simply knock on the sides of the container.
- After 2-3 days, you can water the planted orchid. By this time, the sections will be tightened, and the infection will not be able to get inside the plant. So the stem will not be harmed
.
Make an incision only with a sterile instrument!
Can baby give root
The appearance of roots in a child means that she is ready to develop without a mother plant
... Usually, the roots form on their own at the right time for this, while the baby grows and feeds on an adult orchid.
How to stimulate the growing of offshoots
One of the most common options is application of cytokinin paste
... It is a hormonal agent that promotes the process of cell division.
Cover the kidney with a THIN layer of cytokinin paste
Application: remove the scale from the kidney, gently coat it with paste completely, but in moderation
... Observe the result after about 10 days.
It is better to carry out this procedure at the end of winter.
- at the beginning of spring.