
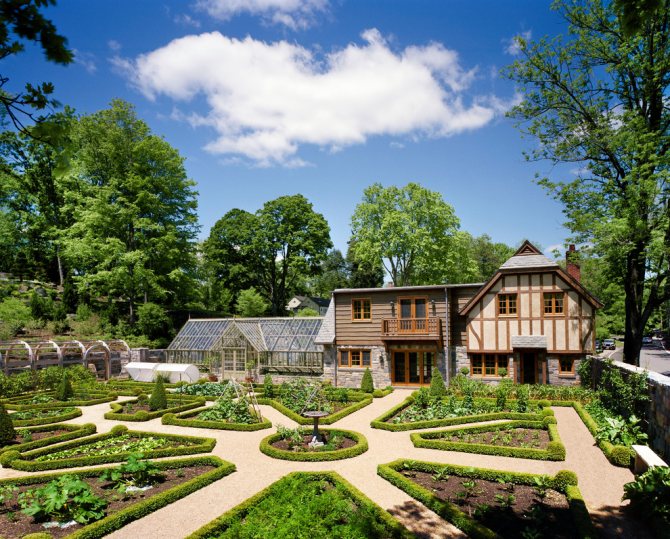
Most often, a dacha is not only flowers and rest, it is also a harvest. These are seedlings in the spring, seedlings, transplanting into the ground and other concerns. If you belong to summer residents who are important not only for the harvest, but also for a neat, well-groomed area with beautiful paths and fences, then you probably wondered more than once how to arrange beautiful beds in the country with your own hands?
Do-it-yourself beautiful garden in the country
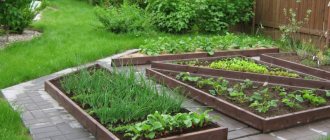
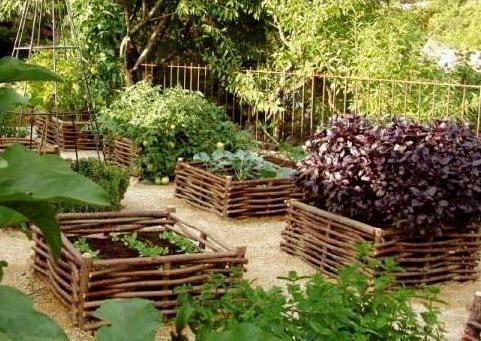
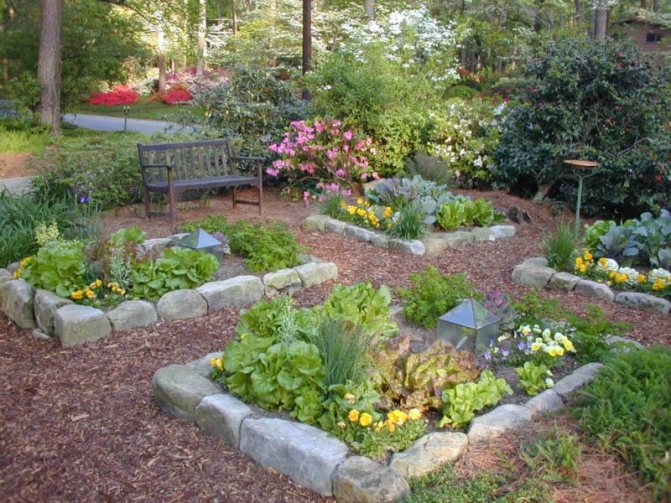
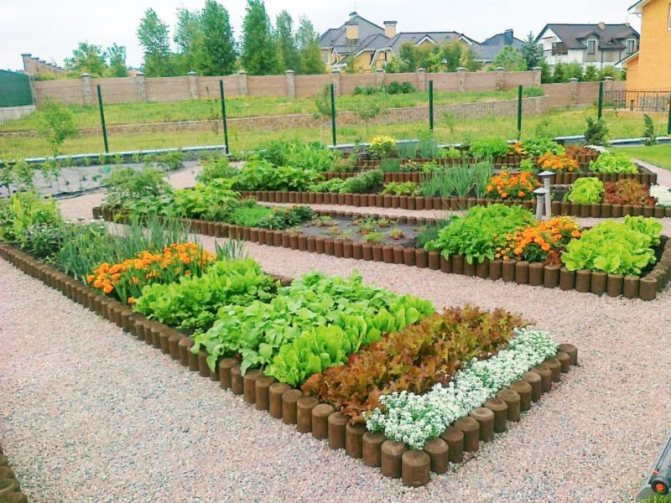
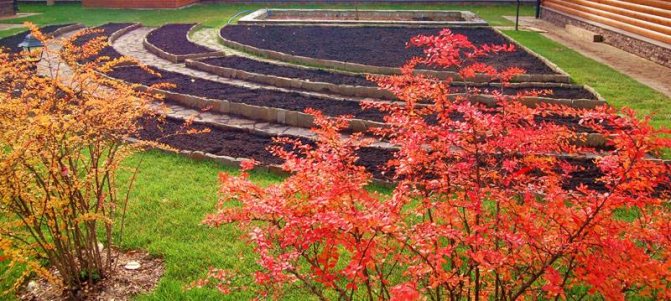
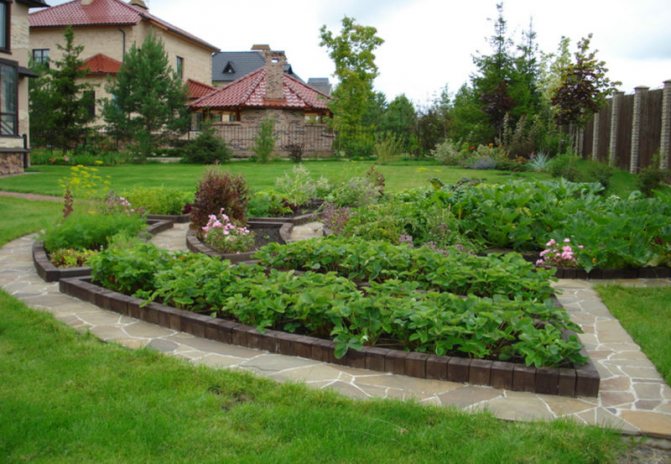
Very spectacular beds
Neatness and style
If you started a summer cottage not only for the sake of flowers and fruit and berry trees, then you definitely have beds. And usually the hardest work is their improvement. Because you need to provide for so many important nuances in order to fully enjoy the harvest afterwards. That is why we want to figure out together with you, what are they - beautiful and correct beds?
Almost a lawn
Unusual shapes are welcome
Art Nouveau
Size matters
When deciding on the size of plantings to create a beautiful garden, heed the advice of experts:
- Do not make the bed wider than one and a half meters, otherwise it will be problematic to reach the middle.
- If the planting is located near a fence or under a wall, then the optimal width will be no more than 80 cm. The main thing is that you can easily reach the opposite side.
- Choose the length at your discretion, adjusting to the size of the site.
- Do not skimp on the distance between plantings - narrow paths will cause a lot of inconvenience in the process of working on the site.
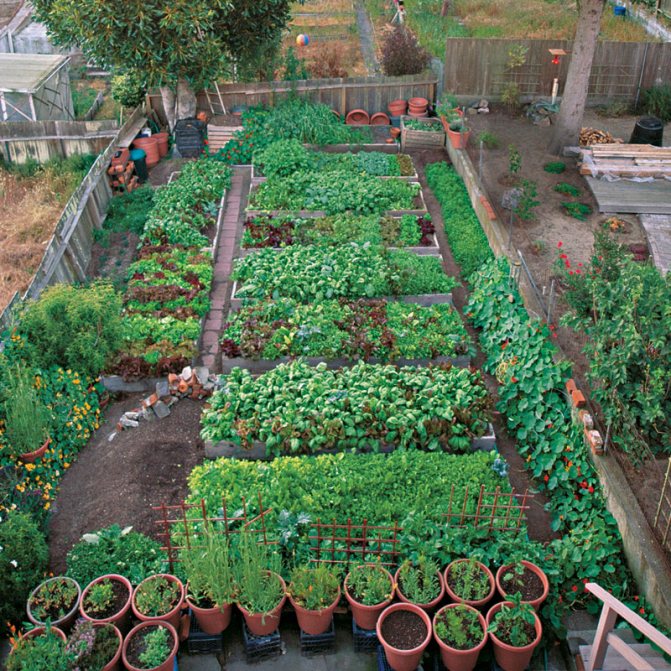
Location principles, space between ridges
The correct layout of the garden is the key to easy maintenance and a good harvest!
Let's outline the basic principles:
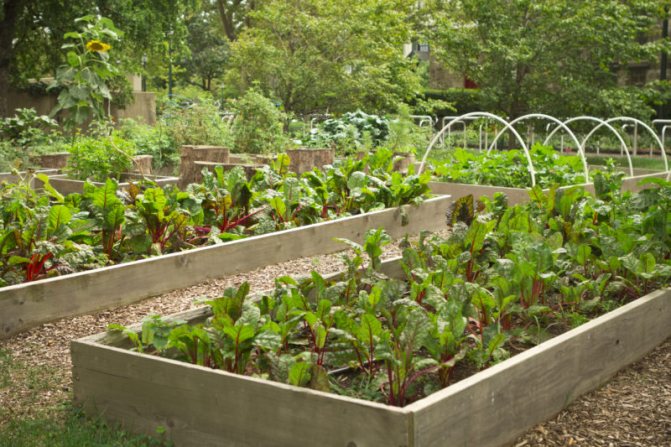
The ridges should be easy to maintain. This means that they must be no wider than 1–1.2 m. Then it will be easy for you to plant plants, reach for weeds to remove them, carry out pest control, fertilize, loosen the soil, and harvest.
Leave 60–80 cm between the ridges.
Position the structure from north to south, then all cultures will have enough light and warmth.
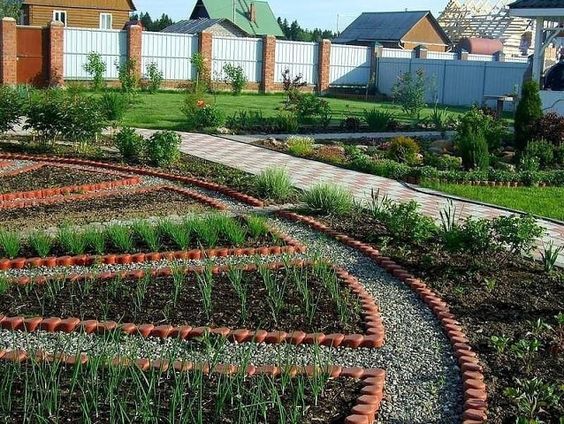
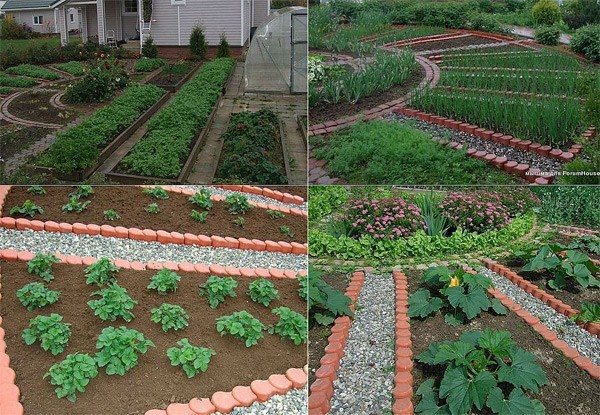
Passages should not be overgrown with weeds. There are many design options for this space - lawn, gravel, roofing material, paving stones. If funds permit, dig up the soil between rows, remove the roots of perennial weeds, level, compact the soil and cover geotextiles. It will prevent the growth of weeds. Decorative gravel can be placed on top. It will turn out very neat, practical and beautiful.
Don't try to plant many vegetables in one row. For a width of 100 cm, it is enough to plant them in 2 rows, observing a checkerboard pattern, so that each plant receives maximum illumination and heat.
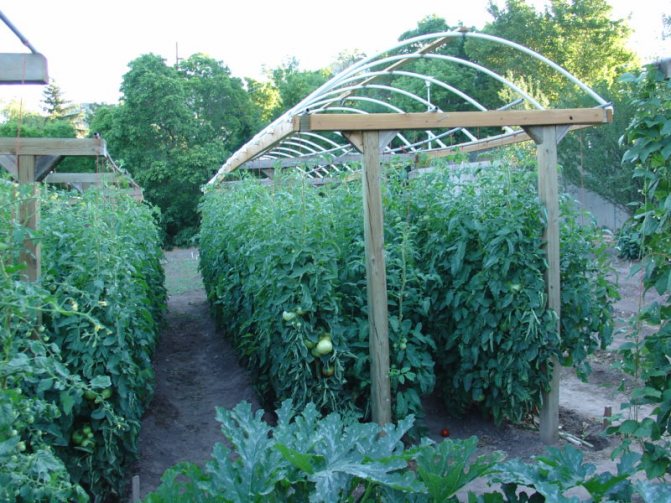
It is convenient to install arcs in a raised bed for the construction of a small greenhouse.
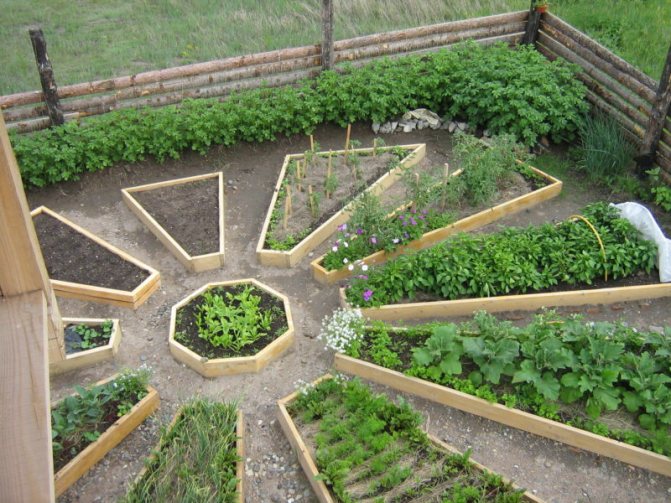
The form
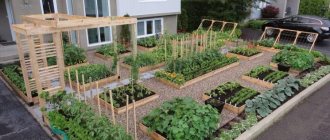
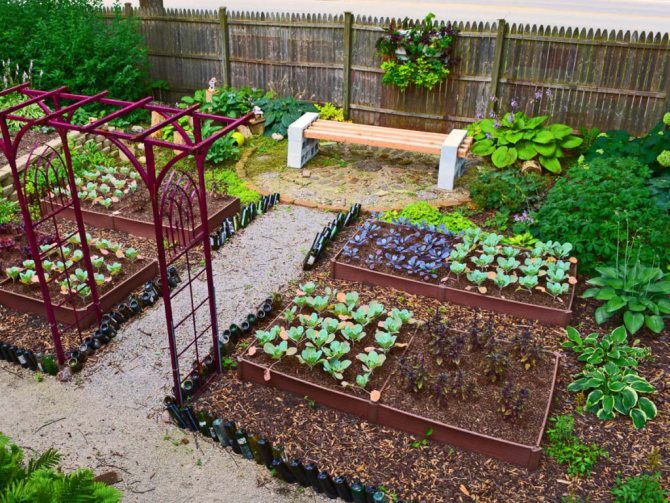
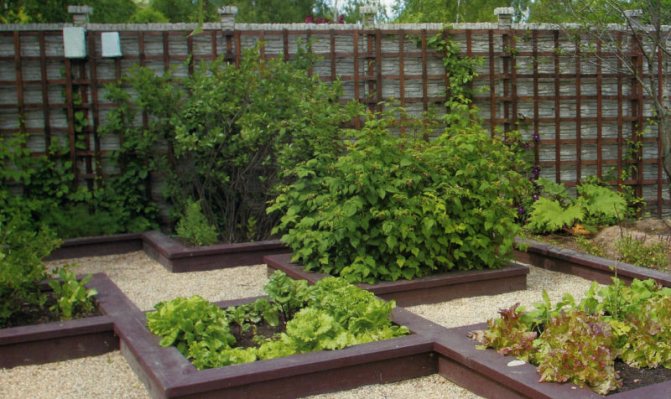
Look at the beautiful beds, the photos of which are presented below. The variety of forms is limited only by fantasy. Square, rectangular, in the form of segments of a circle, round - choose what you like best. The main thing is that you can easily reach the plants in the center.
Beautiful beds do not have to have a clear geometric shape, they can be created by following the contours of the relief.Such placement not only uses the maximum free space, but also looks original and effective. How beautiful to make the beds in the garden, you can see in the photos in our article.
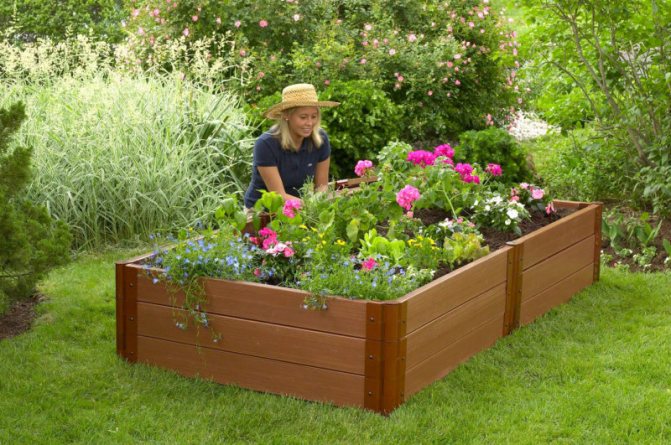
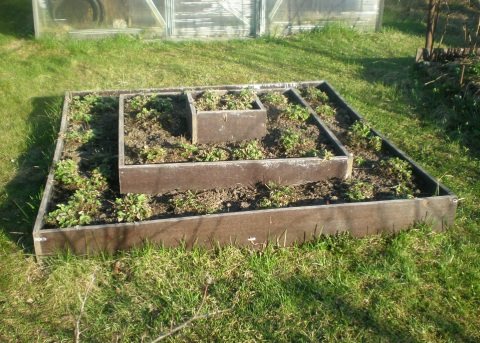
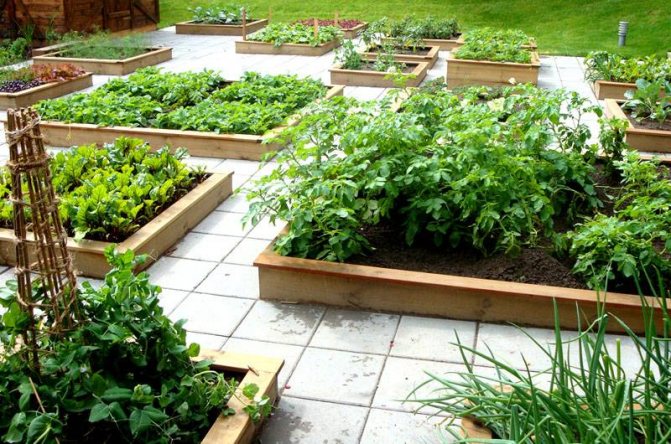
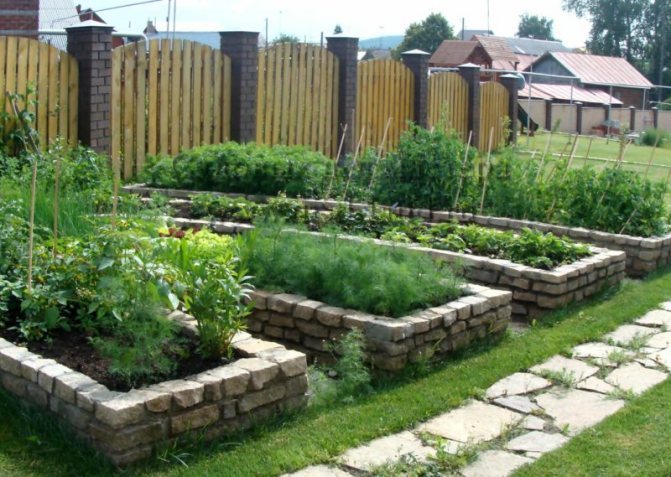
We proceed to the construction of a bed with sides
The garden will be neat, it will be pleasant to look after it. You can, of course, hire a specialized team, or you can do everything yourself.
Moreover, it is not so difficult:
- We carry out the marking of future beds.
- With a shovel, along the marked line, we shovel the earth into the center. We go deeper by 10-15 cm.
- We install the sides. You can take different material for them. The main thing is that it is tough and keeps the shape of the garden bed.
- The sides can be made of boards. It is better to fasten them with screws, not nails.
- Slate. First, it must be cut to the required size.
- Can be made of bricks. It is used in the arrangement of curly beds, where the landscape designer worked. Because, as is clear, the location of such a bed cannot be changed just like that. It is necessary to break!
- The height of the side wall is selected individually. It is defined as follows: the height of the side above the ground level, plus the depth of laying in the soil.
- You can buy factory-made fences and curbs. They are made of galvanized steel with a polymer coating. The plot with them looks not only neat, but also fun. They are made in different colors and in almost any geometric shape.
Here is the bed and is ready. Little tricks when using these beds:
- Paths between the beds can be laid out with stone, tiles. You can also sow lawn grass. It will be both beautiful and comfortable.
- After harvesting, the earth is dug up, but not left even. One or more mounds in the form of a pyramid are made on the garden bed. This is necessary so that after the winter, the earth, having begun to thaw, does not open the fence.
- If the soil on the site is clay, then holes must be drilled in the brick fences for the outflow of water.
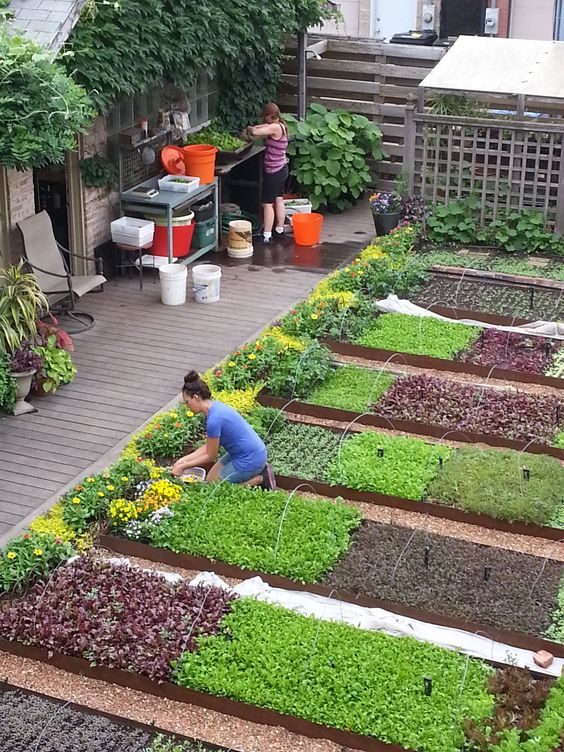
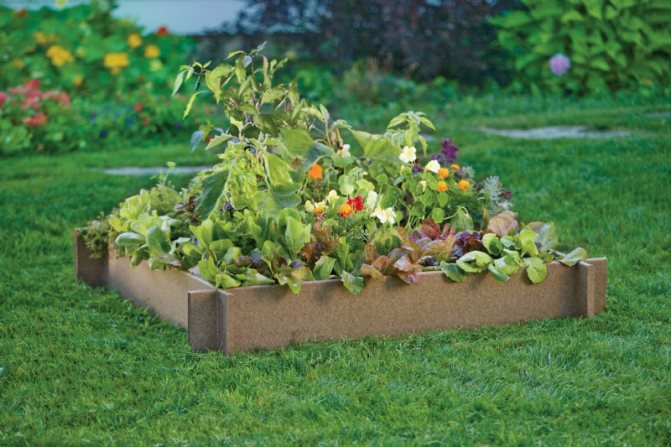
Mixing cultures
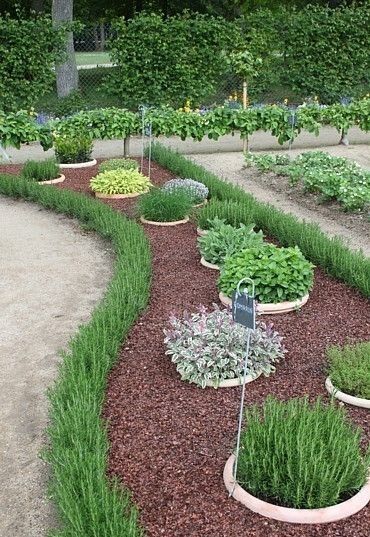
It has long been known that a properly selected neighborhood of different crops on the same bed increases yields and improves the quality of fruits. By creating the decoration of the beds by mixing crops, you can get a vegetable garden that resembles flower beds in its colors. See in our article the ideas of a beautiful garden in the country with your own hands in the photo, demonstrating how the plants were originally selected in one area.
Spicy herbs look very bright, and with their aroma scare away many pests. It is a good idea to place these plants around the edges. When choosing crops for mixed planting, remember to consider their height. Taller plants should be planted in the center or on the north side. See below for examples of how to beautifully decorate the beds in the country, the photo of which is below.

The types of beds in the garden are varied. We will look at the main ones and show you how to arrange a garden with your own hands.
How to make beautiful beds?
I really want our site to be different from others. The design of the beds can help us with this. It can be made unusual and unlike anything else. There is a place where fantasies can roam!
Here are some ideas:
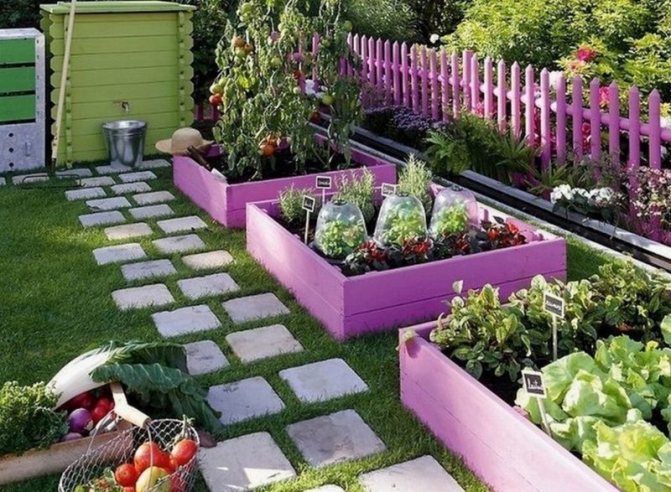
- The fences are made of extraordinary material. For example, car tires painted in bright colors will give the site a festive and cheerful look. Moreover, you can arrange them as you like: a pyramid, a chain, a column, etc. From metal pipes and drums with holes made in them. From which plants grow.
- You can use an empty fence wall, and hang something like a flowerpot with some greenery on it.
- You can decorate the beds around the perimeter with a wicker fence. It always looks original.
Good luck in arranging your garden, and high yields!
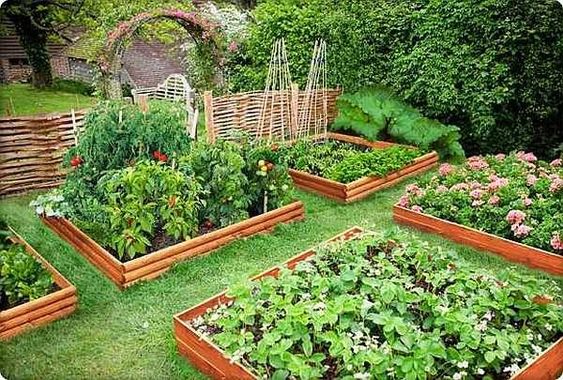
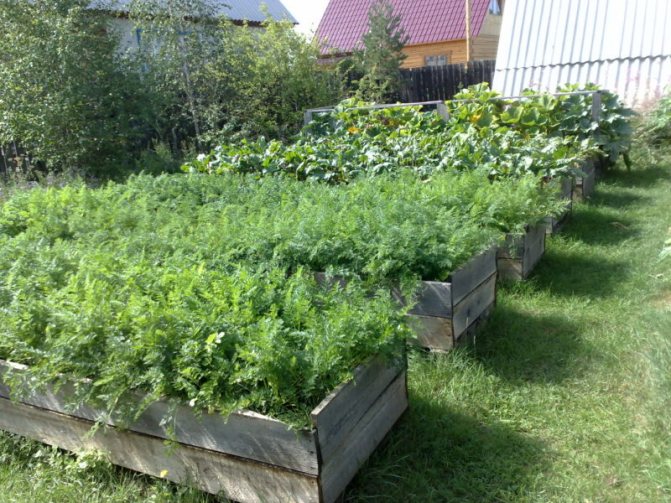
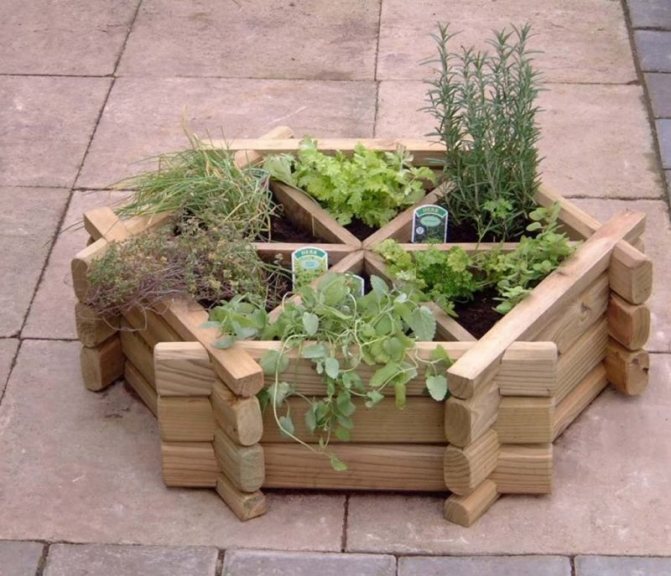
Types of beds
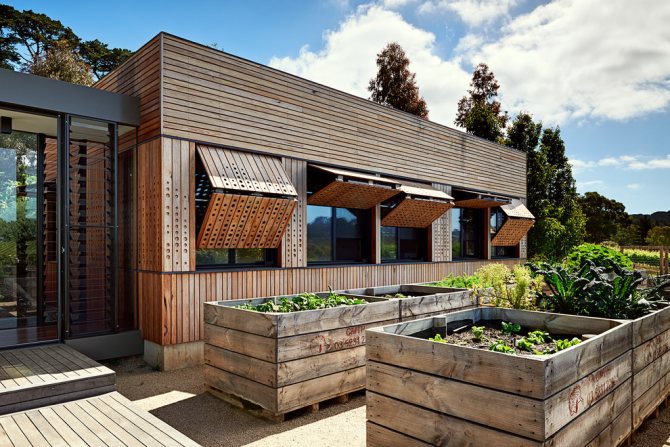
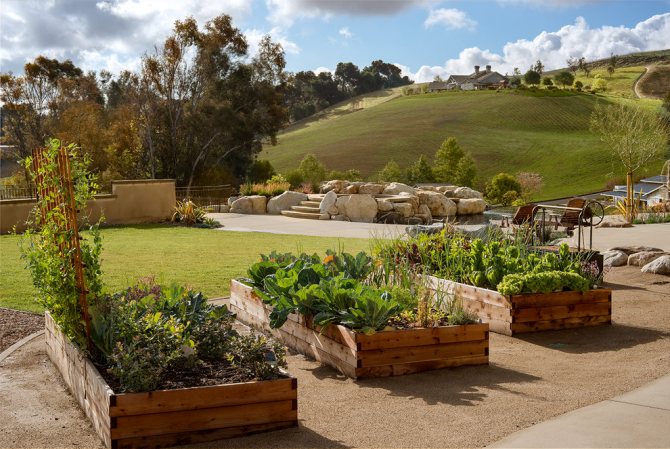
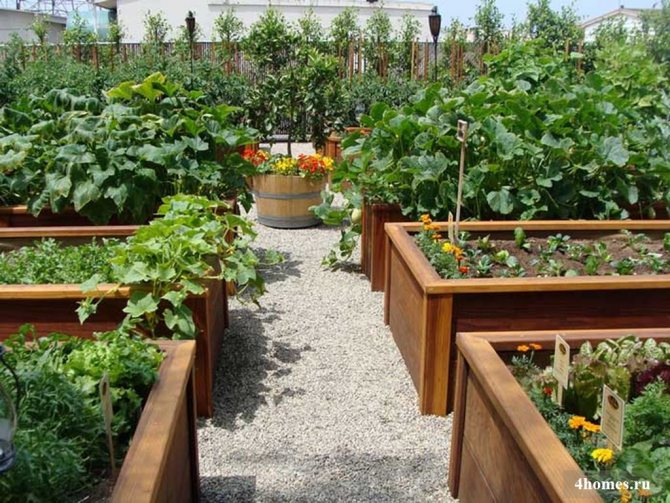
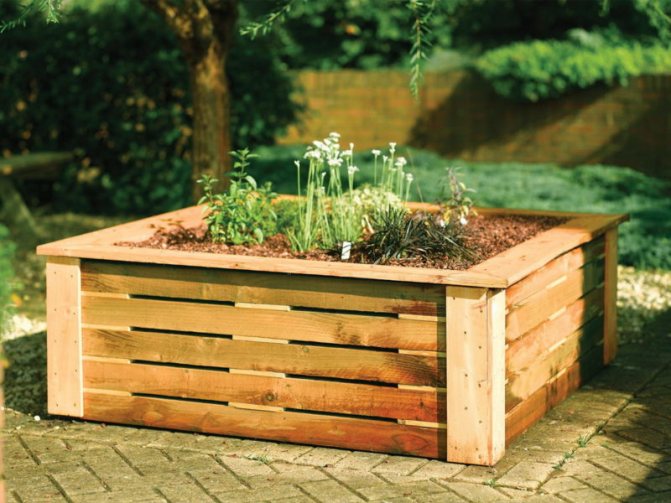
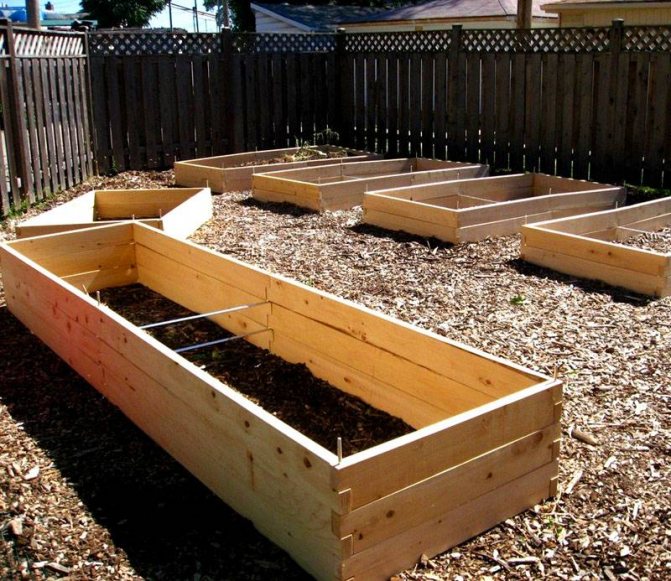
High
A beautiful and practical design can be easily done by hand.An excellent harvest is obtained due to the good warming of the land, and the original design can be an excellent decoration for the site. Look at the design of the beds in the garden photo in our article.
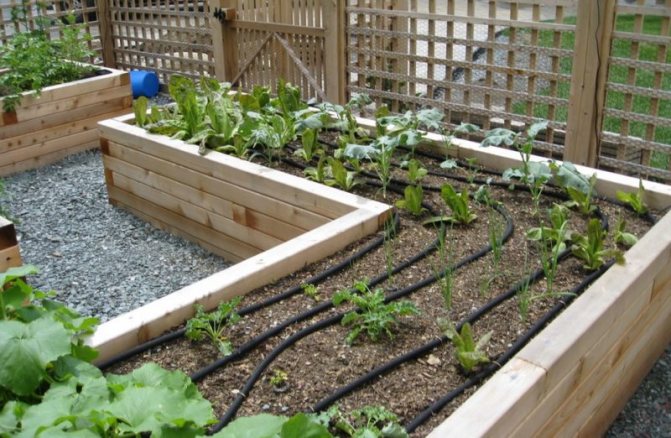
To create them, it is possible to use:
- wood;
- stones;
- brick;
- twigs and vines;
- thin logs;
- slate;
- plastic boxes;
- bottles, etc.
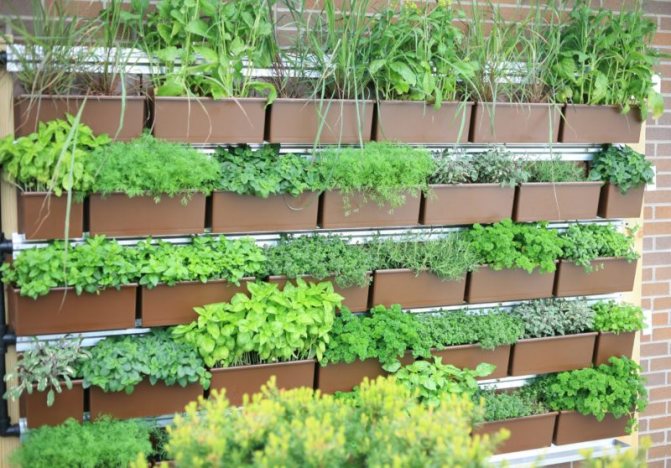
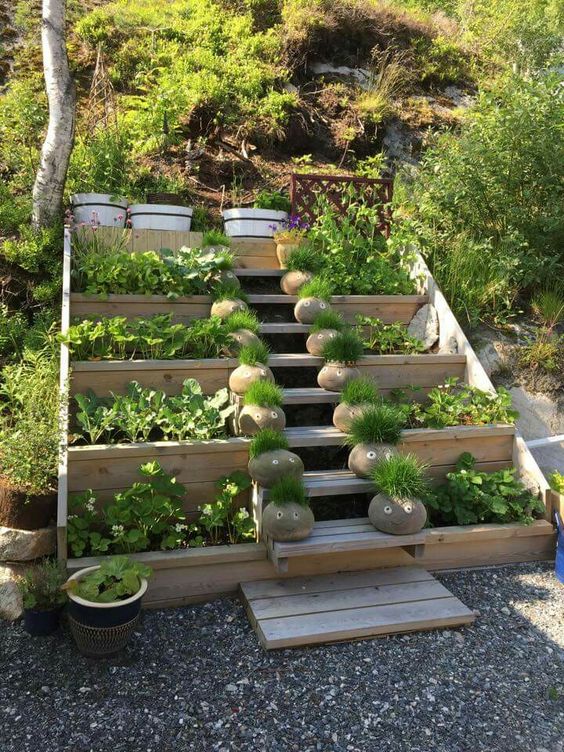
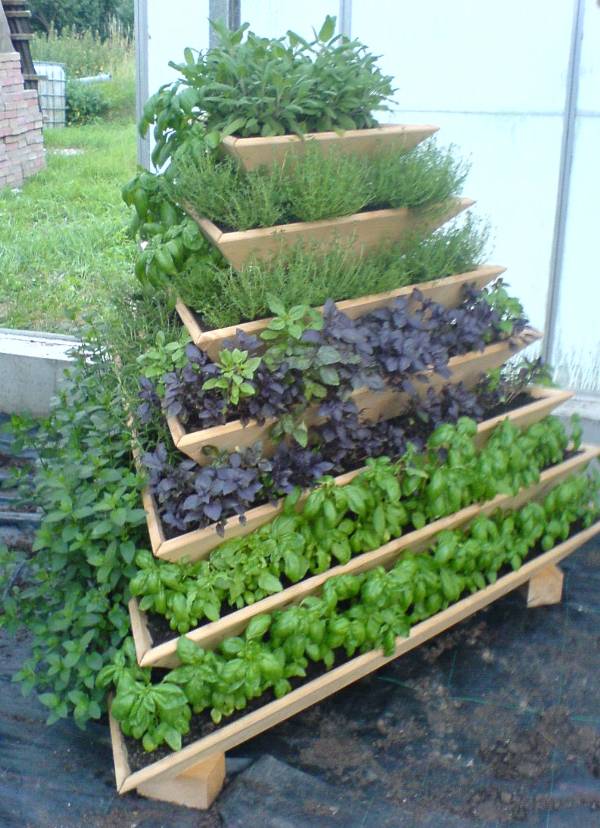
Vertical
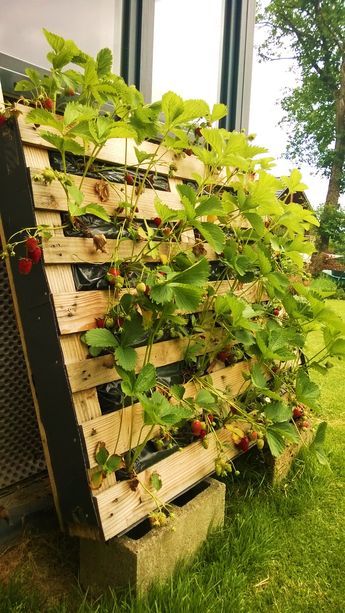
Effective use of vertical space and unusual design make these beds not only an ergonomic design, but also a decoration of the garden. It is quite easy to make beautiful strawberry beds with your own hands. They can also grow greens and some types of vegetables with a small root system.
A big plus is the mobility of many types of vertical structures: in bad weather and for the winter, they can be moved indoors. For their manufacture, you can use any available materials: from plastic bottles to specially designed racks. See examples of how vertical beautiful beds are made out in the country, photos of which are available in our article.
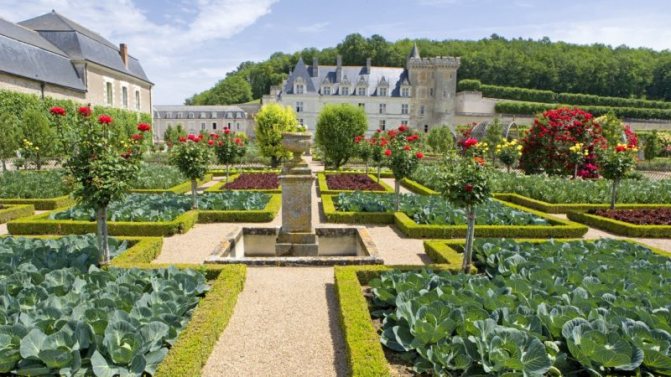
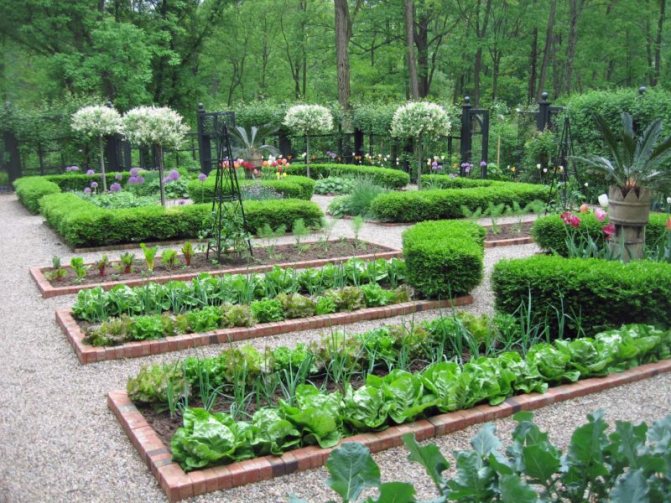
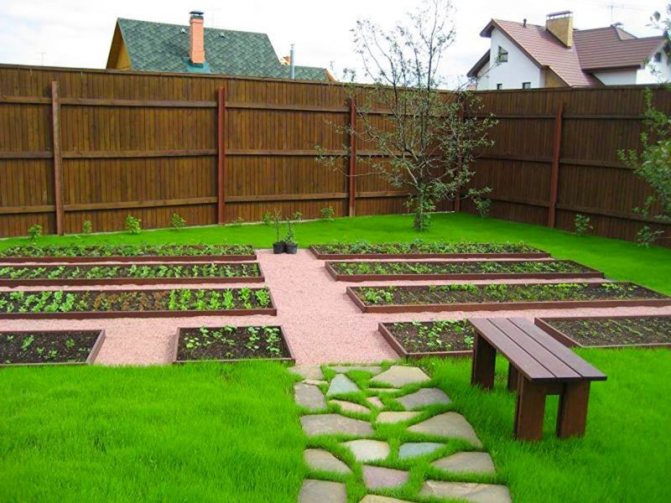
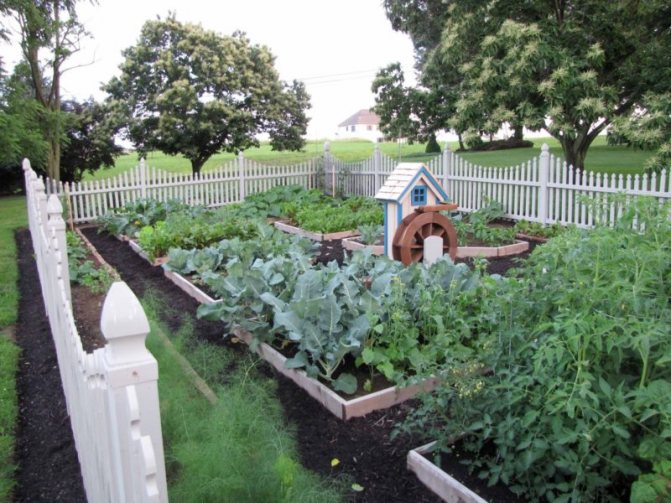
French
How to decorate a French-style vegetable garden beautifully? It's pretty simple. The geometric shapes of the landings are separated by clear path lines. Smoothly planted rows of vegetables with borders of low greenery or leafy salads of various colors. Or slightly raised landings with a border of finishing materials. For example, you can see a photo of a summer house with beds and lawns in our article.
English
An English-style vegetable garden is created according to the “all together” principle - the garden, lawn, flower beds and beds do not have strict delimitations. The design of the beds in the suburban area in the English style allows mixing vegetables and flowers in one area. The main thing is that everything is well-groomed and looks harmonious.
Lazy
The delight of lazy summer residents - the beds do not require deep digging and weeding. The entire space between the plants is covered with mulch, which saves moisture and prevents weeds from germinating. They can be either ground-based without fences, or raised, fenced with curbs.
Smart
How to equip a garden with your own hands in order to harvest more crops? The dream of any gardener has now become available. These are smart beds. High original beds, supported by sufficiently strong bumpers and filled not just with earth, but with a special composition, compost, etc. Some of the complexity of production is compensated by the ease of maintenance in the future and a bountiful harvest.
Compact options
Compact decorative beds are easy to make with your own hands. For these purposes, you can use:
- wooden or plastic boxes;
- tires;
- various furniture (dressers with pull-out drawers, etc.).
Vertical beds - how to create, what are the features, pros and cons
If you have a small plot and want to use it with maximum benefit, then you should think about creating vertical beds. Thanks to them, with small areas, you can get an excellent harvest, only once having made enough effort for this.

These beds are great if you want to:
- save space,
- grow more in a limited area,
- grow outdoors,
- simplify your care and reduce the number of probable weeds,
- facilitate watering and harvesting.
Thanks to their simple design and mobility, these beds are easy to assemble and move. And at the same time, you yourself can choose how many bushes or seeds you need for seedlings.
Varieties of vertical beds
There are several types of vertical beds:
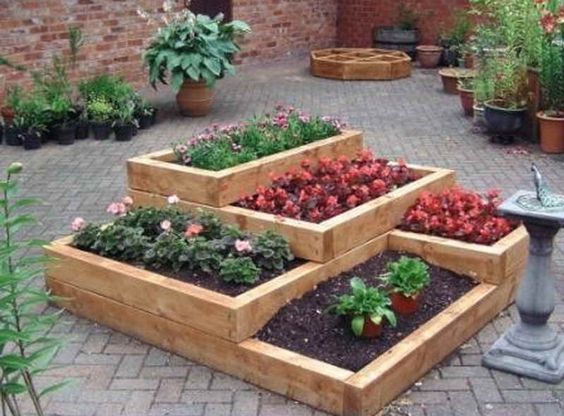
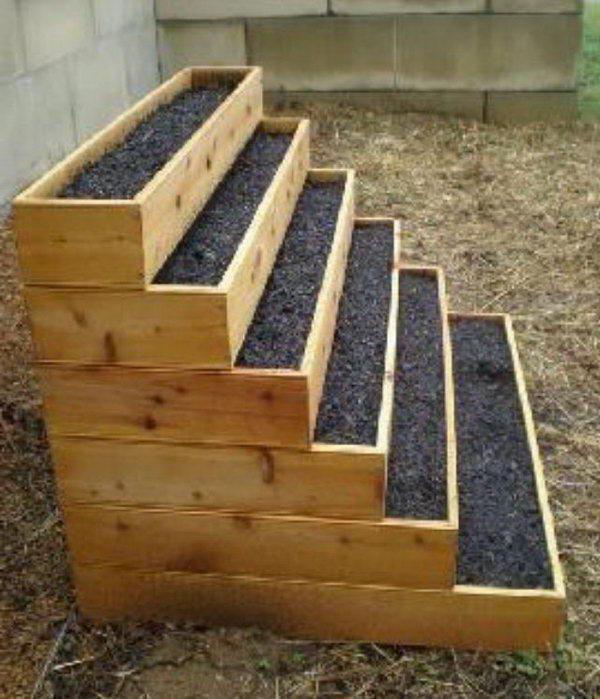
ladder type - are created from boxes of different sizes, stacked on top of each other according to the principle of a ladder,
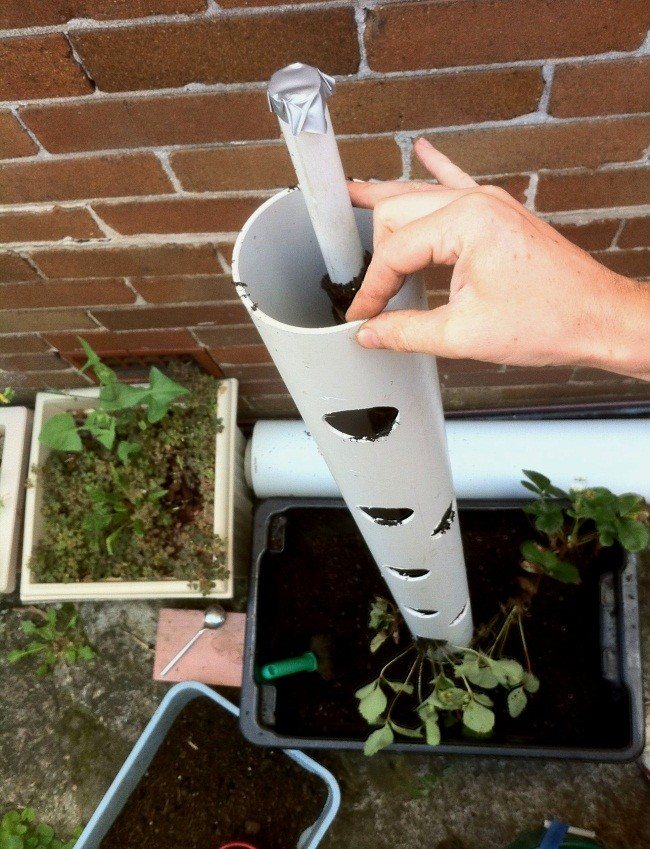
tubular - are plastic pipes of the selected diameter, filled with soil, with holes for seedlings,
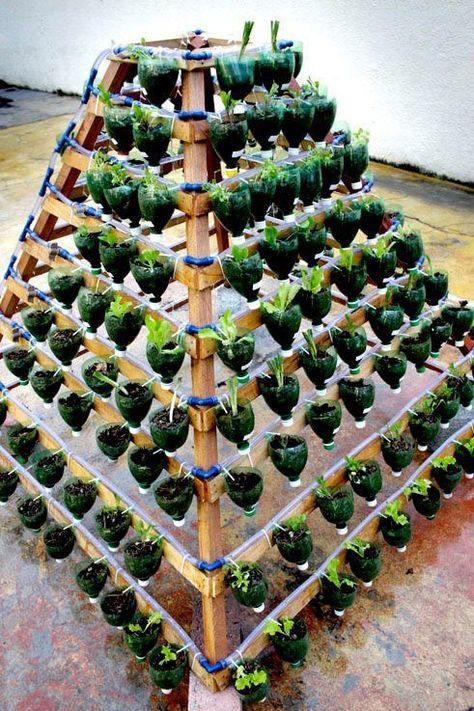
suspended - where the beds are located on top of each other, being suspended or installed on a structure similar to a ladder,
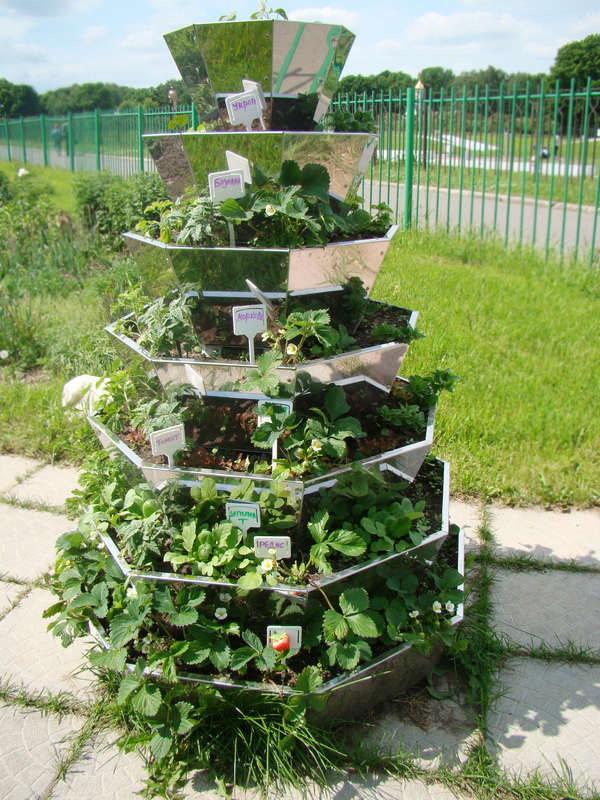
pyramids - they are created on the principle of staircases, but each new tier is smaller than the previous one on all sides and is located in the center, eventually creating the appearance of a pyramid.
Clear instructions for creating different types of vertical beds
It is not difficult to create a vertical bed, but it all depends on your skills, the tools in the arsenal and the materials that you have at your disposal.
Most often they are made from planks to extend the life of their structure and get the most out of it. After all, wooden beds last longer, are more stable and harmless to future seedlings. But their arrangement requires more knowledge and experience in using tools such as a drill, screwdriver and jigsaw (if you need to cut the boards to the intended size).
In general, the basic set of materials for creating a wooden vertical bed is the same:
- boards,
- timber,
- nails,
- self-tapping screws,
- priming,
- seedlings or seeds.
First, decide on the size of the largest and smallest beds. Saw the boards into the cuts you need, and then collect boxes from them, which you stack on top of each other and fill with soil.
Do not forget that even experienced craftsmen use a pencil and tape measure so as not to be mistaken with the size. And to protect the hands, they take thick gloves.
Take advantage of a very clear, step-by-step master class by Ekaterina Komkova, telling how to build a very neat pyramid for your seedlings.
And if you liked a place near the fence or the wall of a country house, then it is more suitable for you ladder bedas in the relena75 master class:
Take up little space and bookbeds, which fit perfectly into small areas, and due to their design are also very mobile. After all, they are so easy to move from place to place or put away for storage at the end of the season. And they are made no more difficult than their more massive friends. See for yourself by following the instructions from the Dacha Expert video tutorial:
However, a pallet can also become a stack.
Tubular the beds do not require much manufacturing effort at all. And they take up much less space in comparison with the previous ones. And the harvest will be worthy of a full-fledged garden.
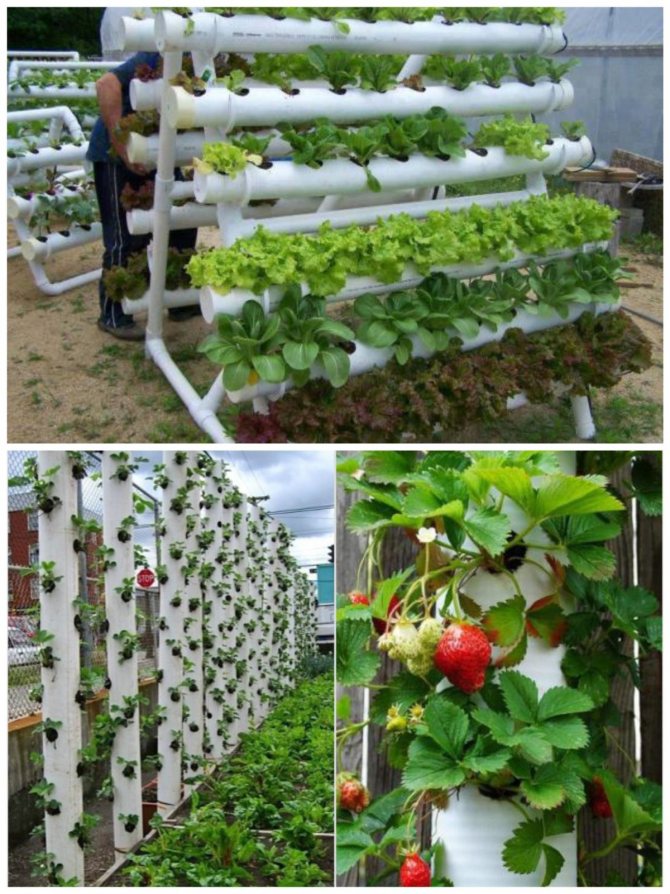
To create it, it is enough to cut pipes of a suitable diameter, make holes on them using a special drill nozzle, dig in a chosen place, fill with soil and your garden is ready!
They are great for growing strawberries or cucumbers.
If you want to understand the intricacies of creating such compact beds, then you should pay attention to the master class of a dacha craftsman with the nickname Adek.
Disadvantages of vertical beds
But, like everything else related to the dacha, vertical beds are not a panacea. Indeed, due to all the same design features, they also have disadvantages.
- the soil in them is quickly depleted,
- the soil often has to be watered due to drying out with a small volume of the garden itself,
- if your region has severe winters, then the earth will freeze through, which is bad for perennial crops,
- it will take some effort and patience and the tools to create them.
In addition, due to the limited space, not every culture will take root in a vertical bed - plants with a powerful root system will not be able to fully develop.
Therefore, it is best to grow in such beds:
- salad,
- basil,
- cucumbers,
- strawberries,
- dill.
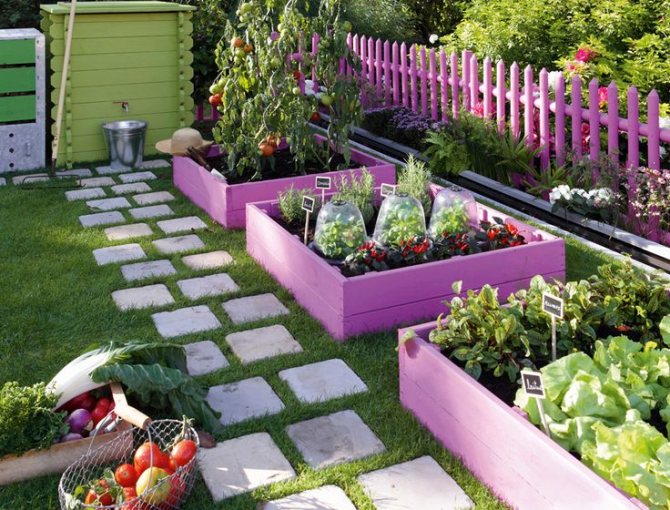
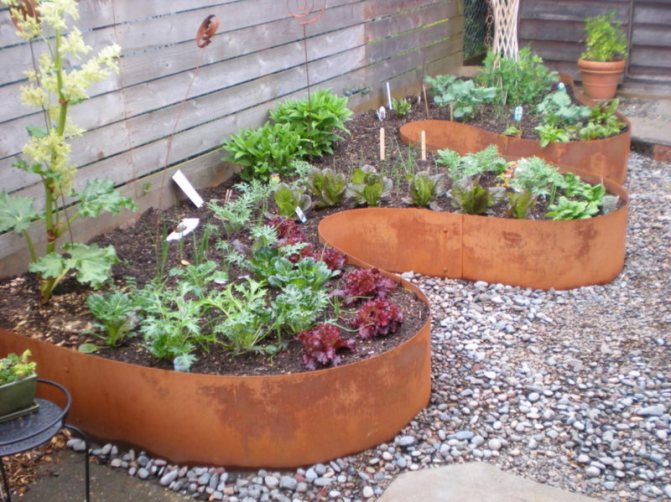
Bumpers and fences
In the design of the garden, the sides for the beds play an important role. It is ideal if they are all made in the same style or in design will be combined with the house and the fence. You can make a beautiful garden with your own hands using for the sides:
- natural stones;
- bricks or paving stones;
- logs of various diameters;
- slate;
- boards;
- vine or twigs;
- plastic or glass bottles.
The choice of material is limited only by imagination and material possibilities.
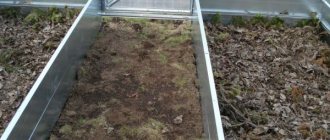
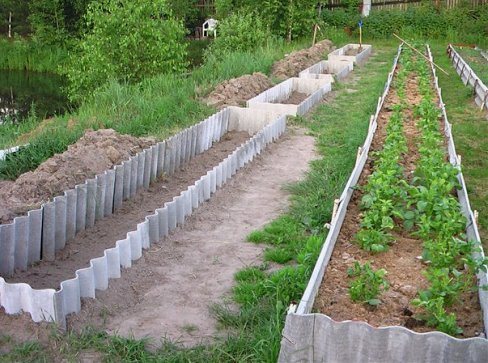
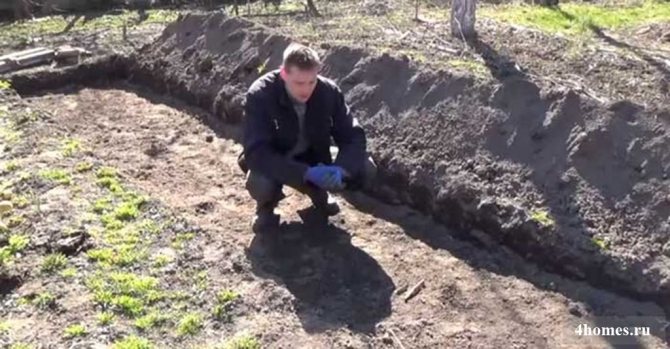
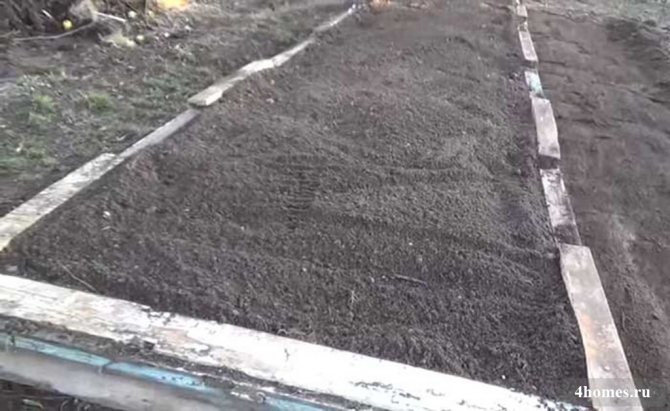
Buried ridges
It is not difficult to make such a structure, but it is time consuming.
Construction stages:
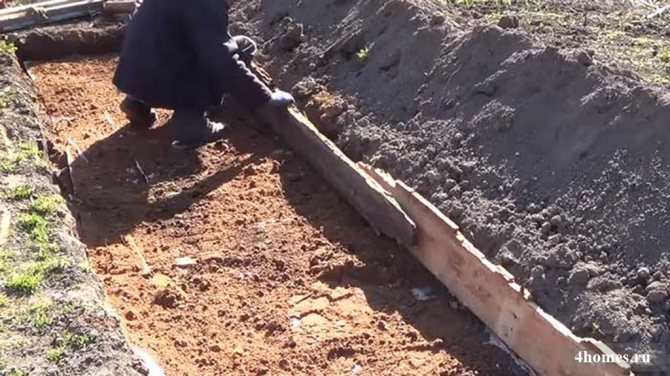
Assume that the surface of the structure must be exactly horizontal. Otherwise, water will accumulate in one corner. Use a building level to break the horizontal.
Dig a trench 1–1.2 m wide and 20–30 cm deep into a shovel bayonet. The length depends on the size of the site. You can do 3, 6 or more meters.
Line the bottom of the trench with thick cardboard.
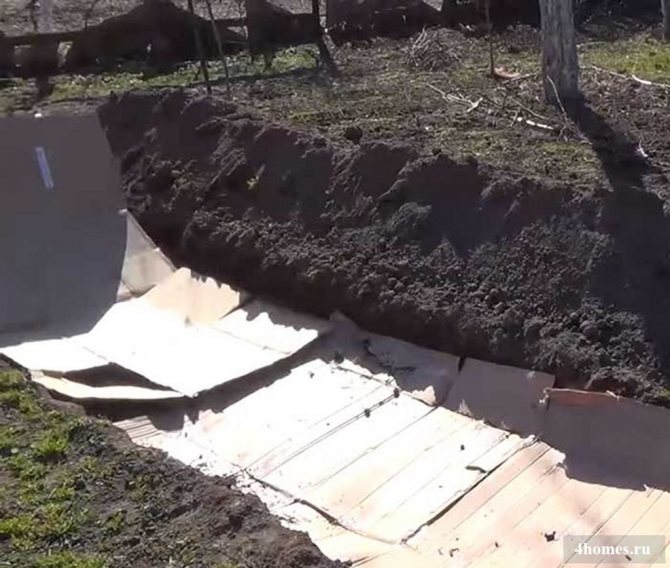
Pour a thin layer of sand on top.
Lay out the perimeter with old planks to ground level.
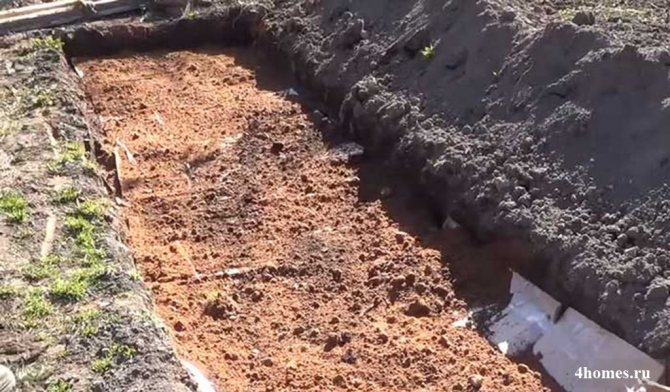
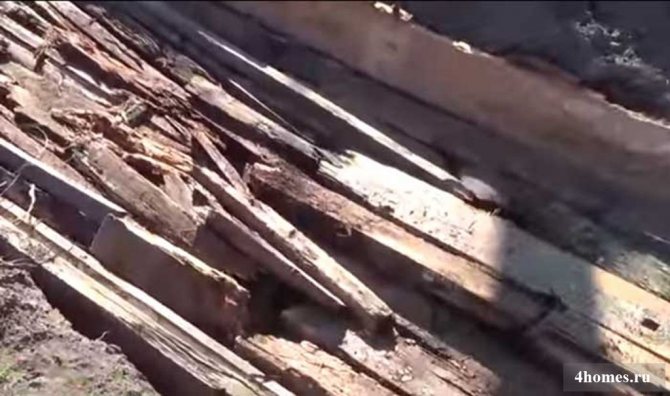
Lay the remains of boards and logs at the bottom. If they have already begun to break down, even better.
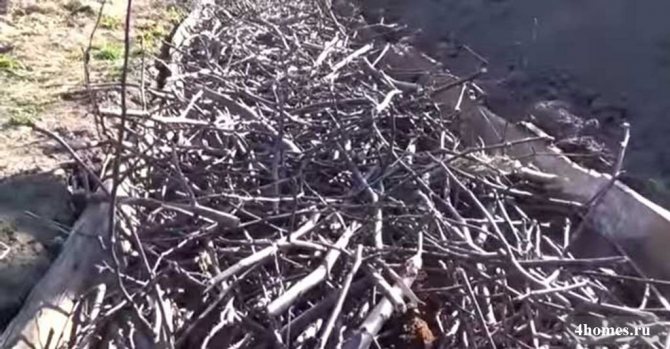
We continue to cover the bottom. We lay out the branches, for example, those left after cutting the garden.
We put a thick layer of compost or the remains of household waste: mowed grass, corn stalks, foliage.
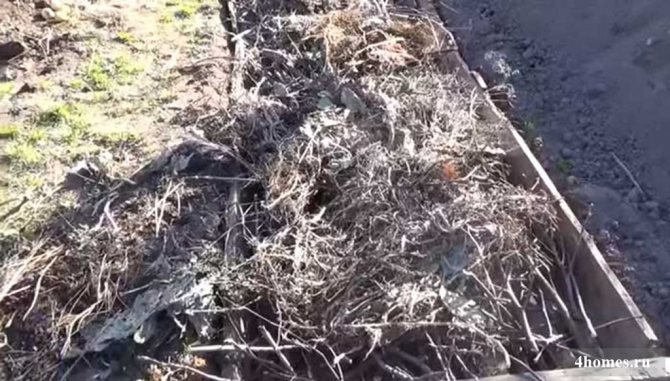
Water the resulting layers. If they have settled, add more compost on top so that the top is at ground level.
Add a layer of fertile soil.
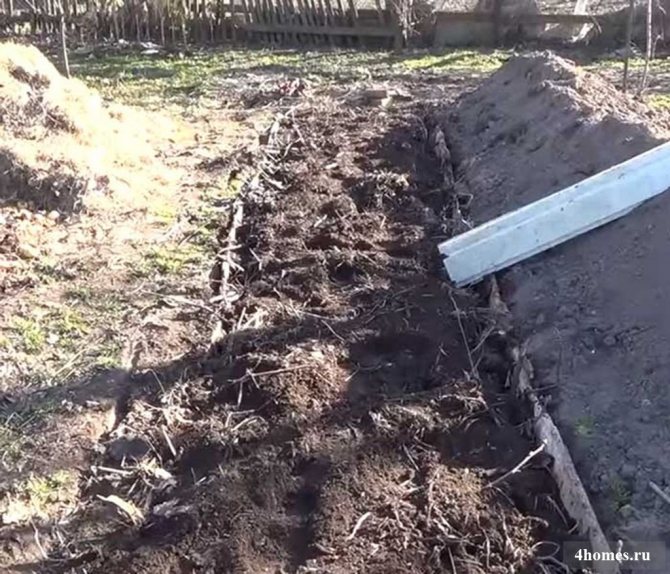
This is where the first stage ends.
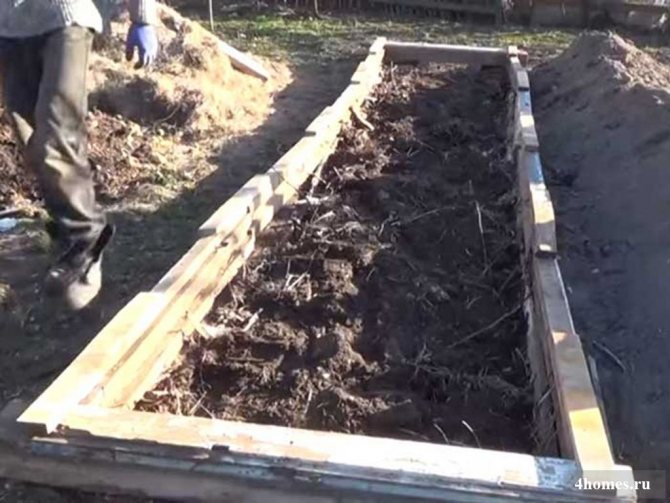
We proceed to the installation of the box. It can be as high above the ground as you want. But not less than 15 cm, otherwise there will be no point. Lay thick boards around the perimeter and hold them together.
Place a thick layer of hay up to the top of the boards. Tamp it well by walking on top.
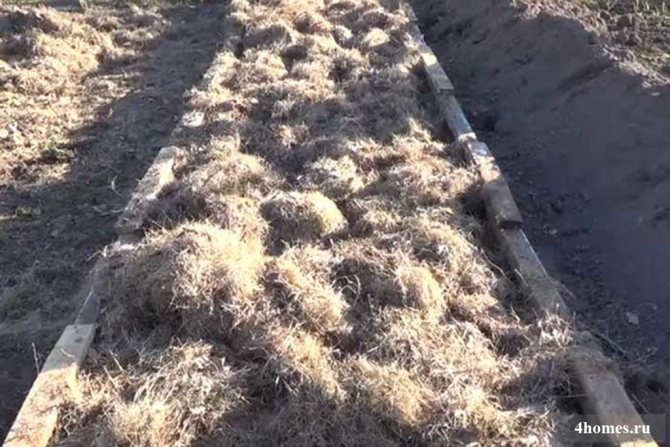
Throw in a layer of rotted manure and compact well too. Drizzle liberally with water.
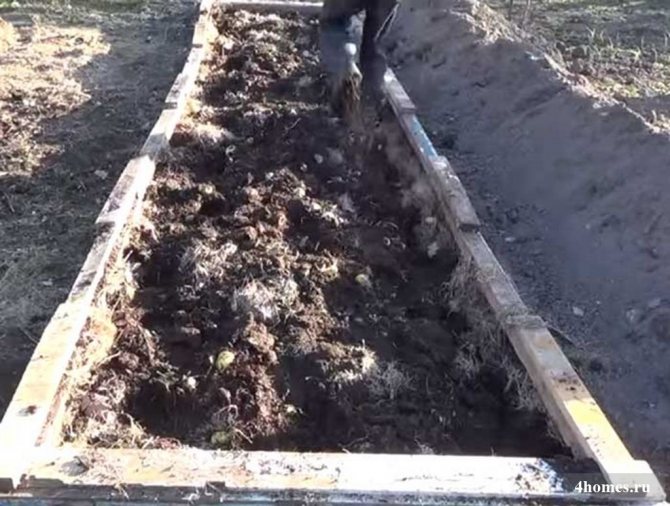
Fill the top with fertile soil. Done!
To avoid sowing weeds, be sure to mulch the soil. To do this, you can use hay, straw, compost, bark, sawdust. Having understood the principle of arranging a buried ridge, you can implement other options.
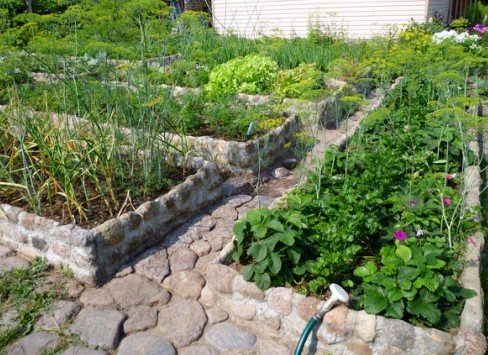
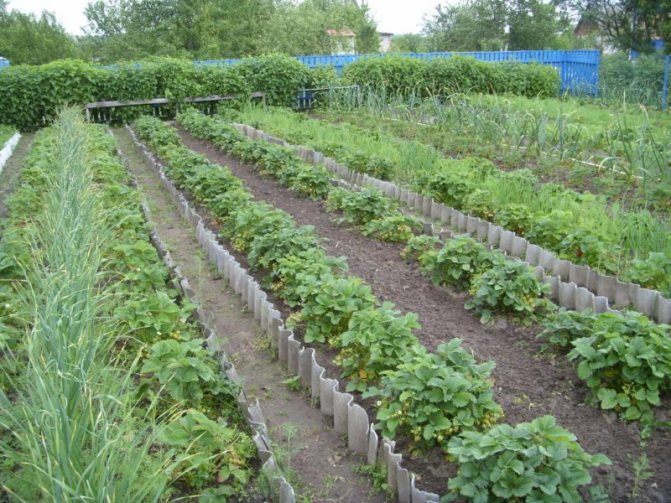
Tracks
The originally designed paths can become a decoration of the garden and vegetable garden. When laying paths, it must be borne in mind that the width of the main ones should be 50-60 cm, and for additional ones between plantings, 30 cm will be enough.For the garden, straight paths are better suited, but winding paths will fit well into the landscape in the garden. There are many design options for tracks and materials for them. Most often used:
- cement;
- paving slabs or paving stones;
- bricks;
- natural stone;
- pebbles or rubble;
- wood.
See how the original and beautiful paths and beds in the garden look, the photo of which is below.

DIY material for making beds
The creation of a bed of any configuration requires some preparation. In order to equip the beds in the form of boxes, you will need to use the following materials:
- slate or boards, plastic or polycarbonate of such a height that there is at least 30 cm in the ground, and at least 20 cm on the surface of the entire size of the product;
- pegs made of wood or metal, which will be needed to secure the fence material;
- non-woven material that can be used to cover the bottom of the prepared trench.
After the workpiece - the dug hole is covered with non-woven material, it will be necessary to cover it from above with the following layers:
- sawdust or straw - about 10 cm;
- dry foliage (which you prepared in advance in the fall) - about 10 cm;
- a mixture of compost and soil, in a ratio of 1 to 2 (layer size 10 cm or more);
- a clean layer of earth at least 10 cm.
Decor
Beautiful beds in the garden, the photos of which you will see at the end of the article, are in themselves a decoration of the site, but if you use the original decor, you can add a twist. Use old furniture, natural stones, tree stumps, original lamps and whatever your imagination tells you. Decorate the garden with ready-made or self-made garden sculptures. Several examples can be found in our article. For those who do not know how to make beautiful beds in the country, it will not be difficult at all.
Interesting layouts of beds in a summer cottage with a photo
In order to get a really high yield and at the same time an attractive appearance of the garden, it is worth considering the peculiarities of the area in which the garden is located. There are several general recommendations:
- In low areas with a large amount of moisture, it is better to make small beds measuring 1 by 1 m, and up to 30 cm in height. Such structures will provide good heating of the soil and increase yields.
Small beautiful models
- Raise the landing site if the area is heavily darkened, for example, by a fence or trees. To do this, make a frame up to 50 cm in height, and leave the width of the beds within 1 m, otherwise you will not reach the center.
Preparing high options
- In open and flat areas, you can combine designs at your discretion, taking into account the required amount of light for each type of plant.
Interesting solution with shape and dimensions
Here are some interesting examples of beautiful do-it-yourself flower beds and flower beds that can be combined on plots and gardens:
Photo gallery
In our gallery you can see 13 more photos of beautiful ways to decorate a garden.

Guide The Village8 flower shops in St. Petersburg
On March 8, more flowers are bought in Russia than on any other day of the year, so the problem of choosing a good bouquet should be taken care of in advance. The Village has chosen eight flower shops in the city, where flowers are not wrapped in plastic paper for a long time, but they approach business with seriousness and taste.
"Flower shop"

Address: Zhukovsky, 14
Telephone: 327–36–68
Working hours: 10:00–20:00
In the "Flower Shop" on Zhukovskogo Street, neat bouquets of non-trivial flowers are collected and decorated with taste. Here you can also find the most suitable vase for the composition, interior items and dishes. It is better to order a bouquet in advance by phone, but you can also buy a ready-made one.
"Tsvetkov"

Telephone: +7 911 995–76–30
The Flowers service makes simple mono bouquets in craft paper from bush roses, calla lilies, lilacs and tulips, as well as several types of prefabricated bouquets - from peonies, cotton, white carnations or hydrangeas, phlox, chrysanthemums and jasmine branches. The smallest bouquet - "Compliment" of one to five flowers - will cost 300-500 rubles, an envelope of 25 tulips - 2,500 rubles, a large composite bouquet - 4,000 rubles.
"Flower cuisine"
Address: Nevsky, 20, restaurant Biblioteka
Telephone: 925–16–20
Shop "Flower Kitchen" is based in a restaurant on Nevsky, 20, but delivers bouquets around the city (the cost of the service is from 300 rubles, for orders over 2,500 the bouquet will be delivered free of charge). A bouquet of nine tulips with greenery and packaging will cost about 800 rubles here, larger bouquets will cost a little more.
Florentin

Telephone: +7 981 953–88–83
Working hours: 10:00–20:00
Flowers in hat boxes that conquered Instagram were invented to be made in the delivery service Florentin, which operates in three cities of Russia, including St. Petersburg. Bouquets are collected from roses and tulips, in the first case it will cost about five thousand rubles, in the second - 3-4 thousand.
Flower House Ginza

Address: Karavannaya st., 12; Moskovsky prospect, 207; Suvorovsky prospect, 51
Telephone: +7 (812) 640–16–16
The Ginza Project holding, which deals mainly with restaurants, has three flower shops in St. Petersburg with a good assortment of flowers and a competent approach to bouquets. The largest is on Suvorovsky Prospekt. In addition, there is a flower delivery service that works 24 hours a day.
Secret flower salon

Address: B. Konyushennaya, 19/8 (entrance from Volynsky lane)
Phones: 993–44–48, 570–40–73
A flower salon near DLT collects bouquets of varying degrees of complexity - from a few hyacinths wrapped in craft paper, which will cost more than 200 rubles, to large compositions for a special occasion, the price of which is approaching 10 thousand. You can order a bouquet around the clock, pick it up - only during the working hours of the salon.
"Atmosphere"

Address: Potemkinskaya st., 9
Telephone: +7 (812) 272–37–86
Maxim Languev's studio next to the Tavrichesky Garden, which at the moment can be immediately noticed by a huge armful of mimosa on the canopy above the entrance. In addition to making bouquets, they are engaged in gifts and interior decoration, and everything from this list turns out great. A large composite bouquet will cost 3-4 thousand rubles here, you can order delivery.
"Flower bed"

Address: Bolshaya Zelenina, 27
Telephone: +7 (812) 993–55–73
A completely new flower shop and floristry school, which should not be ignored by the residents of the Petrograd side. Here, both large bouquets and more modest, but very nice compositions are made equally well, which will cost about 600-800 rubles and a little more if you add a basket.