Everyone who grows tulips in their summer cottage has more than once had to notice that sometimes the planted bulbs simply disappear. This should not be attributed only to the decay process or the spread of rodents. Despite their status as luxurious flowering plants and elite bulbs, tulips of even the best varieties retain many characteristics from their wild ancestors. Tulip bulbs can “disappear” for another reason.
Tulip bulbs.
Tips from experienced florists
The advice of experienced florists will help to avoid many mistakes when growing tulips from seeds.
- Regardless of where the garden bed is set up in the open ground or in the greenhouse, it is necessary to make a nursery with an elevation above the ground. It is filled with soil mixed with humus. It is not recommended to use fresh manure or bird droppings.
- Before sowing, the seeds are placed in a refrigerator, placing them on damp filter paper. This procedure promotes rapid germination.
- After distributing the seeds over the soil, you need to cover them with earth (up to 2 cm). It is not necessary to press down and thicken the ground cover. With deep planting, you can not wait for seedlings.
- When buying seeds, preference should be given to well-known companies. Large operators of the agricultural market pay great attention to the quality of their products.
To get your own experience, you need to grow 3-4 varieties of tulips, using seed. Based on the advice of other gardeners and, taking into account your mistakes, you can grow from the category of selection lovers into an entrepreneur. With low costs, the business will become profitable in a few years.
Watch a video about preparing tulip seeds for growing:
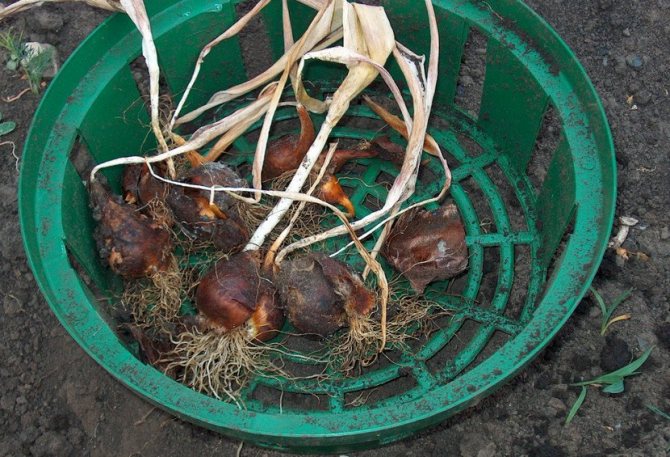
How to grow tulips from babies?
With a large amount of planting material, baby bulbs are planted on a separate ridge in trenches. Sprinkle on top with earth and rotted manure. Planting depth - 2-3 bulb heights, depending on the soil (they are planted deeper on sandy ones).
If the soil is dense, then for small, flat children, baking powder is added to the soil, otherwise it will be difficult for weak sprouts to break through to the surface, and they will lag behind in growth.
In the first spring, only leaves germinate in the child. They are weeded, loosened and fed three times during the growing season. The first feeding of children is carried out even in the snow or immediately after it melts. The second is when the buds are extended in adult tulips. The third top dressing is done immediately after flowering.
On sandy soils in the first year, babies do not need to be dug up. It is better to dig them out in clay areas in order to avoid rotting from excessive moisture. Small onions are stored in the same way as adult bulbs, in a dry room until autumn. In the second year, the largest babies can bloom.
With a small number of tulips, children are planted in one furrow along with large bulbs (but along the edge of the furrow and to a shallow depth). With such a joint planting, it is easier to care for a small baby, which in a separate place can simply get lost. In June, when the leaves turn yellow, the baby is dug up along with all the bulbs.
Cited 13 times Liked: 2 users
Children for breeding culture
With an active increase in the weight of the replacing bud-bulb due to the selection of a site, soil preparation, fertilization, watering regime, regular weeding, loosening and exclusion of tulip flowering, you can get a full-fledged sexually mature plant for vegetative propagation with small daughter baby bulbs.
If there are tulip babies, what to do with them? They need to be grown to the size of bulbs of I and II fractions within 1-4 years. To enter the flowering time, children of tulips of simple and double early varieties will need 1-2 years less time than children of late varieties of the same size, for medium-flowering varieties - an intermediate (average) time. The period of time depends on climatic zones, soil acidity, and the amount of humus.
In the regions of the middle lane, the babies reach the flowering pore and the size of the bulbs:
- I fraction: early and middle grades - for 12 months, late - 24 months;
- II fraction: early and middle grades - in 24 months, late - in 2-3 years;
- Fraction III: early varieties - 2-3 years, middle - 3 years, late - 3-4 years;
- IV fraction: early varieties - 3-4 years, middle - 4 years, late - 4-5 years.
In the southern regions, the children will bloom and reach the size of the bulbs (by fractions):
- I - early, middle and late varieties - for 12 months;
- II - early and middle grades - for 12 months, late - for 24;
- III - early varieties - in 12-24 months; middle and late - over 24;
- IV - early and middle varieties - in 2-3 years, late - in 3 years.
Reproduction of tulips by children of different fractions is carried out on the same area, but separate fields. The first field will be designed for bulbs of I - II fractions, the largest. They dig up the entire fertile soil layer to a depth of 45 cm, and the bulbs are buried to a depth of 10-12 cm. Mulch from humus or peat, rice husks is distributed from above to protect the soil from excessive drying out. During the growing season, fertilizing is applied and the fields with seedlings are watered. When the buds are stained, they should be removed, and the plant should be dug out when the leaves turn yellow and dry. Next, the plant is dried and stored, as indicated above in the article.
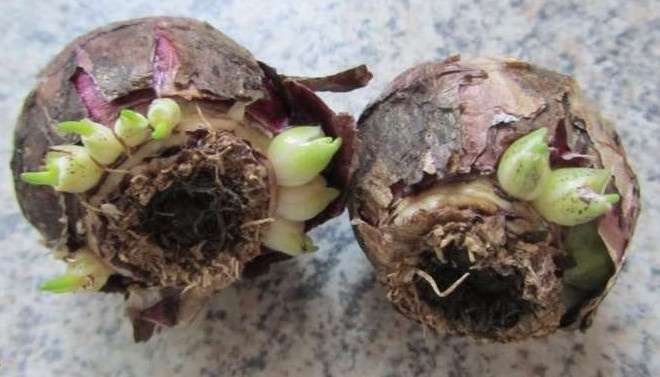
Where do tulip bulbs "disappear"?
Everyone who grows tulips in their summer cottage has more than once had to notice that sometimes the planted bulbs simply disappear. This should not be attributed only to the decay process or the spread of rodents. Despite their status as luxurious flowering plants and elite bulbs, tulips of even the best varieties retain many characteristics from their wild ancestors. Tulip bulbs can “disappear” for another reason.

Tulip bulbs.
Storage of cut tulips
There are two options for storing cut tulips - dry and in water. If long-term storage is required, the first should be preferred. In both cases, the plants continue to grow, so you need to leave space when laying the cut in boxes.
Dry storage: Cut flowers are wrapped in paper (10-50 pcs.) And placed in a dark refrigerator without water at a temperature of 2-3 ° C and an air humidity of 96-98%. In these conditions, flowers can be stored for 2 weeks, slowly continuing to grow, but without losing their decorative qualities. Even a small presence of light causes the stems to bend towards its source.
Before working with flowers, the sections of the stems are updated, wrapped in paper again and placed in water. Within 0.5 hour, the turgor will be restored and the paper can be removed. Do not store flowers in the refrigerator along with vegetables and fruits, as they release ethylene, which accelerates the aging of flowers.
Storage in water: Keep in cold water for a day at 8оС, and preferably 0.1% solution of calcium nitrate. The stems gain strength and the flowers last longer.If the flowers bloom early, you can store them for 1.5-2 weeks in water with snow, in the dark, at a temperature of 2 ° C.
Read more: Cherry did not wake up after winter. Why cherries dry and how to save a tree
There are two options for storing cut tulips - dry and in water. If long-term storage is required, the first should be preferred. In both cases, the plants continue to grow, so you need to leave space when laying the cut in boxes.
Dry storage: Cut flowers are wrapped in paper (10-50 pcs.) And placed in a dark refrigerator without water at a temperature of 2 3 о С and an air humidity of 96-98%. In these conditions, flowers can be stored for 2 weeks, slowly continuing to grow, but without losing their decorative qualities. Even a small presence of light causes the stems to bend towards its source.
Before working with flowers, the sections of the stems are updated, wrapped in paper again and placed in water. Within 0.5 hour, the turgor will be restored and the paper can be removed. Do not store flowers in the refrigerator along with vegetables and fruits, as they release ethylene, which accelerates the aging of flowers.
Storage in water: Keep in cold water for a day at 8 o C, and preferably 0.1% solution of calcium nitrate. The stems gain strength and the flowers last longer. If the flowers bloomed early, you can store them for 1.5-2 weeks in water with snow, in the dark, at a temperature of 2 ° C.
Temperature is of paramount importance at the first stage of forcing (during storage of the bulbs). By changing the temperature in one direction or another, you can control the development of tulips and, to some extent, the timing of their flowering.
The temperature effect on bulbs during storage consists of two stages:
- first - exposure to high temperatures,
- the second - reduced.
The storage regime for bulbs to be forced is slightly different from the storage regime for bulbs that will be planted in open ground. The storage regime is significantly different only for those bulbs that are intended for early and late forcing.
After the bulbs are excavated, which is carried out at the usual time for tulips, they are stored at a temperature of 20-23 ° C for a month. This temperature is considered optimal for the formation of flower rudiments in the bulb. Then, during the month (August), the temperature is maintained at about 20 ° C, and in September it drops to 16-17 ° C.
Such storage temperatures roughly correspond to the average temperatures during these months, therefore, during storage, no special equipment is required to maintain a given mode in the storage. Minor deviations from the indicated temperatures do not have a significant effect on plants. However, with significant temperature deviations in any direction, the processes of flower primordium in the bulb are slowed down or anomalies appear in the form of "blind" buds.
The difficulty of forcing for the New Year lies in the fact that by the time the bulbs begin to cool, all parts of the future flower should be fully formed in them. In the middle lane, the rudiments of a flower are fully formed by mid-August, and with a cool and rainy summer, this period may be postponed by another month.
The agrotechnical method is that tulips are grown under a film and decapitation of flowers is carried out. This method allows you to speed up the process of laying all the organs of the future flower by 2-3 weeks.
The second method is to dig up the bulbs early. The bulbs are dug up as soon as yellowish spots appear on their covering scales. Then the bulbs are kept at 34 ° C for a week. This temperature also helps to speed up the process of laying the organs of the future flower in the bulb. The bulbs prepared in this way are stored in the lower section of a regular home refrigerator from mid-August until the moment of planting.
The purpose of this preparation is to retard the development of leaf buds in the bulb and thereby enable the buds of flower organs to form faster in it.
The most obvious reasons for the "disappearance" of tulip bulbs
The two most common opinions about the "disappearance" of tulips from the place of their planting are at the same time the simplest options:
1. Tulip bulbs are sensitive to waterlogging and can simply rot without a trace in adverse conditions. 2. Vole mice and other rodents love to feast on bulbous plants and, in the absence of protection measures, may well eat the bulbs of planted tulips.
Fighting in both cases is simple: adjust the soil characteristics and care, and when planting, protect the bulbs by planting in nets.
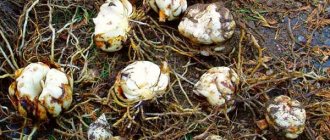
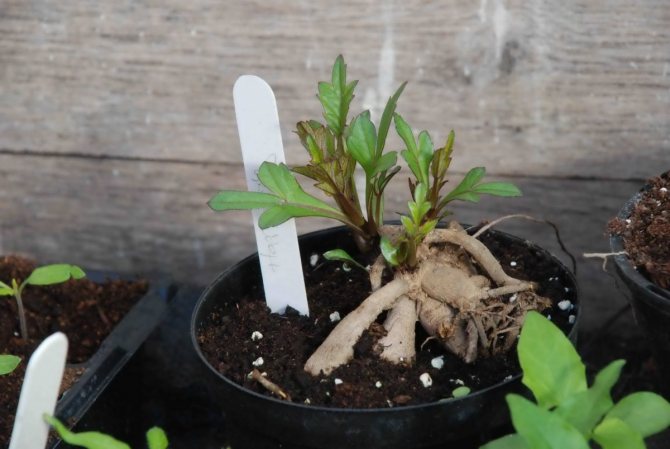
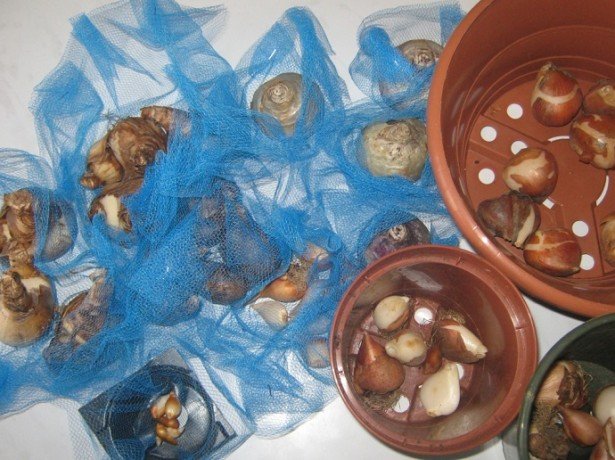
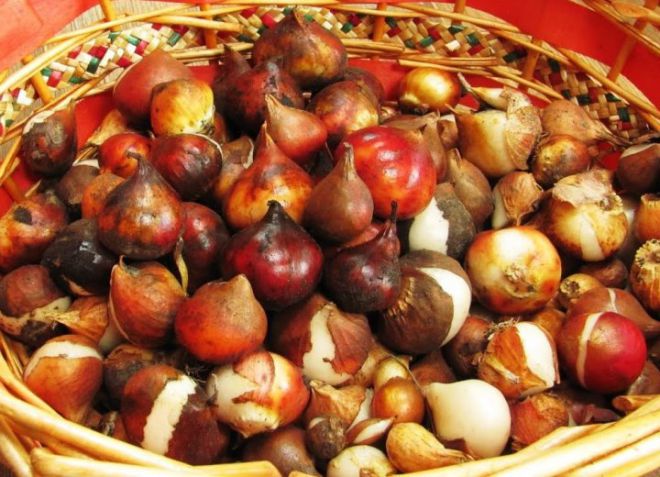
Dug up tulip bulbs with children. <>
What to do with dug tulip bulbs after drying
Bulbs should be kept at a relative humidity of no more than 70%. After drying, it is also necessary to maintain the temperature at 17 degrees and keep it until planting.
Tulip bulb
For some varieties, it is possible to keep in the refrigerator at a temperature of 3 to 5 degrees. In this case, to preserve the bulbs, prepare a plastic bag with several small holes in the bottom. Then add about a 10 cm layer of peat. Then the bulbs themselves are laid, without touching the edges of the bag, and sprinkled with another layer of peat-powder in a layer of 12 cm. Repeat this procedure until the bag is filled.
After that, the bag is tied and placed in a special container. With this method, the seed can be stored at temperatures of 3-5 degrees, as well as at a humidity of 40-45%.
Important!
Don't forget to check regularly for mold or any damage.
In order not to dry out the bulbs, before planting, it is necessary to raise the humidity to 100%, which will also ensure proper germination in the future.
Children instead of a replacement bulb
But if you find empty soil in the place of the planted bulbs, do not rush to despair. Perhaps a surprise awaits you in a few years.
If you have planted new varieties of tulips, then the bulbs may not have been destroyed at all. New hybrids are especially prone to release a lot of small babies instead of one or two powerful and large daughter bulbs. If you do not find traces of the newfangled bulbs that have faded in the first year, then perhaps there are simply too many daughter mini-bulbs that need to grow in mass for several more years to survive in winter.
In most cases, such mini-babies die inevitably due to their unviability along with the mother's bulb. But the strongest bulbs sometimes survive without showing signs of life and, forgotten by everyone, then release flowers completely unexpectedly after 3-5 years.
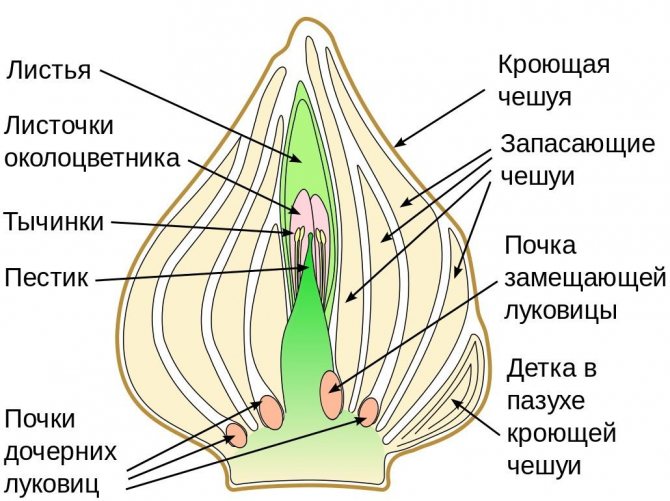
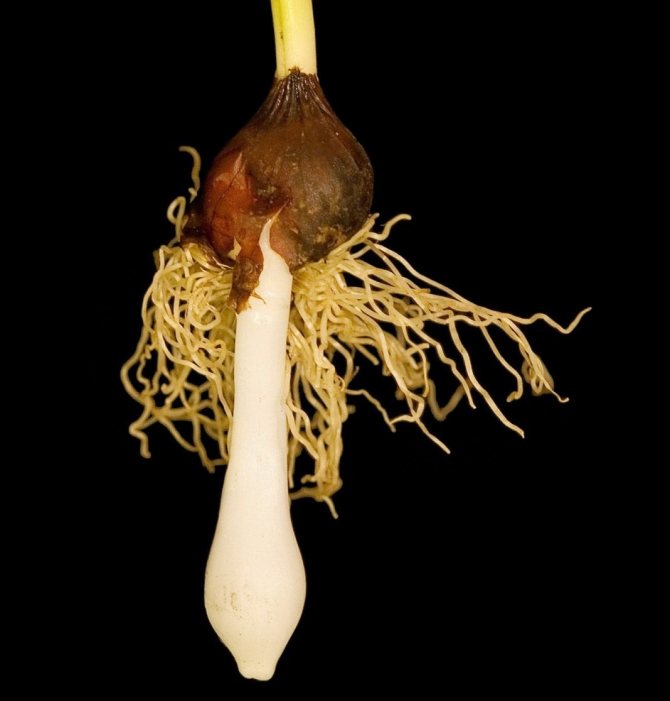
Tulip bulbs usually have a lifespan of two years. In the first year of life, it exists as a bud inside the mother's bulb. A year later, in the summer, the mother's bulb dries up and dies, and the buds embedded in it develop into full-fledged bulbs. The main young bulb is called a replacement bulb, bulbs developing from other buds are called daughter ones, and small bulbs developing in the sinuses of the covering scales are called children. In many tulip species, the development of small bulbs is suppressed: the plant gives all its resources to a single replacement bulb.
Schematic representation of an adult tulip bulb, after laying the shoot of the next year, but before laying the roots.
If you grow old, time-tested tulip varieties, then such an unpleasant surprise does not threaten you. Such tulips always form one or two large, very high quality daughter bulbs, capable of releasing flower shoots again next year.But lovers of new products should not despair: you can save the plants by digging up the kids in time. Just make it a rule not to leave them in the soil for the usual several years, but to dig them out after the first flowering in any case.
Planting tulip bulbs.


Digging out the bulbs
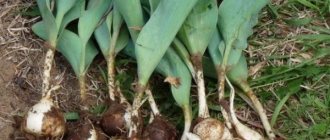
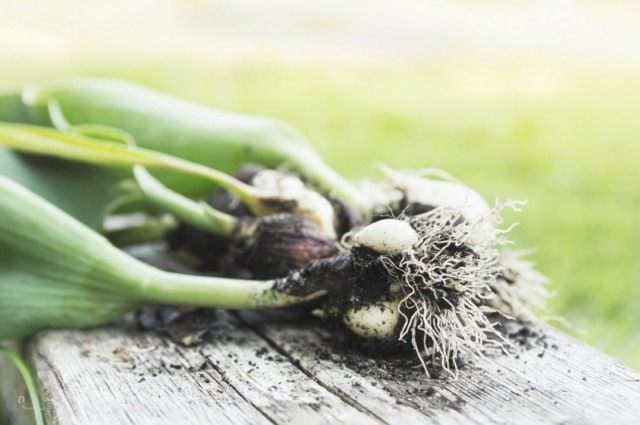
The flowering period of tulips is very short. But even when the flower petals fall off, you should not stop caring for the plants. Within 2 more weeks, tulip bulbs form and gain strength. And if you water them regularly, they will store more nutrients.
Many gardeners overlook when they leave tulip bulbs in the ground throughout the summer. After all, in the summer, not only the leaves of the flowers dry up, but also the roots. And the bulb lying in the soil can be spoiled by pests and susceptible to disease. In addition, when babies appear on the bulb, it goes deep into the ground.
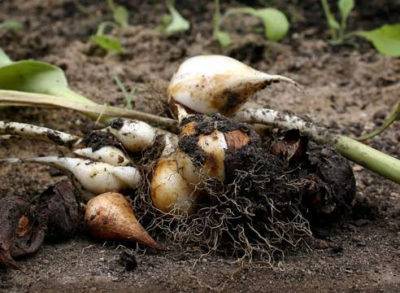
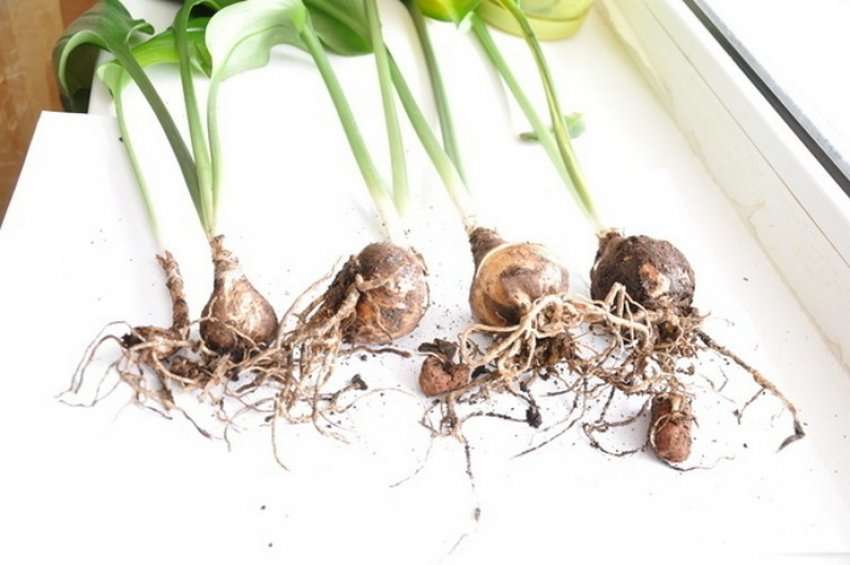
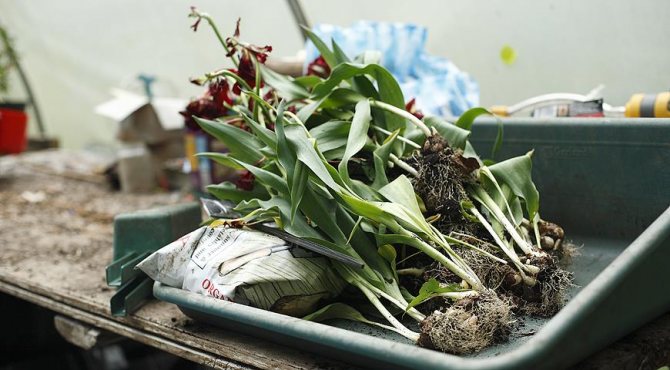
When some of the leaves of tulips turn yellow (not dry out!), You can safely dig up the bulbs. When you dig up a tulip, you will find bulbs of different sizes attached to the stem. If you are late with the digging, then the bulbs will crumble.
One of the bulbs will be larger than the rest, and it is she who will give the most magnificent flowering next year. A few smaller bulbs will produce smaller flowers. Onion babies will not bloom at all in the first year. After you dig up everything, do not cut the leaves. As they dry up, they will give their accumulated nutrients to the bulbs.
The bulbs should dry for about 10 days, but not under the sun, but in the shade, in a well-ventilated place. After that, you have to carefully sort out the tulips and separate the children from the large and medium onions.
Bulbs that will be planted in the fall are best placed in a warm, well-ventilated area. At the same time, do not forget to periodically sort them out, throwing out sick and spoiled bulbs. Small onions (babies), on the contrary, are stored in a cooler place, for example, in a cellar, since, due to their size, they dry out very quickly. It is also not worth storing them for a long time. You can land the kids in mid-August.
How can new tulip varieties be preserved?
In order to preserve such "endangered" plants, it is enough:
- After the flowering of new products, it is imperative to apply fertilizer.
- Wait until the leaves turn yellow, dig up and separate the miniature bulbs, no matter how tiny they seem to you.
- After drying, store the babies in a cool dry place in summer.
- In autumn, during the tulip planting period, plant these small, seemingly unviable bulbs along with the rest.
Provided they are planted in fertile soil, they will have time to take root well before the arrival of frost and will be able to withstand almost any winter. They will not bloom next season, but after two or three years they will delight you with flower arrows no worse than full-grown adult bulbs. And such a generation will no longer repeat the unpleasant surprise of their ancestors.
When tulips are dug up and how to store bulbs
Many people start digging tulips right after they have faded. This option is more suitable for industrial flower cultivation. In the home garden, you should not rush to this, but rather prepare the tulips properly in order to ensure the good development of the bulb.
The peduncle should be removed first to prevent the seed pods from ripening. After that, it is necessary to water the plants for several weeks, as well as once fertilize with fertilizer. As soon as the leaves turn yellow, they should be cut off.
Important!
They usually dig it in the summer - around the end of June or the beginning of July. Digging should only be done in dry and sunny weather.The most important thing is not to damage the rhizome, so the tool is immersed as deep as possible.
What to do with tulip bulbs after digging
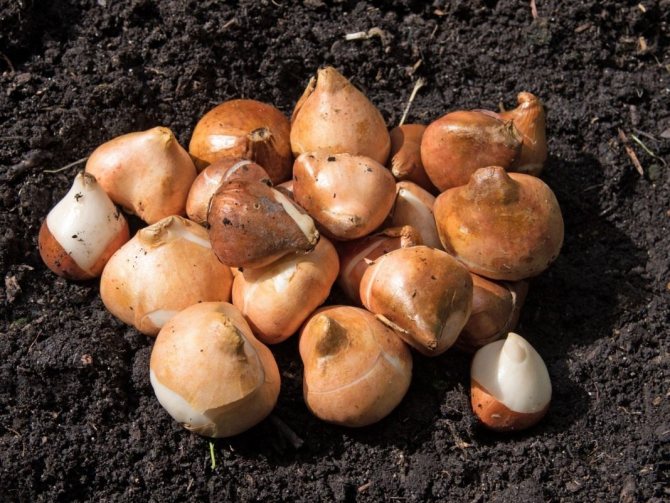
Having carried out all the above manipulations, it is necessary to prepare the bulbs for storage.
To begin with, all the excavated material must be sorted out, separating diseased and rotten bulbs from healthy and ripe bulbs. Then rinse them under the tap and put them on the drawers to dry. It is also necessary to treat the bulbs with manganese (the treatment must also be repeated before planting).
Planting tulips in the fall: the tricks of the experienced
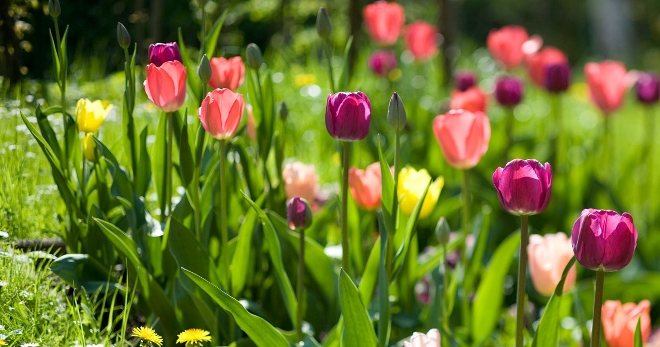
Tulips are one of the first flowers to symbolize the arrival of spring. Their dense elastic leaves are pleasing to the eye against the background of the black earth that has just moved away from the cold weather. Proper planting of tulips in autumn is the key to their early and successful flowering. Do not be afraid of difficulties: growing tulips only seems to be a difficult process. In fact, even a novice gardener can handle this mission. Compliance with simple rules and recommendations - and your flower garden will collect the enthusiastic eyes of neighbors from all over the area.
There are 2 ways to plant bulbs: in spring and in winter. There are more benefits to planting tulips in the fall. It is about him that will be discussed further.

How to plant tulip babies
Despite the short flowering time and the subsequent problem of filling the empty flower bed, tulips continue to be a favorite flower crop of many gardeners. After all, the endless variety of their varieties and shades can satisfy the most demanding and whimsical taste.
With the right place for the flower bed, this wonderful plant is able to delight with its early flowers for several seasons in a row and without transplanting. However, with such cultivation, their varietal characteristics will disappear very quickly and your favorite bulbous plant will run wild.
To prevent this from happening, any gardener must definitely know when to remove the bulbs from the ground after flowering and at what time they need to be planted back into the flower bed.
Digging and storing bulbs
Tulips are dug up annually. Exceptions are baby bulbs, which remain in the ground for 2 years. What is it for: sick specimens are rejected, the appearance is improved (enlargement of flowers), the ability to give children increases.
There are a number of rules for when and how the digging is done:
- Do not miss the moment: you need to dig out tulips when the leaf is 2/3 dry. If you get the bulb earlier, then it will not have time to collect the necessary supply for subsequent flowering. Late extraction is fraught with the fact that the mother's part will go deeper into the ground, and the babies will separate from it. There is a high probability of missing or damaging the planting material.
- Arm yourself with a bayonet shovel: you must stick it deeply and with a "margin" around the edges so as not to damage the flowers.
- Change the bed every 3 years.
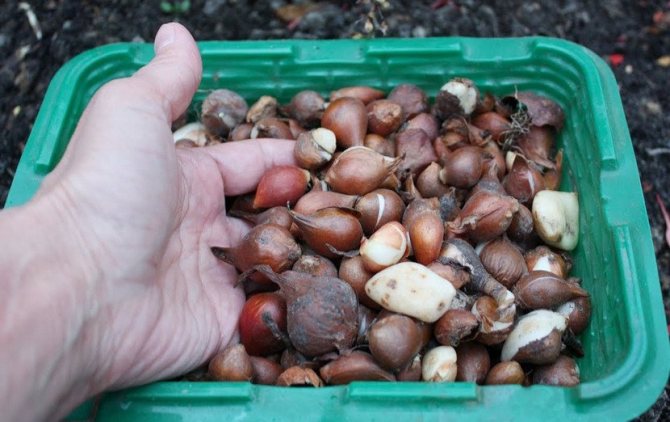
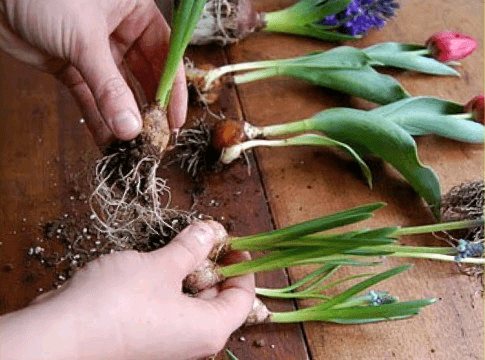
Now more about how to store tulips before planting in the fall. The resulting nests must be divided, freed from husks, roots, and remnants of leaves. Then they are washed (if necessary), antifungal treatment is carried out and dried. Before laying the planting material in boxes, it is necessary to sort it by grades and by sorting. Remove diseased specimens.
Successful planting of tulips in the fall in the ground depends on adherence to temperature and humidity. The bulbs are stored in boxes without a lid, placing them in 2-3 layers. They need to be inspected periodically to remove decaying specimens. The storage temperature is gradually reduced: in July it is 23-25 °, in August - 20 °, in September - 17 °. Failure to comply with the temperature limits leads to the appearance of blind shoots on which a flower does not form.
If during the inspection you find rot or mold, then you can try to save the tulips. If mildew is not widespread, remove it with a dry cloth and sprinkle with ashes. If the decay has gone deep, cut off the affected part with a knife.Sprinkle the cut with ash or brush with brilliant green.
Video "How to dig up and store tulips after flowering"

Preparing for landing
Since I have Dutch varieties in addition to ordinary tulips, in our climate they will give a larger flower and a higher peduncle, if you cover them with peat in autumn, you can use straw so that in cold snowless winters the bulbs do not suffer from frost, and in warm winters with thaws - from temperature fluctuations. I am in no hurry with the shelter, I wait until the subzero temperature is established and the soil freezes by 5 cm.
Many people probably thought about how to grow tulips at home. This is the real highlight of the apartment flower garden: bright buds that adorn the home when frosts are still raging outside the window. But in order to achieve the desired result, you need to take care of all the preparations, from the selection of planting material to the composition of the soil. Let's take a closer look at all these requirements.
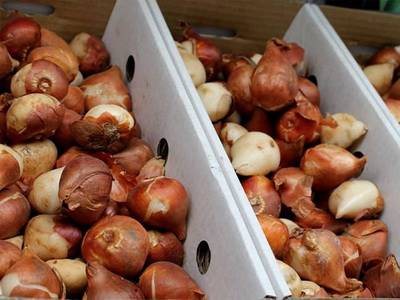
It is recommended to choose the largest bulbs. Make sure they are all large and have the same shade. It is advisable to inspect each specimen and make sure that there is no rot, suspicious spots and dots on it. Another key point when choosing a planting material is the weight of the bulb.
It is necessary to grow indoor tulips in a fairly spacious and practical container, so it is recommended to pay special attention to its choice. Prefer wide specimens, especially if you plan on planting several bulbs at a time. However, it is better not to buy deep vases, since tulips have a small root system.
As for the soil mixture, pure peat or a composition with the addition of a sand layer is considered the best option for rooting tulips. Some growers prefer to fill the pot with perlite or ordinary garden soil. In this case, you cannot do without fertilization: the substrate will need to be saturated with compost, manure or a small amount of wood ash. All key components are recommended to be thoroughly mixed and moistened.
Boarding time
How to grow tulips in your own apartment on the balcony - many flower growers are thinking about this. The main thing is to follow the key recommendations of specialists, purchase high-quality planting material, and carefully prepare the soil mixture. However, rooting time is considered an equally important factor affecting the effectiveness of planting tulip bulbs.
Before planting the seeds, you need to prepare the garden bed. To do this, it is worth acquiring such materials:
- A watering can. It is recommended to add a little salt to the water
- Priming. Sandy loam is best for this.
- Boards, with the help of which the fence is made
- Small scapula
A planting fence is necessary so that the soil layer does not rise. The boards will hinder this process. Experienced gardeners add humus to the soil. But don't take too much of it. It is poured into a place that is fenced with boards, and sand is added on top.
Read more: Tomato cream description of varieties
Choosing a place and preparing a bed
The successful location of the garden and the planting of tulips in the fall when and how to plant the choice will be less problematic. These flowers love sunny, sheltered spaces. There should be no puddles in the spring. The soil should be well drained - loamy or sandy loam soil with a significant amount of humus would be the best option.
It is worth digging the ground to a depth of 25-30 cm, carefully removing the roots of weeds, trees and shrubs. If the soil is heavy and poor, add sand and fertilizers: compost, ash, peat, mineral complexes. You cannot use cow dung - add bird droppings instead. If the PH values are increased towards oxidation, liming is required.
You need to prepare the land a month before the expected date of planting.This is necessary for the soil to “settle down”. In a loose "pillow" there is a high probability of damaging the roots that have appeared. Before direct planting, pour abundantly on the ridges - this will finally distribute the earth.
Usually, this is where the care of tulips after planting ends in autumn. It is not necessary to cover the garden bed - this can lead to the fact that the bulb will grow ahead of time, it will winter worse and will bloom later. Exceptions are sudden cold weather. When the temperature drops sharply, use a specialized covering material. Do not use garden debris, mulch or leaves for this - this can attract rodents.
What problems can arise?
High humidity can cause mold or rot. At the first detection of these signs, it is necessary to remove the damaged bulbs from the rest. With a small amount of mold, you can simply wipe the bulbs with a rag.
If suddenly a rotten smell appears in the room, you need to eliminate its source and for a short time be sure to triple the ventilation of the room.
Note!
As temperatures rise, it may happen that the plants begin to germinate. Nothing can be done about it. Then you can plant the plants in a box or immediately on the garden bed.
Many people do not know that the process of forming a new flower begins from the very moment the plant is excavated. Therefore, it is important to observe the temperature regime and maintain the necessary air humidity, since these 2 parameters greatly affect the health, as well as the beauty of future flowers. Keeping your bulbs carefully monitored each year will help keep your home garden healthy and beautiful for years to come.
Forcing bulbous plants allows you to get great joy from fresh buds and flowers at a time unusual for pets and an unusual time for us - in winter, early spring. Tulips, daffodils, hyacinths, crocuses, muscari and other plants decorate the festive table during winter celebrations, experienced flower growers know how to make their pets bloom for the 8th of March. But what to do with such a gift when International Women's Day is over and the flowers have faded? Someone thinks that after forcing the plants have wasted their strength and are no longer suitable for flowering. However, nature can argue with this, and with proper care, the planting material can be brought back to life.
Stop wasting nutrients
During the forcing process, the plant is depleted, and in order to restore its strength, it is necessary for the bulb to accumulate nutrients. To do this, it is necessary to create such conditions as to extend the growing season of the plant as much as possible and give time for the outflow of nutrients from the leaf apparatus into the planting material.
First of all, you need to free the plant from the flowers that draw out the power from it. Dying buds may seem to no longer pose a threat to nutrient residues. However, one must not forget that seeds can ripen in them. Therefore, flowers that have lost their decorative appearance are removed. In daffodils, they are cut off almost at the bulb itself, in tulips they only get rid of inflorescences, and in hyacinths, the peduncle is bare by stretching it with closed palms.
How to restore strength to an onion
Leaves on plants should be left and the growing season for them extended as much as possible. For this, it is recommended to create more favorable conditions for the plants. The bulbs are moved from a cramped pot into a large container with a loose nutrient mixture. Please note that when planting for distillation, the bulbs are planted separately in miniature tight pots, and with a large amount of planting material, they are placed with a bridge, end-to-end. But as soon as it is time to restore the strength of the bulb, it is provided with such conditions so that the plant is spacious.Transplanting into fertile soil after forcing is also different. If, to obtain a flower in the cold season, the bulbs are not hidden under a layer of soil, then in our case the planting material should be planted deep in the pot so that the bulb does not peep out on the soil surface. Firstly, she no longer needs to spend energy to push the sprouts through the soil layer to the soil surface, and secondly, this is to protect the bulb from drying out.
Laying on the sides and crumbling the bulb with a nutritious substrate, watering is carried out, and then another layer of dry soil mixture is placed on top so that a soil crust does not form. After these procedures, the pot is left in a bright and cool enough place at a temperature of approximately + 15 ... + 17 degrees C. For these purposes, verandas of private housing buildings, glazed balconies of high-rise buildings are suitable. In addition, caring for transplanted bulbs includes feeding. Fertilizing is carried out 2-3 times a month.
Storage until autumn disembarkation
When transplanting bulbs after forcing in late winter - early spring, the leaves begin to turn yellow around May. This is a signal that they can be cut, and it is time to dig up the bulbs and send them for dry storage at a temperature of about +25 degrees C. In this way, they will receive several months of the necessary rest period. In the fall, in the natural terms for bulbous, these specimens are planted in open ground. The strongest will bloom next year, but some will need more time to set the buds again.
What bulbous storage is not required
In winter, so-called flowering small-bulbous cultures can also settle in our houses. Mouse hyacinth, woods, crocuses after wilting of the leaves are not laid for dry storage. So that they do not dry out, they are immediately moved into open ground.
How to plant
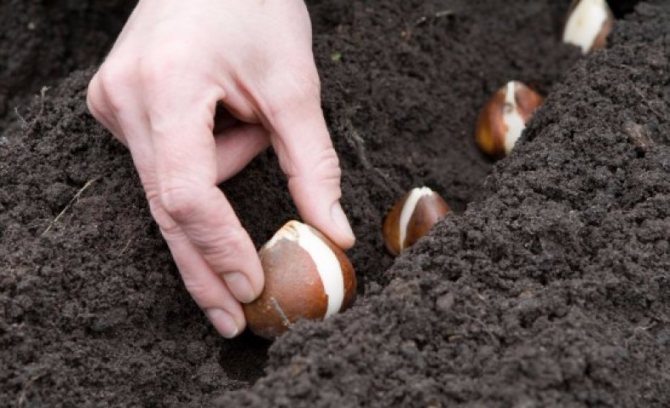
Treat tulip bulbs before planting in the fall to protect them from fungal infections. For this purpose, special preparations are produced that can be replaced with ordinary potassium permanganate. Inspect again: you cannot plant healthy and diseased plants together. Affected bulbs must be disposed of.
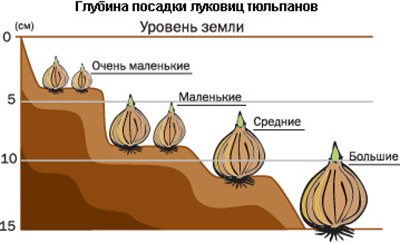
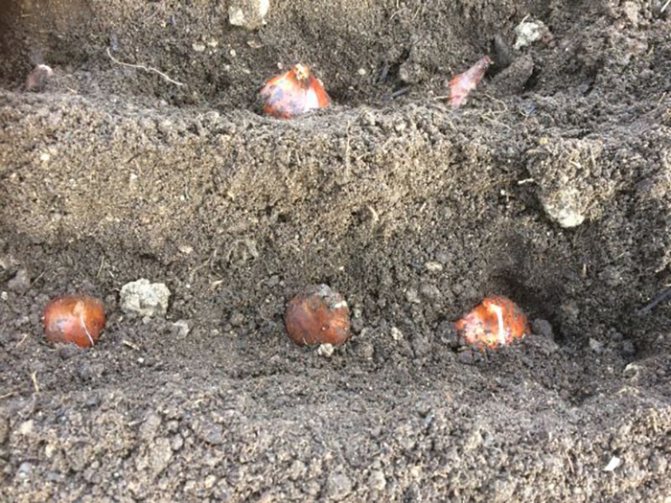
The standard tulip planting scheme is as follows: rows are made at a distance of 25-30 cm. Their location should organically fit into the perimeter of the flower bed. The distance between the bulbs is 8-10 cm.The planting depth depends on the size:
- Children: 5-10 cm.
- III and II analysis: 12 cm.
- I analysis: 15 cm.
Keep in mind that small bulbs produce small flowers. To prevent them from being shaded by taller flowers, plant them from the edge of the flower bed on the south side. If you like the "uncultivated" species, then there is no need to combine. Increase the distance between flowers and enjoy the natural, natural state of the garden.
If you are fond of landscape design, then plant tulips according to the pattern. When compiling it, take into account the flowering time, the diameter of the inflorescence, the color of the petals. Think over and sketch in advance the scheme according to which you will plant the bulbs. The drawing can be supplemented with other primroses.
Video "Planting tulips in autumn: scheme, depth, planting dates"
When is the right spring planting
If you did not manage to plant tulips in the fall or purchased new interesting varieties only at the spring sale, then do not worry that you will not have to admire the flowers in the coming season. It's just that the flowering dates will come a little later, if we take into account all the features of the spring planting of this bulbous culture:
- before planting, you need to make sure that the soil at a depth of 10 cm has warmed up sufficiently, that is, to a temperature above + 9 ° С;
- it must be borne in mind that the rooting of the bulb lasts about 14 days, after which green shoots appear, and the flowers will appear after another 2 weeks;
- depending on when you need to receive flowers, and taking into account the dates indicated above, any time of planting the bulbs can be chosen until the end of June;
- you cannot plant tulips later than July 1 due to the fact that you risk depriving the bulbous opportunities to ripen and fully prepare for the next growing season;
- determining the planting time also depends on the variety: if you have chosen an early species, then you need to plant it as early as possible, while species with late flowering periods can sometimes be grown even after July 1;
- for early admiration of flowers, tulips are best planted in the ground in April, but if in your area during this period the soil and air have not yet warmed up enough, then first plant them in a container and keep them indoors until the weather is warm enough;
- to accelerate flowering when preparing the bulbs before planting, hold them for 24 hours in the refrigerator (not in the freezer), and then for a couple of hours in a weak solution of potassium permanganate.
Longlines and Sandwiches: Alternative Disembarks
A creative approach will make any business interesting. This also applies to floriculture. Recently, unusual methods of planting tulips are gaining popularity. They save time, decorate the garden and attract attention. In addition, they are quite simple and everyone can master them.
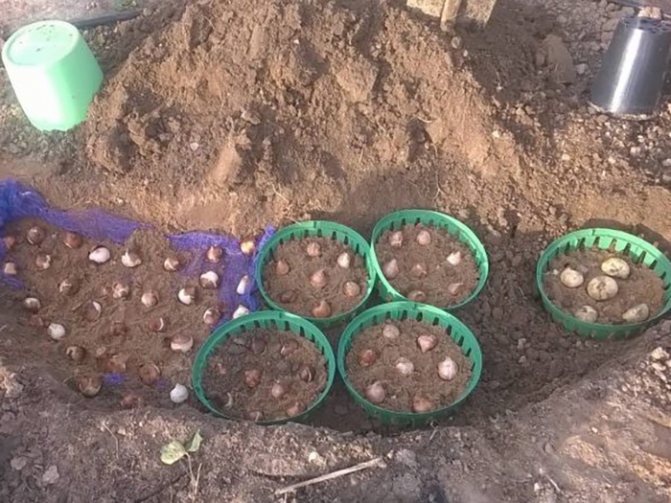
Container planting or basket planting simplifies the tulip growing process. The essence of this method is to use baskets, containers and other containers instead of a flower bed or garden bed. They can be either dug into the ground or freely positioned in any convenient place.
The advantages of this method:
- You firmly believe that you have completely dug up the planting material. The onions themselves are minimally traumatized and, therefore, better stored.
- You create optimal conditions for plant growth. Relevant for infertile soils - it is easier to create ideal conditions in a confined space.
- Reduces the likelihood of damage to the bulbs by rodents. Mice cannot overcome the obstacle from below.
Anything can be used as a container: plastic bottles, boxes, baskets, pots and even bags. One condition - you need to make holes for the outflow of excess water. Use a red-hot knitting needle or other similar object for this. The holes should not be large, otherwise mice will make their way through them.
The second way to arrange flowers in an unusual way is a tiered planting. The essence of this method is to lay the bulbs at different depths. The very first layer, starting from the bottom, is occupied by large bulbs. The higher the level, the smaller the size. In order not to be mistaken and not to plant one flower on top of another, use long thin sticks. Stick them next to the landing site, and after the flowerpot is completely filled, remove it. This combination method is also called "lasagna" - the structure resembles this dish in its layering.
It is important to take into account the color, size and shape of the petals when drawing up such a composition. Try to play on contrasts: smooth plant with terry, red with yellow. Groups of colors combined by color will look beautiful. For example, variegated with monochromatic: the color of the blotches should correspond to the mono color of the petals of the neighboring variety. A group in which tulips are selected according to the timing of flowering will look spectacular.
Video "Methods of planting tulips"
Stage one: landing
Plant the bulbs in pots or, if there are a lot of bulbs, boxes 15 cm deep, filling them with light, always fresh soil with a high content of peat and sand and a neutral reaction (pH 6-6.5), for example, a growing substrate. It is good if your bulbs are large and healthy. Then you have a guarantee of getting full flowers.
Plant tulips and daffodils so that the tops of the bulbs are at the level of the surface of the substrate, the distance between the bulbs is 1-1.5 cm. Peel the tulips first.It is convenient to plant one variety in one pot for simultaneous flowering. Plant hyacinth bulbs one at a time in pots with a diameter of 12 cm, or several in pots or boxes so that the top is at the level of the edges of the container. All three flower crops after planting need to maintain a relatively low positive temperature - 8-10 ° C and high humidity - 75-80%. Indeed, it is in such conditions that they take root when planted in the ground in the fall, it takes from two to five months and depends on the properties of the culture and variety. In hyacinths, this process is faster than in tulips and daffodils. If the bulbs were stored at the temperatures mentioned above before planting, they will take root faster. Place containers of bulbs in a dark place with specified conditions and water at least twice a week.
When to plant
The planting time is affected by the soil temperature. In the fall, a reserve is made for subsequent flowering, so it is important to plant the bulbs in the garden in time. In order for all processes to start, the soil must be no colder than 10 ° (the lower value of the border is 8 °). You can check the data using a depth thermometer.
In different regions, the timing of planting in open ground is different. So, the planting of tulips in the fall in the Moscow region takes place from mid-September and throughout October. The hotter the region, the closer to winter the dates are shifted. If, during the pre-planting inspection, you notice that the bulb is ready to actively start growing, it makes sense to leave it for distillation (i.e., plant it in a pot and keep it at home).
Landing in the ground
Before propagating tulips, you need to:
- determine the landing site;
- select the bulbs.
The tulip planting site should be well lit and protected from the wind. A site with loose fertile soil rich in humus is suitable.
An important condition for planting is the plants that were in the garden before the tulips. Bulbs can be planted in place of flower and vegetable crops, except for nightshades and bulbs, the diseases of which can be transmitted to tulips.
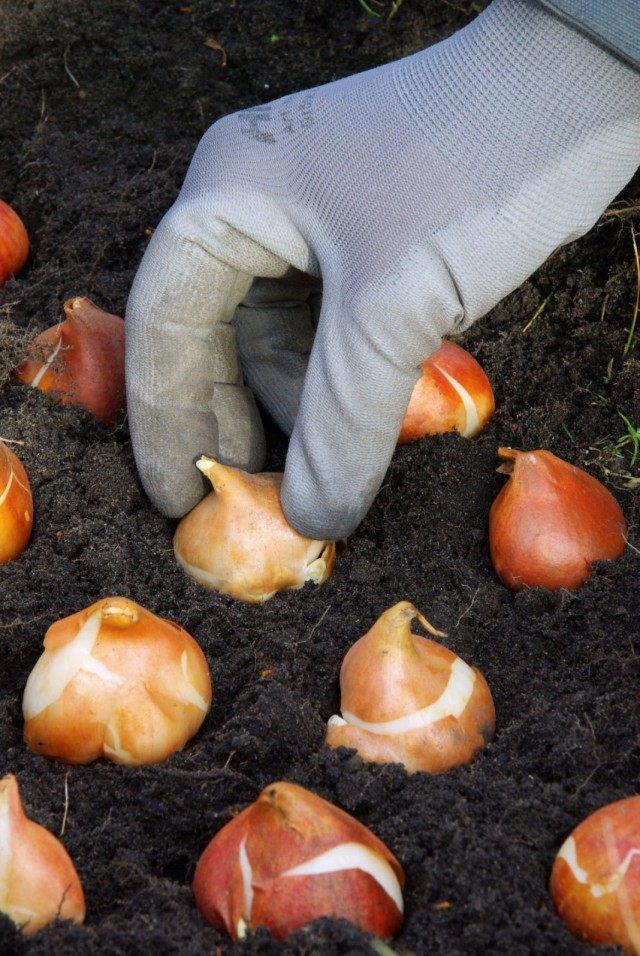
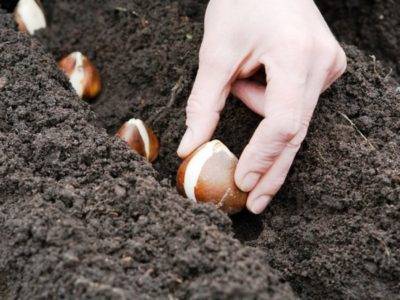
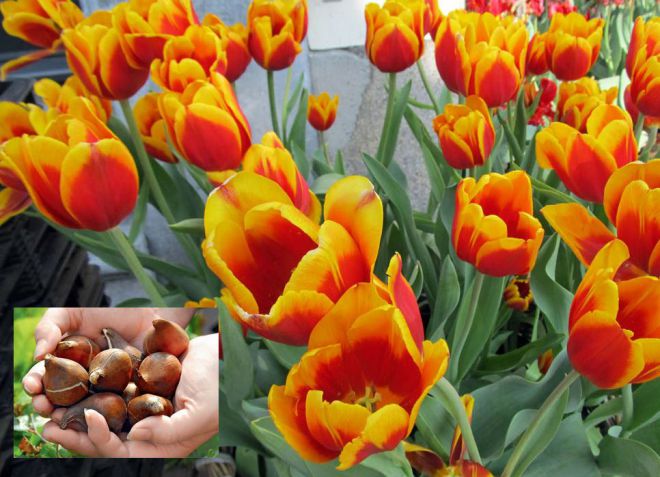
Bulbs must be carefully examined before planting. The appearance of flowers, their size and their health depends on which bulbs you plant. Therefore, plant large, sturdy bulbs with clean, golden yellow and smooth skin. Those with stains should be destroyed immediately.
Planting in the ground (to a depth of 10-15 cm) is carried out in the fall, around mid-September, when the soil temperature is not less than + 10 ° C. And remember that the tulip garden should be mulched for the winter. For this, peat, raspberry, straw or sawdust are suitable.
How to grow tulips in the country from a bulb
Turkey is the first country to cultivate wild tulips. Back in the 16th century, the selection of the most beautiful wild-growing flowers for breeding garden varieties of plants began here.
These flowers were named tulips for their resemblance to oriental headdresses - turbans. A century later, having found themselves in Holland, now known as their second homeland, the beautiful flowers gradually spread to many countries of the world.
They came to Russia during the Peter the Great era. Nowadays, thanks to the selection and hybridization of wild plant species, there are a great many (about 2000) varieties of garden tulips of various colors, shapes, sizes and even flowering periods.
But if you follow the simple general rules for caring for flowers, even the most modest of them will decorate any corner of the garden.
Flower garden on the windowsill! I grow tulips at home, because I know the secret ...
Tags
Just imagine: dullness outside the window, eternal bad weather, slush, cold. And on the windowsill there are delicate tulips, juicy and beautiful, grown by our own hands!
I do not like plucked flowers, bouquets wither, die before our eyes. Here are living plants, also blooming all year round - a completely different matter! Now you will find out how to grow tulips at home... Imagine, even land is not needed! Only an elegant vase and water ...
Growing methods
Growing a tulip from a bulb is the easiest method
There are three known methods of growing garden tulips: from seeds, from a bulb and from "babies".
- The method of growing from seeds is complex and painstaking. A faded flower arrow is tied up and seeds are waiting for the ripening on it. They are then harvested and stored in a dry and dark place until sowing in the garden in September-October. Densely sown seeds are carefully covered with earth. They usually germinate after the snow melts. Bulb formation takes place in several stages, starting with the appearance of a single leaf. In the spring of the fourth year, the ready-made onion is dug up, laying it on a summer drying. In the fall, it is planted again, waiting for another year or two to obtain the full color of the flower.
- The easiest way to grow is from a bulb. Its quality is critical. The bulb must be intact and firm. It is better to choose at least three centimeter bulbs for planting. They are planted in three pieces in a mixture consisting of three parts of sand, as many - earth and four parts of humus. Bulbs that do not touch each other should not be completely buried in the ground. Plants will not freeze and hatch if the air temperature is kept at 12 degrees Celsius. Water them with settled water.
- Small bulbs are called "babies" in tulips. They rarely get sick, because are not damaged when disembarking. In this case, the planting depth should be at least three bulbs in height. Trenches with planted plants are fed with humus or manure. In the spring of the first year, the soil is loosened three times, weeding, and plant feeding. If the soil is clay, then in order to avoid rotting of the bulb, it has to be dug out in the fall until next spring. Therefore, sandy soil is preferable for these plants, in this case the young bulb overwinters in the flower bed. In the spring of next year, the large "children" finally have flowers. This method of growing bulbs is the best for large arrays of flowers, because at the same time significantly saves money on the purchase of planting material.
"Babies" of tulips - small bulbs
Preparatory stage
One of the important and crucial stages of planting tulip seeds is the preparation of the soil, planting material and containers.
Seed preparation
Sowing is usually done in September-October. Seeds need to be carefully examined, select only whole plates with a transparent layer around the edges. If deformations, holes or spots characteristic of rot are noticed, they are rejected.
Preparation of containers, soil
Seeds are planted in soil or containers. As a container you can use:
- flower pots;
- garden boxes;
- plastic bowls or bowls;
- pallet with stable legs.
The garden also needs to be prepared:
- knock down the sides from the boards;
- dilute loamy soil with sand, enrich with humus;
- fill the frame of the bed with soil mixture.
The finished bed should be watered with salted water. After that, the soil is loosened to prevent the formation of lumps.
The technology of growing tulips from a bulb in a garden plot
Tulips do not require complex care, they are very unpretentious, but in order to grow beautiful and large flowers, you must follow a number of rules common to all plant varieties:
- In early spring (the snow has not yet melted), it is necessary to start feeding them with fertilizers used for garden flowers, in the amount of one and a half to two and a half dozen grams per square meter of the garden. The next feeding takes place during the budding of the flowers, and the last one - after their flowering.
- The appearance of plants determines which nutrient deficiencies they are experiencing. For example, with a lack of nitrogen, its leaves become narrow and slope. At the same time, the color of the stems and leaves changes to reddish. A deficiency of potassium and phosphorus is manifested by the appearance of a bluish border along the edges of the leaf.
In the spring, you need to fertilize tulips.
In the spring, it is necessary to completely remove diseased plants, while capturing the adjacent soil. This place is disinfected with a very hot solution of potassium permanganate.
- When loosening, weeding, feeding and other methods of caring for plants, you should be careful not to hurt their leaves and roots, without which the formation of a healthy bulb is impossible.
- For the successful establishment of daughter bulbs, it is important to maintain constant soil moisture by regularly watering it from the beginning of budding of the plant, finishing it only a couple of weeks after all flowers have bloomed.
- In order to prevent the appearance of "children", after flowering, the flowers are torn off by hand, leaving part of the leaves to feed the bulb.
- Tulips prefer light, drained soil. The bulbs should be dug up annually. But with their deep planting and sufficient plant feeding during the entire growing season, transplantation can be carried out every three years.
- When transplanting in early summer, the bulbs should be dug up and dried in order to avoid fungal diseases. This should be done in a shady, well-ventilated place. And you need to store planting material until autumn in boxes, providing them with a label indicating the variety of the plant.
In winter, tulips need to be protected from frost.In early autumn, tulips can be planted in the ground. Trenches up to three tens of centimeters wide and up to two tens of centimeters deep are fertilized with superphosphate. Disembarkation begins with large specimens, placed bottom down. They are sprinkled with earth a little. In the intervals between the first layer of plants, smaller specimens are planted, also sprinkling them. At the end, the "kids" are placed, and the trench is covered with the remains of the earth.
- In a frosty and little snowy winter, when the temperature in the soil even at a depth of two tens of centimeters can reach minus 9 degrees, you should cover the tulip areas with humus, sawdust or straw with a layer of at least ten centimeters. Otherwise, there is a risk of deformed flowers from the frozen bulbs.
- Tulips can grow successfully after any flowers and vegetables. It is only advisable not to plant them in places where bulbous and nightshade plants previously grew. Flowers love sunny areas protected from cold winds. If the lighting of the bed is insufficient, then there is an enhanced stretching of the stem to the detriment of the development of the bulb. And this leads to the crushing of the flowers. This requirement applies to early tulip varieties. Their later varieties, in order to prolong their flowering, are best planted in partial shade.
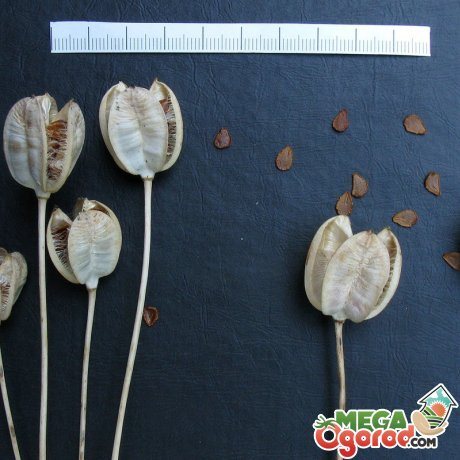
How to collect seeds from ready-made tulips
No special knowledge is required to collect tulip seeds. The main criterion for selecting a flower is the presence of a beautiful and large inflorescence with a stalk. From a weak plant, good shoots will not work.
After tulips bloom in the garden, you need to designate large specimens with wide petals. After the end of the flowering period, time is given to dry the stalk. At this time, the seeds acquire a reddish or crimson hue, which means they are fully formed.
Important! The petals of a faded tulip quickly wither and turn yellow. Sepals and receptacles lose their elasticity, which leads to inflorescence inflorescence. If not secured with sticks or fishing line, the seeds will fall out of the cotyledon to the ground.
The time for collecting the seeds is right after the stalk has dried. This is done carefully using a wooden stick and a gauze pad. The darkened seed is deposited on it. Under natural conditions, the boxes are dried until they burst. It is not worth freeing small grains from the houses, in them the seeds are better preserved until the very planting.
Plant digging technology
There is no consensus among flower growers about the need for an annual digging of tulips. This process definitely contributes to the high quality of the bulbs, however, it is troublesome and time consuming.
It is better to dig up tulip bulbs every few years.
Therefore, everyone decides for himself whether it is worth digging out the plants every year, or to do it at intervals of a couple of years, while providing additional care for the bulbs wintering in the soil.
Those who consider it necessary to dig up tulips every summer should heed a few tips on this matter:
Digging ahead of time threatens with underdevelopment of the bulbs, and, therefore, affects the quality of the flowers. If the dates are delayed, losses in the number of bulbs are possible. The signal to start digging early tulip varieties is their completely yellowed leaves. The optimal time for digging up late varieties is the beginning of yellowing of the leaves. During this time, the bulbs turn light brown and the tops of the stems are soft. This happens for different plant varieties from the end of May to the end of June.
Conveniently store bulbs in a plastic bottle with holes
Planting flowers at home - step by step instructions
Growing tulips at home is based on forcing technology: artificially created conditions for plants are similar to natural ones. At the same time, special attention is paid to cooling the bulbs, because in nature they form shoots and flowers only after they have passed the stage of winter rest. Another thing is that the technology of distillation by controlling the temperature regime allows you to get fresh flowers in the middle of winter or early spring - at the request of flower growers.
In the photo bulbs and pots for tulips
So, the bulbs are ready for planting, it's time to figure out how to plant them at home:
- you can start planting at the end of September;
- prepare pots or bowls at least 15 cm deep;
- mix the substrate from the river stove, sod land and humus (1: 2: 1), add a little wood ash to the substrate, or buy a ready-made soil mixture with good water permeability and a neutral reaction;
- Before planting, inspect the bulbs from all sides for diseases and immerse them in a potassium permanganate solution for half an hour;
- put drainage in bowls or pots (you can use sphagnum moss) and fill the container with the substrate so that the distance to the edge remains three times more than the height of one onion;
- spread the planting material on top of the ground, bottom down, one centimeter apart;
- fill the onions with the substrate to the tops;
- water and top up the soil mixture if the tops of the bulbs appear from the ground;
- transfer the pots with plantings to a dark room, where the humidity is 80%, and the temperature is not higher than + 9 ° C.
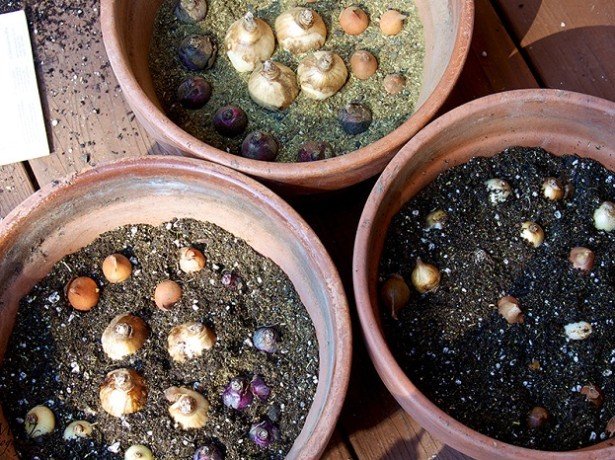
Photo of planting tulips in pots
Planting should not be left unattended - make sure that the earth does not dry out, but also does not mold. Weekly watering will be sufficient.
Enemies of plants - diseases and pests
Fusarium tulip, damaged bulb
Tulip bulbs are susceptible to various diseases spreading due to their mechanical damage or with the help of garden pests such as ticks, bear, beetles and others.
If the upper part of the plant turns yellow, dries up, and the bulb dries, darkens, germinates with spores, or rots and completely disappears, then the plant is affected by fusarium or penicillous rot. When a plant damages an onion mite, causing bacteriosis, the bulbs turn brown and rot, emitting a foul odor.
The manifestation of unusual decorativeness on flowers in the form of various spots, specks, stripes, veins is a symptom of a very common and dangerous viral disease - "variegation". It is characterized by damage to the plant as a whole with changes in its metabolic processes.
To avoid spreading the infection to the entire flower area, all diseased plants should be immediately destroyed.
Garden tulips are one of the most common flowering plants, known for their beauty, diversity and unpretentiousness:
Tulips on the site are very beautiful
most often they are grown from bulbs;
Flowers of incredible beauty - yellow, white, red, orange and other flowers in color - give joy to those who receive a colorful bouquet as a gift, and reward all the efforts of an amateur gardener.
Stage two: flowering
When the bulbs are well rooted, which can be determined by the appearance of roots in the holes of the pots or cracks in the boxes, and the sprouts reach a height of 5-7 cm for tulips, 10 cm for daffodils and 8-10 cm for hyacinths, a bud will be felt in their lower part, and then it will be possible to deal directly with forcing. Place tulips for 3-4 days in a dark room with an air temperature of 15 ° C, and then expose to light, raise the temperature to 20 ° C. They do the same with hyacinths, but the temperature should be 22 ° C. After the dark period, expose pots or boxes to light, but shade from direct sun for the first five days. For daffodils, a dark period is not required, for 3-4 days you need to find a bright place for them with a temperature of 10-12 ° C, then raise it to 18 ° C. Water the plants constantly so that the substrate is always moist.
To prevent the plants from stretching, the leaves are bright green, and the flowers have rich colors, arrange the backlight with 80 W fluorescent lamps per window. Fix the lamps at a height of 10 cm from the plants and lift as the plants grow. The length of daylight hours is 12 hours. Tulips and daffodils will begin to bloom 3-4 weeks after being brought into a warm room, hyacinths - in 2-3 weeks. To prolong flowering, at the beginning, lower the temperature to 15 ° C.
After flowering, pinch off the flowers, and keep the pots with green stems and leaves in the light and continue to water for another two weeks. Then, when the leaves begin to turn yellow, reduce watering, and when they begin to dry out, stop altogether. With this care, you can count on getting full-fledged bulbs. Dried plants can be left in pots and kept indoors, or the bulbs can be dug up and stored in a cardboard box. Plant the bulbs in the garden at the usual time - at the end of September.
Caring for tulips after flowering - rules for storing and digging out bulbs
Providing proper care of tulips after flowering, you can get not only magnificent flowers in the coming season, but also additional bulbs - "children". Although such plants can be seen in almost every garden, not everyone knows how to grow them competently from the appearance of young shoots until the moment when all the buds wither and the stems dry out.
General rules for caring for flowers after digging them
Tulip bulbs, like daffodils, need to be dug up. Many housewives ask themselves the question "I dug up tulips, what should I do next?" The main thing to remember are a few rules:
- It is necessary to dig up plants annually.
- Before handling tulips after digging, each bulb should be inspected for disease, decay, or damage.
- Rinse the bulbs well under running water.
- For the prevention of diseases, the bulbs can be disinfected in hot water (no more than 50 degrees) or a special solution of Karbofos.
- Prepare special drying boxes.
- Dry the bulbs.
- After sorting and before planting, you need to process the material with potassium permanganate.
Tulips - care after flowering outdoors
These flowers are unpretentious and resistant plants, but improper care of tulips after flowering in the garden can lead to rotting of the bulbs, the formation of non-opening buds, and thinning of the stems. When flowers in the flowerbed begin to open one after another, the tulip needs special care - competent watering and regular loosening, pruning, feeding. Know when to dig up the bulbs after flowering and how to store them until next planting.
Do tulips need to be pruned after flowering?
When caring for tulips after flowering, it is important to prune correctly. Then you can easily propagate the species you like and grow healthy and strong bulbs. Pruning tulips after flowering:
- On the 4-8th day after the blooming of the petals (when they are about to crumble), the peduncle must be cut off. Such care is needed so that the plant does not waste energy and nutrients on the formation of seeds in the seed box.
- It is important not to touch the stems and leaves when pruning - if they are removed immediately after the flowers have faded, the bulb will cease to exist. When only the peduncle is cut off on the stem, the rhizome begins to gain mass intensively.
- If the tulip is cut for a bouquet, a couple of leaves should be left on the stem.
- Full pruning of the plant is done after all the foliage turns yellow and dries up.
Do tulips need to be watered after flowering?
With proper care, watering tulips after flowering, as well as during budding, should be abundant and regular. Moisture must penetrate to the entire depth of the roots, because they cannot extract it from the lower layers of the soil. On average, it is necessary to pour from 10 to 40 liters of water per 1 m2 of plot once a week. Watering abundantly and regularly should remain for another two weeks after the tulips have faded.
Fertilizing tulips after flowering
Fertilization of tulips after flowering is carried out no later than two weeks after the petals fall and the peduncle is trimmed. One top dressing is enough for the growth of a flower bud for the next season, which continues to form all summer, and the growth of a large bulb. Tulips are fertilized in this pore with potassium and phosphorus, during this period the plant does not need nitrogen. When choosing drugs, it is important to pay attention that they do not contain chlorine. Caring for tulips after flowering - how to feed:
- You can scatter dry dressing - potassium nitrate and superphosphate in an amount of 30-35 g / m 2, followed by watering.
- Or pour half a liter of wood ash with 5 liters of warm water and leave for 8 hours. Strain the liquid and dilute again with water 1: 5. Pour 2 tbsp into a bucket of working solution. tablespoons of superphosphate and water the plants.
When are tulip bulbs dug up after flowering?
With proper care, it is advisable to dig out tulips after flowering, especially fanciful varieties with fringes, with an interesting pattern every year. Simpler species (for example, ordinary red ones) can be disturbed once every 2-3 years. The bulbs of these plants go deep into the ground over time, and if left in the soil, there is a risk of infection. The flower itself will gradually crumble and lose its varietal characteristics. Tulip care - how to dig up the bulbs:
- They are dug up in June, 4-6 weeks after flowering. Until that time, the rhizome, together with greens, promotes photosynthesis and bulb growth, and the appearance of "babies".
- To determine when to dig the rhizome, you need to watch the flower. Its leaves should wither and turn yellow, but not dry out completely. If you disturb the tulip early, the bulb will not have time to gain nutrients and will not delight you with a beautiful flower later. Late digging is fraught with the fact that the nest will dry out.
- To get the onion, you need to dig in the bush, take out the “mother” with the “children”, cut off the roots and dried stems. The seed is laid out for a couple of days in one layer in a shaded place to dry out.
What to do with tulip babies after digging?
The tulip bulbs are sorted after digging, the nests are disassembled and calibrated (adults - separately, "kids" - separately). After drying, small heads should be immediately placed in a cool room with a temperature of + 15 ° C. In warm climates, "baby" can quickly dry out completely. In early August, such an onion can be planted on the garden bed for growing. If it is not possible to store the "kids" separately, they are planted immediately after separation, not forgetting to water and weed the plantings.
How to store tulip bulbs after flowering?
After drying, the planting material is etched in a solution of potassium permanganate, laid out in boxes and placed in a dark place with little or no light. At the same time, it is important to ensure proper care of tulip bulbs after digging:
- The air temperature in the room for the first 1.5-2 months should be in the region of +20 - 25 ° С, from the beginning of September it is lowered to + 15 ° С - ° С. This is necessary so that a flower bud can form in the bulbs.
- The room should be well ventilated so that the planting material does not rot and mold.
- Periodically, the bulbs need to be stirred and rotted, soft, defective ones should be discarded so that they do not infect the rest.
- Tulips are planted outdoors in autumn - from mid-September to early October. At this time, it is still warm, the plants will have time to take root, take root and winter well in the garden in order to paint it with bright colors in the spring.
What to plant after tulips?
Beautiful tulips adorn the garden but have a short flowering period. To keep the flower bed busy for the rest of the season, it can be planted with other plants. What to plant in place of tulips after flowering:
- Aster, salvia, marigolds, ageratum, lobelia, geranium, petunia. Their grown seedlings are planted right after the tulips, the plants will help keep the flower bed constantly in bloom.
- If tulip bulbs will be dug up every year, then preference should be given to perennials that will bloom right after them - hosts, astilbe, bruners, peonies, phlox. They will cover drooping and lost bulbous stems.
- The classic companions of tulips are forget-me-nots, viols, magrarites, they can be used to sow all the spaces between the bulbs.
- You can also grow vegetables after tulips. Carrots and parsley go well with bulbs. They are sown in the aisles of tulips in spring or before winter. When the tulip leaves turn yellow, the grown tops form a green carpet on the plot. After the onion, the flowers must be carefully dug out so as not to damage the vegetables.
How to grow in an apartment?
Many people want to grow tulips, but do not have their own garden or garden to plant flowers. In this case, a logical question is brewing: "Is it possible to grow tulips in an apartment?" The answer is simple - you can. In addition, it is very easy, and you can do it all year round if you follow certain rules. This option is suitable for those who want to grow flowers for sale by March.
Today, tulips are grown on a windowsill or on a balcony, using some tricks that you can read about in our article. True, it is better to plant plants in open ground if you want to get large buds, but at home, tulips will turn out to be not much smaller.
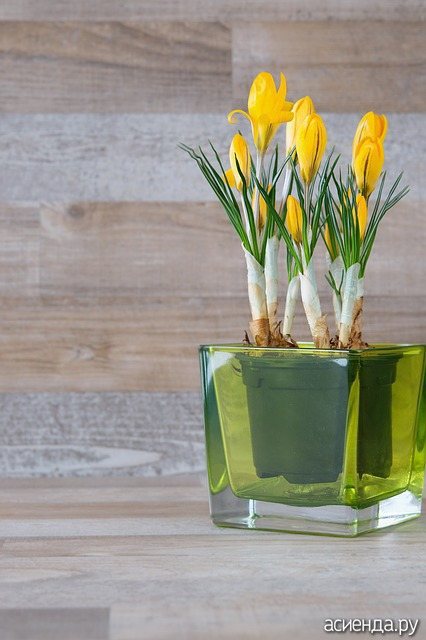
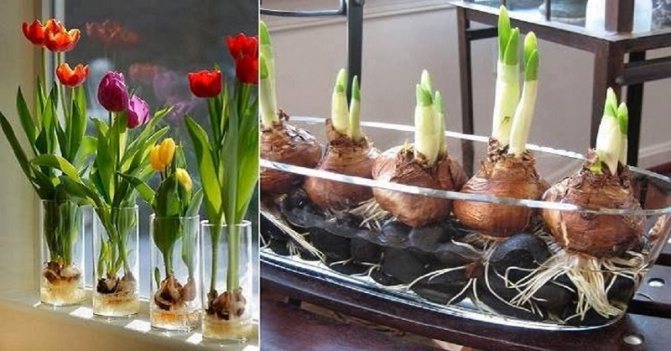
In a vase
You can grow flowers in a vase even without land, using only water. To do this, you only need a suitable container, decorative stones (instead of them, you can take plastic beads, decorative glass, sand and other small solid objects) and a little patience.
You can grow flowers without soil as follows:
- First, you need to soak the planting material in warm water for two hours, where you need to add a little "Epin". Any other product that stimulates plant growth will also work.
- Now you should take the container chosen for planting the bulbs and pour a low layer of stones on the bottom.
- Next, you need to lay out the bulbs with the rhizome down as shown in the photo.
- The bulbs should be laid in such a way that they are immersed in the stones by only one third. Most of the planting material should be on the surface.
- Now you need to fill in water so that its level is 1-2 millimeters above the root of the bulb. It is not necessary to fill the bulbs completely, as they can begin to rot.
- Now containers with bulbs need to be removed away from direct sunlight and the sun, in principle, leaving them in a well-ventilated, but not too bright room.
- After the long white roots appear, you need to add water, and also do not forget to monitor the amount of liquid.
- Within a week or two, green shoots should appear, and after that you can rearrange the vase with tulips on the windowsill or in another place that will be closer to the light.
- Since the flower does not grow in the soil and cannot receive nutrients from it, the stem of the tulip can be lethargic, so alcohol must be added to the water, based on a ratio of 4: 1, respectively.
- So that the water does not stagnate, the container, along with the tulip, is placed under running water and washed.
Next, you need to monitor the water level and periodically add a new one. Such tulips can both be kept at home in a vase, and subsequently planted in the garden.
In a pot
In order to properly and quickly grow tulips in a pot, you must adhere to our advice, as well as timely watering and caring for flowers.
The process of planting bulbs in pots is as follows:
- First you need to choose a small and not very wide pot for each bulb. The maximum number of flowers in one pot is three. More will suffer from a lack of free space.
- Two-thirds of the pots are filled with soil mixture specially purchased from the store and lightly tamped.
- Next, the bulbs are planted so that there is a distance of at least one centimeter between them.
- The bulbs are completely covered with soil mixture, which is lightly crushed, and poured on top with a small amount of water.
- The pots are kept in a room in which the air temperature is not lower than ten degrees, and the humidity is about seventy-five percent. A cellar is best suited for this purpose.
- After the sprouts appear, the temperature in the room needs to be lowered to three to four degrees, and after sixteen weeks you can put tulips on the balcony or windowsill.
Twice a year, you need to feed home tulips with calcium nitrate to ensure the flow of beneficial components to the roots. This will make the petals and stem more elastic. You should also protect plants from direct sunlight.
Watering should be done as the soil dries out. It is also necessary to ensure that no pests are introduced into the soil.
More information about planting and growing tulips in the open field and at home can be found in the informative video.
Reproduction of tulips - baby
Well, we dug up the tulips, sorted them out, and saved the baby, until planting. And now - the most pleasant thing - we will plant it and grow it.
Alas, the reproductive rate of tulips is much lower than that of gladioli or lilies. You probably noticed: we managed to collect the kids - not very many.
Baby tulips, it is highly desirable - to plant early. The longer we store it, before planting, the more it dries up. Some tulip bulbs may die, completely dry out.
For tulips breeding - choose a sunny, open place. Planting a baby - you need to in a well-treated bed, with nutritious soil.
If the bed is not very clean, overgrown with weeds, we dig it up with a pitchfork. Rhizomes of perennial weeds, of course - we choose.
Baby tulips - can be planted thicker. Distance in a row, between bulbs of the same type - 3-5 cm.
When breeding tulips, as you probably already understood, you should not make a mixture of different varieties. Each variety is more convenient to grow separately, dividing the plantings with pieces of unoccupied land. And, if desired, with tags.
The distance between the rows - make it so that it is convenient to loosen the garden, weed and slightly poke the growing tulips. In my opinion, 20cm is quite suitable aisle for tulips.
Having made a row, spill it with water, plant the tulip baby. Sprinkle with earth, with a layer of about 5 cm.
Well, that's all, baby, for breeding - we planted. Caring for her will be, although not difficult, but thorough.
tulpani-