Many plants tolerate cuttings well and reproduce by cuttings. But there are several subtleties in this issue. To get a good result, you need to cut off and properly store the material for grafting and rooting.
Cuttings for propagation of horticultural crops can be harvested at almost any time of the year. However, if you cut them in the summer, then there is no point in storing them - you can immediately vaccinate or start rooting the cuttings. But what if you managed to get the desired material only in the cold season? Do not worry, it is quite possible to save the cuttings until spring.
When to harvest cuttings
Apple cuttings for grafting can be started at different times.
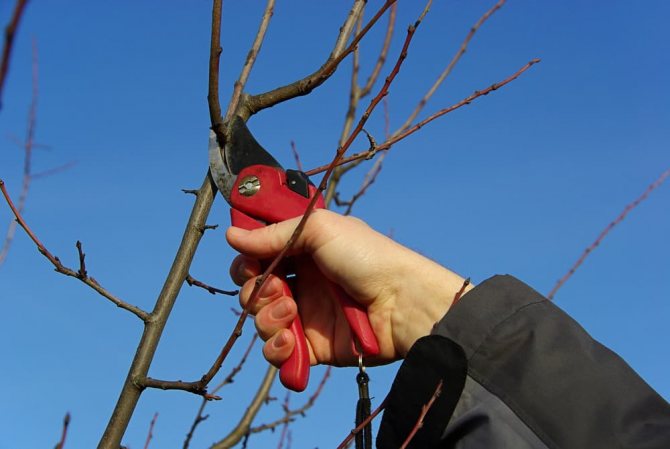
Most often, preparation is carried out in the fall (end of November). The most suitable time for harvesting is the period after the cessation of sap flow in the tree. This period begins after the apple tree has completely shed its leaves and entered a state of dormancy.
Some gardeners claim that harvesting can be done at the beginning of winter. For winter preparation of cuttings, the period from the beginning of winter to mid-January is suitable. After January, thaws may occur, and this will significantly worsen the survival rate of the cutting (it may not take root at all), which was cut during this period. There is an explanation for this phenomenon. It is believed that in this case, the movement of plastic substances to the tops of the shoot occurs when the sun warms up. They move to branches. Cutting off such a branch and grafting it to the stock will be ineffective due to the fact that it already lacks the nutrients that are necessary for the grafting elements to grow together and callus build-up. Also, during the winter period, freezing of young shoots may occur.
Other gardeners claim that for effective grafting, apple stalks can be harvested in December or February, as well as in March. But in this case, the weather conditions should be taken into account. The air temperature at the time of cutting must be at least -10 degrees Celsius. It is this temperature that contributes to the best hardening of annual shoots. If harvesting is carried out at the beginning of winter, then it should be carried out after the first frost. If the winter was not very frosty, and the wood on the apple tree is not damaged, then the cutting can be harvested at the end of February or at the beginning of March.
Also, the scion can be prepared in the spring. In this case, young shoots are cut before the budding period. If the buds on the shoot have already blossomed, then they are not used for inoculation. In some cases, harvesting can be done during the March pruning of the apple tree.
Some gardeners suggest harvesting the stalk just before grafting it.
Grafting of apple cuttings can be carried out both in winter and in spring. The time of harvesting the scion directly depends on its time. If the grafting is carried out in winter, then the scion, respectively, is prepared at the beginning of winter, and if in spring, then either at the beginning of winter or early spring.
For winter-hardy apple varieties, both the preparation of the scion in the fall and in the winter is equally suitable.
Of all the harvesting periods listed above, 100% of the grafting result is obtained by harvesting cuttings at the beginning of winter.
A video showing the spring or winter harvesting of the scion can be found below.


Preparing the stock for grafting
Let's start with the stock. Sometimes, in the practice of a gardener, it becomes necessary to completely re-graft an existing plant (well, I don't like the variety), or to plant several branches of another variety or even varieties in the crown to improve pollination and fruiting. Although, in my opinion, the best option is to grow a seedling and plant it.
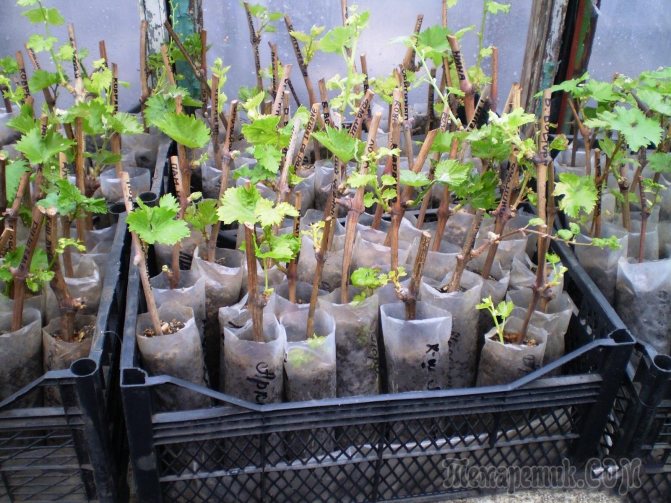
Right now, in winter, it is worth sowing the seeds of many crops in order for them to undergo stratification and sprout in spring. Of course, it is not worth grafting on a tiny seedling, you need to wait a year, or preferably two. Let the seedling grow stronger and acquire a powerful root system.
How to procure
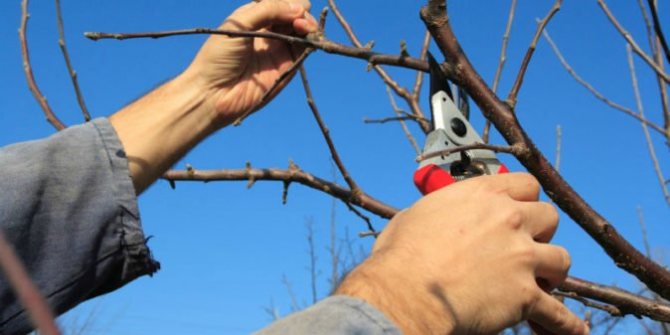
In order for the grafting to go as it should, it is necessary to choose the right time for the preparation, and also to carry out the preparation itself with high quality.
To do this, you must adhere to the following instructions:
- you should select in advance the trees from which the graft will be taken;
- in order for the stalk to take root well, you need to use only young, healthy, as well as fruitful branches of the apple tree;
- the scion is made from annual shoots. If it is impossible to use annual shoots, two-year shoots are used;
- branches should grow from the lighted part of the bark;
- cutting begins only after the end of the growing season or before bud break;
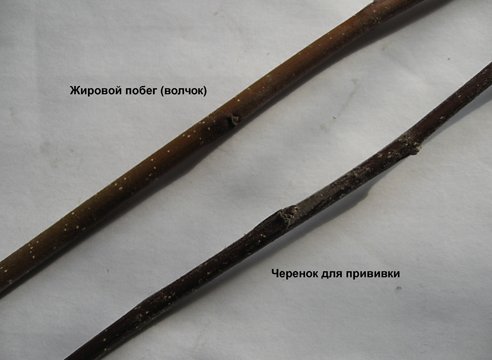
- cuttings are not harvested from branches that grow vertically (from tops or wen);
- at the end of summer, the tips of the buds should be pinched on the selected branch. This is done so that the shoots, after grafting, ripen well. But you can also use regular branches;
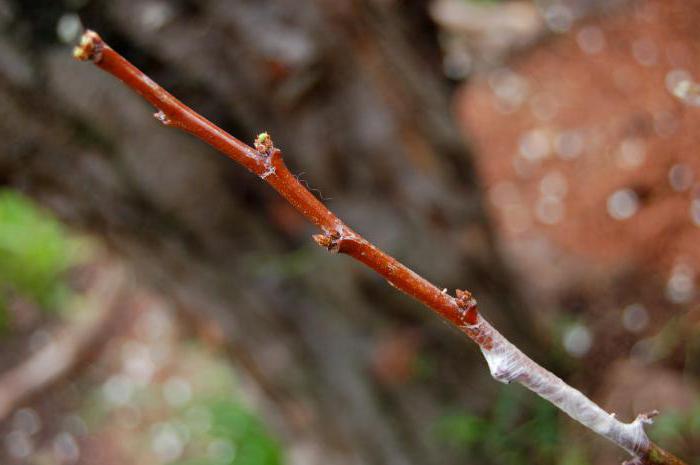
- ripe shoots with a diameter of at least 5-6 mm are best suited for the scion; they should have an apical growth bud and leafy lateral buds;
- do not make the scion too short (about 10 cm);
- crooked, thin and damaged branches are not suitable as a scion;
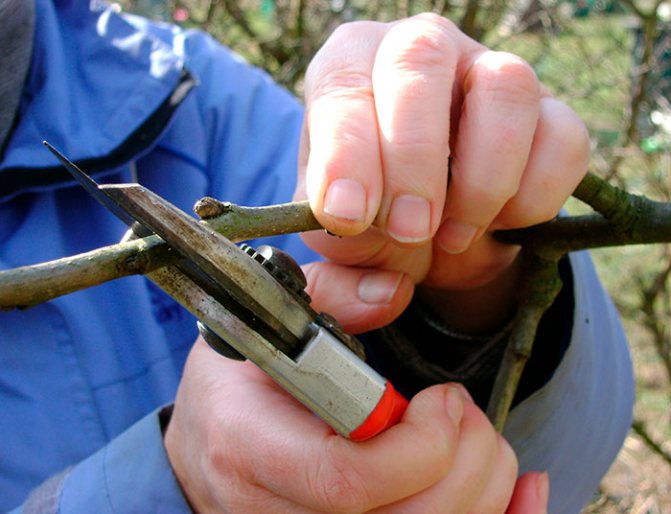
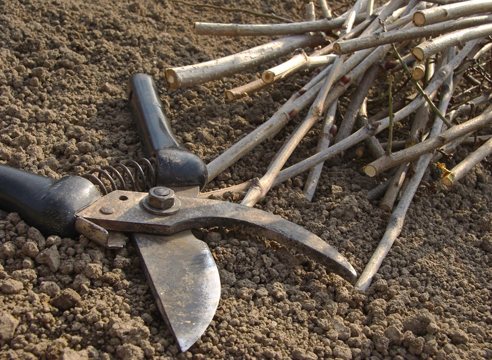
- it is necessary to cut off the shoots below the growth neck with a piece of two-year-old wood up to 2 cm. Otherwise, the scion may deteriorate during storage.

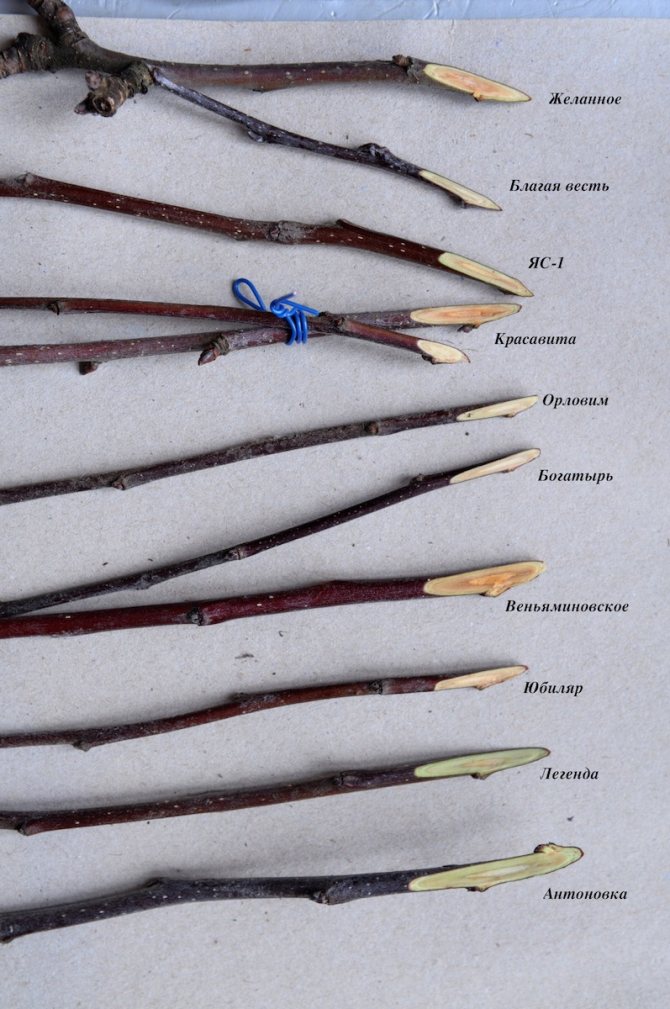
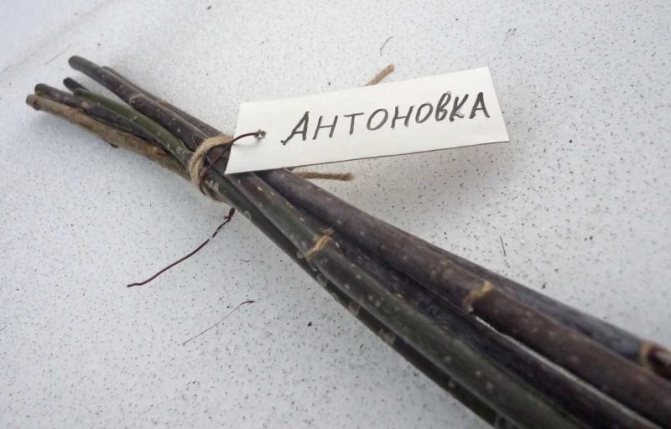
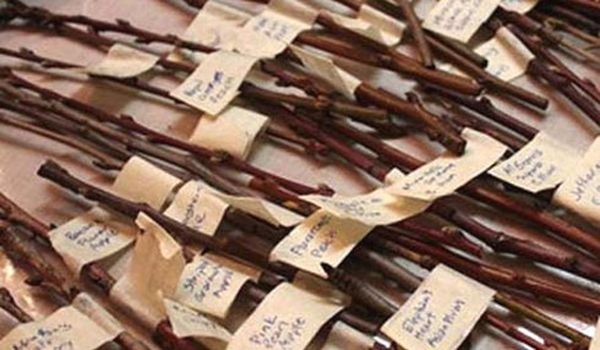
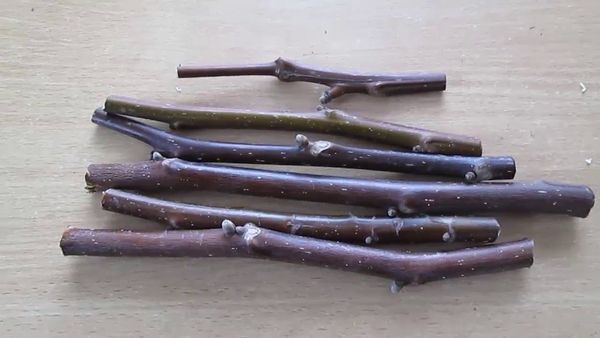
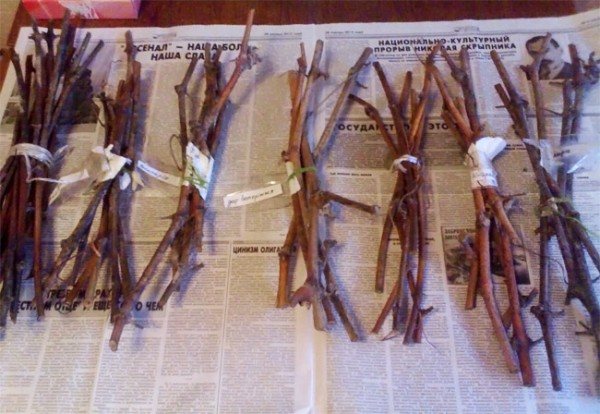
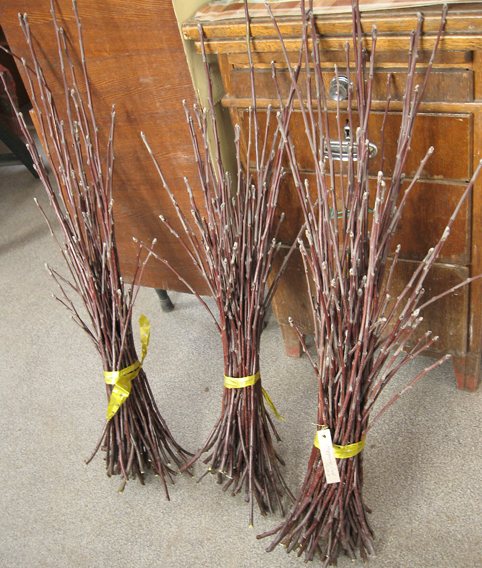
After the scion has been cut, it must be collected in bunches by varieties (if several trees are grafted with different varieties at once). Before that, in order for the cuttings to be stored for a long time and give a good harvest after grafting, they must be wiped with a damp cloth and sorted by size. Then the bundles need to be tied with wire and be sure to hang a tag on which to indicate the variety, cut time and the place where these cuttings will be grafted in the spring (tree variety).
Video "Harvesting cuttings for grafting an apple tree"
All stages of harvesting cuttings can be additionally viewed in the video.
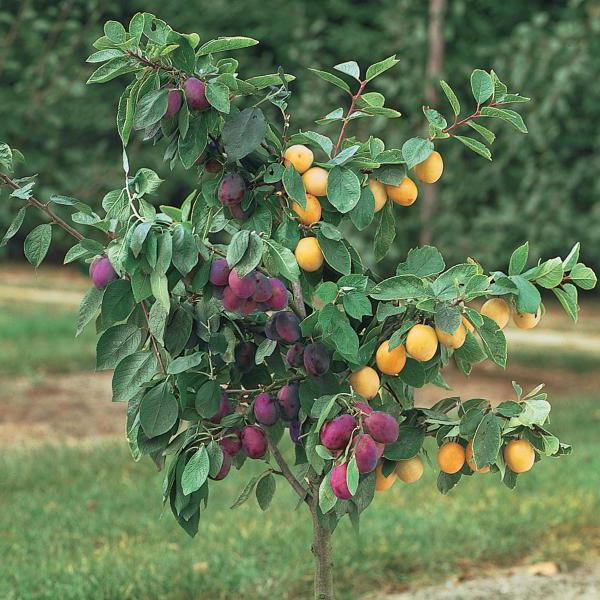
Plum care after vaccination
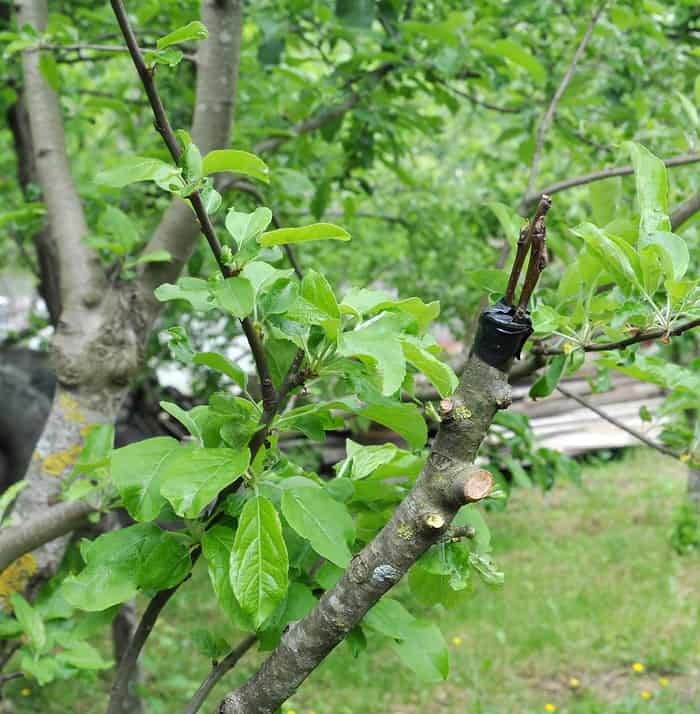
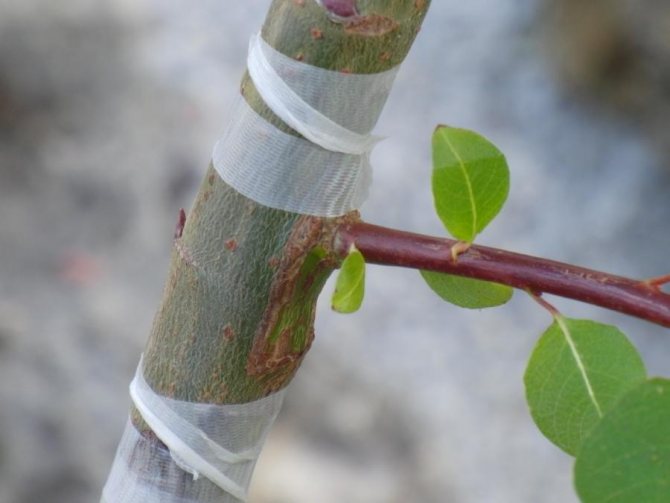
After the grafting process, a little attention should be paid to the drain. It is necessary to monitor the condition of the bandage and periodically loosen it so that it does not squeeze the bark of the tree. Usually the first easing is done in July.
The polyethylene is removed as soon as the first leaves appear on the handle.
The success of grafting plum cuttings can already be seen after 3 weeks. The condition may be as follows:
- The graft has taken root if an outgrowth (callus) is observed at the point of contact between the rootstock and the scion. They should look healthy, not dry. And, finally, the appearance of the first leaves is observed.
- The vaccination failed in the absence of a build-up. Graft dry without leaves. In this case, the graft site is used for the next year about 10 cm lower.
With a strong increase in growth, the harness is removed by the end of the month. And usually the harness is removed in the spring of the next year.
As a rule, the plum gives a good growth of young shoots (tops).
If all the buds have grown, then only the most necessary shoots should be left. And the rest are completely removed. Otherwise, the "tops" will oppress and weaken the scion.
To form the correct crown, the branches are directed in different directions. In the summer, you need to pinch the tops so that the young branches have time to ripen by the winter period.
If the vaccination fails, then the treatment site can be applied for next year.
In the spring, the winding is removed. The wound is re-processed with garden varnish. In the case of grafting several cuttings, the strongest of them is left. The rest of the layers should be removed.
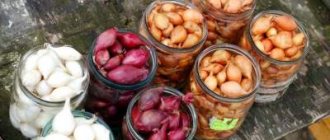
How to store
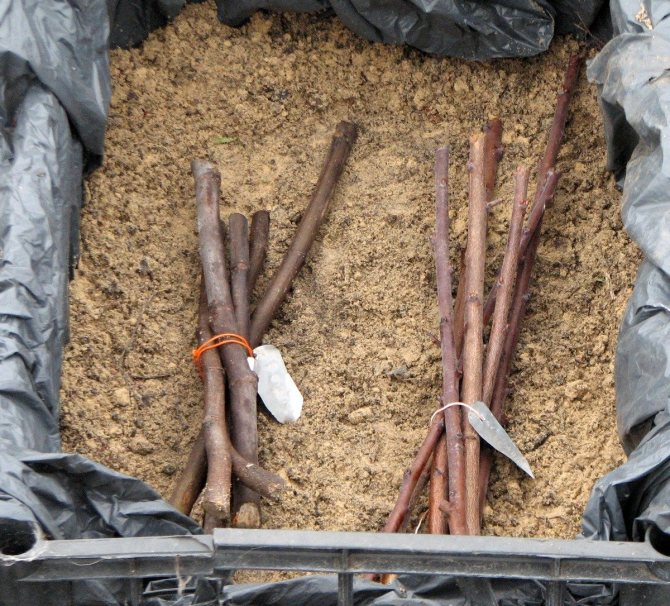
Once the shoots have been cut and tied, they should be laid for storage. To do this, they are placed in a clean plastic bag and placed on the north side of your house or barn.
The following methods of storing the scion are distinguished:
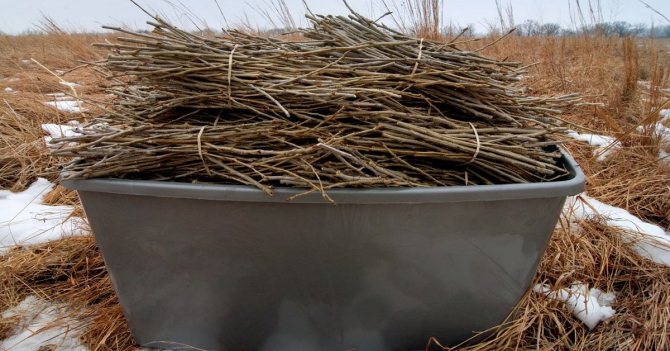
- bundles can be stored outdoors. In this case, you should clear a small piece of land from snow, put the scion there and cover it with snow on top and tamp it;
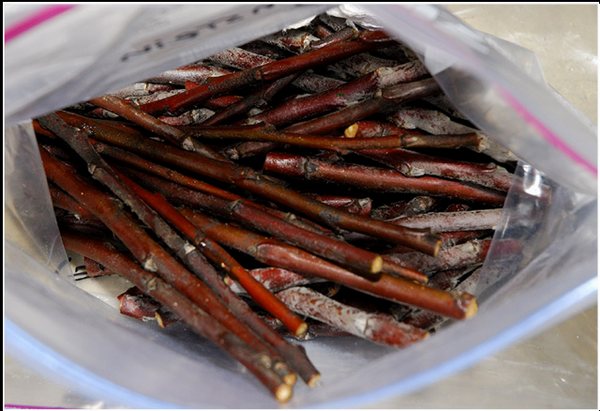
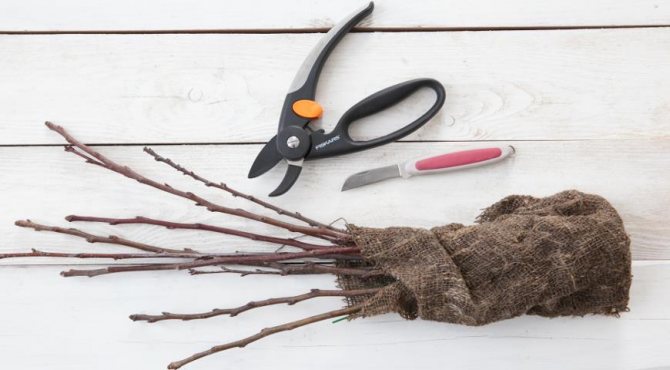
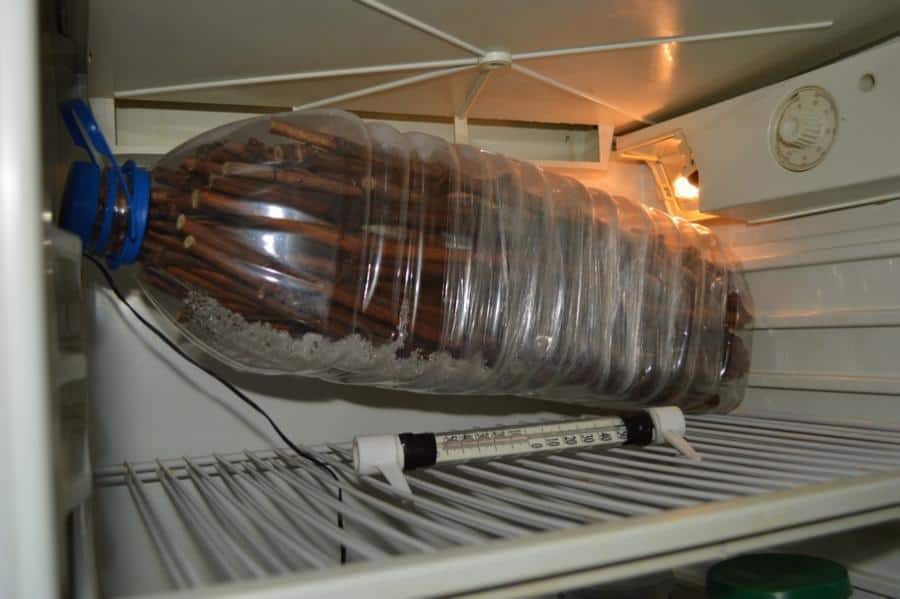
- cuttings can be stored in the refrigerator. In this case, they must be wrapped first in a damp burlap, and then in paper. After the bundles are placed in polyethylene. Periodically you need to look at the cuttings to prevent them from drying out or developing mold;
- sections can be stored in wet sand, peat, sawdust or any other suitable substrate (oldest and proven method); storage temperature should be positive, but low. It is periodically necessary to moisten the substrate. In this case, the cuttings are kept fresh and swollen;
- The scion can be stored in a basement at temperatures from zero to +3 degrees Celsius. The beams are placed vertically downward with the cuts, and from the sides they are spudded with sand or sawdust. The moisture content of the substrate must be maintained throughout the winter.
- also rootstocks can be stored in a suspended state on the veranda, balcony, tree. But in this case, they must be well insulated with a clean and sterile bag. They should be checked periodically to prevent the slices from sprouting.

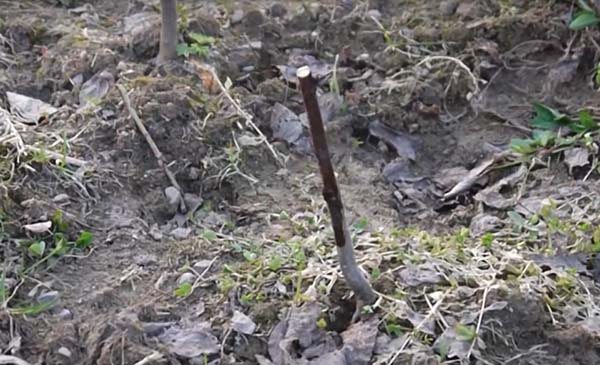
Sometimes, when the cuttings need to be preserved before spring grafting, they are buried in the ground in the garden. The pit depth is one shovel bayonet. From above, they are covered with spruce legs from moles, and then they are thrown with plant residues and a mark (for example, a peg) is left.
By observing the above requirements and instructions, you can achieve a successful vaccination, and the scion will bear many fruits.
When is it better to harvest cuttings
Cuttings for grafting are harvested in autumn or spring. In autumn, this should be done when the movement of juices in the tree ends, that is, around the end of November. The question of whether it is worth cutting cuttings in winter is the subject of much controversy, so it is better not for a novice gardener to carry out such experiments.
In the spring, this should be done after the end of frost, when the circulation of the juice begins. Cuttings for grafting an apple tree can be taken during spring pruning, especially if it is a frost-resistant variety. On average, harvesting apple cuttings for grafting in the spring is best done in March, in the second half of the month, although this period may vary depending on the region and how long the winter was. It is necessary to prepare the grafting material before the buds bloom, otherwise there is almost no chance that it will take root. In general, it is recommended to harvest cuttings mainly in the fall - so there is less risk that the shoots will freeze in winter, after which they will no longer be useful for grafting.
When is vaccination time
Despite the fact that the apple tree grafts well throughout the year, it is best to do this in early spring. It is recommended that the grafting be carried out at the beginning of the growing season - at this time, the sap is just beginning to actively move along the wood, and the bark lags well behind.
If the vaccination is carried out in a split, then it is better to hurry up and carry out the work even before the juice begins to move, during the rest period. Usually this is the beginning of April, but in warm regions it is recommended to start the process earlier - from mid-March.If there is a risk of frost return, postpone the date for several weeks.
Grafting, in which the scion is inserted into the side cut, is done in summer, spring, even winter, especially if the seedlings have already outgrown.
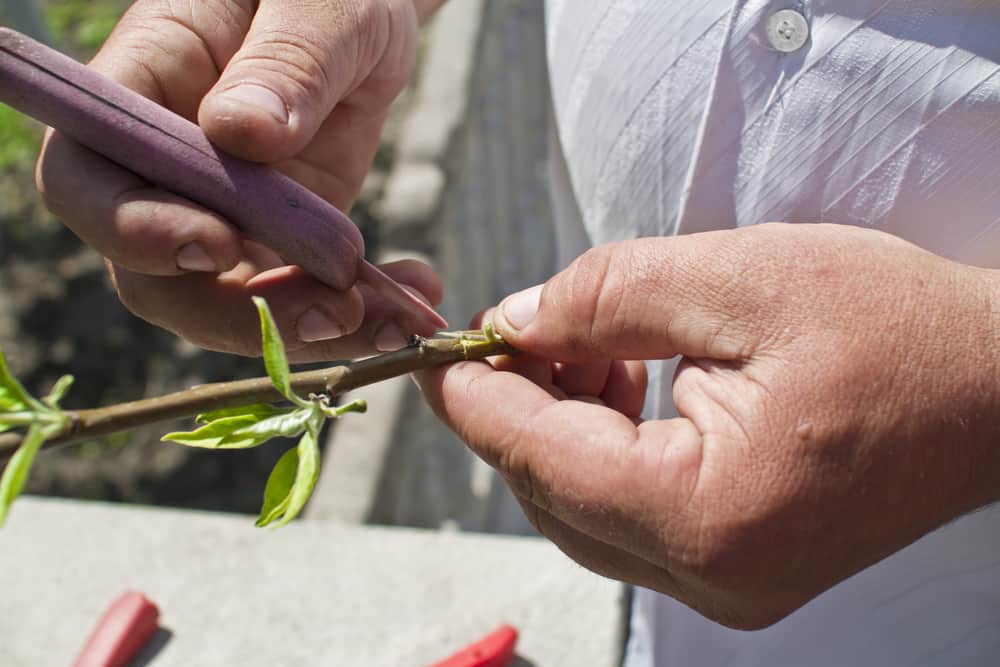
How to make the perfect cutting
Consider how to properly prepare cuttings, and what sprouts you need to take in order to get a healthy scion. Cuttings should be taken from a young (3 to 10 years old), abundant fruiting tree from a well-lit side, preferably the southern one, where they have the shortest internodes. For this, annual shoots are suitable, best of all in the middle tier.
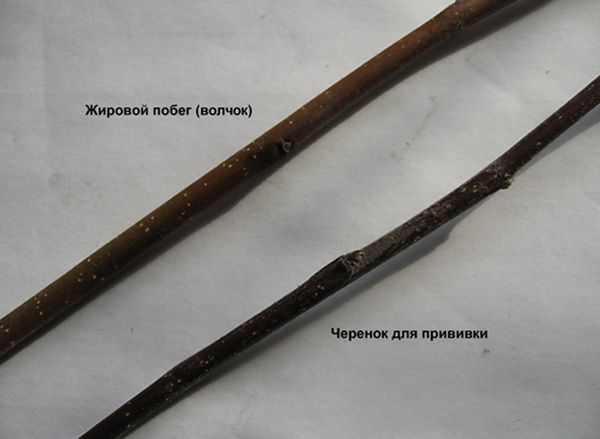
The eyes in their leaf sinuses should be well developed. It is important that the final kidney is pronounced. Take shoots 30-40 cm long, pencil-thick (about 7 mm in diameter), with at least 4-5 developed buds. You should not stock up on "tops" (ie, fatty shoots, perpendicular to the branch, even along the entire length, with subtle buds) - they quickly take root, but do not bear fruit for a long time. Also, shoots on which leaves and petioles remain are not suitable - if they have already fallen from most of the tree, this indicates poor ripening.
You can also make cuttings from old apple trees, although they are usually shorter than the recommended ones. There should be more of them, up to 15 pieces, so that you can choose the best ones in the spring. Prepared sprouts should be smooth with intact bark. Take a look at the cut - there should be no brown blotches in its center.
What trees can be grafted with a plum: suitable grafts
The best option for crossing a fruit tree is to graft a plum on a plum or on its wild.
In the case when there is no suitable stock of one species (genus), the plum is grafted onto others. stone fruits the cultures that are best suited for this:
- cherry plum;
- turn;
- felt cherry;
- apricot (although, as a rule, they do the opposite).
Video: grafting plum on cherry plum in the split
Good stock parameters
As rootstock ideally it is better to use young 1-2-3 year old seedlingsThis is considered the best option for grafting plums.
Important! Grafting of young seedlings, as a rule, is carried out at a height of 3 to 25 cm from the surface of the earth, it is possible even almost above the root collar itself. The lower the graft, the better the accretion, the closer the roots, and the more powerful the seedling will grow.
But older trees are also suitable (in this case, as a rule, they are grafted onto their skeletal branches, but there are exceptions), while preferably not older than 10 years.
However, it should be borne in mind that the survival rate of cuttings (grafts) on a very old bark (rootstock) has very low rates.
Naturally, in the same Middle zone (Moscow region) and other cold regions for rootstock use the most winter hardy varieties.
Of course, the rootstock tree must be in good condition: be healthy, have no damage or disease, have increased endurance both to weather conditions and to various diseases.
As for the choice of a specific branch, it is better to graft at the base of the skeletal branches, at a distance of 20-40 cm from the trunk. In this case, the stock should be directed upwards or strive for a vertical position. It is these branches that grow much better, which means that the success of the survival of the cuttings is significantly increased.
As a rule, annual cuttings (grafts) are grafted onto annual shoots (rootstocks). they are of the same diameter.
Where and how is it best preserved
Now let's find out how to store cuttings for spring grafting, and where is the best place to do it.
On the street
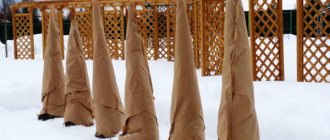
Grafting material can also be stored outdoors - provided that you live in places with snowy winters, sweeping snowdrifts at least half a meter high.
To do this, prepare a place protected from flooding, near the northern wall of a shed or house. There you need to make a groove about 30 cm deep and put coniferous tree branches on the bottom (this will also protect the workpiece from moles).Put the cuttings on top, cover with spruce branches again, and then sprinkle with foliage, straw or sawdust.
If the thickness of the snowdrift is half a meter or more, the sprouts can not even be buried, but the snowdrift itself must be covered with dry straw or sawdust - so there is less risk that it will melt. A natural question arises: how to keep cuttings from pests? To do this, cuttings can be wrapped with a layer of nylon, metal or plastic mesh with small cells.
In regions with prolonged thaws, cuttings can be stored on the ground between two layers of wet sawdust until spring. Wait for this embankment to endure one frost, then cover it additionally with dry sawdust with a layer of 40 cm, and on top with plastic wrap. Instead of water, carbolic acid (50 ml per 10 L of water) can be used to repel mice and other pests.
In the cellar

In a home basement or cellar, cuttings are stored cut down in a slightly damp substrate such as sand, sphagnum moss, or sawdust. The moisture content of the substrate must be maintained throughout the winter. In this case, the temperature should be no lower than 0 and no higher than +3 ° C.
In a refrigerator
In urban settings, it may be convenient to store cuttings in the refrigerator. Cuttings, tied in a bunch, should be wrapped with a damp cloth (best of all with burlap), then paper and, finally, polyethylene. In this case, it is necessary to use a compartment where the temperature is kept within the range from 0 to +2 ° C (for example, for fruits). Under no circumstances should they be stored in the freezer! To keep the sprouts longer, they need to be regularly ventilated and do not forget to wet the fabric. At the same time, an inspection is also carried out in order to notice the mold in time and prevent its spread.
Other suitable places
Good grafting material is kept suspended from a tree branch, balcony or veranda. To do this, you need to insulate it with a bag or place it in a plastic bottle. Air the workpieces from time to time so that the slices do not begin to germinate.
The main stages and rules of vaccination
Only related plants can be grafted. That is, it is better to inoculate plums on plums. It is advisable to choose the main tree no older than 10 years of age. The stock must be strong and well rooted. It must be perfectly adapted to the local climate.
There are various ways of grafting plums onto plums.
Vaccinations are considered the main ones:
The principle of the procedure is the same.
The first method of grafting plums onto plums is to connect a branch to a branch of approximately the same diameter.
Splitting is when a narrow cut is grafted onto a large diameter trunk.
Grafting with a plum cut means the same diameter of the branch and the cut. Moreover, the layers are attached to the end of the branch. And he becomes its continuation.
The cuts must be straight. And also the same in width and length both on the handle and on the grafting tree.
You need to prepare all the necessary tools in advance:
- grafting sharpened knife and secateurs;
- grafting tape or similar materials (adhesive plaster, electrical tape);
- var, plasticine or garden paint;
- package, cord and rag.
It is important to properly prepare and store the cuttings. Pruning the main tree before grafting is considered an important procedure. The cuttings must have a certain cut.
You need to properly connect the grafting twig to the main tree. And also to make the binding of the grafts and provide appropriate care for the tree in the future.
How to protect from damage
First, the cuttings need to be kept within the recommended temperatures. If they freeze, the stock will no longer work out of them, so you need to worry about sufficient insulation in advance. Excessive heat, however, can lead to contamination by bacteria or premature germination, which also makes them unusable.So if the cuttings are in a cellar or refrigerator, you need to control the temperature, lowering or raising it if necessary.
Secondly, you need to maintain optimal humidity: drying out will kill the future stock, and excess moisture will provoke the appearance of mold. Before using any substrate or fabric, squeeze them in your hand - they should be visibly damp to the touch, but no water should drip. When mold appears, cuttings can be saved by dipping them into copper sulfate (3% solution) or alcoholic iodine (1%).
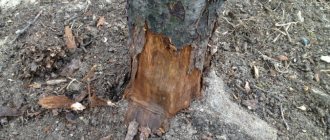
Why cuttings deteriorate
Even if all conceivable and inconceivable rules are followed, many gardeners cannot understand why cuttings cut for storage rot. The most common reason for this is moisture ingress or storage for too long, but there may be other options.
The cuttings are frozen
This can be determined by their "glossy" appearance and wateriness. In addition, if you put such cuttings in water, then it will quickly become cloudy.
The cuttings have sprouted
At temperatures above 5 ° C, cuttings start growing. If the buds hatch, then the rest period is over, and it makes no sense to store the material further.
Sprouted cuttings
Cuttings got out
High humidity and positive temperatures can also cause cuttings to dry out. Having started to grow, they become easy prey for fungi and viruses.
The cuttings are withered
If the cuttings crunch when bent and break easily, it means that they did not have enough moisture in the shelter, and they died.
The formation of mold is facilitated by the stagnation of condensate in the storage. To prevent this from happening, moisture must be removed regularly. If mold has already appeared, it is necessary to urgently wipe the cuttings, immerse them in an aqueous solution of 1% iodine or in a 3% solution of copper sulfate, and then place them in a new clean container for further storage.
Almost all of these types of damage indicate that the material is no longer suitable for further reproduction - the cuttings will have to be thrown away.
Checking whether the stalk survived storage
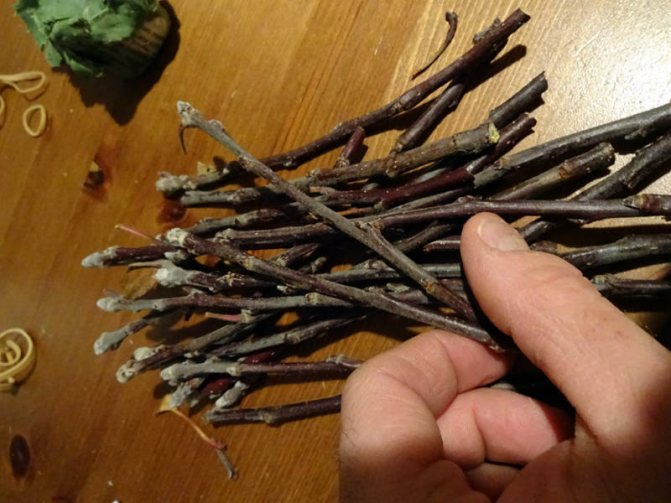
Cuttings that have survived the winter safely can be identified by the smooth and fresh bark, as well as by the tightly-fitting buds with smooth-looking scales. Gently bend the sprout - the living one bends elastic and resiliently, the dead one immediately breaks. An elastic stalk with shriveled bark can be freshened up: cut 1–2 cm above the previous cut and place the sprout in clean water for three days.
If it doesn't help, then he's dead. A frostbite test can be done.To do this, cut a new cut from the bottom of the cutting and lower it into the water. If she stays clean, then everything is in order. A yellow or brown color will show that the workpiece is frozen. The condition of the sprout will help to check the cut itself: it should be fresh, light green. If the cut is brown, then the stalk, alas, can be thrown away. How many days before grafting do you need to bring apple cuttings into the heat? Usually it is one day, but if you used frozen sawdust, then 3-4 days.
About skill and skill
Many will give up, but, I assure you, there is nothing difficult in vaccination! It won't work out the first time, but still ... I'll give you one piece of advice. It's winter outside, 2-3 months before vaccinations. Cut branches of different thicknesses and on long winter evenings in a warm house, master and polish the technology of grafting. Learn to make straight and smooth cuts in one stroke. You already bought a good knife, right?
Why is this article called Preparing for Spring Vaccinations? There is plenty of time: to prepare cuttings, to buy tools with materials, and to acquire skills. But if it works out, how much pride you will feel! And what new opportunities will open before you! I wish you success!
Experienced gardener tips
When harvesting cuttings, you need to use sharp and well-disinfected tools so as not to infect. For the same reason, the cut points should not be touched with your hands. After the sprouts of a certain variety have been prepared, tie them together and sign this bundle - this way you will not get confused in the spring. If there are blanks from different trees of the same variety, they can also be divided (especially if you want to try yourself as a breeder). You can sign the variety on cardboard (after which it must be tied with tape so that it does not suffer from dampness) or on a wooden plate.
It is better to collect material for grafting with a margin, and if possible, save it in different places - this is more likely to get live cuttings by spring if one of the storage methods does not work. This is especially true for novice gardeners or those cases when you are going to store sprouts in a new place. If the tree is pruned regularly, the sprouts from it will be more vigorous. Some experts recommend capturing a 1–2 cm piece of 2-year-old wood, which improves survival.
Rules and recommendations for the plum grafting procedure
- It is imperative to observe the compatibility of trees (rootstocks and scions) with each other.
- Perform the operation (vaccination) at the correct time and under favorable weather conditions.
If you are planting in early spring, the weather should already be warm, but not dry and hot. There should be no rain a few days before the day of the vaccination.
- The vaccination procedure itself is best done in the morning.
- It is better to choose the place for grafting (on the rootstock) from the north side, in order to subsequently avoid direct sunlight (then you will not have to shade).
Important! It is undesirable to vaccinate from the southern side of the tree, since the scorching rays of the sun will dry out the graft site, and the graft may not take root.
- Before carrying out the operation, be sure to wipe the graft site (rootstock branch) with a cloth.
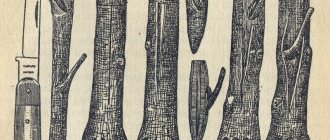
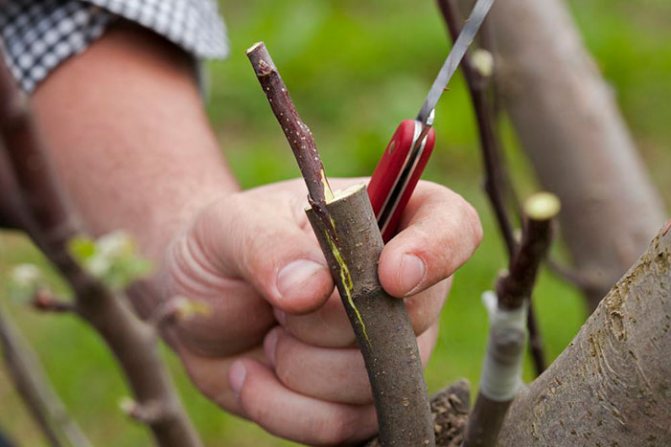
- The success of the grafting largely depends on how smoothly you cut the cuttings (scions). They should be perfectly smooth, without any bends or roughness.
By the way! As a rule, the length of the bevel cut should be 3 times the diameter of the cutting (scion).
- The diameter at the grafting site at the rootstock and the scion should ideally be the same. However, if the stock is thicker than the scion, then in this case you need to move the scion to one of the edges, thereby aligning the cambial layers.
Note! It makes no sense to use a scion of a larger diameter than the stock, as well as to put a smaller scion in the middle of the stock.in this case, there will be no contact of the cambium, which means that the vaccine will simply not take root.
- It is necessary to carry out the operation quickly so that the surfaces of the sections do not have time to oxidize and dry out.
- During the vaccination procedure, in no case should you touch the slices with your hands, so as not to accidentally introduce an infection.
- The same applies to the instruments used: they must be not only sharp, but clean (disinfected), otherwise an infection may get on the cut.
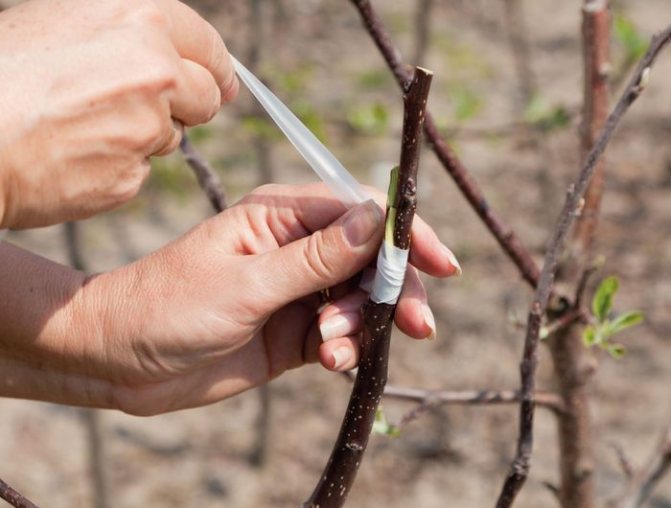
- The vaccination site must be wrapped as much as possible (optimally with a polymer film, but you can also use electrical tape or special tape) and cover the open parts of the graft and the cut off top of the cutting (scion) with garden pitch.
This measure is necessary to protect the vaccination site from drying out, as well as to isolate it from the ingress of air and moisture.
Some gardeners, for better adhesion, put a plastic bag (bag) on top of the graft, but this is not necessary at all, because it is much more important to tightly fix the vaccination site with tape.
- Do not ignore the rules of caring for a grafted tree, otherwise it may reject the cutting.
- Remember that any grafting is a risk of not too strong fusion, especially in the early years, so it is advisable to drive a peg next to a tree and tie it to it.
Harvesting apple cuttings for grafting in spring
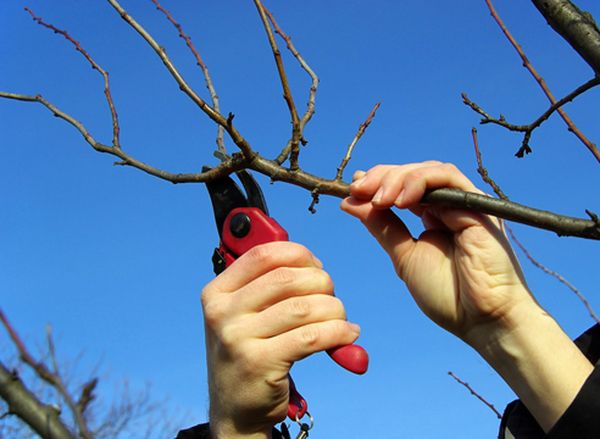
Spring cutting of cuttings for grafting apple trees is possible after the end of severe frosts, which in most regions refers to mid-March, or even to the end of February. Since it is at this time that most gardeners carry out detailed pruning of trees, choosing the best cuttings is not a problem. Can I do it later? Yes, in principle, it is possible, it is only important to have time before bud break: in this case, all the work will be useless.
For thirty years now I have been grafting my trees from time to time, and quite successfully. I must say, I rarely harvest cuttings in advance. And although there is an opinion that the cut material must first "lie down", most often it is necessary only in April (before the summer cottage did not reach), when the sap flow began and the buds swelled, cut off the necessary cuttings from one tree and immediately graft onto another. Whether it is right or not, experts judge, but I have never experienced failure.
What cuttings to take for grafting an apple tree
Before choosing branches for harvesting cuttings, you need to correctly determine the donor apple tree. It is desirable that it was not yet an old tree, aged from 3 to 10 years. It was during these years that the apple tree is the strongest, healthiest, intensively growing. But since at the age of three, not every variety has time to bear fruit, it is better to wait to make sure that this is the tree of the required variety.
Usually in March there is still snow, but at this time a well-groomed apple tree allows you to choose the right cuttings for grafting.
After all, how often it happens that we buy something that has been conceived for a long time, and we end up with another Melba or the North Sinap! These are, of course, good varieties, but the question is that even in nurseries, deliberate or accidental deception is possible. Therefore, when buying seedlings of fruit trees, I am never sure that I will get what I want until I collect the first fruits.
So, the apple tree gave the first apples, they turned out to be tasty, beautiful, let's wait another year. If the next year's harvest is already decent, you can definitely take cuttings from this tree for grafting. It is better to approach the apple tree from the most illuminated side: the branches ripen better on it, have greater growth vigor. Do not cut cuttings from the lowest and highest tiers. You need to choose strong annual shoots, thick, with short internodes.
You should not use tops for cutting cuttings (strong fatty shoots growing almost vertically upwards)! The grafting will most likely succeed, but the yield may be low, and the first apples will have to wait for many years.
All buds on the cut branches must be large, healthy, well developed. The terminal bud should also be strong, although it will not necessarily remain in the cuttings. If, after winter, leaves or even petioles remain on a branch, you should not take cuttings from it: such a branch, most likely, has matured poorly. The thickness of the cutting should be about 6–8 cm, cut sections with a length of 30 cm, with the number of buds at least four (the excess will be cut off when inoculated).
The main tool for cutting cuttings is a clean, sharp pruner; you can cut off a piece of a branch with a section of two-year-old wood, but only a one-year-old cutting can be used
When cutting cuttings, you need to carefully examine their core: any darkening, brown blotches may indicate freezing of the branches, such cuttings may not take root on a new tree. Naturally, there should be no damage on the bark, and the cuttings themselves should be practically straight, without strong bends.
Is it possible to take cuttings from an old tree 25 years old or more? Most likely, they will take root, but the choice of branches for grafting must be approached more responsibly, and more cuttings must be prepared. As a rule, the annual shoots themselves are thinner and shorter in this case, but not always their vigor on a new tree will be lower. Therefore, if there is no other choice, and the old tree is quite healthy, you can take cuttings from it.
Better to have the stalk thinner than optimal for grafting, it's still better than a thick top
Can cuttings be taken from biennial branches? Oddly enough, such vaccinations are sometimes obtained, although they are not recommended by specialists. Still, it is better not to risk it: a one-year growth can be found on any apple tree, and if it is practically absent, then the tree is so weak that it is better not to cut the cuttings from it.
Despite the fact that when pruning fruit trees, it is recommended to cover only slices with a diameter of more than 2 cm with garden varnish, it will be useful to cover up even the slices from cuttings, especially if they have been produced a lot, and there is not much time left before sap flow. The apple tree will more easily endure parting with its last year's growths.
Video: what should be a grafting stalk
Do I need to soak apple cuttings before grafting
Regardless of the timing of cutting the cuttings and how long they have been stored before grafting, it is best to refresh them before undertaking a critical operation. Although, ideally, properly preserved cuttings should be firm, retaining their original moisture, they should be soaked in sweetened water before grafting. Usually, even for perfectly preserved cuttings, 10–12 hours of soaking are needed, and even more for dried ones.
During soaking, the cuttings should be saturated with moisture. Indirect indicators that this happened are:
- flexibility of cuttings when bending;
- no crunch or crackle with the same procedure;
- slight pushing of the bark when pressed with a fingernail;
- appearance of moisture microdroplets when making a new cut on the handle.
The water for soaking should not be warm: it is better to use melted ice or snow water altogether. First, there are certain substances in the melt water that stimulate the growth of all living things, including the engraftment of grafts. Secondly, the cuttings must be saturated with water, but not cause early spilling of the kidneys, which can be stimulated by heating. Therefore, even for these 10–12 hours (in fact, at night), cuttings in sweet water should be refrigerated.

Some gardeners simply put the cuttings in a jar of water: this is possible, but it seems more correct, apparently, is bathing them whole in a nutrient solution.
Why sweet? Why sugar? Yes, you can do without it, but, firstly, it is some carbohydrate feed for the cutting, stimulating its further life.Secondly, sugar forms a protective film on the cut of the cuttings, preventing rapid drying and penetration of pathogenic microbes into the cuttings. Therefore, adding 1-2 tablespoons per liter of water is still worth it.
Instead of sugar, you can use bee honey (1 tablespoon of flower honey per liter of water), which is even better, since it contains biologically active substances. They stimulate the growth of grafts and protect the cuttings from pathological microorganisms.
Grafting Tips
How to prepare cuttings? If you have a desire to personally try to bring out a new variety of apple trees, it means that the preparation of the material should be taken very seriously and responsibly.
Therefore, let's find out what experienced summer residents advise:
- cuttings must be cut from trees that are distinguished by good resistance to defects and a high yield;
- to obtain such material, only well-ripened branches of one-year-old are chosen;
- It is best to cut the shoots from the outside of trees and shrubs that are most illuminated by the sun.
As a rule, the best side of the culture is the one that is located on the south side. The fact is that such sprouts have well-formed internodes.
It is also worth noting that if you plan to cut cherry cuttings, then it is important to take into account that you choose only annual shoots with fewer buds.
When planning to prepare such material, take note of a few recommendations from experienced summer residents, namely:
- strong annual branches are used as material;
- if you are cutting fragments from young crops in which the crown has not yet been fully formed, then you can use those branches that you plan to remove in the spring;
- sprouts with defective buds, or those that are underdeveloped, will not be suitable for future grafting manipulations;
- cut material is stored much better if it is processed with a pitch or a clay mash.
Important! It is advisable to excise material from crops that are regularly trimmed. As a rule, such trees always give very powerful growths.
Finally, it is best to cut a little more pieces for the future than you need. Even if there is a partial damage to the material, an extra supply will save you.
Scion twigs are harvested for future use three times a year, namely:
- in late autumn, early December;
- in the last days of February;
- in June.
It is worth noting that experienced summer residents prefer November harvesting. They perform it as soon as the first frosts come to the ground, after which you can start this procedure. The fact is that cultures at this time enter the sleep phase, and, accordingly, the sprouts were hardened, and in parallel they went through the process of disinfection.
There are just a lot of advantages in the autumn harvesting of material, namely:
- as described above, cuttings taken from a fruit crop closer to the winter period will no longer freeze, which means that you will not be left without a graft fragment;
- the grafting material taken at this time will have a state of complete rest, until the time of such a manipulation, which is very important because for this procedure it is precisely a sleeping stalk that is needed;
- such material is much better preserved if harvested in late autumn and early winter, which means that the risks of damage are minimized.
So, we figured out the benefits of this time of year for harvesting grafting material, let's find out what are the advantages in spring harvesting.
If you did not manage to cut the material for the winter, do not be discouraged, you can harvest apple cuttings for spring grafting closer to the onset of spring. To do this, you need to stock up on the following tools at hand:
- gardening scissors;
- crushed activated carbon for putty;
- and some free time.
In the case when your region of residence has a harsh climate, you should check if the sprouts from which the material is excised for further vaccination are frozen. Only after making sure that the branches are completely intact, proceed to cutting. In this case, the cuttings will be able to collect healthy and strong.
Well, if your region of residence is distinguished by relatively mild winters, then this procedure can be performed on any day. Basically, there is enough material from a pair of branches for pruning.
In the summer
Would you say that such a procedure cannot be carried out in the summer? Complete nonsense, during this period of time, cuttings are also harvested for grafting apple trees. The only difference is that you need to make fresh cuttings just before grafting. Since in this hot period of the year, we can say that every minute is important.
Well, here we come to the most important question, how such a procedure is performed as a blank. For everything to go right, you should choose not only high-quality branches, but also the time.
Therefore, we act strictly according to the instructions:
- we select fruit crops in advance, from which we will get a good graft;
- do not forget that it is advisable to choose young and healthy trees for a good cutting;
- we start cutting only before bud break or after the full completion of the fertile period;
- branches growing vertically are not suitable for grafting material;
- closer to the end of summer, the pagon from which it was decided to make a stalk we pinch;
- crooked, damaged or too thin branches are not suitable for picking up such material;
- do not make the scion unnecessarily long or short.
After you collect the material, you need to sort them into bundles and attach to each a small tag with the name of the tree from which the cutting was assembled. This is necessary in the case when you plan to inoculate several varieties at once, attaching an identification mark to them, you will never get confused.
In addition, the collected shoots are stored, in a slightly damp cloth napkin, laid with the slices down in the cellar or in any other place that is suitable for the so-called temporary residence of the shoots.
How to store apple cuttings for grafting
If the cuttings are cut at the end of February or in March, before sap flow, and several weeks remain before grafting (in the middle lane they are usually carried out in April), the cuttings must be properly preserved. This is not at all difficult: if there is a snow cover, they can be kept under the snow by specially throwing a bunch of more so that it does not melt for a long time. You can save the cuttings in the cellar by wrapping them in a damp burlap or placing them in a damp substrate (peat, sand, sawdust). But this is done most often when harvesting cuttings in the autumn. Spring cuttings are easiest to store in your home refrigerator.
Spring harvesting of cuttings for grafting fruit
March, or rather its second half, is the right time to start pruning fruit trees. The sun is already high enough, the day has increased significantly, and one can no longer expect severe frosts. It's a good time to go out into the garden with a pruner and a garden saw to clean up the trees that have grown overgrown the previous summer. Simultaneously with pruning, you can start harvesting cuttings for spring grafting in the crown or on the rootstock you have grown. During pruning, there is enough material to select suitable cuttings.

At this time, the trees are still dormant, the buds are dormant, and there are enough plastic substances in the wood to remain viable until grafting. The grafting operation is carried out at a time when the sap flow in the tree has already begun, buds are already beginning to bloom on the grafted trees. The rootstock stalk attached to them immediately receives nutrients, and the growth process goes quite quickly.However, if the stalk is taken from a tree on which the buds have already blossomed, then the likelihood of its drying out significantly increases, even if it was immediately grafted into a new place.
Plum grafting methods
Plum, like other fruit trees, can be planted using various methods. The gardener makes the optimal choice based on his personal experience and preferences.
Advice! To begin with, choose the easiest one for yourself (in your opinion), and then be sure to practice making cuts, fixing the vaccination site. In short, fill your hand.
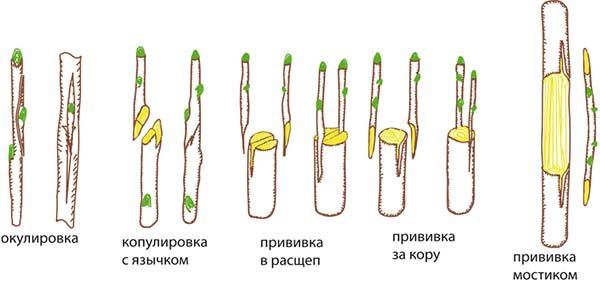
By the way! The vaccination process in any way consists of 3 main stages:
- preparation of stock and scion;
- their combination;
- protection of the vaccination site (wrapping with tape and covering with garden pitch).
Copulation
Plum grafting by copulation is carried out in early spring, when the tree is at rest, i.e. before the start of sap flow.
The diameter of the scion, like the rootstock, must be the same. Or the stock may be slightly thicker than the scion (cutting), but in this case, you need to be sure to combine their cambial layers.
There are two types of copulation: simple (a) and improved (b).
Naturally, the second method is more popular, since thanks to a more reliable contact, the vaccine takes root better than with simple copulation.
Simple copulation
Stages of simple copulation of plums in spring:
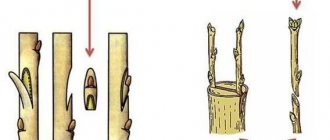
- Make an oblique cut (at an acute angle to yourself) on the rootstock and an identical cut on the scion (cuttings) under the lower bud in the same direction.
The cut on the rootstock and the scion should be made of the same length, at the same angle and preferably in one motion (but it's okay if 2-3 times).
- Attach the scion to the stock so that their cambial layers coincide.
- Wrap the vaccination site tightly with foil or electrical tape.
- Cut off the top of the cutting (scion), leaving 2-3 buds (above the upper bud) and cover the cut with garden var.
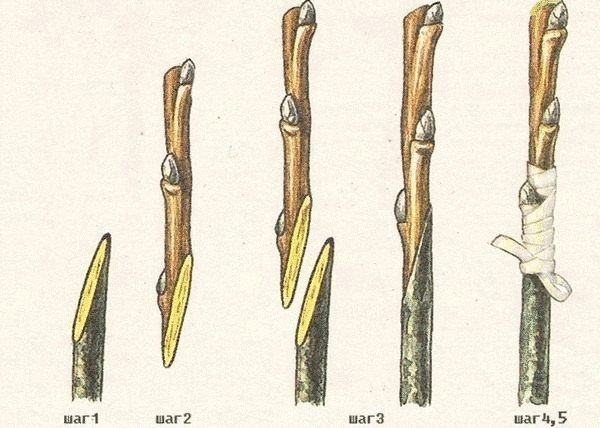
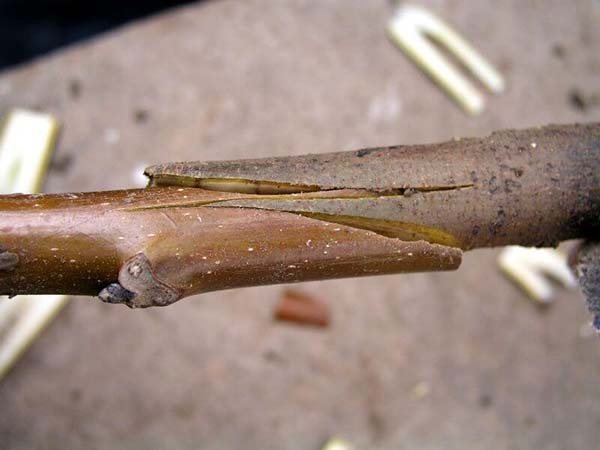
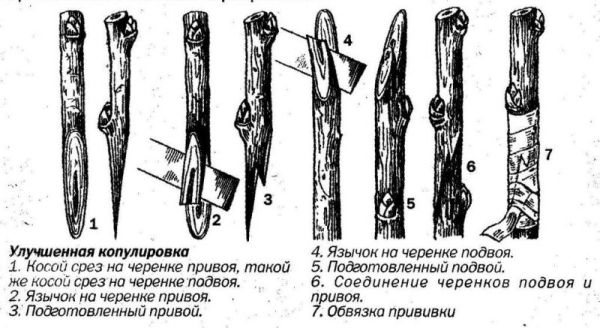
Improved copulation
Spring grafting of plums using the improved copulation method:
- Similar to simple copulation, oblique cuts must be made on the rootstock and scion.
- After that, stepping back from the upper edge of the cut by 1/3 of the length, make a "tongue" on the rootstock (cut 10-12 mm deep into the shoot).
- Make exactly the same "tongue" on the scion.
- Insert the scion into the stock, in other words, start the "tongues" behind each other.
- Further, everything is the same: tightly wrap the graft site with foil, remembering to cut the scion over 2 or 3 buds, and process (cover) its upper cut with garden var.
Video: Plum grafting with improved copulation
Thus, the only difference between the two grafting methods is that small splits are cut out on the cuttings (they make "tongues" for better grip), the depth of which is equal to 1/3 of the length of the oblique cut.
Video: grafting trees - simple and improved copulation
Into the cleft
In the split, as a rule, adult (thick) tree branches are grafted, but it is quite possible to graft young ones with this method.
As for the timing, the grafting of the plum into the split is carried out while it is still sap flow did not start, i.e. when the tree is dormant.
Split grafting is performed when the stock is thicker than the scion (cutting). But in any case, the stock should not be thinner than the scion!
Moreover, if the rootstock branch is thick, then you can use 2 scions (cuttings) at once, placing them opposite each other (on opposite sides).
authors: Sychev A., Ponomarenko V.V.
In the fall, it is time to cut cuttings from fruit trees for winter and spring grafting.
Theoretically, cuttings can be harvested during the entire dormant period of the tree, which begins with the end of the leaf fall. However, in the conditions of most of the territory of our country, where fruit crops are annually exposed to the risk of frost damage, it is better to do this in late autumn (in the second half of November) or at the beginning of winter (before the onset of severe frosts).Cuttings whose wood has suffered from frost do not take root or take root very poorly.
The success of the grafting primarily depends on the quality of the cuttings used. Primarily, the stalk must be thick enough
, preferably not thinner than a pencil. Too thin cuttings have time to dry completely until the cambial layers of the scion and rootstock grow together, and when water and nutrients begin to flow into the scion. Therefore, for harvesting cuttings, use a strong annual growth of at least 40-50 cm long.If the growth is weak on the tree from which you are going to harvest the cuttings, you must first, in the spring, carry out a strong anti-aging pruning on the tree or at least on one skeletal branch.
First of all, cuttings of less winter-hardy stone fruit crops are harvested - peach, apricot, cherry. This must be done before the onset of frost below -15 ... -18 degrees.
Cherry, plum and pome crops are considered more winter-hardy - apple, pear, quince, mountain ash. But it is also advisable to prepare their cuttings before the onset of -20 ... -25-degree frosts.
The biggest and most painful problem for a gardener is how save cuttings
before vaccination in good condition during the winter and early spring period. This is especially true for cuttings of stone fruit crops. The optimum storage temperature for cuttings is -2 ... -4 degrees below zero. Nurseries have special refrigerators where cuttings are kept at such a favorable temperature. It is much more difficult to do this at home.
Selection of cuttings for grafting
So what kind of cuttings to take and how to save them until April - May, when you can start grafting?
Strong annual branches with mature wood are used as grafting material. For cuttings, choose branches located on the well-lit side of the tree. Do not harvest fatty shoots ("tops"), they will take root well, however, the time before the beginning of fruiting of such a scion will greatly increase. In apple and pear, the fat shoot tends to have a greenish bark and long distances between the buds.

The buds themselves are much smaller, less pubescent and more densely pressed to the stem than in the branches of the usual annual growth, suitable as grafting material.
If you prune in your garden every year, then you will have enough such branches to select for your own vaccinations and share with your neighbors.
However, more often there is a desire to preserve a variety from an old tree that is living out its days. In such trees, the annual growth is small, the length of annual shoots does not exceed 10-15 cm. In this case, they will do too, just prepare more of them so that you have plenty to choose from when the time for vaccination comes. Since there are enough branches suitable for harvesting during pruning, take at least 10-15 cuttings of each variety. This amount will allow you not to be afraid that you will not have enough cuttings for your grafting or storage losses. In addition, the more heterogeneous the thickness of the cuttings, the easier it will be for you to adjust them to the thickness of the rootstock.
During harvesting, pay attention to how the cutting itself and the wood look when cut. The cutting should have intact bark: no cracks or wounds. In addition, there should be no brown core in the cut. Both of these signs (bark damage and brown pith) signal frost damage to the cutting. Such cuttings are not suitable for grafting.
Why grafting a plum: the benefits and objectives of grafting
As a rule, the main goal of grafting is to get a tree that is more resistant to negative factors.
However, the benefits of plum grafting do not end there. Here are the purposes for which it can be produced:
- You want to cultivate the wild and plant a varietal plum on it (in other words, multiply it).
- Not satisfied with the planted variety, and you want to re-graft it to a more suitable one.
- You have a compact (small) area, and you want to have several varieties on one tree at once.
- Accelerate fruiting.
- Save the tree (in case of damage to the bark by hares or mice).
- Propagate or save a favorite or just a rare variety.
Rules for storing cuttings for grafting
So, the cuttings are prepared. Now you need to save them until the time of vaccination, that is, before the onset of sap flow (April-May). To do this, cuttings are tied into bundles according to varieties, by attaching labels to them.
Then the bundles are folded into dark plastic bags and put into the basement. The bundles can be wrapped with a damp cloth before being placed in a plastic bag.

The temperature in the basement should be close to zero. However, not everyone has such a room, and not every gardener needs such a number of cuttings. In this situation, a small number of cuttings can be stored in the refrigerator in the fruit compartment. And if there are a lot of cuttings, you will have to bury them in the snow (in a snow pile).
To do this, make a snowdrift about a meter high on the north side of the house or shed. Dig a recess in it almost to the ground, put bundles of cuttings there, cover with snow. To prevent the snow from melting, lay a layer of straw or sawdust on top of the entire surface of the snowdrift for as long as possible. Thus, it is possible to save the cuttings until the onset of stable above-zero temperatures, when it will already be possible to start grafting.
I will talk about how to make sure that the vaccination is successful and the survival rate is the maximum percentage, I will tell you in the following articles.
Positive characteristics of vaccination
Grafting fruit trees has several advantages:
- rational use of the garden area;
- rejuvenation of the old plum;
- shortening of fruiting times, the grafted shoot bears fruit the next year;
- grafting of a southern variety on a climatically local tree allows the thermophilic cuttings to adapt;
- grafting is cost effective.
There are a lot of pluses. The main thing is to carry out this simple procedure according to all the rules. Observe the terms of plum inoculation. And enjoy the result of your labors.