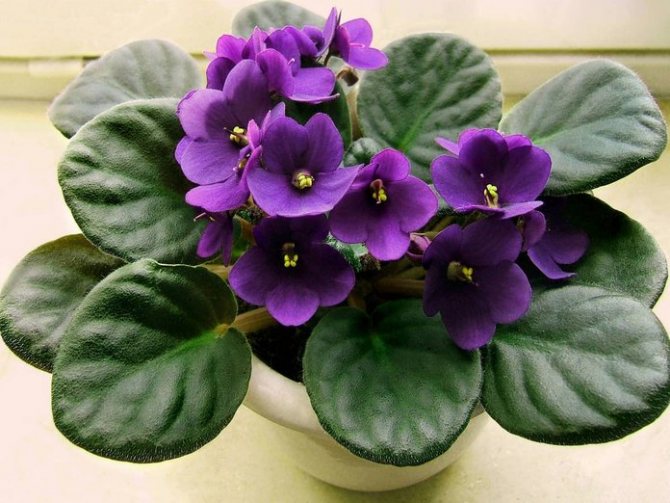
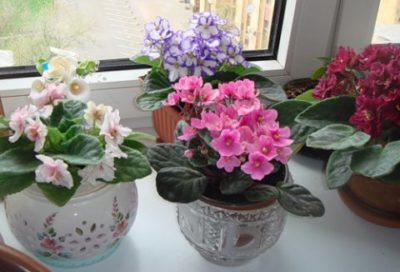
Violet is a popular houseplant, and many novice flower growers are wondering how to propagate a violet with a leaf, since this is the most popular method for growing this flower.
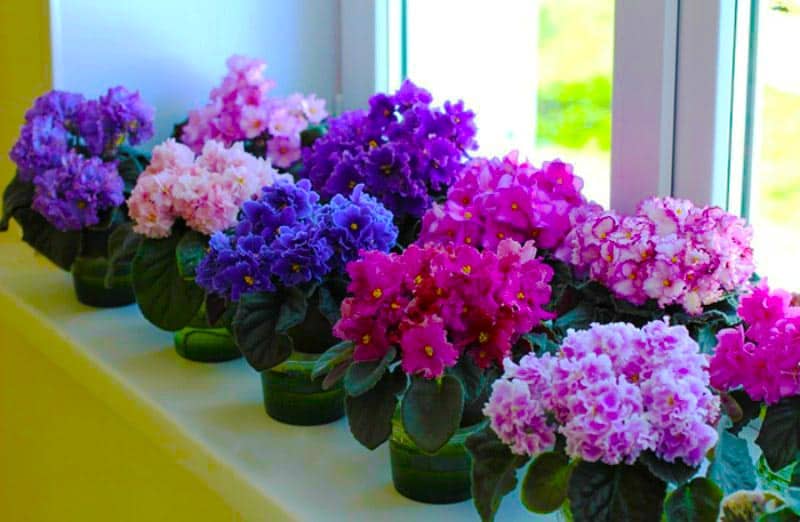
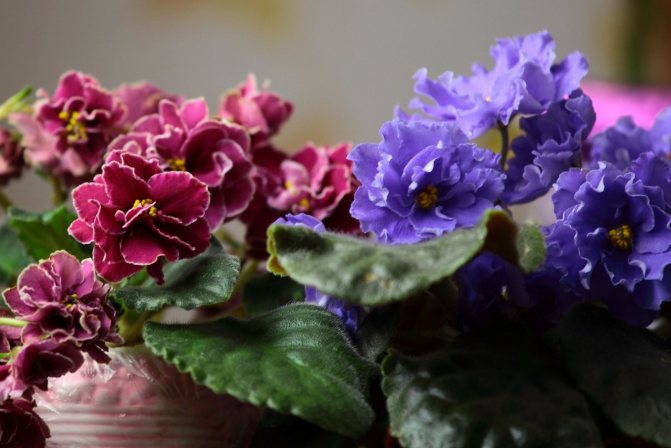
Today, about 500 species of violets are known, they differ in color, shape, size. Violets are also called Saintpaulias - this plant is known all over the world, and naturally grows in the mountains of East Africa. Saintpaulia feels great at home, if the care of the flower is carried out correctly, then it will bloom for a long time and profusely, delighting the owner with its beauty. We can say that the plant is not picky, easy to care for, so growing violets is not a big deal. The flower can be propagated not only by experienced florists, but also by those who are just gaining experience in the flower business.
Choosing a material for reproduction
Before planting a violet with leaves, it is important to choose the right planting material:
- for grafting, an adult violet is chosen, which has a well-developed rosette;
- from the second or third row, counting from the base of the flower, a strong and healthy leaf is selected;
- in variegated violets, the choice is made on a leaf with a predominant green color.
A strong healthy leaf is chosen for rooting.
If the cut leaf has come a long way and wilted a little:
- before planting, for 2-3 hours, they are completely immersed in a container filled with warm boiled water and lightly colored with potassium permanganate;
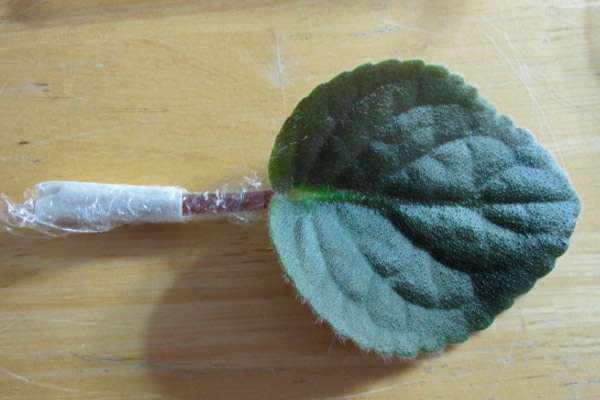
- then the leaf is dried and, retreating 3-4 cm from the edge of the leaf blade, make an oblique or straight cut with a sharp razor.
This procedure will help to disinfect the leaf and restore the turgor to its original state, and then you can already be guided by the general rules of how to plant violets from the leaves.
Correct breeding from a leaf
Another method of breeding violets is by cuttings, or simply growing from leaves. Growing violets from leaves also has its own characteristics:
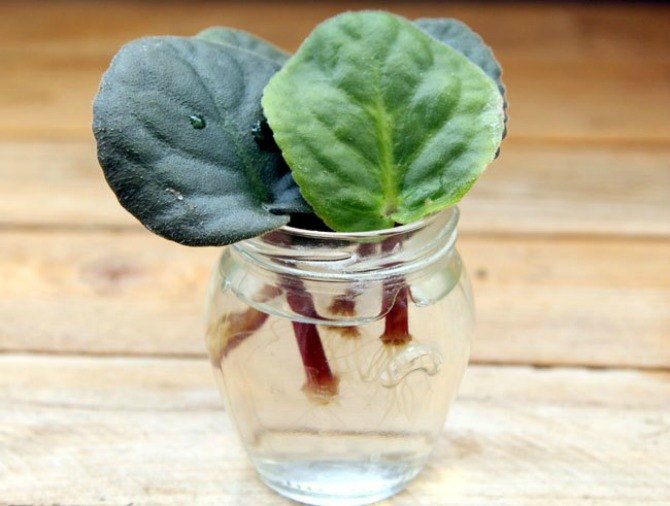
- The very first, so-called leaf pot, should be an ordinary glass of water. The idea is to develop a root system in seedlings. Boiled water is used to germinate the roots.
- The first step is to disinfect the sprout; for this, a little potassium permanganate is added to warm water, a leaf is dipped into it, and settled for several hours.
After the disinfection procedure, a new container or plastic cup, previously washed, is taken. Pour boiled water into a glass with the addition of activated carbon.If the water starts to evaporate, do not forget to add it.... Depending on the variety of violets, the first roots may appear after 3 weeks.
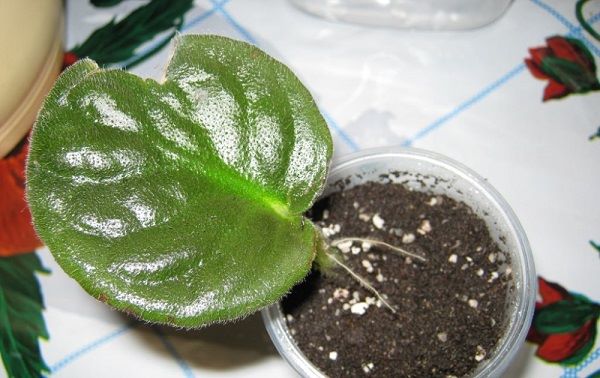
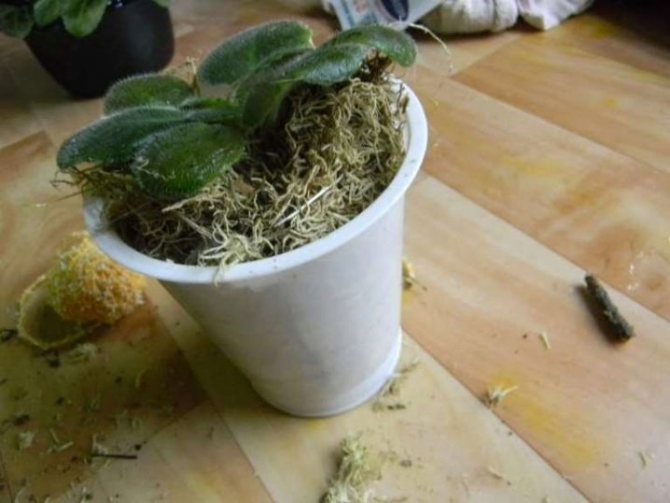
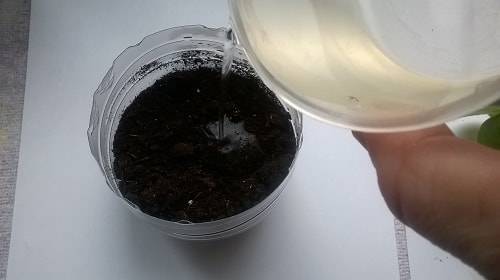
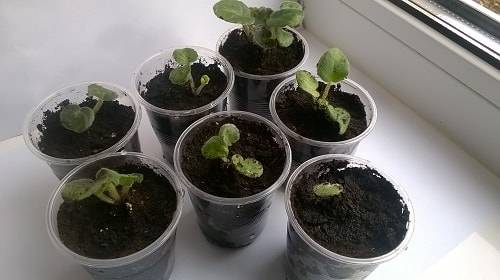
Rooting of leaves into the soil occurs in a small container, covered by a third of shallow drainage and the rest of the earth. The cutting is planted at a shallow depth, so that oxygen would be available to the still weak root.
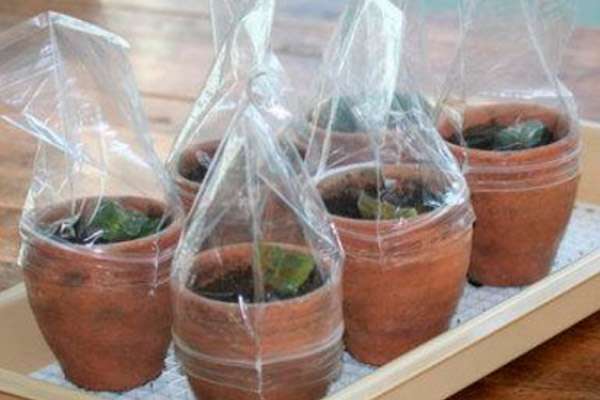
The soil around the leaf is rammed and moistened, after which the glass is covered with foil and placed in a warm place with sufficient sunlight. In this form, the plant keeps until small leaves begin to appear at the cutting, which means that the rooting of the leaf was successful.
It is necessary to exclude the transplantation of the cuttings immediately after cutting into the soil, since the root system is not developed, and the soil is saturated with various bacteria and parasites.
From the video you will learn how to grow a violet from a leaf:
How to plant a violet from a leaf at home?
Rooting of violets is carried out not only in order to expand the collection of flowers, but also to preserve the variety in case of root rot or other fungal diseases.
Under favorable conditions, the leaf quickly develops roots, so rooting by leaf cuttings is widespread in home floriculture.
The optimal period for cuttings is spring and summer., but experienced people root violet cuttings without a problem at any time of the year.
In water
With this method, before planting the leaves in the ground, they achieve the development of roots in a container with water. The main positive point of germinating cuttings in water is ease of observation and control over the formation of the root system:
- make optimal use opaque containerto exclude the development of algae in the water;
- small leaves are placed in a paper circle with a slit for the petiole, all this is placed on a glass so that the leg of the leaf is immersed in water;
- the leaf is put in a glass with boiled water, lowering the petiole to 1.5-2 cm;
- the leaf blade should not be submerged in water;
- to keep the water clean, a piece of charcoal is placed in it;
- as it evaporates into a glass add water.
The duration of rooting is determined by the variety of violets, it can last from two weeks to one and a half months.
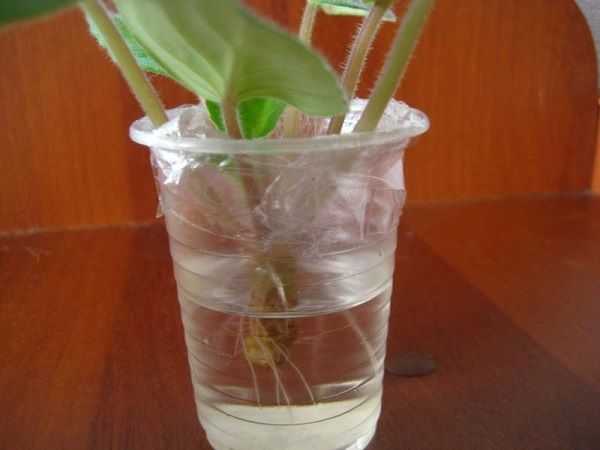
Rooting in water.
After the appearance of the roots of 1-2 cm, the cutting is planted in an earthen mixture.
Subsequent landing
Following all the recommendations will allow you to easily grow a young plant.
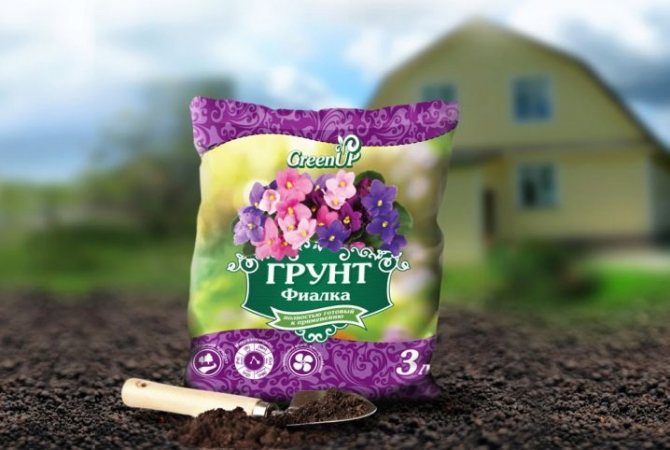
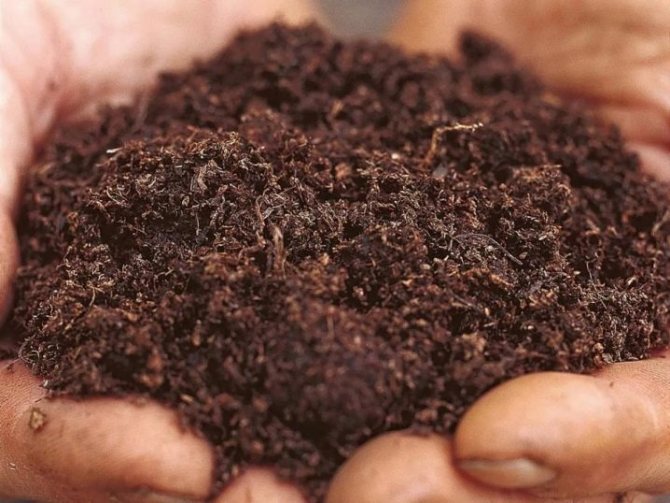
Violet loves lightweight, breathable, nutrient-poor substrate, for planting cuttings, it is prepared in advance:
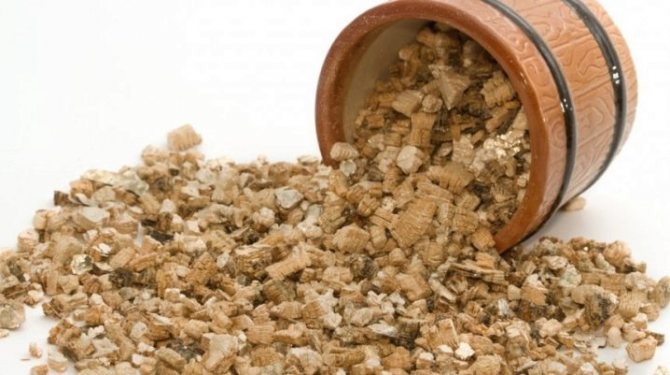
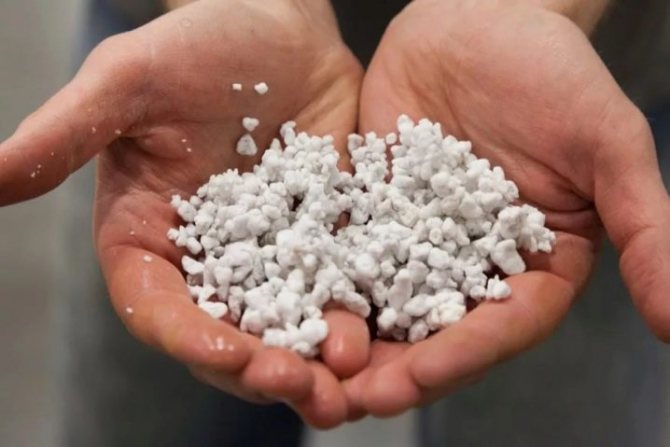
- even a special soil for violets is loosened with crushed foam, fine perlite, vermiculite or dried sphagnum moss;
- the soil in the mixture should be no more than 1/3 of the volume of the glass.
To plant a leaf you will also need:
- 80 g cup with drainage holes. As a tray, you can use a second glass, 100 ml, without drainage holes so that excess water cannot flow out onto the windowsill;
- drainage. Foam balls or fine vermiculite are spread to a height of up to 1/3 of the volume of the cup. When using containers of different sizes (put one in another) - a drainage layer is not needed, an air layer between the bottoms of the cups forms a gap that will prevent root decay;
- transparent jar or package to create greenhouse conditions.
After everything has been prepared, you can start planting the cutting.
Technology
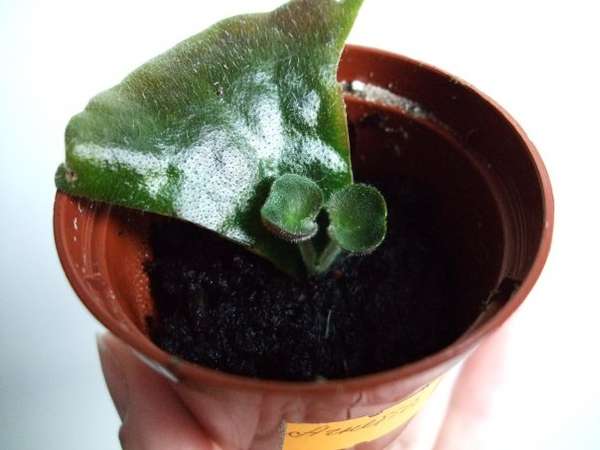
A small depression is made in the ground, a stalk with roots is carefully placed there, sprinkled with earth and slightly compacted:
- strong deepening of the cutting will make it difficult for the germination of children;
- violet leaf strengthen with a toothpick support;
- Place the violet leaf in a polyethylene bag or glass jar.
So that the seedlings take root faster, it put in a warm, bright place.
With the use of vermiculite
You can root a violet stalk not only in the soil, but also in pure vermiculite... This mineral contributes to:
- air circulation in the substrate;
- retention of moisture and minerals;
- prevents root decay;
- promotes the removal of excess moisture.
Planting a leaf in vermiculite practically does not differ from planting in an earthen mixture. Until the stalk forms its roots poured with boiled waterthen go to watering with liquid fertilizersbecause vermiculite contains no nutrients.
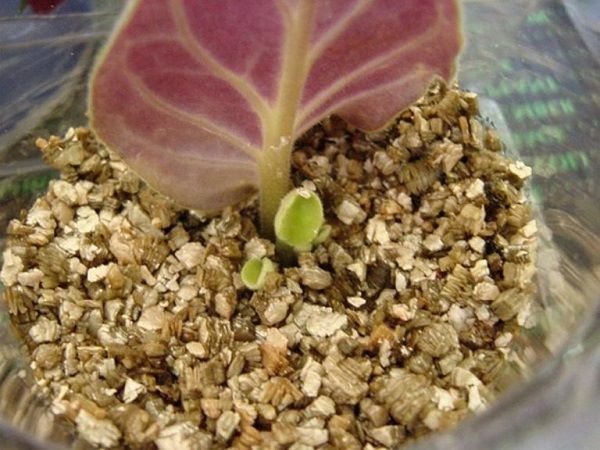
When growing a cuttings in vermiculite, violet babies appear after the same period of time as when rooting on a soil mixture. We will tell you when to seat the kids from the sheet just below.
Further care
Do not worry if, after transplanting, the leaf wilted somewhat, since the use of vermiculite will not give the full amount of nutrients. Once rooted, it will restore the turgor and color of a healthy plant:
- water it with warm, settled water after the top layer of the soil has completely dried;
- regularly ventilate the mini-greenhouse.
After the formation of the children, the violet is cultivated in normal room conditions.
Separation and seating of children
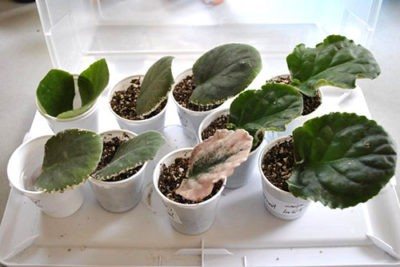
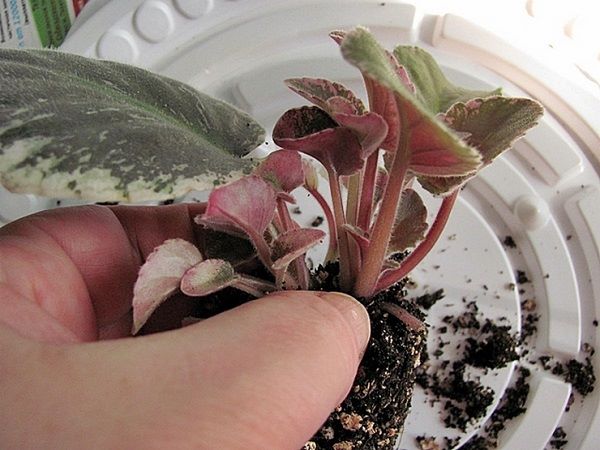
Kids four to five centimeters in diameter (for mini-varieties 1-3 cm) are seated in separate containers:
- for this you need to take a small glass with holes, in which they spread drainage interlayer (expanded clay or crushed polystyrene), then soil;
- before the procedure, the soil of the mother plant is moderately watered so that a lump of earth is preserved on the roots of the children during separation;
- the period when the children of violets are removed from the leaf is the period when they increase at least four leaves and a developed growth point;
- children who do not have formed roots are not separated;
- each young sprout is plantedin a separate pot.
At first, the planted plants are kept in a greenhouse, after which they are accustomed to the conditions of the apartment.
In order for the violet rosette to develop symmetrically, and the leaves to grow in a horizontal plane, small violets are provided good lighting.
Into the ground
Planting leaves in the ground gives almost 100% rooting of cuttings and shortens the germination time:
- the method is optimal for varieties that are difficult to form roots in water and cuttings of mini-varieties of violets;
- thanks to planting immediately on a permanent place of growth of a violet from a leaf in the ground forms roots and babies faster.
Rooting in the ground gives you the best chance of success.
In order for rooting to be successful, you need to take into account all the recommendations on how to properly plant a violet with a leaf in a pot.
We grow a violet from a leaf
Violet is one of the most popular indoor plants. Amateur flower growers share their favorite specimens with each other, cutting off a leaf from a flower that they like. It is easy to propagate a violet with a leaf; special knowledge in the field of agricultural technology or botany is not required. However, it is best if you schedule this procedure for the spring or fall months, when the weather is warm and clear outside the window.
The success of violet breeding depends on the selection of planting material. Weak frail leaves with creases, cracks, rot spots, burns or traces of spider mites in the form of red dots are not suitable for seedlings.
A healthy leaf of the plant has a uniform color, turgor and a well-defined edge.
It is not worth using plates from the lower tier located closest to the substrate, since the most mature and already weakened leaves are located here. Also, proximity to the ground is fraught with contamination of the leaf plate with spores and bacteria. Suitable material is taken from the tier at the second or third tier.
If a leaf for planting has lost its elasticity due to a long stay on the road or lack of watering, before embedding it in the soil, it is soaked for a couple of hours in clean warm water, where several grains of potassium permanganate are dissolved.
Caution: do not allow grains of potassium permanganate to fall on the sheet plate, this will lead to burns.
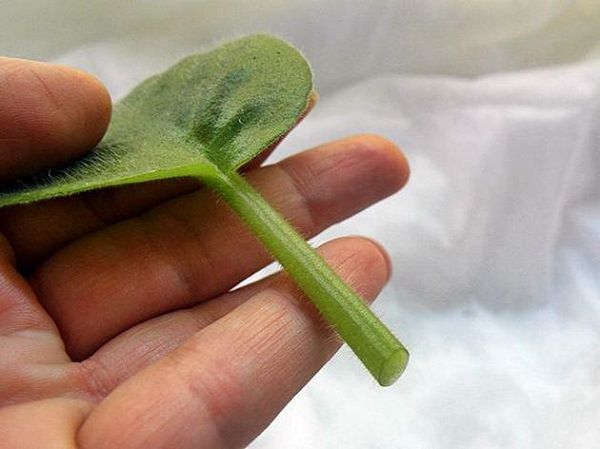
After returning the turgor to the sheet and disinfecting in a solution of potassium permanganate, the stalk is trimmed with a sharp blade or a clerical knife at a level of about four centimeters from the base of the plate, the cut angle is straight.
Violet rooting should be done in water.For these purposes, settled or boiled water is used (in the latter, the presence of lime sediment and other impurities must not be allowed). The container is selected in a small size - plastic cups, small glass jars, flasks, etc. are suitable. Before planting, the container is sterilized with steam or doused with boiling water.
The further algorithm of actions will be as follows:
- Dip the sheet into the container so that the cut of the cutting does not touch its walls. For fixing, a paper circle with a hole made in the middle is used;
- The liquid in the container is disinfected using a crushed activated carbon tablet;
- As it evaporates, water is added to the container.
Sometimes the cut is covered with rot. This indicates a violation of the cultivation technology or the ingress of cyanobacteria or other pathogenic microorganisms into the water. In this case, the sheet is removed and shaken off from the water, and the damaged area is trimmed again, with the capture of healthy tissue a couple of millimeters higher.
Where to keep the leaflet?
A container with sprouting violet leaves is kept on a light windowsill. The plant needs access to ultraviolet radiation and fresh air. But protect the seedlings from drafts and hot rays of the sun. Excessive heating of water in the jar negatively affects the development of violets. If microscopic water droplets remain on the leaf plate, exposure to sunlight will provoke a "lens effect" and the violet will get burned.
When will it take root?

On about 7-10 days, you can observe the formation of very small roots. However, depending on which variety of violets was chosen, their appearance can take two or even four weeks. As soon as the roots begin to grow, it is time to transplant the violet into an earthen substrate.
What is a violet seedling?
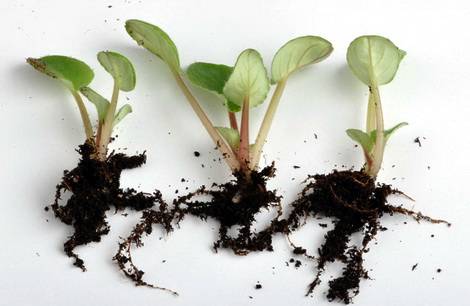
Violet seedling is a plant grown from seeds. There is an opinion that the seedlings are more tenacious and full of health due to the fact that they did not have time to acquire viral and fungal diseases due to their small biological age.
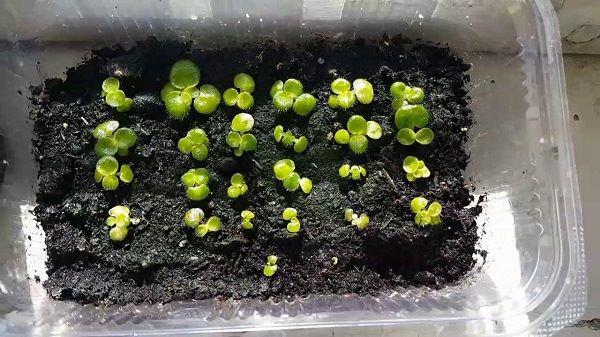
Seedlings grown from seeds.
There are no 2 identical seedlings, each is individual and has its own set of genes. The difference can be noticed even visually upon a deeper examination. You can get 2 identical seedlings only if the seed was damaged:
In this case, a full-fledged plant does not grow from the seed, but a small "hummock", which subsequently gives several identical seedlings.
The thing is that violet, in fact, is a hybrid of a hybrid, not a variety, and when trying to propagate it by seeds, a plant is obtained with a more primitive set of genes. To declare a seedling a variety, it is necessary to check its varietal quality over several generations.
Reproduction of violets using a leaf fragment
If you ordered some unusual variety of violets on the Internet, and the leaves came by mail in a deplorable state - they froze, rotted, broke in half, the stalk rotted or broke off - do not be discouraged. Indeed, even a small but healthy part of the leaf is suitable for reproduction. Every vein can give you kids. Halves, quarters and even fragments of cuttings with one square meter take root well and give birth to offspring. see sheet plate. Babies can appear from all the veins caught in the substrate. They, however, are smaller and weaker than those children who are obtained in a different way. And they grow a little slower. Therefore, they use this method only when there is no way to root a whole healthy leaf with a cuttings, when you have no choice, and you are afraid of losing a rare variety that is special for you.
If you only have a rotten leaf, try cutting out the rot with a clean blade, going over the healthy part of the leaf. Rinse the leaf in a potassium permanganate solution to stop the decay process.Now cut out fragments from the healthy part of the leaf plate so that the piece has a vein, even if not the central one, but the lateral one, but this will be one of the conditions for successful rooting. It happens that leaf plates without cuttings, planted in this way, give children faster, and there are more of them.
How to cut sheet fragments correctly
The main thing is to cut a violet leaf with a very clean and sharp blade or a clerical knife. If there was rot on the leaf plate, the blade should be disinfected after each cut (for example, dipped in a glass with manganese or wiped with alcohol). All lines should, if possible, run with minimal damage to the lateral veins.

You can divide the entire sheet into segments and plant each segment in a mini greenhouse. Each segment will give its children - rosettes of leaves.
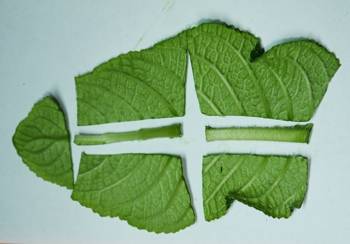
You can cut each leaf so that you first cut out the central vein, and then cut each half of the leaf into three parts. Each part should have a side vein running from the central vein to the edge of the leaf.
You can cut two or three strips from the healthiest part of the leaf, each with two veins. There is a high probability that babies will appear from each vein of the leaf.
A fragment cut along the veins from the upper third of the leaf is also quickly and successfully rooted. In this case, each vein forms a daughter outlet, and their total number is greater.
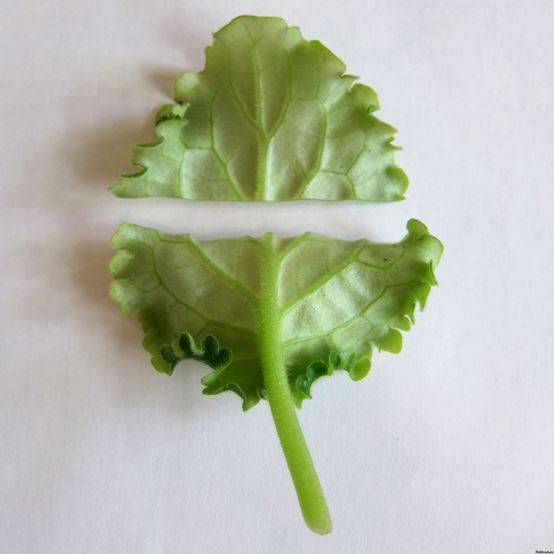
You can cut the sheet in half. In the substrate, place the upper part of the fragment along the cut. The lower half of the leaf can be rooted in turn - you will have more babies from one leaf.
If your stalk is rotten, cut it to the healthy part of the leaf so that from the central vein you get a homemade small stalk - a leg, about 1 cm in length. You will root it in the substrate.
Whichever way you cut your sheet, after this operation you need to leave all the fragments in the air alone for 15 - 20 minutes, so that the sections are covered with a film, and only then you can start planting them in the ground.
- prepare a weak solution of pink potassium permanganate, dip the fragments prepared for planting into it for 20 minutes;
- remove from the solution and dip the edges of the slices well in crushed activated carbon;
- Dry for 10 - 15 minutes, and only then place each piece in an individual greenhouse.
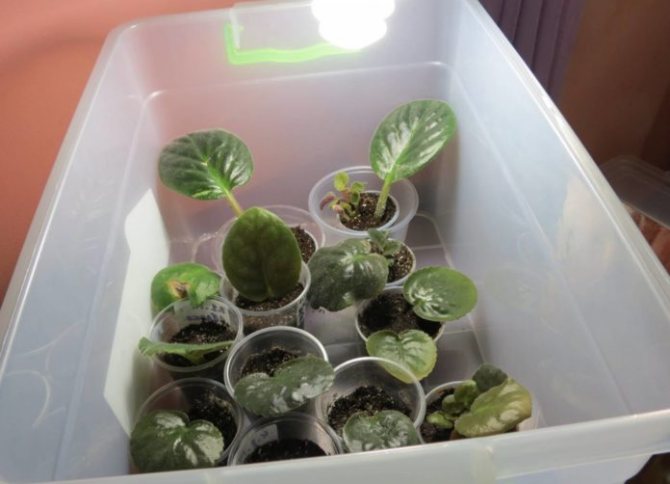
As a greenhouse for future violets, you can use two 50 ml and one 100 ml cups with different bottom areas. In one, with drainage holes, with foam as a drainage and sphagnum moss as a substrate, the fragment will take root, use the second 50 ml glass as a tray, in which there will always be water. (There should be space between the cups for this water). You can cover these cups with a large glass, 100 ml, to make a mini-greenhouse. Remember to ventilate it occasionally to remove excess condensation. To make the kids appear faster, we recommend highlighting the greenhouse.
Reproduction
What to do if you want to get this or that variety, which has an unusual color of flowers, terry or amazed by their size.
In the case of Saintpaulias, only reproduction by leaves, that is, vegetative.
The most optimal conditions for breeding will be spring and summer months.
Choosing a leaf for breeding
The choice of a leaf for breeding must be taken seriously. You cannot take:
- leaves of a diseased plant;
- lower leaves. They are old and it will take them a long time to educate their children;
- sheets located at the outlet. It is possible, when breaking off a leaf, to damage the point of growth of the violet.
For reproduction, take healthy leaves from 2-3 rows.
For breeding, you need to take leaves located in the second and third row... They have to be of medium size, good coloration and firm to the touch.
Preparing the cut cuttings
In order for the broken off stalk to take root and develop well in the future, it is necessary to carry out a number of manipulations:
- a sharp knife or razor is wiped with alcohol;
- the leaf is placed on the table and cut at an angle of 45 degrees, leaving the tip of the leg 3-5 cm;
- leave the sheet to dry the cut or dust the cut site with activated or charcoal.
If there is nothing sharp at hand, the stalk is simply broken off, leaving a stump of the desired length.
When and how you can separate a violet leaf for transplant
One of the most important points is determining the readiness of the mother plant. It should be completely healthy, without pests or fungi, with dense leaves well-grown in several rows.
It is best to cut off a leaf in spring or summer - this will contribute to the early appearance of a root system in it.
It is better not to touch the lower leaves - they are old and will not give babies for a very long time, too small, they will not fit inside the sockets either. Those that grow in the second or third tier are considered optimal - they can be cut off safely!
In order for the violet from the leaf to grow at home quickly and most likely to be a healthy plant, we choose a dense, bright green leaf, without lesions and spots.
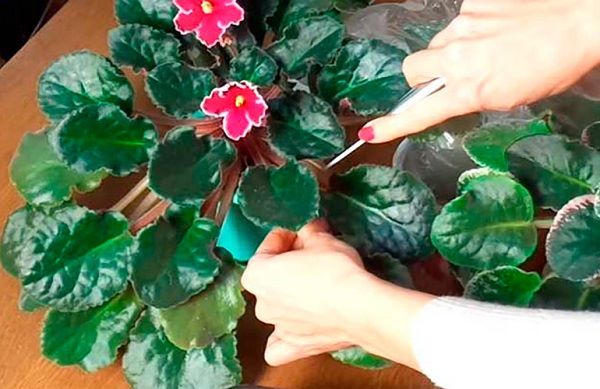
- To separate the leaf, it is better to use a knife or pruner, but not with your fingers - this injures the flower too much.
- We sterilize the blade with alcohol or ignite it over a fire (in this case, it must be allowed to cool!).
- Then we cut off the leaf at an angle of 45 °, leaving a "stump" of at least 5 mm on the mother plant.
Sprinkle the slice remaining on an adult violet with a crushed tablet of activated carbon - this will disinfect the wound and promote its early healing.
Rooting and planting
Planting leaves with roots is done naturally after building these very roots. And for this there is several ways of rooting. We will consider the following in detail:
In water
For rooting in water, you need to take washed and scalded small container. It is poured into clean warm water. So that the leaf does not rot take precautions:
- the stalk should be immersed in water for 1.5 - 2 cm;
- is he should not touch the walls of the vessel, for this, the sheet is fixed in various ways;
- dipped in water activated carbon tablet;
- can be added to a glass of water to stimulate root growth 1 tsp honey or 1 tsp. aloe juice;
- evaporating water is addedkeeping the water level at one level.
The appearance of roots can be seen in 14-20 days. Planting violets with leaves with roots in a suitable soil is done when roots 1-2 cm long appear on the handle.
In the ground
Good effect gives planting cuttings directly into the ground. For this:
- Small cups with a volume of no more than 5 cm are filled by 1/3 with a drainage mixture;
- Then add soil for violets and make a hole in it in the center;
- There is added soil mixed with perlite to make it friable;
- Moisten the mixture and plant the leaf, deepening no more than 1 cm;
- From above cover with a bag to create a microclimate, opening it from time to time for ventilation and protection from rot.
We sprout a violet from a leaf
Now comes the most crucial moment! In order not to be mistaken, you should watch the video and follow the instructions step by step.
A leaf of a violet saintpaulia at home can give roots both in water and in the soil - we choose the method that seems to be the easiest to perform.
How to grow a Saintpaulia leaf (uzumbara violet) in the ground
To do this, we will use 2 plastic disposable cups with a volume of 200 ml or the same small pot and a plastic bag (you can build a greenhouse for plants at home from any material at hand).
In one glass we make a couple of small holes for drainage at the bottom, and they should already be in the pots.
We pour down a little, to about 1 cm of drainage - crushed foam, then a substrate suitable for an uzambara violet - we wrote about how to prepare it here, and plant a leaf. It is not worth deepening it by more than 1 cm, so as not to disrupt air exchange.
Tip: If there is no foam, and another type of drainage seems too large, you can use another plastic cup: put the one in which the violet was planted in it and make sure that the gap between the hollow and the full is at least 5 mm. This air gap will keep the roots from rotting and will allow you to track when watering needs to be stopped.
Cover the top with a violet or another plastic cup or plastic bag and get a miniature greenhouse. In it, a violet from a leaf will take root much faster.
The temperature should be comfortable for this species - 22 - 25 ° С. We moisten the soil as it dries out.
After 3-4 weeks, the rooted leaf can be stopped to cover, because we have in front of us an already established violet
How to grow a violet from a leaf in water
This method can be done with
Transfer
Timing
When next to a rooted saintpaulia leaf, daughter rosettes grow up to 3-5 cmthen this is a signal for transplanting and dividing the plant. Divide young plants in such a way that everyone has 2 leaves each with a growth point, and there were several roots.
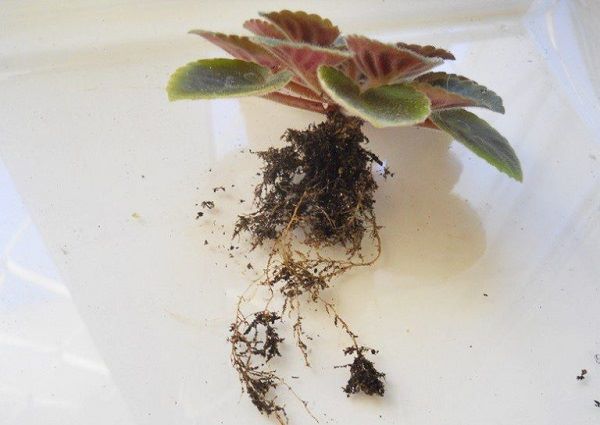
In order for the plants to tolerate transplantation and separation well:
- well moisten the soil in the pot;
- take out the plant along with a lump of earth;
- gently shake off the soil from the roots by hand;
- separate small children from one another with a needle.
For such tiny plants, they select pots with a diameter not exceeding 4 cm. A mixture of soil and perlite is poured into them, planted to a depth of no more than 1 cm and kept under cover for about 10-14 days.
Technology
When the diameter of the rosettes becomes 1.5-2 times the diameter of the pot, the violets are transplanted to a permanent place of residence. For this:
- pick up a pot with a diameter of about 6 cm with drain holes;
- a drainage layer is poured onto the bottom;
- add soil mixture for violets;
- moisten a clod of earth in a pot where the plant is located;
- carefully remove the Saintpaulia with a soil clod;
- plant a violet in a prepared pot;
- add soil mixture from the sides, slightly compacting the soil.
Priming
An earthen mixture for Saintpaulias must meet some requirements. The substrate needs to be:
- loose;
- fertile;
- moisture and breathable;
- have a slightly acidic pH.
Many violet lovers prefer prepare the soil for planting yourself. A mixture of turf, coniferous, leafy soil, compost, sand and peat is suitable for this. Vermiculite and sphagnum moss are used as disintegrants.
With big roots
Instructions on how to properly plant a violet with a leaf with a spine more than two centimeters long:
- You need to stock up on suitable soil and a pot, with a diameter of no more than 10 cm;
- Lay on the bottom of the prepared pot drainage layer on top and a little potting soil;
- Spill the plant;
- Carefully removed from the old pot, cut off the lower yellowed leaves;
- Very long roots can be shortened by 2/3 without harm to the plant, sprinkle with activated carbon;
- A plant is planted, soil is added from the sides, compacting it a little;
- Watering Saintpaulia.
Roots that are too long can be cut off.
Preparing for breeding violets
The carefully selected leaf can be torn off by hand or cut with a knife, pruner or razor blade. The second method is preferable: it is considered less painful for the plant. The instrument must be disinfected before the procedure. The cut should be made at an angle of 45C. A "stump" about 0.5 cm long should remain in place of the leaf, but more is possible.It is sprinkled with crushed activated carbon and left for a quarter of an hour.
The size of the cutting on the leaf is also important. It should not exceed 4 cm. Less is acceptable, more requires correction. Shorten the surplus, respecting all the requirements of the technology. Make sure the cut site is not dry before planting. If this happens, cut off a small piece again at a sharp angle.
Follow-up care
The necessary conditions for the favorable development of Saintpaulia grown from a leaf:
- suitable soil;
- sufficient watering;
- lighting for at least 12 hours;
- air humidity about 65%;
- comfortable temperature, from 22 to 26 degrees.
It is not difficult to create such conditions, and soon the violet will delight the owners with its flowering.
A violet grown according to all the rules should be not less than 20 cm and not more than 40 cm in diameter. Large stepsons are required to be planted, and the flower must be grown in one trunk, which should not bend. Deformation of the leaves is not allowed. The bottom row runs parallel to the pot, and the top row runs at an angle of about 40 degrees.
A Few Tips
In order for the plant to take root well, the following conditions must be observed:
- the soil must contain nutrients and pass moisture and air well;
- daylight hours for violets should be at least 12 hours;
- air temperature - 22-26 ° С.
- humidified indoor air.
When violets are planted in individual pots, they require regular watering, in addition they need to be fed with special fertilizers that can be found in flower shops. Immediately after planting, fertilize once every 2 weeks, and when the flower grows stronger - once a month. This simple maintenance will help the plant grow.
Reproduction of violets is a fascinating and uncomplicated process, the main thing is to carry out all procedures carefully, with warmth, and as a result, the violet will delight with its beauty and exuberant color.
Violet planting methods
You can plant indoor violets using:
Using material from an adult plant allows you to save money on buying seeds and save damaged bushes of rare varieties.
Root planting
For reproduction of violets by a shoot with a root system and leaves, it is necessary to prepare planting material. Cuttings with roots and 2-4 leaves are required; there must be a developing point of growth.
Before properly planting a violet with a root, it is necessary to provide a suitable indoor climate. Plants develop at least 12 hours of daylight. In winter, the organization of illumination using phytolamps or fluorescent lamps is mandatory. It is important to maintain the temperature + 24 ... + 27 ° С.
Growing is required for variants with unbranched roots; the shoot is placed in a container with moss or perlite, covered with a cloth. The formed seedling is transferred to the soil. It is necessary to sustain a plant grown from a leaf at home in a greenhouse for about 2 weeks, regularly ventilating. After the bush reaches 1.5-2 diameters of the pot, it is transplanted into a stationary container.
Planting from a leaf with a root
To propagate violets with a leaf with a root system, it is necessary to prepare a stalk from an adult plant. Planting material is selected from 2-3 tiers from well-formed young rosettes. A part of the leaf up to 4-5 cm is cut off at an acute angle, disinfected with copper sulfate, saline or soap solution.
A vessel for breeding violets from a leaf must be clean and sterilized. Tinted glass beakers or flasks are recommended.
Root germination is carried out in a container with water (settled or boiled). Part of the leaf should be in water at a depth of 1.5-2 cm. The material grown for seedlings is located in a place with medium illumination.
The recommended temperature regime of water for root development should be maintained at + 25 ° C. In cool water, the leaves will rot.
If the planting material is damaged, it is necessary to cut off parts of the leaf by 1.5 cm. It is allowed to trim the material 2-3 times before the roots are formed. Water change is obligatory after the procedure.
To accelerate root growth, stimulants can be added to the jar with the leaf. The material is placed in an aqueous solution until small roots appear for 2-4 weeks.
A plant that has given roots needs a compact container. The planting material is placed in the soil at a medium depth. The lateral roots should be 2 cm deep. Watering for rooting of violets is carried out with warm water (+ 35 ° С).
For 7-14 days, the seedlings must be placed under a covering material or glass to create a greenhouse effect. It is important to carry out daily ventilation. After rooting, flower care is carried out in a standard mode. Transplanting into a container of large dimensions is performed after increasing the volume of leaves several times.
Planting with leaves without roots
It is possible to plant violets with a leaf without roots. The procedure is performed with a small amount of planting raw materials and for rare species of Saintpaulias. A cutting and part of a leaf with at least 1 vein is required. The material is dried, sprinkled with crushed coal.
For planting, part of the leaf is tightly placed in the ground in compact pots or plastic glasses with openings for water outflow. It is necessary to supplement the container with drainage by 1/3; the remaining volume is filled with soil.
It is not recommended to place the planting material deeply, because the sprouts will not be able to rise to the surface. The ground next to the handle is tamped, watered, the pot is covered with polyethylene or glass to maintain the microclimate and maintain the required humidity level. After the shoots appear, young plants are distributed in permanent pots.
Planting conditions for cutting violets
The rooted stalk is placed for germination in a small pot or glass made of plastic or peat. The material is not so important: the presence of holes in the bottom is much more critical - without them and appropriate drainage, the root system will be waterlogged and can rot. The container is filled by a third with a layer of drainage material. The rest of the space is covered with soil. A high-quality substrate for violets includes components such as:
- A soil mixture of leafy earth, river sand and peat;
- Perlite;
- Vermiculite;
- Swamp sphagnum;
- Crushed charcoal (activated charcoal can be used).
The stalk is embedded to a shallow depth along with the leaf, so that it is easier for the rosettes that have tied up to reach the soil surface and hatch out. The soil near the cutting is slightly compacted and sprinkled with warm water. The planting is covered with a plastic bag to create greenhouse conditions. The pot is kept closed until the stalk gives birth to babies. When a growth appears, the violet is seated in separate containers. The old "mother" sheet is detached at the same time. The next transplant will not take place soon, as the plant needs to gain strength.
Where to store it?
Lighting mode - bright but diffused natural light shaded from direct rays. The flower grows well in the east or west window. If the pot remains in one position, over time, the side that is constantly facing the window and receives more light will produce larger leaves. In order for the violet to have a uniform shape, the pot should be turned periodically. You can increase the flowering period with the help of artificial lighting, which is used in the autumn and winter seasons.
Watering and fertilizing
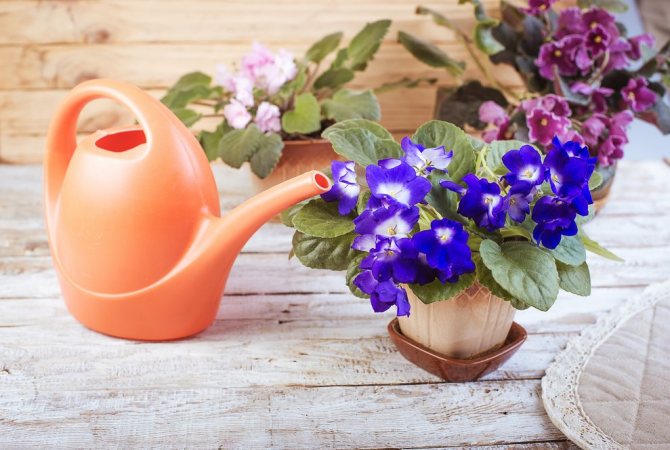
The basic rule of watering violets, which is talked about even in school biology lessons, is to prevent drops from falling on the leaf plate. Otherwise, the leaf turns white, covered with spots, dots and ulcerations. Also, from the ingress of water on the leaves, microscopic ectoparasitic fungi can activate the growth. The people call this disease powdery mildew. For this reason, you cannot spray the flower.Water it with a long-nosed watering can, lifting the lower tier of foliage. You can moisten the substrate by watering from the pallet, this is an even safer way.
The violet is very unpretentious and blooms for several months a year with proper care. To fertilize or not to fertilize the plant - the choice is yours: the transshipment of an earthen clod once a year is quite enough so that the substrate is not depleted. But if you plan to add top dressing to the soil, choose those preparations that contain nitrogen, potassium and phosphorus. Fertilizer is applied every 10-14 days.
Violet is not fed:
- Within 30 days after transplant;
- If the ambient air temperature is too low or high, or when the pot is illuminated by direct sunlight;
- If the plant has decayed and is sick or infected with pests.
Top dressing is carried out by the root method by irrigation with water in which the required amount of concentrated fertilizer is diluted. An excess of the drug will burn and destroy the roots, so read the instructions carefully before using it.
How to choose the right soil
Before you take a violet shoot and plant it, you need to choose the optimal soil. The soil is required loose, moisture-absorbing, with good air permeability, slightly acidic, non-greasy. Garden land is not recommended due to high density and risk of infestation by insect pests.
Aspiring growers can purchase specialized soil from the horticultural department. However, to create good conditions for breeding Saintpaulia, you can choose the composition of the ingredients yourself.
- sod soil;
- humus from leaves;
- sphagnum moss;
- clean river sand.
The soil for adult plants should be more (than for young plants) saturated with fertilizers for long flowering and growth of rosettes. For sprouts and cuttings, the air permeability of the soil mixture is important.
The optimal version of loose soil contains 5 liters of soil mixture, 0.5 liters of perlite, sphagnum, vermiculite, vermiculite. It is necessary to lay a layer of expanded clay on the bottom of the pot. It is possible to add sand to the container.
A combination of peat or coconut fibers and biological humus is obtained rich in nutrients. Perlite is used as a baking powder.
Regular fertilization of the violets is required when using standard peat soil.
Transplanting violets into a pot
Planting leaves with roots is initially in small cups. The container is filled by a third with drainage (it should be shallow), then the earth is poured to the top. Planting a leaf is carried out at a shallow depth, otherwise a young rosette, which will appear soon, will climb out for a long time and it is quite possible that it will simply rot.

Planting leaves with roots is initially in small cups
The ground around the planted leaf is compacted and watered. After that, the pot with the violet must be covered with a bag in order to create optimal conditions for the development of a young culture. In high humidity, under the bag, the violet should develop until little babies appear. It is the young shoots that speak of the successful rooting of the leaf. Now you can plant the violet in a separate pot, in which it will grow in the future.
Important!
Violets develop best on the east window. But in the northern part of the house, this culture can hurt a lot and rarely bloom.
Pot requirements
Before planting violets in a pot, it is necessary to correctly determine the dimensions and material for making the container. According to the standards, pots with a diameter of 3 times smaller than the violet rosette are optimal. If the size of the pot does not match the proportions of the bush, there may be no flowering. In a container large for the variety, the soil will oxidize due to the lack of root nutrition.
The height of the pots should be up to 10 cm, because the root system of Saintpaulia is shallow. For regular flowering, the roots must fill the planter tightly.
Miniature species are grown in containers with a diameter of 4 cm.Standard varieties are planted in pots 5-9 cm in diameter. Adult bushes are placed in 9-11 cm tubs.
For breeding Saintpaulias, pots are used from:
- peat raw materials;
- plastic (thin, dense);
- clays, ceramics.
For planting cuttings of Saintpaulias, peat-milling compact containers or plastic glasses are optimal.
Pots made of dense polymer raw materials are practical, budgetary, have a small mass, differ in a wide range of textures and shades. Plastic containers do not require complex care and disinfection. The decorative characteristics of the products are average.
Ceramic pots are aesthetically pleasing, durable, allow air and moisture to pass through, ensuring stable development of the plant root system, and prevent sprout decay. However, the products are notable for their massiveness, high price, and are not recommended for glass and plastic racks. It is necessary to take into account the rapid drying of the soil in clay containers and ensure frequent watering. Ceramic products are durable, but after transplantation, containers must be disinfected.
The bottoms of the pots under the saintpaulia must have holes of at least 2-3 mm. The tubs are supplemented with trays to collect water and prevent fungal plant diseases.
What are the best containers to use?
It is believed that the larger the pot, the better. However, do not forget, first of all, about the aesthetics: a small flowering plant will look ridiculous in a large pot. Also, the root system of the flower develops on the surface, and the lower processes of the root die off, this is due to the fact that there is more oxygen and nutrients on the surface. It so happened that in nature, henoplia grow on rocky surfaces, and the root does not grow deeply.
As for the dimensions of the pot, then:
- For the largest representatives of violets, a 9x9 cm pot is suitable.
- The average container is 7x7.
- For the smallest, or miniature varieties, the pot should be no more than 5x5.
For what other reasons the violet does not bloom and what to do with it, you will learn here.
The pot material also plays an important role in the cultivation of violets.
Various outlets can offer you a large selection of pots, each with their own advantages and disadvantages:
- Plastic pots not expensive and durable, their flexibility greatly simplifies plant transplantation. The main disadvantage is that, in such a pot, the violet will suffer from a lack of oxygen.
- Ceramic tableware there are two types - glazed or not. Treated pots always look beautiful, but because of the glaze, they do not allow oxygen to pass through, and the other type, although it allows oxygen to pass through well, quickly loses its appearance, and as a result, it can crack altogether. The severity of ceramic pots can also be attributed to disadvantages.
Beauty and benefits for a flower can be combined, just put a flower, planted in an ugly pot without glazing, inside a beautiful and bright ceramic pot.
Step-by-step planting instructions
Beginner growers need to determine the sequence of stages for planting violets. To root a young plant or plant a large bush (performed once every 6-9 months), you need to determine the size of the pot. When planting a new branch, a ratio of the diameter of the container and the outlet of 1: 3 is necessary. A pot that is being reused needs to be disinfected.
A layer of up to 1/4 of the drainage composition is poured into the container, covered with a layer of sand prepared by soil for Saintpaulias. The plant is then placed in a pot. Soil is gradually added to the container, distributed between the roots and compacted. The plant must be watered abundantly.
The adaptation period for Saintpaulia takes about 14 days. The temperature regime during this period is maintained at + 24 ° С. When breeding small shoots, the organization of a greenhouse from a covering material is required.
When planting a bush, it is recommended to keep the plant out of direct sunlight. Not suitable for Saintpaulia sprouts and dry indoor air. Placing the plant in dense soil and excessive deepening of the roots that have appeared is considered a mistake.
Before planting violets correctly, it is important to take into account the microclimate of the room. After rooting of the seedling, the temperature can be maintained at + 22 ... + 24 ° C. Young plants require abundant soil moisture and the addition of perlite to prevent root damage.
When breeding Saintpaulia, the humidity level in the room is maintained at 50-60%; for growing mature bushes, it is enough to maintain 50% humidity.
Getting a plant from seeds
For a positive result of growing violets from seeds, you need to adhere to certain rules:
- Take a plastic wide and not deep container, and fill it with a thin layer, up to 3 cm, special soil, consisting of a mixture of peat and earth. The soil can be bought ready-made or you can prepare it yourself, observing the proportions, you do not need to fertilize at first. To ensure oxygen exchange, the pot must be placed on a special raised saucer, its design allows oxygen to pass through the drainage hole.
- Violet seeds should be purchased from specialized stores. Seed preparation for sowing consists in mixing them with sand in a one-to-one ratio.
- Seeds germinate well in a warm and bright place, so the pot should be covered with a transparent film or lid and put in a bright place. Avoid direct sunlight and drafts.
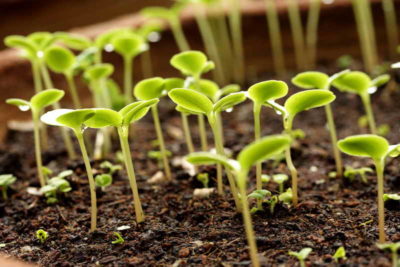
- The first sprouts from seeds begin to germinate already on day 20, all this time the mixture should be moistened with a spray bottle.
The first pick of seedlings should be carried out when they reach a height of about half a centimeter and release the first leaves. Plant at a distance of 2 cm from each other in fertile soil, which should be fertilized with charcoal.
The next transplant should be carried out as needed, when the sprouts begin to interfere with each other and are already planted in separate small containers. Before transplanting into a permanent pot, time must pass for the root system to be strengthened.
The peculiarity of growing violets from seeds is that the germinating new plants are of the same size and with multi-colored flowers.
From the video you will learn how to grow a violet from seeds:
Do you need fertilizers
A violet grown from a leaf must be fed to form rosettes, create lush bud ovaries. Fertilization of young plants is performed once every 7 days. During the flowering period, fertilizing is added to the pot 1 time in 14 days. During the dormant period (late autumn, winter), superphosphate fertilization is carried out monthly. Useful substances are introduced during irrigation dissolved in water.
When planting an adult plant, experts do not recommend feeding for 1 week, because the new potting mix has the necessary nutrients.
During the period of bud formation, a violet needs fertilizing with complex fertilizers (“Uniflor-Bud”, etc.). After the end of flowering, the plant is fertilized with Uniflor-growth or universal compositions Etisso, AVA, Schultz.
When placing plants on racks, it is required to provide a larger amount of fertilizing and organize lighting. Subject to the temperature and humidity conditions, the bushes grow rapidly and require transplantation.
How to plant violets with leaves?
Before planting a violet with a leaf, you need to choose the planting material. Selecting violet leaves for rooting.
So, experts recommend taking leaves for rooting only from a healthy plant. Leaves from the second or third tier will come in handy, but not from the bottom. The oldest leaves are always on the lower tier.After all, if there is plenty to choose from, why then give preference to the worst? Violet leaves should be taken healthy, with good turgor. no visible damage. All these elementary rules will only speed up the process of rooting and the appearance of children.
However, there are situations when the leaves for rooting are taken from a known diseased plant. After all, a violet at home can be poured, it is affected by various diseases. Many owners, in order to save the species, resort to growing violets from a leaf from a gradually dying plant. How, in this case, to select planting material that is more or less suitable for life?
If the violet is flooded and its root system rotted, you need to choose a leaf for rooting from the middle of the crown. You need to trim the stalk to healthy tissue. A rotten stalk will never root and will soon rot. If a violet is struck by diseases such as powdery mildew or downy mildew, and the violet dies, the leaves are also taken from it without visible damage. But before rooting, they are subject to treatment with fungicides, namely: soaking for 30 minutes in a solution of the selected drug. However, a one-time treatment does not help and the planted leaf will need to be processed several more times, according to the instructions for the preparations.
So, the best option is to take leaves from the middle of the crown, healthy, without visible damage to reproduce violets. If the plant was sick with rot, then the cuttings of the leaves for rooting are cut to healthy tissue. If the violets are infected with diseases, then before planting their leaves are subject to treatment with appropriate preparations.
We read more about the diseases of the violet and why the leaves of violets turn yellow and rot ...
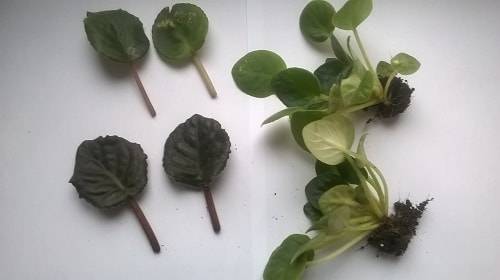
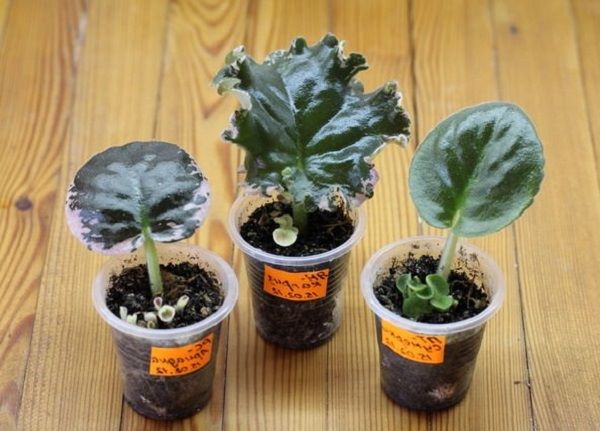
So, for rooting, I was given a few leaves from well, very beautiful violets. There were two more full-fledged bushes that were ready for planting without first rooting. True, the names of the varieties were lost. But with the modern possibilities of the Internet, determining the varieties and names of flowers is not a problem. That is why, without bothering with the names of the violets, I started planting their leaves.
Greenhouse for rooting violets with a leaf
Growing violets from a leaf is carried out at a constant temperature and humidity. Such constancy can be organized with the help of a greenhouse. The latter can be done from any available means. The main condition is a transparent cover of the greenhouse, through which light must enter the plant. The first way to root a violet leaf. I heard the following recommendations: you need to take a disposable bag with a fastener, pour wet earth into it. For one leaf, your own bag. Put a leaf in a bag, close the bag with a fastener, put it in partial shade and forget about it for several weeks. Do not ventilate or water. In such conditions, the leaf will quickly sprout and give children. But I have not applied this method in practice.
The second way how to root violet leaves... Violet leaves are placed in water, in which the root and activated carbon are preliminarily dissolved. A violet leaf in water should root faster than in soil. As soon as a violet leaf sprouts, it is transplanted into the ground. I did not rooting a violet leaf in water, as I was afraid of decay of the planting material.
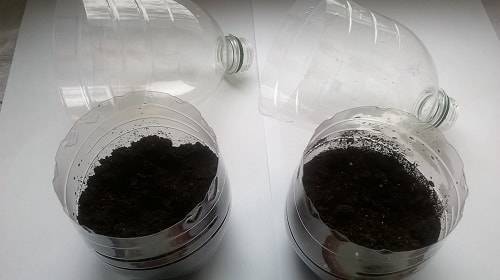
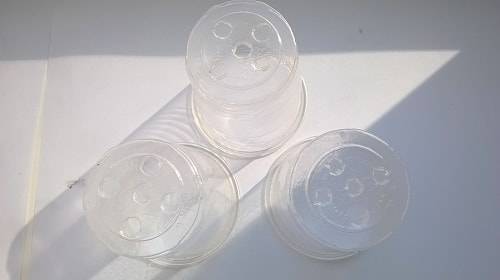
Violets were planted with leaves in greenhouses from plastic bottles. The middle part is removed from a regular plastic bottle. The bottom of the bottle is the bottom of the greenhouse, where the soil is placed. The top of the bottle is the greenhouse lid. The plugs must be left, without them the tightness of the structure is broken. I did not make drainage holes.
Violet leaves can be rooted in water and soil. In the second case, a greenhouse with a transparent top is prepared.
Rooting soil for violets
In what soil is the rooting of violets with a leaf carried out? Experts recommend using a special soil for violets, which contains all the necessary nutrients, the pH and consistency of the soil are optimally matched for the full development of violets. Soil for violets is mixed with vermiculite and moss, crushed coal is used. Soil for violets and vermiculite are mixed in equal proportions, and very little moss and activated carbon are added.
I also bought special soil for violets for my leaves, but instead of vermiculite I added river, coarsely graded sand.The proportions of soil and sand are 3: 1. Sand does not accumulate moisture and makes the soil loose and soft. Vermiculite is able to retain an excess of moisture. The soil was poured into the greenhouses and moistened with a spray bottle. I waited until the moisture is absorbed.
To root the leaves, you need to use soil for violets. It is additionally mixed with vermiculite or sand.
Leaf violet: growing
Planting violets with leaves begins with the preparation of the greenhouse and soil. A greenhouse made of a plastic bottle, a special soil for violets, mixed with river sand. The soil is poured into greenhouses and watered. For better rooting in the irrigation water, I dissolved the root.
While the water saturates the soil, it is necessary to prepare the leaves for planting. So, the planting material came to me from a healthy plant. I am 100% sure that the leaves are free of ticks, powdery mildew and, moreover, a variety of rot and other fungi. That is why I did not process violet leaves with special preparations before planting. Although many experts, for prevention purposes, recommend soaking the leaves in a phytoverm solution.
If leaves are planted from a violet affected by a disease, then the planting material must be treated with specialized preparations. There is no universal remedy here. For the treatment of a specific disease, and therefore the processing of leaves, there is a highly specialized drug. Pre-processing of planting material is simply necessary and necessary. Otherwise, the leaves will die without sprouting.
Planting violets with a leaf begins with the preparation of the leaves themselves. Their cuttings need to be shortened. And not just shorten, but cut with a sharp blade at an angle of 45 degrees. The length of the cutting can be up to 2 cm, but no more. I immediately plant freshly cut cuttings in the ground. This must be done quickly so that the cut does not clog in dry air. A violet leaf is planted very deeply in the ground. Up to the sheet plate.
Experts recommend planting violet leaves almost horizontally in relation to the ground, they almost lie on the ground. Such a planting of violets with leaves allows children to grow up, and not from under the cutting. On the other hand, this makes it easier to separate the babies from the mother's cuttings. It is enough for the baby to gently pull on the base, as it will separate from the rooted leaf. At the same time, the latter does not need to take out their land and he can give several more children in the future. At first, until the leaves take root and are not elastic enough, they need to be supported either on the wall of the greenhouse, or to support them with a toothpick.
I found out about this after planting, and therefore my leaves just stuck up vertically in the greenhouse. But next time I will plant violet leaves according to the method proposed by experts.
Correct planting of violet leaves: cut the stalk at an angle of 45 degrees, the length of the stalk should be a maximum of 2 cm. The leaves are planted in moist ground almost horizontally with respect to the ground in the greenhouse. At first, the leaves need support. I remove the latter as soon as the leaves become elastic and their cuttings will not turn out.
How to care for planted violet leaves?
1. Violet leaves are in the greenhouse until they regain their turgor. They have become elastic - great, the seedlings have sprouted. Until this moment, the greenhouse must be ventilated at least once a day, but the cover must not be removed completely.
2. Do not fertilize.
3. Water only when the soil is completely dry. Otherwise, even rooted leaves can rot, as happened with me. In my absence, the land in the greenhouse was waterlogged. The miracle was that only one violet leaf died.
four.From the moment the violets are planted with leaves and until the day when the children are ready to separate from the mother plant and the subsequent transplant, the greenhouses are kept in a well-lit place. But not in direct sunlight. Otherwise, the leaves will simply burn.
5. The greenhouse cover can be removed as soon as the seedlings are rooted. From this point on, they will have to be watered a little more often, compared to the period when they were in the greenhouse.
6. Watering is carried out only after the soil has completely dried out and carefully along the edge of the greenhouse. It is impossible for the water to fall on the leaves themselves. This will increase the risk of rotting.
I did not monitor the temperature regime. Violets were planted with leaves in the spring (more precisely, March 19). Greenhouses from that moment until the day the children were seated (October 23) stood at the window on the western side of the apartment. In front of the glass windows, light-loving plants were located, which easily tolerated direct sunlight on their leaves. The greenhouses were located in the second row. The leaves were light enough, but without direct sunlight. The summer was hot. The temperature in the apartment sometimes rose to +35 degrees. In such a microclimate, it was necessary to closely monitor the moisture content of the soil and prevent its prolonged drying out. The situation was saved by regular ventilation of the room. Simply put, the window to the room was always open.
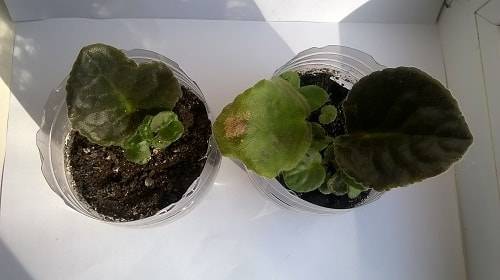
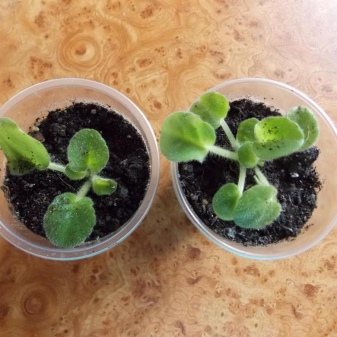
The first baby from a violet leaf appeared in early July. Some of them made their way to the surface of the ground themselves. Some had to be dug up a little. Fortunately, the walls of the greenhouse are transparent and against the black background of the soil it was hard not to notice the pale green leaves of the children.
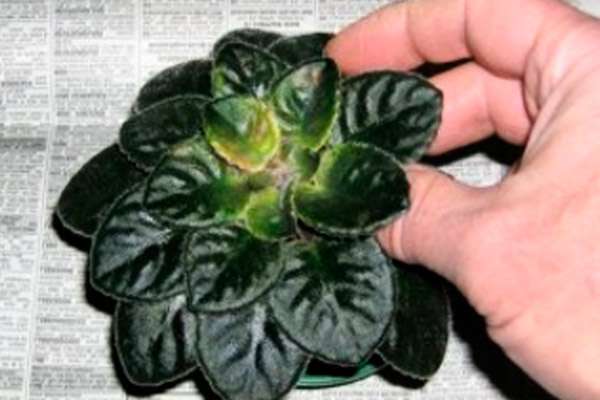
When to transplant a baby violet?
So, the violets gave children. What should you take off to do? When to transplant a baby violet? Regardless of whether the baby was given leaves or an adult violet plant, the baby can be separated when the size of its leaves is commensurate with the size of the nail plate of an adult's thumb. Having reached the above size, the children stop growing. This state of affairs can be easily explained. I did not feed the rooted leaves and children, so as not to harm the root system of the latter with fertilizers. In young plants, it is very delicate.
How to separate violet babies? I planted violet leaves vertically, and therefore, in order to separate the children, I had to remove the rooted leaf from the ground. However, on the forums where professionals communicate who have been breeding these flowers for more than one year, a different planting method is described. The leaves are almost laid on the ground, deepening only the stalk. Thus, babies grow vertically, and not from under the cutting. They can be easily separated by pulling slightly. In this case, the rooted leaf is not removed from the soil. Subsequently, he can give several more small plants.
So the violet baby has grown. It's time to transplant it. For the subsequent growing of violet babies, I took plastic cups. I made drainage holes in their bottom. The soil was taken special for violets, mixed with river sand. He stayed with me since spring, when I planted leaves for rooting.
We take out a violet leaf with children from the ground. The latter are carefully separated from the mother plant. Why neat? Because the root system of young plants is very small and fragile. The less we damage it during transplantation, the more chances the plant has to take root.
How to plant baby violets? Pour soil into pre-prepared cups, moisten it. Then in the middle we make a small depression and lower the violet baby there. It must be planted so as not to dig the growth point with the earth. Otherwise, the plant will die. Slightly press down the soil around the seedling. That's it, the baby violets were transplanted.
Violet baby care is very simple. If the transplantation took place in the spring, it is better to protect the little ones from direct sunlight.I put the kids away in the fall, and therefore there were no problems with direct sunlight. On the contrary, the gloomy November days did not give enthusiasm. But for such a case, I have an artificial lighting based on a phytolamp. You need to light up at least 12 hours every day.
Watering... You need to water carefully, along the edge of the glass, so that God forbid water does not get on the leaves of a small violet. I watered when the soil dries out after the next watering. Some of my charges had slightly drooping leaves before the next watering. But after the turgor was restored.
Temperature... Normal, room. The transplant was carried out in the fall, and therefore the temperature in the room was kept stable at +22 degrees. In summer, of course, it is hot and therefore experts recommend placing violets in front of an open window. Constant air currents will reduce heat a little.
Top dressing... I didn't do them until six months. The soil is fresh, the plants are small. Why injure flowers once again. I made the first feeding when the seedlings grew up and their leaves went far beyond the edge of the pot.
Can violets be planted outside in summer
Saintpaulia is an indoor flower. But in summer, violets can be moved outdoors. It should be borne in mind that not all plant varieties are suitable for planting in a suburban area. Many varieties are sensitive to drafts, low temperatures, and direct sunlight.
You can transfer the garden violet (Viola) to the street. The variety has special subspecies (annual, perennial) that can be planted in open soil. Planting is carried out using seeds; the material is placed in loose soil with drainage and watered regularly.
Preparation of planting material
The preparatory procedure is of great importance in further rooting, the cultivation of violets largely depends on how correctly the planting material was prepared. Many people believe that it is enough to break a leaf and plant it in the ground, but this method is unlikely to give a positive result. At home, you can prepare the selected sheet in two ways:
The first way consists in cutting the cutting with a blade or a sharp knife. Before starting the procedure, the instrument that will be trimmed must be disinfected with alcohol. The selected Saintpaulia leaf is placed on a hard surface and, leaving the leg about 3 cm, an oblique cut is made at an angle of 45 °. After the operation, the leaves are left to dry. Some growers shower a fresh cut with crushed activated carbon, you can also use crushed charcoal, such manipulations will help to disinfect the planting material.
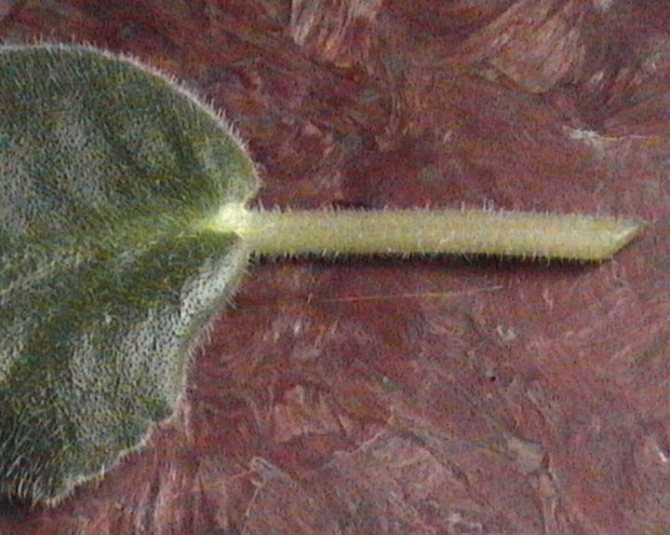
Cropped violet leaf
Second way... In order to spread the violet with a leaf, it is enough to simply break off the selected material at the required distance from the plate itself. The size of the stem left will depend on the size of the container in which the flower is to be rooted. This method is acceptable only in cases where there is no sharp knife or blade and if there is nothing to disinfect them.
By applying any of the methods for preparing the leaf, you can proceed to the stage of rooting the planting material, this is also easy to do at home with the help of scrap materials.
Landing phase errors
When planting cuttings from leaves, the most common mistakes are:
- Very "greasy", abundantly fertilized and airtight soil.
For safety reasons, we present the composition of the substrate for Saintpaulias: sphagnum (cut bog moss) - 2 parts; peat (not sour) - 2 parts; rotted leafy ground (better from under the linden) - 1 part; coniferous land (preferably pine) - 1 part; garden land (sifted, without humus) - 1 part; river sand (not fine, medium or large) - 1 part; a piece of charcoal in each pot.
- Deepening of the cutting when planting is more than 1-1.5 cm. Deep planting makes it difficult for young leaves to germinate into the light.To keep the leaf well at a shallow depth, it is attached with a stick or straw.
- Optimal germination temperature and light conditions are not observed. Provide plants with a temperature of about 24-26 degrees and ambient light.
- Drainage is not provided, the water is in the pot, not seeping out. Check for drain holes, do not fill young plantings.
It is possible to separate young people when 3-5 leaves grow in them, and they reach a third of the size of the mother's leaf. They are carefully separated and planted separately.
What kind of lighting should you choose?
For violets, both natural and artificial lighting are perfect, but it should be diffused, since direct sunlight is detrimental to the leaves of the plant. They burn and fall off. In order for the violet to feel comfortable and grow, the daylight hours for it should be from 10 to 14 hours. If you grow Saintpaulia with thick and dense leaves, then the daylight hours for it should be longer.
If a situation arises when it is necessary to extend the daylight hours, it is better to resort to the help of artificial light sources. For this, fluorescent lamps, LEDs, and so on are ideal. Just remember to rotate the plants to avoid twisting. In this case, the bushes will be compact, dense and pretty.
Comments (4)
Marina
05.10.2017 at 00:36 |
Violet, in my opinion, is one of the most capricious plants, somehow we had no luck with them for a very long time. Recently we planted a violet according to your method, so we blow off all the dust particles from it.Reply
Julia Expert Plodogorod
02.07.2019 at 22:28 |
Hello Marina! Let's look at the main nuances of growing such flowers and mistakes in care, so that your plant is beautiful and healthy.
First of all, for the violet to bloom, it takes a long daylight. If you do not light up the plant in winter, you should not be surprised at the absence of buds.
Despite the love of light, direct sunlight, especially during the warm season, will have a negative effect. To ensure optimal illumination, we recommend installing a protective screen. You can attach thin paper or parchment to the window glass in front of the flower.
During the period of active growth, the violet needs feeding. Complex mineral products are best suited. For abundant flowering, it is also better to remove stepchildren. Otherwise, the buds will begin to shrink.
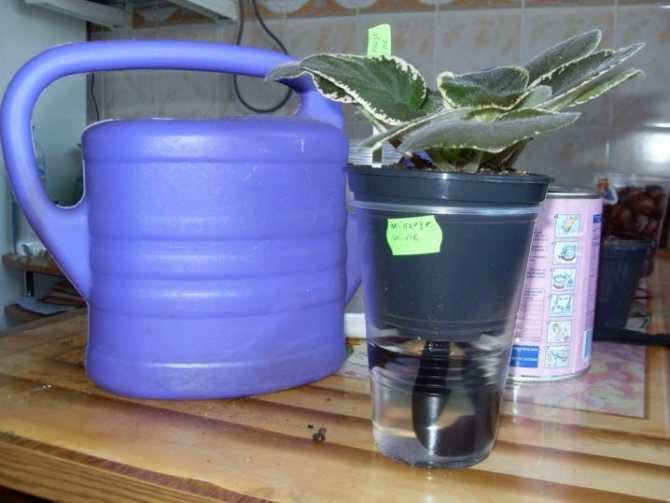
These plants don't like big pots. The optimal size is one third of the crown diameter. Such flowers do not tolerate dry air well. Therefore, you need to install a container with water next to it, or a stationary air humidifier.
In winter, do not place violets over radiators or radiators. Or, cover the heat source with a thick cloth.
Do not moisten plants with cold water. It should be at room temperature and allowed to stand for a couple of days.
In winter, it is impossible for the air temperature in the room where the violet is to drop below 16-17 degrees. At the same time, do not actively moisturize the plants. In winter, you shouldn't fertilize these flowers either.
Violets do not tolerate drafts and cold air in principle. So, during airing, you need to take away the flowers or install some kind of protection.
All of the above can provoke poor development, lack of flowering or oppression of the plant. But, there are factors that cause his death.
These include excessive or insufficient watering, as well as improperly selected soil. If the soil is heavy and dense, it will inevitably have a bad effect on the flower. In order for the plant to develop normally, the soil must be light, and you should not tamp it after planting.
It is also worth laying a drainage layer on the bottom of the pot. This can only be omitted if drip or wick irrigation is used. When planting, the growth point must be located above the ground level.
Reply
Victoria
24.06.2018 at 06:13 |
I learned from a feng shui specialist that violets have a beneficial effect on relationships in a couple and material wealth. I took a leaf cut from a neighbor, and after planting, covered it with a bag. As soon as the first flowers appeared, the salary increased and the husband became more attentive.
Reply
Julia Expert Plodogorod
02.07.2019 at 23:01 |
Hello Victoria! It is believed that these flowers have a special energy that affects people who are near the plants. In addition to what you described, the beneficial effects of the plant on the health of children are noted. Therefore, violets are often placed in children's rooms. We would like to note that violets of different colors have excellent properties.
For example, plants with white petals are considered a symbol of beginning and purity. They contribute to the establishment of order in the house and have a positive effect on thoughts. The described buds are believed to help cope with negative emotions and nervous stress.
As for the rosebuds, according to the signs, they purify the energy of the room and contribute to the health of the people living there. Florists note such plants even help to cope with overeating. You can place violets with this color near the workplace, as they help to improve working capacity.
Purple varieties are recommended for conflicting people. They contribute to a peaceful mood, harmony, mutual understanding. According to beliefs, sitting next to such a flower in a difficult time can make a good decision.
Blue violets are advised to plant for creative individuals. It is believed that varieties with this shade of buds inspire, improve mood.
It is believed that this plant, on the contrary, takes energy, because in rooms where there are many such flowers, you can feel lethargy and headache. But, this alarming feature is explained very simply.
At night, violets absorb oxygen and give off carbon dioxide. And it is this that can affect the state in a bad way. Therefore, we do not recommend keeping many colors in the bedroom. It is better if there are no more than 2-3 and medium-sized.
Reply
Landing phase errors
When planting cuttings from leaves, the most common mistakes are:
- Very "greasy", abundantly fertilized and airtight soil.
For safety reasons, we present the composition of the substrate for Saintpaulias: sphagnum (cut bog moss) - 2 parts; peat (not sour) - 2 parts; rotted leafy ground (better from under the linden) - 1 part; coniferous land (preferably pine) - 1 part; garden land (sifted, without humus) - 1 part; river sand (not fine, medium or large) - 1 part; a piece of charcoal in each pot.
- Deepening of the cutting when planting is more than 1-1.5 cm. Deep planting makes it difficult for young leaves to germinate into the light. To keep the leaf well at a shallow depth, it is attached with a stick or straw.
- Optimal germination temperature and light conditions are not observed. Provide plants with a temperature of about 24-26 degrees and ambient light.
- Drainage is not provided, the water is in the pot, not seeping out. Check for drain holes, do not fill young plantings.
It is possible to separate young people when 3-5 leaves grow in them, and they reach a third of the size of the mother's leaf. They are carefully separated and planted separately.
Separation of children from a leaf
Since the children are separated from the leaf after the appearance of 2-3 true leaves, they can be seated in individual containers. To make the roots unravel easier, dry the soil a little over a few days.
The scheme of separation and seating of children at home is simple:
- The leaf, together with the earthen lump, is removed from the container, the substrate is removed.
- The babies are separated carefully so that root damage is minimal, the strongest and healthiest specimens are selected.
- The container and substrate are used the same as for planting the leaf, with more drainage placed on the bottom for small children.
- Even with good roots, it is better for young outlets to provide greenhouse conditions for 1-2 weeks.
Remember: you can only grow beautiful, symmetrical violets with a lot of ambient light. It is advisable to carry out the next transplant of outlets after they grow up to 12-15 cm in diameter.
Propagation of Saintpaulia leaf
The simplest and most common method of increasing or expanding your collection is leaf propagation. Method is enough simple even for an inexperienced grower, requiring only the execution of simple instructions.
Also this breeding method can be done by direct landing in the ground or in water... The correct choice of planting material practically guarantees the preservation of the species characteristics.
Rare species of Saintpaulias are propagated by leaf fragments, they are divided mainly into several (usually up to 6) fragments.
Rootless planting of a leaf takes root quite well in a properly selected soil. Even the process of growing a leaf with a cutting is faster.
Root application
Kornevin, as a stimulant of root formation, activates the penetration of the active substance into the cellular part of the plant, increasing the efficiency and accelerating the formation of roots.
But according to experienced violet growers, the use of root does not particularly affect the reproduction of roots in Saintpaulias.
If the planting material is correctly selected, namely from 2-3 rows in a healthy plant, then the formation of roots is wonderful.
Florists note that the acceleration or improvement of the process of root formation, when using the root, was not noticed.
How to stimulate the appearance of children?
There are no specific dates for the appearance of children. Too many factors influence their appearance. It depends on the conditions, care, variety, soil, temperature, etc. Usually, it takes a month or more for the appearance of children, even for a well-rooted leaf. Some growers wait a long time, and some start the process over, cutting the leaf again.
Stimulation of the rooted leaf for the appearance of children is based on the creation of stressful situation.
Florists pierce the leaf with toothpicks, remove (tear off) 1/3 of the upper part of the leaf, etc., but sometimes stimulation does not work.
Some refer to the phases of the moon, or to the wrong container. Therefore, it is difficult to accurately determine the timing of the appearance of children, since their education depends on too many conditions.
The right planting material: how to grow a flower from a violet leaf
Many people want to grow violets on their windowsill, because of their attractive appearance and abundant, magnificent flowering, which pleases the eye of any gardener so much. However, many people think that this plant is overly capricious, so not everyone will be able to grow and care for it so that it remains healthy. In fact, the violet is quite unpretentious, it does not like excessive watering and frequent movements, but otherwise it does not need much, and the plants reproduce quickly and simply, so it will not be difficult to cope if desired.
Often, flower growers give special recommendations for growing violets from a leaf, and by observing them, you can really greatly simplify your work, and also get an excellent result in the form of a lush, healthy plant. It makes sense for us to listen to what experienced people say about the planting material:
- For planting violets, it is best not to choose the lowest leaves of the plant, just those that are closest to the ground. The fact is that it is there that they can turn out to be weak and not healthy, be affected by pests or diseases.Bacteria and fungi are what threatens violets, and they begin their dirty deeds from the bottom, from the lowest tiers of the plant.
- It is advisable to take the second or third leaf, which will already be stronger, and also protected from pests, mold and fungi by the first tiers. They are usually well formed and have a pronounced turgor.
- It is best to use healthy ones for reproduction, without cracks, scratches, drying out and burn spots.
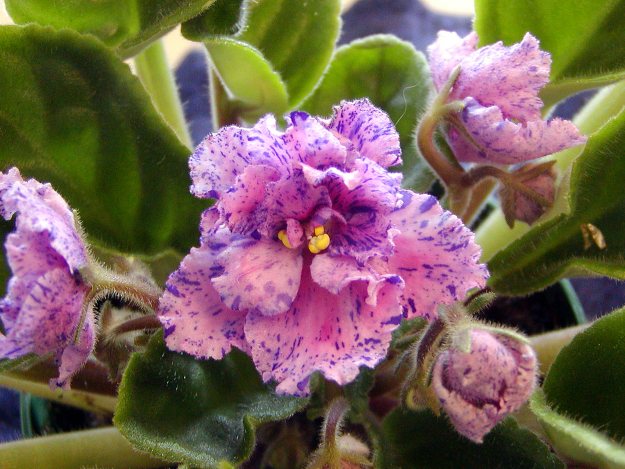
- If you are trying to plant variegated violets with leaves, then select only those leaves that have calm, maximally green shades, without spots.
- If you did not pick the leaves for planting personally, but sent them to you by mail, or they just waited a long time in the wings, then before planting they need to be revived, that is, simply put in warm water, with potassium permanganate previously diluted in it. It is necessary to ensure that the water is boiled, and the potassium permanganate solution is very weak, literally a few crystals.
It should be understood that when the leaf recovers, it will take time, at least a couple of hours, after which the planting material must be pulled out and carefully cut off the stalk with sharp scissors three to four centimeters from the leaf plate.
Care in the early stages of growth
Young plants are quite unpretentious, but there are a couple of important points to consider in order to grow a healthy flower.
Greenhouse effect. Young plants love warmth, so you can cover the pot with a violet with a plastic bag and periodically remove it for airing when condensation forms.
Watering. Violets do not require frequent watering, it is enough to do it once a week. It is necessary to monitor the condition of the soil: if it is dry, then this means that the flower needs to be moistened. Only the ground should be watered, trying not to fall on the leaves themselves.
If you follow these rules exactly, the violet will grow healthy and beautiful.
How do I land?
Planting Saintpaulia at home is possible in several ways.
Scion
Reproduction of violets by shoots is carried out in order to maximize the preservation of varietal characteristics. Planting Saintpaulia step by step using this method is as follows:
- side sockets are separated from the main bush;
- after that, the stepsons are placed in a small pot of soil;
- watering of the planted offshoot is carried out as necessary;
- after the growth of the bush, it is transplanted into a pot that is more suitable in size.
A wick is often used for uniform and optimal watering of Saintpaulias. To land in this way, you will need a moisture-absorbing tourniquet and a container with perforation at the bottom:
- the wick in the pot is pulled through the bottom hole, leaving about 1/3 outside;
- a small amount of soil must be poured onto the bottom of the container and a wick must be folded over it with a ring;
- the remaining soil is poured over the ring and the plant is planted;
- in the future, a pot with a violet is installed in a tray through which watering takes place.
From the sheet
There are two ways to grow Saintpaulia from a leaf. In the first case, the root system is built up in water. This procedure consists of several stages.
- For planting in water, a healthy leaf of a rich green color is selected without various kinds of stains and damage. The lower row of leaves is not used for propagation, but is taken from the second or third row. The sheet is cut with a sterile knife.
- When the petiole is cut, it must be treated with a weak solution of potassium permanganate for several seconds in order to disinfect the cut.
- After that, the stem is placed in water and fixed so that the leaf does not touch the liquid. To germinate the petioles in this way, experts recommend using dark glass containers, for example, medicine bottles.
- After the roots grow back by 1 cm, the petiole is transplanted into a prepared pot with soil.
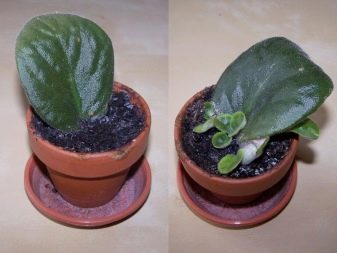
Planting a cut leaf in the soil allows you to build up the root system immediately in the ground and is considered the most effective way of growing violets among flower growers.
- To begin with, with a sterile blade, cut off a healthy stalk of Saintpaulia from the middle tier, taking it to the side and making an oblique cut.
- Then the stem is dipped in a weak solution of potassium permanganate for a few seconds and allowed to dry or sprinkled with coal chips.
- The cuttings prepared for planting must be planted not too deeply in a glass with drainage and a substrate, which is compacted for the stability of the leaf. If the soil is dry, then it must be watered through the pallet.
- Then you need to organize a mini greenhouse. To do this, place a glass with a stem in a larger glass and cover with a transparent plastic bag.
- Periodically, the greenhouse needs to be ventilated by opening the film.
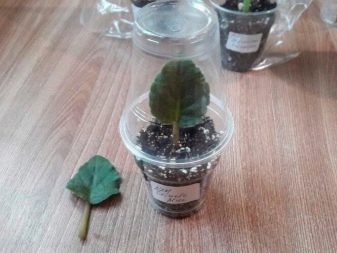
Root
The root system of the violet lends itself to division and, subject to certain rules, you can using this method to propagate your favorite variety:
- at home, the division of the roots is carried out with a strong growth of violets;
- the plant should not be old;
- it will be correct to divide the roots of Saintpaulia only at the end of flowering;
- the root system must be absolutely healthy;
- the rudiments of the stepsons should be visible on the trunk;
- the root is placed in the ground in the usual way and watered as needed;
- as the stepsons grow, they are separated and deposited in a separate container.
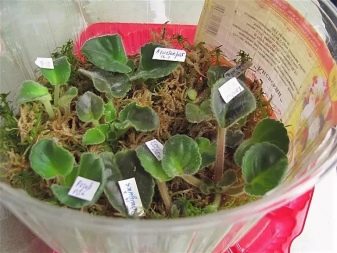
Tip 4: How to plant a violet leaf fragment

- - violet leaf;
- -sharp knife or scalpel;
- -Plastic cups 50-100 ml with drainage holes;
- -land for planting;
- -water for irrigation;
- -transparent bags or greenhouses
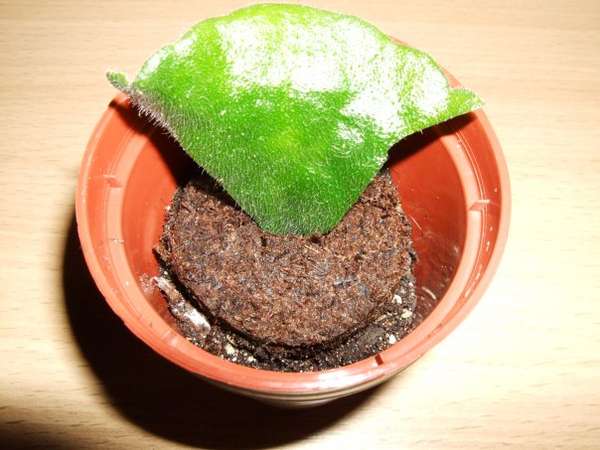
- Reproduction of violets by a leaf
Care advice
Some conditions and recommendations, how to properly plant a leaf without roots for effective rooting:
- correctly selected and processed planting material;
- the soil should consist of correctly selected components: equal parts of chopped sphagnum moss, high peat, "Saintpaulia" soil and the floor - part of the soil baking powder - vermiculite;
- the soil should always be moist;
- irrigation water should be clean, with a temperature 3-4 ° C above room temperature;
- after the earthen coma has shrunk, add soil;
- be sure to create a greenhouse effect (greenhouse);
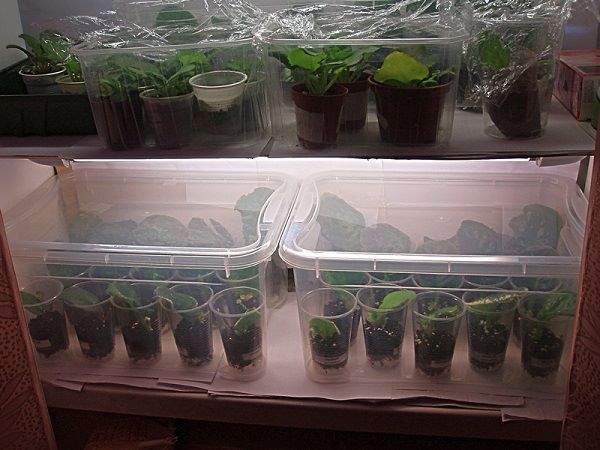
Root in a greenhouse.
- maintain humidity at least 60%;
- the optimal planting depth should not exceed 1.5 cm;
- babies are transplanted when the size reaches from 3 to 5 cm.
Necessary tools
Before writing about how to plant a violet, it is worth identifying all the necessary tools that we need for this. It is better to immediately collect the right tools so that during the landing process you will not be distracted by anything. If you still cannot decide on the method of planting, then you can at least prepare all the tools in advance.
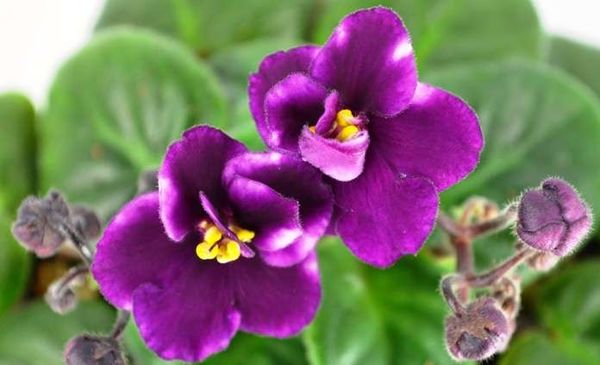
Planting violets is carried out using:
- Pots of different sizes (several will be required).
- Soil specially designed for violets. Available from specialized stores.
- Several plastic cups. You can use regular yogurt cups or purchase regular plastic cups from the store.
- Small paddle with which it is convenient to work with soil.
- Fertilizers that are suitable for violets.
- Lamps. Artificial lighting will be required if the plant is grown in a dark room or if planting is carried out in winter.
All this should be enough to properly plant the violet in the pot.
The main stages and nuances of rooting
Although it is believed that leaf propagation of violets is the easiest way to increase the collection, without performing certain actions and observing some of the nuances of landing, it is unlikely that a positive result will be obtained. There are two ways, but they have one goal - rooting the cut leaf:
In water
For this way required:
- a clean container with a volume of no more than 0.2 l (preference is given to disposable cups);
- warm, clean, boiled water;
- Activated carbon;
- correctly selected saintpaulia leaf;
- sharp, disinfected cutting tool.
Water and an activated carbon tablet are poured into the container. Prepared sheet, with a cut updated if necessary, immersed in water to a depth of no more than 1 cm... The container is removed to a warm, bright place without direct sunlight, until roots are formed at the cut. As it evaporates, add water.
After the formation of roots and their growth not less than 1 cm, the rooted leaf is transplanted into a prepared and high-quality soil.
The positive aspect of this method is the visual observation of root formation. An unsafe transplantation of the leaf that gave the roots into the ground is considered a negative point. Delicate roots are easily damaged by careless transplantation.
Directly in the ground
Before planting a leaf in the ground, prepare:
- capacity 0.2 l;
- boiled clean water;
- inert material for drainage (polystyrene, expanded clay, etc.);
- special soil or vermiculite with perlite;
- prepared saintpaulia leaf;
- disinfected, sharp instrument.
Rooting in the ground.
The containers at the bottom are made drainage holes for excess moisture... A small drainage layer of inert material is evenly laid on the bottom. A leaf with a petiole is planted in the laid soil, to a depth of about 1 cm.
The container is installed in warm, bright place without direct sunlight, and the sheet is covered on top with a glass or plastic transparent cup. If there is a lack of moisture, cover the structure with a plastic bag. The soil is periodically watered, but not waterlogged.
The pros and cons of this method are exactly the opposite of the first method.
The rooting time for both methods depends on the growing conditions. Usually, the formation of roots in water occurs within 2-4 weeks, and rooting in the ground occurs with the formation of children, after about 1.5-2 months.
Read also Order cheap lilies bulbs
Will you need fertilizers?
Whether there is a need for fertilizers depends on the composition of the substrate used. If the soil is bought in a store, then, as a rule, it is already enriched with a mineral complex and additional fertilizing will be needed only 3 months after planting. Otherwise, an excess of fertilizers can harm the plant.
For the normal development of Saintpaulias, three main elements are needed: nitrogen, phosphorus and potassium.
Nitrogen is responsible for the green mass of the plant, accelerates vegetative processes and takes part in the formation of chlorophyll. Phosphorus is involved in the formation of the root system and budding. Potassium is involved in enhancing the immunity of violets to the effects of harmful microorganisms. In addition, violets need sulfur, magnesium, calcium, iron, copper, molybdenum, zinc and boron.
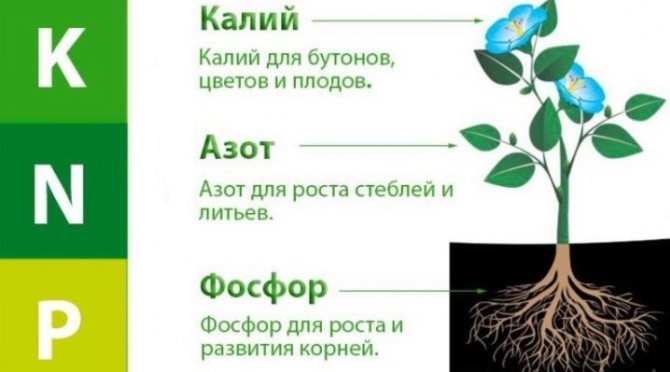
If the preparation of the substrate was carried out independently, then special additives such as superphosphate, organic fertilizing, complex mineral fertilizers can be used to fertilize it. Each stage of development of Saintpaulias requires the introduction of different substances. A young plant needs nitrogen fertilization to build up green mass. Phosphorus and potassium are added to the soil before flowering.
Violet care also depends on the season. From spring to autumn, feeding is carried out every two weeks, and in winter it is reduced to once a month.

For information on how to propagate a violet leaf, see below.
Indoor violet (Saintpaulia) is increasingly gaining the love of flower growers. She is unpretentious in care, has a long flowering and easily multiplies at home.
Simple rules for rooting violet leaves will allow you to create a real collection of these cute flowers of various shades on the windowsill, and we will tell you how to plant this charming flower with a leaf.
Bright flower bed on the windowsill
The extensive family of violets is a perennial herb with evergreen foliage. Plants mature quickly, reach a height of 10-20 cm. The stem is formed from the leaves of the root rosette. Leaves are rounded, pointed to the edge. They are dense, leathery, covered with soft hairs. The leaf plates of violets come in various shades of green, in some varieties they are spotty. Buds with five petals, the color range is extensive: pink, blue, purple, two-tone. Saintpaulia flowers are simple or double. The plant loves continuous, but diffused lighting, warmth (20-25 ° C), air humidity 60-70%.
Violet breeding methods
You can expand your collection of indoor flowers in several ways of reproduction:
- a leaf;
- stepson (daughter outlet);
- seeds.
Stepsons are shoots that appear in the leaf axils. They are removed to maintain their decorative appearance. The stepson, having 4-5 leaves, is cut off and rooted in a separate pot.
Breeders prefer to grow saintpaulias from seeds. Seeds are germinated in loose, moist soil placed in a container. Greenhouse conditions are created for them. After 15-21 days, leaves appear on the seedlings, it is dived and transplanted into separate containers.
Choosing a violet leaf for propagation
To breed a violet from a leaf, you must first of all choose high-quality planting material. Only from a strong, healthy cuttings without damage can you get offspring of the appropriate quality.
Most often, for growing a new violet at home, leaves are taken from the second or third tier - they are fully formed and characterized by good turgor. Old leaf plates from the bottom row cannot boast of such qualities, because due to their proximity to the substrate, they weaken, may be damaged or become sluggish, and begin to turn yellow. Due to the limited supply of nutrients, juvenile (baby) leaves give only a few children, but in some cases it makes sense to plant them, especially if a rare variety or a violet in a critical state is propagating.
A high-quality stalk should be a rich green color, without cracks, dried edges or dents. It is worth noting that only leaves with turgor take root well, so the wilted planting material is not suitable for reproduction. Before planting such leafy cuttings, be sure to place them in warm boiled water with several crystals of potassium permanganate - this will restore their original appearance.
Selection and preparation of leaf cuttings
How to grow a violet from a leaf, at least theoretically, everyone knows who has ever grown uzambar violets at home. This version of the reproduction of violets is considered the simplest and most understandable - to grow a full-fledged plant from a small leaf is within the power of novice growers, in contrast to other methods (stepchildren, peduncles, or, even worse, seeds).

Carefully break off the selected leaf stalk, moving it away from the violet. Healthy adult plants with a well-formed rosette are suitable for propagation. A leaf stalk is taken from the second or third row from the bottom of the outlet, choosing the greenest, strongest leaf without signs of rot and drying, without scratches and burn spots. Yellowed leaves cannot develop into a good plant due to the depleted supply of nutrients and leaves from the center of the outlet, which have not yet managed to accumulate enough vitality. For variegated violets, choose leaves that are green in color. Video about growing violets from a leaf Carefully break off the selected leaf stalk, moving it away from the violet.It is advisable that the leg remains at least four centimeters, but even if you accidentally break off the shank shorter, nothing particularly terrible will happen - the leaf still has every chance to take root. Now cut the leg obliquely to 3 cm using a sharp knife or razor. Scissors cannot be used when pruning indoor flowers, since they pinch the capillaries of the plants. The length of the cutting is not decisive for the survival of the leaf and the formation of children. If you cut the stem shorter, it will be more difficult when germinating in water to ensure that the stem does not dry out and the leaf plate does not get wet. A long stalk, on the other hand, will lead to bending of the leaf, and when germinating in the substrate, it will need to be additionally supported with something.
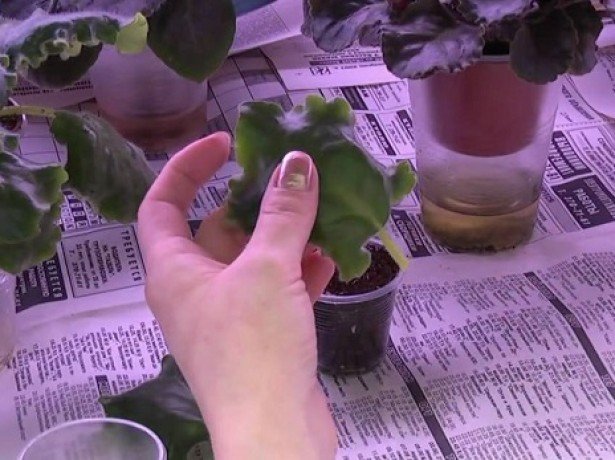
Cutting the stem shorter will make it harder for the stem to dry out when germinating.
Violet babies
In order for the children to emerge from the ground faster, it is recommended to cut off part of the leaf plate. This technique stimulates the development of young plants. The supply of nutrients from the leaf is reduced, the roots of the children begin to germinate more actively into the soil. With the growth of children 3-4 cm and the presence of several pairs of leaves, it is time to plant them. You can do this earlier, but if you wait, the plants will get strong enough.
Young violets and a petiole are taken out with a lump of soil. They are neatly separated by hands. For children, separate cups are prepared with a drainage hole and a special substrate. Senpolim needs to provide adequate lighting and watering. Children develop at different rates, when the outlet grows up to 12-15 cm, the next transplant is performed.
Attention. The main enemies of young violets are dry soil and water on leaves.
Growing a new violet from a leaf is a fun process that requires patience and knowledge of the main features of the process. By following the instructions and advice of professional flower growers, you can achieve excellent results in the propagation of indoor plants.
Violets are planted using seeds, cuttings, leaves, seedlings. The choice of method depends on the season, temperature and humidity in the room. Before planting violets, you need to prepare the soil, pots, fertilizer and drainage. Planting can be carried out at any time of the year - the best periods are spring and summer.
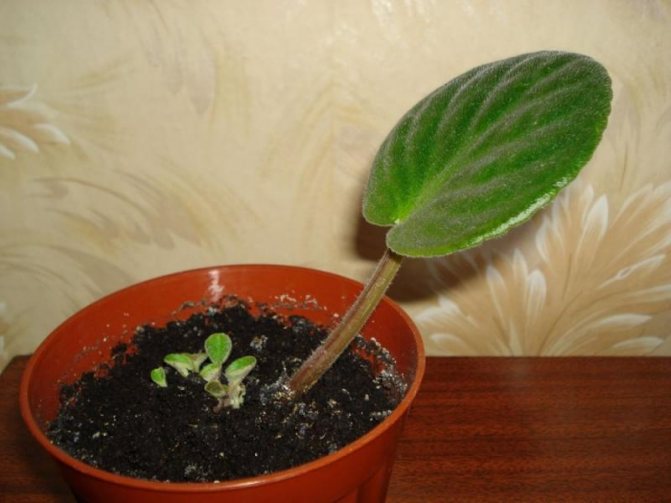
Composition of soil for violets and its preparation
The soil mixture for planting violets with a leaf is prepared in advance, necessarily a day before the plant enters the ground, disinfecting it and mixing it with all the components and fertilizers.
As a basis for the substrate, you can take ready-made soil for violets or seedlings of garden crops. But experienced flower growers promise the best effect if you make the mixture yourself. Moreover, there are many interesting compositions of soil for violets. One of them was proposed by the famous breeder B. Makuni:
- 1 part leaf humus;
- 3 parts of peeled high-moor peat;
- 1 part clean sand;
- 2 part green moss;
- 1 part sphagnum;
- 1 piece of garden land.
Today, more and more often, for soil mixtures for growing violets, substances such as perlite and vermiculite are used, which provide a good soil structure and its friability. To disinfect the soil and its quality, crushed charcoal and sphagnum are introduced into the soil. You cannot overdo it with the last component, otherwise the soil turns out to be moisture-absorbing, and the roots of violets in it can rot.
First flowering period
If the violet is provided with favorable conditions for growth and development, then soon the first flowers will appear on it. The plant usually blooms within two months.After that, the violet needs a break of two to three months in order to grow young foliage and accumulate enough strength and nutrients for a new flowering period.
After flowering, the plant needs to be well cared for, fertilized and watered so that in the next stage it will give larger and more beautiful buds.
While watching the video, you will learn about growing violets.
Thus, planting a violet from a leaf cutting at home is quite simple. It is only important to precisely follow the basic planting rules and provide the plant with optimal care in the early stages of growth.
If the violet develops in favorable conditions, then very soon it will delight you with its flowering, and this period will last for two months.
After the flowering stage, you need to give the plant a rest, providing it with good conditions. Then the violet will live long enough, decorating your home with its flowering and aroma.
Attention super FLY!
Violets
Interesting to read:
- We carry out cuttings of dracaena at home: basic recommendations
- Violet "Curly Sue": how to grow a plant on your windowsill
- Description and features of growing violets Blue fog
- Violet Winter cherry: care basics, bloom tips
- How to plant violets: in water, soil, cuttings, stepchildren and peduncles
- Reproduction of dieffenbachia at home
- How codiaum reproduces: main characteristics
- Violets on a wick, advantages and disadvantages of the wick irrigation technique
- How rubber ficus reproduces at home: main characteristics
Temperature, humidity when growing violets
Indoor violet is a flower that loves warmth. The most ideal temperature for its growth will be between 20 and 25 degrees Celsius. In such conditions, it blooms and grows profusely. If the temperature is above thirty, it can have a detrimental effect on the flower. It will become dull, flowers - small. If a purebred violet grows on your windowsill, then the features of its variety will come to naught.
To lower the temperature in the room and prevent the flower from dying, it is worth resorting to all the known methods and tools that you have at hand. For example, turn on the air conditioner or use a fan. Or resort to the simplest way - to ventilate the room.
Violet is a flower that does not tolerate sudden changes in temperature, scorching sun and cold drafts. As for the content of violets in the winter period of the year, at this time the temperature in the room should be from 16 to 20 degrees, but not lower.
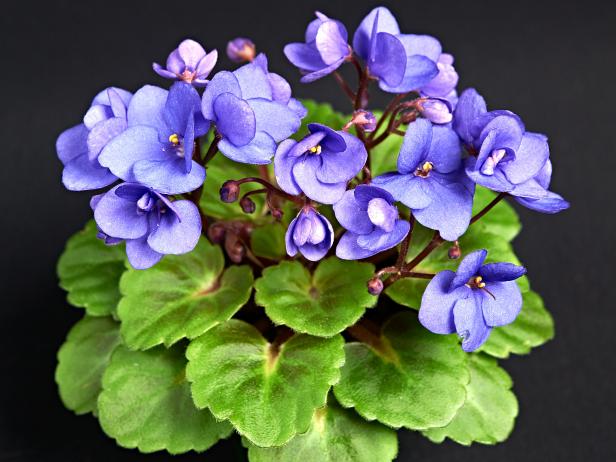
To create good conditions for growing violets at home from a leaf, you need to pay attention to the natural conditions in which the flower grows. And these are warm regions with high air humidity. If the indoor climate is dry, it is best to purchase a humidifier. It is inexpensive and does not take up much space. It is not recommended to spray the violet. Such moisture can cause fungal disease in the plant.