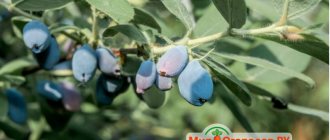
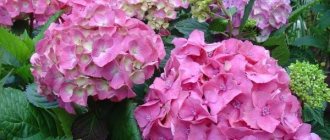
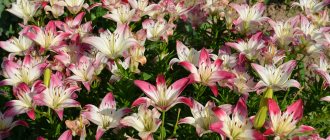
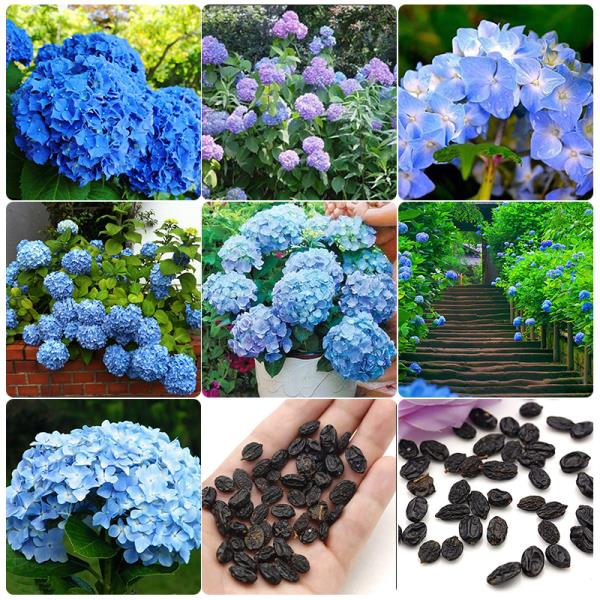
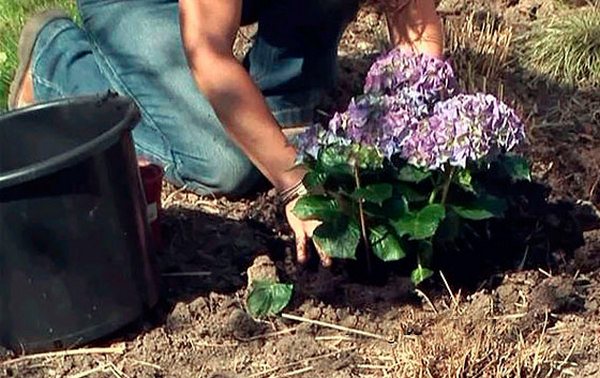
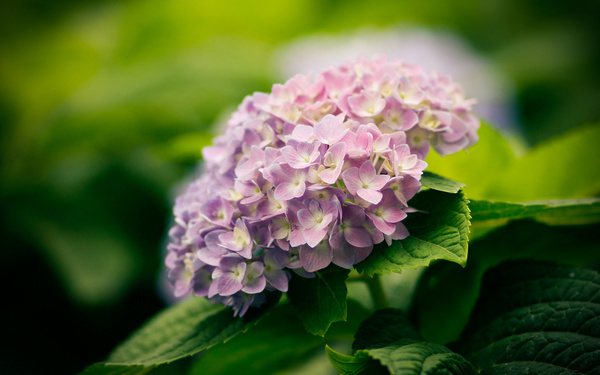
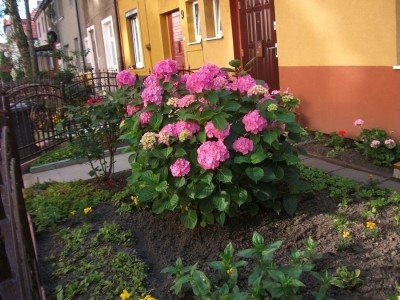
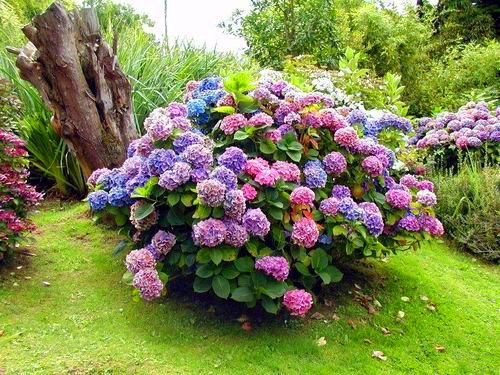
Blooming hydrangea leaves a lasting impression. Any person who adores flowers will gladly grow several bushes of this delightful plant on their site.
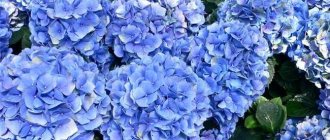
Usually, "colored" varieties of plants are planted on the plots, which give a variety of inflorescences of pink or blue shades.
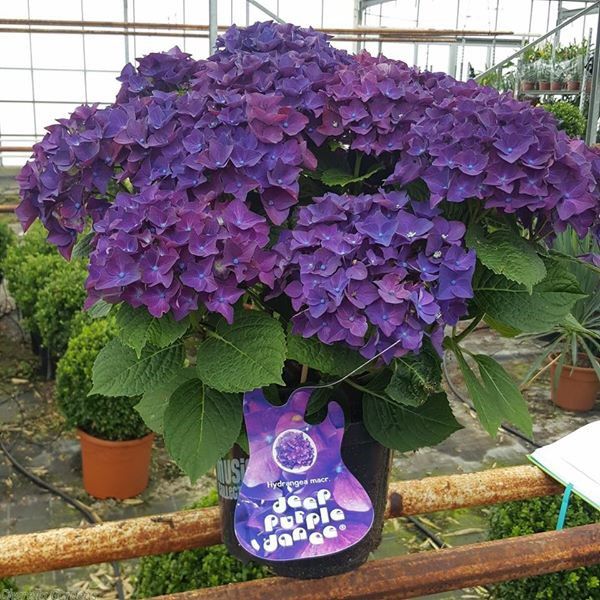
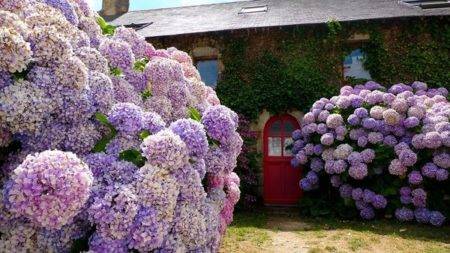
Breeders have bred a variety of hybrids of large-leaved crops, the inflorescences of which are different in structure and color.
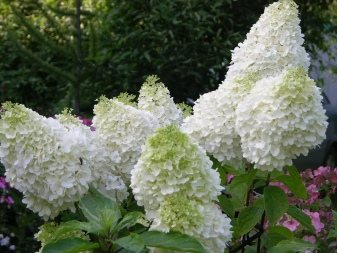
If you need an easy-care hydrangea that is not afraid of cold weather, it is better to take the paniculate variety. The buds are green with white at first, but later they become ruddy.
How to propagate hydrangea?
Autumn cuttings of hydrangea - pros, cons, features
Most garden shrubs are extremely demanding to observe the seasonality of reproduction. Often it is required to do the work not just, for example, in the summer, but clearly on the first day of the first week of August. This is inconvenient - it is not always possible to meet deadlines due to weather or busyness. Hydrangea is easy to work with. If you wanted to start breeding in the spring, choose the day you like. Likewise in summer and autumn. Taking into account the characteristics of each period, there are some differences in the procedure associated with the degree of woodiness of the shoots. Let's talk about the difficult and costly in terms of time and effort - autumn breeding.
What is the difficulty? Firstly, by the fall, the shoots are already completely lignified, in this state they take root more difficult. Secondly, young cuttings will grow in the house for a long time until they are prepared for subsequent planting in open ground.
All types of hydrangeas propagate quite effectively by cuttings, so feel free to start solving the problem. The best time to work is early October.
Let's figure out the advantages of choosing autumn for plant propagation:
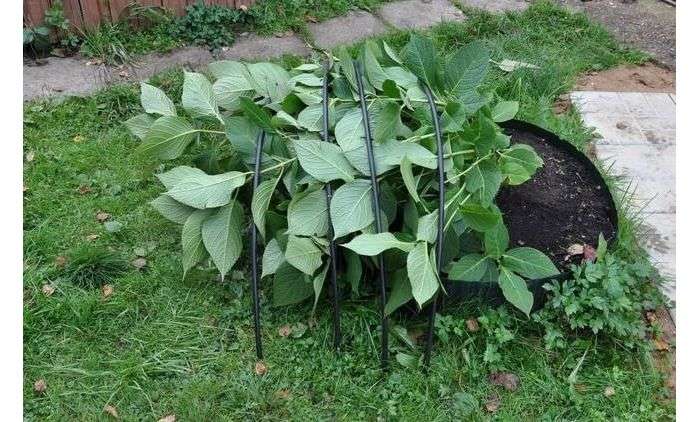
- after pruning before wintering, branches are quite suitable for cuttings, which are usually thrown away;
- in winter, gardeners and gardeners are freed from constant work on the site, there is more than enough time to look after the cuttings;
- by spring, the planting material is not only germinated, the cuttings are gaining strength and take root well.
Cuttings require careful maintenance throughout the winter. They are planted in the ground only after the establishment of stable warm weather, without the threat of frost.
Features of the
The most common way of breeding panicle hydrangea is propagation by cuttings, and it is ideal for its other varieties, including petiole (curly) and tree-like. A definite advantage of the method is the preservation of all varietal characteristics of the original plant, this is especially important in relation to rare and valuable varieties., since when they are multiplied, it is envisaged to obtain unique copies.
But not only for this reason, the method is considered preferable - cuttings root best of all, develop and grow, and this is a definite plus when growing.
However, in comparison with the adaptation of cuttings in the soil, it is more difficult to carry out cuttings, and you need to know some of the nuances of the procedure, as well as the rules of agricultural technology that guarantee a positive result.
As for the features of cuttings of paniculate crop species, you should know:
- it is wiser to carry it out in the summer, since often spring and autumn procedures do not give the desired result - seedlings can take root and develop poorly;
- special attention should be paid to the choice of the place - it is better to choose a well-lit area near hedges or buildings that protect the plant from drafts and strong gusts of wind;
- when planting, in order to avoid slow growth and diseases, it is worth being picky about the soil - alkaline soils are contraindicated for hydrangeas;
- before the onset of the first wintering, it is necessary to seriously think over how to reliably protect young rooted cuttings - this applies to a greater extent to cold regions.
Otherwise, cuttings of paniculate varieties are not much different from this procedure for other hydrangeas, but all agrotechnical work must be carried out in a timely manner.
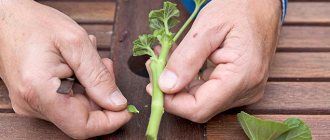
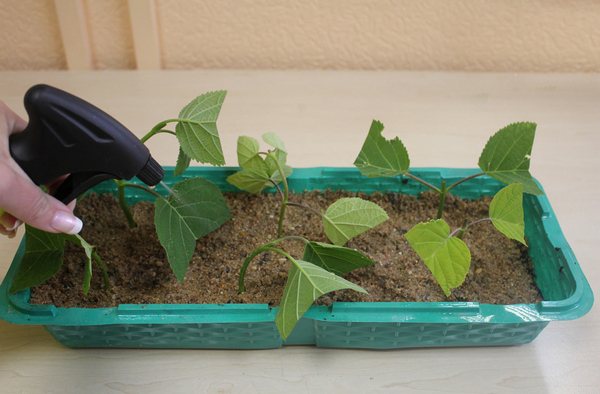
Propagation of hydrangea by cuttings in autumn - step by step instructions
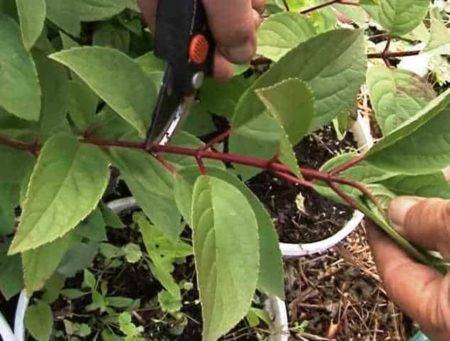
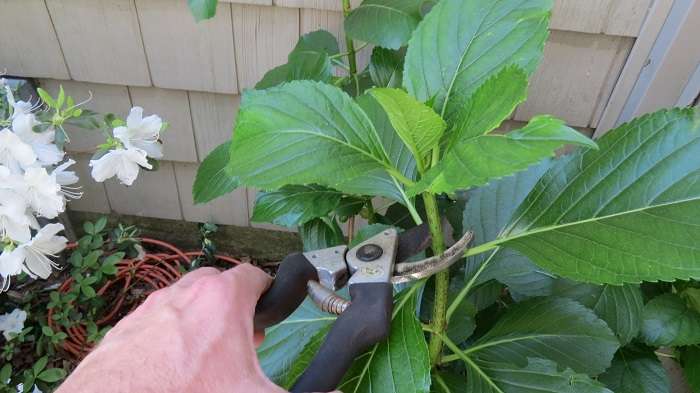
For work, only healthy branches are suitable, without damage, signs of illness, etc. In order not to accidentally spoil the material, always use clean tools, disinfect them and be sure to sharpen sharply. Do all the manipulations yourself with gloves - this will protect both hands and cuttings.
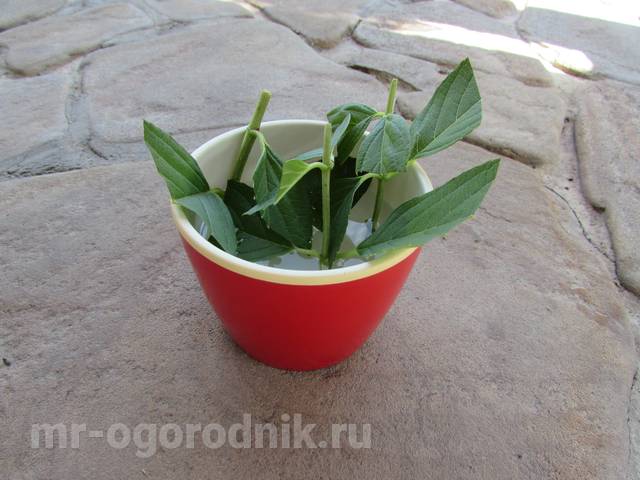
The best time to harvest material is cloudy morning hours, you can even wait for a little rain. The fact is that such conditions provide the maximum concentration of moisture inside the plant - and these are forces and useful substances for future growth and easy wintering. Please note that the cuttings cannot be left without water, for example, if you decide to postpone further work for the next day, be sure to provide them with liquid - put them in a bucket.
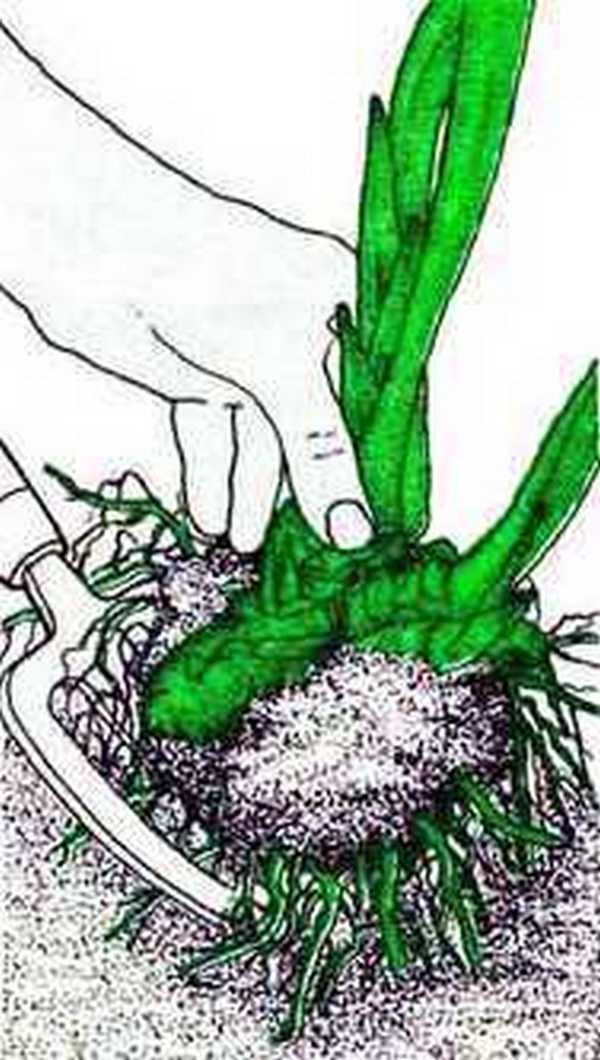
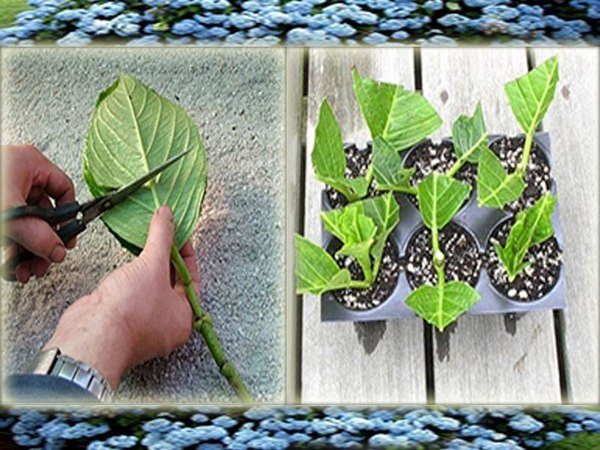
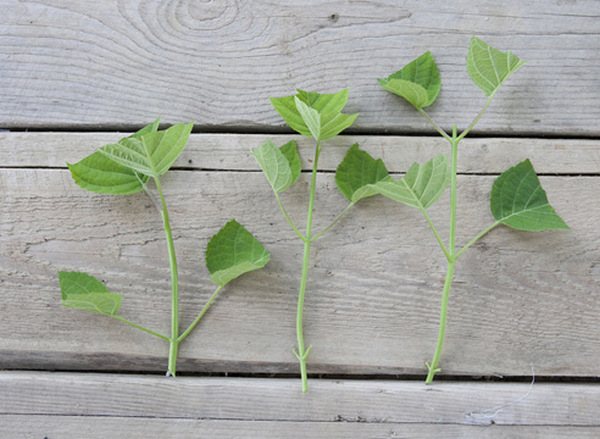
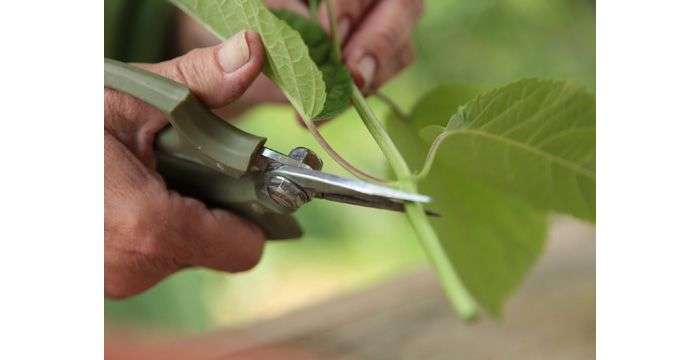
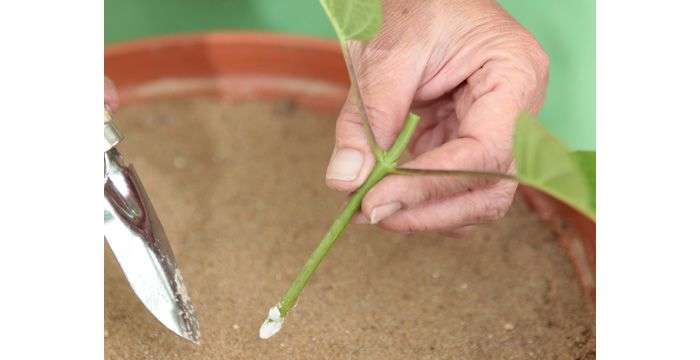
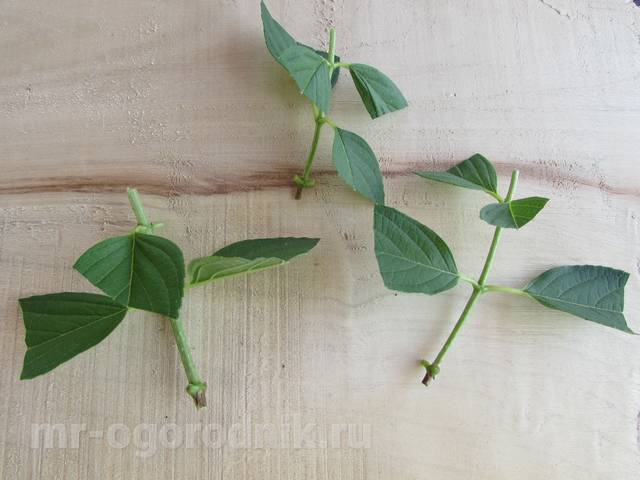
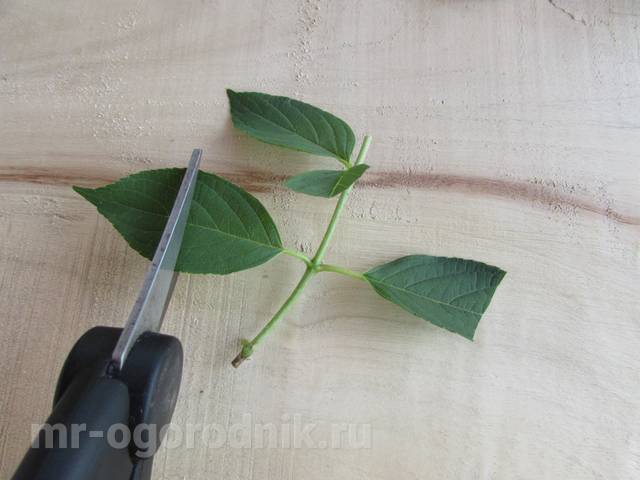
You can take branches for grafting only from adult hydrangeas, you need shoots that are one year old, it is important that they do not bloom. After cutting, process the material immediately. Remove the tops, divide the rest into cuttings, each up to 15 centimeters long. Make sure they have at least three nodes with future buds.
The bottom is cut strictly perpendicular to the growth direction just below the knot. Top - at a distance of a couple of centimeters from the last knot. Usually, by the time of work, there are still leaves on the bush, carefully remove the lower ones, and cut the upper ones in half.
The cuttings are ready, what to do next?
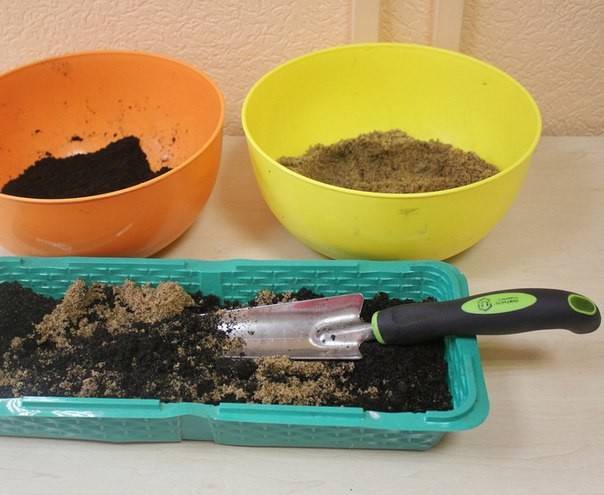
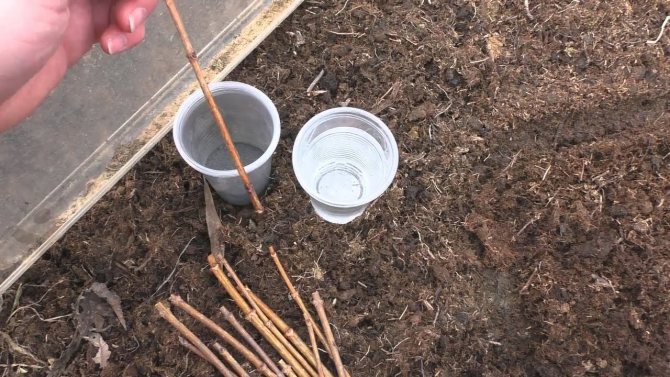
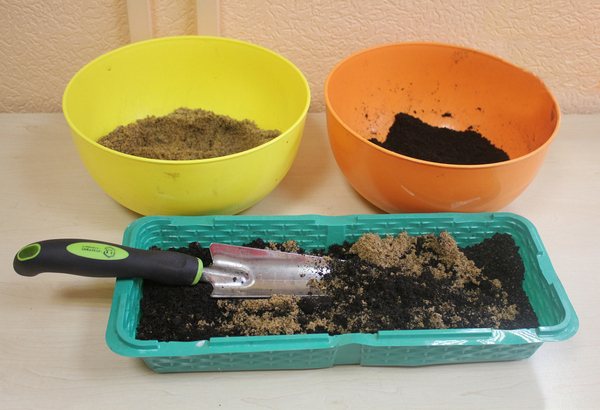
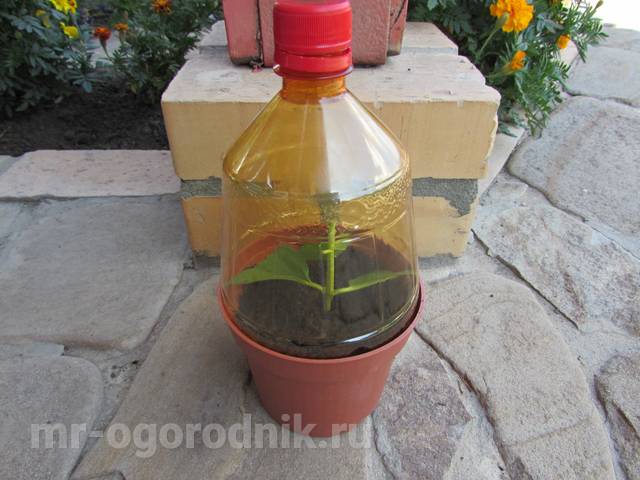
Prepare the container for germination in advance. Ideally, clay pots or boxes are chosen, but gardeners use any suitable containers. Liter plastic food buckets are popular. The bottom is laid out with drainage materials, the rest of the space is filled with nutritious soil. For cuttings, ordinary seedling soil is suitable; you can add a little fallen needles to it. If desired, make your own soil. Take:
- coarse sand, peat (2: 1);
- ordinary garden soil, mixed with sand and needles in equal parts;
- sand, peat and turf (4: 3: 1).
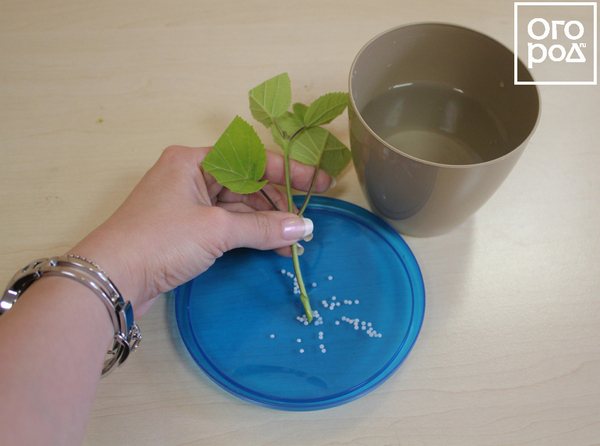
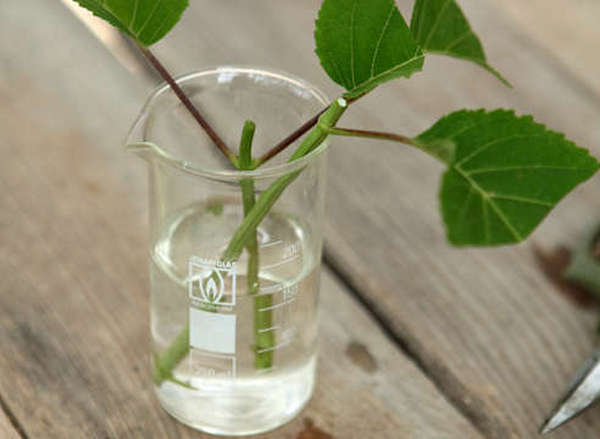
By the way! Experienced gardeners advise first to keep the cuttings in water so that they have roots, and only after that start transplanting into the ground. This is not a requirement, but a recommendation, usually cuttings germinate well in the ground.
If you have chosen the option with immersion directly in the soil, be sure to treat the lower cut with a composition that stimulates the formation of roots. The corresponding drugs are sold in specialized stores.
By the way! Instead of industrial remedies, you can use ordinary honey diluted in water.
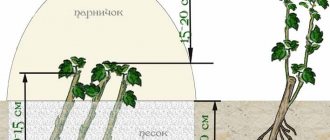
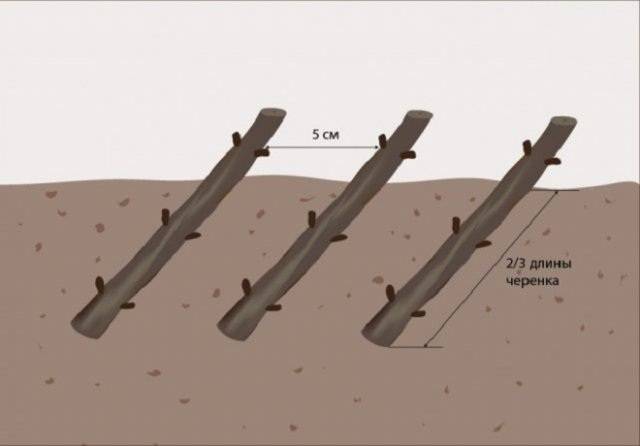
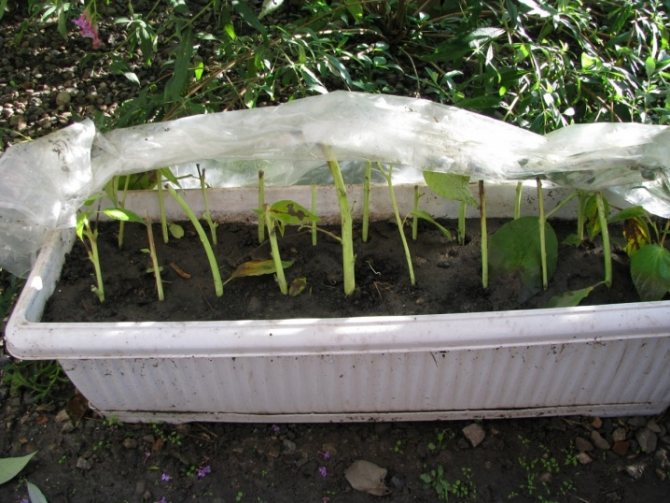
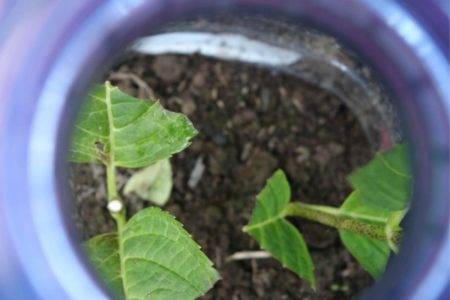
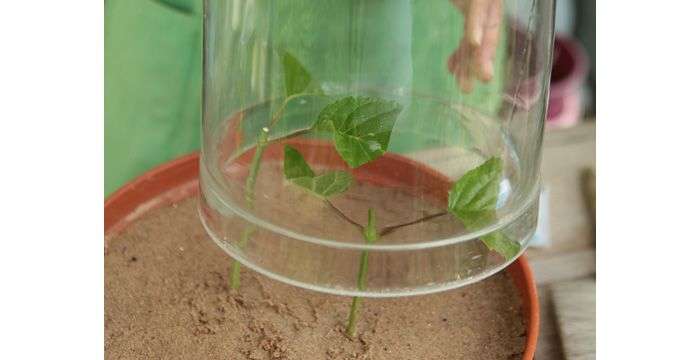
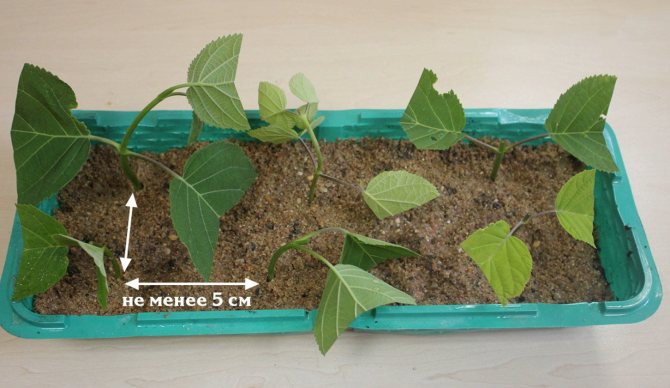
The scheme for planting cuttings is shown in the figure. As you can see, they need to be positioned at an angle of about 60 degrees. Deepen 5 centimeters. Note that the top bud should not be in contact with the soil surface. Cuttings can be positioned often, it is only important to make sure that they do not touch one to one. Usually, at least 5 centimeters are left between them. Remember that leaves will begin to grow on the cuttings - they need free space.
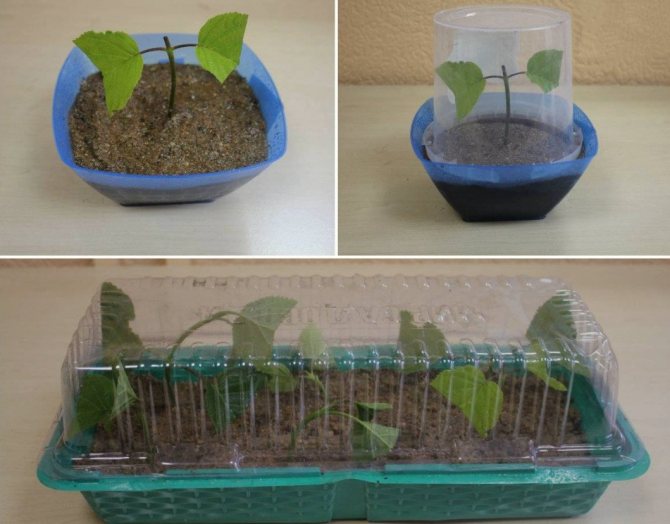
The twigs will root faster if you create greenhouse conditions for them. Literally. Use glass jars, plastic containers, or bags to cover future hydrangeas. If possible, make holes in the shelters for ventilation. If not, open it periodically for ventilation. Keep the cuttings warm, do not place on windowsills in direct sunlight, it is better to choose a light shade.
Keep the soil moist - water as needed at least once a week, if necessary, apply moisture more often. In the absence of shelter, periodic spraying is needed.
In winter, when the sundial becomes a rarity, and the day is significantly shortened, hydrangeas must be supplemented with additional lighting, this will ensure the plant's correct and stable development.
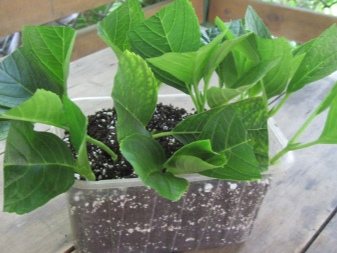
Keep the cuttings under the “caps” until they are firmly rooted. This usually takes about a month. By the end of the specified period, inspect the plantings - buds should swell on the branches, from which leaves will soon appear.
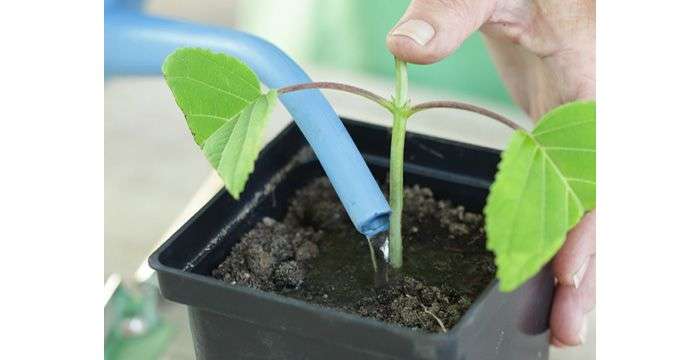
If everything is in order, remove the cover. Further care is reminiscent of looking after a houseplant. The hydrangeas are watered regularly to keep the soil moist, but without excess. It is important to spray them about once a week. Keep future seedlings in a room with a stable temperature - sudden jumps up or down lead to developmental disorders, slow down growth. Perceptible kinks can kill plants.
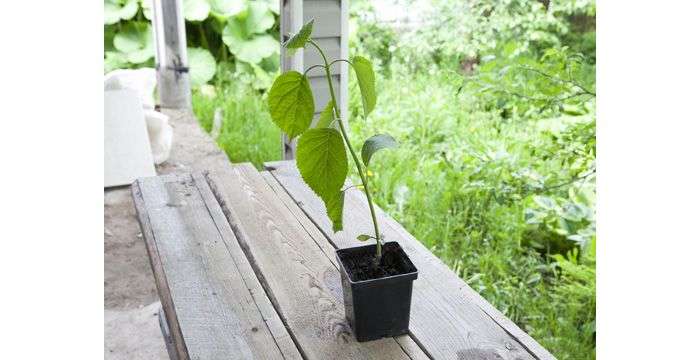
In the spring, after establishing a positive temperature, start gradually hardening the seedlings. First, put containers on the balcony for literally half an hour, then gradually increase the time intervals. After two weeks, hydrangeas can be planted. Use temporary beds or permanent places at once.
Caring for small hydrangeas is similar to that required by adults.
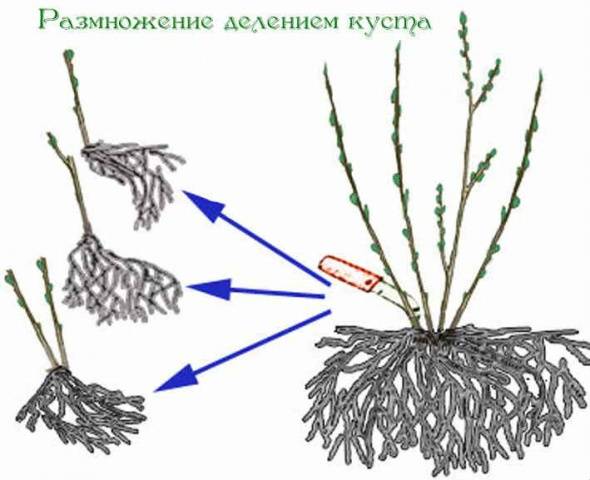
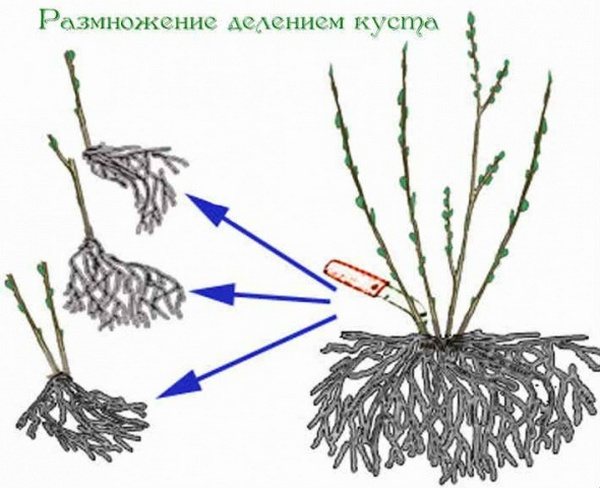
How to reproduce a flower by dividing a bush?
It is permissible to use this method of culture propagation until the third September decade or in the first days of spring. It is very important to adhere to such deadlines, because when planting a separated hydrangea in October and after, rooting will not occur, the flower will lack nutrients, it will not be ready for the impending frost.
The division of the bush is carried out before the cold weather
note! The named method is suitable for all types of plants, except for panicle hydrangea.
| Sequence | Description |
| So, for this procedure, you must first carefully dig the flower. This is usually done with a pitchfork, protecting the root system from injury. |
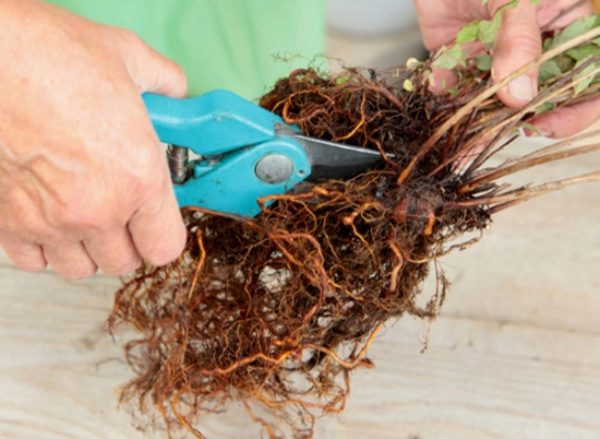
| The bush extracted from the ground is divided into small parts, always looking at the regenerating buds. There should be at least three of them on each separated part. |
| Hydrangea plots are planted in carefully prepared pits. Be sure to pour plenty of water over each separated portion. If the fall is rainy, you don't have to water it yourself - nature will do everything by itself. And if rain is a rare occurrence, watering is done daily or once every two days. |
Panicle hydrangea does not like dividing the bush
You can propagate your favorite flower without digging it out. Dig in the bush a little, keeping a distance of 15 cm from the outermost branches. Carefully select a piece of the bush along with the rhizome and pruning shears, cut off the roots extending from the branches. Do not pull and drop this piece right there.
On a note! This method does not put a lot of stress on the bush. In addition, it is suitable for rejuvenating large adults.

Thus, you can rejuvenate adult bushes.
Timing
The optimal timing for transplanting hydrangeas will allow the plant to root quickly and easily. Each method has its own term:
- in early spring, reproduction is best done by dividing the mother bush, this method is also used in the fall, but only if the hydrangea is reliably protected from the winter cold;
- with cuttings, the procedure is carried out in the middle of summer, in rare cases it is possible in late autumn;
- March is suitable for planting seeds;
- it is allowed to transplant hydrangea by layering in autumn and spring.
Reproduction of hydrangeas is not an easy task, which requires a lot of effort and attention, but in return, the plant will decorate the site with its beauty and aroma.
Description of culture
Botanical description of the plant:
- Root system. Fibrous roots, densely branched, form a wide and shallow root system up to 40 cm and fill the entire volume of the planting holes of the shrub.
- Large green leaves of the plant are oval in shape with sharp tops and small veins.
- Long bloom: early spring to late autumn.
- Variety of color shades: from white to dark purple.
- Various forms of inflorescences: in the form of a ball, panicle or umbrella.
- After flowering, instead of buds, fruits are formed in the form of a small box with several sections filled with small seeds.

Hydrangea
Hydrangeas in the form of a shrub or tree can grow in height from 1 to 3 m with a fairly wide rounded crown shape. Liana-like varieties grow up to 30 meters in length, this length is limited only by the height of the tree on which the liana hydrangea climbs.
On a note! There are deciduous or even evergreen varieties. In central Russia, deciduous hydrangea mainly grows.
Hydrangea breeding methods
Like many other garden plants, hydrangea can be propagated in the fall with several simple and accessible methods for all:
- planting seeds;
- cuttings;
- dividing the mother bush;
- layering;
- shoots.
Each of the breeding methods in the fall has its pros and cons. For example, if you plan to grow a plant from seed, you will have to spend a lot of time and provide proper care. In addition, not always all the seeds sown germinate. Therefore, the propagation of hydrangeas at home in the fall by cuttings, layering or dividing a bush is popular. These three methods are considered optimal and affordable even for beginners.
How to propagate hydrangea by cuttings in the fall
This method is considered the most effective and affordable. Using it, many seedlings are obtained at once from one mother plant. This method can be used at any time of the year.
Reproduction of garden hydrangea by cuttings in the fall consists of the following stages:
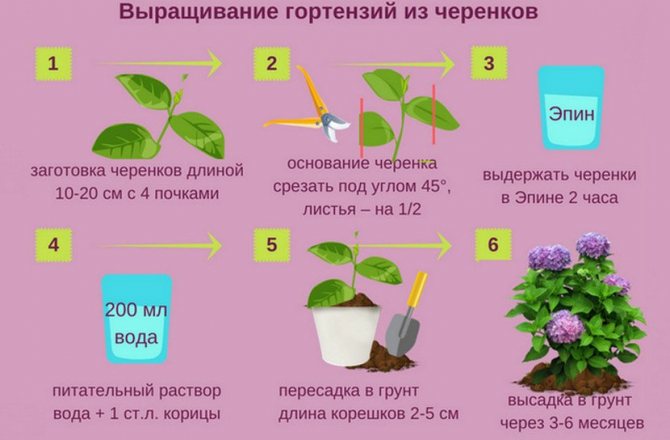
- Preparation of material for planting. Cutting is best done in the morning or in cloudy weather. Only young annual shoots are suitable, from which cuttings of 10 cm are cut with the help of a pruner. The leaves growing from the bottom are removed, leaving only the two upper and a couple of buds.
- Rooting. Prepared cuttings are tied in 4 pieces. The cut is treated with a means for rapid root formation, and the upper one with a disinfectant, for example, manganese or brilliant green solutions. For planting, a special mixture is prepared, consisting of turf, peat and sand in a ratio of 1: 3: 4. It is treated with hot steam. Workpieces are planted in the finished substrate to a depth of 5 cm. For several days, the seedlings are sprayed with a spray bottle. The workpieces are covered with glass caps. Once every 6-7 days they are aired, they are completely opened only a month after planting, when the roots appear. You can put the sprouts in the water, previously settled, wait until the roots of 2 cm appear, and then they are planted in pots.
- Planting cuttings in the ground. If the germination of sprouts was carried out in spring or summer, then they are planted immediately on the site. And in the fall, it is better to grow sprouts in pots at home, and planted in the ground after it gets warmer.
If the cuttings of hydrangeas in the fall are carried out according to the rules, then after a few weeks strong roots will begin to grow.With this method, you cannot use young shrubs and thin sprouts, as they often rot. The first two years in winter, hydrangeas are very vulnerable and can die. When the first frost appears, they are protected with several layers: crumbling foliage, branches of coniferous trees and a film. When they begin to bloom, additional funds are no longer required.
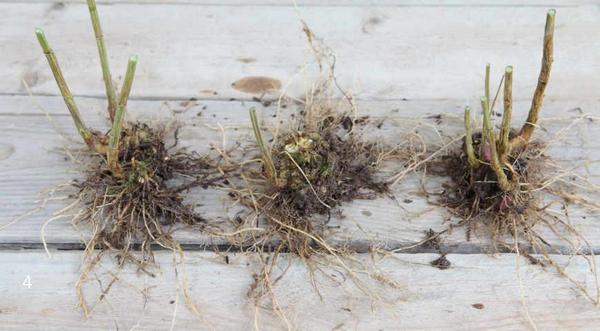
Reproduction of hydrangea in autumn by dividing the bush
This method is considered the easiest, so even a beginner in this field can easily cope with division. The process is best carried out in the spring, but if for some reason it is necessary to reproduce in the fall, then each young plant needs to be covered for the winter, protecting it from frost.
Phased cuttings:
- A large bush is dug up and carefully examined so that there are no diseases and injuries on it.
- The plant is divided into several parts, buds are left on each of them, which will help to give new shoots faster.
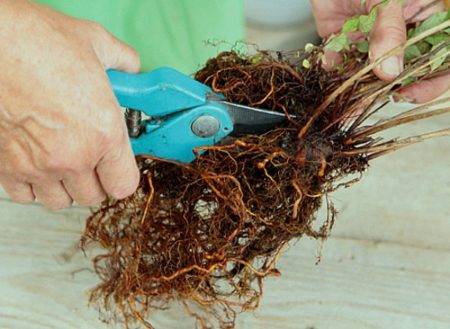
- The roots are carefully cut with a sharp knife, the ends are sprinkled with charcoal. If not, then a brilliant green solution can be used.
- Compost, peat and mineral fertilizers are added to the holes before planting.
- The resulting cuttings are planted, watered and mulched with peat.
In addition to the standard division of the roots in the fall, during the propagation of hydrangeas, the process can be carried out without digging out a large bush. It is enough just to take a pitchfork, make a tunnel 15 cm from the branches, tilt the flower and cut off a small part of the root system.
Reproduction of hydrangea by division is a good way to rejuvenate old shrubs. The method is not recommended for panicle hydrangea.
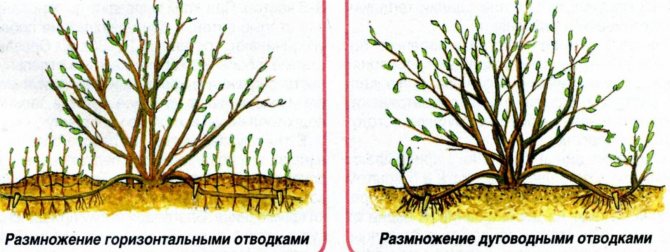
Propagation of hydrangeas in autumn by layering
It is possible to reproduce shrubs by layering in late autumn. The procedure can be started only after the hydrangea has finished blooming. It is better to combine this process with preparing the hydrangea for winter. It will take a little time, but by spring several plants ready for rooting will appear from one branch.
Step-by-step reproduction by layering:
- dig up the soil around the bush, but not too deep, so as not to harm the root system (15 cm depth is enough);
- level the soil well;
- make grooves no more than 1.5 cm around the bush along the radius;
- put one layer of hydrangea in each furrow;
- press each shoot well to the soil (you can take a hook or a wooden spear to help);
- the top of the appendix no more than 12 cm long is left above the ground and preferably vertically;
- sprinkle the shoot with earth, but not too thick layer, otherwise weak young shoots will not be able to break through to the sun;
- after 2-3 weeks, the first shoots will appear on the surface of the earth;
- after they grow up to 10 cm, they are spud.
It is imperative that the mother bush and the grooves around it be watered regularly. It is recommended to separate the layers and plant them in the spring or next year in the fall.
This method of propagation of hydrangeas is rarely used by gardeners. If you take care of it correctly, then there are not so many branches on the bush. But due to the ease of implementation, it is great for beginners.
Flower varieties
No garden plot can do without this magnificent flower, whose inflorescences are incredibly beautiful. Hydrangea gained universal recognition due to the fact that it can bloom even in shaded places. Flowers look great in the garden when they are planted several at once. Sometimes it is not possible to buy many bushes at once, but you can achieve the desired effect with the help of cuttings and layering. The text below will tell you how to propagate a hydrangea.
This flower is propagated by cuttings and layering
This plant is divided into several subspecies.
Tree-like - she is less afraid of the cold than all her "relatives". She is not covered for the winter, and the care of the bushes itself is not too difficult. Planting is best in a shaded area or partial shade.Dry soil can kill a flower, so if it's hot, you need to water it adequately.
On a note! Never let the earth dry out completely.
Tree hydrangea
Paniculata - its interesting inflorescences reach 25 centimeters in diameter, decorating bushes with long fluffy leaves. The color of the buds is varied, so the hydrangea will look good in the garden among other flowers. They plant it in the shade, as the sun burns the buds. Keep in mind that the bush grows quickly, so you will have to constantly prune it. Cuttings can be used for propagation.
On a note! The plant can survive temperatures as low as -30 degrees.
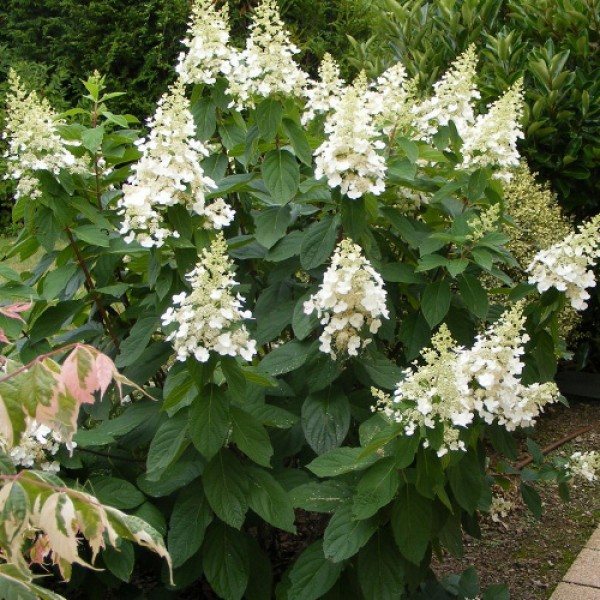
Panicle hydrangea
The large-leaved variety is the most capricious, but at the same time it has excellent external data. The bushes are low, spreading. The foliage is bright green and pleasing to the eye, but its flowers are even more beautiful. Hydrangea becomes a real beauty, delighting the owner with lush flowers and a rich palette of shades.
On a note! This variety can be planted in a container, and this is a definite plus, since the plant does not always tolerate wintering.
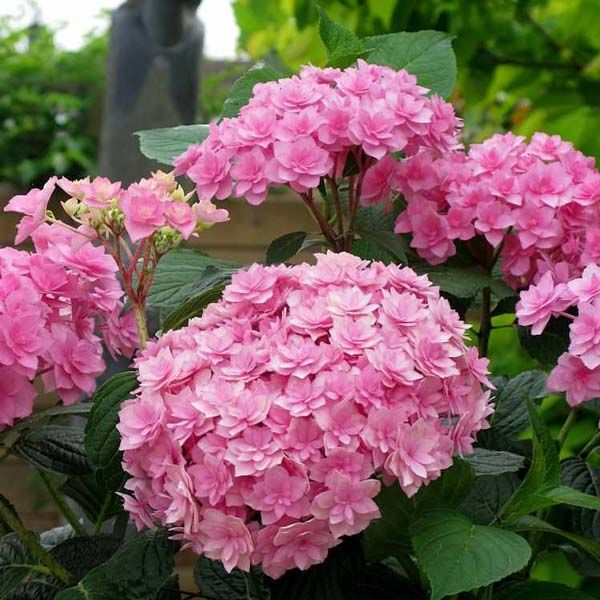
Large-leaved hydrangea
You can breed all these varieties on your own using any convenient method, however, before doing this, you need to understand exactly how this event is carried out.
Features of the reproduction of different plant varieties
There are many types of hydrangeas, but more often than not, gardeners prefer several of them because they do not require special growing and care skills. But the features of reproduction may vary:
- For large-leaved or garden hydrangeas, you can use any of the methods. But only this species is a little sensitive, so it is better to stop at a transplant by dividing a bush or green summer cuttings. You can start performing all the work in June and until the end of September. After breeding in the fall, garden hydrangea must be wrapped for the winter. This applies to both young shoots and adult bushes.
- Treelike hydrangea can be propagated in almost all ways, the only exception is the division of the bush. To carry out the procedure, the bush must be dug up. This variety is large enough and does not like interference with the root system. The plant blooms best when left untouched. If you transplant a plant, then it may not bloom for a couple of years. It is preferable to propagate this variety with green layers that bend easily and do not break. Until the moment they take root, it is necessary to cover with a film. For the winter, young shoots are protected.
- Panicle hydrangea is a beautiful and fragrant plant, but it has too short a time to reproduce. It is very important to carry out all the work on time, otherwise the procedure will not be successful. The optimal time for reproduction is when the root of the bush has absorbed enough water. In middle Russian latitudes, this time occurs in mid-June. It is better to take cuttings for propagation from the lower part of the trunk, on which there are no flower buds. You cannot use a pruner or a knife for cuts, it is better to do it by hand. This will help the cuttings take root better. Reproduction in water of this hydrangea variety will not give any results. Young seedlings are sure to warm well for the first three years after planting for the winter.
Selection of a breeding method based on the current season and type of hydrangea
Either way has pros and cons. To find the best one, you need to take into account the current season, type of flower. You also need to indicate the future result.
On a note! It is very important to know the specific features of each method! You can always choose the one that is right for your case.
Seed propagation of hydrangea is not too easy.
It is effective to propagate hydrangea by seed, but for a rather long time. The owner will be pleased with the lush flowering of the hydrangea only after a few years.If you grow a single individual from bush seeds, it will not mimic the parental traits. It is best to sow seeds purchased from specialized establishments.
Cutting a culture is a fairly convenient procedure, which is carried out both in spring and summer. The overgrown lush bush allows you to take many cuttings - sometimes 20 plants are rooted. It will bloom in a year or two.
On a note! This is the best breeding method.
But there are varieties of this culture that are problematic to propagate by cuttings, for example, panicle hydrangea. It is propagated differently.

Cuttings can be carried out both in winter and in summer.
If you need the resulting plant to retain the features of the mother, propagation by layering and offspring is suitable. However, the productivity of such methods is questionable, since about five layers per year are obtained from one hydrangea, but the number of offspring is beyond control.
It is inappropriate to propagate hydrangea by dividing the bush. This method is used only when transplanting, immediately receiving an adult capable of producing flowers in the same year.
On a note! It is wise to hold this event if you need to get several adult hydrangeas of your favorite variety.
Divide the hydrangea bush only when transplanting
Cutting panicle hydrangea in spring
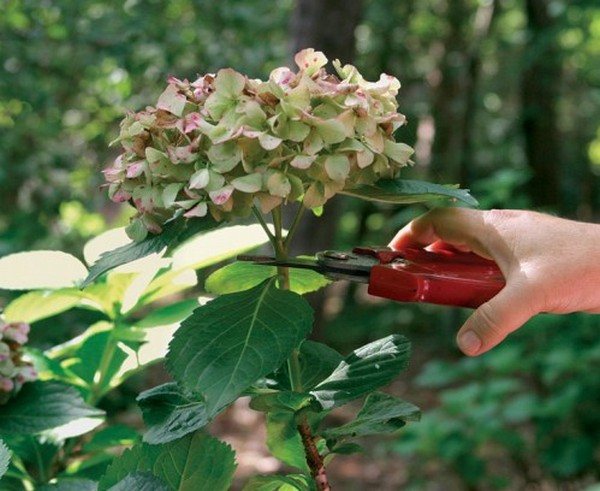
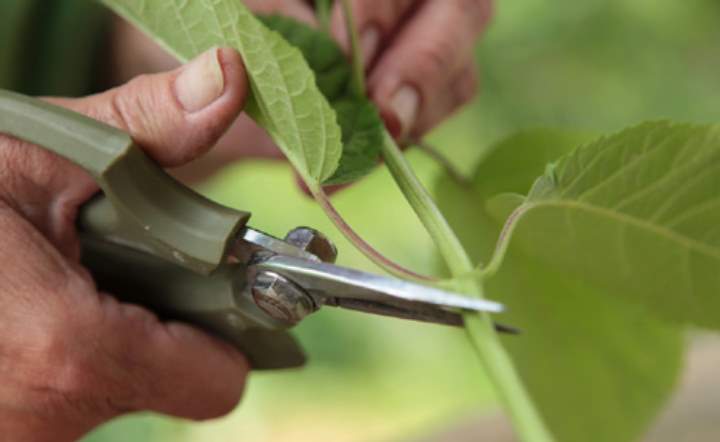
If you are going to cut the panicle hydrangea in the spring, then the cuttings must be cut before the plants begin to flow. For this purpose, use lignified branches of last year's bushes.
When planning cuttings for the spring, you can kill two birds with one stone: not only propagate the plant, but also give the bush the correct shape by pruning.
Cut branches should be brought to a warm room and placed in water. Typically, the branches are left to stand in the water for 3 to 5 days. Then they are cut into several pieces. Make sure that there are 3-5 buds on each part.
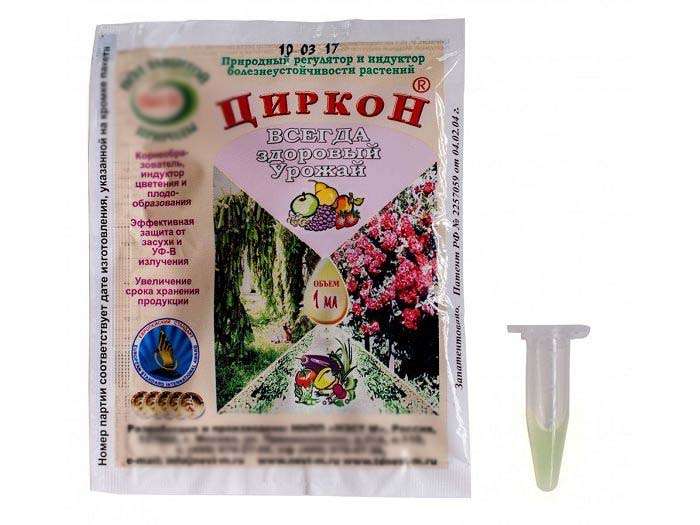
In order for the cuttings to be successful, experts recommend treating the cuttings with root formation stimulants. Processing is carried out regardless of what time of the year you propagate panicle hydrangea. As such drugs, you can use Epin, Heteroauxin, Kornevin, Kornerost, etc. (according to the instructions).
If there is no root-forming agent at hand, you can use honey - 1 tsp per 1 liter of water. The cuttings must be immersed 1/3 in the resulting solution and kept for about 12 hours. After removing from the honey solution, the cuttings must be rinsed with clean water.
After that, you can start planting cuttings in pre-prepared soil.
In most cases, gardeners use a substrate of sand and peat in a 1: 2 ratio to root cuttings of paniculate hydrangea, but there may be other options.
Cuttings are placed in the substrate for 2/3 of their length. The distance between future plants should be at least 5 cm. The container with the planted cuttings is covered with plastic wrap (they create a kind of mini-greenhouse) and left in a warm place.
At this stage, the cuttings do not require special care, as long as it is enough for them to keep the soil moist. Make sure that the soil does not dry out. If you did everything correctly, then in about a month the cuttings will take root. Usually they are transplanted into open ground when 1-2 months have passed since the roots appear. But remember: these will still be young and not very strong plants, so they need to be sheltered from frost for the winter.

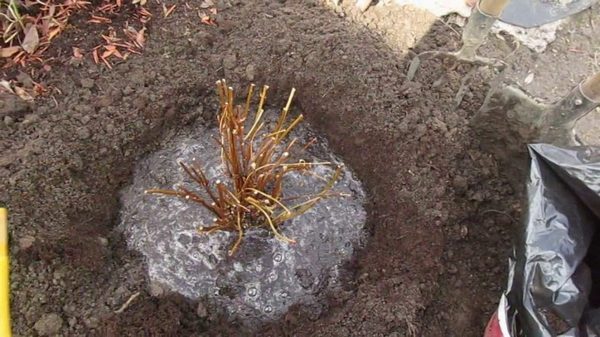
How to propagate a culture using a seedling prikop?
First you need to buy a healthy and powerful young hydrangea in blooming form, choosing the desired color of the buds.
A healthy plant with closed roots (that is, in a pot) will delight you with good growth during the season, if it is taken care of correctly. In the fall, the roots will be strong and strong, the shoots will be viable.
The easiest way is to purchase a blooming hydrangea and transplant it to the desired location.
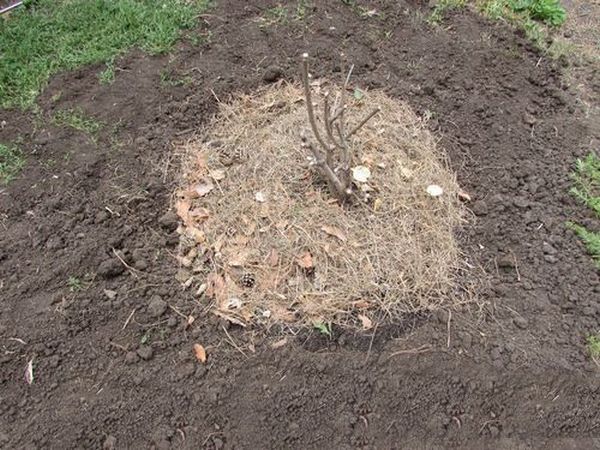
In late summer or early autumn, you need to start horizontally dropping the entire hydrangea bush, freed from the pot, with rather loose and high-quality soil. Before doing this, do not forget to rid the plant of foliage and inflorescences.
On a note! When you do the full backfill of the crop, make sure that all the shoots are ripe enough!
Weak and underdeveloped branches must be removed before the procedure. Otherwise, decay will occur, due to which the hydrangea may die.
Weak branches need to be removed
Keep in mind that the root system of the flower should be deeper than the shoots. To do this, the bush is placed with its roots down in the dug hole, while adhering to an angle of 35 degrees.
After placing the plant, cover the roots with soil and tamp a little so that the soil is in good contact with the root system. Water.
On a note! Add some more soil and compact again.
Make sure that the rhizome of the flower is well covered with soil, fan the branches in the trench. After that, cover the entire bush with earth from above.
It is important that the rhizome is completely covered with soil.
When the ground warms up on spring days, the whole bush buried will give the first young shoots.
On a note! The number of individual branches, which will later become a full-fledged hydrangea with their own root system, is equal to the number of buds on the mother.
In the future, you just need to divide the bush into separate parts and plant them in a permanent place.
Small twigs can later be planted separately, thereby obtaining a few more bushes.
Experience shows that with this method of propagation, fresh plants delight with their flowering in the same year.
So you can easily get from just one parent dozens of "children" who quickly begin to delight with colorful flowers.
With this method of reproduction, the hydrangea will begin to bloom in the same year.
Using this simple method of hydrangea propagation, you can do two things at once - and prevent the buds from freezing in the cold, and get many copies of hydrangea during a thaw.
Cutting panicle hydrangea in summer
The optimal time for propagation of panicle hydrangea is summer, when buds have already appeared on the plants. For this purpose, green cuttings with leaves that have at least one bud are used. But we must remember that only young bushes are suitable for cuttings in the summer.
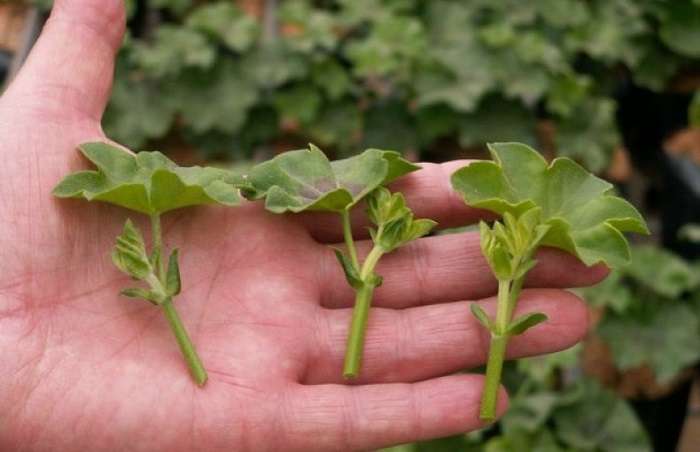
Such cuttings should not have flower buds. Usually, for grafting, they take those branches that are located in the lower part of the bush. For greater success, gardeners recommend not cutting them off, but carefully pinching them off. Then the branches are cut into cuttings approximately 15 cm long. As a rule, all the lower leaves from such cuttings are cut off together with the petioles, and the upper pair of leaves is cut in half.
The lower cut of the cutting is sprinkled with powder or immersed in a solution of a root formation stimulator. To exclude the ingress of microbes, some gardeners recommend smearing the upper cut of the cutting with brilliant green.
Next, the cuttings are planted and placed in a previously prepared moisture-absorbing substrate. For planting cuttings, a traditional wet mixture of peat and sand 2: 3 is used. Sometimes peat is replaced with leaf humus. Cuttings are placed in the substrate at a slight angle, 2-3 cm deep. The distance between the cuttings should be at least 5 cm. After planting, the surface is covered with a layer of sand about 2 cm, and the cuttings are covered with a jar. Instead of a can, you can use a plastic bag. Young shoots need daily ventilation and watering. In warm, comfortable weather, you need to water the hydrangea once every three days, in hot weather - every day.
For propagation of paniculate hydrangea, you cannot use cuttings of plants that are not one year old.
Cuttings
Cut during the summer months, somewhere from mid-June to mid-July.
| Sequence | Description |
| It is best to cut the cuttings when the sky is covered with clouds or in the early morning hours. Take green shoots, annuals about ten centimeters long. The leaves from the bottom must be removed immediately, leaving only a few upper and buds. |
| For greater convenience, planting materials are collected in a bunch. The lower part is covered with substances that stimulate growth, so that the cuttings take root well. |
| After that, they are planted in a nutrient composition of turf, peat and sand in an inclined position. The depth is no more than five centimeters. |
| In order for the culture to take root better, a cuticle is used so that there is optimal humidity. Otherwise, it is recommended to spray the future hydrangea with water a couple of times a day. |
Hydrangea can be propagated by cuttings
If the temperature is kept at twenty degrees, it will take about a month for rooting. Young hydrangeas need careful shelter for the first winter.
Cutting panicle hydrangea in autumn
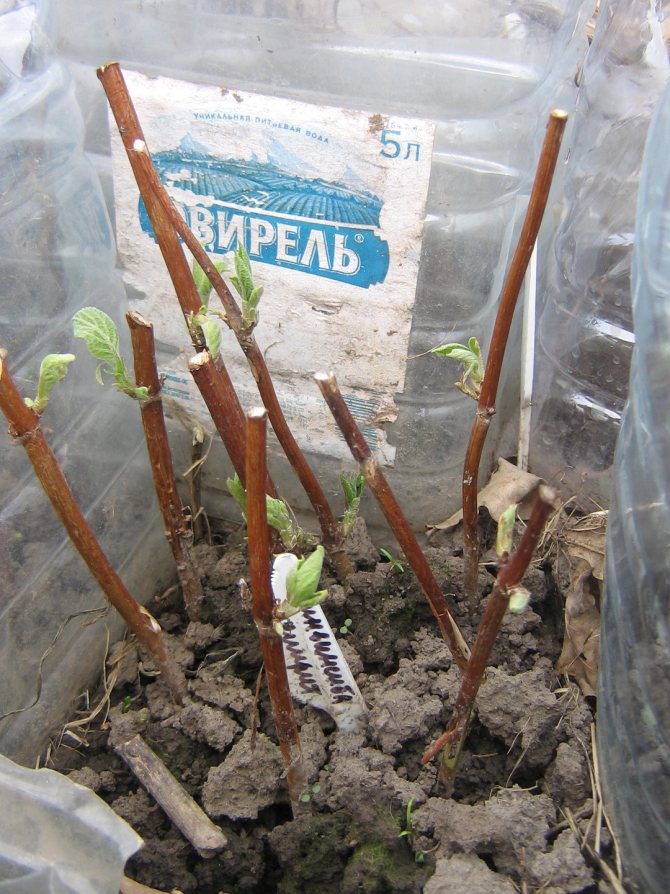
In the autumn, woody cuttings are also used to propagate paniculate hydrangea - those that many simply put in compost when pruning the bushes.
The optimal time for autumn cuttings of panicle hydrangea is the second half of September.
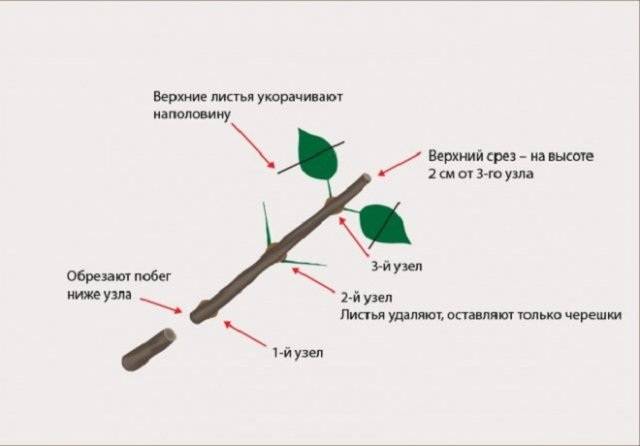
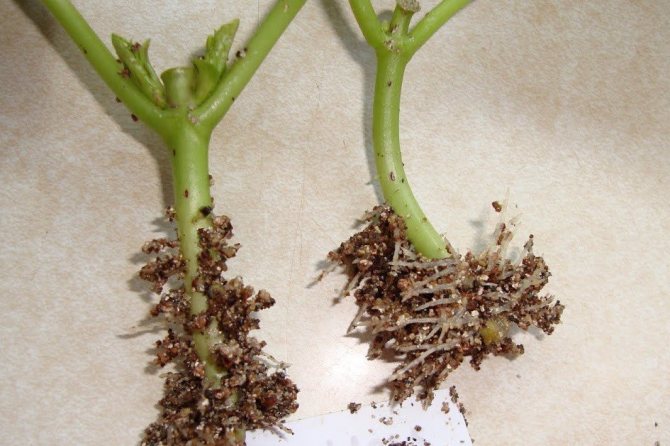
There should be at least three nodes on the cuttings you choose to propagate. The lower cut is made under the first, node, perpendicular to the axis of the cutting. Leaves, if they have not fallen yet, are trimmed with scissors. The top cut is made about 2 cm from the third node. The lower leaves must be completely removed, leaving only the petioles. And the uppermost ones should be shortened by half.
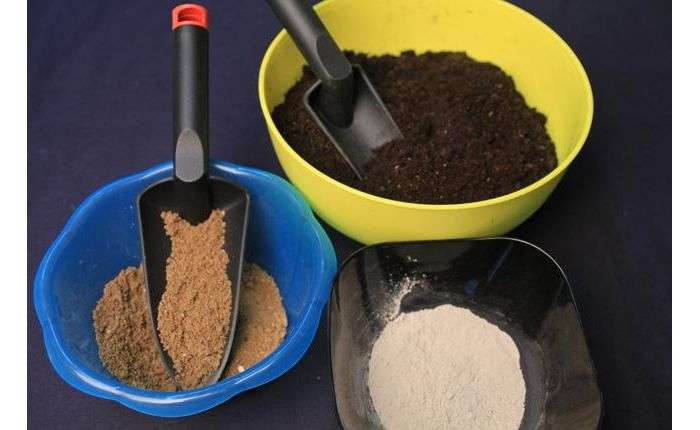
Experts recommend using clay pots for autumn cuttings of panicle hydrangea - they are good for air and evaporate excess moisture. Drainage material is poured onto the bottom of the pot with a layer of 3-5 cm. The soil prepared in advance is poured on top.
You can use the traditional sand and peat substrate mentioned above. But some gardeners for the autumn breeding of paniculate hydrangeas prepare such a mixture: they take in equal proportions the soil from the garden, coniferous waste from the forest and a 5-7-centimeter layer of soil under it, as well as river sand, and all this is fertilized a little with humus.
As in previous cases, before planting, the cuttings are treated with a root stimulator. They are planted in a substrate at an angle of 60-70 degrees to a depth of 3-4 cm.
In order to prevent the leaves from drying out, the cuttings are covered with polyethylene, glass jars or plastic containers.
The most important thing during this period is to take care in advance of a comfortable temperature for the plant and additional lighting, because young hydrangeas will grow in winter. Perhaps this will be the main condition for your success in propagating panicle hydrangea by cuttings in the fall.
Cuttings covered with jars need watering at least twice a week. When watering, the banks are not removed. If you decide not to use a jar for your plant, then you will have to maintain a comfortable humidity for it with a spray bottle and spray the seedling at least twice a day.
You can cover the plant with a plastic bag, which is periodically opened to ventilate the seedlings.
The rooting process of cuttings takes 25-30 days. The result of your work on cuttings can be judged by the swollen upper buds, as well as the leaves that will appear soon. You do not need to remove the jar (or polyethylene) until you see all of the above and make sure that the stalk has taken root.
The jar is removed after the first leaves appear. Now your task is to regularly water the seedlings and spray the leaves twice a week until it is time to transplant the panicle hydrangea into the open ground.Keep a close eye on the room temperature and avoid changes: even a difference of 2 ° C can destroy new plants that are still too weak to protect themselves from external influences.
When spring has come, the hydrangea, which has already managed to take root, is planted in a specially prepared place where it has to "grow", or in a garden bed provided for it.
As a rule, plants that are planned to be transplanted into open ground are pre-"hardened". For this purpose, containers with seedlings are left outside for an hour. Subsequently, the time interval is increased. Young shoots will be ready for planting in the garden in a week.
The panicle hydrangea is the real queen of the garden. But, despite the royal appearance, she is distinguished by good characters and does not give gardeners any special problems. Cutting is an easy and affordable way to propagate paniculate hydrangea. Let it decorate your garden for as long as possible!


Photo
More photos of hydrangea, see below:
Garden hydrangea often becomes a “target” of various diseases and pests. It is important not only to recognize the onset of the lesion in time and take measures for recovery, but also to revise the rules for caring for the plant in order to prevent the recurrence of problems.
Positive and negative sides
Before the plant propagates by cuttings, the gardener analyzes the pros and cons.
| Positive | Negative |
| The branches that remain after pruning are used for a fire or as compost. | The seed is kept indoors. Landing in the ground is carried out after the end of the cold weather. |
| The grower has enough time to control the growth rate of the seedlings. | It is possible to carry out cuttings of the planted hydrangea in the fall in an exceptional case. The reason is the risk of a sudden arrival of cold weather. Before starting work, they study the weather forecast. |
| By spring, the grower will have healthy planting material. |
Hypersensitivity to cold is a nuance that the gardener always remembers.
Planting and maintenance
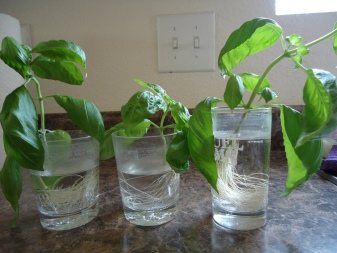
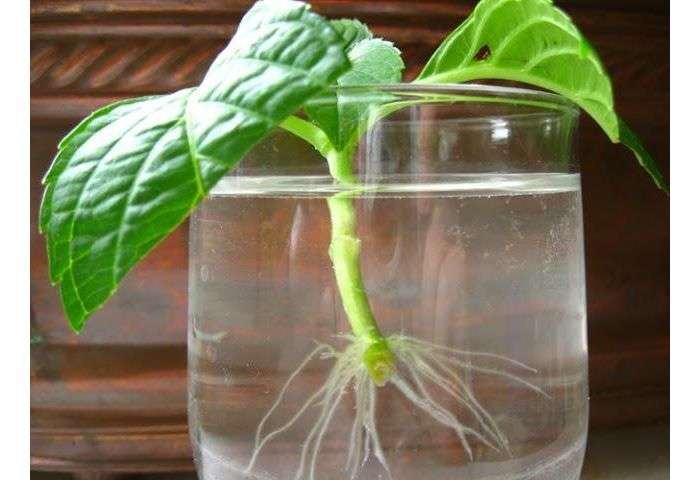
Hydrangea shoots can be rooted in water and in prepared soil mixture - for paniculate varieties, both methods are acceptable.
If water is selected, then the rooting scheme will look like this:
- a spoonful of cinnamon is added to a dark container with a volume of 250 ml;
- 2-3 cuttings are placed in it so that their lower part is 1/6 of the length in water;
- when water evaporates, it must be topped up with settled, filtered water, it is not necessary to completely change the solution;
- during spring cuttings, plants are kept on the south side in conditions of diffused light, when autumn branches need to be rooted, a container with them is installed in partial shade;
- when forcing, it is recommended to regularly saturate the solution with oxygen, which will prevent root decay.
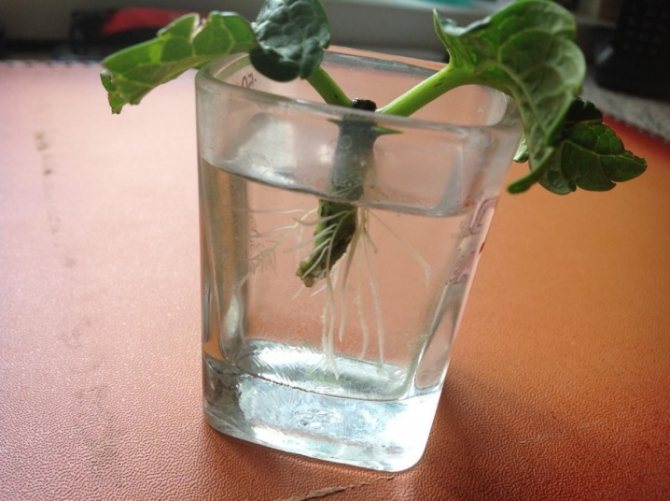
When root shoots 2-4 cm long appear, the plant can be transplanted into soil with a low acidity level for further rooting.
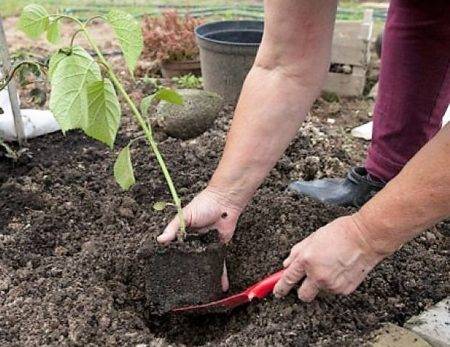
Planting hydrangea in the ground right away is also acceptable. Before planting the petioles, it is necessary to prepare a nutrient substrate for the plant, taking into account the established requirements.
- The soil should be fairly loose, so a mixture of vermiculite and coarse sand is used. Another option is sand, peat, perlite and fertile soil. You can use any composition by adding citric acid (1 g) to it, all components are taken in equal parts.
- Plants are planted in wooden boxes, the outer part of the bottom of which is covered with rags for the purpose of warming, and inside they are laid out with wool strings at intervals of 5 cm, their ends are immersed in vessels with water - thanks to this, the soil will be moderately moistened and will not dry out. The harvested cuttings must be correctly positioned in the ground - at an angle of 45 degrees and at a distance of 12-15 cm from each other, they must be buried by 2-3 cm.
- After planting, the soil under the plants must be moistened by spraying.
Further care for young hydrangeas is to cover them with plastic wrap in order to create greenhouse conditions.
You can protect the land from drying out, and the seedlings from overheating, you can place the boxes in a dark place at a temperature of + 20 ... 25 degrees during the day, and + 15 ... 18 degrees - at night.
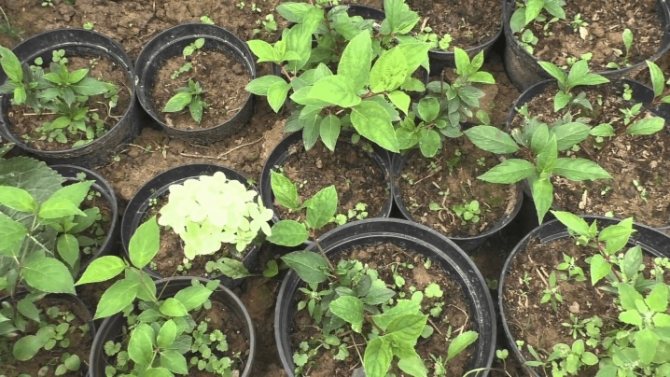
Hydrangeas are transplanted a month later, when they have roots 2-3 cm long, in separate containers with a volume and height of 10 cm. The nutrient substrate is chosen special for this type of culture, or it is prepared independently from sand, peat and garden soil. The pots are then placed in a shaded area, continuing to water and ventilate regularly. If buds form on the branches, you can feed the plant.
Reproduction methods
Using cuttings is not the only option. Alternative technologies are used taking into account the climate and the requirements of the variety.
| Shoots | Bends | Dividing the bush | Seeds |
| Least efficient way. | It is carried out in spring or early autumn. | Carried out until the third decade of September. | It will take several times more time from the gardener. |
| Not always an effective procedure is carried out after the completion of hydrangea flowering. | Strong shoots are taken for manipulation. They should not show signs of illness. | Low germination. |
How to propagate hydrangea using offspring?
This method is also suitable for this beautiful flower. However, you need to be patient.
So, remove the surface level of the ground in the fall and carefully, without touching the roots of the parent, separate the offspring.
You can separate the "baby" from the bush and plant it separately
Plant the resulting shoot on the garden bed and let it grow to the desired level.
On a note! The time required for each individual individual depends on its general condition. Usually it takes no more than a year.
Execution stages
Correctly cutting a hydrangea on your own does not require experience. For work, take a healthy and undamaged stalk, the length of which is 10 cm.
Blanks for planting are cut in the morning. The more moisture there is in the branches at the time of cutting, the better. The further procedure is as follows:
- it is forbidden to leave the cutting without moisture - as soon as they are cut, they are immediately placed in a container with liquid;
- use green branches for cutting - before starting, you need to make sure that they are not lignified;
- cutting begins with the lower and lateral shoots;
- the top is removed;
- cut shoots are divided into several cuttings - each of them should have 3 pairs of leaves;
- slices are always performed obliquely;
- after the completion of cutting, the seed is sent to a container with water, to which 10-12 drops of any growth stimulator are added;
- the seed is placed in a container with water so that the leaves do not get wet;
- a container with cuttings is sent to a dark place;
- it is forbidden to plant a plant in an open place - the less light, the better the hydrangea feels.
Manipulations are performed using clean garden tools. After each use, it is disinfected.
Planting planting material
3 hours before planting, the upper cut is dipped into molten paraffin. If not, then replace with wax. The second requirement is proper soil preparation. They take peat, which is mixed with sand in a ratio of 1 to 2. If it is impossible to find the listed components, they buy soil for azaleas in the store. Further recommendations for breeding hydrangeas at home are as follows:
- the soil is moistened with a sprayer;
- cuttings are planted - the recommended depth is 3 cm;
- planting is carried out so that the upper leaves do not come into contact with the soil;
- the seed is covered with a bottle or jar;
- the stalk is planted 7 cm further from the other;
- the soil is covered with a 2.5-centimeter layer of sand.
The intensity of watering depends on whether the gardener has covered the planting or not. If the answer is yes, then the water supply is carried out at the beginning and end of the week.Do not remove jars while watering. The gardener who has not covered the seedlings has to spend more time on the mentioned procedure. They are watered from a spray bottle in the morning and evening every day.
Rooting and further care

The process will take up to 30-40 days, depending on the selected variety. The first sign that the hydrangea has taken root is swelling of the buds and the appearance of leaves. It is forbidden to remove the jars (bottles) with which the cuttings are covered until both signs are noticeable. After removing the protective covering, the seedlings are provided with regular watering. It is carried out in the form of spraying twice a week. The gardener's job is to constantly monitor the temperature. A jump from 5 degrees and above is considered critical. If it happens, then the seedlings will not "hold out" until spring.
As soon as the weather outside the window has become spring, the seedlings are planted in open ground. If the size of the garden allows, then the first 1-2 months the hydrangea is placed in a small area. Compact planting will show how viable the seed is. If there are no problems, then the seedlings are planted in a permanent place.
Sapling hardening
The stage on which the result depends. Hardening is carried out as follows:
- within 14 days, containers with seedlings are placed on the street;
- the duration of the daily “walk” is 10 minutes;
- each next day will add 5 minutes to the specified figure.
If the plant has survived removal to fresh air, then it is transplanted to a permanent place.
Hydrangea growing rules
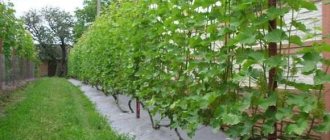
This shrub prefers abundance of sun, therefore, it is recommended to plant it in an open place. But on condition that there it will be protected from wind and drafts.
Hydrangea does not require any special care. It is only important to choose the correct soil composition for her - she prefers slightly acidic, loose compositions and absolutely does not tolerate lime impurities... Sand is also not suitable for her, since nutrients are washed out of it at high speed.
Further care consists of watering and feeding. For the winter, the bushes are necessary harbor, since they are thermophilic and do not tolerate a significant drop in temperature.
To stimulate flowering, the shrub needs spring pruning. The tops of the shoots are cut, leaving three to four flower buds on each.
Varietal breeding features
Each of the three types of hydrangea has a number of characteristics. The more information the summer resident has about them, the better.
| Large-leaved | Tree-like | Paniculata |
| They use the technology of dividing the bush. If the climate in the region is harsh, then cuttings are used. | First, the bush is dug up. | Punctuality is the key to success. Cuttings are carried out from mid-June to early August. |
| The manipulation is carried out from June to mid-September. | After transplantation, hydrangea may not bloom for 1 season. There is no need to worry. It is a natural response to root intervention. | The handle is taken from the bottom of the trunk. The absence of buds on it is a good sign. |
| After planting, the seedlings are covered with foil. | ||
The peculiarity of propagation by cuttings in the fall is that the seed is first sent to the pot. The plant spends winter at home. With the onset of stable heat, it is transplanted into open ground. The key to success will be the protection of the seed from the vagaries of nature and regular watering. Its intensity is chosen taking into account whether the seed is covered or not. Experienced gardeners recommend not giving up the use of plastic bags as a shelter. They have proven to be more effective than plastic bottles or cans.
Subscribe to our channel in Yandex.Zen! Click "Subscribe to the channel" to read Ogorod-in the "Yandex" feed
Material preparation
Experienced gardeners carry out the procedure in the summer, in June-July, and only green tops of the branches are suitable for this.
The lower part of the cuttings should have time to woody, the ideal moment is the beginning of the formation of buds.
It is possible to ensure 100% rooting of shoots by adhering to certain rules.
- An adult, strong and healthy plant is selected, from which it is necessary to cut a branch with sprouts at an angle of 45 degrees. No tops are needed for planting material - they are carefully cut off.
- It is allowed to cut a hydrangea on a cloudy day in the absence of the sun, so that ultraviolet rays do not leave burns in the places of cuttings of shoots and the mother bush.
- The branches need to be divided into 10-12 cm segments, leaving a couple of leaves on each. The lower part is cut off under the kidney.
- The leaves at the bottom of the cutting should be removed and the upper ones should be cut in half.
- When the required number of cuttings is collected, their lower lignified part is placed in a solution of a root-forming agent for 2 hours. If such a preparation is not at hand, natural honey diluted in water (200 ml 1 tsp) is used. If the nutrient composition HB101, made from plant extracts, is used, then the future seedling needs to be kept in it for 30 minutes.
- Another option to stimulate the rapid formation of the root system is to dip the cuttings in water and then in a dry mixture of a growth promoter.
Features of summer cuttings
Propagation of hydrangea paniculate cuttings in summer is considered the most effective. During this period, buds begin to form. Working hours: June 10-July 15.
- It is necessary to choose green cuttings that have not yet become woody, have not bloomed. They must be healthy, strong, well developed. Use young stems with buds (1-3 pcs). Petioles are cut from them.
- The seedlings planted under cans or foil are aired every day. Watered once every 3 days. In drought - every day.
- It is preferable to harvest the petioles early in the morning. This will help the stems retain the moisture they need. Having cut them off, they are immediately divided. If you plan to do planting later, the shoots can be placed in the water. The tops of the branches with buds must be cut off. A month later (after 20 August), the petioles will take root.
This is how the panicle hydrangea is cuttings in summer.
Tips for care, growing cuttings
Until the root is formed in the seedlings, they are placed in a dark place. This will protect the young growth from overheating. Comfortable temperature for plants during the day is 20-25 degrees, at night - 15-18 degrees. When the roots of the plants are 2-3 cm, they are seated in separate pots. The containers should be small (height 10 cm, the same diameter).
During cuttings in the fall, professional gardeners recommend using clay pots. Air circulates well in them, excess moisture does not accumulate. Drainage is usually poured onto the bottom with a layer of 2-3 cm. Earth is poured over it.
Important! Do not allow the soil to dry out, regularly moisten the seedlings (at least twice a week). This is the main condition for correct cuttings. Air the seedlings every day.
The bushes are planted in the garden 1-2 months after the roots appear. They are pre-tempered for a week. The first time the plants are left for an hour in the open air, gradually increasing the time.
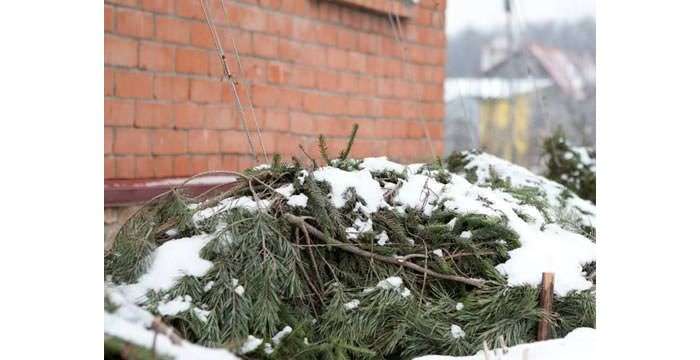
For the winter, the plant should be protected from frost. Sprinkle the roots with dry foliage. Small props are placed around the bush. Wrap up with foil, spruce legs. Thus, the hydrangea is covered for the next two years. She needs to adapt during this time. When the bush blooms, it means that it has acquired frost resistance.
Panicle hydrangea is an incredibly beautiful plant. While grafting is a hassle, it's worth it.
Paniculata hydrangea is propagated in different ways. For this, young shoots (children), air layers, seeds are used; when transplanting and rejuvenating a bush, it is allowed to divide it in order to get several new plants.Why is cut cuttings most often used? It is worthwhile to find out in more detail what this is connected with, and how to competently carry out pruning and rooting of cuttings.
Features of winter cuttings
In the fall (second half of October), it is necessary to dig up the plants, transplant them into pots. Take it to the cellar, basement or greenhouse (the temperature should be from 0 to 5 degrees). If the bushes have preserved the leaves, they are placed in a bright room. If the leaves have fallen off, they are transferred to a dark place.
A mixture for planting should be prepared:
- compost (4 parts);
- peat (1 part);
- sand (1 part);
- turf soil (2 parts).
Another version of the soil mixture:
- sod land (4 parts);
- humus (2 parts);
- peat (1 part);
- sand (1 part).
In mid-January, you should move the hydrangea to a room where you need to maintain a temperature of 8-10 degrees. Now you need to transplant the bush (if you didn't do it in the fall). You should first feed the adult plant with a mineral complex (Superphosphate - 10 g, Potash and Ammonium nitrate - 5 g per bucket of water. At the end of February, young shoots will grow up, they will have 3-4 pairs of leaves. Then the cuttings can be cut and rooted.
Step-by-step planting process
Algorithm for propagation of green cuttings of hydrangea:
How to root a hydrangea stalk at home in order to get maximum survival rate? Greenhouses should be ventilated daily, and young shoots should be watered with warm water. In rainy weather, cuttings are watered 2 times a week, and in extreme heat - daily, in the evening.
By the end of August, the cuttings will form roots and fresh greens will appear on them. At this moment, greenhouse banks can be removed. In autumn, young plants are necessarily sheltered from frost. In the first year of cultivation, a protective shelter is required.
Shelter for young bushes:
- Cover the rooted cuttings with dry leaves.
- Install the frame.
Cover with foil and spruce branches.
In the northern regions with harsh winters, rooting and growing hydrangeas from cuttings is carried out in room conditions. The algorithm for performing work is similar to the garden one, only the planting material is planted in pots and is kept indoors for the first 2 winters.
Features of spring cuttings
You can propagate panicle hydrangea in the spring. You need to cuttings before the start of the movement of sap in plants (March). For these purposes, use lignified branches growing on last year's bushes.
Cut branches are kept in water for 3-5 days. Then they are divided into several parts. Each fragment should have 3-5 buds. Then they are placed in a container with loose moist soil.
How to harvest, cut cuttings
For cuttings, the upper parts of the shoots are used. Each should have 2-3 sheets. Better to collect them in the morning. Choose healthy, strong branches. Cuttings are cut from them, they must have 2 internodes. The stems are divided into fragments. With a sharp knife, a cut is made (angle of 90 degrees) below the first node by one cm. From above, cut off 1 cm above (angle of 45 degrees) of the second point. The lower leaves are cut off, the upper ones are shortened by half a leaf.
How to process planting material
Shoots are left in the solution to form roots:
- Epin (2 ml / 2 liters of water) (soaked for 10 - 12 hours);
- HB101 preparation (1 - 3 drops / 1 liter of water) (for 30 hours);
- Kornevin, Zircon, Heteroauskin - use according to the instructions.
If there are no root stimulants, you can use a honey solution (1 teaspoon per 1 liter of water). The cuttings are immersed in a third, kept for 12 hours. After removal, rinse with water.
Rooting
The soil for planting is prepared in advance.Peat (2 parts), sand or leaf humus (1 part) are mixed. Many people just use coarse sand. Moisturize.
It is necessary to plant the shoots at an inclination of 45 degrees. They are deepened by 2-3 cm, leaving a space of 5 cm between them. They should not come into contact with each other and the ground. Then they are sprinkled with sand, a layer of 2 cm, sprayed from a spray bottle, covered with cans or film. They should take root in a month. The shelters are being removed.
You can grow roots in water for 20-30 days. True, there is a danger that they will simply rot. When the roots are 3 cm, the shoots are planted in the ground.
Garden hydrangea - propagation by cuttings
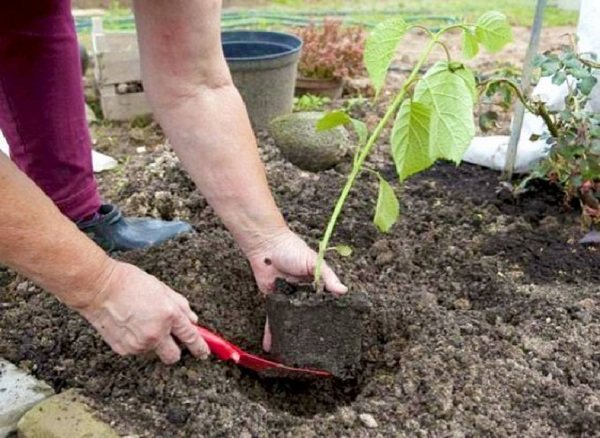
There are several breeding options for an exquisite plant: dividing the bush, layering and cuttings. Vaccination can also act as a way to obtain new copies, but it does not allow obtaining a sufficient number of them at the same time, and it is not at all easy to carry out it without experience. That is why novice gardeners are interested in how to propagate hydrangea by cuttings in the summer - this is the easiest way that does not require special skills.
Timing
The optimal time when it is worth cutting a hydrangea, according to many breeders, is the middle of summer - the period when the buds begin to appear. Young green shoots with 2-3 strong buds are used for the procedure. A shoot can be used as propagation material if it bends easily and does not break at the fold.
Advice! For cuttings, use the lower shoots from the side where the greatest illumination is. Such branches are distinguished by their strength. Thanks to the accumulated energy, they quickly start growing.
For the propagation of a flowering bush, lateral shoots that have appeared on last year's mature branches are also used.
Preparation of planting material
Rooting hydrangeas with cuttings requires adherence to certain rules. The preservation of moisture in the shoot is considered an important factor.
- The branches for planting should be cut early in the morning, while the plant has accumulated a sufficient amount of moisture. If the planting work is planned to be carried out later, the cut elements are immediately placed in a glass of water and placed in a shaded place.
- The top, where the bud has already appeared, should be cut off.
- The cut branches are divided into equal parts with 3 buds on each specimen.
- The lower leaves should be permanently removed, and the upper ones should be cut by 2/3.
- The top of the cutting is treated with garden varnish or brilliant green to prevent moisture evaporation.
Treat the planting material with a special substance that stimulates root formation. Apply root, zircon, heteroauxin. If these funds are not at hand, you can soak the sprouts for 2 hours in a honey solution (1 teaspoon of honey dissolves in a glass of water). It is very important when processing the cutting to ensure that the working solution does not touch the leaf plates.
Prepared cuttings are planted directly into the soil or placed in a glass of water for rooting. Hydrangea cuttings in water give roots for 1 month. As soon as their length is 2.5-3 cm, young plants are planted in the soil. It is worth noting that rooting hydrangeas in water is a risky undertaking, as it very often leads to the formation of rot.
Soil preparation
When determining whether it is possible to grow a hydrangea from a cuttings, it is also worth studying information about the requirements for the soil. A mixture for planting cuttings is prepared in advance. Gardeners recommend using nutritious loose soil, which consists of 2 parts of peat and 1 part of river sand. In the absence of peat, it can be replaced with leaf humus.
The purchase of a ready-made substrate in a garden center will help to simplify the preparation of the soil. When purchasing land, you should take into account its acidity. Optimum pH values 5.
Preparation for planting in the ground
It is possible to plant young hydrangeas with formed roots only the next year.And before that, you should take care of the plant on the eve of winter.
There are 2 options:
- bury a container with a bush in the ground so that it does not freeze, but it is better to do this in a greenhouse;
- reduce the frequency and volume of watering, and then move the cutting to the cellar or basement.
At the first signs of growth in the spring, the ground begins to be watered moderately. In fact, the plant is ready to plant. Before placement, a complex mineral agent containing potassium, phosphorus and nitrogen is added to the planting pit, and 2-3 days before that, the bush is no longer irrigated - this is necessary in order to easily remove it from the container along with the soil clod. Immediately after planting, to create a beautiful crown, the hydrangea is cut to 2/3 of the height of the bush.
If you follow the instructions correctly, observing the rules of cuttings, using this method it is possible to grow a high-quality ornamental shrub, which will decorate the site with lush flowers of magical beauty all summer long.
For hydrangea cuttings, see below.
How to care
There are few features of caring for young hydrangeas after the breeding procedure. In general, the care is standard, however, for the winter, young plants require careful shelter, protection from the cold. This measure should not be neglected, since a still weak plant in our climate can freeze over quite easily.
In the spring, be sure to remove the covering material as soon as the sun begins to warm. If you leave the shelter, the hydrangea will become waterlogged under it, root rot and other negative processes are possible.
Growing seedlings in a place with partial shade, in the open, sunny is not recommended.
Be sure to water young plants, as with sufficient soil moisture they take root and grow stronger much faster.
If the hydrangea is grown at home, then before planting in the ground, it must be tempered for a couple of weeks on the balcony, veranda, on the street.
What is green hydrangea cuttings
For rooting, young green shoots are used, in which the bark has not become denser. These are last year's branches, on which buds did not form. Young shoots more easily and more actively release roots, in contrast to lignified twigs.
Green cuttings are harvested after June 10, until July 10. The size of the branches is 15-20 cm, with a thickness of 5-8 mm, they should have at least 3-4 buds.
Cutting is carried out in the early morning, after evening watering - the branches will be saturated with moisture and more viable.
Rooting green hydrangea cuttings step by step
The cut cuttings are placed in a solution of a root formation stimulator (Kornevin, Heteroauxin). You can apply a solution of honey (0.5 teaspoon per liter of water) or aloe juice (a few drops per liter of water).
If there are a lot of leaves on the branches and they are large, the lower leaves are removed, and one third of the leaf plate is cut off from the upper ones. This is done to reduce the area of evaporation of moisture.
Hydrangea cuttings can be rooted in water or planted directly into the substrate.
For rooting in water, take containers with opaque walls. Complex fertilizers for ornamental shrubs are added to the water in a dose that is half the recommended dose. Only 2 cuttings are placed in 1 glass of liquid. Banks with seedlings are removed to a shaded place, during the process of root growth, the water is not changed, only boiled liquid is added.
For rooting in the ground, prepare a substrate from equal parts of peat, perlite and sand, moisturize it well. The lower end of the cutting is cut obliquely and immersed in the substrate at an angle of 45 degrees. Planting depth - 2-4 cm. Above the container with cuttings is covered with a greenhouse.
The rooting process lasts about a month, during which it is necessary to maintain a high humidity of the air and substrate. The ambient temperature should be +22 +24 degrees.
A month later, cuttings with a beard of roots are transplanted into individual pots filled with nutritious loose soil (humus, peat, vermiculite, garden soil) for further cultivation.
The summer method of cutting hydrangeas with green twigs is considered the simplest and most successful in terms of survival rate. It is recommended for novice gardeners.
Pruning and sheltering hydrangeas for the winter
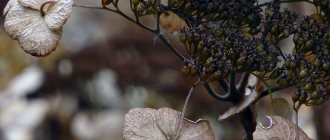
Hydrangea care includes mandatory pruning. Only the large-leaved hydrangea is not cut off, since the buds of this plant are laid in the summer next year. In autumn, in large-leaved hydrangeas, only faded inflorescences, weak and abnormally growing shoots are removed.
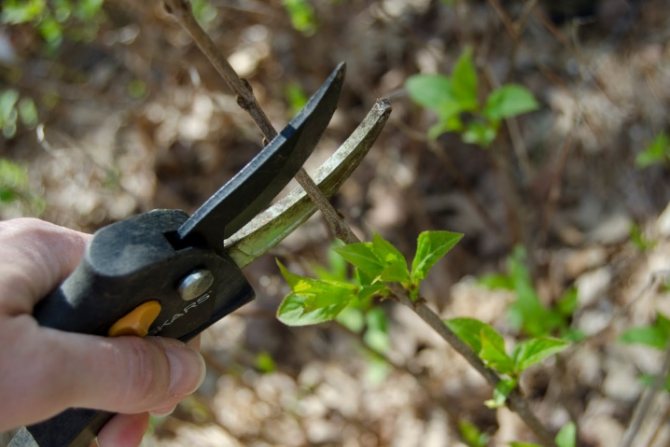
Panicle and tree hydrangeas are subject to mandatory pruning in autumn or spring. On each shoot of these plants, 2-3 buds are left, the rest is cut out. Gardeners advise you to cut off live shoots that did not have time to stiffen up, since they will not survive the winter anyway. Old bushes can be cut at the root.
In the fall, the plants should be prepared for winter. This is not only pruning hydrangeas, but also hilling the ground under the bush, covering it with a layer of mulch. Adult plants of winter-hardy varieties of hydrangeas do not need to be covered, but 1-2 year old plants of panicle and tree hydrangea, as well as all large-leaved hydrangeas, need shelter. As a rule, lutrasil, spruce branches, film and other covering material served as a good shelter for hydrangeas for the winter. You can learn more about how to prepare hydrangea for winter in our separate article "Hydrangea: Preparing for Winter".
As you have seen, planting and caring for hydrangeas does not require much knowledge and skills. And if you consider what a luxurious decoration of the garden will be the result of your efforts, you must agree that it is worth it. Tatyana Kuzmenko, member of the editorial board, Sobkor of the Internet edition “AtmAgro. Agroindustrial Bulletin "
Cutting method
Using the cuttings method, from 8 - 10 cm cuttings, with proper care, you can get a luxurious hydrangea bush, all covered with stunning flowers.
The productivity of this method is obvious, since we can get many viable seedlings from one mother bush. For cuttings, both summer and autumn seasons are suitable.
But only cutting hydrangeas in the fall involves growing seedlings in pots at home. In winter, planting material requires painstaking care, and only in spring, rooted and strengthened seedlings are transplanted into open ground.
Feeding hydrangeas
How to feed hydrangea in spring
In early spring, as soon as the buds begin to bloom, feed the hydrangea with nitrogen and potassium. This will allow the plant to actively grow green mass and bloom more actively.
- a tablespoon of urea or saltpeter
- a tablespoon of potassium sulfate
This mixture is diluted in 10 liters of water and consumed per square meter.
Lovers of natural fertilizers can be advised to use fermented slurry diluted with water. As usual, the concentration is 1:10. We also water: a bucket per m2 of area.
A barely pink solution of potassium permanganate is used three times per season, and feeding is useful not only for the roots: you can douse the plant from above to process all the green mass.
How to feed hydrangea in summer
Abundant flowering all season is a good load for any plant. Therefore, gardeners need to support the beauty with complex fertilizers, for example, "Kemira blooming" will provide all the necessary substances for hydrangeas.
The same organic matter will not be superfluous: slurry and bird droppings. Poultry droppings are diluted even more, since the nitrogen concentration there is much higher. Therefore, ferment the droppings first for two weeks and use a 0.5L can of concentrate in a bucket of water.
A good feeding of hydrangeas would be whey or yogurt containing lactic acid. However, you should not get carried away: 2-3 such dressings are enough for the entire season.
If you have any remaining pieces of bread or crackers, soak well in water and embed in the ground around the hydrangea. The beauty will not forget such a "dinner" and will thank you with beautiful flowers on strong branches.
How to feed hydrangea in autumn
Autumn feeding with potassium-phosphorus fertilizers will help to prepare for a successful wintering, to lay more flower buds.
- a tablespoon of potassium sulfate
- a tablespoon of superphosphate
We dilute the mixture in a bucket of water and pour 7 liters under each bush.
I would like to warn against the introduction of natural organic matter and nitrogen-containing mineral fertilizers in the fall: the hydrangea will begin to actively grow young branches, which will take away the strength from the plant and will not allow the existing branches to ripen. So the bush will become brittle and will not overwinter well.
The advice does not apply to already rotted humus, compost or fall leaves, where the nitrogen content is very low. Such mulching is even necessary to cover the hydrangea for the winter and prevent the roots from freezing.
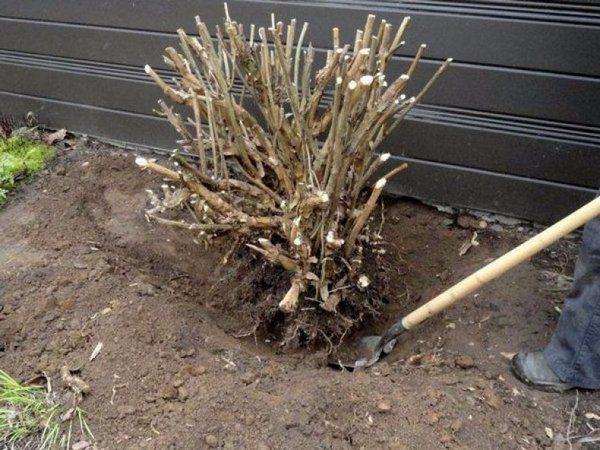
Cutting with lignified twigs
In September, when the time comes to cut the hydrangea, rid it of unnecessary branches, lignified cuttings are harvested for propagation of the shrub. Only ripe, completely healthy shoots are taken, on which there are 3 internodes.
- The lower oblique cut on the handle is made at a distance of 1 cm from the lower kidney, the upper one - at a distance of 2-3 cm from the upper kidney. Up to the second bud from the bottom, all leaves break off. The top sheet plates are cut by one third to reduce moisture evaporation.
- For rooting, a substrate is prepared: peat, coniferous litter - in one part, humus, earth and perlite - in 2 parts. A layer of fine gravel, 2 cm thick, is placed on the bottom of the pots.
- Cuttings treated with a root stimulator are immersed in the substrate at an inclination of 45 degrees, immersed in the ground by 4 cm.
- The pots with plants are covered with plastic containers on top or placed in a mini greenhouse for the entire rooting period - 30 days.
Cuttings are watered daily with non-cold water, making sure that there is no excess moisture in the substrate.
Successful rooting will be noticeable by the new leaves that the cutting will release. The greenhouse is removed from the seedlings, and the plants are kept until spring in a room with a temperature of +22 degrees, providing the hydrangea with additional lighting.
Description of the flower
Panicle hydrangea vanilla freise is a medium-sized shrub, approximately the same in length and width - 1.5-2 meters each. Its inflorescences are large, up to 25-30 cm in diameter, resembling a pyramid in shape. The color of the flowers tends to change during the season: at the beginning of flowering, it is white, then a pink border appears on the petals, and gradually all the flowers turn pink, moving towards a raspberry hue closer to autumn. However, at the top of the bush, some of the inflorescences remain snow-white. The flowering period covers the month from June to October inclusive.
The crown of hydrangea vanilla freise is asymmetrical, uneven, the shoots are strong and sparse, bending due to the severity of the inflorescences and giving the plant a rounded silhouette. The leaves are oblong, elliptical, rough to the touch, dark green colored, but with burgundy petioles.
Among all varieties of panicle hydrangea, this variety is distinguished by the largest and brightest inflorescences, fragrant and flowering duration. But in order for vanilla freise to consistently maintain its charming appearance all season, it is important to properly care for it.
Reproduction of hydrangea paniculata: photo, advice of a candidate of agricultural sciences
Of course, in the winter period we will have to tinker with them a little, a little, but this, absolutely, is the same as with all indoor plants. So there are no difficulties. But on the other hand, those branches, those large shoots that you cut off on your panicle hydrangeas and throw them into a compost heap, we can use for cuttings.Dozens and even hundreds of new plants can be grown in this way.
Cut branch of hydrangea paniculata
The main requirements in winter are the temperature at which to grow and the lighting. Well, we will add a little lighting with you, at least with daylight, and we will increase the temperature by isolating it from a cold window or from a cold window sill, at least putting a piece of foam plastic underneath. Here we are cutting the hydrangea - everything is already, it remains for them to live a little, insofar as the cold is about to come.
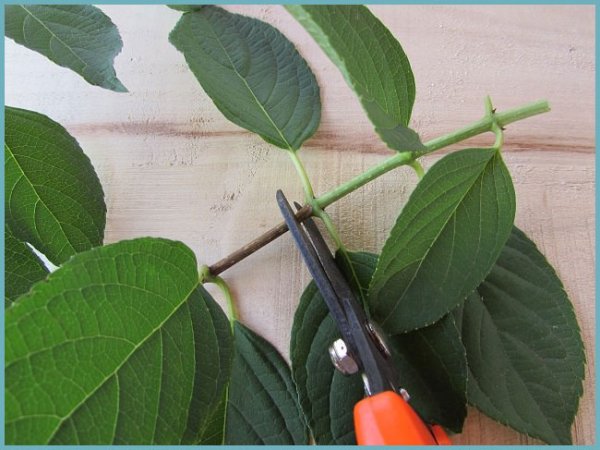
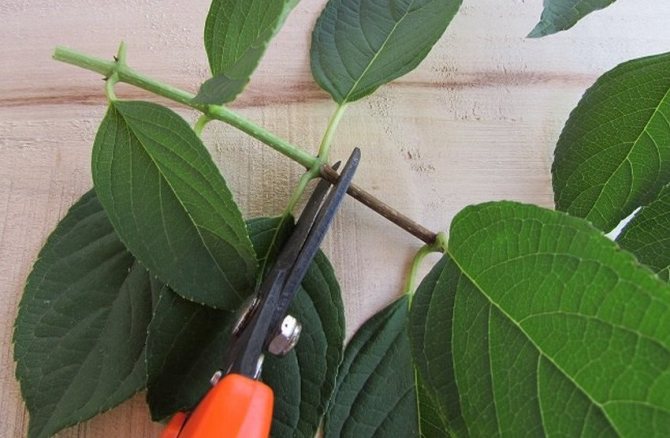
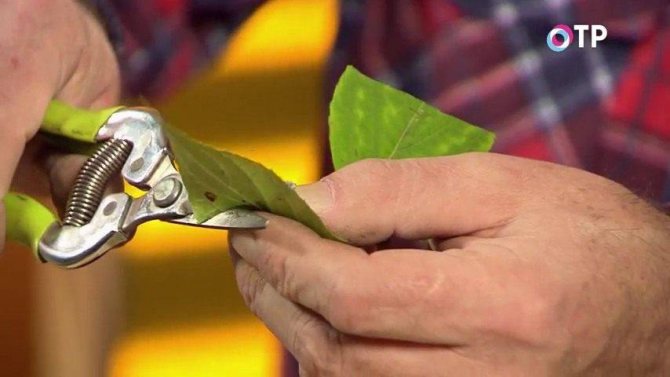
What should we do with you? What should the stalk consist of? The stalk should consist of a knot, we just make a cut under it. The leaves are opposite, so we make the cut perpendicular to the axis. In this way. Or slightly diagonally. Can be diagonally. The leaves can be shortened like this, you can trim them with scissors.
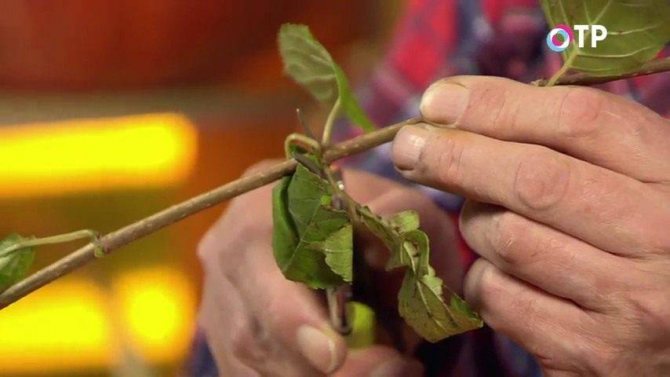
Making a cut under the lower knot of the cutting
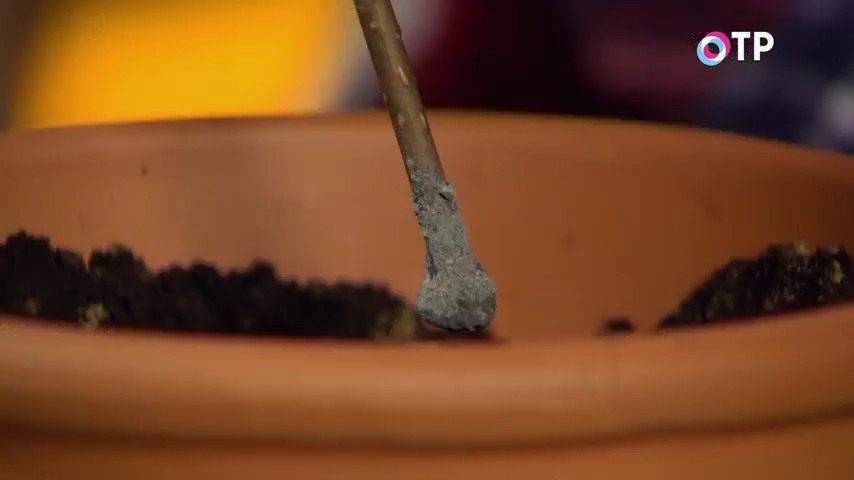
Then we go with you. Here we have a knot with you, here it is - a knot. Here comes the second knot. See, yes? And here is the third one. So what do we take for the cutting? One knot, the second, the third - we make a cut over the third knot, about two centimeters. This is how we cut.
We make a cut two centimeters above the third knot of the cutting
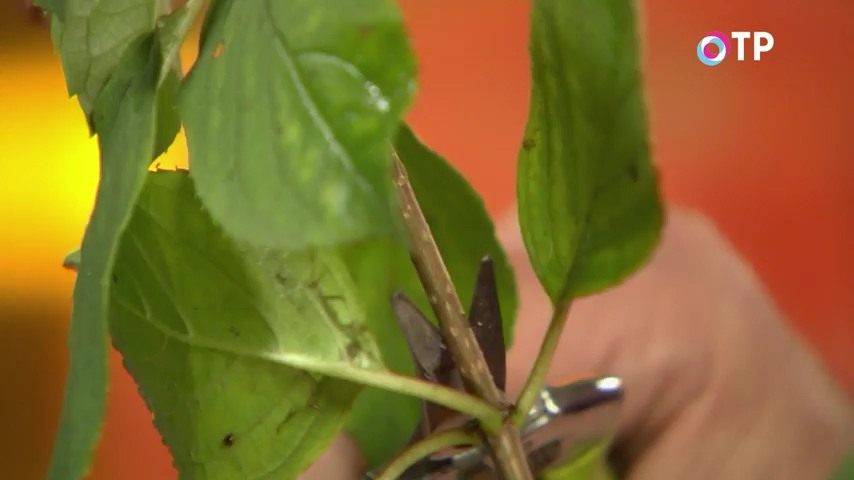
We remove the leaves on the middle node in this way, leaving the petioles completely. Then we shorten, shorten these leaves a little, i.e. leaf blades. This is how we shorten, so that the surface from which moisture evaporates slightly decreases and it is easier for the handle to work on sap flow.
Shortening the leaf blades
Here's a look at what the stalk actually looks like. Well, wonderful, look, just beauty. We'll put it aside.
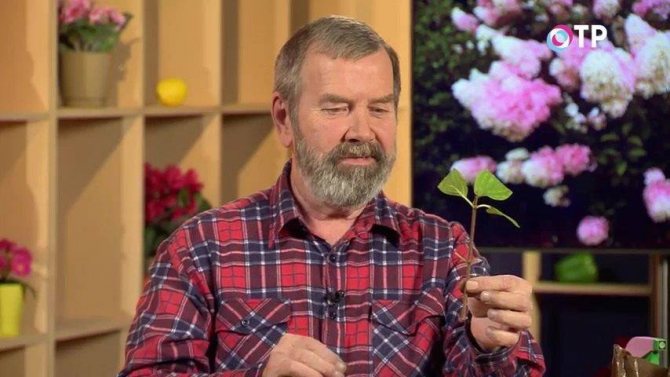
Prepared stalk of hydrangea paniculata
And now I will quickly remind you how to prepare the soil. Be sure to take a pot, a good pot. It is desirable after all to be made of clay, which breathes well and allows excess moisture to pass through. In the same way, such a pot can even take moisture from the air. We fill it to a height of about 3-5 cm with drainage material. Like this.
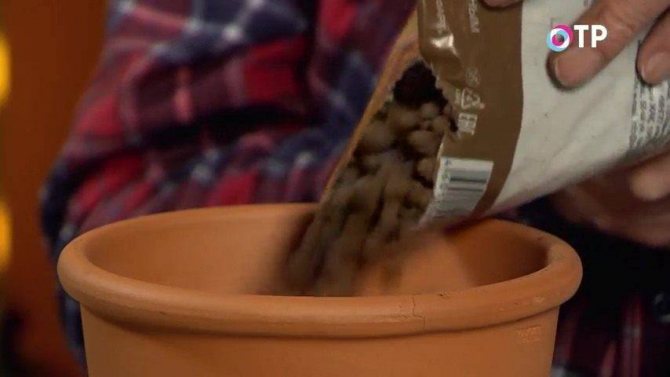
We fill the pot to a height of 3-5 cm with drainage material
Then I will fill in the soil that I prepared in advance. It consists of garden soil. Look - the usual garden soil from the garden. Then I went into the forest and brought coniferous litter and soil, which is under the coniferous litter, about 5-7 cm in thickness. Here she is so beige and gray. Needles, cones, twigs. And river sand. Here is such a free-flowing good river sand. I mixed in equal proportions, got a substrate.
I added a little humus after all. And I will pour this mixture into a pot and tamp it lightly. So, we pour this mixture almost to the edge, we tamp it.
The stalk, in order to better rooted, so that rooting occurs faster, I will take and process it in a growth and root formation stimulator. I love using these stimulants if the filler is charcoal.
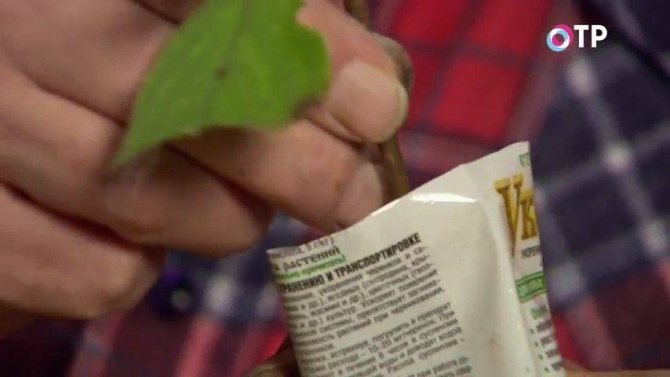
We process the cutting in a growth and root formation stimulator
If this stimulant does not stick well to the tip of our cutting. Look, you lower it like that. This way, this way. Well, a little bit. You can dip it in some water, dip the tip in some water, dip it in a stimulant, and then there will be more of the drug. Here.
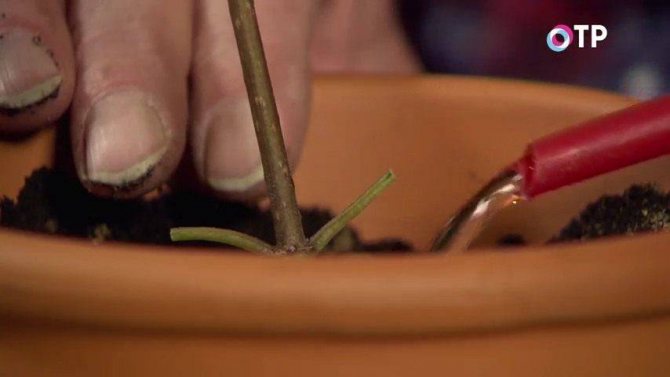
We make a small hole. About 3-4cm. This is how we insert the handle, on the corner a little, obliquely, on the side. Like this. Degrees 60-70.
We insert the cutting into the substrate obliquely
We squeeze more tightly and, of course, water. We water it neatly. No need to fill. Again, if suddenly you once overflowed the soil, the soil becomes very heavy, dense, then in this case just take a pack of newspapers, put them somewhere, on the floor, for example, put a pot and newspapers will draw excess moisture from your pot. In this way, you can get rid of excess moisture.
Squeeze the stalk tightly and water it gently
So that our leaves do not dry out, you can cover our landing either with a plastic bag, or with some kind of plastic caps, but so that the leaves do not touch each other, so that you do not jam them there, and so that the leaves do not touch the surface of this plastic container that you cover.

So that the leaves do not dry out, cover our planting
If you plant in a row, a lot, then there you will adapt yourself, you will understand what to cover in order to maintain good air humidity.
Dear ones, do not be afraid, do not throw away such gorgeous branches of your hydrangeas, but get dozens of new wonderful plants from them.
Reproduction of garden hydrangea by seeds and transplanting an adult bush
Hydrangea seeds do not require pre-sowing preparation, so they can be sown directly into seedling boxes. Precisely right away, because their germination persists for 2-4 weeks (for example, in panicle hydrangea). The seeds are very small, so they are not embedded in the soil. When hydrangea propagates with seeds, immediately after sowing, cover the box with glass or plastic wrap. At the same time, of course, do not forget that the soil must be moist. Seedlings will appear in about 20 days. Then the seedlings are grown for two years and only in the third year can they be planted in a permanent place in the garden. By this time, the seedlings should be 30-40 cm high.
Other specific hydrangeas also propagate by seeds, and varieties bred by breeders with this method of propagation lose their acquired decorative qualities.
It is difficult to propagate hydrangeas by seeds, so this is mainly done by specialists. In this case, their goal is selection.
These photos show the propagation of garden hydrangea by seeds:
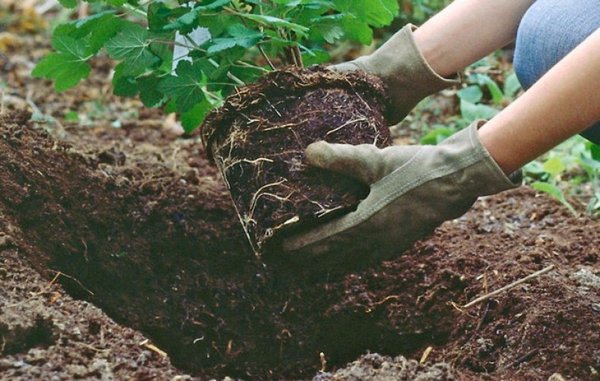
There is one horticultural rule that must be adhered to unequivocally - what blooms in the fall will more easily survive the transplant in the spring, and what in the spring - in the fall. So the best time to transplant hydrangeas is early spring. This is especially true for thermophilic hydrangeas that require shelter.
It is recommended to prepare adult bushes for transplantation in the fall. To begin with, they tie the hydrangea branches with a rope so that they do not interfere and do not break off. Then, a ring trench is dug outside the root system of the plant, approximately equal in length and width to the bayonet of a shovel. The trench is filled with compost and constantly moistened,
The plant will take root in the compost.
Before transplanting, the hydrangea should be dug along the outer edge of the trench and a bush with young unharmed roots should be removed. After such preparation, the plant will undergo transplantation easily and painlessly.
Do not forget an important rule: you need to place the root collar at the level of the soil. For the first time, it is necessary to install supports that will support the bush and will not allow strong gusts of wind to knock it down. After the root system has taken root well, the props can be removed.
Together with the spring transplant of the plant, you can make rejuvenating pruning of branches so that the bush quickly takes root in a new place.
The second axiom is to transplant under inspiration, then fresh thoughts appear. If very necessary, tree and panicle hydrangeas can be transplanted even in the fall. You just have to shade from the direct sun, and spray the bush several times a day. It is better to cut off all inflorescences - for fidelity. The plant, most likely, will not die, but next year it will not be too vigorous. However, the condition of the hydrangea will depend on the size of the bush and the luck of the gardener.
cultivation experience
at home ... read

The best way is with green cuttings
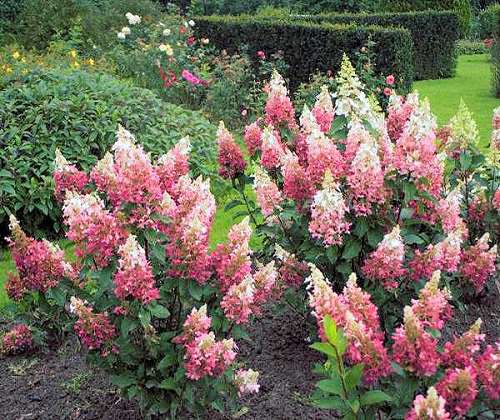
This way breeding hydrangeas is the most common among summer residents.
It is best to do green cuttings at the moment when the buds appear - this is about mid-July.
Let's define what a green stalk is.It is a leafy part of the stem with one or more buds.
I advise you to only cut the cuttings from young plants. If you already have old bushes, then you must first carry out anti-aging pruning.
Also, note that cuttings cut from lateral shoots (grown on last year's growths) in the lower part of the crown take root better, but it should be well lit. Such cuttings have fairly well-developed large buds and no signs of any disease.
Another very important point is the preservation of moisture in the tissues in the cut cuttings, since the success of rooting largely depends on this. To do this, we cut off the shoots in the early morning, at this time all the tissues of the plant are still filled with moisture, and then, in the process of further work with the cuttings, we carefully make sure that they do not dry out.
We immediately put the cut shoots in the water in the shade and start cutting the cuttings as soon as possible. Cut off the green top with a bud at the shoot, since it is not suitable for a cutting.
Divide the remaining green part of the shoot into several parts with 2-3 pairs of leaves. After that, we remove the lower leaves from the cutting, and shorten the upper ones by half and carefully put the cuttings in a solution of some root growth stimulator so that the leaves do not get into the solution.

This can be, for example, root, heteroauxin, or zircon. We make the solution strictly according to the instructions and keep the cuttings in it for 2 hours, preferably in a dark place.
If you did not have any root former at hand, then I advise you to prepare such a solution: dissolve 1 teaspoon of honey in one glass of water. Honey promotes the rapid formation of callus - a thickening at the end of the cutting, from which the roots grow.
Now you can start planting the prepared cuttings. We plant their prepared in advance a mixture of peat and sand (2: 1), pre-moistening it. For better rooting, you can cover the cuttings with jars and water them directly over the jars a couple of times a week (in the absence of rain).
If the weather is very hot and dry, it is advisable to water the cuttings every day. Cuttings that you have not covered, it is advisable to spray twice a day.
Usually, after 25-30 days (approximately by the second half of August), the cuttings take root and new leaves appear on them.
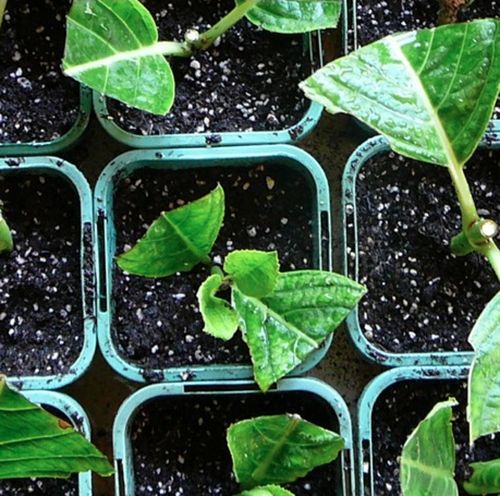
Banks can already be removed from them, but it would be better to cover the seedlings with several layers of any covering material so that early autumn frosts do not damage our still very young plants.
They also need to be well covered for the winter. We fill the seedlings with fallen leaves, then set a low frame above them and cover it with a covering material.
For better snow retention, you can additionally put spruce branches on top.
In the spring, already rooted cuttings are planted in the garden for further growing. We plant seedlings in a permanent place when they grow up enough.
Planting blanks and germinating them
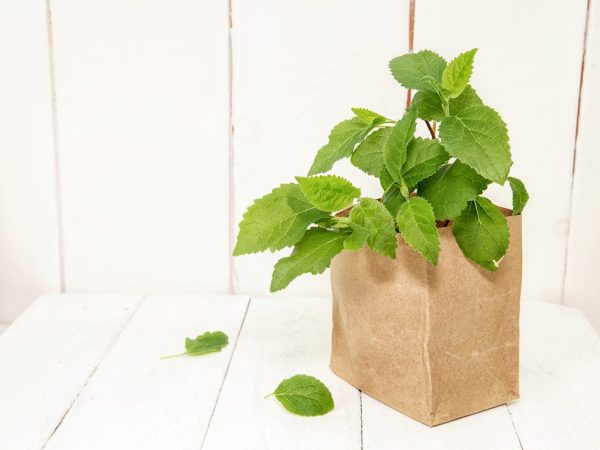
Young leaves will begin to appear on rooted cuttings
The next stage of hydrangea cuttings in the fall is planting the harvested material. Small depressions of 3-4 cm are made in the ground. Cuttings are placed in them. Place them vertically, at a slight angle. The installed material should not touch the ground with its leaves.
The distance between the seedlings is at least 5 cm. After they are sprayed with a spray bottle, and the soil is carefully watered. The container is covered with polyethylene or a glass jar. Further care comes down to simple actions. The seedlings are watered daily, the mini-greenhouses are ventilated and the room temperature is maintained in the room. Rooting time - 2-3 weeks. You can recognize the success of the process by the new leaves that have appeared on the cuttings.
Preparing hydrangeas for wintering
It is not necessary to cover frost-resistant species and varieties of hydrangeas for the winter. It is enough to slightly huddle the base of the bush.All the rest in early September stop watering, remove the lower leaves so that the shoots begin to lignify.
Before freezing, all the leaves of the hydrangea are cut off, leaving only the upper ones (they protect the apical flower buds). Then the branches are tied with a rope, carefully bent to the ground and laid on a wide board with nails driven in (a rope is tied to them).
Young bushes are also tied up, laid on spruce branches and pressed with stones or bricks. Then they are covered with dry leaves and covered with lutrasil (spunbond). In the spring, the shelter is gradually removed and shoots are raised.
Propagation of hydrangea by cuttings
0
Author of the publication
offline 1 hour
How to reproduce?
The reproduction methods of vanilla freise do not differ from the reproduction of other varieties of paniculate hydrangeas and are carried out only vegetatively. It should be noted right away that growing several copies of this plant is not an easy process, and in order to increase the chances of success, you will need to use stimulants for growth.
The most popular, simple, although not 100% successful method is grafting. The best period for the beginning of this process is the second half of June, when the shoots are growing very actively and have not yet had time to stiffen.
The shoot should be cut into cuttings so that each has at least 3 buds and a pair of internodes. If the cuttings are quite large, a half-centimeter incision should be made above each bud. You do not need to shorten the leaves.
Future shrubs should be planted in pots with a suitable substrate - 2 parts of peat and 1 part of sand, to a depth of 2-2.5 cm and at a distance of 5-7 cm from each other.Above, you need to build a mini-greenhouse and remove the container with cuttings in semi-dark corner. You constantly need to ensure that high humidity remains, spray often and do not forget about airing.
If everything is done correctly, the roots should appear 3-4 weeks after planting, and after another 1-1.5 months they should become visible visually (for example, through a hole in the pot). The sprouts now need more air. If several leaves have rotted or wilted, they will need to be removed.
Read about Dracaena's diseases, their treatment
and the reasons for the occurrence.
Learn about Geranium, its medicinal properties and contraindications here.
In this article, see about pruning a Panicle hydrangea.
In the spring, mini-shrubs need to be transplanted into larger containers and looked after as usual for indoor plants. Young hydrangeas can be planted in open ground only in the second half of summer.
Reproduction of hydrangea vanilla freise by layering often gives a positive result, although at first glance it may seem time consuming. The procedure is usually carried out in the spring or at the end of summer. What should be done?
- Dig a hole about 20 cm deep next to the mother shrub;
- Take the side branch and press it to the hole;
- Lightly cut the area that touches the hole and put a match (to speed up the rooting of the roots);
- Sprinkle the area where the roots are expected with soil, and pin the layering itself with staples, or crush it with stones or bricks;
- When the roots are clearly visible, cut the layers from the mother plant and plant them separately in a suitable pot.
Do not rush to send young seedlings for permanent "residence" in the open ground. Optimally, they should be given a couple of years so that they have time to get stronger and accumulate strength. Then the bloom of young vanilla freise will occur in the first year after planting and will be truly luxurious.
Harvesting cuttings and their processing
Having decided to propagate a beautiful garden shrub with a large-leaved, paniculate or tree-like hydrangea, you should take this activity seriously.
Each stage of vegetative propagation presupposes the presence of some rules, from harvesting cuttings to their rooting and subsequent planting in open ground.
The first thing a gardener will have to face is the preparation of planting material:
- For cuttings, non-lignified shoots are used. They take root faster.
- cuttings are taken from the root parts of the bush. They take root better than lateral shoots.
- The age of a bush suitable for grafting is no more than 10 years.
- The dimensions of the future cutting are taken into account. It should be 15-20 cm long and no more than 6 mm thick.
It is easy to get 2-3 cuttings from one shoot. The main thing is to leave 2-3 pairs of kidneys on each of them. Slices are made oblique at a distance of 1-1.5 cm from the eye. The tool must be sharpened, treated with alcohol-containing agents.
If the cut parts of the shoots have leaves, they are shortened. This is important for organizing the outflow of nutrients from foliage to root formation. Then the future planting material at home is treated with biostimulants. Use "Heteroduxin", "Kornevin", "Epin" and others. Before planting, they are soaked in a weak solution of potassium permanganate.
Pruning a hydrangea or how to make a hydrangea bloom
The branches of the hydrangea are brittle. To enhance the strength of the shoots, watering with a solution of potassium permanganate is recommended. And so that the bush does not lose its decorative effect, it must be cut twice per season: in spring and autumn.
Spring video crop
Pruning time: before bud break. Pruning procedure: remove frozen and broken shoots, thin branches that have not formed, shorten annual shoots to 4 buds.
The purpose of pruning: to reduce the amount of leaf mass, to promote abundant flowering of the shrub.
Pruning hydrangeas in the fall
Pruning terms: late autumn, after leaf fall. The order of pruning: cutting off dried inflorescences, thinning the shrub. The purpose of pruning: preparing for the winter so that the bush does not break from the weight of the snow.
There are also types of pruning - for rejuvenation of the bush and standard. To rejuvenate an old plant, you need to keep 3-7 of the strongest shoots, and remove all the rest by cutting them at the root. Already in the next season, the hydrangea will again become a lush and abundantly flowering bush. The standard form of hydrangea is rarely used and the goal here is to form a bush in the shape of a tree, leaving only one central shoot.
Hello dear readers!
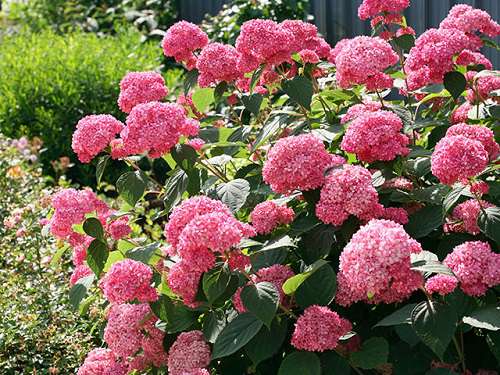
In the previous article on hydrangeas, we got acquainted with its species and varieties, with the requirements for growing these lovely flowers.
The question of how to breeding hydrangea... Of course, the easiest way would be to buy a seedling in a nursery.
But, firstly, it is still an expensive pleasure; secondly, there is not always the variety that you like and, thirdly, the very process of hydrangea breeding is also a very exciting experience.
well, like this how does hydrangea multiply? There are at least five ways to reproduce it: by seeds, cuttings, layering, offspring, dividing the bush.
Let's get to know each of them a little.
At what time to carry out cuttings of hydrangeas: terms
Spring, autumn and summer are suitable for propagation of hydrangeas by cuttings. But experts and gardeners still cannot come to a consensus on this matter. Some argue that the best time is spring. They substantiate this opinion by the fact that it is during this period that the maximum movement of juice along the trunk begins in the plant and the shoots receive the optimal amount of nutrients. That is why the sprouts will have a high chance of growing the root system in a short time.
Other experts are of the opinion that the best time is the middle of summer, when the plant is preparing to bloom. An important emphasis is made on the fact that the main thing is not to allow the shoots to become woody. Otherwise, the cuttings have little chance of rooting.
Useful tips for gardeners
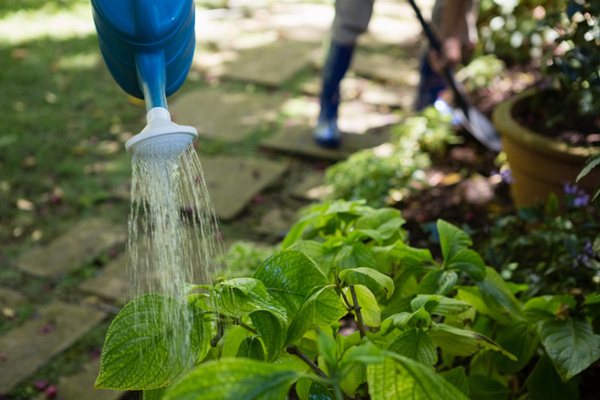
To make the hydrangea delight you with lush flowering, try to adhere to some rules, the implementation of which will allow the plant to feel as comfortable as possible:
- It is necessary to choose a place for the hydrangea on the site in such a way that direct sunlight falls on it in the first or second half of the day. On a hot afternoon, the plant needs shading.
- Hydrangea is very fond of acidic soil, in extreme cases, the soil should have a neutral reaction. For acidification, you can use high-moor peat, coniferous sawdust, citric acid solution.
- Cuttings root best at 20 ° C and 80% humidity.
- In the first year of planting, it is recommended to remove the buds that are forming in order to obtain the strongest, healthiest plant possible.
- You can diversify the type of bush by grafting a stalk of another variety of hydrangea on it. With the help of grafting, you will get an original plant, unlike any other.
- Hydrangea is very hygrophilous. It needs to be watered frequently and abundantly.
- Be sure to choose a zoned variety for planting. In unsuitable conditions for itself, hydrangea will not be able to reveal all its magnificent qualities. Treelike, paniculate and ground cover hydrangeas are considered the most frost-resistant.
Today hydrangea is again at the peak of popularity. However, this magnificent shrub is quite worthy of the attention of gardeners. Using one of the listed methods of hydrangea propagation, you can get the number of new plants you need and give your site an updated look.
We transplant and divide the bush
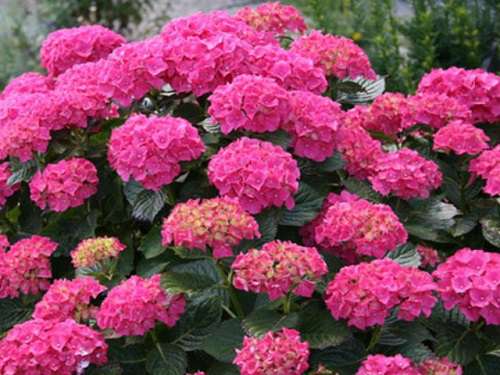
This breeding method is used mainly when transplanting hydrangeas.
It can be used for all types of hydrangeas except paniculate. It is best to do a hydrangea transplant in early spring.
First, we water the bush abundantly, then dig it out and thoroughly wash the roots from the soil.
Now you can divide the bush into several parts and immediately plant the divisions in a permanent place, cutting off the ends of the shoots and roots.
Propagate by layering
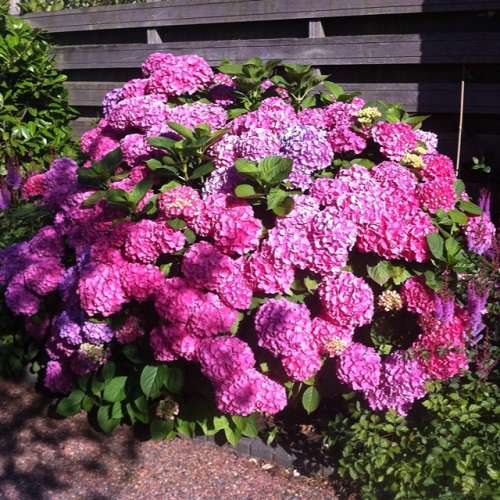
It is best to start the propagation of hydrangeas by layering in early spring, even before bud break.
First, we dig the soil around the bush, then level it well. We make radial grooves with a depth of 1.5-2 cm and put in them one shoot from the bottom of the bush.
To prevent the branches from straightening, we pin them with specially made slingshots and lightly sprinkle them with earth.
For a faster appearance of roots, you can apply the following technique: on the layers in front of the first well-developed bud from below, we make a constriction of thin soft wire in 2-3 turns, then when the shoot thickens, our constriction will be pressed into the bark and roots will appear in this place.
By the end of summer, several young shoots should have formed on each of our layers.
When they reach a height of 15-20 cm, they must be hilled, then we repeat the hilling every 7-10 days. And we do this until the height of the mound becomes 20-25 cm.
In October, we dig out the layering and separate the formed shoots from each other. By this time, their height should be about 50 cm.
We dig in the seedlings, and in the spring we plant them on the garden bed. And only after a year they will be ready for landing in a permanent place.
Planting hydrangeas
It is best to plant hydrangeas in the open ground in spring, but seedlings with a well-developed root system can be planted in early September. A pit measuring 50 × 50 cm is filled with loose fertile soil mixed with high-moor peat.
In no case should ash and lime be added to the mixture. The plant is planted so that the root collar is at the level of the soil. Then it is watered abundantly, and the trunk circle is mulched with peat or sawdust.
Diseases and pests of tree hydrangea
Most often of the pests of tree hydrangea, aphids are harmful. Please note: if there are ants on the site, then there will be aphids, so you need to deal with them in a comprehensive manner.
Of the diseases, leaf chlorosis is a frequent guest on hydrangeas, which can be eliminated by treating the plant with a solution of iron salts.
Reasons why tree hydrangea does not bloom:
- young age - hydrangeas begin to bloom only at 4-5 years of age;
- freezing of shoots;
- improper care of hydrangea in the garden (insufficient watering, lack of fertilizer and too much pruning).
Despite the fact that hydrangea requires attention and certain actions, it is becoming more and more popular with gardeners every year. And all because of their incredibly beautiful and numerous inflorescences that adorn the garden from June to September. Well, do not forget about the frost resistance of the tree hydrangea, which is another advantage.
Hydrangea cuttings processing and rooting methods
Hydrangeas of any kind can be grown from a cuttings: tree-like, petiolate, paniculate and even large-leaved. For this, it is necessary to properly prepare the planting material. A couple of days before the start of cutting, indoor plants are removed to a shaded place, and garden shrubs are covered with covering material. If a decorative action is growing on your site, about planting and caring for which you know a lot, then it is worth collecting cuttings with it in order to acquire new attractive bushes for landscaping.
After the hydrangea has settled in partial shade, they start cutting the planting material. To work with the plant, use only a professional disinfected tool. A pruner or garden shears are suitable. For cuttings, shoots with several pairs of nodes are chosen. The twigs are separated from the trunk with an oblique cut.
Large leaves are cut by ½ to reduce the outflow of nutrients into the crown of the seedling.
The collection is placed for a couple of hours in solutions of biostimulants such as "Epin" or "Cyclops". If this is not possible, the sections are powdered with any root formation stimulant: "Kornevin", "Heteroduxin". Thanks to them, the procedure for growing from cuttings takes half the time. The stems are sprayed with a weak solution of manganese to give them flexibility and disinfection.
Rooting in water
Before rooting hydrangeas with cuttings, you need to choose a suitable substrate or prepare an aqueous nutrient solution.
Modern flower growers practice the following methods of rooting hydrangeas:
- in water;
- in the soil substrate.
Rooting a hydrangea in water is quite simple. Moisture is a favorable environment for the growth and development of filamentous processes. Thanks to this method, a novice florist will be able to track and control the process of formation of the root system. Water itself is not a nutrient medium for plants, so growth stimulants and liquid fungicides are added to it.
Sequencing:
- Preparation of a nutrient solution from water and cinnamon (1 tablespoon of the mixture per 200 ml of liquid).
- Containers with dark or opaque walls are used as containers, since root buds hatch faster in the dark.
- Placing cuttings in containers, but no more than 2-3 blanks for every 200 ml of water. The lower part of the stem is immersed in liquid for 1/6 of the total length.
- Throughout the entire period of forcing the rhizomes, the water in the containers is not changed. As the moisture evaporates, add a warm, filtered solution.
- Autumn cuttings are rooted in shaded places, spring cuttings with a large number of leaves - on the sunny side.
- In order to avoid decay of the planting material, experts recommend regular aeration of the solution throughout the entire period of forcing.
After the plant has given several roots from 2 to 5 cm long, it is transplanted into slightly acidic soil.
Planting in a substrate
The following mixtures can be used as soil:
- planting cuttings in vermiculite and river sand in proportions 1: 1;
- perlite, garden soil, peat and river sand in proportions 1: 1: 1: 1;
- vermiculite, garden soil, peat, river sand in proportions 1: 1: 1: 1 with the addition of 1 g of citric acid.
Woolen ropes are laid out at the bottom of the landing boxes with a step of 5 cm.The ends of the ropes are lowered into containers with water, and one of the substrate options is poured into the boxes. Thanks to the wicks, the soil will be optimally moistened, and the rhizomes will not rot.
The bottom is wrapped in rags for better heating of the root buds and the speedy growth of the root system.
The workpieces are evenly placed over the entire area of the box with an interval of 10-15 cm at an angle of 45 °. The cut should enter the ground by 2-3 cm. The container is placed on a lighted area. As needed, water is added to the container, and if swollen buds are found on the shoots, hydrangea is fed.
With proper planting, the seedlings take root within a month, after which they are planted in individual peat or plastic pots. They can hold seedlings for up to 3 months before planting in open ground or moving to a larger pot for home growing.
Plant pruning
Even the most careful maintenance will not maintain the splendor of the Fraze vanilla if you do not prune it in a timely manner. This procedure is necessary for the correct formation of the bush and the stimulation of lush flowering. In the spring, the plant is cut by 2/3. Or rather, they completely remove all dried and frozen shoots during the winter, and make healthy ones 3-5 buds shorter.
In addition, the spring "haircut" of the hydrangea allows you to adjust the size and number of flowers. The shorter the branch is cut (up to 2 pairs of buds on each), the fewer inflorescences will appear, but each of them will be very large and voluminous. If the branches are not cut too much, the number of inflorescences will increase compared to the previous season, but they will become smaller.
In the fall, pruning of paniculate hydrangea is carried out in order to prepare the shrub for hibernation. For this, the remnants of dry inflorescences are uncompromisingly removed - this way the excess load on the branches disappears, which is completely useless for the plant during the rest period.
Hydrangea vanilla freise, if the tree is still very young, is also insulated for the winter at the roots. All that needs to be done is to spud the trunk within a radius of 10-15 cm with garden soil or compost. Adult shrubs are frost-resistant, and there is no need to insulate them.
Rooting in water
Cuttings can be rooted not only in the soil substrate, but also in a water-based nutrient medium. The advantage of this method is the ability to observe root formation.
Preparation for the procedure does not require much effort. You will need a container, better transparent, water and cinnamon. 1 tbsp. l. cinnamon is added per 200 ml. water. Following actions:
- The workpieces are immersed in a nutrient medium by 1/6 of their total length. For every 200 ml of liquid, there are no more than 3 cuttings.
- Cuttings taken in the fall are rooted in a dark place.
- Monitor the water level in the container. If it evaporates, the liquid is added. Use only warm and purified water.
Cutting hydrangeas in the autumn using water is difficult. The most common problem is material decay. This can be easily avoided by daily aeration of the liquid with oxygen.
The planting material will become ready for further use when its roots reach 2-5 cm. The transplant is carried out in a fertile slightly acidic soil.
How to plant hydrangea outdoors

When to Plant or Transplant Hydrangea? Spring is considered the best time to plant a bush. By the fall, the plant will take root, grow the root mass. But if you missed the spring planting time, you can transplant the bush in the fall.
Both single hydrangea bushes and groups are planted. With a single landing, a square hole is dug on the long side of 59-70 cm and a depth of 40-45 cm.In group planting, in order to form a hedge, the plants are planted at a distance of 1.5-2.5 m. The main criterion is the hydrangea variety. An important rule is that the volume of the planting pit is not less than the volume of the crown of the plant.
To transplant an adult plant (from 4 years old or more), they dig a planting hole with a depth of at least half a meter. At the same time, it is taken into account that the bush will grow comfortably if the distance from its center to neighboring plants is one meter.
When transplanting, the soil is enriched with the following additives:
- urea;
- leafy soil, humus, compost;
- potassium sulfate, colloidal sulfur to increase acidity;
- superphosphate.
After transplanting, the plant is not fed for two seasons, and then the feeding is resumed up to 3-4 times during the spring and summer.
Features of cuttings depending on the season
Cutting is permissible in spring, summer and autumn. The choice of the season is made by each gardener for himself personally. It is worth noting that in spring and autumn, woody shoots are better suited for reproduction, which are placed first in water and wait for the roots to appear.
Also here it is worth paying attention to the correctness of the cuts on the branches. If handled incorrectly, plants may not give roots. In these seasons, caring for young sprouts becomes more difficult. Plants require regular watering and ventilation.
In summer, green shoots from young plants are better suited for this. At the same time, care is much easier than in the spring or autumn.
Rooted cuttings care
When roots appear on the cut material, it is taken out and placed in a nutritious substrate of garden soil, peat and sand (2: 2: 1). Planting is carried out in small pots, which are later set in a shady place. Further care is limited to systematic watering.
Planting in a permanent growing place is organized only next spring. Pre-hardening is carried out on a veranda, loggia or balcony.
Hydrangea is a lush bush with bright flowers in the form of large bunches. Many gardeners are engaged in breeding this type of garden plant and know that only strict adherence to the stages and rules will help to correctly reproduce hydrangeas in the fall.
Popular varieties of tree hydrangea
- Hydrangea Annabelle - the bush reaches 1-1.5 m in height, and up to 3 m in diameter. The inflorescences of this tree-like hydrangea are large, white flowers. Evergreen shrub, leaves do not turn yellow in autumn;
- Hydrangea Pink Pinkushen is a low shrub (only up to 1.2 m in height), up to 1.5 m wide.It can be planted both in sunny areas and in partial shade. It blooms with pinkish-white flowers;
- Hydrangea treelike Grandiflora - blooms with cream flowers, inflorescences are numerous. Not to be confused with the large-flowered hydrangea;
- Hydrangea Sterilis - large inflorescences, with white-green flowers, which eventually become completely white. It blooms for a long time and abundantly.
Offspring
In this case, the hydrangea reproduces by young shoots. The method is not bad, however, it requires concentration of attention, accuracy and caution.
Step by step process
- Next to the hydrangea bush, the topsoil is removed so that the roots in this area are exposed. In this case, it is important not to touch the roots.
- The coppice shoot is separated along with a part of the root. It is better to separate several of these shoots at once in order to increase the chances of success of the operation.
- Shoots are planted immediately on the garden bed, as they are sufficiently adapted to the outdoor microclimate.
- In the garden, the shoots are grown for 1-2 years, after which they are planted in permanent places.
Specificity of cuttings of various types of hydrangea
In order to propagate hydrangea as efficiently as possible, it is necessary to take into account its typological features. For example, cuttings of panicle hydrangea are carried out in the spring, and tree-like ones - in the fall.
When preparing large-leaved varieties for transplanting, their leaves are always cut in half, and when planting in open ground, the tops of the seedlings are cut 10 cm from the ground for better rooting and tillering. In the case of picking up planting material from panicle hydrangea in the fall, woody shoots are chosen for cutting.
Video about 3 ways to grow new seedlings.
Growing from cuttings is a popular breeding method for hydrangeas. It does not require much time and effort, and the percentage of rooting shoots is relatively high. The most suitable time for propagation by cuttings is late spring. During cosmetic pruning of the bush, gardeners not only give it the desired shape, but also collect planting material. Over the summer, cuttings take root, undergo adaptation and become suitable for autumn planting in open ground, followed by wintering under cover.
Popular types of hydrangea
Hydrangea paniculata differs in high winter hardiness and looks very much like lilac. Flowers in large (up to 30 cm) pyramidal panicles are initially white, and then turn pink. Bloom in August.
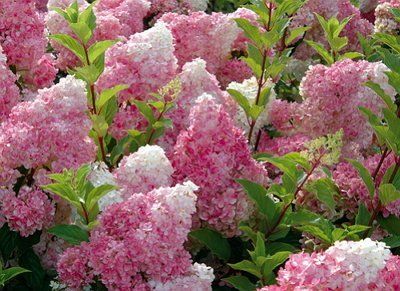
Hydrangea paniculata
Have Bretschneider hydrangeas when blooming, the flowers have a greenish tint, then they turn milky white, and at the end they turn purple. This hydrangea blooms in June-August. One of the most winter-hardy and drought-resistant species.
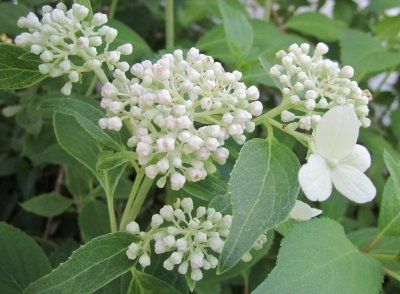
Bretschneider hydrangeas
Stalked hydrangea - liana shrub with suckers and aerial roots. Its flexible stems quickly braid the vertical support and are perfect for decorating walls, arbors. The flowers are whitish-green, collected in shields up to 20 cm in diameter.
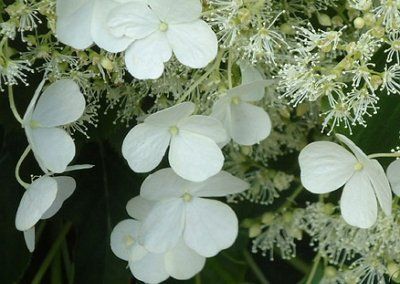
Stalked hydrangea
Hydrangea pests and diseases
Common shrub pests are spider mites and leaf aphids. To cope with the problem, spray the plant with drugs against these insects, which can be bought at the store. How to properly prepare the solution, read the instructions for the preparation.
Among the common diseases of hydrangeas, chlorosis is distinguished. This disease is indicated by a change (lightening) in the color of the leaves. The reason may be insufficiently acidic soil or frequent watering with tap water. As an emergency measure, watering with a solution of potassium nitrate and ferrous sulfate is used. Each component is separate, 3-4 days apart. For prevention, the plant is watered with acidified water.
Also, the shrub can be affected by downy mildew. Due to the high humidity in the rainy period, bushes growing in the shade are sick. Yellow spots appear on their leaves. Over time, the spots change color from yellow to dark brown. Treatment: spraying with a solution of copper sulfate with the addition of soap.
In gardens, hydrangeas are planted singly or in groups to create hedges, in the background of flower beds, in flower beds, in flower containers and in greenhouses or in rooms as a pot plant.
So the conclusions. For the proper growth and development of hydrangea, the plant needs:
- frequent watering;
- planting in acidic soil in a shaded area of the garden;
- feeding several times per season;
- spring and autumn pruning.
If these operations are not carried out, the hydranthea gets sick, blooms poorly and does not look well-groomed. But since the hydrangea recovers well, even such a plant can be saved by transplanting it and completely renewing it.
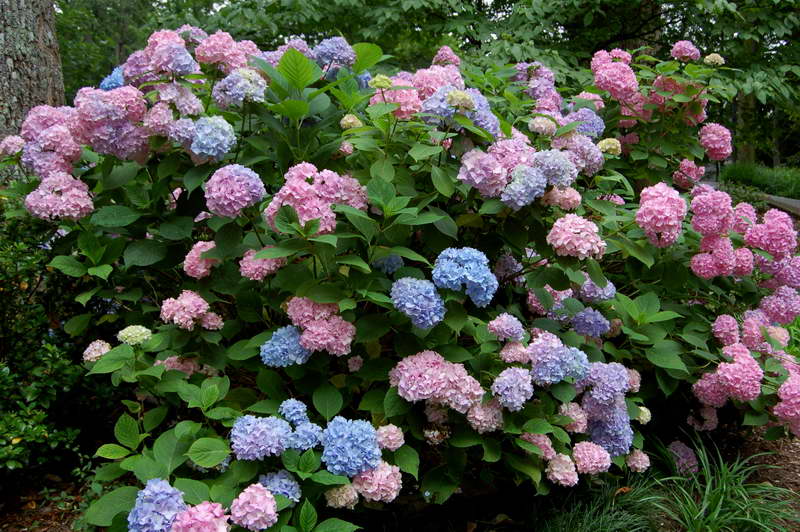
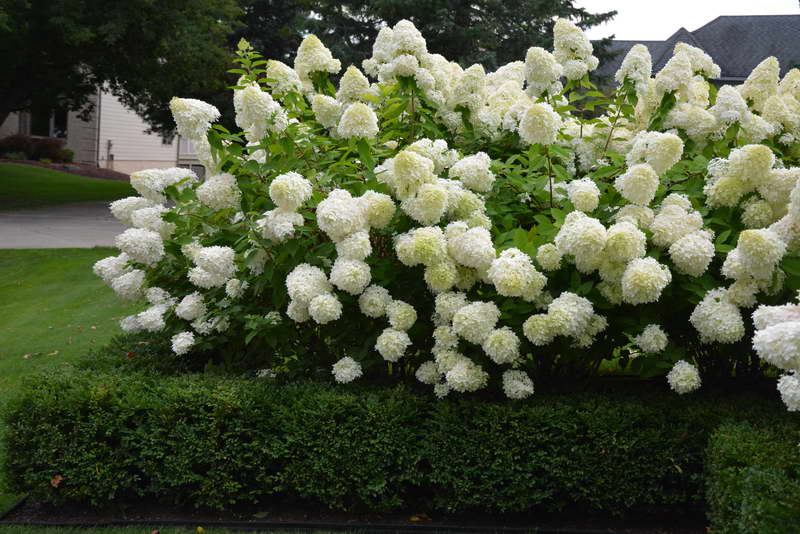
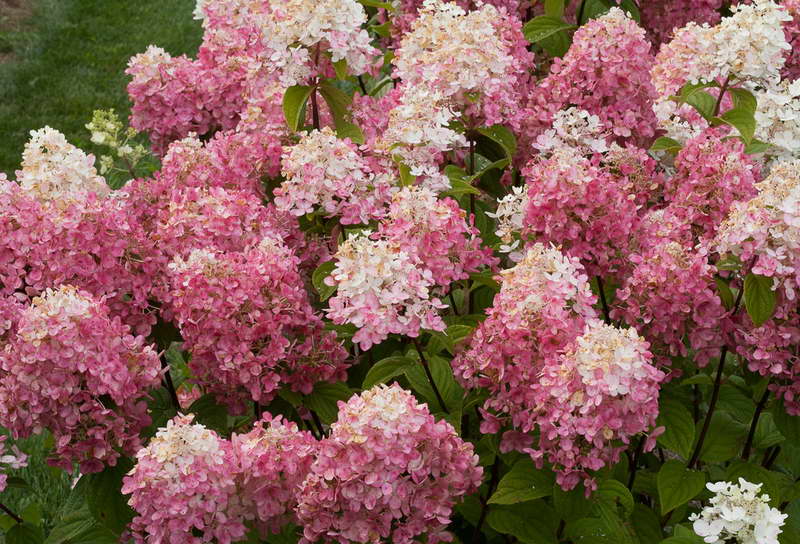
Loading…
Watering and feeding shrubs
Hydrangea is a moisture-loving plant. In summer, it needs to be watered abundantly (30-50 liters of water / adult bush) and regularly (1-2 times a week in dry sunny weather and once a week in cloudy weather). Mulched bushes can be watered less frequently.
For lush flowering, the plant needs top dressing. In the spring, at the beginning of growth, 20-25 g of ammonium or urea sulfate, 30-40 g of superphosphate, 30-35 g of potassium sulfate are added under each adult plant.During the budding period - 60-80 g of superphosphate and 40-45 g of potassium sulfate, and at the end of summer - 15-20 kg of rotted manure or compost.

Hydrangea is very fond of good watering.