Clara Vladimirovna (Novgorod-Seversky)
I cannot call myself an orchid collector, but I have some phalaenopsis that I would like to reproduce. I chose for myself the method of growing children using cytokinin paste. At first it seemed that I would not be able to cope with this jewelry procedure. Plucking up the courage, I decided to try it, and everything worked out for me. Literally 3 weeks after applying the stimulant, a shoot appeared on the treated kidney. And after another 4 months, I cut off the baby, transplanted it into a separate pot. Now I have two identical orchids, one old and the other young. Now I'm thinking about how to multiply others for gifts to my family and friends.
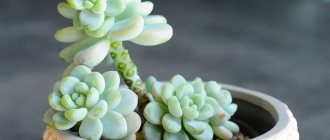
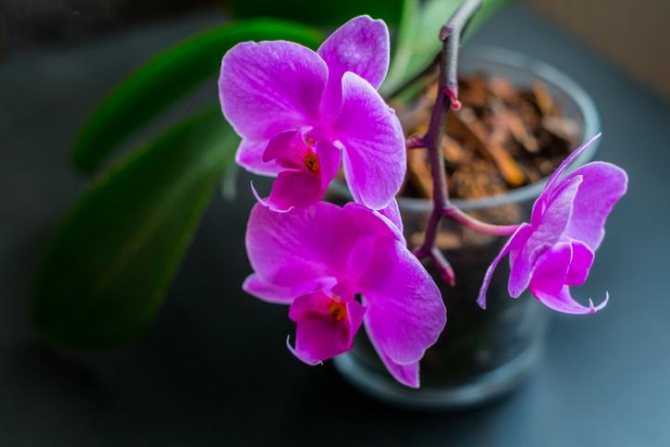
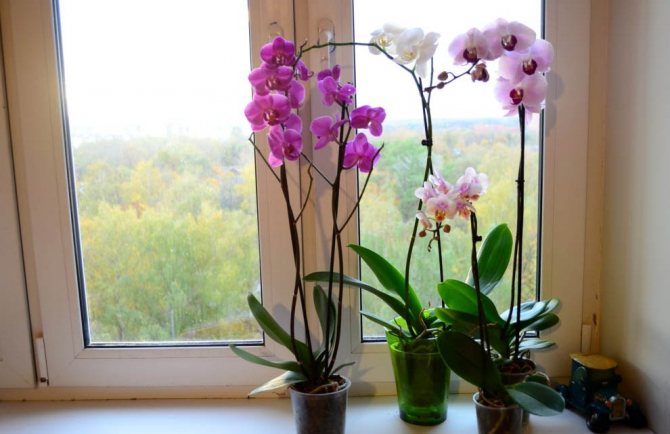
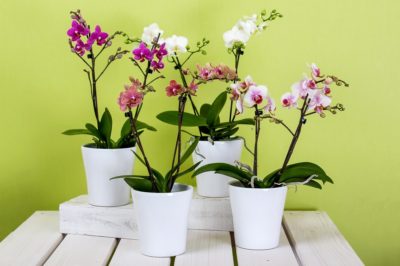
Phalaenopsis orchid has become a resident of our windowsills not so long ago, but has already gained fame as one of the most unpretentious species.
An overseas beauty, with minimal effort, perfectly adapts to almost any microclimate of an apartment, with proper care flowers adorn it up to 10 months a year.
For many, one stem is not enough, they want to have a couple more pots with the same plants. But not everyone knows how to propagate a flower correctly and safely.
Reproduction of orchids in nature
Before talking about the methods of reproduction of orchids at home, it is important to figure out what the plant needs for reproduction. In nature, there are over 20 thousand species of orchids, and each of them has its own characteristics and conditions in which the genus continues.

Speaking of orchids, we usually mean the plants that are most adapted to home conditions:
- phalaenopsis;
- dendrobiums;
- cambria;
- cymbidiums;
- oncidiums;
- wandas;
- miltonia;
- cattleya.
How do orchids of these species reproduce in nature? Some of them belong to the sympodial species, which have many growth points and easily reproduce by division, and some are monopodial species, which reproduce mainly with the help of children. A common factor in the continuation of the genus in all flowering plants, including orchids, is seed reproduction. Once in the soil, the seeds are completely dependent on the beneficial fungal flora, which gives them a nutrient medium and the ability to germinate.
In a similar way, the genus is continued in domestic plants. Sympodial species - dendrobium, cambria, cymbidium, cattleya, oncidium, easily reproduce by division. Every year they give new and new growth, as a result of which the owner somehow has to plant them. In monopodial orchids, this process is more complicated and in order for the orchid to give birth, it is necessary to create optimal conditions.
Read on how to do this.
Classification by type of height
All types of orchids, according to their characteristic growth characteristics, are divided into two large groups:
- Sympodial - plants consist of numerous shoots, which are interconnected by a rhizome. This is a modified stem, creeping along the surface of the substrate, from the nodes of which leaves and pseudobulbs with bunches of young roots are formed. They have several points of growth, and each new sprout turns into a pseudobulb (a thickened orchid stem with a supply of nutrients). This type includes "Lelia", "Cattleya", "Dendrobium".
- Monopodial - they do not have rhizomes and pseudobulbs, but contain one vertical stem and only one apical growth point. Growth is carried out by lengthening the stem and laying leaves at the top. In the axils, between the leaves, buds are laid. Lateral peduncles or axillary aerial roots are formed from them. Over time, from below, the leaves grow old and die off, and the young ones develop higher along the shoot. Representatives of this type are "phalaenopsis" and "vanda".
From what type the orchid belongs to, its reproduction method to some extent depends.
Conditions for breeding
Breeding orchids requires a number of skills and can be challenging for beginners unfamiliar with plant cycles. It is recommended to provoke the appearance of children with various stimulants only in healthy flowers, since a plant with weak or diseased roots may not withstand the load and die.

The season is also important, as light, temperature and humidity create good conditions for flowering and for the formation of new shoots. Most often, orchids at home begin to multiply in the spring: after a short day of light in the winter season, an increase in light signals the plant that a favorable period is coming. If the other conditions are suitable for the plant - temperature and watering regime, then the plant will begin to give new shoots.
Next, let's talk about what methods of reproduction of orchids are acceptable for home conditions, and how the owner of these beautiful flowers can be influenced by the continuation of their genus.

Growing on a cut peduncle
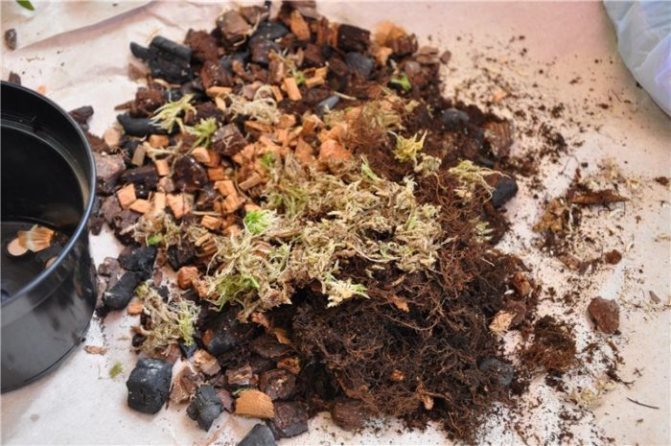
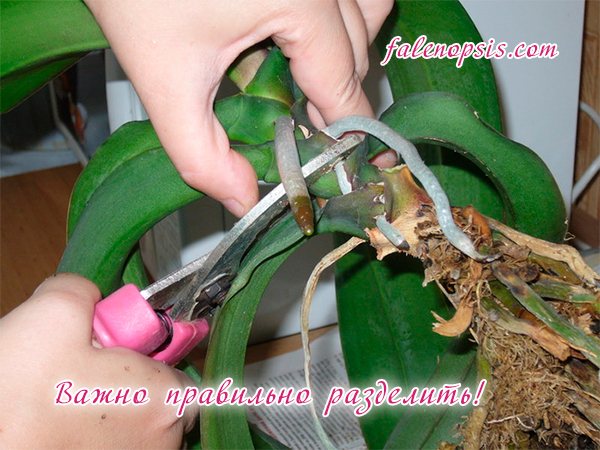
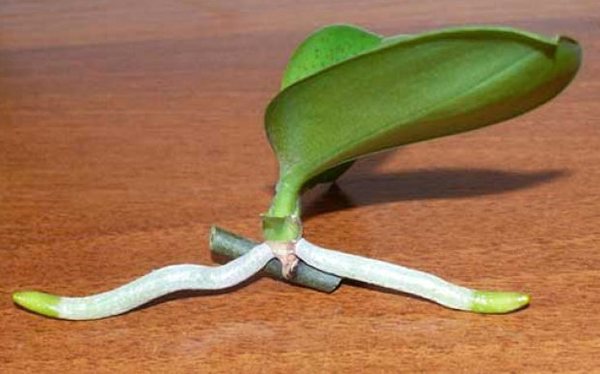
Some growers prefer to grow babies on a cut peduncle. For this, the flowering stem must be cut off at the base. After that, it is cut into several pieces. The size of each fragment should be 3-4 cm. At the same time, there should be a “sleeping” kidney in the center of each piece.
After the peduncle has been cut into separate fragments, all the sections obtained during this procedure should be sprinkled with activated charcoal or charcoal powder. In this case, the resulting cuttings must be placed in moist sphagnum moss or in a mini-greenhouse. The cut peduncle should be at a temperature of + 25 ... + 28 ° C. It is also necessary to maintain a constant humidity indicator in a mini-greenhouse or room. Only in this case the harvested cuttings will be able to germinate successfully.
Reproduction of orchids by division at home
As already mentioned, the division method is generally suitable for sympodial species. Since all pseudobulbs are united by a rhizome, or as it is also called, a rhizome, new growths are just a matter of time. But it is no less important to know that it is necessary to divide the plants only in cases where the pseudobulb becomes very much and the entire root system no longer fits in the pot.
In addition to dividing, there is another option: transplant the overgrown plant into a larger pot. As practice shows, sympodial orchids with a large number bloom more luxuriantly, are distinguished by better immunity to diseases and pests. Therefore, here you need to be guided by the principle "Measure seven times."
If you nevertheless decide to divide an orchid, the question of how to divide it without harming the flower will certainly arise. For this, it is important to determine where the rhizome is located, and to make division along it. It is extremely important that in each division there are at least 3 pseudobulbs, the more there are, the faster the orchid adapts after division.
Another important feature of sympodial orchids is that the faded pseudobulb will no longer bloom, therefore, dividing the plant, you need to leave the old ones with new growths, they will nourish and support the young plant for the first time, and then dry out over time.
The action plan for separation should be as follows:
- We take the plant out of the pot and use a sterile tool to separate the pseudobulbs.
- The rhizome slice should be processed. For this, a garden pitch is suitable or you can simply drip it with wax or paraffin.
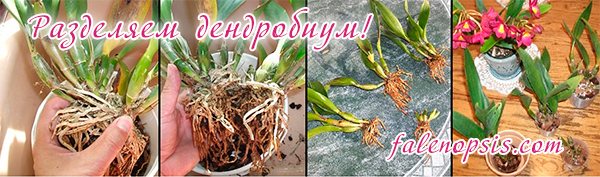
For many adherents of phalaenopsis, who have not encountered other species before, the question of how to plant a dendrobium orchid becomes very relevant. It should be noted that, although dendrobium belongs to the sympodial species, division is not the only type of its reproduction. Sometimes children begin to grow on pseudobulbs, which eventually grow roots.
After the baby releases a new growth, followed by a new pseudobulb, as well as grows sufficient roots for independent life, it can be removed using a neat cut with a sterile sharp instrument.
Important advice! Do not remove babies with the same height or pseudobulb from the dendrobium, as well as new shoots without aerial roots. It is impossible to propagate an orchid of this type without roots, since they provide the basis for growth, and not vice versa.
Recommendations and contraindications
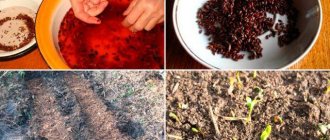
Cytokinin paste is an effective stimulant that can awaken dormant buds, activate growth and normalize metabolism, and it also helps to restore normal plant life after stress.
Nevertheless, before using it, you need to carefully read the instructions for use and be sure to take into account possible contraindications.
Recommendations for use:
- the paste must be warmed to room temperature;
- select several healthy buds on the peduncle (no more than 3!);
- with a scalpel or tweezers, separate the upper semicircular scale;
- treat the opened area with water, and then apply cytokinin paste evenly.
The main contraindications:
- the orchid was recently transplanted and adaptation to the new soil has not yet been completed;
- flowering period;
- the plant has undergone hypothermia, weakened or damaged by harmful organisms;
- too young, underdeveloped plant.
If all the necessary recommendations are followed, the result will not be long in coming, the first changes will be noticeable in a week.
We suggest watching a video about cytokinin paste and its use for awakening the kidney:
Reproduction of orchids by root children
Reproduction of orchids by root children at home is practiced quite often, but it is important to understand in which cases this should be done. Monopodial species of orchids reproduce by root children, such as:
- phalaenopsis;
- wanda;
- vanilla;
- brassavola.
One of the most common questions for novice growers is how you can grow an orchid from the roots. To answer it, you need to define the concepts.
It is almost impossible to grow an orchid from the root in a natural way: this happens either in the event of the death of the mother plant or in the case of rejuvenation of the old orchid. Moreover, a prerequisite is that the roots must be strong enough and be on the remnant of the trunk, which the orchid growers often call "stump".
In other cases, after cutting off a piece of root, it is completely pointless to wait for a new growth point to appear from it.
So how to plant an orchid to get root babies? Florists for this use the division of the bush horizontally. However, it should be noted that this method is quite extreme and requires compliance with the conditions:
- the plant must have a healthy root mass;
- on the trunk of the orchid there should be at least three aerial roots, 5-8 cm long.
The action plan will be as follows:
- We take the plant out of the pot and once again carefully examine the roots.
- We outline the place of trimming: usually, when dividing with the roots, two lower leaves are left, and the upper part, together with the aerial roots, is separated with a sterile instrument.
- We treat the sections with antiseptics: phytosporin or crushed activated carbon.
- We plant the roots together with the remaining leaves in an old pot with an old substrate and reduce the watering by 2 times.
- We plant the top in a new pot according to the size of the aerial roots, using a new substrate.
- Watering the tops after 4 days, fertilizing - not earlier than 30 days.
- Succinic acid can be used to support the split plant by wiping the leaves or spraying with a fine dispersion spray bottle.
Further, caring for the parcels is no different from the usual plant care. After a while, green shoots may appear on the "stump" - this is the root baby. After its appearance, fertilizers should be applied 2 times a month by the root method.
In addition to the reproduction of orchids by roots, there are a number of ways to make several from one plant. How to do it - read on.
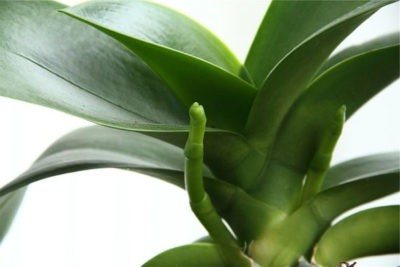
What is a flowering shoot?
During the flowering period, the orchid releases a peduncle - a long, straight shoot directed upward or towards the light. It is on it that buds are formed, which subsequently bloom with wonderful flowers, which are the main pride of this plant.
At the initial stages, it is almost impossible to distinguish a peduncle from an aerial root., both begin to grow at the junction of the leaf and trunk, and look almost the same. The difference becomes apparent when the scion reaches a length of several centimeters.
Reproduction of orchids by cuttings
In order to propagate an orchid by cuttings, you need to know for which species this method is suitable. Oddly enough, both sympodial and monopodial species can be bred by cuttings. In the first case, grafting will be done with a pseudobulba, and in the second, with peduncles.
The best results for this type of reproduction are given by dendrobiums and phalaenopsis. However, negative experience is also noted, since the result depends on many factors: environment, lighting, and most importantly, the genetic characteristics of the orchid. Experienced flower growers also do not recommend using cymbidiums, cattleyas and other more expensive species for this.
So what do you need to do to propagate by cuttings?
- We need a peduncle or pseudobulb. The peduncle can be cut off after it begins to dry out, and the pseudobulb can be taken from any faded dendrobium.
- We need a mixture of fine fraction bark and sphagnum moss.
- Slices of peduncles can be dried, slices of a pseudobulb can be treated with phytosporin or filled with paraffin.
- We place the prepared substrate in a greenhouse and put the cuttings there.
- As the substrate dries, it should be moistened with a spray bottle. The temperature should be maintained at 23-25 degrees, there should also be diffused light and regular ventilation.
The first results can be seen in 1-2 weeks. Dormant buds can wake up on the peduncles of the phalaenopsis, new processes can appear on the pseudobulbs of the dendrobium, which will eventually become children.
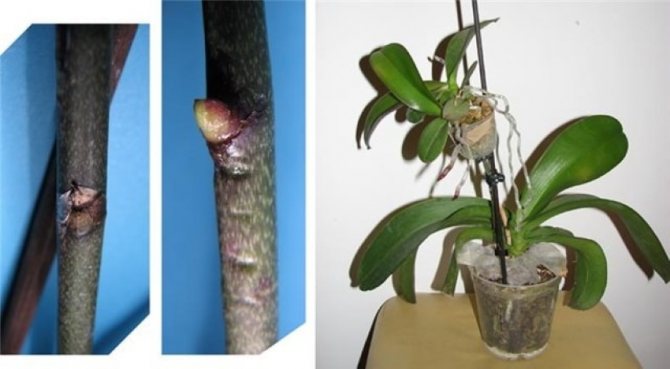
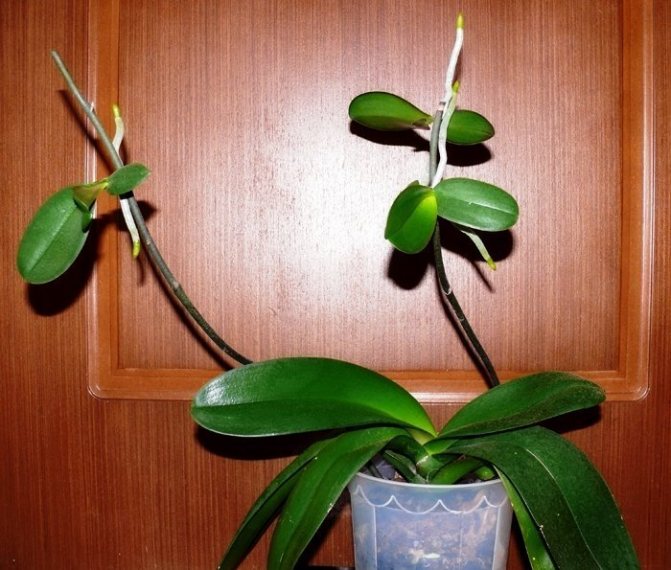
Growing per plant
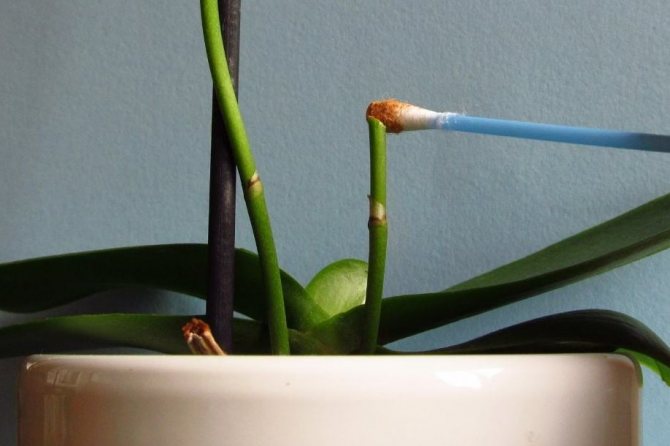
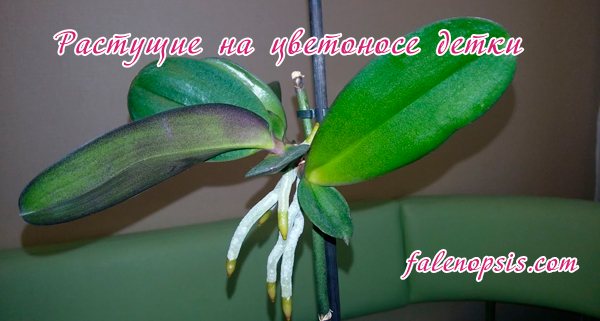
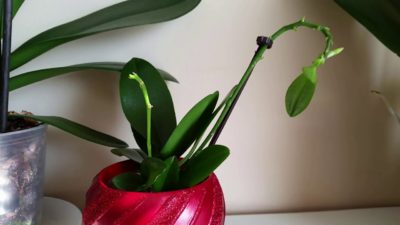
Florists often raise babies directly on the mother's body. To do this, after the end of the flowering period, the peduncle should be shortened. It is necessary to cut the flowering shoot above the "sleeping" bud. It is necessary to retreat from it 1.5–2 cm. It is necessary to remove the integumentary scales from such a kidney. This procedure injures the stem, leaving a small "wound" on it. It must be treated with cytokinin paste. This paste contains the plant hormone cytokine. As a result of processing, it gets inside the flower and stimulates the growth and development of the bud. When growing a lateral process on a peduncle, it is enough to prepare 1-2 "dormant" buds.
After the work has been done, the orchid should be placed in a warm room. Lighting must be organized in such a way that directed sunlight falls on the treated kidneys in the evening and in the morning. If there is insufficient humidity in the room, then the buds should be additionally wrapped in a plastic bag and left until pecking.
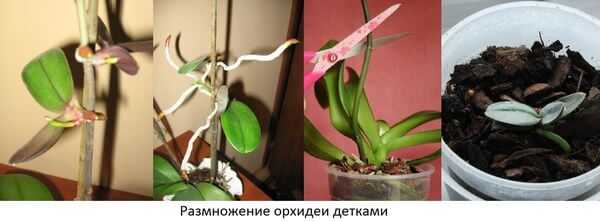
Reproduction of orchids by children
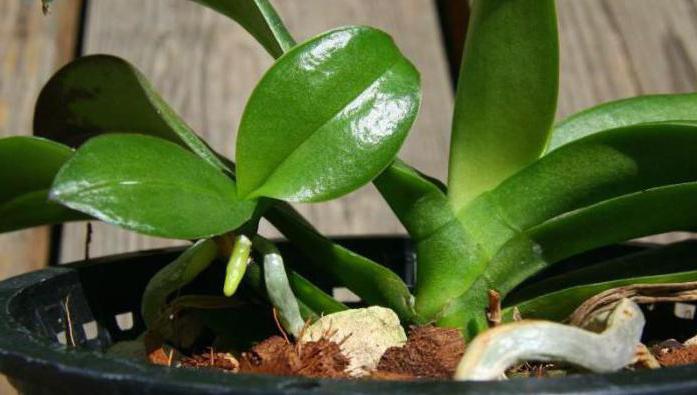
This method is most relevant for the most common phalaenopsis orchids. It is these plants that reproduce very readily even without the additional intervention of the grower. Reproduction of orchids at home with the help of children can be triggered by hormonal pastes containing cytokinins. However, children often appear both in the roots and on the trunk of the plant itself.
Important! Paste for orchid propagation in the CIS is sold freely, but it is rather difficult to purchase it in European countries. It has side effects and uses.
This paste contains phytohormones - cytokinins, which accelerate plant metabolism, enhance the growth of new shoots and buds. However, it should only be used on healthy and mature plants.
The natural appearance of children in orchids is possible immediately after flowering. The upper or middle bud on the peduncle wakes up and gives either new growth or a new shoot. Read on to learn how to plant orchids using paste.
Baby on a peduncle
In order to get a baby on a peduncle, you can use cytokinin paste. The action plan will be as follows:
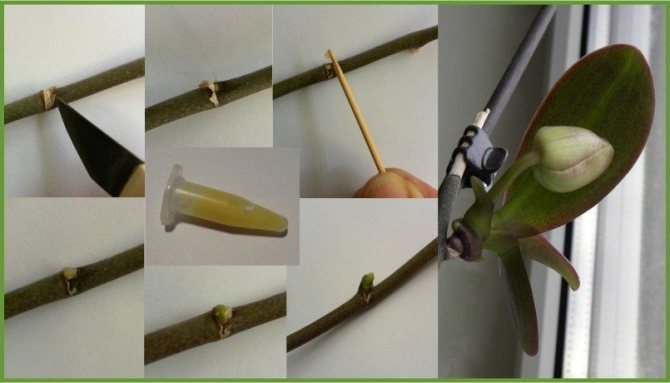
- Using a sterile instrument, it is necessary to bend the scales covering the sleeping kidney.
- Scratch the plant tissue next to it with a calcined needle or clean toothpick.
- Apply the paste to the sleeping kidney in the amount of a pinhead.
- Kidney awakening can be observed on days 7-10.
Reproduction with orchid paste can result in 2-3 new shoots per bud. Such mutations are very harmful to the aesthetic appearance and lead to severe stress on the mother plant. This can happen both due to an overdose of hormonal paste, and due to genetic pathologies in development. It is difficult to say how strong or weak the baby will be, but, according to numerous reviews of flower growers, the offspring after cytokinin paste is an order of magnitude weaker, and the flowering is not as lush as in the mother.
Another important point in the propagation of an orchid by children is the need for proper rooting of the baby. Quite often, young growths are in no hurry to build up the root system, but new leaves are kicked out one by one and may even bloom. This situation negatively affects the mother, she may not have enough strength to feed the baby.
A good way to quickly grow roots in young animals is to create a cushion of moss, or so-called planting in a pot right on the mother's peduncle. For this we need:
- A small pot with a diameter of 2.5 cm or a cut-off plastic bottle of 0.5 l.
- Scissors.
- Scotch.
- Sphagnum moss.
- Pin.
At the bottom of the pot we make a hole for the diameter of the peduncle. Using scissors, cut the pot vertically to the hole and wrap the pot around the peduncle so that the baby is at the level of ¾ of the pot. We fix the container from below with a clothespin. We glue the walls of the pot with adhesive tape and put sphagnum moss inside, having previously moistened it with water and a rooting agent. A good drug for this is "Kornevin" - it is available and inexpensive.
This method adapts young plants well to independent life, while the undoubted advantage is that the orchid immediately learns to feed on the roots, this reduces the stress during transplantation. Among other things, flower growers note a positive point in the fact that the roots immediately grow inside the pot and the transplant will be less traumatic.
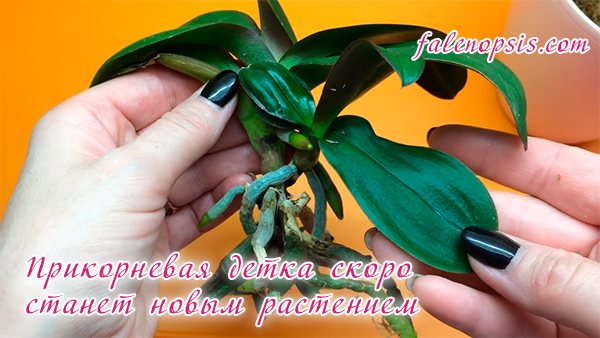
Root baby
Basal babies, or as they are also called, basal, can appear in monopodial orchid species. Most often they begin to grow in phalaenopsis, but it is impossible to induce an orchid to such a type of reproduction. As a rule, a basal baby appears if the mother plant is in danger and the plant does not want to interrupt its life cycle.
Experienced growers categorically do not recommend smearing the trunk of healthy phalaenopsis with cytokinin paste - this method can be detrimental to the plant.
Fundamental rules
Despite the fact that the process of reproduction of an orchid with the help of a peduncle is considered the simplest, it requires strict adherence to certain rules, otherwise the result may be far from the desired.
The factor that triggers the transformation of a dormant bud on a peduncle into a new plant is stress.
That is why it is so important to maintain the right conditions throughout the entire breeding period.
- Temperature should be higher than room temperature, not lower than +25 degrees. It is not recommended to exceed the mark of +30 degrees, this will most likely lead to overheating and possible death of the plant.
Watering must be reduced to twice a month.- Humidity should remain high - 60-80%.
- Use top dressing and fertilizers are strongly discouraged.
The optimal breeding period for orchids is from late February to early summer. It is during this period that the chances of success are greatest.
If, even if all the conditions for awakening the kidney were not achieved, you can use cytokinin paste, which can be purchased at any flower shop. It is a hormonal agent that stimulates the growth and division of new cells.
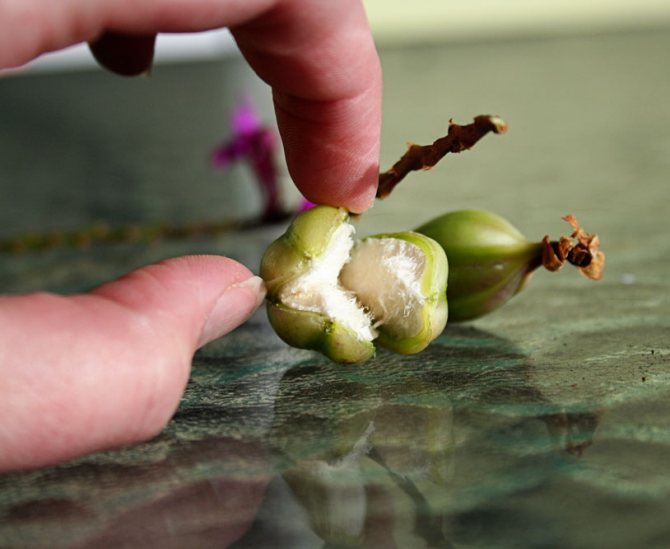
Bulb orchids
Quite often on the forums they write about how to grow an orchid from a bulb. Many do not know what they are in general. The bulbs or "carrots" are pseudobulbs of the cicnades orchids that grow and sell in Vietnam. Reproduction is the same process as grafting, but the care of the sprout is slightly different.
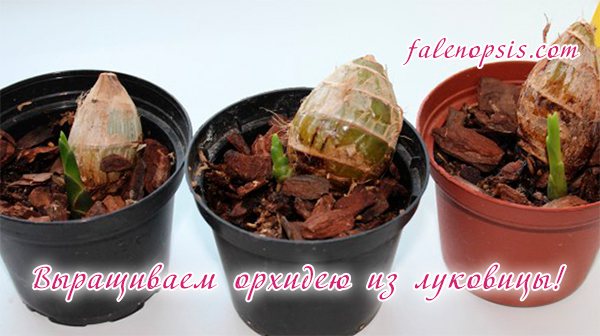
The bulb has a rounded shape, about 15 cm long, and outwardly very much resembles the pseudobulbs of dendrobium. It is quite simple to grow it: the bulb is planted with roots in dry bark, slightly deepening its body so that the root collar is open. For strengthening, the cicnades sprout can be fixed with a wooden stick.
You do not need to water the bulb until new roots are formed. However, the growing plant will need warmth and good lighting.
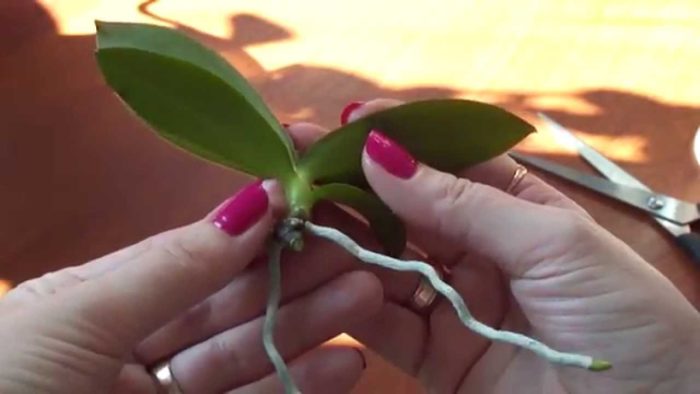
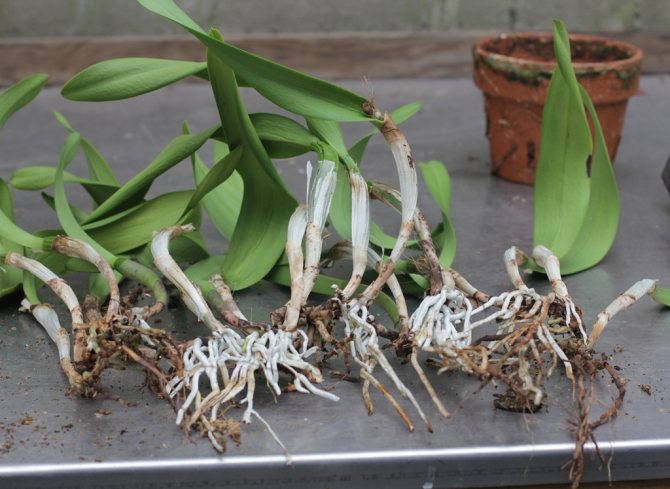
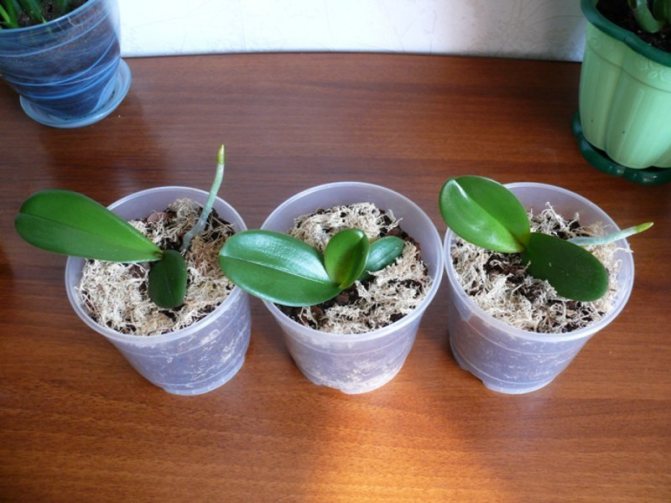
When and how to separate the baby
After the formation of the baby on the plant, it is necessary to properly separate the process so as not to injure either it or the mother's body. For this operation to succeed, the timing must be correct. A baby that can take root must meet the following requirements:
- have developed roots. They should be several centimeters long;
- have a couple of formed true leaves;
- outwardly, the process should be healthy.
From the peduncle, the baby, ready for this, should be cut off carefully in order to minimize injury to both organisms. You need to cut off the process with a gap of 1.5 cm.After disconnecting the baby, it must be given 30 minutes for it to dry well. Then we process the slices with activated carbon. If not, use of cinnamon is allowed.
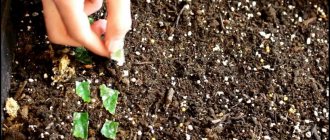
Orchid propagation by seeds at home
In the wild, epiphytes reproduce in different ways, but the easiest is the sexual way. Of great importance here are not only the plants themselves, but also the insects, thanks to which the pollination of orchids occurs.
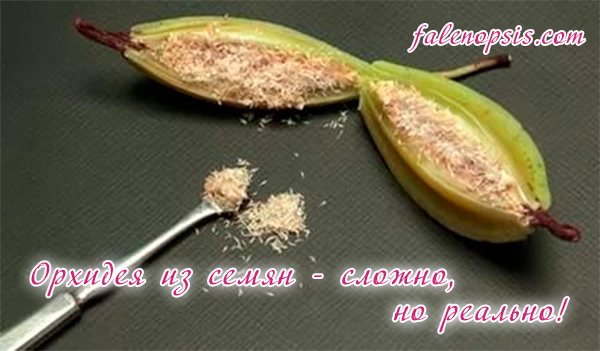
After pollination, the plant develops a seed capsule containing 3 to 5 million seeds and ripening within 6-8 months.At the end of the process, it bursts, and seeds, small, like dust, are carried away by air currents. For their development, they need a nutrient medium, which is rich in the soil and bark of trees.
As for the sexual reproduction method at home, it is quite difficult to withstand all the conditions. A successful result can only be achieved in completely sterile conditions, as well as in the case of providing an ideal environment for development. However, some growers have had successful breeding experience.
In order to grow an orchid from seeds, it is necessary to create a nutrient medium in which the seeds are sown. Out of 3-5 million, very few will be able to germinate, because due to the small size of the seeds, they have very little nutrients. After 6-8 months, the germinated seeds will acquire a tuber-like appearance and will develop for another 2 years.
However, here the orchid also needs certain conditions. In order for a plant to receive nutrients from the environment, it needs to exist in symbiosis with a certain fungal microflora. The plant's immunity must be sufficient to form a symbiosis with microorganisms, otherwise either the plant will destroy it or the fungus itself will turn into a pathogen and destroy the plant.
It is almost impossible to do all the manipulations of orchid seed propagation at home. To grow orchids from seeds, laboratory conditions or professional home selection are required.

Pros and cons of this breeding method
The first time to reproduce an orchid is very exciting, much depends on the chosen method of reproduction. In this case, the advantages are undeniable:
- extensive experience and knowledge are not required;
- no damage to an adult plant;
- buds on a peduncle can be woken up on their own;
- most plants root successfully afterwards.
However, one should not forget about a number of features of reproduction through the peduncle:
- the flower chosen for reproduction must be an adult and fully formed, it must have at least four full leaves;
- the plant should not be sick, weakened or infected with parasites;
- the root system must be healthy and fully meet all the needs of the orchid;
- only a fresh peduncle with several live buds is suitable for reproduction.
Outcome
Breeding orchids is an exciting process, because their beauty can hardly be overestimated. To summarize, we can conclude the following:
- There are a large number of breeding methods: cuttings, division, babies, seeds.
- For sympodial and monopodial orchids, different breeding methods are used at home.
- Any method requires a lot of time and special care for young plants.
- Seed propagation is in most cases available either to professional orchid breeders or only under laboratory conditions.
How do you propagate your orchids?
Why is it necessary to root the shoots?
The rooting process is the creation of the necessary conditions for the germination of roots from parts of the plant taken for reproduction. New shoots can be planted in the substrate only after the roots have grown, otherwise the plant will not be able to receive nutrition. There are two ways to root cuttings: in soil and in water.
To stimulate the growth of root shoots, special hormonal preparations are used, on the basis of which solutions for rooting are prepared. These preparations contain acid, which has a beneficial effect on the formation of callus - plant cells that form new tissues.
Important! The recommended dosages should be followed exactly when preparing a solution for rooting or spraying the offshoot.
The rooting agent is used for pre-soaking or one-time immersion of cuttings in it before planting, or it is added directly to the nutrient solution.Correct rooting is one of the most important stages in the reproduction of orchids, since the further development and growth of the flower directly depends on the formation of a healthy root system.

Air layering
At home, the flower is propagated by air layers. Such processes are formed only in some types of indoor plants: Dendrobium nobile and Epidendrum.
Some growers grow new specimens with stem processes in a special mini-greenhouse using sphagnum moss. In order for the bare shoot to develop correctly and quickly, it is laid horizontally on moistened moss and placed in a greenhouse.
The main conditions for sprouting are consistently high humidity and high temperatures in the greenhouse. If these conditions are met, after a month, the bare processes will release the roots.
Then the rooted plants are planted in a nutritious substrate, sprayed and looked after in the same way as for adult flowers. At first, the planted shoots require stable heat - 26 ° C-28 ° C and high humidity.
Comparison of outdoor and indoor plants
When growing a plant on the street, it will multiply in two ways, but home flowers have much more of them. In nature, Phalaenopsis reproduce quite interestingly - with the wind, the pollen located in the seed capsules spreads and settles in different places. In addition, the flower emits an amazing aroma, which attracts various insects.
After the seeds of the plant have landed on the ground, they cannot just germinate, they need soil fungi to get carbohydrates from them for germination and development. The next way to reproduce phalaenopsis in nature is after flowering, new layers and shoots are formed... Both seed and cuttings work great. But propagating a home flower by seeds is quite problematic and it is not always possible to get a healthy plant.
How to get young plants with green cuttings
Step-by-step instruction
This method of propagation is most popular because it is simple, and young plants can be rooted as much as there are buds on a faded shoot.
For work, you need to prepare the following devices and materials:
- Cutting tool - a knife with a sharp blade, surgical scalpel or garden pruner;
- Disinfection solution for tool processing. Usually ethyl alcohol or chlorhexidine is used;
- To apply the product you need cotton swab or soft natural cloth;
- Slicer... For this purpose, choose one of the following substances:
- Powdered charcoal or activated carbon,
- Finely ground cinnamon.
- Rooting stimulant, for example, "Kornevin" or a similar drug.
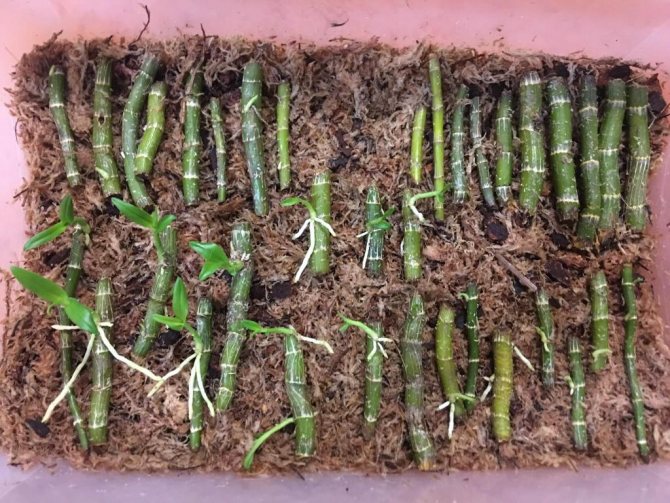
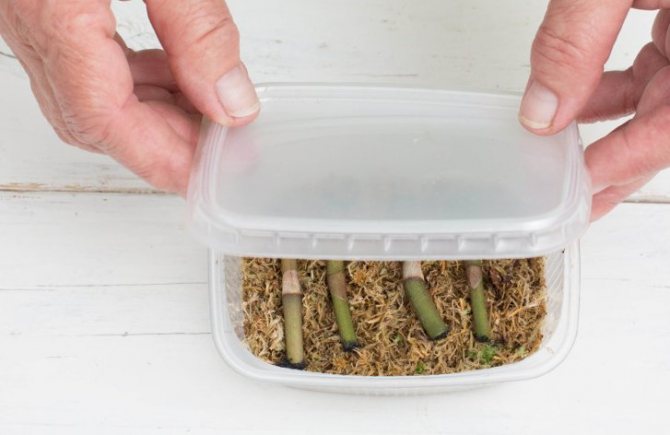
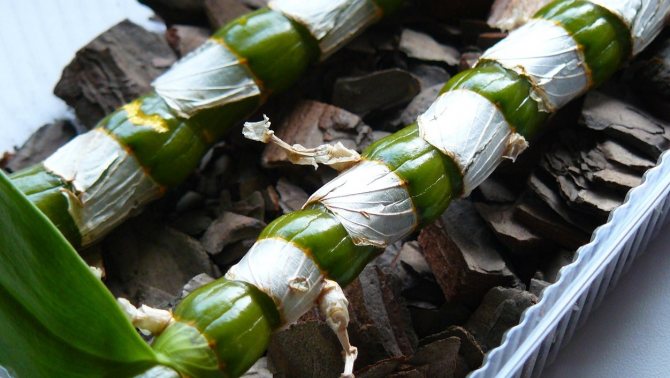
- Greenhouse for rooting cuttings... It is constructed from a conventional plastic container. In the upper part of the container, about 1/3 of the height, an incision is made so that the lid can be slightly opened. A layer of sand or sphagnum moss is placed on the bottom. Before planting the cuttings, the nutrient substrate is moistened. When closed, so that the "lid" adjoins tightly, it is attached with tape or adhesive plaster.
When everything is ready, you can start the main process.
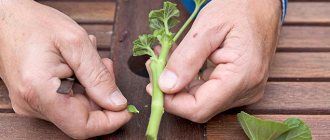
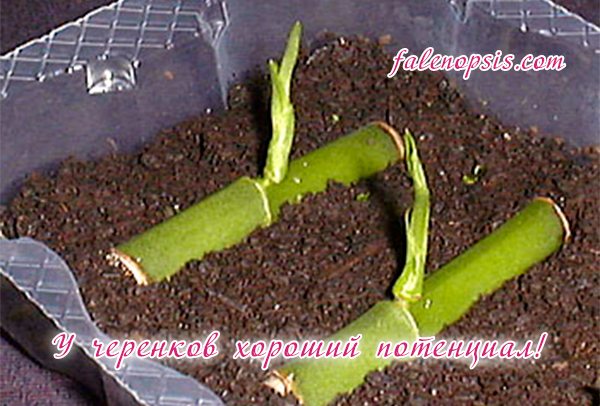
Step-by-step instruction
| Step 1 | Move the phalaenopsis to the desktop and place it so that it is convenient to work with the plant. |
| Step 2 | Using a cotton swab or soft cloth dampened with alcohol (or chlorhexidine), wipe the blade of the cutting tool. |
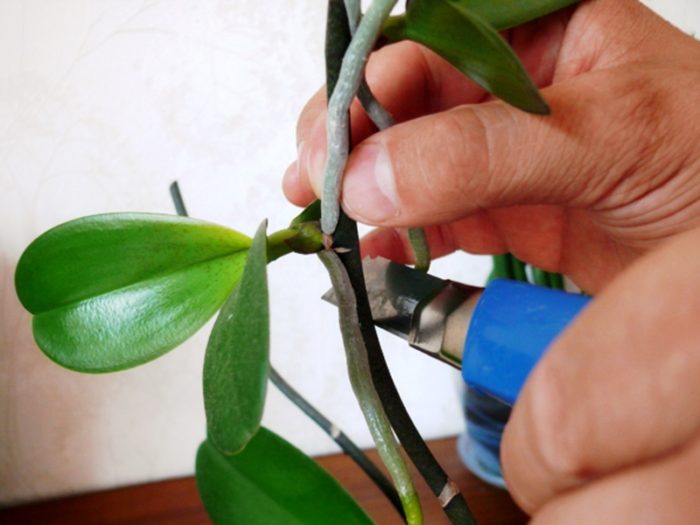
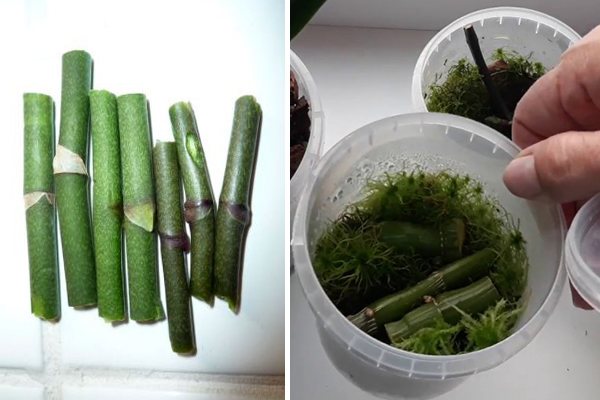
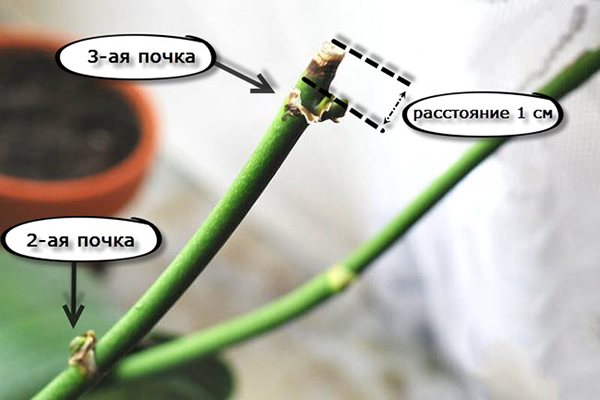
| Step 3 | Cut off the peduncle from the main stem. |
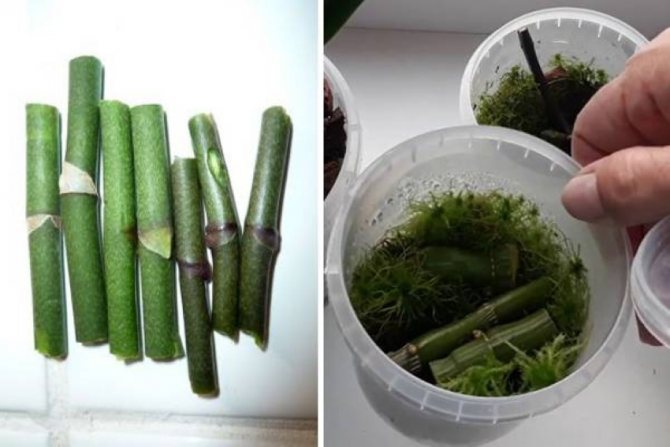
| Step 4 | Cut the stem into pieces so that each piece has a dormant bud. Moreover, the lower end under the kidney should be longer than above it. Leave at least two centimeters below, 0.5 cm on top. |
| Step 5 | Dry the upper cuts of the cuttings and treat with a protective agent, charcoal or cinnamon. |
| Step 6 | Prepare the rooting solution. For example, the hormonal drug Kornevin is used to soak orchid cuttings. It contains indolylbutyric acid (IMA), which stimulates the formation of callusnecessary for the growth of new roots. Specialist consultation Callus - specific plant cells that form connective tissue for the healing of open wounds. Based on the materials of the article "Callus Plants" author - E. V. Lyapustina, candidate of biological sciences. To germinate roots in green orchid cuttings, prepare a solution in the following proportion: Kornevin - 1 g. · Water - 1 liter. Keep the cuttings in the solution for 8-10 hours. You do not have to soak the cuttings, but only soak the lower cut in powder and immediately place it in a moist substrate. |
| Step 7 | Plant the prepared cuttings in a greenhouse. In order not to injure the delicate stems in the substrate, make indentations with a pencil. Insert green cuttings processed in the rooting machine into them. Then, squeeze the substrate around them with two fingers.
|
| Step 8 | Cover the greenhouse with the upper incised part and secure it with tape or adhesive tape. Sticky construction tape will also work. |
| Step 9 | Place the structure in a warm, bright place. Inspect the inside of the greenhouse every day. Control the temperature, which should correspond to the indicators - +240 - +280, and humidity, within 70 - 80%. You also need to constantly ventilate the cylinder, for this you just need to open the lid. Air stagnation should not be allowed, otherwise the cuttings will rot. For the survival of cuttings, the moisture that accumulates inside the greenhouse is enough. Therefore, watering is rarely carried out, on average, once every two weeks. |
3.Rooting of green orchid cuttings in a greenhouse from a plastic balloon.
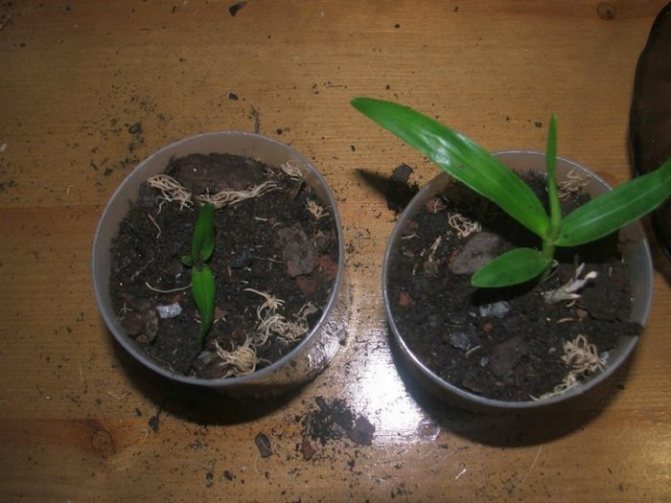
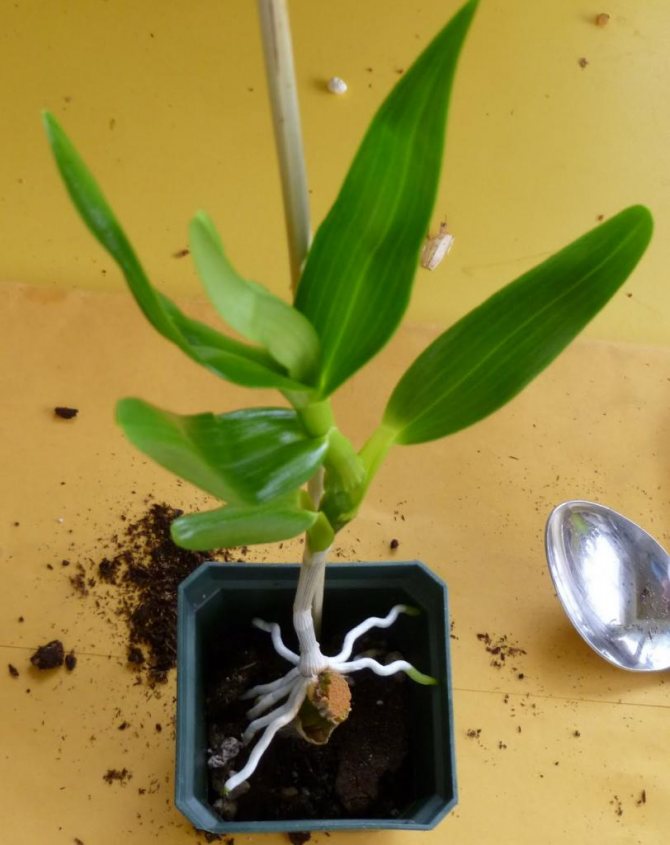
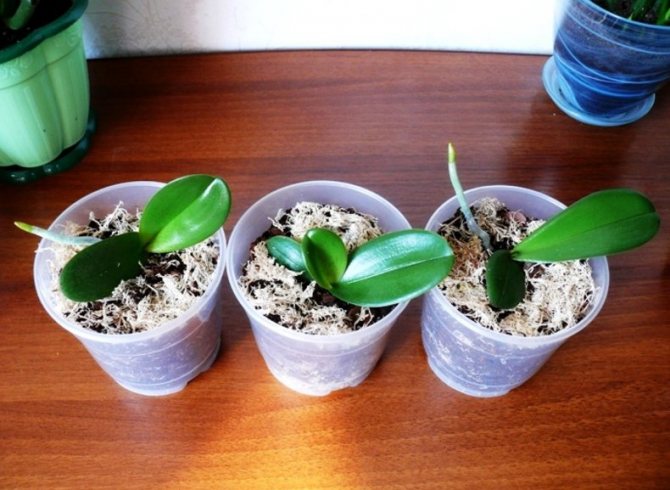
If done correctly, the bud on the handle will begin to sprout in about two weeks. In fact, the same baby is formed as on the growing shoot. First, two leaves grow. Simultaneously with them, new roots are formed. When they grow to three or four centimeters, the young plant can be planted in a separate pot in the orchid substrate.
What is this method?
Before moving on to considering the technology of orchid cuttings, let's understand the concept of cuttings and what this method implies.
Did you know? Under natural conditions, there are varieties of orchids that are incapable of photosynthesis. They have to settle on other plants in order to deepen their root myceliums into their organs and feed on the substances necessary for life.
Definition
According to the "Biological Encyclopedic Dictionary", cuttings are one of the artificial methods of vegetative propagation of a plant, in which a part of the mother plant is separated and rooted - a cutting. In the future, the separated part is planted in water or soil substrate, the cutting takes root, develops buds and grows into a young plant. This method was widely used about 150 years ago. In addition to indoor floriculture, it was also adopted by decorative gardening, fruit growing and forestry.
What parts can you use?
The following plant organs are used for grafting:
- lignified shoots;
- green shoots;
- roots;
- stems;
- leaves;
- peduncles.
Did you know? Some varieties of orchids, for example, coriantes, marsh dremlik, secrete a special nectar with a narcotic substance that intoxicatingly affects insects. After the insect sits down on the bud, it will not be able to take off for 40 minutes.
Possible problems after separation from the mother plant
Often, when this capricious plant propagates, the following problems may arise:
- The processes are absent for a long time, the kidneys do not wake up. When observing this situation, one should resort to the help of phytohormones or growth stimulants.
- Decay of the cutting. Excessive watering or lack of soil treatment with fungicides or potassium permanganate solution before planting can lead to such an outcome.
Important! It is harmful for an orchid if drops of water fall on its leaves, stems and flowers. This leads to the fact that unaesthetic spots appear on the plant. Therefore, watering and spraying should be carried out carefully, not allowing the ground organs of the flower to come into contact with water.
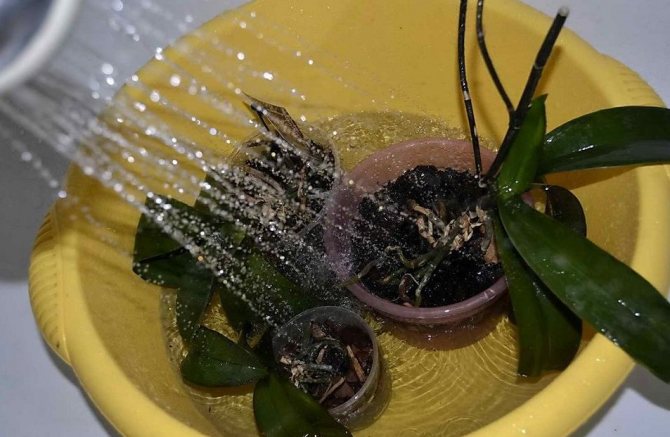
Photo
Below are step-by-step photos that show how the reproduction of a home orchid takes place.
When is the best time to propagate an orchid
It is best to start the breeding procedure one to two months after the end of flowering. The same time is suitable for transplanting a flower, since at this time the culture enters a period of vegetative dormancy and you can safely divide the bush or cut the required number of cuttings.
Unlike transplanting, which, if necessary, can be carried out with a flowering culture (for example, if pests have settled on the plant), it is better to postpone reproduction until spring so that the adult plant does not experience stress from the procedure.
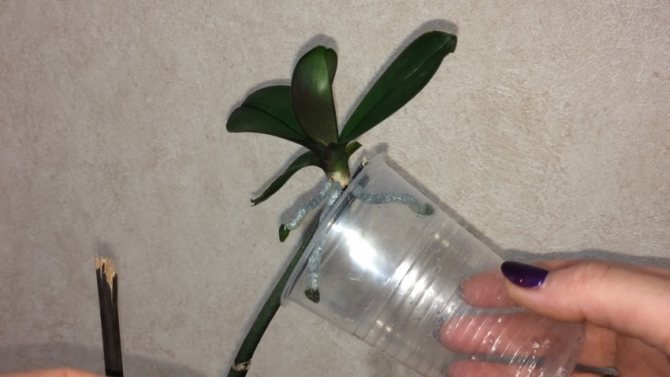
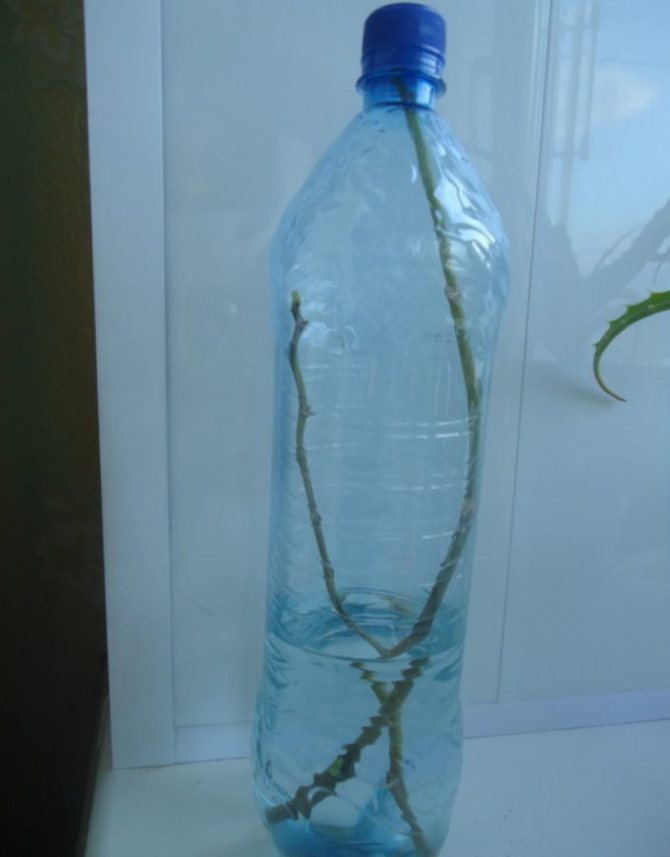
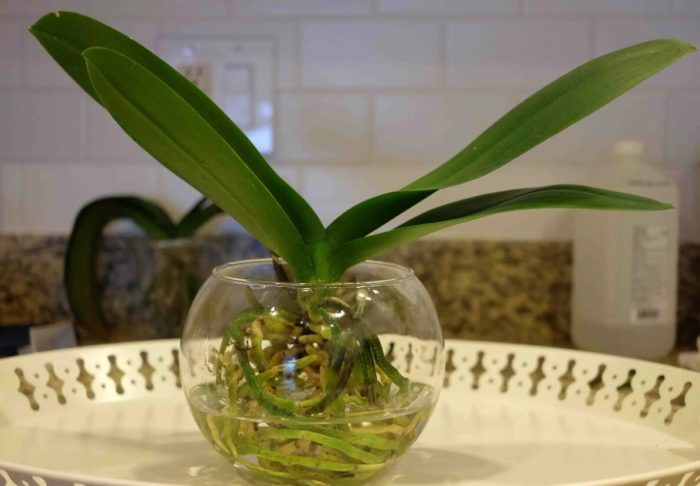
How to grow Phalaenopsis in water?
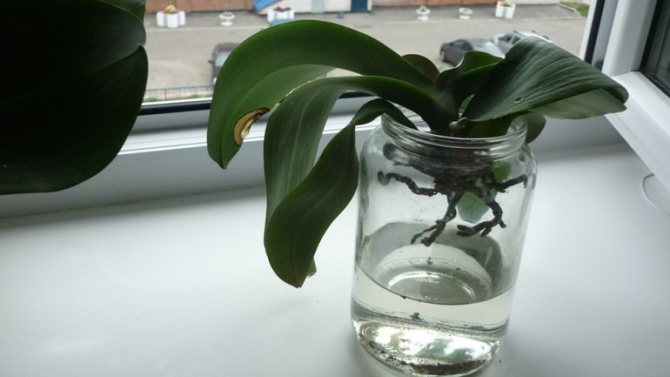
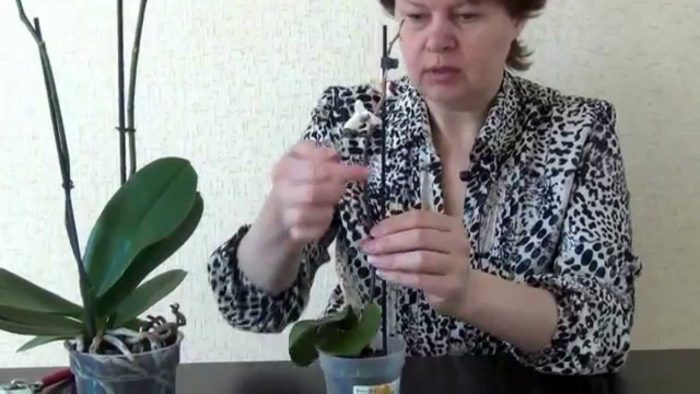
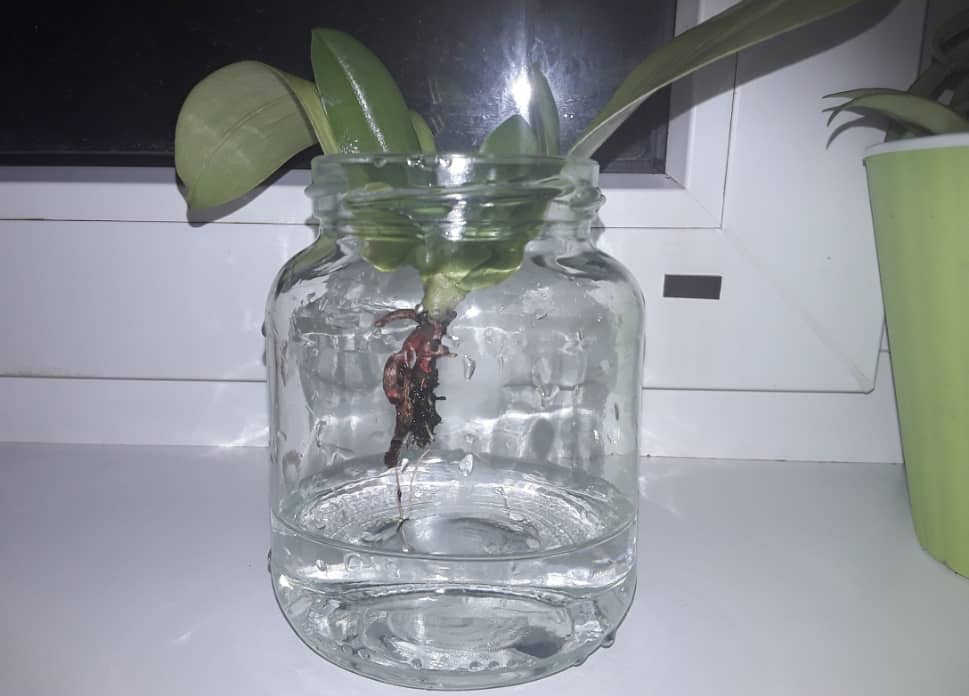
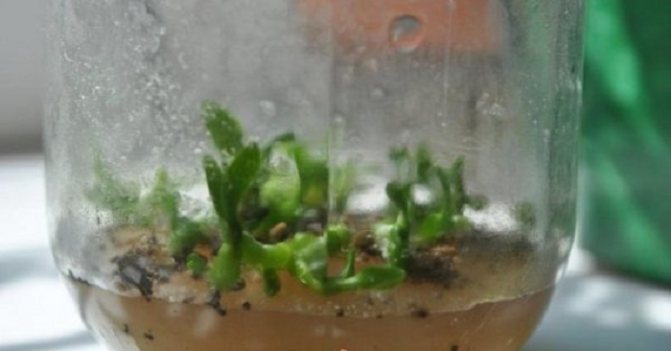
You can get several new copies of the Phalaenopsis orchid by cutting off a peduncle with dormant buds and placing it in water. If, after the flowers wither, the arrow remains green, it is cut from the plant and used to grow children.
Stages of the procedure:
- The peduncle is cut from the orchid with a disinfected tool.
- With a toothpick, gently remove the surface scales from the kidneys.
- Liberally lubricate the kidney with cytokinin paste.
- Expose the peduncle in a glass of water with the addition of charcoal.
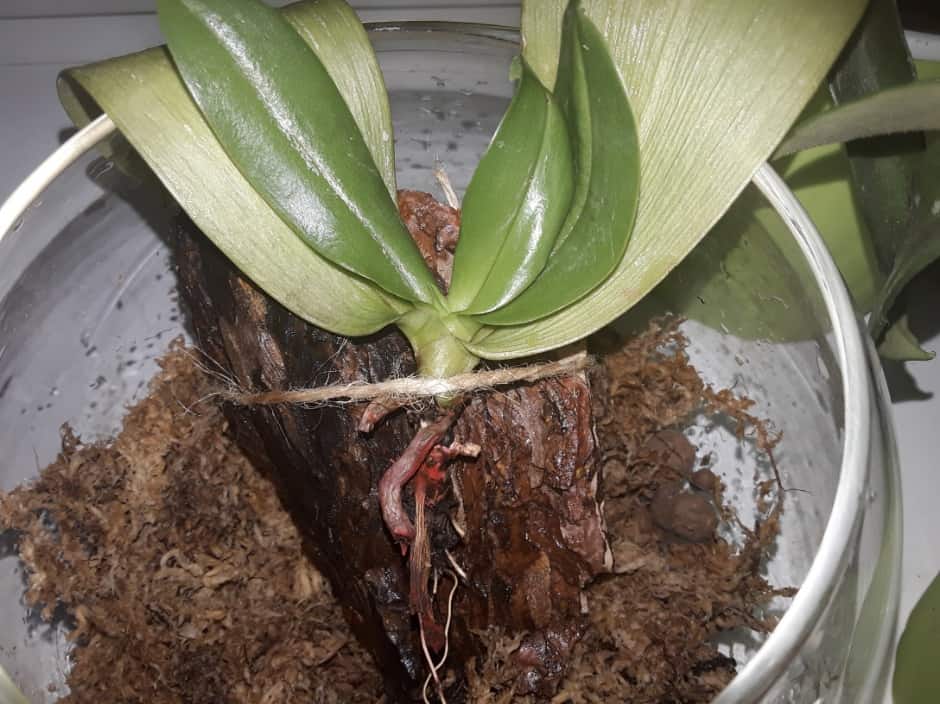
- After a while, roots begin to form on the kidney. The stem in the place of their growth is wrapped with sphagnum moss and fixed with a thread.
- After the formation of children with a leaf on the kidneys, they are separated and planted in pots.
Important! If the baby is not manually separated from the stem, or the roots are twisted around the branch, a part of the peduncle to which it is attached is cut off and planted in the substrate together with it. The stem will dry out on its own and will be easy to remove from the pot.
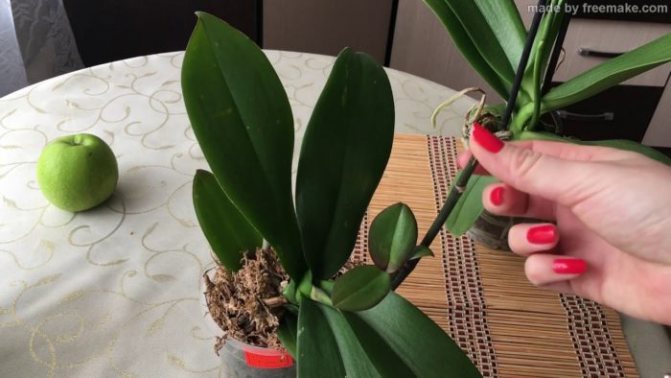
Daughter sockets
Reproduction of orchids Daughter rosettes
Some types of orchids are prone to overgrowth of rhizomes and the appearance of basal rosettes (Cypripedium, Pafiopedilum). It happens that lateral shoots are formed not at the roots of a plant, but on its stem or in the axils of the leaves (Dendrobium, Phalaenopsis). Such small shoots begin to develop from their own leaves, then roots appear, thereby forming a plant ready for transplantation - a baby.
Conditions for the appearance of a baby
In order for the orchid to give the shoots necessary for reproduction, the flower must be prepared:
- apply more nitrogen fertilizers than usual;
- ensure air temperature over 28 ° С;
- increase air humidity up to 80-90 ° С.
If side shoots do not appear on the orchid for a long time, you can also apply cytokinin ointment. Then the bud for awakening is chosen not on the cut stem, but directly on the growing flower. It is better to take the plants farthest from the roots and activate no more than 3 buds at the same time.
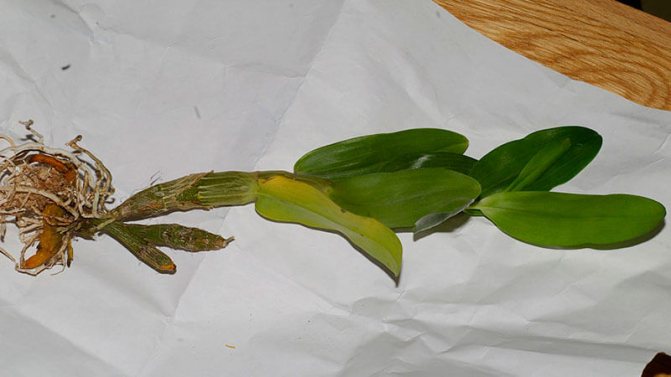
Department of babies
Before separating the offshoot from the mother plant, you need to make sure that it is ripe for transplantation. The baby should have at least 3-4 leaves, 4-5 own roots more than 5 cm long.
Important! You need to separate the baby with a sharp knife, cutting off about 1 cm of the stem above and below it. After processing and drying all formed sections, transplant into a separate pot.