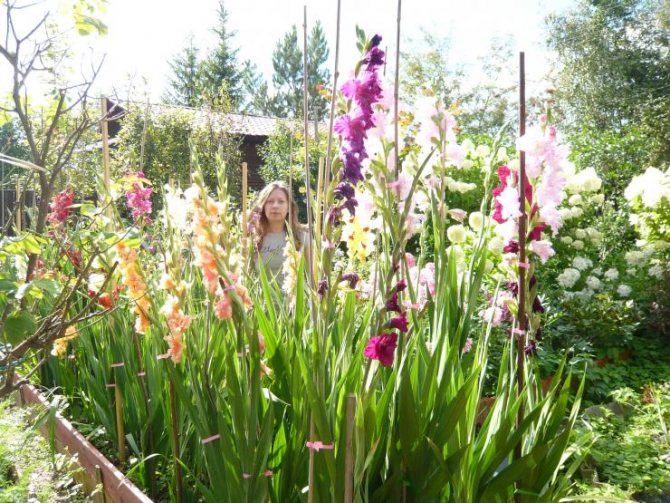
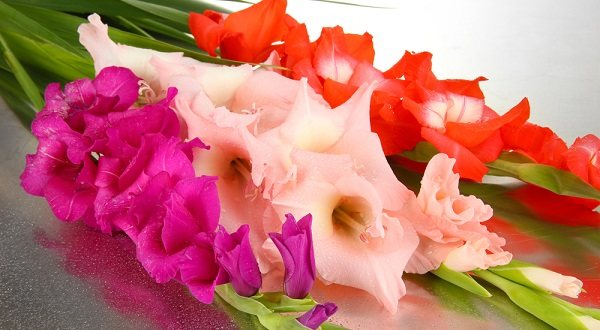
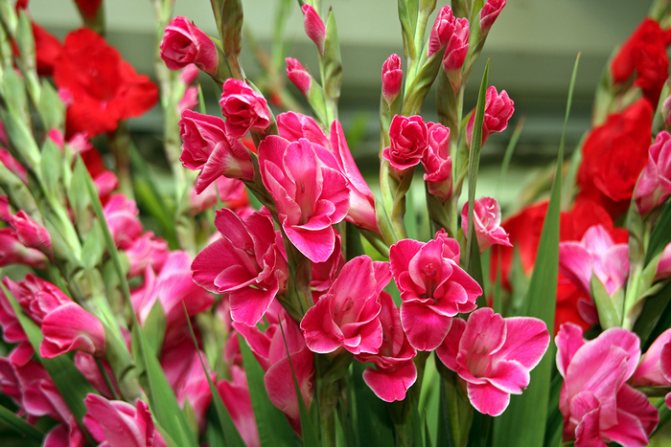
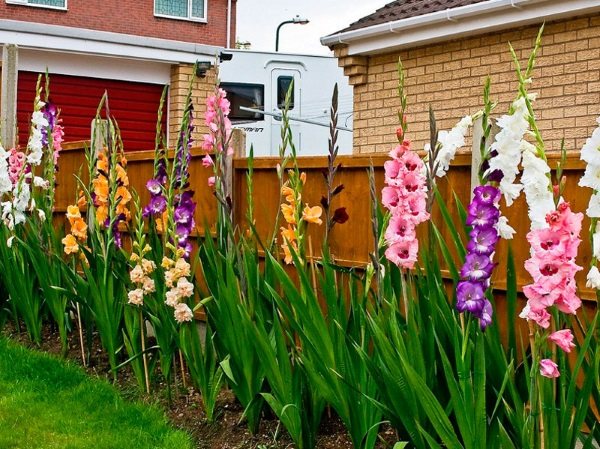
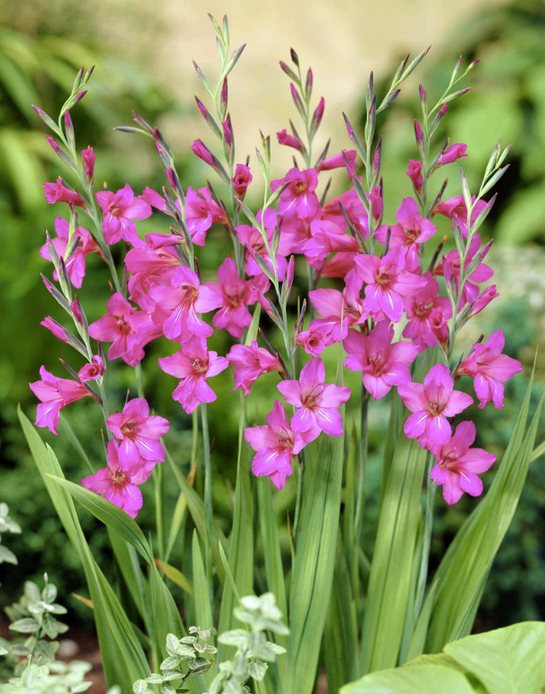
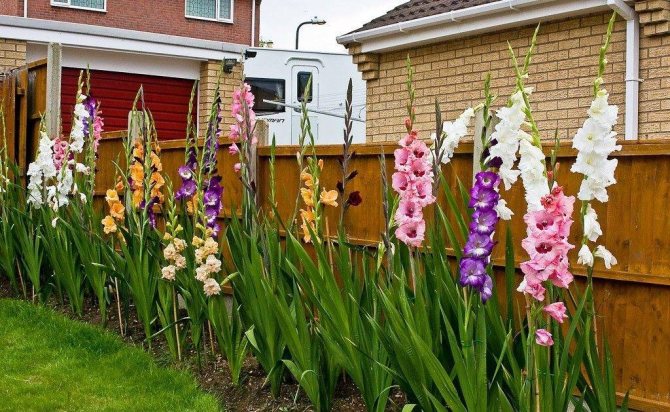
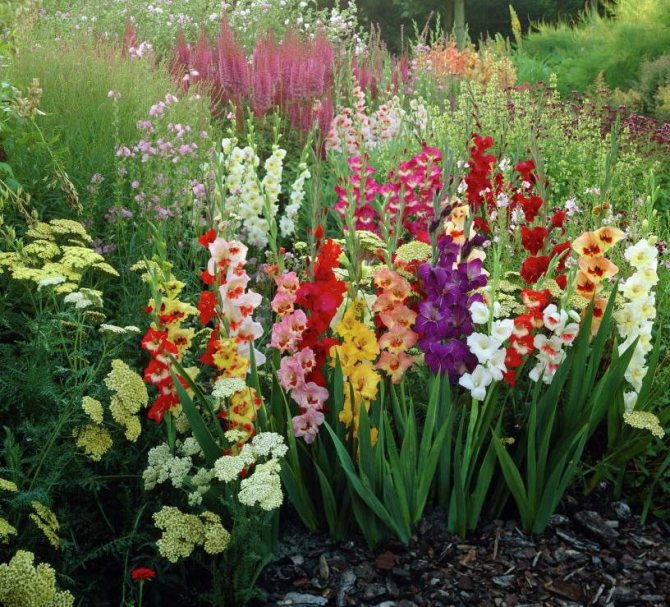
In our family, gladioli have a special attitude. Probably because these are my mother's favorite flowers. Now imagine my joy when I have a "small piece of land"! Guess what was the first on the list of crops that I want to grow on the site? Favorite greens: dill, parsley? Tomatoes, without which it is difficult for me to imagine a menu for my family? Peanuts that are not only delicious, but also look beautiful in the garden when they bloom? Of course not! Mom's favorite gladioli!
And so I bought the onions. I listened to the seller's detailed instructions. I dropped it off by all the rules. They grew up amazingly beautiful ... and that's it! Unfortunately, there is no continuation. I did not find any onions in the ground so that I could dig them up and send them to the balcony for the winter. They did not germinate the next year. And believe me, I don’t feel sorry for the pennies that I paid for the seed. Do not mind the effort, because in the first year they were completely justified. It saddens me that I did not know everything about planting and caring for a plant in order to prolong their life and flowering. Therefore, our conversation today and gladioli. And about everything related to their cultivation!
Planting and caring for gladioli outdoors
The first thing to understand is that, despite all the inventions of breeders who have come up with varieties that grow both on the mountains and under water (I exaggerate), it is worth considering the natural conditions for the growth of gladioli (skewers). Only then will we understand what the plant needs to make it feel comfortable, and, accordingly, the bush would be healthier, and we would observe more lush and prolonged flowering, and pests so as not to bother either the root system or the aboveground one.
The tropics and subtropics are the homeland of the skewers. And accordingly, the plant expects us to plant it in "light" soil, where most of it is organic. It would be ideal to mulch the plantings with straw, deciduous humus. In this case, watering is desirable small, but frequent. Best of all, sprinkling in the morning or evening. It is allowed to have a shade in the flowerbed where the gladiolus will grow. But at the same time, the land should not be clogged with roots. This means that the neighbors must be minimized as much as possible. It is best to give the garden bed completely at the disposal of this culture, and plant other herbs and flowers along the edging.

Now we know approximately where and what kind of flowerbed. Consider the peculiarity of this plant:
- sunny bed with little shading;
- moderate timely watering;
- obligatory plant feeding;
- a protected place from drafts so that the peduncles are not bent to the ground;
- the soil in the flowerbed must contain a lot of organic matter.
What is important to consider when planting for successful plant growth:
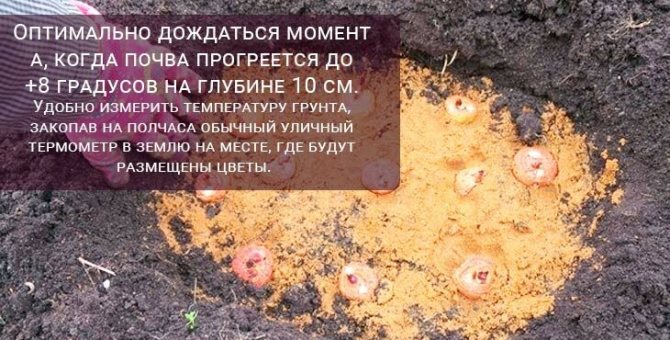
- Wait until the soil warms up to 10 degrees. But you need to measure the temperature not on the surface, but at a depth of 10 cm (or planting depth). And this is approximately from mid-April (in the southern regions) to mid-May (in a more severe climate).
- By the way, all bulbs are planted at a depth that is 3 times greater than the bulb itself (if the soil is dense; in looser soils, the planting depth is 4 times greater). And therefore, it will not be possible to dig the same trench for all plants if one bulb is 2 cm, and the second is 3-4!
- The appearance of the flower bed will depend on the landing scheme.For example, 20 by 20cm is a tight fit. 20 to 30 is looser, but it is optimal for lush bushes.
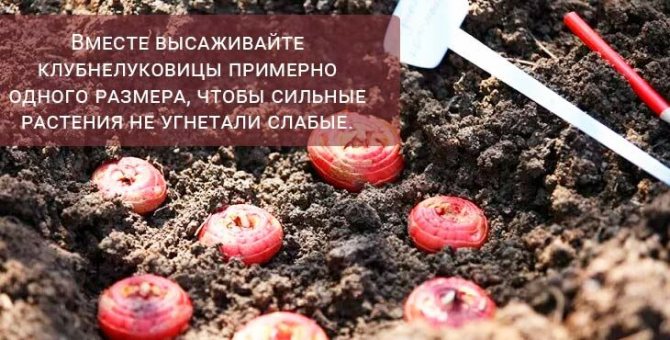
Advice! Do not plant strong adult crops (you can tell by bulb size and age) next to juveniles. Then the strong plants will overwhelm the weaker ones. It is best to sort the tubers and plant them according to their size.
What is important in the care of gladioli:
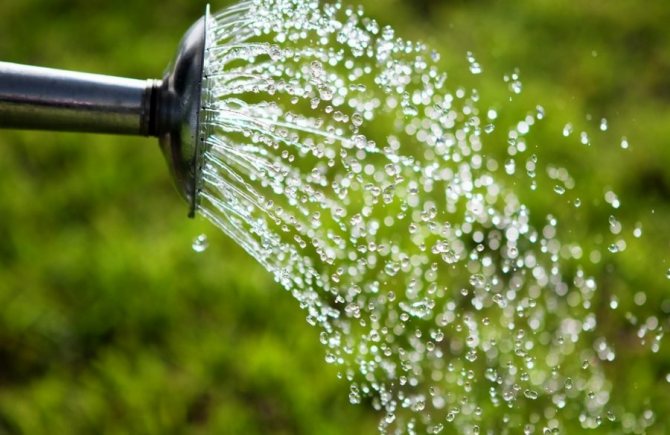
- Watering. As it grows - 2 times a week, an adult plant - 1 time per week (20 liters per 1 sq.m.). Watering under the bush.
- Loosening. They say that one loosening replaces 2 waterings. And for sure! For the benefits it brings to the plant, loosening the soil is incredibly important for gladioli.
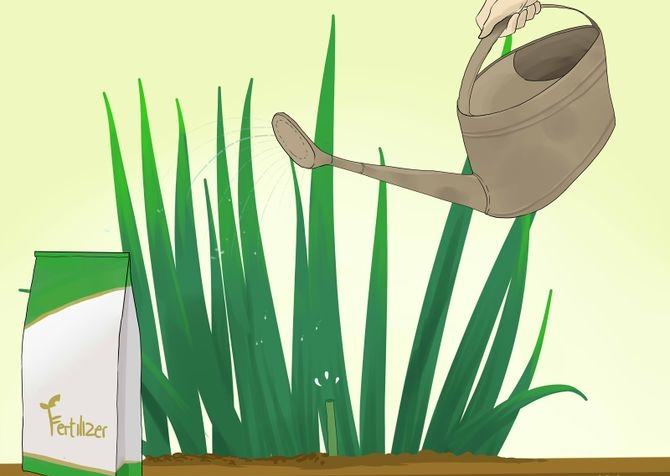
- Top dressing. When seedlings appear, nitrogen-containing fertilizers are applied to the soil. When 5-6 leaves appear, phosphorus is added to nitrogen. Buds appear - phosphorus and potassium.
- Protection from pests. The tubers themselves are processed, but it is also worth spraying the bushes with special agents (insecticides) that protect them from the whitefly.
- Garter... It is necessary for rare / single plantings, with winds or when the soil does not support the plant.
There are no special difficulties or problems with growing these flowers, as you can see. Skewer is considered an unpretentious crop. And therefore, you will definitely succeed in growing it!

Care and cultivation of gladioli
Experienced growers give recommendations. The more precisely you adhere to the rules, the more chances for the emergence of strong peduncles and luxurious buds.
Watering
Gladioli grow in the sun and need to be supplemented regularly. The soil should not be dry, otherwise the buds are poorly tied, the flowers become smaller, the plant withers. Strong boggy is also not needed: fusarium develops, gray rot.
The best option is to water the skewer abundantly every week (up to 12 liters of liquid per 1 sq. M). In extreme heat, watering is carried out every three to four days, preferably in the evening. When planting, it is useful to put sphagnum or river sand (a couple of centimeters) on the bottom of the grooves of moss to retain moisture in the root zone. Loosening is not very deep, but regular.
Weeding
Weeds often appear in the nutrient soil next to gladioli. Do not wait for the parasitic plants to "clog" the flowers and take most of the nutrients from the soil. Slugs actively settle in the weeds.
Weeding is carried out as needed (three to four times per summer). Be sure to pull out herbs with roots, and not only the aerial part of wheatgrass and other harmful plants.
Autumn and spring digging of the soil reduces the number of weeds on the site.
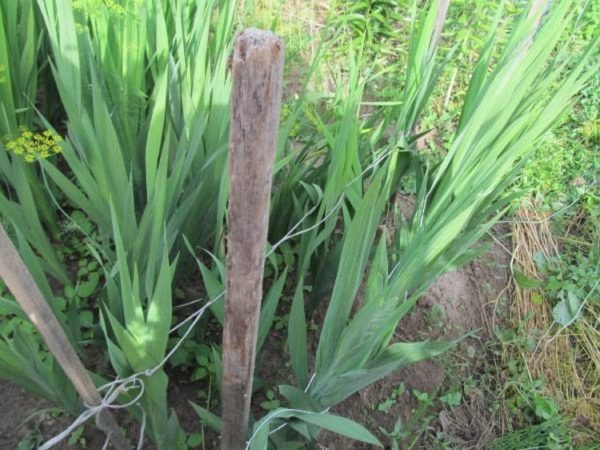
Garter
Gladioli are actively extended, the stems in some species reach 70–80 cm or more. Timely garter (when the first buds are ejected) prevents stem breakage, reduces the load on the lower part. The support is made of rods, between them a strong nylon cord or other material is stretched horizontally.
Fertilizers and feeding
There are two types of nutrient mixtures:
- Foliar dressing (spraying). It is carried out during the ejection of buds and flowering. One of the safe and useful components is natural succinic acid for plants. It is useful to spray a solution of boric acid, potassium permanganate or copper sulfate in a minimum concentration.
- Root dressing. The first time - when one or two leaves appear, the second procedure - when the fifth or sixth leaf is thrown out. The third time, fertilizers are applied shortly before budding at the skewer.
You can feed the soil with organic matter (not very strong, for example, diluted bird droppings), mineral fertilizers. Flower shops sell liquid fertilizers for gladioli. When peduncles come out, it is useful to add Nitrophoska.
Shortly before planting gladioli, phosphorus and potash fertilizers are introduced into the soil, then the substrate is dug up.Before planting in spring, it is useful to nourish the soil with chlorine-free potash mixtures.
Beautifully flowering plants need additional feeding with microelements. Boron, copper, molybdenum, zinc sulfate,
A warning! It is strictly forbidden to fertilize the soil for gladioli with horse manure.
Reproduction
You can breed gladiolus in your summer cottage in different ways. Each method has pros and cons.
Breeding methods:
- corms (most popular);
- kidneys;
- seeds.
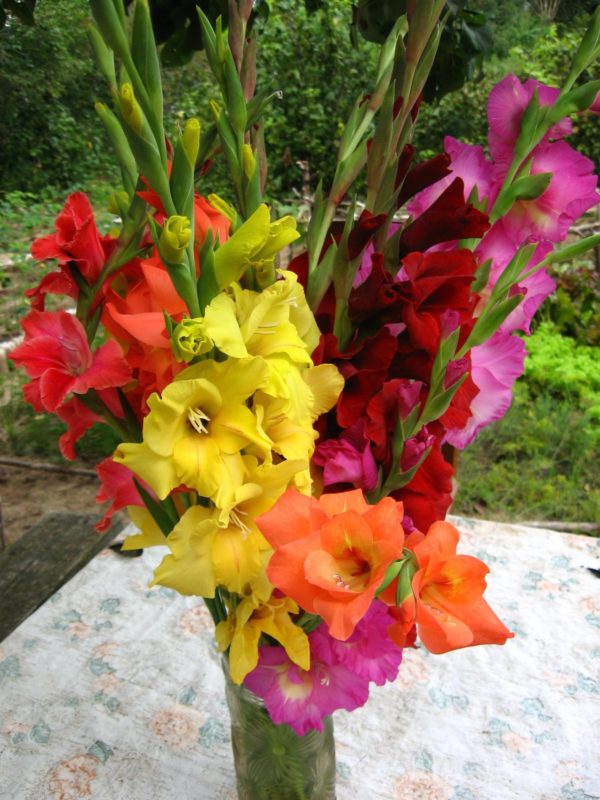
Cutting flowers
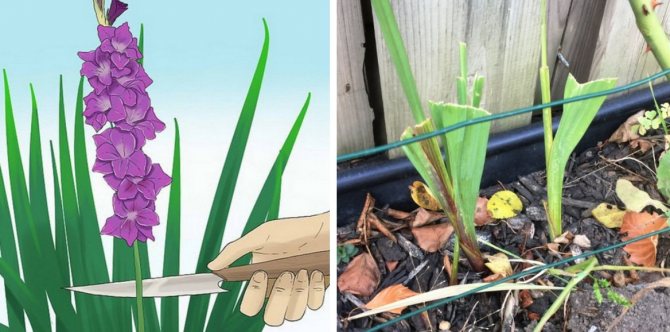
Flowers are suitable for cutting, which, after removing the top, have at least four leaves. Gladioli are cut in the evening or early in the morning, the peduncle is separated close to the axils of the leaves, obliquely, with a sharp knife. A luxurious flower is placed in water. 1 tablet of activated charcoal or 1 tsp helps to keep cut gladioli longer. boric acid in 1 medium vase of flowers.
How to prepare gladioli for planting after winter storage
If you are preparing for planting, the first thing you need for gladioli is to get them (from the basement or from the balcony) 2-3 weeks before planting the plants in the soil.
How to prepare planting material and what you should pay attention to:
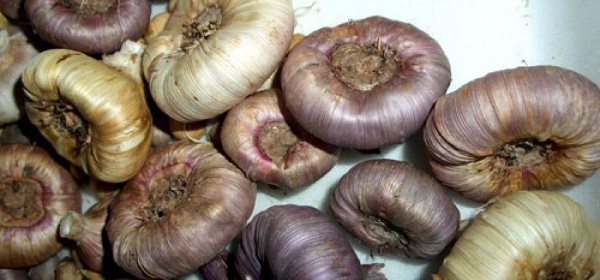
- Inspection. The initial examination is to make sure that the bulbs are healthy and free of any defects, damage or disease. If there are defects (damage), cut off part of the bulb (after soaking) and process the cut with charcoal or brilliant green.

- Cleansing bulbs from the husk.

- Sorting. If the bulb has a small bottom, then it is young and strong, and will give good shoots. The big bottom is old bulbs and should be replaced.
- Etching. We breed 1 gr. potassium permanganate per 10 liters. water (you can make the solution slightly weaker if roots have appeared and the onions have sprouted). And soak for 2-3 hours.
- Soak in biostimulants for better root formation.

- Germination (optional). After soaking, spread the bulbs on the moistened sawdust.
Now it remains to wait for the bulbs to germinate and the soil warms up.
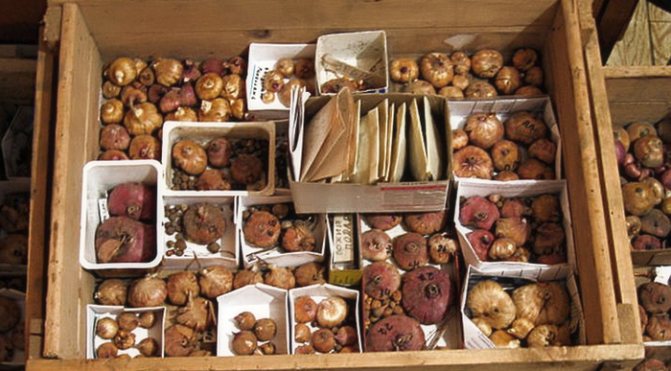
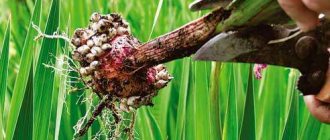
Preparing the bulbs for storage
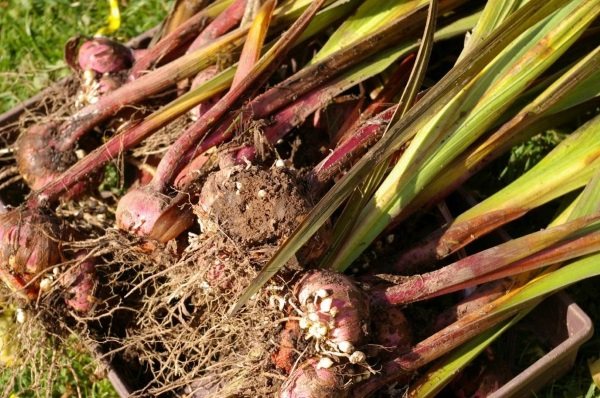
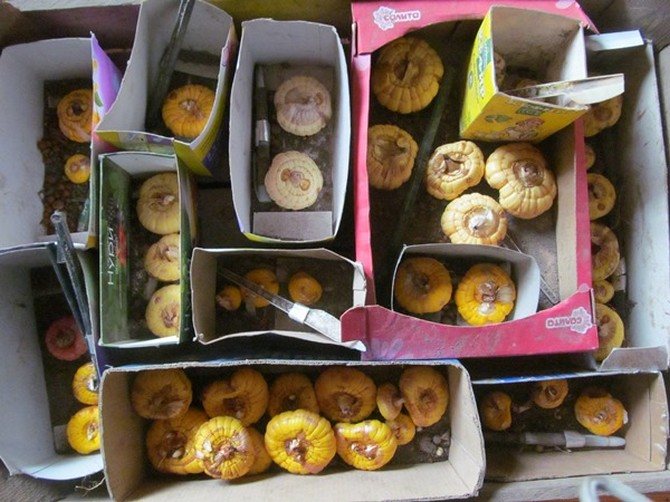
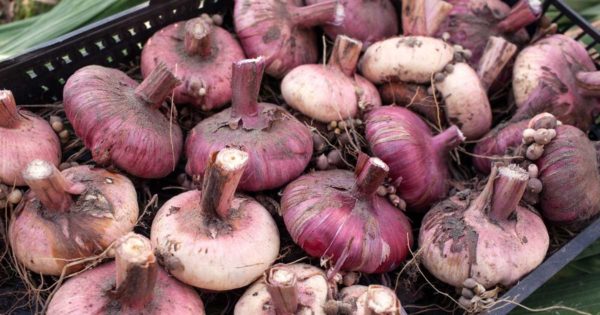
The bulbs are shaken off the ground, the roots are cut off and the children are separated. Then they are washed under running water, treated with a weak solution of potassium permanganate and dried in a dark ventilated room for several days.
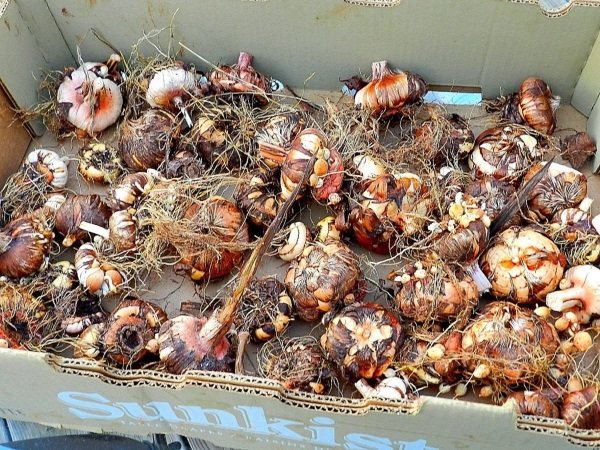
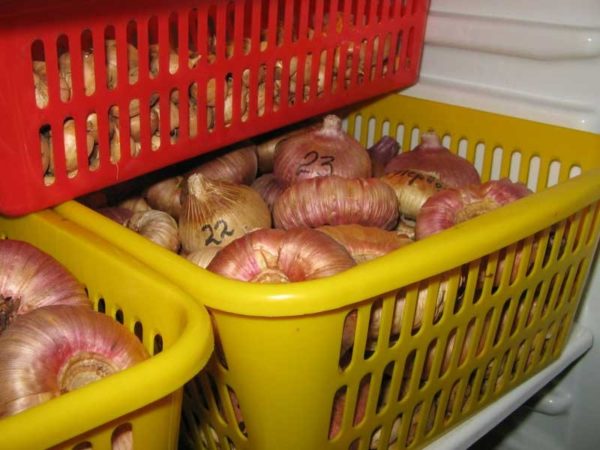
Store in cardboard boxes with ventilation holes, turning the corms over to the other side several times a month. Peat or sawdust is not covered. Can be covered with paper. The optimum temperature during the dormant period is 10 degrees, so the boxes are placed in the cellar or vegetable section of the refrigerator. In February, corms can be sprinkled with Kornevin's solution to prepare gladioli for planting in spring. Babies are stored in the same way, but at lower temperatures, about 5-6 degrees.
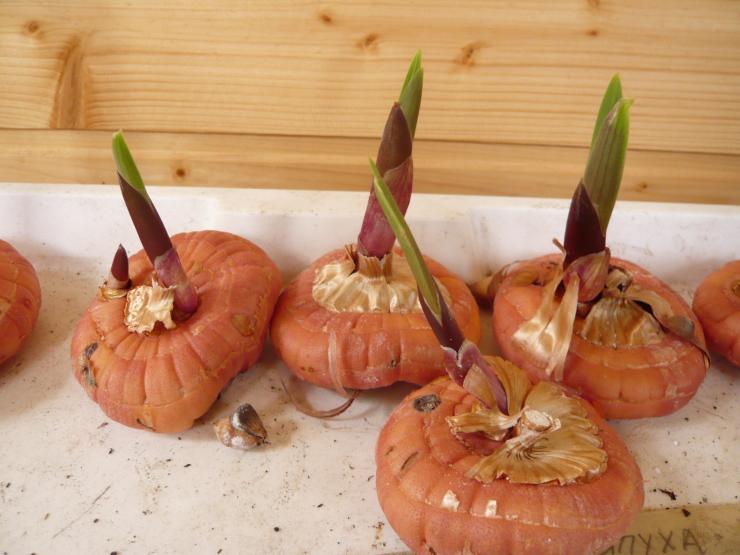
We germinate gladioli before planting
We place the tray with cunning sawdust in a warm place, protected from direct sunlight. If necessary, spray the sawdust from a spray bottle. We check if any onion has 2 or more processes, the onion can be carefully divided into parts by treating the "seam" with ash.

We regularly inspect the material, checking if the bulbs and sprouts are healthy. With the appearance of 3 cm sprouts, the bulbs can be planted in the soil.
If you want to get gladioli by September 1, then you do not need to germinate.
This is important to know!
How to cut flowers correctly
When cutting gladioli, it must be borne in mind that the bulb will remain in the ground for some time. In order not to damage it, the stems are cut 4 cm above the soil level. To compose a bouquet, use those flowers on which the three lower buds have blossomed. Modern varieties are distinguished by the fact that they dissolve 8-10 buds at the same time. The procedure is carried out in the morning or evening. The "stump" remaining after cutting the inflorescence is covered with leaves.
After what crops can not be planted gladioli
When choosing a site for planting gladioli, one should take into account what crops the area was occupied with in the previous season.
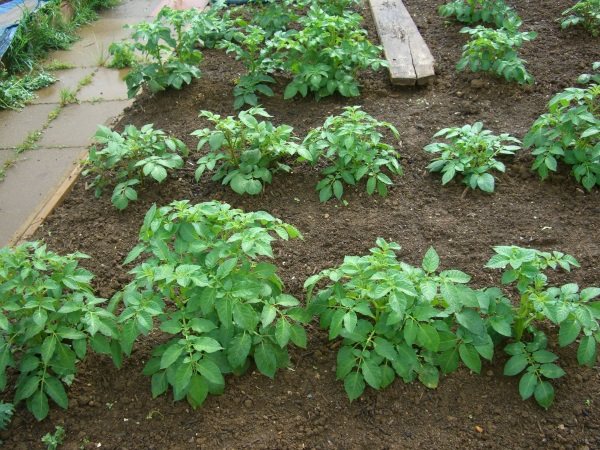
It is not recommended to plant the bulbs in the beds where it used to grow:
- beet;
- carrot;
- potatoes.
There is a risk of wireworm infection.
They do not like gladioli and areas where cruciferous plants grew: cabbage, radishes or daikon.
When to dig up gladioli
The bulbs must be fully ripe before they can be dug up. That is why they are not in a hurry with the procedure. You need to start it no earlier than September. In southern regions, digging up the bulbs can be postponed until October.
After cutting the peduncle, the plant is not disturbed for 30-45 days. During this time, gladioli will distill juices from the leaves into the underground part. A well-nourished bulb will winter better. It is necessary to carry out work in dry warm weather.
On a note! When digging up the bulbs, proceed carefully so as not to damage the children formed nearby.
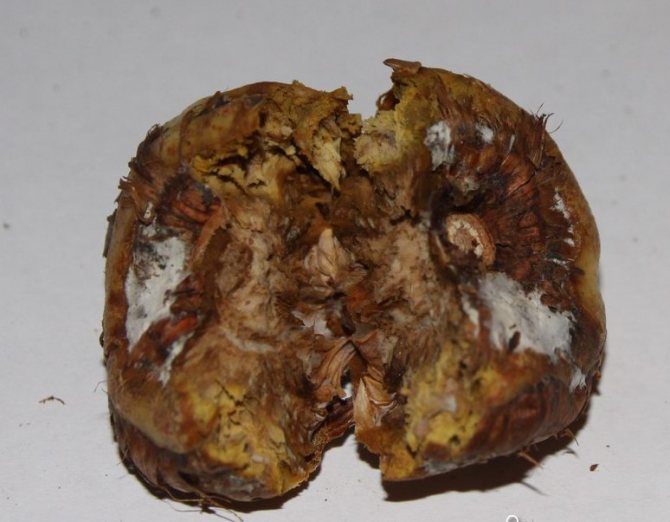
How to store bulbs correctly
After digging up on the bulbs, a part of the stem 2-3 cm long should be left. The nodules are freed from the ground, the roots are cut, and carefully examined. Only healthy specimens are put into storage. The material is divided into grades, washed, treated with Fundazol and dried for a month in a ventilated warm room.
After that, the babies are separated from the mother's bulbs, each copy is wrapped in a newspaper. The nodules are stored in cardboard boxes, signing the name of the variety. After 1.5-2 months, it is necessary to periodically check the planting material so as not to miss premature germination and the appearance of symptoms of the disease. The storage area should be cool and well ventilated.
Helpful advice! To protect the gladioli bulbs from pathogenic microorganisms during storage, you can put several peeled garlic cloves in the box.
How to store gladioli in winter
Gladioli are dug up in the fall, it is necessary that at least 35 days have passed since flowering. Corms that are ripe have integumentary root scales, babies, dressed with dense scales, are easily separated from the mother bulb. In dry weather, the early varieties are first dug up, then the later ones. Children and small bulbs are dug out at the last moment.
The roots and remnants of the stems must be trimmed. Place the corms in boxes with a grate at the bottom, rinse under running water. Then immerse in 1% Fundazole solution, wash again, process with 3% potassium permanganate, spread out to dry for three days. After drying, you need to transfer the tubers in one layer into boxes, store at a temperature of 25-30 degrees. Turn the bulbs regularly. After half a month, the temperature is lowered to 22 ° C. After another month, the bulbs can be peeled and sorted.
The upper scales are removed from the bulbs, separating the children. Planting children of gladioli in the spring in the ground is done after sorting by size. Before planting, they are stored in paper bags at a temperature not exceeding 6 ° C. You can put the kids in the refrigerator. Corms can also be stored there. In warm climates, the bulbs will feel good on a glazed balcony.
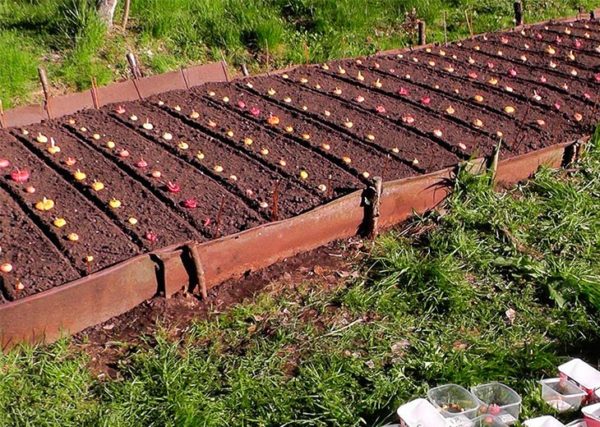
We plant gladioli bulbs in spring
When both the soil and the material are ready for planting, we plant the sorted bulbs in the flower beds.
How to do it right:
- Water the soil to anchor the bulb in the soil.
- If you haven't fertilized since autumn, add plant compost and mineral fertilizers.
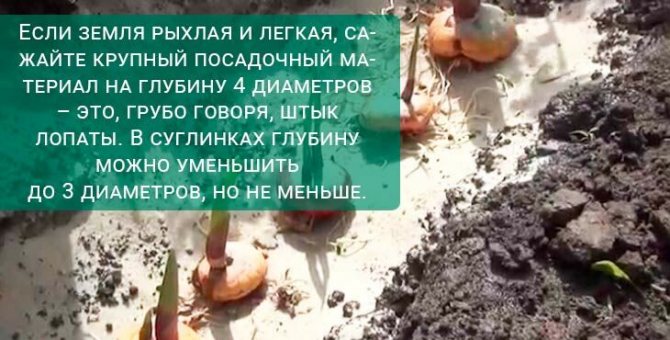
- If the ground is loose and light, plant coarse planting material to a depth of 4 diameters - roughly speaking, a shovel bayonet. In loams, the depth can be reduced to 3 diameters, but not less. The same rule works with tubers.
- Lower the onion, cover the onion with 1.5 cm of sand.The second option - sprinkle the bottom of the hole with a layer of sand (1–1.5 cm), lower the tuber and sprinkle it with 1.5 cm of earth.
- Water a little again.
- And only after that cover with earth.
Distance between bulbs from 20cm. the distance between the rows is 30-40cm.
Caring for plants during growth and development
In order to get a good result in the form of beautiful and lush flowers, within two months after planting the bulb, special attention is required to the plant.

Water the tubers every other day, but you should be guided by the weather. If it starts raining, reduce your watering frequency. The water should be warm, settled, it needs 8 liters per 1 square meter. It is best to do this in the evenings when the sun goes down.
Be sure to loosen the soil after each watering. This will help it stay in the soil, and besides, air permeability will improve, which will have a beneficial effect on the growth and development of the root system. Water should be poured between the rows so as not to overmoisten the bulb. Leaves can be sprayed with water using a spray bottle.
It is necessary to feed the flower several times during the growing season. The first feeding is carried out when the sprout reaches a height of 8 - 10 cm. There will be enough humus here, it will help to keep moisture in the ground and will not let it overheat. Mineral and nitrogen fertilizers are applied after the appearance of the third leaf. And fertilizers containing phosphorus and potassium are necessary during the formation of buds in gladiolus.
The brightness and quality of flower buds directly depend on the applied top dressing. Indeed, for a tall and fluffy flower, you need correct and timely fertilization.
How to plant gladioli in the open ground in spring so that they do not fall
You can use a net or pegs for a garter, or you can plant it so that bade large inflorescences and winds do not force the stems of gladioli to bend. What's the secret?
In the correct groove:
- Consider the quality of the soil. In very loose soil, bury the bulb approximately on the bayonet of a shovel, this is about 4 bulb sizes. On a denser soil, for example, if planted in loam, 3 sizes are sufficient.
- Plant more densely, then the planting density itself will be protection from the wind. But not thicker than 15cm.
- And the most important thing is to choose an area where there are no winds or install a "screen" of buildings or other plants.
All this is very simple to implement. By the way, cascade planting is also suitable. I will talk about this in the very last part of the article.
Description of the flower
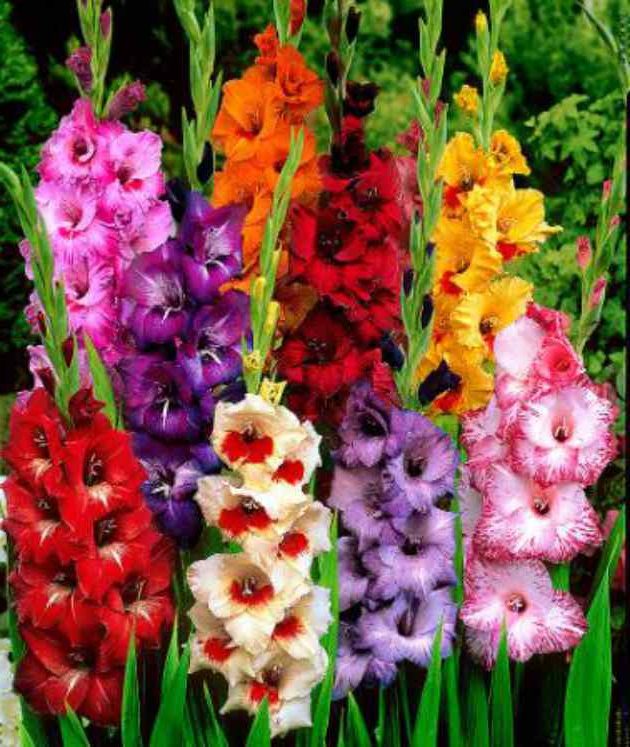
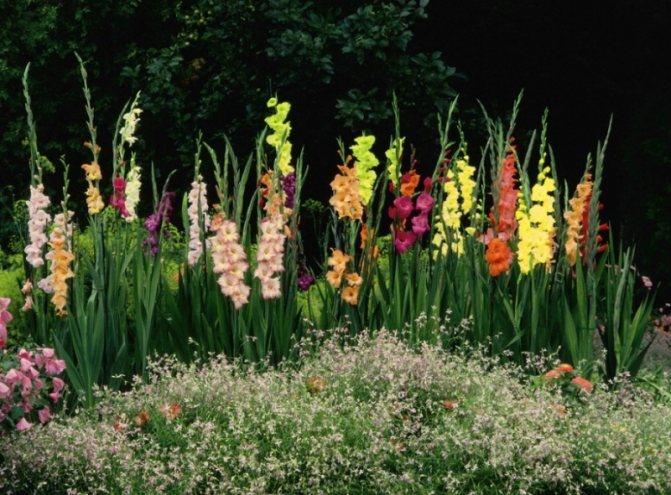
Currently, there are more than 4500 varieties of these handsome men. There are two types of gladioli:
- Household. They have a long flowering season. They are well suited for transportation.
- Decorative. Grown for decorating the suburban area. They come in a variety of sizes and colors.
Gladiolus is a fairly tall plant, leaves can reach 90 - 100 cm, and inflorescences on one stem up to 20. Therefore, it is important to observe the distance when planting. The correct distance will help save these beautiful crops from diseases between neighbors, and will allow each bush to fully receive the necessary mineral and nutrients.
When to plant gladioli seedlings in 2019
After germination, you can plant the bulbs on the seedlings. To do this, it is worth considering when the soil in your area warms up to 8-10 degrees. And it could be. Both at the end of April and at the beginning of June. And accordingly, it is worth starting to plant gladioli. (It is very important to do everything on time so that the sprouts do not overgrow, then it will be more difficult for them to acclimatize in the soil).
In mid-March for warmer regions and until mid-April (in regions with colder climates), you can start planting skewers on seedlings. Provide additional lighting if necessary!
According to the lunar calendar 2019, the following days are considered favorable:
- April - 6-8, 20-26, 29, 30.
- May - 6-8, 14-17, 21-23, 31.
- June - 1, 2, 9-11.
These dates are relevant for planting, both in the open ground of planting material and for seedlings.
Variety selection

Gladiolus, or skewer, belongs to the Iris family. In nature, this perennial tuberous plant is found in the subtropical and tropical parts of the Mediterranean, Africa, and partly Asia. The stems of gladiolus are solitary, dense, can reach 150 cm. Leaves are long, up to 80 cm; linear or xiphoid, pointed, often finely serrated, close around the stem. Flowers are sessile, with a funnel-shaped perianth and six petals of various shapes and sizes, collected in spike-shaped inflorescences.
The genus includes about 200 varieties:
- according to the structure of the inflorescence, gladioli are divided into loose, dense and medium-dense;
- according to the location of the buds on one-sided, two-sided, spiral and spike-shaped;
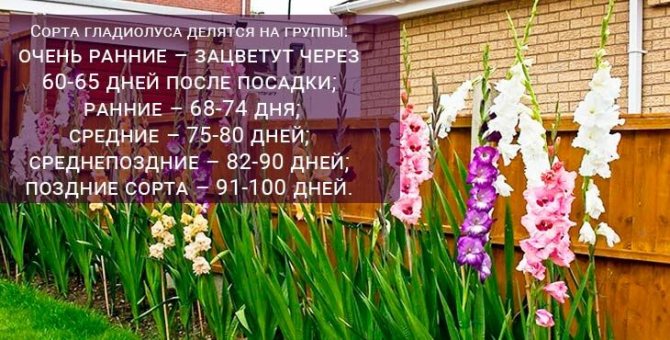
- by the timing of flowering in early, middle and late; the time from planting to budding, respectively, can vary from 75 to 90 days.
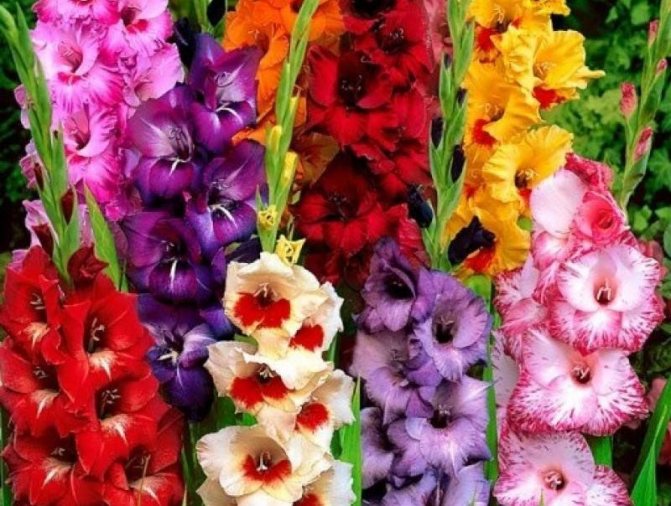
Distinguish gladioli and the shape and size of the flower, the color of the petals. Thanks to the intensive work of breeders, many bright and original varieties are available to the modern gardener.
Some wild species are cultivated: marsh, tiled, Kochi. They are more frost-resistant; the petals are pinkish, lilac, purple.

In Siberia, the natural Byzantine gladiolus is often found in flower beds: thin-stemmed, low, with purple-crimson flowers, decorated with a white stripe running along the vein of the lower petals.
In gardens, artificially bred hybrids are most often found:
- Colville is an early flowering hybrid with medium-sized flowers of white, raspberry or pinkish hue. The stem reaches 90 cm.
- Harlem - stems are short, fragile. The peak of flowering occurs at the beginning of summer; wide range of colors.
- Dwarf - Dutch hybrid, growing up to 40 cm. The petals are more often light colors, with dark fantasy spots in the middle.
- Tubergena is a narrow-leaved Dutch hybrid that grows up to 75 cm.
Recommended to read
When to plant petunias for seedlings and how to care
Features of cultivation and reproduction Hosts in the open field
Planting and caring for Rhododendron outdoors
Planting perennial garden primrose outdoors
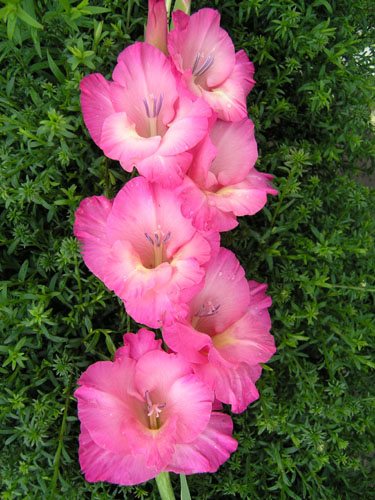
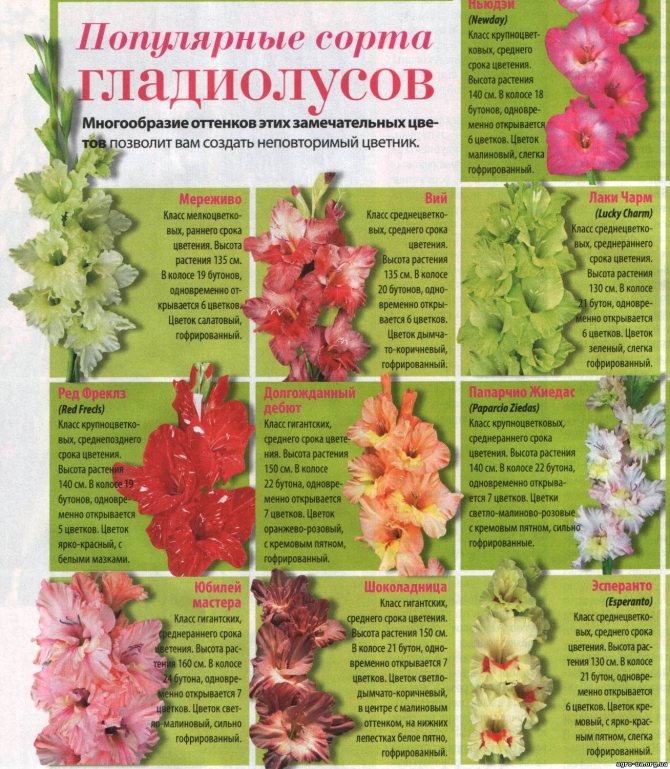
The most popular varieties of gladioli:
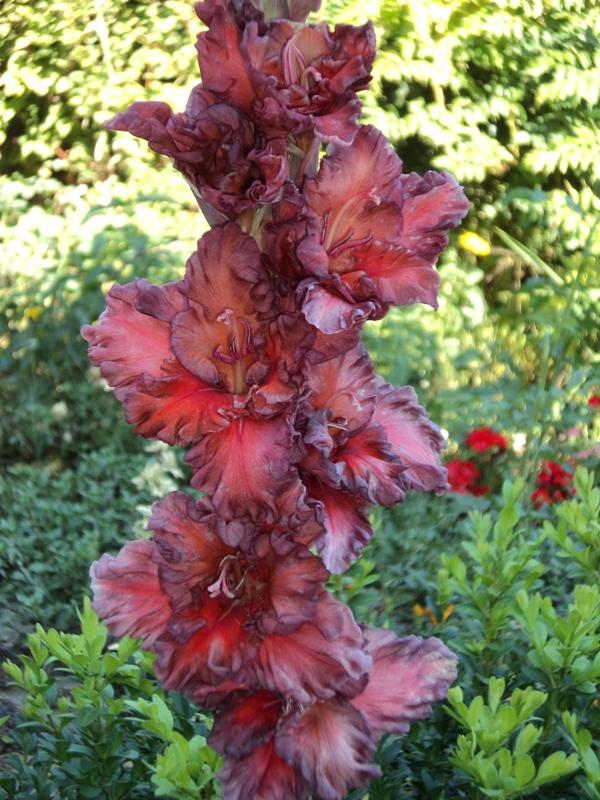
- Gladiolus Mombasa - dark purple large flowers, loose "spikelets". Blooms in July - September.
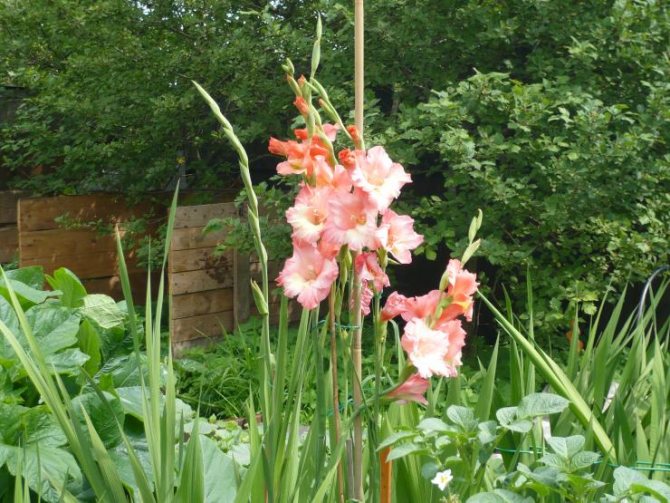
- Peter Pearce is tall, up to 110 cm, a hybrid of a pale salmon color with reddish-orange strokes on the two lower petals, a reddish neck.
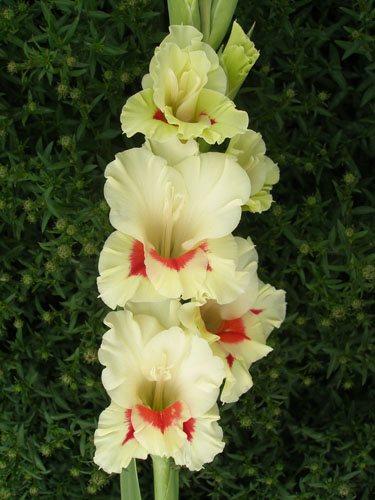
- Nova Lux - tall, up to 120 cm, with large, up to 18 cm, flowers. Tonal petals: bright yellow in the center, paler towards the edges.
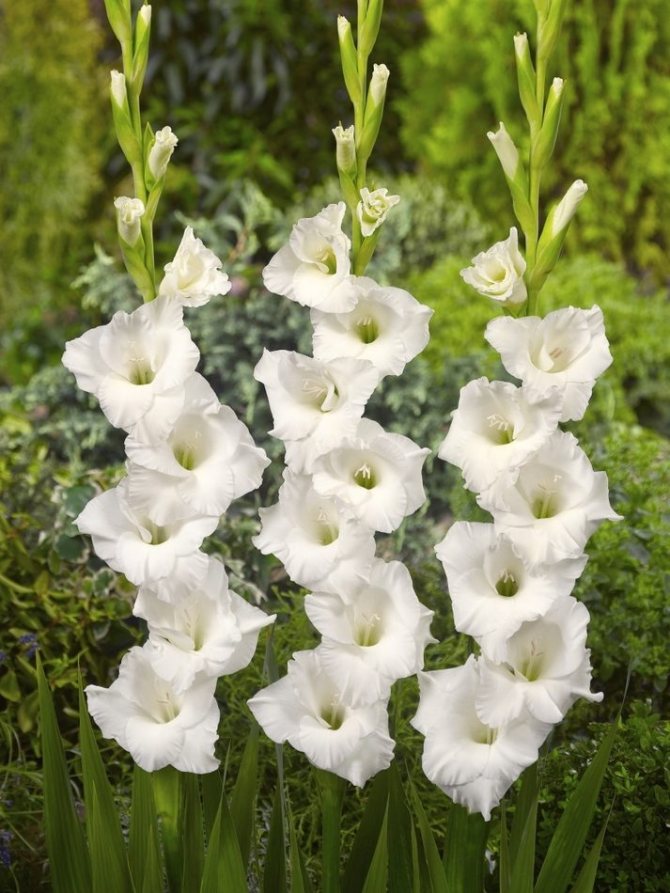
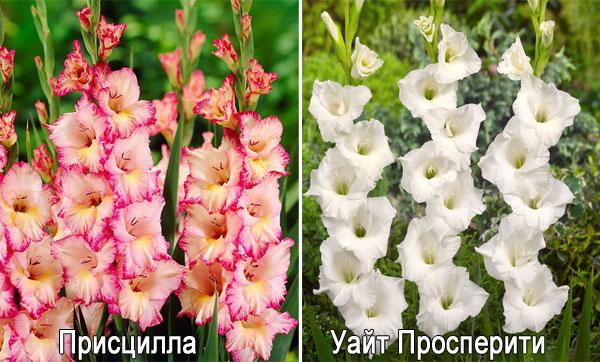
- White Prosperity - stem up to 110 cm, flowers are slightly corrugated, snow-white, with a reddish neck.
- Jester is tall, the flowers are corrugated, bright yellow, with reddish-crimson prints on the lower two petals.
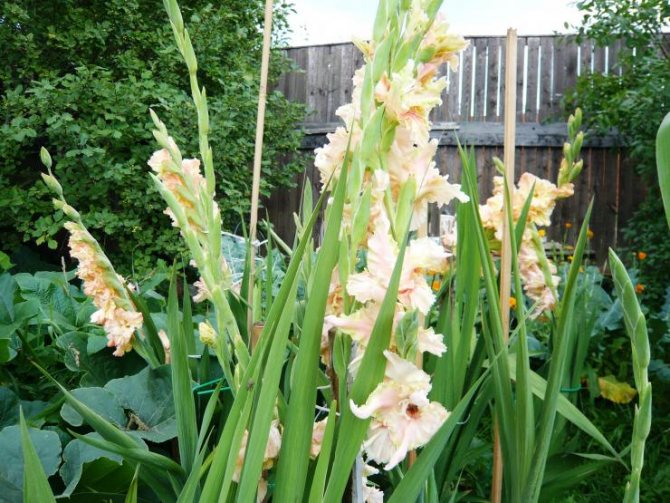
- Priscilla - large delicate creamy pink corrugated flowers with a crimson edge and a golden-orange throat.
The Chinese gladiolus, which is also called Japanese, montbrecia or crocosmia, stands out. Leaves are narrow, xiphoid, pointed; peduncles can reach 1.5 m in height. The inflorescences, unlike most gladioli, are paniculate, the flowers are stellate, sometimes funnel-shaped, with elongated graceful petals bent outward. Blooms from July to September. On the basis of crocosmia, several hybrids have been bred, for example, the winter-hardy and profusely flowering Massonorum and Lucifer.
When to plant bulbs in open ground in spring
Please note that early varieties bloom on day 68, later ones on day 100. So, if you have additionally germinated your planting material, you can choose a time for your plants to bloom for a specific event. Of course, it is worth considering which variety you are planting: early, middle or late.
For example, by September 1, the plants that you planted in mid-May will bloom (in regions with a warm climate. In a colder one - in June). By the way, if the summer is short where you live, it is worth choosing early varieties of skewer!
When to dig up gladioli
Gladiolus must be dug out before the first cold weather. This usually happens in mid-autumn, but each region has its own timing.
| Region | Period |
| Central Russia (Moscow, Moscow region). | It can be produced from September 15 to October 10, it is possible even later, if comfortable climatic conditions remain or flowering continues. There is no need to disturb the skewer until the temperature drops below +8 ° C. |
| The middle lane, including the Leningrad region. | The weather is more unpredictable here, so the dates are shifted to September 1-20. |
| Siberian region and the Urals. | You should dig up gladioli before the end of September, at 10-15 days of the month. |
| Southern strip | Since the temperature here drops slowly and in autumn it is still warm, the corms are taken from the soil on October 20-November 5. However, there is no need to delay the timing, otherwise decay will begin and the plant will die. |
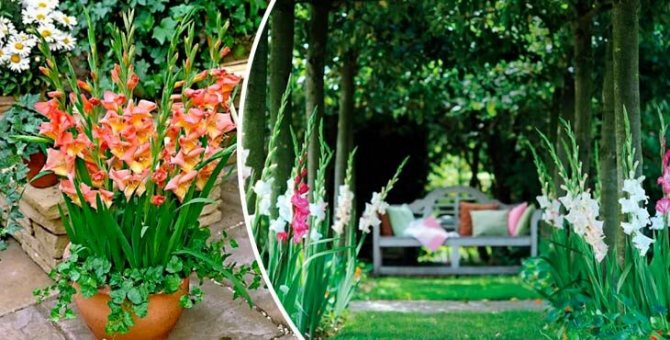
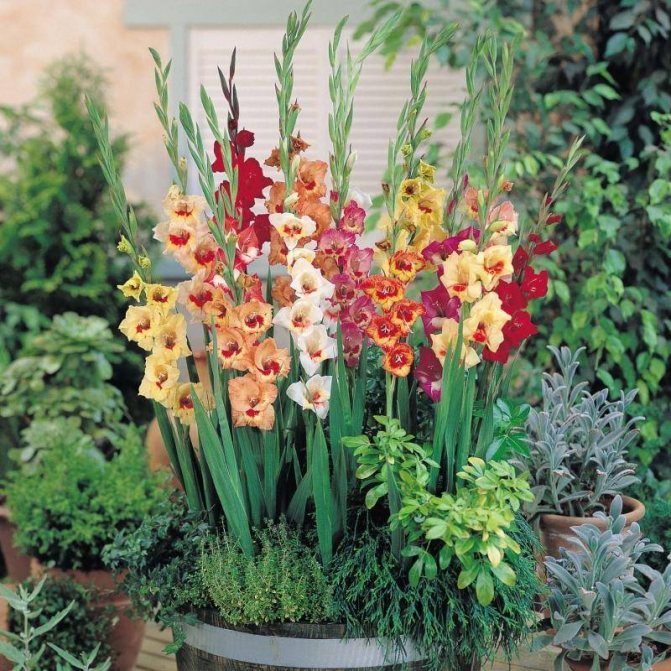
Growing gladioli in pots outdoors
Surprisingly, gladioli thrive in pots, flowerpots and flowerpots. If this is your first time doing this, choose undersized varieties.
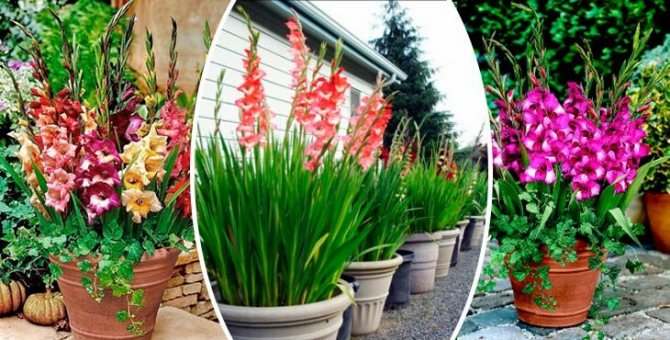
But you need to take into account the following requirements:
- The dimensions of the pot should be: diameter - 20-30cm, depth - 30-40cm.
- A high drainage layer should be laid at the bottom.
- The soil is very light, enriched with organic matter.
- Planting time is from late March to mid-May.

You need to find a place where there are no drafts and scorching sun. You may need a garter and be sure to loosen the soil in the flowerpots.
The best varieties
There are several varieties that are adapted to our climate.
Golden fantasy
Cultivation of gladioli began in the 16th century.
An early flowering variety bred in Holland and adapted to our climate. The flowers are large, rounded, strongly corrugated. There are 23 buds in an ear, the flowers open almost simultaneously. The stem is powerful, up to 1.6 m high. It reproduces well.
Newday
The first hybrids emerged from two crossed South African plant species
Medium flowering variety. The flowers are large. There are 18 buds in an ear, 6 flowers open each. The average height of the stem is 1.2–1.4 m. The color is crimson, the petals are corrugated.
Viy
Gladiolus contains a large amount of vitamin C, so it is used as a prophylactic agent for colds.
The flowering period of the variety is average. The flowers are medium in size. There are 20 buds in an ear. Only 6 flowers open at a time. The color is from crimson smoky to purple smoky with a brown tint and significant ripple on the petals. The stem reaches a height of 1.3 m.
Chocolate girl
The Shokoladnitsa variety is characterized by good resistance to various diseases and high yield.
Medium flowering variety. The flowers are large. There are 21 buds in an ear, 7 flowers open at the same time. The color is light brown with a chocolate sheen and a white spot. The petals are strongly corrugated. The stem is tall and powerful, up to 1.5–1.6 m in height.
Esperanto
Gladiolus petals and leaves are used in home cosmetology to prepare face masks.
Medium flowering variety. The buds are medium in size, there are 21 pieces in an ear, 6 flowers open at the same time. The color is creamy with red spots. The petals are slightly corrugated. Stem height up to 1.3 m.
When and how to plant gladioli in the Moscow region
In the middle lane with its temperate climate, gladioli can be planted at the end of May, when the soil warms up to 10 degrees and there is no longer a threat of frost. It is necessary to deepen the bulbs by 5-8 cm, depending on the quality of the soil.

Loam predominates here. Therefore, do not deepen the landing too much. It is advisable to introduce organic matter into the soil in advance, even in the fall, and let it overheat during the winter.This will not only enrich the earth with useful substances, but also make it more suitable.
Types and varieties of gladioli with photos and names
The breeding of the skewer is well developed, which is why the genus of Gladioli includes 280 species and even more varieties.
| View | Description | Varieties | Flowers. Peduncle |
| Large-flowered | Thick, strong stem 90-150 cm tall, the leaves are elongated, dark green, have a glossy sheen. |
| 5-20 cm in diameter, triangular, with variegated petals up to 28 in one inflorescence. There are purple, pinkish, red, yellow petals with a white or gray base. It is characterized by a large size of about 90 cm and a straight spike-like shape. |
| Butterfly-shaped | 50-100 cm, strong greenish-gray stems of medium height, sometimes slightly deflecting under the weight of the inflorescences. Large xiphoid leaves are elongated towards the end, yellow-green with a white tint. |
| Large sessile ones with intense color: yellow, pink, purple, burgundy, lilac-white with a slight orange tint. The petals are wavy, curved, lacy. The pharynx are lighter. About 15-20. Elongated, thickened at the base. |
| Primrose | 70-120 cm long, compact appearance with elastic unbranched stem. The leaves are thin, narrow, light green in color, covered with vegetable wax. |
| Most often solid red, white, pink or purple. There are also bright yellows (Leonora). 4-8 cm, triangular or rounded, the petals are thin, have slightly wavy edges, and the upper ones are slightly curved and resemble a hood. There are 18-23 colors. |
| Dwarf | A small-sized species (50-80 cm) with large dark green glossy leaves. The stalk is dense, slightly rough, streamer. |
| Exotic, of various shapes, with folded petals. Orange, purple, red, yellow, pink with a whitish sheen and pronounced pharynx. Compact, alternating. |

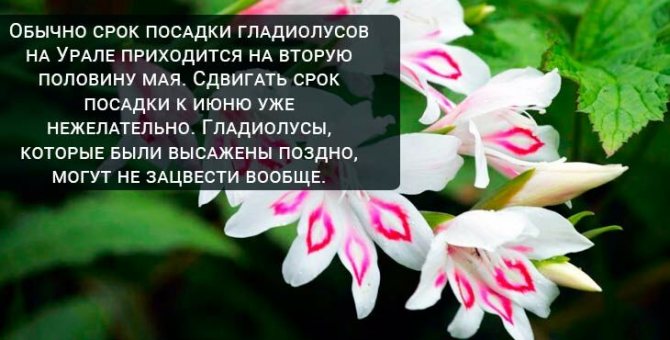
Planting and caring for gladioli in the Urals
The most optimal time for planting a skewer in this region is the second half of May. In the Urals, summer is short. How to have time to grow a culture so that it not only gives a beautiful bush, but also blooms? It would be most correct to choose early varieties.
It is worth planting not only early varieties, but also lower ones, which do not need to take a lot of nutrients from the soil for normal development, health and flowering. It is worth making sure that the soil in the flowerbed with gladioli is not waterlogged. Perhaps, if there is a moisture retention, then you need to pre-seal the drainage into the ground in the flower bed or more often loosen and reduce watering (water only if necessary).
Diseases and pests
Problems in growing gladioli appear when insects and ticks are colonized on plants. Large pests (slugs and bears) live in the garden.
Interfere with the growth and development of plants:
- cabbage scoop;
- wireworm;
- meadow tick;
- thrips.
For pest control are used:
- insecticides (preparations against parasitic insects);
- acaricides (chemicals to control ticks);
- folk remedies: tincture with onion peel, tobacco leaves or garlic cloves, soapy water;
- collect parasites by hand;
- put traps in the ground from plastic bottles with beer, hang and lay adhesive tape on the site;
- fight the larvae of harmful beetles and caterpillars. In late autumn, it is important to dig up the soil in the garden: this is how pests that are going to winter in the ground get outside and freeze at subzero temperatures.
With improper care, violation of the temperature regime, excessive humidity or excessive fertilization, diseases develop.If signs of severe bacterial, viral and fungal infections are detected, it is important to remove the infected specimen from the site in time and burn it, otherwise the pathogens easily move to neighboring flowers.
Common problems:
- smut;
- gray rot;
- fusarium;
- rust;
- cancer;
- sclerotinosis;
- bacterial scab;
- viral diseases.
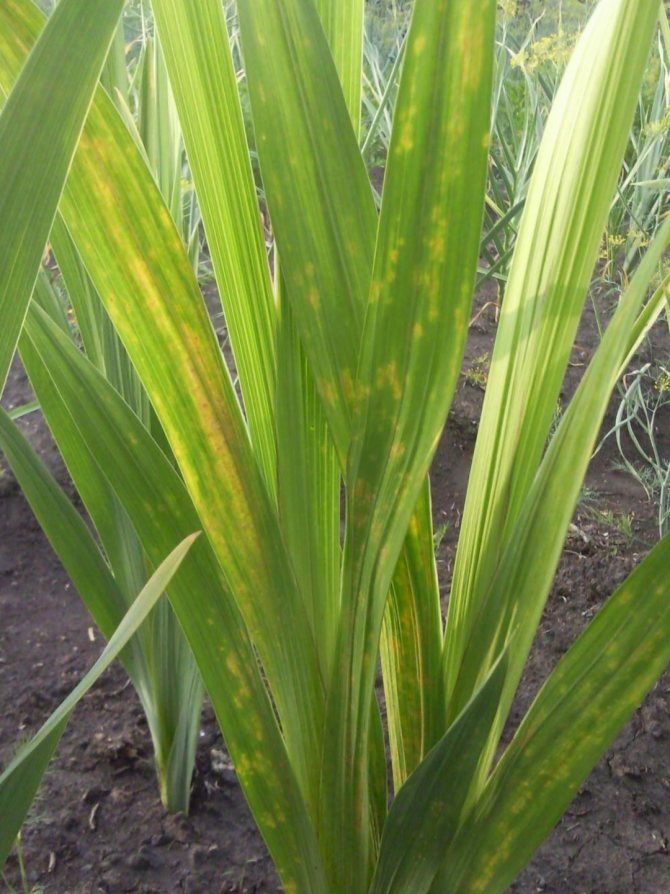
The defeat of the skewer develops less often if the grower observes the rules for conducting agrotechnical measures. You can not overfill the plantings: excess moisture provokes the development of fusarium, gray rot, and other fungal diseases. It is important to inspect the specimens more often. When the first signs of disease are detected (leaves wither and turn yellow, spots appear, gray and black bloom, the flower weakens, lags behind in growth, the shade of the leaves changes), they are treated with chemicals or the plant is removed for disposal.
How to grow gladioli in Siberia
Siberia also differs in weather conditions. What to focus on when disembarking? The most correct is the soil temperature. In some regions, the ground (at a depth of 10 cm) warms up to the 8-10 degrees we need in early May. In others, at the end of May, beginning of June.
What other features of growing skewers in Siberia:
- Germination - will help to achieve uniform good flowering of gladioli in your area.
- Landings are made thicker. Distance between plants - 10-15cm, between rows - 25-30. This will help the culture to retain the necessary warmth and create its own microclimate, comfortable for it.
- The bulbs are planted in dry sand. The sand layer is increased to 3 cm.
- After planting, the wells are filled with warm water.
- It is better to water the planted material not from above, so as not to compact the soil over the bulbs, but into the grooves made next to the planting.
- Leaving involves a garter to the pegs. It is very important!
- And spraying with fungicide solutions from pests.
Of course, in these regions neither watering nor loosening of the soil can be neglected!
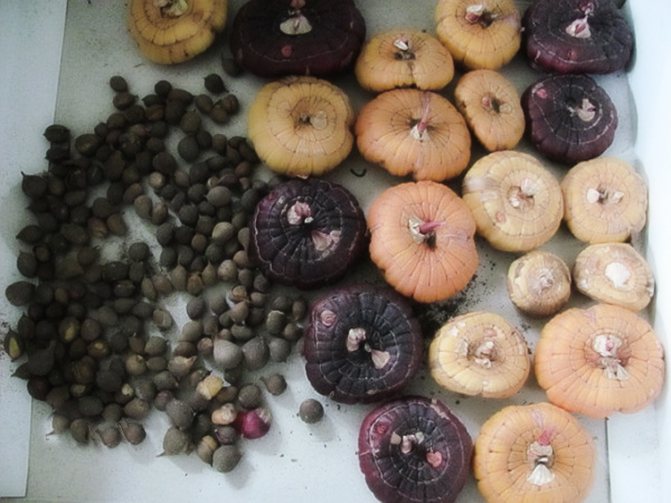
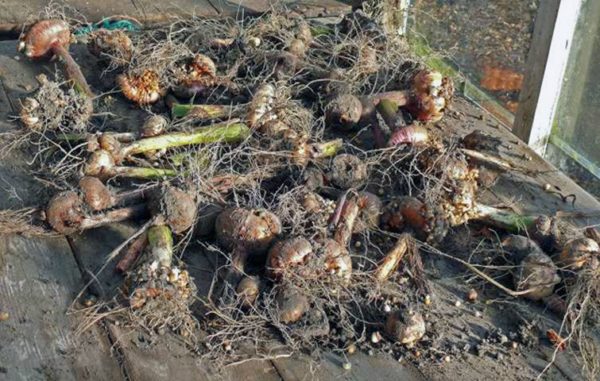
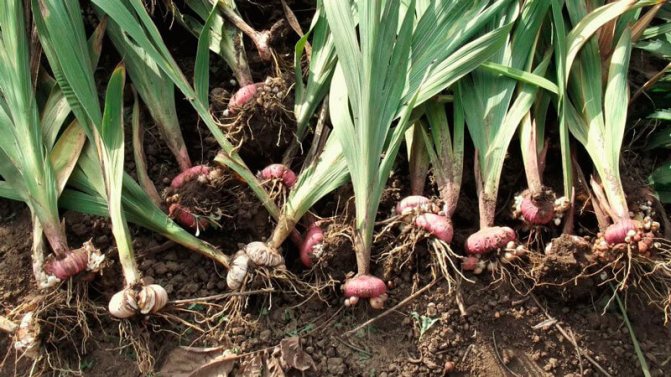
Reproduction by bulbs and children and storage conditions
You can not only buy gladiolus tubers in the store, but also grow them at home.
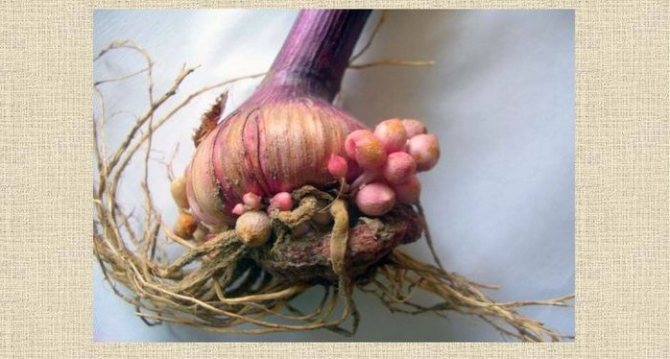
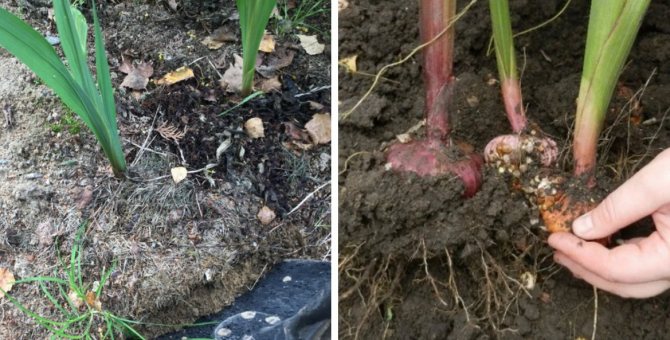
The vegetative reproductive organ of the gladiolus bulb is the so-called baby. It is a tuber that has formed at the roots of a tuber. By the end of maturation, they differ from the parent only in diameter.
The number of babies can be different, the average value is 20 - 30 pieces, but there are varieties in which the number can reach more than 100. It depends on the variety, age and sowing depth of the parent bulb.
This method of breeding gladioli is a great option if you like a variety and want to continue growing it in the future. Flowers grown in this way do not inherit the diseases that their parents had. In addition, this is a great opportunity to increase the number of flowers that will retain all the characteristics of a given species, and will also be strong and healthy.
It should be noted that tubers are well stored. Children collected in the fall should be separated from the bulb, rinsed thoroughly and dried. To dry, lay them on a blanket in a dark and dry place, the sun's rays should not fall on the kids.
In early November, they will dry out enough. For further storage, it is better to sort them by size. Place them in a wooden box and let them sit until spring. The temperature in the room where the bulbs will winter should be about 10 - 14 degrees. At optimal temperatures, they can lie for about 16 to 24 months.

Before disembarking, children should be prepared. From above they are covered with dense scales, thanks to them, they can be stored for a long time. In order for them to begin to germinate, this shell must be removed, or its integrity must be violated. This must be done carefully so as not to harm the onion itself.
With good care, tall beautiful gladioli will grow from children in the very first year, and will delight you with flowering.
How to dry bulbs
After processing, the bulbs need to be dried.
- They are first dried at about 27 ° C for 14 days.
- Then you need to move the tubers to where the temperature is kept at about 22 ° C for a month.
The quality of the planting material depends on how competently the drying was carried out. If the bulbs are not completely dried, mold can develop. Florists still cannot come to a consensus on whether to remove the scales of tubers. Some believe that an infection develops under the scales, but experienced gardeners claim that the bulbs will remain healthy and scaled if dried well.
To scare away pests, you can put garlic cloves next to the tubers. You can sprinkle the planting material with naphthalene, this will also help prevent infectious ailments.
Gladiolus bulbs are protected from drying out by scales. It is convenient to store the bulbs by dipping them in melted paraffin wax. A layer of paraffin will protect the tubers from mold and prevent them from drying out. And when landing, it will not interfere.
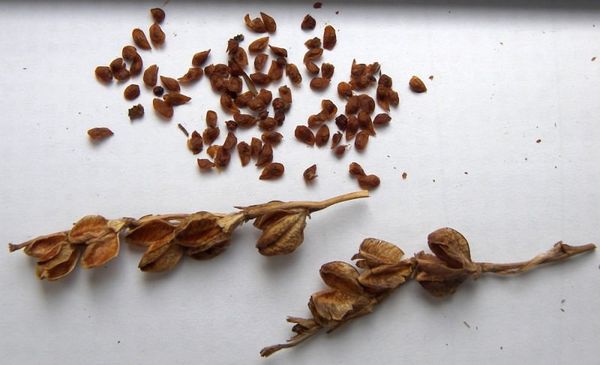
How best to plant: seeds, bulbs or seedlings
Seed propagation of gladioli is a complex undertaking; it is rarely used among simple florists. Varietal traits are rarely transmitted through seeds exactly, all the more you should not try to propagate modern gladiolus hybrids by seeds.
Seed propagation is used by breeders to develop new varieties.
If the desire to grow gladioli from seeds is very strong, then it is better to purchase seeds in specialized stores with a good reputation. Such seeds are specially selected by specialists and correspond to the variety as much as possible.
On a note. It is not uncommon for budding gardeners to order inexpensive flower seeds in unusual colors from China. Nobody knows what will grow from such planting material, there are no guarantees. It is better not to waste money and time on raising “unknown animals”.
How to plant gladioli with seeds?
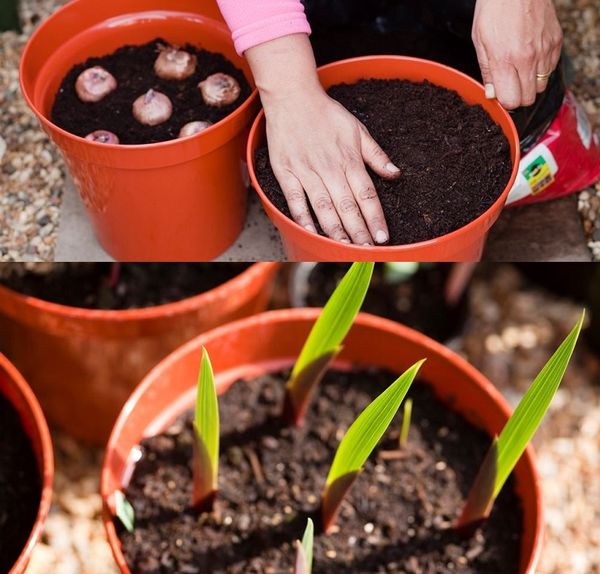
Gladiolus seeds are sown for seedlings in February-March, subject to additional lighting. Presowing treatment of gladiolus seeds consists in soaking in a solution of Epin or Heteroauxin, you can use a natural stimulant: aloe juice or honey water.
Small seeds are spread over a moist soil surface, consisting of equal parts of sand, garden soil and humus. It is not necessary to cover crops with a layer of earth. Before germination, the seed boxes are placed in a warm and bright place.
Care for gladiolus seedlings consists in moderate watering with warm water, loosening the soil. The lighting for the seedlings is not too bright, with a day length of at least 14 hours.
Now read:
- Preparing gladioli for planting in spring - stages with a photo
- Why do gladioli grow in curves?
- Gladiolus: planting and care outdoors
- When to plant potatoes in 2019. Moon calendar
- Why do gladioli change color?
With the onset of warm weather, the container with seedlings is taken out into the street, not placed in the bright sun. You can transplant young plants into the ground or leave them in boxes until autumn. With the onset of cool autumn weather, children of gladioli dig up and clean up until spring. You can store the bulbs in linen bags in a cool place or in cardboard boxes, no thicker than 4 cm.
The influence of plant biology on agricultural technology
It would seem that he studied in detail how to plant gladioli, did everything according to science, looked after small children, but the result was not impressive. Or even if in the first or second year everything turned out as it should, after a while the flowers begin to ache, become smaller, and degenerate. To prevent this from happening, it is necessary not only to blindly follow the recommendations, but to understand the biology of the plant.
A feature of corms, which includes gladiolus, is a two-year development cycle.In the first year, the bulb is formed as a daughter and lays the organs of development, in the second, it gives life to a flower and a new corm, and itself dies off.
During the growing season, phases of development are distinguished, when certain systems of the plant are more intensively formed, food is consumed unequally, moisture, therefore, accents in care are also shifted.
Consider the basic rules for growing gladioli in the open field in relation to their biological characteristics. This approach will help you avoid common mistakes.
- The value of the gladiolus planting corm is not in size, as many think, but in age. The highest quality is considered to be the material obtained from tubers and never gave a flower. It is easy to determine by the absence of a dried peduncle and a small neat bottom. Such bulbs are called juvenile and produce the largest decorative flower. Further, it will be renewed, but the optimal period of its use is 2-3 years. Anything older will hurt, worsen flowering, and fall out during storage. Conclusion - the planting material must be regularly replaced, supplemented, and rejuvenated.
- Early landing is most favorable for gladiolus. In the recommendations for when to plant gladioli, you can find information about the timing shift in the warm period in order to get a later flowering, for example, by September. But this is contrary to the biology of the flower. At a soil temperature of 4–15 ° C, the root system develops intensively, the plant turns out to be powerful, blooms earlier and more abundantly, and in a timely manner forms a large replacement bulb. At a temperature of 15-18 ° C, the vegetative part (stem, leaves) grows faster, and the roots lag behind, and gladiolus turns out to be weaker. Conclusion - use early, medium and late varieties to stretch flowering.
- Gladioli should not be grown in the same location for several years. On the one hand, the soil is depleted, since the consumption of the same set of minerals and microelements is going on, and harmonious proportions cannot always be restored with the help of fertilizers. The second negative factor is the contamination of the habitat with “targeted” diseases and pests. For the same reason, it is not recommended to plant gladioli after other bulbs (tulips, lilies), next to plants with an aggressive root system, for example, peonies. Conclusion - observe the crop rotation.
- The flower has phases of growth when it is most vulnerable to adverse conditions. Gladiolus has formed 3-4 leaves. During this period, the formation of roots of the second tier takes place, feeding the daughter bulb, while the old (maternal) roots, which provided the start, gradually die off. At the same time, a peduncle begins to form, drawing off nutrients to itself. There comes a point where getting enough moisture and nutrition is more important than ever. If the conditions are unfavorable, new roots develop worse, and in later varieties they may not grow at all, which is fraught with oppression and even death of the flower. Conclusion - during this period, regular watering and feeding are needed.
- Not all gladioli varieties can thrive in regions with moderately cold climates. You can often hear that after planting gladioli in the spring in the ground, they grew and bloomed beautifully, but the corms after digging turned out to be sick and weak. We are talking, most likely, about Dutch, American varieties, the planting material of which was grown in a different climate (warm and humid). When buying such decorative varieties, be prepared for the fact that you are unlikely to receive your planting material. Conclusion - cultivate Russian varieties, from foreign cultivars, give preference to those adapted to our conditions.
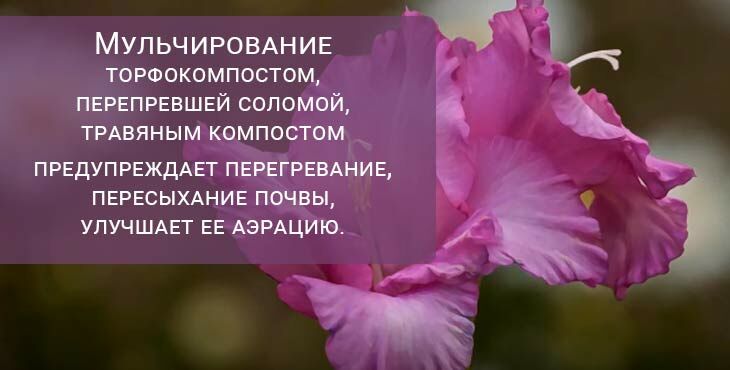
- In the agricultural technology of gladioli, soil mulching plays an important role. The fact is that the second layer of roots, which we talked about a little higher, does not go deeper, but assimilates the upper fertile layer. The depth of their occurrence is 5–18 cm.Mulching with peat compost, rotted straw, grass compost prevents overheating, drying out of the soil, improves its aeration. Plants grown on mulched flowerbeds form powerful inflorescences, increasing the number of buds by 4–5 pieces, bloom longer, get sick less, give an increase in bulbs by 20–25%. Conclusion - do not ignore this agricultural technique.
How to store gladiolus bulbs in winter
When the roots of the tuber are taken out of the ground, they are sorted, washed under water. After disinfection is carried out in a 1% solution of the foundation for half an hour and again washed. Next, the roots are again treated with a 3% solution of potassium permanganate. They dry it for several days and put it in a container lined with paper. Contains gladiolus bulbs at 25-30 degrees, turning occasionally. After half a month, the temperature is lowered to 18-22C. After a month / one and a half, the bulbs should be sorted and peeled.
The upper husk is removed from them. Children are divided according to size, grades. A baby is considered large up to 8 mm in diameter or more; medium up to 6 mm. Then the roots are placed in paper bags, keeping at a temperature of no more than 6C. It is extremely dangerous to keep tuberous buds at the highest possible temperature, because it is fraught with loss of germination. In the city, planting material can be kept in the refrigerator.
The resting period for gladiolus lasts forty days. During this time, the roots will sprout. After this period, sprouts will appear, and it's winter outside! To preserve flowers until spring, they are placed in a room with 5-10 degrees of heat. Room humidity should be 60-70%.
Pruning gladioli
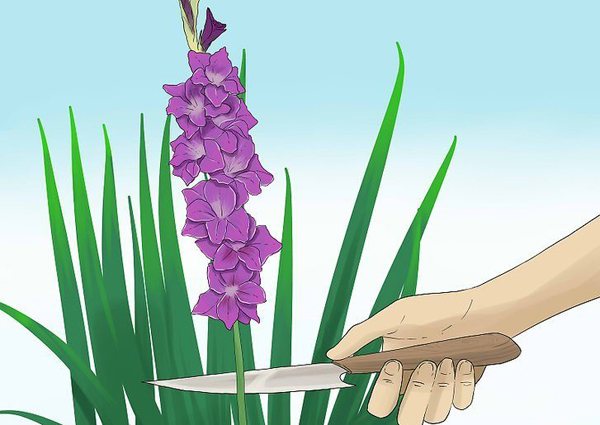
Correct cutting of gladiolus inflorescences affects not only their durability in bouquets, but also the process of tuber formation. Cutting the peduncles of these plants should be carried out only in the evenings or early in the morning, when the plants do not lack moisture and do not suffer from heat.
You should not wait for the full blooming of all flowers on the inflorescence and its greatest decorativeness: it is necessary to cut the peduncle when one lower flower is open or two lower buds are painted in the colors characteristic of the variety and are preparing to open. Such inflorescences bloom completely in water, are perfectly transported and stand surprisingly long.
When cutting off the peduncles of gladioli, remember that you should not touch the leaves and remove them along with the inflorescences. Only those plants that have kept at least 4 full leaves for the bulb, and ideally 7-10 leaves, will be able to develop and grow normally, to mature for the next season. It is necessary to cut the inflorescences only with a sharp knife, at an angle, as low as possible above the leaf, but without asking it. In order to get a longer peduncle, you can not cut, but twist it, slightly incising from the flat side of the stem, then breaking and bending the shoot and, gently holding it just above the point of exit from the leaf, gently twisting it.
Pruning before storage is carried out only after digging. Even if you have already cut all the flower stalks, do not completely remove the greens, because they are very important for the ripening process of the bulbs.
Growing features
After disembarkation, careful care of the gladioli is necessary. Caring for them after planting includes:
- fertilizer;
- spraying to protect against disease;
- watering when there is not enough rainfall.
Top dressing
Flowers accumulate nutrients in the corms, so it is important to systematically fertilize them. Gladioli harvest from the beginning of flowering until the end of the growing season. The differences between fertilized and unfertilized bulbs become apparent after planting the next season. Fertilized ones will germinate earlier, releasing earlier flowers.
During the growing season, when, when probing, a flower shoot is felt under the fingers, it is worth feeding the gladioli with phosphorus-potassium fertilizers:
- phosphorus - for beautiful flowering;
- potassium - for the rapid formation of a large tuber.
Under no circumstances are nitrogen fertilizers used during the season, they delay flowering, slow down the growth of tubers.
Watering, weeding, pruning
The soil should be weeded, loosened, creating better conditions for air access, especially on heavy soils, preventing moisture loss. The lack of moisture in the soil at the moment when gladioli form flowers negatively affects the height of the spike-shaped inflorescence.
Diseases and pests
Gladiolus is susceptible to fungal, bacterial, viral diseases that cause rot, fusarium. Gladioli care includes fungicide treatment. The drugs described above will do.
The most common pests of gladioli:
- thrips,
- root mite (Rhizoglyphus echinopus).
It is important to choose the right place in the garden, in the flowerbed. Bad predecessors can transmit diseases and pests to the skewer.
Attention! Where you can't plant gladiolus!
- Skewers should not grow in one place for several years.
- They are not planted in a garden bed on which other bulbous flowers grow.
- You can not plant gladiolus next to tuberous plants, potatoes.
- Do not plant next to cucumbers, tomatoes, tobacco, beans.
- The risk of infection of plants increases when growing a number of asters, freesias, lilies, phlox.
Planting plants at time intervals, such as every 7 or 14 days, will allow you to enjoy flowers for longer. It is worth removing faded flowers in order to preserve the stored substances. The plant will use the reserves for seeds, and accelerate the growth of tubers. Additionally, we get the aesthetics of the garden bed. Since the tuber grows most intensively immediately after flowering, only the part of the stem where the flowers were is cut off, the rest is left untouched for feeding the tuber.
Storage in the autumn-winter period
After the gladioli have faded, the stem is cut 8-10 cm from the soil and the plant is left dormant for 45-60 days. In the case when the flowers were cut for a bouquet, the state of dormancy is reduced to 30-40 days. During this time, new bulbs and babies are gaining strength and nutrients for future wintering.
There is no general agreed period when gladioli should be dug up. First of all, it depends on the variety, and secondly, on the climatic characteristics of the region.
As a rule, in the non-chernozem zone, excavation can be carried out already in mid-September. If the corm does not have time to ripen, this will in no way affect its storage, but on the contrary, it will be more convenient to dig it up, because the children will not have time to separate and will remain on it.
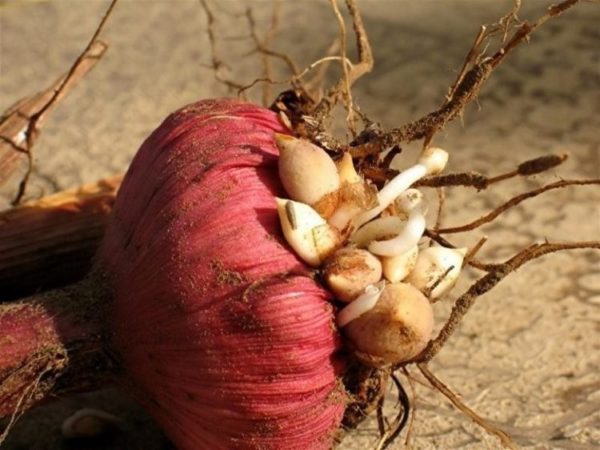
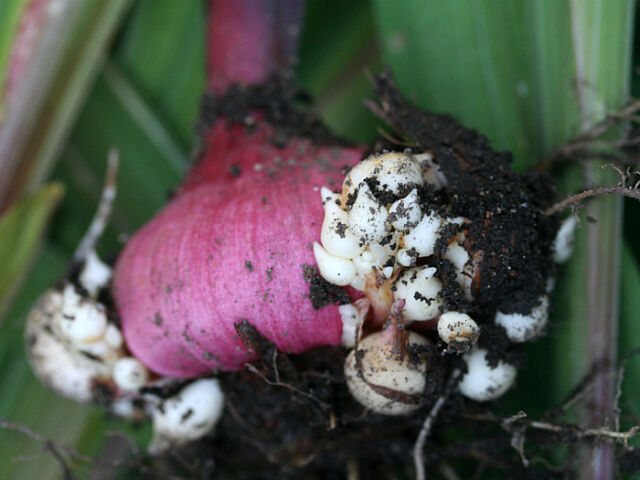
Healthy onion with babies
Well-ripened babies are dark brown in color and they are not connected to the parent bulb, unripe ones are gray in color and come out with it.
It is better to dig up gladioli in dry, sunny weather. Experienced flower growers plant gladioli by varieties, early and late in different places, which will facilitate their digging in the future. They usually start with early varieties.
- use a shovel and start digging the gladiolus in such a way as not to damage the corms and children, for this they carefully dig it from all sides and pull it out of the ground by the aboveground part, shake off excess soil and cut the stem almost at the very base of the bulb;
The bulbs need to dry in the sun before harvesting.
It is better to weed out the area with flowers before digging up.
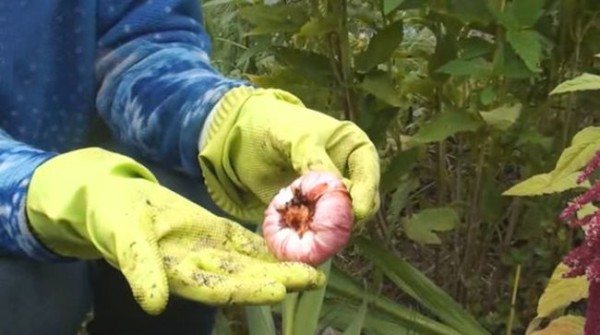
Bulbs ready for storage
- let the corms dry in the sun for a couple of days, if the weather conditions are favorable, then the old bulb should be removed and the roots cut off, the children should be separated, all planting material should be washed in water and pickled, then placed in wooden boxes or plastic trays, transferred to a warm, well-ventilated rooms for further drying;
- before removing the planting material for storage, it must be examined again, carefully and only healthy specimens must be selected;
- can be stored in a refrigerator, basement, ventilated room and even a windowsill, the main thing is to maintain a low humidity level (up to 60%) and a temperature regime within 3-9 C, at elevated temperatures the bulbs will soften or sprout, and this will lead to their death.
Cold storage
Periodically, at least once a month, the bulbs should be examined for infections and fungus. Infected specimens are eliminated immediately. It is better to lay out in one layer for ventilation.
Video - Storing gladioli in winter
How to cut flowers correctly
When cutting gladioli, it must be borne in mind that the bulb will remain in the ground for some time. In order not to damage it, the stems are cut 4 cm above the soil level. To compose a bouquet, use those flowers on which the three lower buds have blossomed. Modern varieties are distinguished by the fact that they dissolve 8-10 buds at the same time. The procedure is carried out in the morning or evening. The "stump" remaining after cutting the inflorescence is covered with leaves.
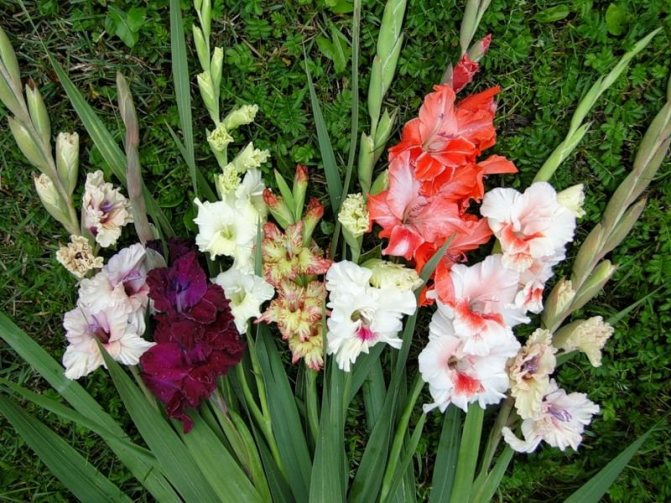
Gladiolus varieties
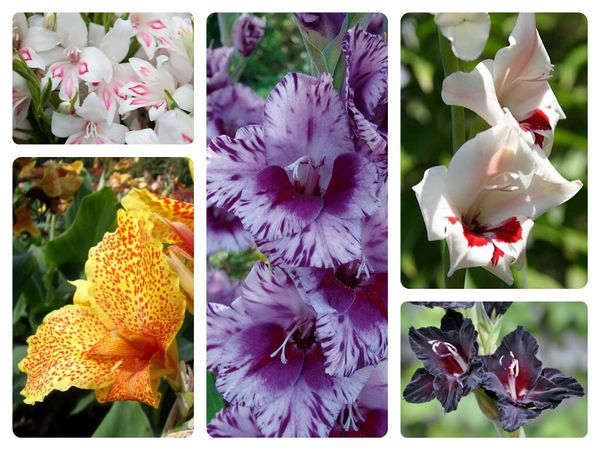
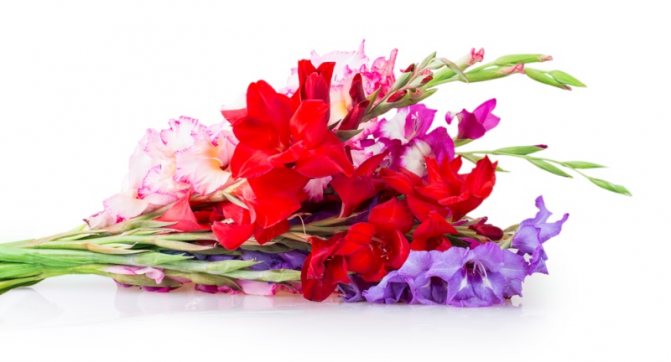
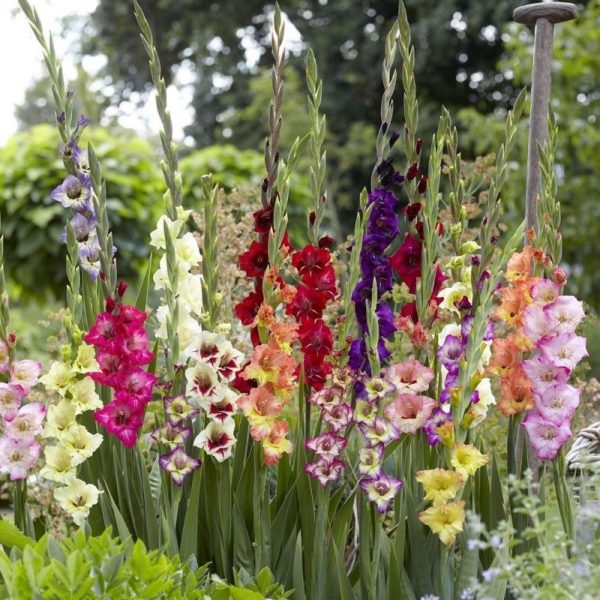
In culture, gladiolus has been grown for a very long time. Now in the world there are about 5,000 varieties that differ in height, size and number of flowers, their color and shape.
To make it easier to navigate in the variety of varieties, a classification system was invented, where in the numerical code the first digit indicates the size of the flower, and the last two indicate the color.
By the size of the flowers, the skewer variety is divided into subgroups:
- miniature, with a flower size up to 6.5 cm;
- small-flowered - up to 9 cm;
- mid-flowered - up to 12 cm;
- large-flowered - up to 14 cm;
- giant - more than 14 cm.
According to the timing of the beginning of flowering, gladioli are: early, medium and late. The flower shape is simple, corrugated and super corrugated. The color palette of flowers is very diverse, there is no such shade in which gladiolus is not painted.
Gladioli have faded, what should I do next?
When gladioli fade, a completely fair question arises: "What to do next?" After all, leaving the tubers in the soil for the winter is unacceptable.
There are only a few representatives that can survive in the winter safe and sound. And then such options are permissible only in the warm climate of the region.
After cutting or already at the end of flowering, you should wait about 30-50 days and only then carry out the necessary manipulations with the preparation of the bulbs for the winter.
If the temperature in the region has dropped below -2 ° C, then the excavation should be carried out much earlier than the due date. Freezing a tuber will significantly weaken it, which means it will increase the likelihood of any disease occurring in winter.
What types to choose
Modern selection does not stand still, and today amazing varieties and luxurious hybrids of this perennial have been obtained. Whichever variety your gladiolus belongs to, in any case, it is a corm plant with straight stems and a scattering of luxurious flowers, different except for their location, color range and shape.
The stems of some varietal hybrid specimens reach a height of 170-200 cm, and require additional support.
High grades need extra support
Flowers are arranged in the following ways:
- spiral and spike-shaped;
- one-sided and two-sided.
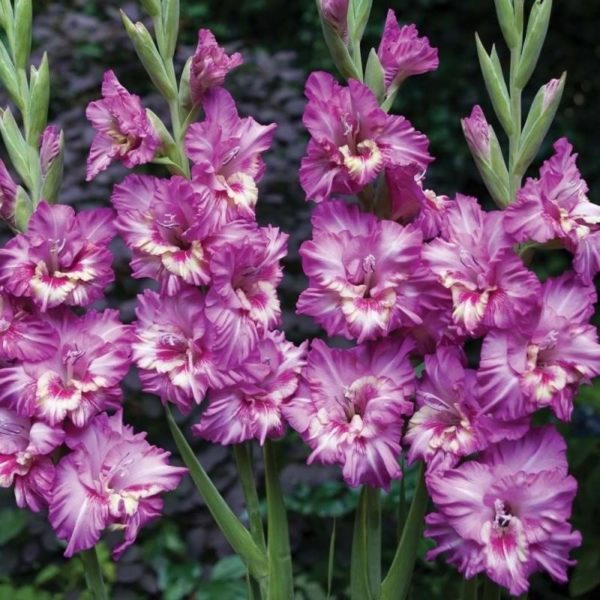
Variety "Violetta"
The shape of the petals also differs, it can be: simple, wavy or with corrugated edges, and the diameter of the flowers themselves is very diverse:
- small-flowered size - from 7 cm to 10 cm;
- mid-flowered size - 12 cm;
- large-flowered size - 15 cm;
- giant — over 17 cm.
Gladiolus byzantine
Try not to combine varieties with small and large gladioli flowers, the latter will stand out and focus all attention on themselves.
Planting secrets
When growing gladioli in the open field, a number of agrotechnical rules must be observed, otherwise the flowering will be short-lived and not too abundant.
Corm age
It is a mistake to believe that the size of the tuber affects the quality of flowering. Not always a large adult gladiolus bulb is guaranteed to give a large and bright peduncle. The biological age of this culture does not exceed 4-5 years, then the planting material needs to be renewed. It makes no sense to expect abundant flower formation from an old plant. The age of the skewer can be determined by the diameter of the bottom and the height of the corm. The flatter it is and the wider the bottom, the older it is.
A young bulb is almost round, sometimes its height is greater than its width. For the development of a full-fledged strong flower shoot, its diameter should be at least 3 cm. Plants that have developed from young tubers bloom later than their older relatives by an average of 12-14 days. The shape and size of the bulbs can vary greatly in different varieties, so it is impractical to compare them with each other.
Choosing a landing site
Gladioli love the sun and warmth, so you need to choose sunny, well-lit areas for them, protected from cold northerly and northeasterly winds. Large trees and shrubs should be no closer than 3-5 m, because their crowns will shade the flower bed, and the root system will take away moisture and nutrients from the flowers. High green spaces located at a safe distance will protect the long shoots of the skewer from gusts of wind and help avoid lodging of the stems.
The landing site should be sufficiently high and dry. The culture does not tolerate the close location of groundwater, since increased dampness leads to rotting of thin roots, and then of bulbs.
In low, damp places, you will have to make a high bed, otherwise the roots will not receive enough air and the plants will die. It is advised to pour a little sand into each hole when planting.
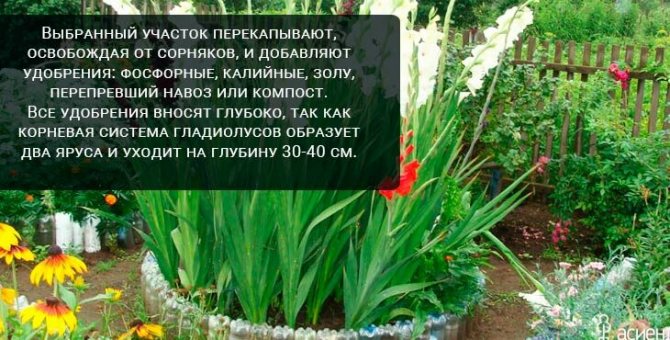
The skewer grows best on light, loose, well-drained sandstones and loams, which are rich in humus. In heavy clay soils and poor sandy soil, it develops poorly and may not bloom at all. A garden bed for this culture is prepared in advance in the fall. The roots of the plant go to a depth of 35-40 cm, and you need to dig up the ground deeply. When digging, coarse sand and compost are added to the soil with a high clay content. Sandstones that do not retain moisture are made heavier with clay and fertilized with humus.
Gladioli prefer neutral or weak acidity, therefore fluff or dolomite flour (100-150 g per 1 m²) should be added to too acidic soils.
It is useful to add a little crushed charcoal to the garden bed (100-120 g per 1 m²). It is undesirable to add fresh humus, since this causes excessive growth of green mass and not too abundant flowering.
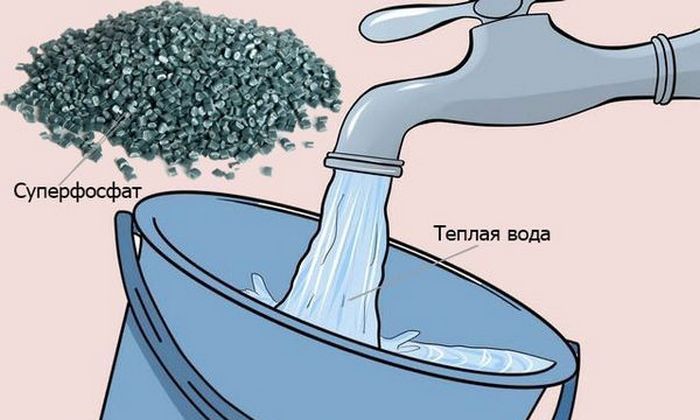
During spring digging, the following mineral fertilizers are applied to the substrate:
- superphosphate - 15 g per 1 m²;
- ammonium nitrate - 10-15 g per 1 m²;
- potassium sulfate - 30 g per 1 m².
You should not plant a skewer in the area where asters, phloxes or any cruciferous plants (cabbage, radishes, mustard, etc.) grew last year, since these crops are affected by the same fungal infections. Wireworm is the worst enemy of corms, so it is better to refrain from placing them in the place where root crops grow.
The best predecessors for gladioli are considered: legumes, tomatoes, garlic, strawberries, dahlias, zinnias. Calendula and marigolds, planted in the immediate vicinity, repel insect pests (thrips). It is recommended to change the planting site every 2-3 years.
How to plant gladioli correctly?
The rules for planting gladioli provide for the preliminary preparation of the planting material, which consists in the following actions:
- planting material is carefully sorted out, discarding rotten and dried out specimens;
- sort the bulbs by size, dividing them into several fractions;
- carefully cleaned of the husk covering them, trying not to break off the sprouts that have appeared;
- once again carefully examine, small damaged areas are cut out with a sharp disinfected knife, the places of the cuts are sprinkled with crushed coal;
- disinfection is carried out - 30 minutes in a solution of potassium permanganate (0.5 g per 1 l), 2 hours in a garlic infusion (100 g of chopped cloves in 3 l of water) or 30 minutes in a solution of karbofos (15 g per 5 l);
- treated with microelements and growth stimulants (8-10 hours) - 1 tablet of heteroauxin, 10 tablets of succinic acid, 3 g of boric acid, 3 g of potassium permanganate; 2 g of sodium gummate per 10 liters of water heated to 40 ° C.
It is recommended to lay out the planting material for germination for several days in a bright, warm place, but not in direct sunlight.
The technology for planting corms in the ground is as follows:
- Dig holes or grooves. In light, loose soils, the depth is 12-15 cm, in heavier and wetter soils - 8-10 cm. The seeding depth is determined by the size of the planting material. It is generally accepted that it should be equal to 3 diameters of the corm. Last year's small onions do not deepen more than 4-5 cm, otherwise they may not germinate.
- The soil at the bottom of the grooves or pits is spilled abundantly with water. Dry soil can pick up moisture from the tubers, causing them to dry out.
- Sand is poured inside the hole or trench in a layer of 1-2 cm. This will prevent root rotting caused by excessive moisture.
- The bulbs are placed in trenches or holes. About 13-15 cm are left between large specimens, at least 20-25 cm between adjacent rows. Smaller bulbs are placed denser. It is impossible to thicken the planting, since the plants will develop poorly.
- Sprinkle on top with a small layer of sand.
- Fill up the trenches or pits with a garden substrate.
- Water abundantly again.
- Mulch with peat, humus, sawdust or cut grass.
Before germination (about 15-20 days) of planting, it is better not to water anymore. Further care consists in regular moistening, weeding, loosening of row spacings and periodic top dressing with any mineral complex fertilizer (once every 2 weeks).
Do I need to water gladioli after flowering
If the weather is dry and sunny, continue watering. Faded gladioli are irrigated less often than during flowering, when moisture was required to form beautiful flowers. With an approximate frequency, about once a week or ten days, it is required to water the skewer so as to maintain a rational level of moisture in the soil in which the corm is located.
Try not to pour water on the above-ground parts of the skewer. In advance, even in spring, when planting, make holes or grooves for irrigation along the plantings or between them - this irrigation method prevents gladiolus rot.
Features of spring planting
The important question is when to plant gladiolus flowers that were dug up in the fall? In the spring of next year, in April - early May. Before planting, carefully examine the bulbs to remove any contaminated specimens.
It is worth protecting the bulb from pests (thrips), fungal diseases using chemicals. The solution is prepared in accordance with the recipe on the package, the tubers are dipped in it for 1.5-2 hours before planting. For example, an ampoule of fungicide is diluted in a small bucket (5 liters). The drugs are used:
- Tanrek;
- Fufanon;
- Captan;
- Aktelik;
- Topsin;
- Vitaros.
The bulbs can be dry treated by dusting with a suitable preparation. After processing, the bulbs are planted to a depth equal to three dimensions of the tuber height, which in practice means 10-15 centimeters. If you plant the tubers more shallowly, the flowers will be bent.
The rule is as follows:
- smaller bulbs are planted on heavy soils;
- on light soils - deeper.
Experienced gardening tips
It is not recommended to leave gladioli in the soil for the winter, they should be dug out due to the risk of frostbite.
You can start digging up the bulbs 3 weeks after flowering, but it is better to refrain from digging up this early due to the possible lack of time for ripening. You can help facilitate the process by choosing a pitchfork instead of a shovel.
It is also believed that the bulbs should be harvested in the period after harvesting the potatoes, but before removing the cabbage.
Preparing for landing
The bulbs are prepared for planting for about two to three weeks, i.e. from mid-April. Experienced gardeners prefer to clear the bulbs of last year's scales before planting, then they can germinate faster. Before planting, they also check the condition of the onions to determine if they are sick. Diseased corms are removed and then destroyed if they can no longer be cured. But in any case, they should not be planted on a flower garden. Clean, healthy bulbs are laid out on a windowsill lit by the sun, where they first hatch and take root. Only then can they be planted. But first, they need to be kept in a weak solution of manganese or garlic for about an hour.
Cut for bouquets
- It is better to cut flower stems in the morning or in the evening, after sunset, using a sharp knife or pruner.
- The stems can be with one or two flowers already in full bloom, the rest will open in a vase.
- It is necessary to cut diagonally, leaving at least 10 cm of the stem and a few leaves that will feed the bulbs.
- Before placing the flowers in the vase, place them in a bucket of cold water in a cool room for several hours.
- Remove flowers that have faded each time, this will provoke the opening of new buds.
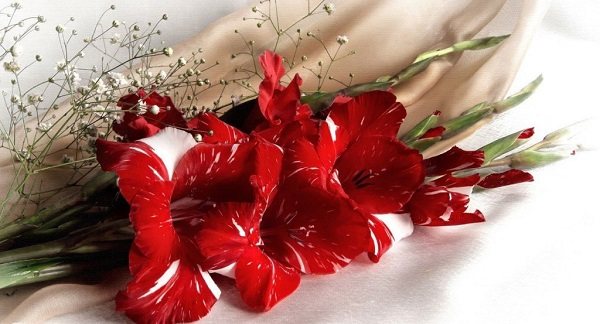
Gladioli look great in a vase
Gladioli are very showy and beautiful flowers. Beauty, as you know, requires sacrifice. Donate some of your time to the basic rules for the care and storage of these beauties, and they will not hesitate to thank you for your efforts with abundant and colorful flowering!
Gladioli will adorn any flower garden!
Diseases
Gladioli are susceptible to the same diseases as all bulbous plants. And also the danger is represented by fungi and all sorts of pests (mites, aphids, caterpillars). Most varieties are the result of selection, the main criterion of which is appearance. Therefore, many species have practically no immunity of their own and can die without human intervention.
Gladioli are susceptible to many diseases and are attractive to pests
Fusarium
The causative agent of the disease is a fungus that infects the bulb, penetrating into it through the soil. This usually happens with excess moisture.
The disease interferes with the growth and development of the aerial part of the plant. This causes the leaves to turn yellow. The bulb itself is covered with brown spots. Bordeaux liquid is used for treatment.
Sclerotiniasis (dry black rot)
Another fungal disease that occurs in excessively acidic moist soil or with an excess of humus. The risk of development increases when grown in the shade.
The fungus infects the bulbs, as a result of which it gradually dries out and dies. At the same time, the leaves become brown, dry out and fall off. If untreated, the plant dies. You can destroy the fungus with Bordeaux liquid. All infected bulbs will have to be burned.
Botrythiasis (dry gray rot)
Botrythiasis affects the bulbs, and then the whole plant dies.
Fungal disease occurs with a constant excess of moisture in the soil and a lack of heat. The bulbs of the plant are covered with brown watery formations, and the aerial part of the gladiolus dries up. Then the whole plant starts to rot and dies. For treatment, copper sulfate, Bordeaux liquid or Fundazol are used.
Scab
A bacterial disease that occurs when there is an excess of moisture in the soil. This may be due to high groundwater levels, frequent irrigation or heavy rainfall, excessively clayey soil that retains moisture.
Red or brown spots appear on the leaves and stems, which gradually increase in size and turn into sores. The plant is rotting, so it needs to be treated. First, you can cut off the damaged parts and treat the stems with ash or crushed coal. But the main thing is to reduce the moisture content of the soil around the flowers. Bacteria are always present in the ground, but they are activated precisely when conditions are favorable for them.
Hard rot
A fungal disease characterized by black spots or dots on the leaves and stems. The affected areas increase in size and harden. The reason is the increased humidity of the soil and air as a result of damp weather. It is extremely difficult to cure the disease. It is recommended to destroy all infected plants.
Root mite

Root mite affects bulbous flowers, not only gladioli
These are small parasites that live on all bulbous plants, feeding on corms. In appearance, these are small translucent insects living in whole colonies. They can be seen with the naked eye if the tuber is dug up. They prefer humid and hot weather.
The main symptom is yellowing of the leaves and drying out of the plant for no apparent reason. To get rid of the parasite, it is necessary to treat the soil with karbofos or insecticides. Infected bulbs must be burned.
Thrips
It is a pest insect. In appearance, they look like a small black earwig, since their body is elongated. Pests affect the bulbs during storage, when the room temperature is above + 10 ° C.
The bugs settle under the scales and feed on the bulbs. After planting, the laid-off larvae move from tubers to leaves and stems. To get rid of parasites, insecticides are used.
Features of culture
Gladiolus is a perennial culture. In the south of our country, corms are left to winter in the soil, having previously planted overgrown nests. And for us, residents of the middle lane (and even more so for summer residents of the northern regions), before the onset of a stable cold snap, it is imperative to dig out the corms and store them until spring in more comfortable conditions.
Before the cold snap, gladioli dig
Remember that after flowering (or cutting) gladioli should be given time to ripen the underground part. During this period, she must have time to accumulate a sufficient amount of nutrients in order to adequately overwinter and release a strong peduncle in the next season.
Preparing a site for disembarking gladioli
Gladioli need well-lit, sunny areas of the garden, protected from strong gusts of wind, and well-drained soil with a lot of organic matter.
In the southern regions, on the contrary, gladioli do not experience discomfort in conditions of some shading, while they bloom and develop beautifully.
Prefers loamy or sandy soil. Lean soils can be improved with well-rotted compost and granular mineral dressing. Too acidic soils are neutralized with dolomite flour or chalk.
The garden bed prepared in the fall is ready for planting in the spring, it remains only to loosen the soil
In most areas, the soil is dug up and prepared for subsequent planting in the fall, organic and mineral fertilizers are added, and in the spring they only loosen the top layer and, if necessary, moisten.
To keep the soil moist and prevent weeds from growing, lay a 6-10 cm layer of mulch around the gladioli.
Gladioli in landscape design photo
Usually the crop is grown for cutting. Large bouquets are present at all festive events. In the landscape decoration of plots, you can create unusual combinations using a skewer.
Gladiolus goes well with phlox and dahlias. When combining colors, their size and color are taken into account.
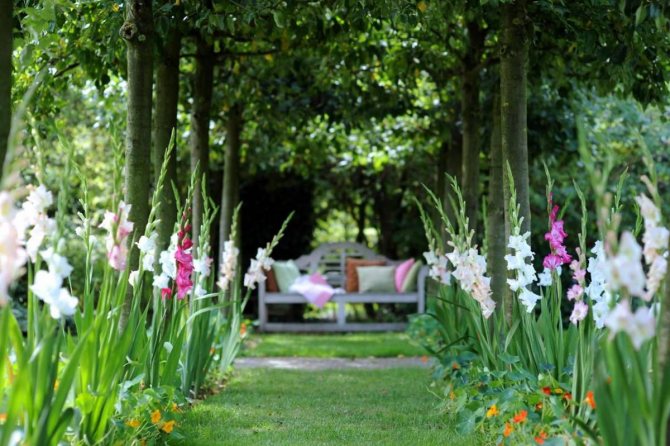

Making out mixborders, the plant is combined with conifers, stones, undersized junipers. Often crops are planted in containers, stone beds. To hide the lower part of the trunk, small stones and gravel are suitable.
It is important not to forget that the skewer is placed in the landscape in sunny areas.
Flower care
Agricultural technology for growing gladioli in the open field includes the following elements of care - watering, mulching, feeding, tying, spraying against diseases and pests.
Watering and mulching
The first layer of gladiolus roots penetrates to a depth of 40–45 cm, providing the shoot with moisture and nutrition. From the moment the roots form on a young bulb, you need to make sure that the surface layer of the soil is moist. In June, it is enough to water the seedlings once a week at the rate of 2 buckets / m². The need for moisture increases during the period of budding, flowering, the establishment of hotter weather - at the same rate, the frequency of watering is increased to 2-3 times a week.
Water the plants under the root, being careful not to get on the leaves, with water heated in the sun during the day. Do not forget to loosen the soil after the top layer has dried.
Mulching will help to preserve moisture and soil structure - covering the root zone with a layer of peat, compost, grass at least 5 cm thick. Mulch, in addition to retaining moisture, feeds the plant with useful substances that are released as organic matter decomposes.
Top dressing
Gladioli are usually fed three times a season.
- At the germination stage (2–4 leaves), nitrogen fertilization is given. Of organic fertilizers, flowers respond well to a solution of dry chicken manure (1:15), horse manure (1: 7). But it is better not to offer mullein. Nitrogenous fertilizers take 25-30 g / m².
- The second top dressing is needed complex, so that, in addition to nitrogen, there is potassium and phosphorus in the composition. Do it in the phase of 5-6 sheets. The dose is 50-60 g / m².
- The budding phase is the time for the third feeding. At this time, the plant needs phosphorus and potassium. You can use special complexes for flowering or superphosphate (30-40 g / m²) and potassium chloride (15-20 g / m²).
Spraying, garter
When growing gladioli in the open field, care must be taken to protect them from any misfortune. Sometimes it is enough to pickle the corms before planting. But if there is a whitefly on the site, she will not miss her. Any insecticide can be used against it.
Another common garden flower problem is thrips. If yellow spots, dry bald spots appear on the leaves, urgently spray the plants with insecticides with acarcidal effect (karbofos, metaphos, etc.)
Tall and unstable stems are tied up. To do this, use a strong coarse mesh - it is pulled over the seedlings before forcing the peduncles, as they grow, they are passed into the cells. The second option is individual pegs or special supports (as for orchids).
Gladiolus is a cut crop. As soon as the first flower has opened, the arrow can be sent to the vase, where it will dissolve everything to the last bud. This is also useful for corms, as they have more time to accumulate nutrients and ripen.
Growing conditions and choice of planting site
To create the best conditions for plant growth, it is necessary to take into account that gladiolus does not like low-lying, with stagnant moisture, soils. Oversaturation with moisture contributes to rotting of the bulb. Slopes with hummocks will also be unacceptable. Only a flat, dry place, which will not only be well lit, but also protected from the wind, will be suitable for planting gladioli. But you also can't overdo it, since complete calm can contribute to the development of fungal diseases.
Semi-shady places are suitable for growing only early varieties of gladioli... If late flower varieties are planted in such a place, they will not bloom at all. And the reason will lie in the lack of lighting. It should also be borne in mind that this is a very thermophilic flower.
Before planting, remember what kind of crop was cultivated on this plot of land last season. If these were flowers from the genus of dahlias, marigolds or plants from the legume family, strawberries and tomatoes, then feel free to use this piece of land to grow gladioli. Be wary of the area where potatoes, carrots or cabbage grew last season, as well as all those plants that were fertilized with manure. But it is very important that every 2 years the gladiolus is transplanted to a new place.
Garter or hilling
Most gladioli require additional support, because their peduncles are very long and heavy, prone to lodging. There are two support strategies for gladioli:
- Garter... For gladioli, they traditionally use not individual supports, but a twine or twine stretched in rows between columns or around a group of plants, which will hold the peduncles.
- Hilling... Gladioli for the first time dig in soil to a height of about 10 cm at the stage of blooming 5 of this leaf. Thanks to the hilling, the soil above the root system warms up better, the plant will feed more actively, and stable conditions will be created for active growth and the release of powerful peduncles that do not need additional support.
Gladioli.