Why is it important to share a baby with a parent
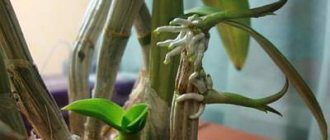
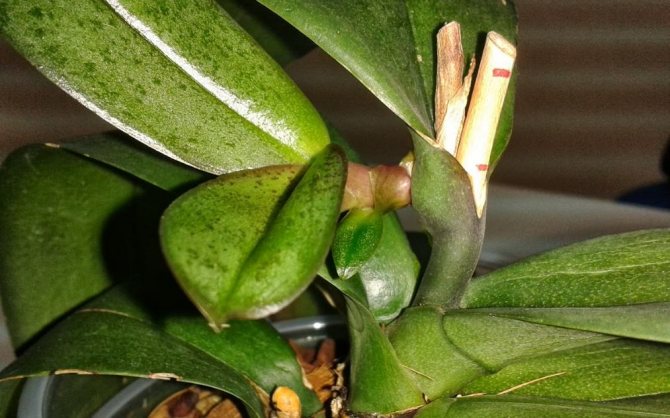
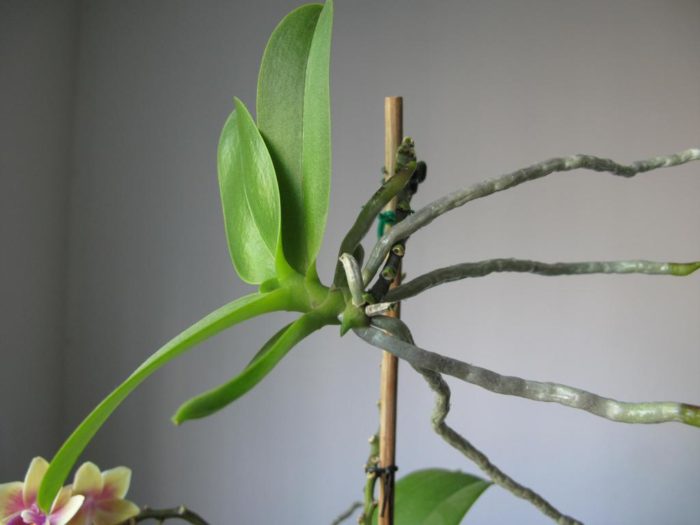
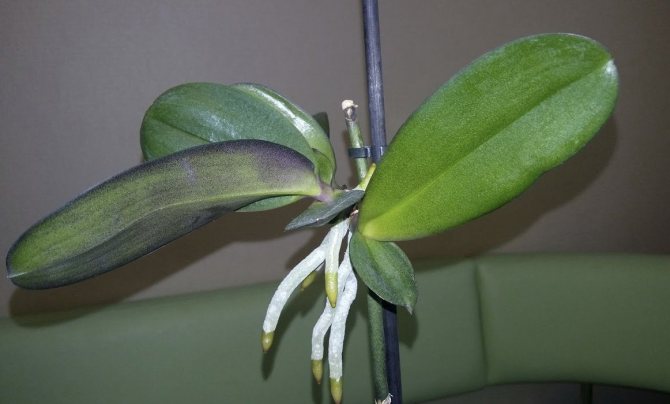
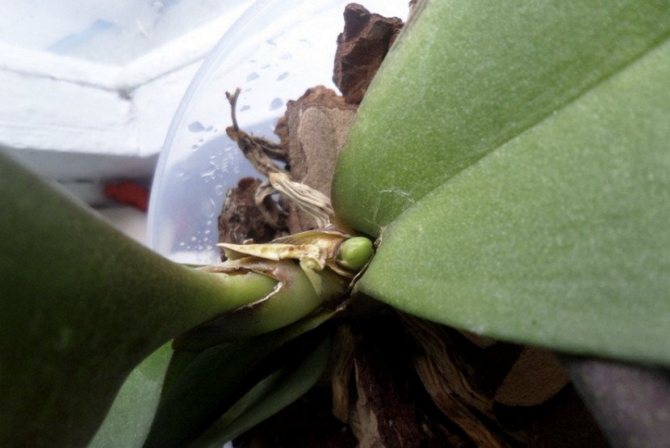
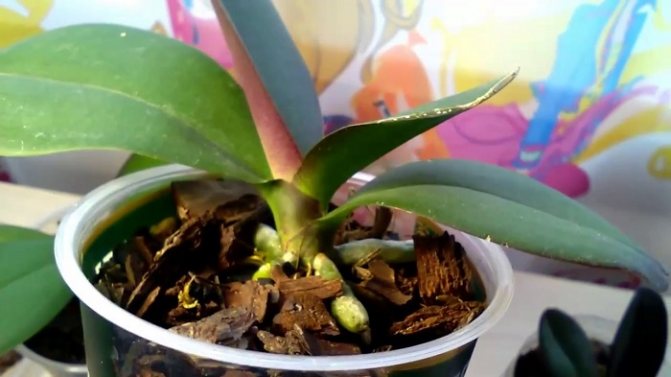
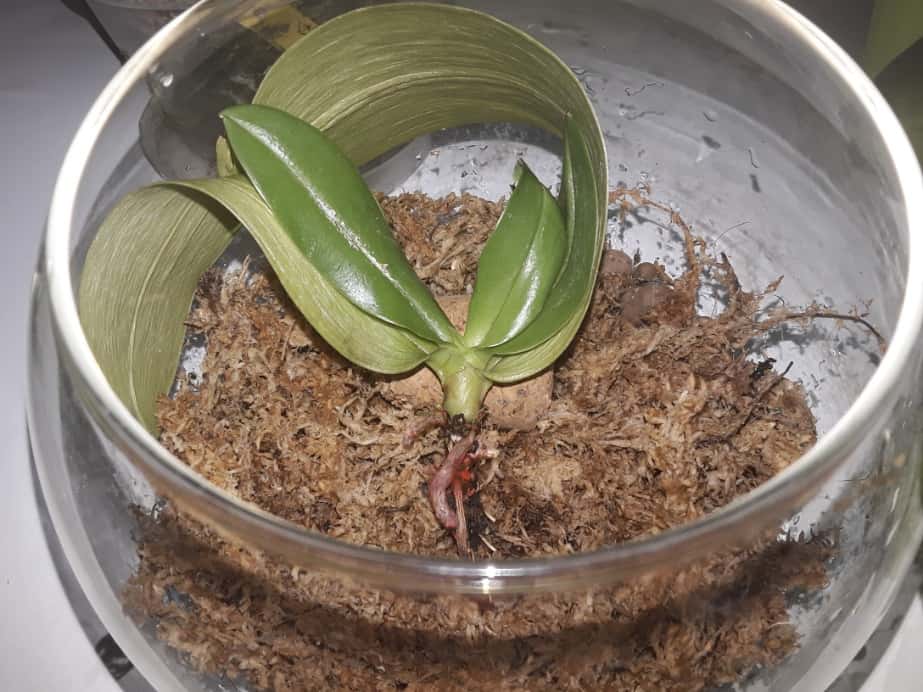
The baby is a young plant that has grown on a stem. It can appear on the peduncle, trunk, or roots. In most cases, young shoots grow on a peduncle. First, a seal appears, then a kidney forms, and after that a young process grows out of it. Sometimes the daughter process may have its own roots, stem, peduncle. Occasionally it happens that it blooms directly on the mother plant.
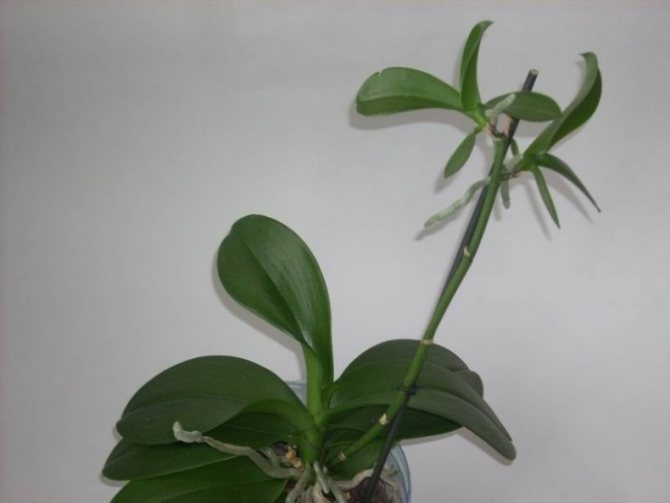
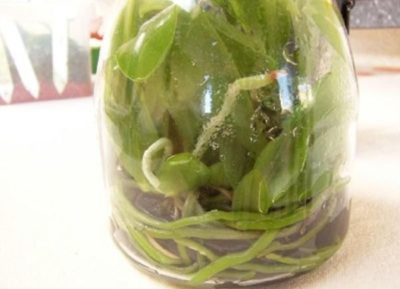
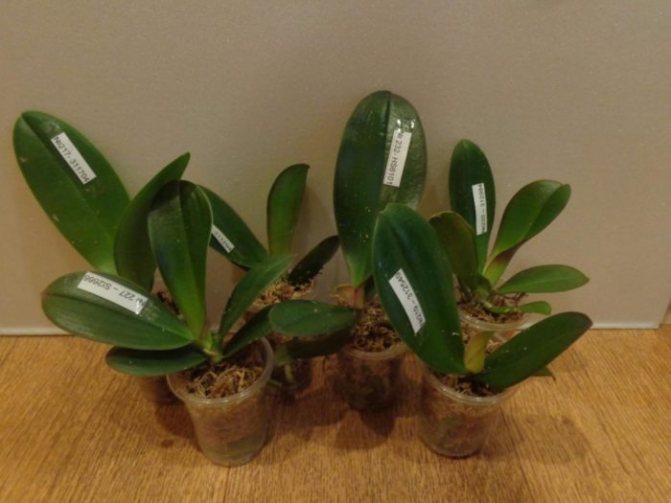
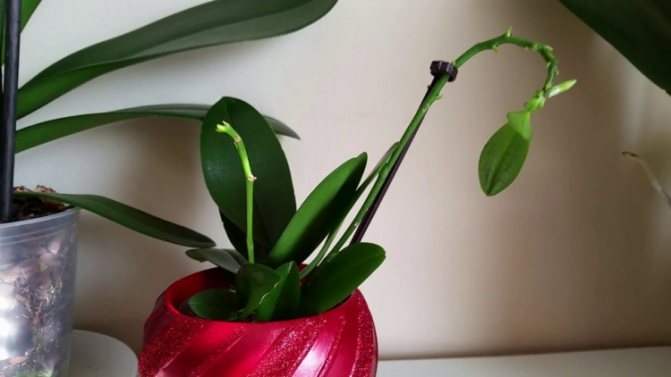
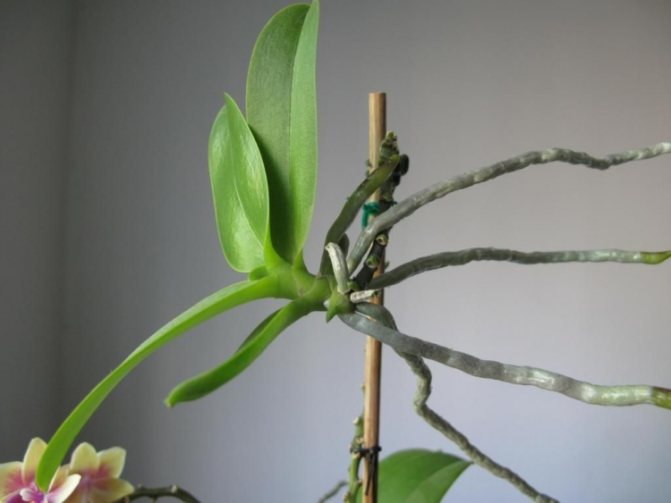
Orchid with a young shoot
It is necessary to share the baby with the mother's orchid so that the parent does not die. The offshoot takes up a lot of nutrients, so the mother plant receives them in insufficient quantities, because of this it can get sick and not survive. There are difficult situations when either a daughter or a parent can die. In this case, they need to be seated urgently.
Attention! If the baby has grown on the stem of an orchid, then in no case should it be separated from the mother's flower. It feeds from a common root through the stem, so it will not survive on its own.
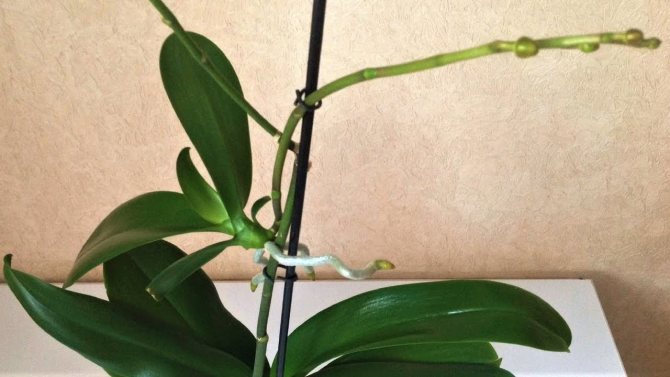
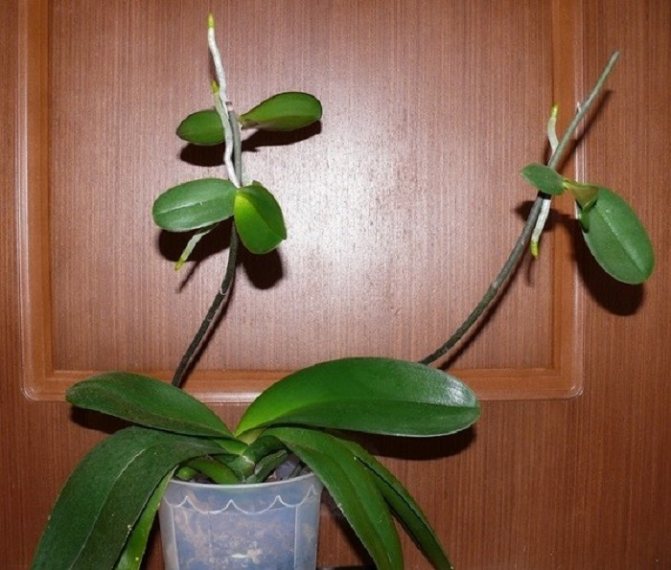
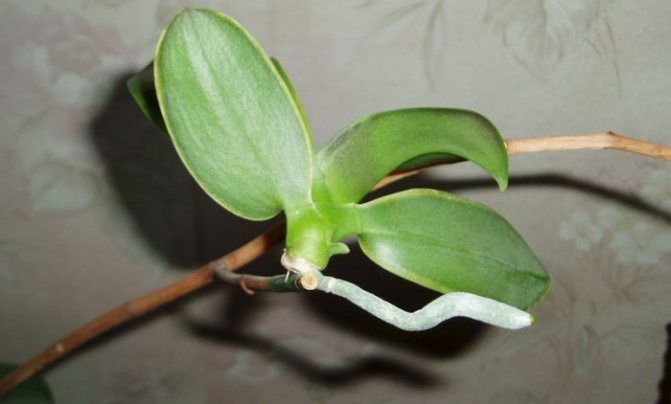
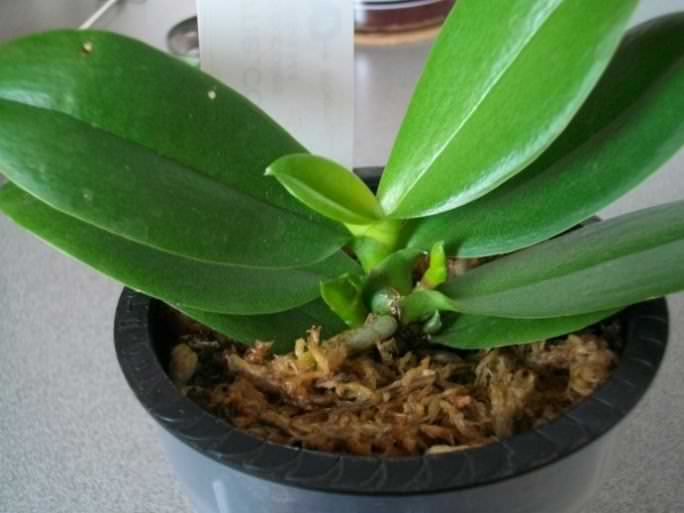
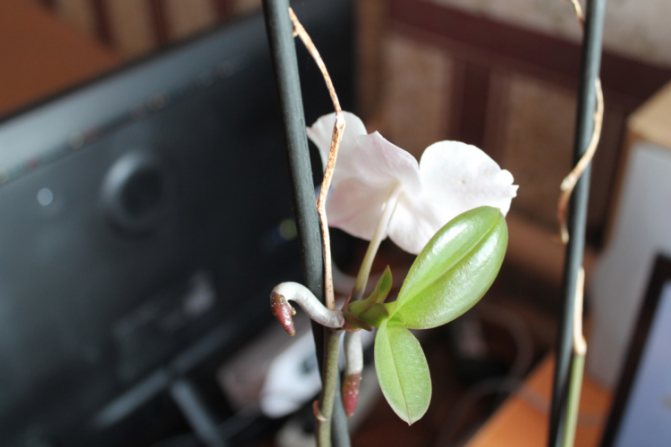
Daughter shoot on a peduncle
Substrate transplant
After separating the cuttings from the mother plant, it can be immediately planted in the substrate, but it is still better prepare for landing:
- for this, the layers are soaked for 15 minutes. in water in which growth hormone is dissolved. This will ensure faster root growth;
- moistened roots are less traumatized during planting and are easier to fit into the pot.
Before planting the children, a layer of drainage is laid out on the bottom of the pot (expanded clay, vermiculite or ceramic shards), after which the plant is lowered into it:
- the baby in the container is positioned so that the lower leaves are above the surface of the ground;
- the substrate is poured in small portions by shaking and tapping the pot so that the soil is evenly distributed between the roots. It is not necessary to additionally compact the substrate;
- the first few days, the plant should not be watered so that the sections dry out.
It is better to put the planted orchid for a while in penumbra, then can be rearranged to diffused light.
When can you plant
The process can be removed from the parent only when it is ready for it. Do not rush: the branch should get stronger a little.
How to know when a scion is ready for separation
Why do orchid leaves turn yellow - how to save
The florist will understand that the daughter is ready to be separated from the parent, according to several signs:
- 5 leaves appeared on the young process. Thanks to the leaves, the plant feeds and breathes on its own.
- He has grown healthy strong roots (at least three). Do not replant before the length of each root reaches 5 cm.
- The shoot should mature on the mother flower within 5–6 months. It is not recommended to separate it earlier.
A strong and healthy shoot can be removed and transplanted into a new pot to grow a new orchid. This is one of the main breeding methods for this flower.
The optimum temperature for replanting is 20-25 ° C, the appropriate air humidity is 50-60%. It is best to separate the shoot in summer or spring, but this depends on the condition of the adult orchid. As a rule, no shoots appear in the orchid in winter.
Young shoots rarely grow on an adult orchid. Its appearance can be considered a stroke of luck. This will allow another flower to grow in the room. Most often, the shoot appears in the warm season - in summer, late spring or early autumn.
Important! A baby with weak roots cannot be planted, she may die. You need to wait until the roots get stronger, otherwise the process will not take root in a new place.
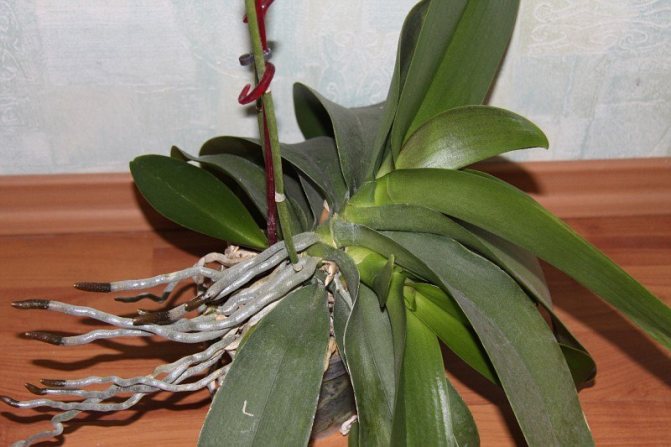
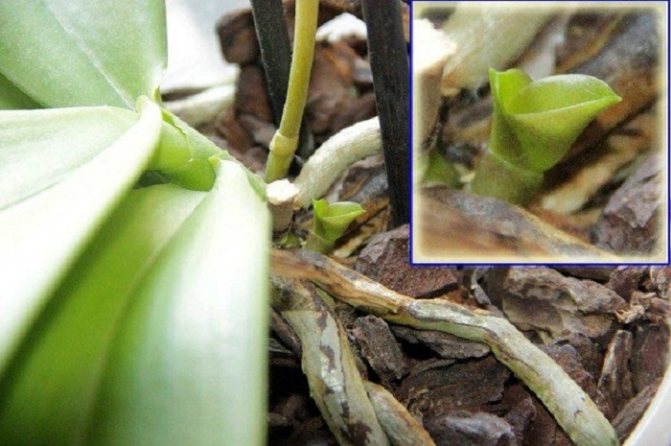
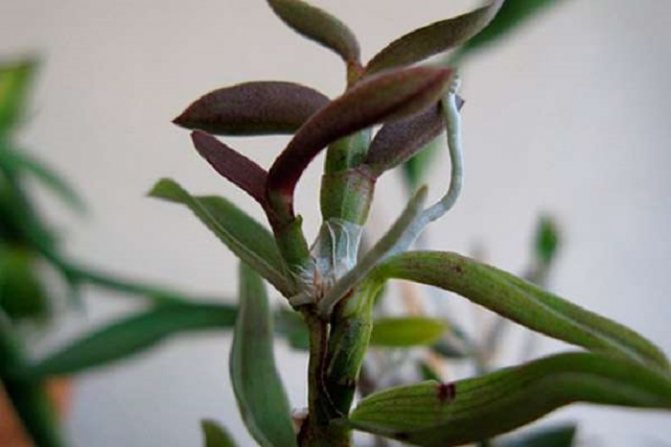
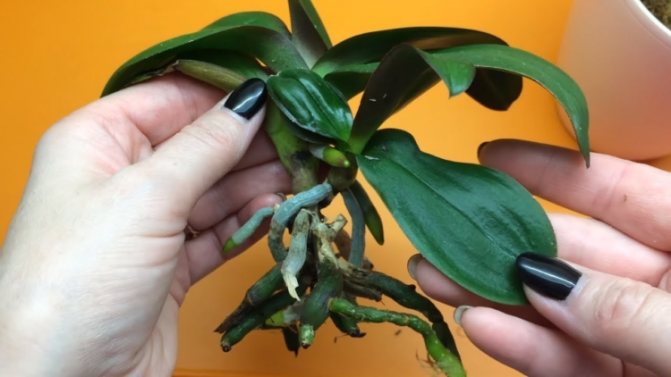
Daughter shoot near the root at the base
Is it possible to separate the baby if the orchid blooms
Inexperienced growers have difficulty noticing that the orchid has a baby on the trunk. What to do if an orchid blooms at this time, not every flower lover knows. In this case, it is advisable not to transplant the young shoot, but to wait until the flowering ends. Separation of shoots is a serious stress for a flowering plant. In addition, during this period, the daughter's roots have not yet formed, so she will not survive on her own.
Important! You cannot cut off and transplant several babies at once from one mother plant. This can destroy the parent.
Daughter shoots must be separated so that they do not destroy the parent
If it grows on a peduncle
Very often there are situations when an orchid gave birth to a baby on a peduncle. How to transplant a young shoot is described below.
Detailed instructions on how to plant an orchid baby from a peduncle:
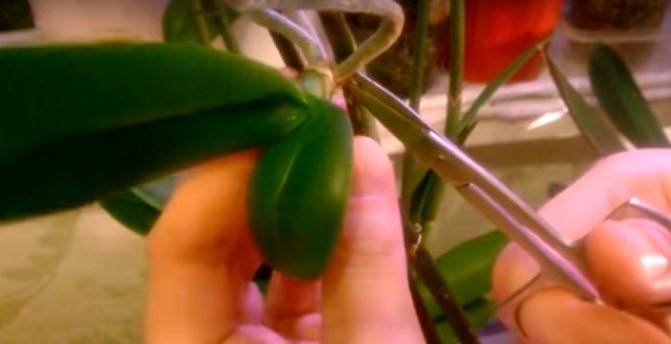
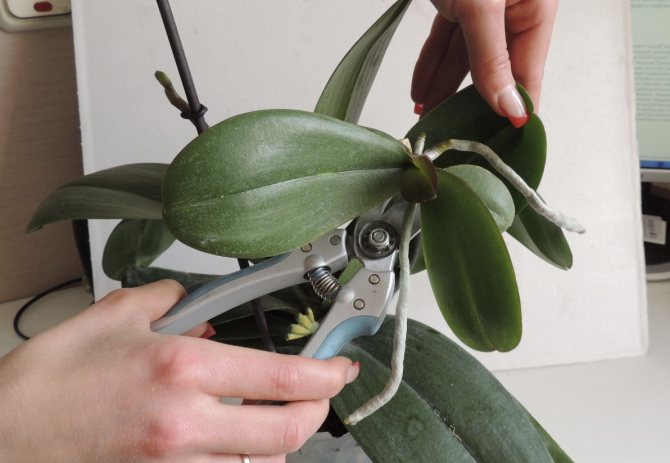
- A young shoot is cut with a sterile pruning shears, capturing part of the peduncle, but leaving 1–2 cm on the parent's branch.
- The place of the cut for disinfection is sprinkled with crushed activated carbon and allowed to dry.
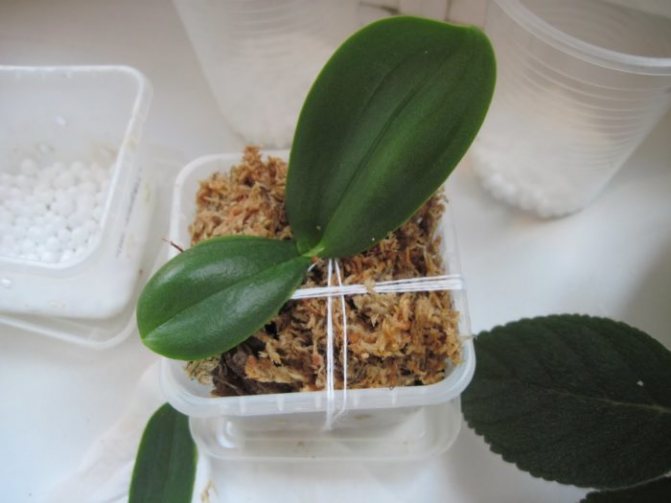
- The base of the shoot is flaked to allow the roots to germinate.
- Expanded clay, tree bark and wet moss are placed in a plastic cup with a hole on the bottom.
- A horizontal support is installed on top that will support the plant. Additionally, you can install a vertical support to hold the stem.
- The twig is attached to the support so that its lower cut does not touch the ground. The scion should hang in the air, this will allow the plant to root.
- The plant is covered with a large plastic bottle or eggplant with the bottom cut off, placed in a warm place and watered regularly.
Important! It is necessary to wait until the roots grow. Then the branch can be transplanted into the ground.
This method of rooting is widespread among flower growers, because daughter shoots often grow on a peduncle.
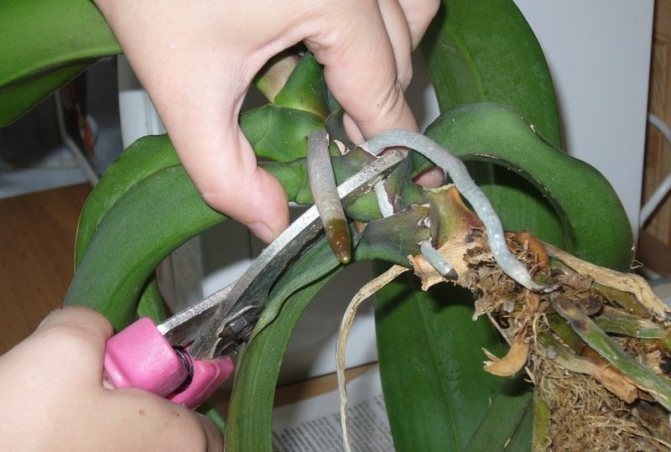
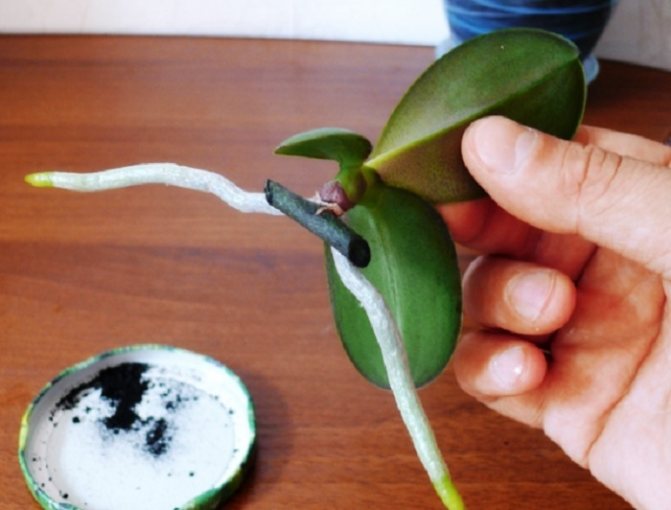
Tools must be disinfected
How to help grow the underground part of the flower?
If the orchid layer does not build up the root system, then it needs help. The algorithm of actions is as follows:
- Buy sphagnum moss, prepare a thread and a plastic bag.
- Soak the moss in warm water and leave to swell for 30-40 minutes.
- Next, remove the moss from the water and squeeze it out a little. Make a small nest, and place the base of the baby in it, secure with a thread.
- The peduncle will become heavy, and you need to prevent the plant from overturning, for this, take a support and secure the peduncle.
- You can organize a greenhouse effect - put a plastic bag on the peduncle with the baby.
Important! Moss needs to be moistened every day, and the baby should be ventilated. Kornevin can be added to the water to stimulate the growth of the root system.
How to grow roots in a layer that is separated from the mother:
Organize a small mini greenhouse. In a plastic cup, make several holes in the bottom and on the sides from opposite sides, closer to the edge. Pour drainage into the container, a little wet moss. Install a support in the side holes that will not allow the base layer to come into contact with the substrate. Place the baby on a support and cover the entire structure with a cut plastic bottle. Spraying and daily airing are mandatory.- On a piece of styrofoam that will float in a container of water. To do this, take a piece of the desired size - make a hole in it.The foam must be thick enough so that from the base the cut to the water is at least 2-4 mm. Place the baby in the hole, and secure it well on a piece of material. Lower
We suggest watching a video on how to help an orchid baby grow roots:
Instruments for separating and transplanting children Orchids
Orchid baby on a peduncle: examples of how to grow and root
Before separating the baby and transplanting it into new soil, it is necessary to prepare the tools:
- garden pruner;
- activated carbon (1 tablet) or ground cinnamon;
- alcohol for disinfection;
- a thin plastic pot with a diameter of 8–10 cm, there should be holes at the bottom;
- a sharp clerical or kitchen knife, you can use scissors;
All instruments must be thoroughly disinfected before use.
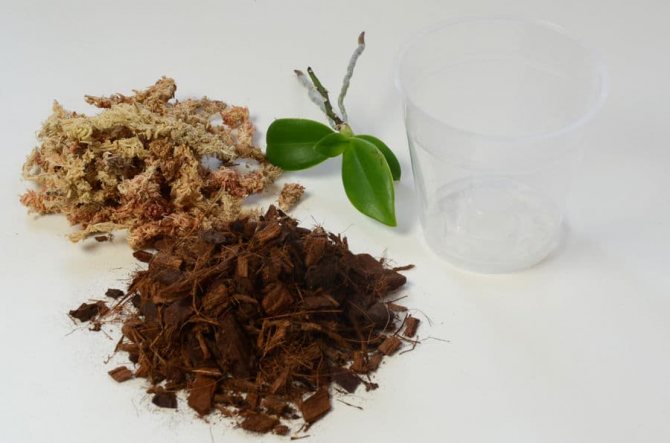
The soil must be prepared from three components:
- sphagnum moss;
- finely ground tree bark (pine);
- charcoal.
You can buy ready-made orchid soil in the store.
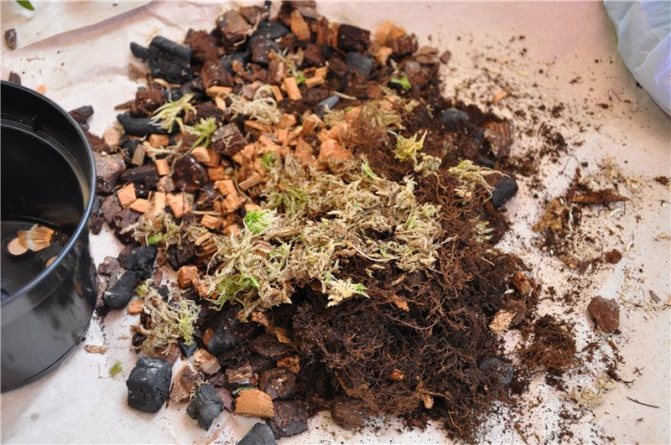
For the orchid, a substrate is prepared from pine bark, sphagnum and charcoal

Rooting Phalaenopsis babies with horizontal layers
Some growers practice a gentle method of separating the shoot. It is first rooted, and cut off from the mother plant only after the baby has taken root. This requires:
- So that the peduncle is flexible and long enough so that it can be tilted and not broken.
- A smaller pot is placed next to the orchid. It is pre-filled with a moist substrate that has undergone heat treatment for disinfection.
- The peduncle is tilted so that the baby can be freely planted in the pot.
- The shoot is fixed in the substrate using wooden sticks stuck towards each other. The baby is fixed and will not be able to budge.
- After that, the roots are sprinkled with the substrate so that the base of the leaves is flush with the edge of the pot.
- The scion receives nutrients from the mother plant, although it is in its own pot.
- In this state, the baby is grown until new leaves appear, and the roots grow to six to eight centimeters. After that, it is cut off from an adult orchid.
- Sections are treated with an antiseptic.
This method allows you to increase the survival rate of the plant. A young orchid receives almost no stress during transplantation, and an adult one is practically not injured.
How to separate correctly
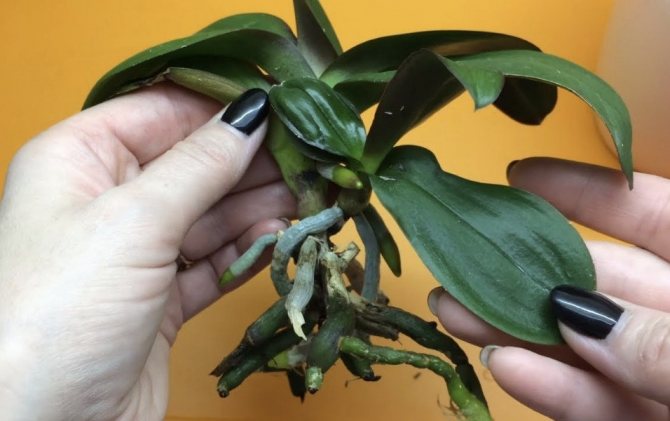
You need to know exactly how to plant an orchid baby from an adult plant. Occasionally, a shoot grows at the base of the parent, then the baby has roots.
How to make an orchid bloom at home
If a root baby has formed on the orchid, then the procedure is slightly simplified:
- Check the presence and condition of the roots. They must be strong, sturdy, long;
- Cut off the baby with a disinfected knife, pruner or scissors, detach it from the roots of the main orchid.
- Sprinkle the cut area with activated carbon powder or cinnamon.
- Prepare the substrate: expanded clay is placed on the bottom of the pot, then moss and pine bark are mixed. It is advisable to water the substrate with a solution of potassium permanganate.
- Make a depression in the ground and place the cut baby there. Gently sprinkle the roots with the substrate so that they are completely covered with soil.
- Cover with a plastic bottle (greenhouse).
Important! The transplanted baby can be watered with clean water after 2-3 days, not earlier. This will protect the wounds from infections, and the roots from decay.
A young orchid will grow quickly in a warm and humid environment. It needs to be watered regularly. The soil should not be dry, but it should not be poured either.
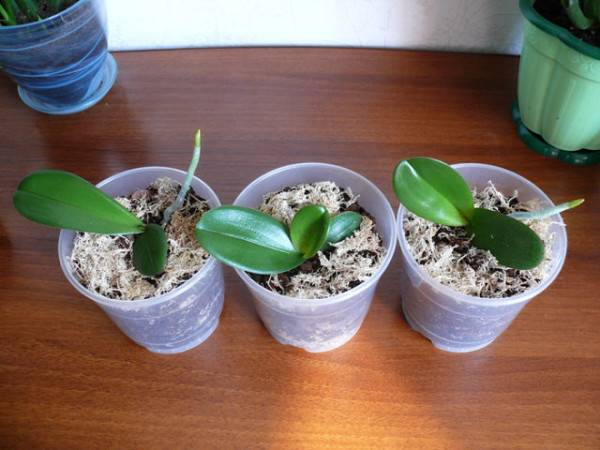
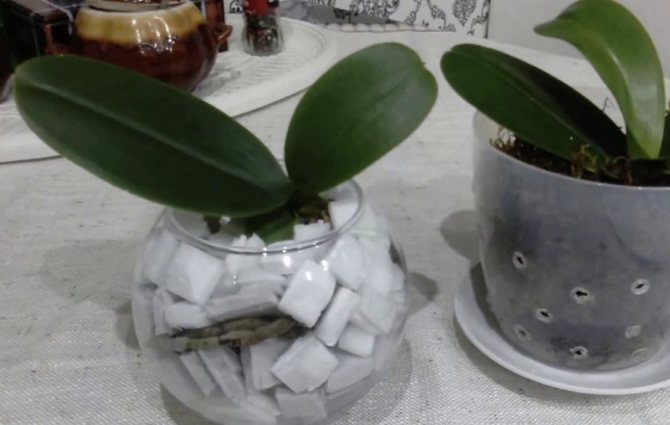
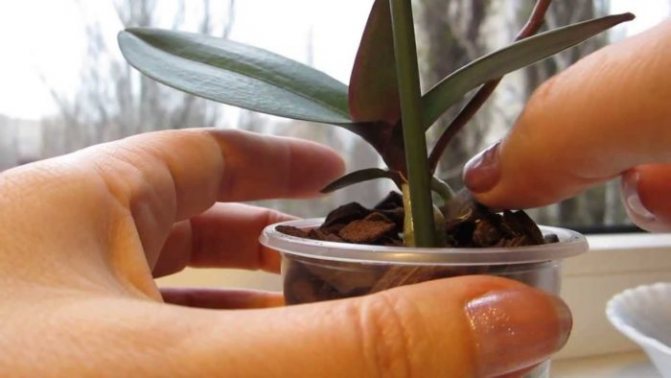
Shoots are transplanted into cups with holes at the bottom.

Care features
For the successful growth and development of the baby, optimal microclimate parameters should be created. In no case should the plant be placed in direct sunlight.The planted flowerpot should be in the shade. Only after a while can the pot be rearranged to a permanent place. The ideal room temperature should not exceed 23-25 ° C. The maximum permissible fluctuation of indicators is in the range of 16-32 ° С. These parameters can vary depending on the type of phalaenopsis, since there are thermophilic, cold-loving and medium-temperature plants. An orchid baby needs not only watering, but also moisturizing the leaves. This should be done using purified warm water every few days.
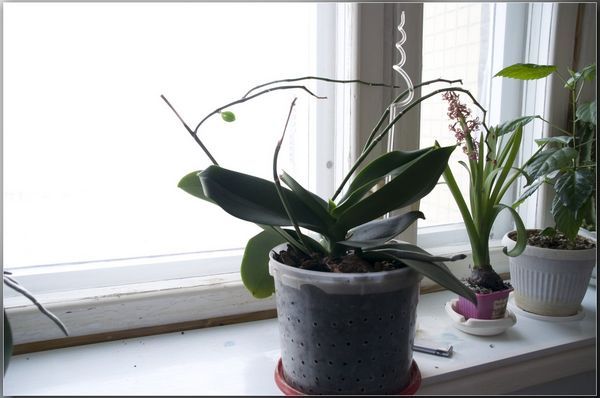
Growing orchid
The first feeding is allowed to be carried out no earlier than 30 days after transplanting, so that the plant has time to adapt. To do this, you need to take a fertilizer specially developed for phalaenopsis, which is called "For Orchids". With its help, you can provide the plant with the necessary trace elements and other nutrients. There are options that are suitable for fertilizing phalaenopsis throughout the year, regardless of the growing season.
The multiplicity of top dressing is 1-2 times a month. It is necessary to dilute the product in accordance with the instructions for use, however, the recommended concentration must be halved, since this is not an adult plant, but a baby. When applying fertilizer, it must be remembered that it is better to underfeed phalaenopsis than overfeed.
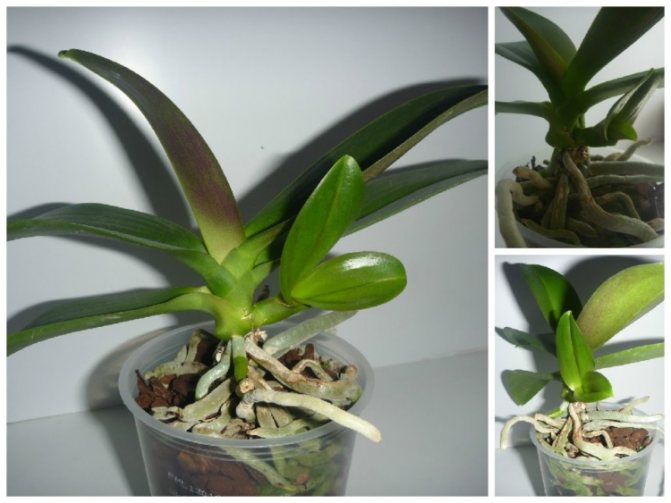
Following these simple rules, at home, you can independently transplant an orchid baby and achieve its flowering. Young phalaenopsis will surely become a decoration of the room and will delight you with beautiful buds.
Where is better to transplant
The separated orchid branch must be transplanted into new soil. Novice growers should remember well how to plant an orchid shoot at home.
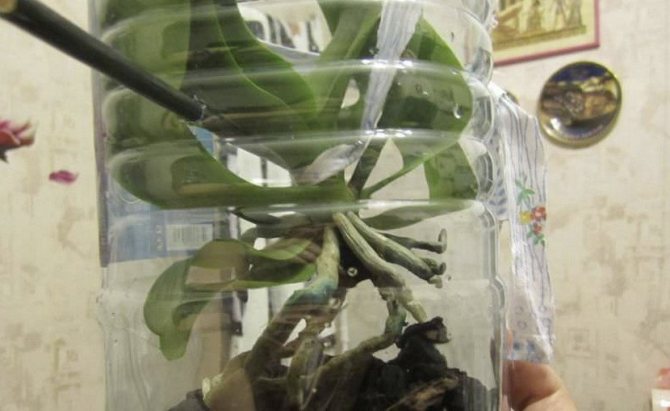
An orchid shoot can be transplanted into a greenhouse or foam. If the child has its own root system, it is planted in a new soil. If it does not have roots, then it is hung over a pre-prepared substrate and they wait for the baby to take root. In both cases, the orchid must be grown in a greenhouse, which can be made from a large plastic bottle. The greenhouse will keep the orchid warm and humid.
There is another way of rooting an orchid process: the baby is planted in polystyrene foam. A hole is made in a piece of polystyrene and the base of the appendage is inserted there. The entire structure is placed in a glass of water and fixed. You can cover it with a greenhouse or plastic wrap.
Important! The baby's root should be under water until roots begin to appear. After that, the plant is transplanted into the ground.
The cut offshoot is germinated in foam
Under what conditions are the processes of an orchid formed and where are they located
Vegetative offspring appear in the orchid soon after full and long flowering. New shoots indicate that the plant is healthy, well developed, has a powerful root system and at least four large leaves.
Children are formed:
- on peduncles,
- at the roots,
- on the stems,
- in the axillary kidneys.
Babies begin their formation at the final stage of orchid flowering.
Most often, they form in the spring, at the beginning of summer, at the last stage of flowering, when the buds have fully blossomed, but have not yet wilted. At the end of flowering, the rudiments of the future process become visible on the stems. The process of formation and formation of leaves and roots takes about 5 - 6 months.... That is, from the moment of appearance to separation, it takes about six months if development takes place under conditions optimal for the orchid:
- At temperature conditions +220 - +280,
- Average air humidity 60%,
- In sufficient light, but not in the scorching sun. Openwork shading is preferable.
- Free air movement, but no draft.
At the slightest failure in the environment, the process may fade.
In addition to the basic conditions, there is one more important circumstance.Children can form only when the daily temperature changes, not less than 50. For example, if during the day +280, then at night it should be +230 - +210. Typically, such conditions occur on closed northeastern balconies without drafts.
Experts argue about the reasons for the appearance of processes. At the same time, two opposite versions are put forward:
- Babies appear under conditions unfavorable for the orchid. If a plant “thinks” it might die, it starts producing offspring.
- Another hypothesis is excellent care and a favorable environment, thanks to which the plant is provided with resources for full growth and reproduction. The way it happens in natural conditions.
Oddly enough, both sides are right. Although, every florist would like to think that he takes good care of his favorite exquisite plants.
Transplanted baby care
Proper care will help a young orchid grow into a beautiful adult plant. The flower grower must provide the necessary conditions for both the transplanted child and the parent. Then the flowers will survive and will delight the owner with their beauty for a long time.
Additional Information! The orchid loves a warm shower, so in the summer months, the flower can be put under the shower for 5-7 minutes.
The condition of the transplanted process must be closely monitored. If the leaves turn yellow, the flower withers and dries up, it means that the florist has violated the rules for transplanting the appendix or improperly looked after the plant. The pruning shears and the soil must be disinfected so as not to infect. The cut site is also treated with activated carbon or mustard.
Yellowed leaves are a sign of dry soil or sunburn. It is necessary to water the plant and put it in the shade. If the orchid is watered too often and abundantly, rot will form on the roots, and then the flower will need treatment. Root decay and leaf wilting can cause pests. Then it is necessary to use insecticides and special preparations for the treatment of plant diseases.
The root is grown using wet sphagnum
Stimulating the emergence of roots
It so happens that a young orchid does not grow roots. There are several ways to grow a root system on a detached baby. Floating the scion on styrofoam and hanging it over the ground are good methods. But there is another effective way to help your baby develop a healthy, independent root.
How to grow roots on a daughter process of an orchid:
- Moss (sphagnum) is soaked in water for half an hour.
- Damp and swollen moss is rolled up into a ball and tied with a thread.
- They make a small greenhouse: drainage is put in a plastic glass with a hole on the bottom, and then moss (sphagnum).
- Outside, they put a support for the sprout, which will not touch the moss.
- The underside of the baby is treated with a root growth agent (for example, "Kornevin"), which is added to the water for irrigation. It is necessary to alternate the use of water and means: today it is poured with water, and after 2 days - with Kornevin.
- The baby is placed in the moss, pressed tightly against it, fixed from below and tied to a support.
- Sphagnum is watered and sprayed daily.
- The entire structure is covered with plastic wrap or a greenhouse and placed in a bright place, protected from the scalding rays of the sun.
This method can even be used for babies growing on a mother plant. The wet moss is fixed on the base of the parent's peduncle and the roots of the daughter shoot are awaited.
The roots will not grow earlier than in 3 months. Sometimes the building process can take six months.
The reason for the lack of roots lies in insufficient lighting, inappropriate fertilization or lack of moisture. First you need to eliminate the cause, and then build up the roots. If the flower does not have enough light, you can install a phytolamp. The plant needs regular, but not excessive watering and feeding.An orchid will not survive without roots, so the grower should start growing the roots of a young flower as soon as possible.
The orchid should receive enough heat, light and moisture, but their excess can harm

Mature babe shaping
Phalaenopsis baby is natural clone of the mother plant and after transplantation it will have the same characteristics as an adult orchid (color of flowers, their size, etc.).
It is a miniature, fully formed orchid: it has leaves, stem and roots, and sometimes, being on the mother plant, even releases a small flowering shoot.
Conditions
Sometimes from dormant buds, which are located on the flowering arrow, leaf axils or at the roots of the orchid, babies are formed. There are enough of them easy to use for vegetative propagation of phalaenopsis.
If such a baby appears as a lateral process on the stem of an orchid, it is called basal.
Very often, vegetative processes are formed on the flowering arrow... This method is most convenient for orchid propagation, it consists of several stages:
- activation of dormant buds located on the flowering arrow;
- the phase of germination and development of layering (babies);
- separation and transplantation of the formed layer.
The most favorable period for the formation of children is coming after prolonged flowering of the orchid.
But for them to appear, the plant also needs certain cultivation conditions:
- the orchid must be an adult, with a well-developed root system, have at least 4 large leaves;
- orchid flowering should be in its final phase;
- the optimal time of the year is spring or early summer;
- relatively high air temperature;
- air humidity at the level of 50-60%;
- sufficient light intensity in the room.
At low humidity, as well as in winter, when the illumination drops significantly, phalaenopsis babies are not formed.
In order for children to form on the flowering shoot, after the end of the flowering phase, it is not cut off, but shortened by 1.5-2 cm above the upper dormant bud. it stimulates the awakening of the rest of the sleeping kidneysthat are on the peduncle.
Sometimes the shoots form by themselves, but in some cases, even if the plant is in optimal conditions, stimulation of their distillation is necessary. This is facilitated by:
- daily temperature fluctuation. It should be cool at night - up to + 17-18 ℃, during the day - up to + 27-30 ℃. These conditions in the spring and summer are most favorable on a glazed balcony;
- poor watering of phalaenopsis should be combined with high relative humidity. In an apartment, this requires regular spraying and installation of the mother plant on a stand with wet moss or pebbles;
- a large amount of intense scattered light.
Having provided the necessary cultivation parameters, it is enough to simply cause the appearance of vegetative layers at home.
Period
On the peduncle or stem of the phalaenopsis may develop from one to several small plants... First, they form leaves, and after a certain period, the roots.
If the roots do not form for a long time, their development can be stimulated. To do this, prepare sphagnum moss, cling film and strong thread:
- moss for half an hour is soaked in water until it swells completely;
- they form a lump of moss and wrap it with thread so as not to disintegrate;
- the formed lump, carefully, so as not to injure the plant, is attached to the base of the peduncle with a thread;
- at low humidity indoors, the moss is additionally wrapped with cling film to create a greenhouse effect inside. The film must be opened daily to air the baby;
- since a plant with moss can tip over, it is better to attach it to a support;
- moss should be sprinkled daily with water, to which you can add the root growth stimulator "Kornevin".
Read also Tomato intuition reviews photo yield
After the baby's roots have grown, it can be placed in a separate pot. On the mother plant, layers develop, as a rule, within six months.

Several babies on peduncles.
Determination of readiness for transplant from the mother plant
In 6 months in a small child, 2 pairs of leaves are formed and roots are formed.
After the emergence of 3-4 roots about 5 cm long in a formed baby, it can be separated from the maternal phalaenopsis and transplanted into a separate pot.
Preliminary preparation
In order not to severely injure an adult plant when separating a formed baby, it is necessary to prepare the tool and related materials for work:
- garden pruner, scissors or knife;
- any disinfectant (such as alcohol);
- a few tablets of crushed activated carbon or cinnamon;
- a small transparent glass or pot for transplanting layering;
- soil mixture for planting a small orchid.
You can use as a pot clear or frosted plastic cup, in which to preliminarily do drain holes... The glass should be small enough to fit the roots.
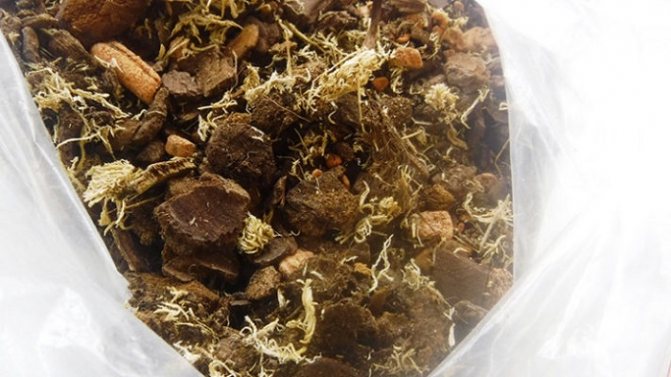
Soil mix can be prepared with your own hands from the following components, taken in equal proportions:
- pine bark, pre-boiled and cut into pieces of about 1 cm;
- sphagnum moss;
- charcoal.
Also ready-made high-quality potting mix can be purchased from a specialist store... The main thing is that the pieces of bark in it are also no more than 1 cm.
Phalaenopsis substrate composition.
After the orchid grows up, the pot should be replaced with a larger pot.
Reproduction methods
The plant has several ways to reproduce:
- seeds;
- dividing the trunk of the mother plant into parts;
- sprouts (side shoots).
Phalaenopsis orchid reproduces only vegetatively. You can plant flowers using sprouts. But at the same time, if lateral processes appeared on the flower from the root, and not from the stem, these are deviations from the norm. It indicates that mistakes were made in the care of the plant. If root jigging is planned, but there are no children, they are awakened artificially.
Dendrobium Scion Transplant - A Beginner's Guide
The Dendrobium orchid is capable of giving children much more often than its popular relative, Phalaenopsis. The sprouts can grow on their own on the mature pseudobulbs of the mother flower. In this case, it is enough to wait for the appearance of leaves and good strong roots. You can separate the baby from the trunk when its root processes reach 5 centimeters in length. They grow for about 5 months.
Demanding and moody orchids need proper care. In comfortable conditions, orchids grow and delight their owners with bright flowering. If you want to multiply your copies, then this is quite possible at home. You can plant a flower in different ways, or plant an orchid baby
.
The main thing is to comply with certain rules and all the necessary conditions. This process is as distinctive as the orchids themselves.
How to plant by cuttings-plant with a peduncle
Suitable for monopoid orchids
(with a growing straight shoot).
After the orchid has bloomed, cut off the peduncle with a fat-free knife
or lateral escape. Next, we divide it into parts so that there is a kidney in the middle of each. Cut the trunk of each part with coal.
Activated carbon or wood powder can be used. Greenhouse conditions are required for bud germination
: put the cuttings on wet sphagnum moss, cover with plastic or glass dishes and put in a warm place.
Remember to maintain moisture
so that the cuttings germinate successfully and take root.
The sprouted stalk is planted in the ground with the cut down
.
How can you multiply by division
Suitable for large plants with 4 or more false bulbs
... Consider how to plant such a flower correctly.
Carefully take the orchid out of the pot. Check first that the soil in the pot is not dry. Next, we clean the roots from the ground, cut the rhizome in half. Each half should have at least 3 pseudobulbs.
It is better to replant the plant if the soil begins to deteriorate.
Slices must be processed with charcoal powder.
and put each piece in a pot with fine bark. For young plants, special conditions are required: high temperature and a small amount of light.
Highly finely divide the plant
not necessary
so it will slowly grow.
Correct rooting of pseudobulb-care of the trunk after the appearance of the leaves
In the process of transplanting sympodial (with many growing shoots) plants get rid of darkened soft pseudobulbs
, and dense and rounded are used for reproduction. At the base of the bulb is a kidney, from which a new Phalaenopsis appears.
Difference between sympoidal / monopoidal species leads to different modes of reproduction
After the pseudobulb has faded, it is cleaned, part of the roots is cut off. Then the bulb is rooted in a container with a bark substrate or a mixture of sphagnum with coarse sand. Deepen the bulb to the base of the bud.
In order for the bulb to germinate, it must be sprayed, kept in a warm place and keep it away from direct sunlight
... When the leaves appear on the bulb, they can be transplanted into a regular pot with regular orchid substrate.
Propagation of phalaenopsis by seeds - how to plant seeds and care for them
This way of growing complex and requires special conditions and a lot of effort
.
Orchid seeds are very small and lack any protective and nourishing tissue. Growing shoots in this way requires an extremely careful approach. For seeds to sprout outside of nature for them it is necessary to create a suitable built environment
.
Microcloning is possible only under laboratory conditions
Completely sterile conditions can be created only in the laboratory
... This process takes a long time: it takes 1.5-3 years for the sprout from the seed to turn into a plant ready for planting.
At home, you can also try planting seeds. For soil, use chopped moss and leafy soil. Plant the seeds in rows, sprinkle with earth on top. The soil needs to be moistened. To do this, it is enough to spray the ground with seeds with warm water. Maintain the temperature at 22-25 degrees
.
As soon as the first leaf appears from the seed, it is transferred to the soil from moss and peat.
(diluted 50/50). After the appearance of the second leaves, they are transplanted again. When the seedling has already formed four leaves, you can finally transplant it into a regular pot and grow it.
Meristem reproduction - how to grow and get many sprouts quickly
More simple this process can be called cloning
... Only specialists can sit in this way. This way
exclusively laboratory
, this type of reproduction is impossible at home. Here, special cells of the mother plant are involved, which are able to divide. They are placed in a nutrient-rich environment.
The cells divide to form clumps. Then they are transferred to a new kind of environment, in which the plants themselves are already growing. In a short time, it is possible to grow a large number of identical orchids
.
How an orchid can reproduce by baby shoots
The formation of children occurs either at the base of the root collar, or from the bud on the peduncle.
What to do for the appearance of children
:
- after orchid bloom the peduncle is not completely cut
; - plenty of daylight
; - heat
in room; - end time of flowering.
In order to separate the grown baby from the mother plant, you need cut it off along with part of the peduncle
(about 1 cm). Treat all slices with charcoal powder or cinnamon and let dry.
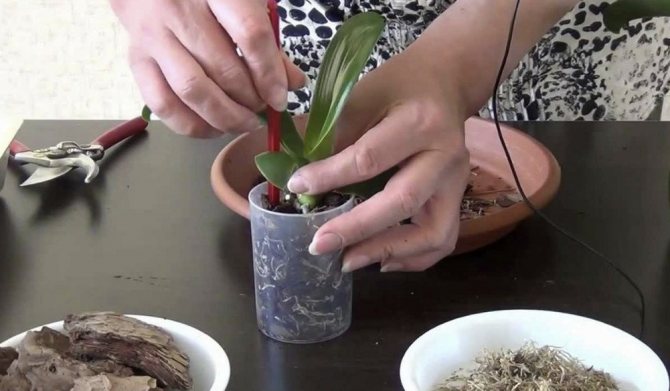
Rules for planting babies at home:
- For landing take small pot
, a glass or a round container. Better that it is transparent. Drainage holes are made in the container. - Baby place in the middle of the pot
, the root collar should be flush with the edge of the container. - Pot fill with soil, holding the orchid baby by the root collar
.
To allow air and moisture to pass through, use pine bark soil or special soil mixture
for orchids.
- The roots do not need to be located in the soil itself.
... You can leave them on the surface or cover them with sphagnum moss.
There is no need to tamp the substrate in the pot
so as not to damage the delicate roots. To make the soil settle, simply knock on the sides of the container.
- After 2-3 days, you can water the planted orchid. By this time, the sections will be tightened, and the infection will not be able to get inside the plant. So the stem will not be harmed
.
Make an incision only with a sterile instrument!
Can baby give root
The appearance of roots in a child means that she is ready to develop without a mother plant
... Usually, the roots form on their own at the right time for this, while the baby grows and feeds on an adult orchid.
How to stimulate the growing of baby shoots
One of the most common options is application of cytokinin paste
... It is a hormonal agent that promotes the process of cell division.
Cover the kidney with a THIN layer of cytokinin paste
Application: remove the scale from the kidney, gently coat it with paste completely, but in moderation
... Observe the result after about 10 days.
It is better to carry out this procedure at the end of winter.
- at the beginning of spring.
Possible difficulties
When transplanting, the following problems may arise:
- Infection
.This can not only lead to disease, but also to the death of the plant, so the pruner or knife must be sterile.
- Decay
.Before planting the baby, you need to let her lie in the air for 30 minutes, then treat the slices with ground cinnamon or wood ash.
- If you cut off the process too early, it will die.
... If there are several children on the orchid, then it is strictly forbidden to cut everything at once, the mother plant will simply die from the injuries received.Attention!
First, separate one baby, the second can be planted as soon as the cut from the first is completely tightened.
What is it?
Before considering step by step how you need to properly plant this luxurious flower, you need to figure out what the children mentioned earlier are. So, we must take into account that the baby of this plant appears on the peduncle after the flowering stage. If you look closely at the stem, you can see small tubercles with a scaly coating. These are dormant kidneys. The orchid baby begins to develop on these elements. However, there are also exceptions to the rule.
Also, this part of the flower is capable of ripening from the axils of the foliage, despite the fact that the children are still root processes.
Can it be separated from a blooming flower?
Many novice flower growers, who are first engaged in planting such a capricious flower as an orchid, ask themselves the question: is it possible to separate his baby from a blooming flower? Experts recommend not to rush, but to wait until the orchid bloom is over. This is due to the fact that during this period, the roots of the child are still poorly developed, therefore, it will be too difficult to root the shoot in a new substrate.
In addition, for a blooming orchid, such procedures can be serious stress.
How to care after transplant?
After separating the baby from the main plant and transplanting it into a new substrate, it will be necessary to provide the process with proper care. If initially the sprout is quite strong and healthy, then its rapid development and active growth will begin without delay. To grow such a flower, you do not have to resort to various tricks and additional means. If, at the time of separation, there were leaves on the shoots, then during rapid growth they may dry out. But there is nothing to be afraid of - give the baby a little more time so that she put down new leaves.
If the babies of the mother (the main plant) turned out to be too weak and hardly develop, then they will need to provide greenhouse conditions. The greenhouse can be purchased at a specialized store or built by hand. In such conditions, the required high temperature and the required humidity level are always maintained. Moisturizing a young sprout should be done carefully. Never pour water on your orchid baby. Otherwise, the root system of the flower can begin to rot - and this is a rather serious problem. The roots of the sprout, subject to competent and moderate watering, begin to grow quite quickly.
In the area where the pot with a young flower is located, it will be necessary to ensure a high-quality air outflow and inflow. The space should always be fresh and comfortable. It is recommended to provide lighting for the orchid process, relying on the main principle - direct sunlight for the described plant is very harmful. It is desirable to form diffuse or shaded light. The sun's rays that penetrate into the dwelling in the morning, along with the sunset rays, will not harm orchids. After a certain time, it will be possible to plant an orchid sprout in a new pot, which is more suitable for her in size and volume.