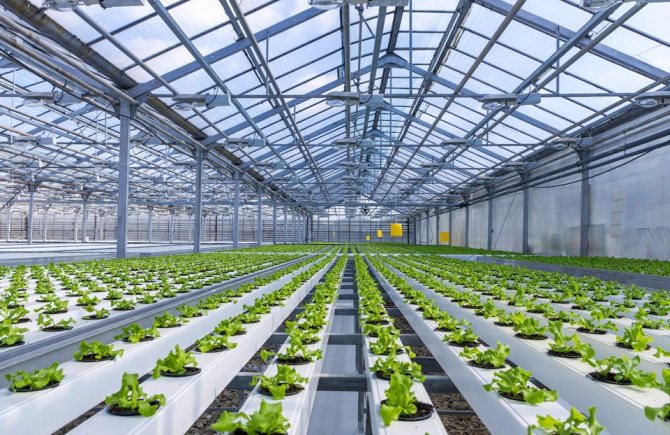
Harvesting on your site is a pleasure. But plants need careful care and warmth. It takes a long time to warm up the soil in a natural way inside the greenhouse, therefore, to obtain the optimal temperature, you need to think about heating the greenhouse. Greenhouses are heated using various heat sources. Any method of warming up the land is an effective way to get a good harvest in a short period of time. It is not so difficult to equip high-quality heating of the greenhouse with your own hands.
Types of heating systems
Many summer residents and residents of rural areas use greenhouses only in a relatively warm season, but if desired, they can be equipped for year-round use.
There are several types of heating systems.
Steam
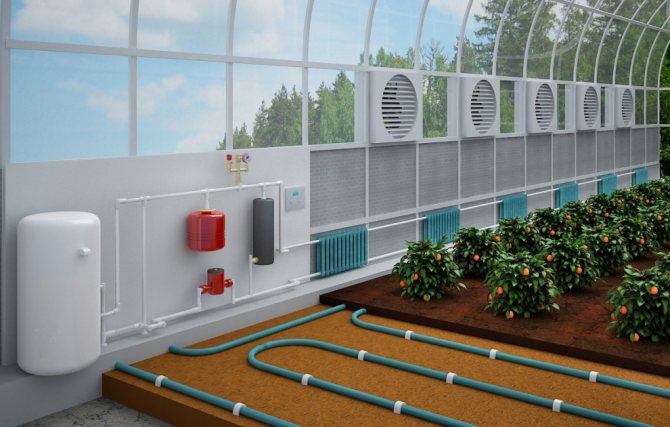
If the greenhouse is located in close proximity to the house (no further than 10 meters) or is completely adjacent to the wall, then ordinary steam heating can be mounted: pipes are led inside and the room is equipped like an ordinary residential one. In addition, it is advisable to make a warm floor. To do this, the pipes are led directly into the ground so that the circuit evenly heats the usable soil area.
This type of system can affect the overall heating of the home, so care should be taken not to worsen living conditions. It is important to take into account whether the boiler has enough power, whether it will "pull" an additional load, or you will have to install another, additional one. If the greenhouse is not very close to the house, significant losses in heat transport are possible.
Air
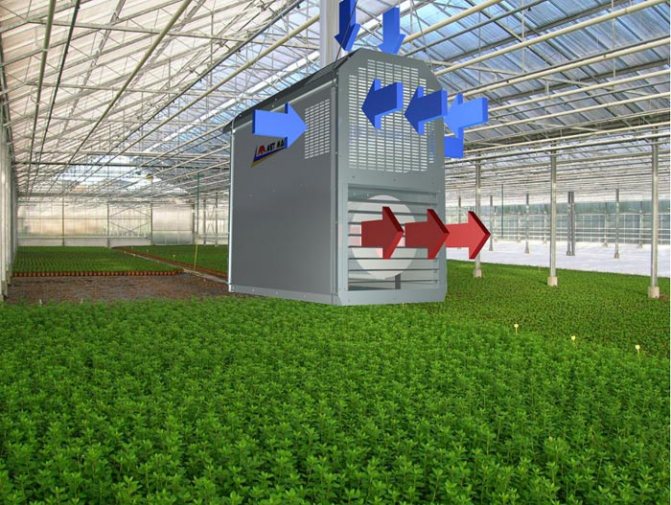
One of the most common methods is air heating. In order for the temperature to be sufficient not only in space, but also in the soil, it requires a proper device of the structure itself. In many greenhouses, even without additional heating, building insulation materials are used for this purpose.
With this method, the air is heated by the following equipment:
- heat guns;
- ovens;
- convectors;
- boilers.
The cannons, in turn, are divided according to the type of heating (direct or indirect) and the type of fuel used.
Cannons are:
- solid fuel;
- electrical;
- diesel;
- aquatic:
- gas;
- multi-fuel.
When choosing, you should pay attention to such characteristics as power (indicated in kilowatts) and heating area. The principle of operation is the same for everyone; you will need a heating element and a fan that lets an air stream through it.
The next method is heating with gas stoves operating on the principle of a conventional "stove-stove". Unlike boilers, the stove is not connected to the heating main. It can work both from a gas pipeline and from cylinders.
Air heating boilers are a cross between a stove and a conventional boiler. In contrast to them, such a boiler has a fan that carries out heat exchange by the so-called forced convection method. That is, it spreads the heated air. Unlike the main one, the air boiler is not connected to pipelines.
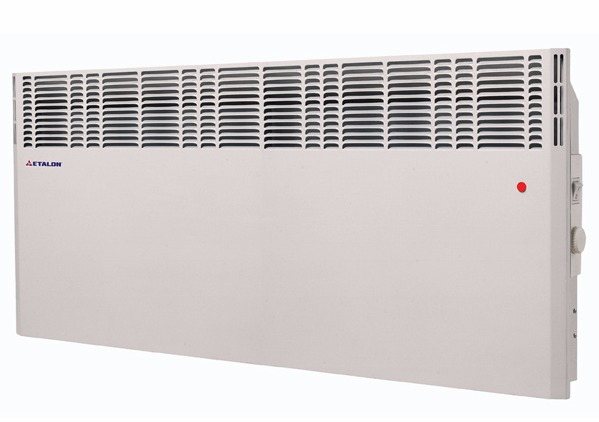
Another option is to use convectors, which are divided into wall and floor convectors.There are other options, but they are suitable mainly for living quarters and offices, but not for a greenhouse.
Convectors can also operate on different fuels, moreover, they can be built into the heating system with boilers.
Pros:
- relatively low cost;
- fast heating;
- safety;
- noiselessness.
In addition, convectors do not burn or dry the air, and do not require special maintenance. Gas-fired ones are characterized by low fuel costs.
Minuses:
- small heating area;
- the need for wiring and approval for gas boilers;
- high cost of electricity - for electrical.
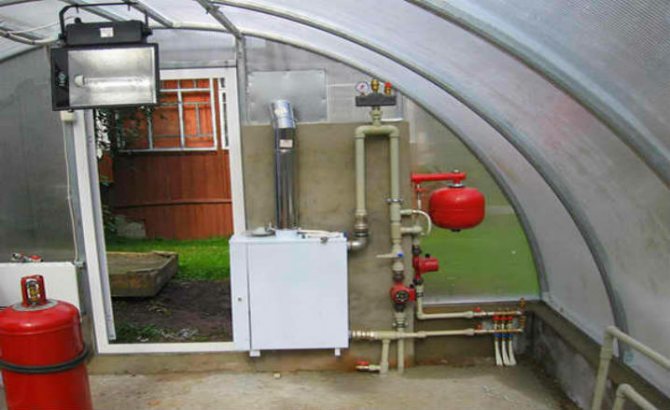
Aquatic
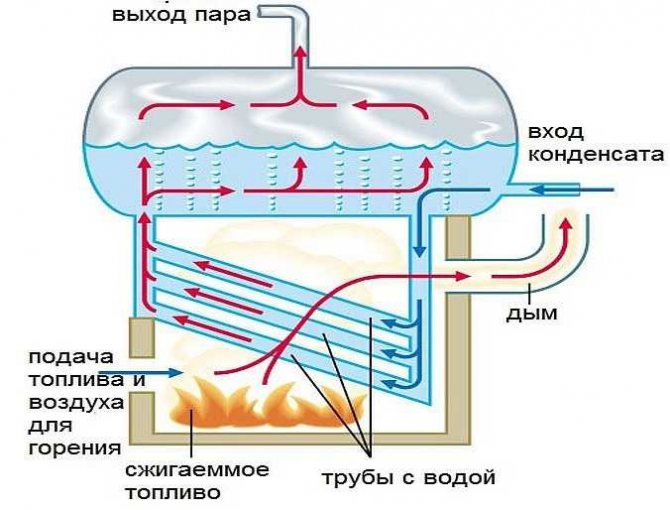
Water boilers work on a principle similar to stove boilers, they are usually connected to a gas pipeline, but they give off heat to a pipeline with a thermal carrier, which is often water. Thus, a local boiler house is obtained, with its own main line and heating batteries, capable of heating rather large areas, including greenhouses.
Water heating is most effective if the greenhouse is an extension and there is no need to conduct communications in an open area.
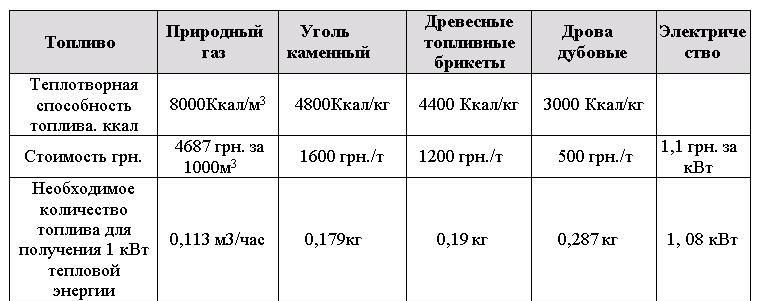
The solid fuel modification runs on wood or coal. The obvious disadvantage of such equipment is the difficulty of maintaining constant heating. Even in long-burning models, one bookmark is enough for no more than 16 hours.
This is not the cheapest way of heating: taking into account the efficiency (efficiency), equipment and installation costs, firewood can cost twice as much as gas per season. On the other hand, solid fuels are more readily available - gas pipelines are not available everywhere in rural areas. Moreover, “eco-pea” coal may not cost much, but it is still cheaper than gas.
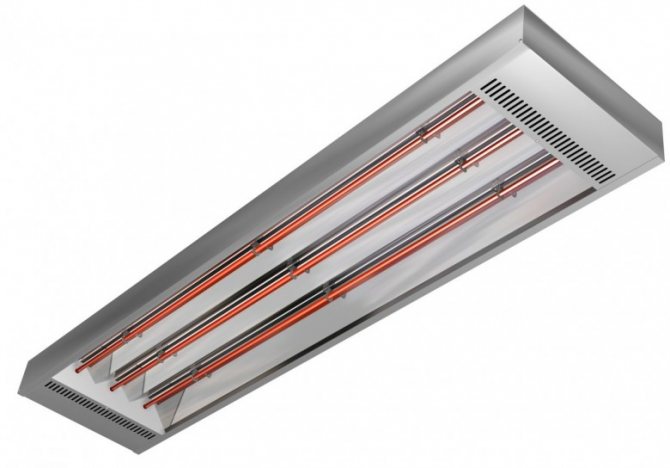
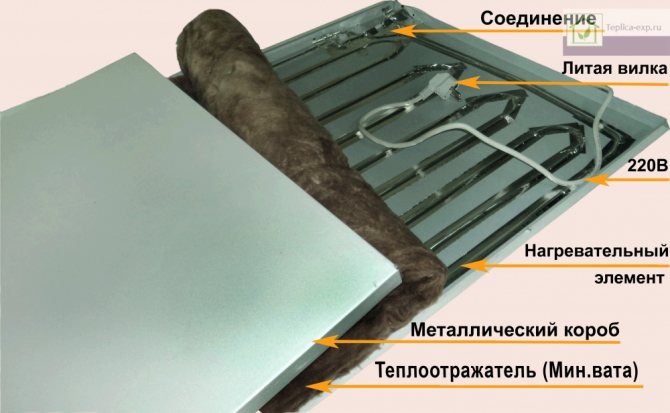
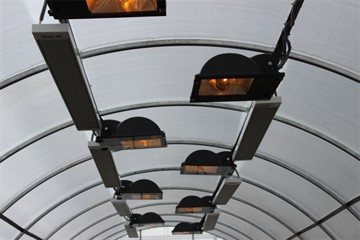
Heating with infrared heaters and heating cables
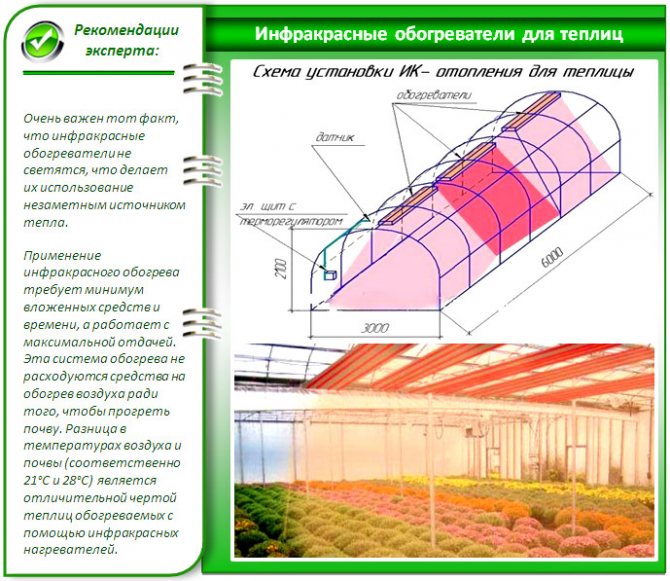
Infrared heaters are also used to heat greenhouses. Their main structural element is the emitter. The principle of operation is that it heats not the air, but the surrounding objects, which, in turn, give off heat to the air.
Such heaters are divided according to the type of energy source.
Distinguish:
- electrical;
- gas;
- water;
- diesel.
One of the advantages of such devices is that they can heat directionally, that is, not the entire room, but its local part. The heater is directed to some element of the greenhouse, for example, a concrete path between rows or a wall (if it is stone or concrete), which subsequently serves as a heat accumulator. That is, it warms up and gives off heat to the air.
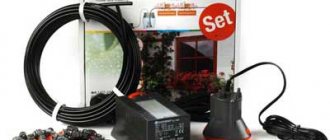
Quite often, infrared emitters are combined with heating cables. A sand cushion is set up under the soil layer, into which the cable is laid. The power source can be a normal power grid. Laying is carried out in such a way that uniform heating of the entire area is carried out. Warming up the land is more effective and allows you to reduce the warming up of the air, which has a fruitful effect on crops.
Prices for different types of infrared heaters
infrared heater
The economic benefit from using these types comes from the cost of fuel. It is advisable to use thermostats, especially since different types of plants require their own heating modes.
Heating cable prices
heating cable

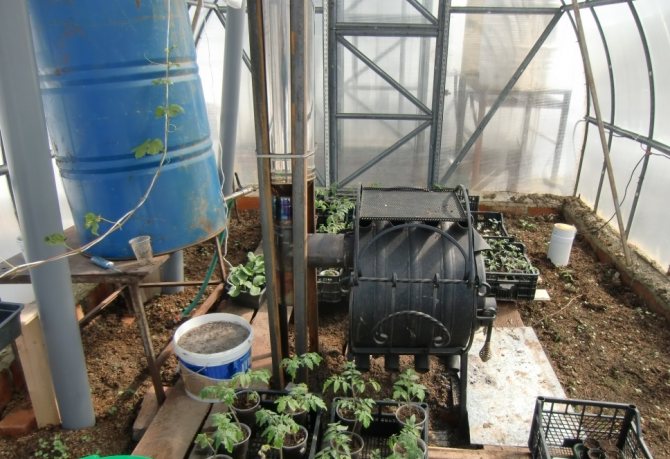
Installing a furnace or boiler from a barrel
This heating method involves the installation of special stoves, which should be suitable for small spaces. You can make stoves with your own hands from bricks or even from the most ordinary barrel.
To make a stove, you need the following materials:
- refractory bricks;
- reinforcement, crushed stone, cement brick for the manufacture of the foundation;
- steel thin pipes for the chimney;
- scoop, poker, doors, handles;
- cast iron grates for the firebox.
The stove is installed in the vestibule or indoors, where it will create additional heat. In order for the whole greenhouse to warm up well, and carbon dioxide to escape outside, the chimney is drawn along the walls. Good draft is required, so the end of the chimney rises 3-4 meters above the ground.
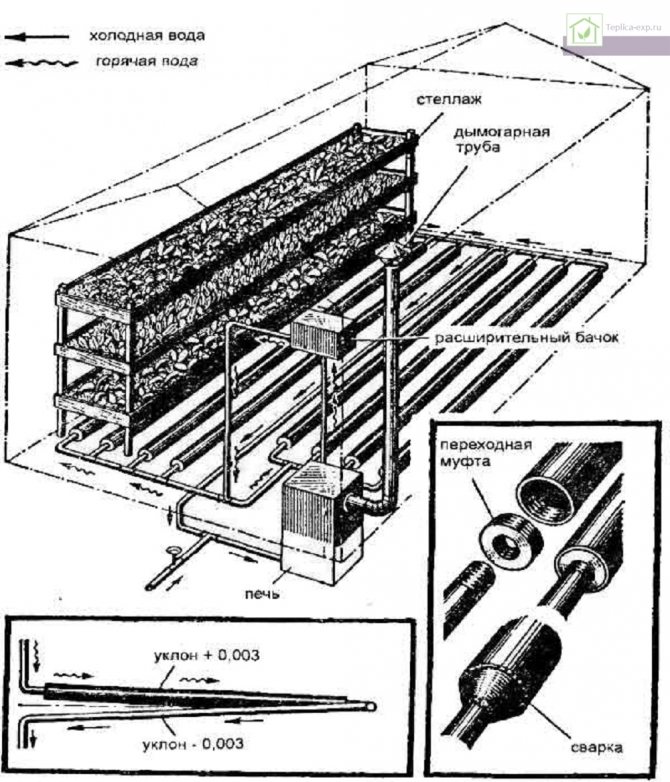
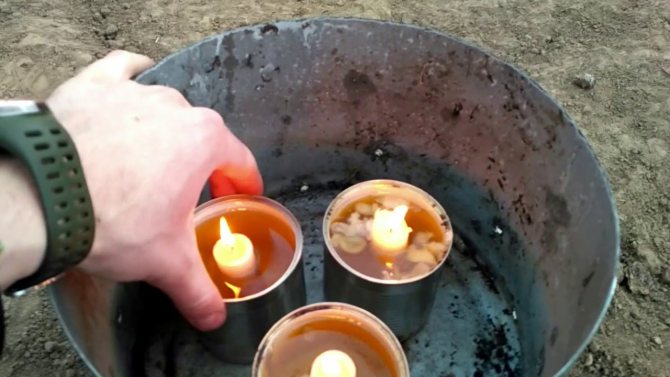
You can also make a firebox from a do-it-yourself stove-stove and barrels with a capacity of 200 liters, which inside must be painted twice.
The stove will be placed in a barrel, in which a hole must first be made for the chimney and for the tap. The chimney is removed from the barrel and connected to a 5 meter long chimney.
Infrared heaters: description, principle of operation
On top of the barrel, a container of 20 liters is installed with a volume that you can cook with your own hands from sheet iron. The heating itself is cooked from a profile pipe, the dimensions of which should be 40 x 20 x 1.5 cm.
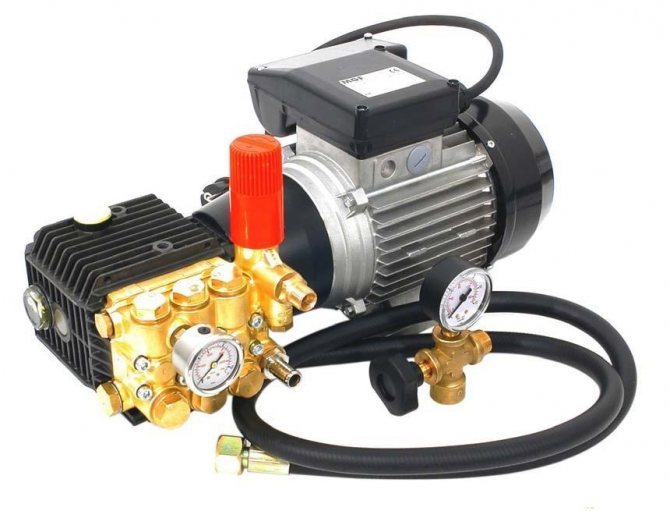
For effective heating of the soil, the pipes are spaced 1.2 m apart from each other. The water is circulated using a special pump, which can be purchased at the store.
Heating system selection criteria
There are several basic positions that are generally accepted when deciding to install a particular heating system in a greenhouse.
The combination of parameters and capabilities is the main selection criterion, while taking into account:
- Finance. A winter greenhouse requires investment. In this case, the rule applies: the more expensive, the less participation the system requires, the more autonomous it is. Cheap options require constant monitoring, so saving money leads to high time and labor costs.
- Cultures. There are frost-resistant and thermophilic. If one species is grown in a greenhouse, then a heating system must be chosen for it.
- Fuel availability. If there is no electricity nearby, you will not be able to use the appropriate type of heater.
- Climatic zone. The longer the cold season, the more money and effort will have to be made to keep the greenhouse in working order. However, self-cultivation can be cost-effective even with the most expensive heating options.
- Greenhouse device. With the help of a number of construction measures, you can significantly insulate the room. Unlike losses for the constant purchase of fuel, these are one-time costs for materials and installation. However, it is necessary to make a decision on the choice of the type of heating based on the purpose of the greenhouse.
- The size. This is often one of the most significant factors. Heating costs directly depend on the area of the room.
- Location. It is not only the proximity to home and communications that matters, but also the availability of access to direct sunlight. In addition, if it is decided to build a dugout, the level of groundwater is important.
- Possibility of constant supervision. Devices such as stoves require constant supervision and fuel filling.
It is not always necessary to pay attention only to the rational side of the issue. If aesthetics are important, you can safely experiment with design, but at the same time take into account technological features.

Warming with expanded polystyrene
A lot of heat goes directly to the floor of the greenhouse - to the concrete base (if the structure is placed on a foundation) or to the ground. Therefore, even if you use the most powerful heating systems, the floor of the greenhouse must be carefully insulated.
This can be done with a heat insulator such as expanded polystyrene. The material is sold in sheets of various thicknesses. For laying on the foundation itself, you can use the material with a layer of 50 mm. Expanded polystyrene is placed on the surface and fixed with a special adhesive for thermal insulation (Penoplex). After that, sand is applied (2-3 cm), leveled and a productive soil layer 25-30 cm high is laid.

Expanded polystyrene plates have excellent thermal insulation properties, so a layer of 50 mm in height will be enough
Important! The insulation can even be laid on the ground, i.e. this method is suitable for both mobile and stationary greenhouses.
Greenhouse heating projects
There are several common types of greenhouses. In the warm season, crops can simply be covered with perforated cellophane or similar films, but this option is not suitable for a cold season. The best way out of the situation would be a winter greenhouse with self-assembled heating.
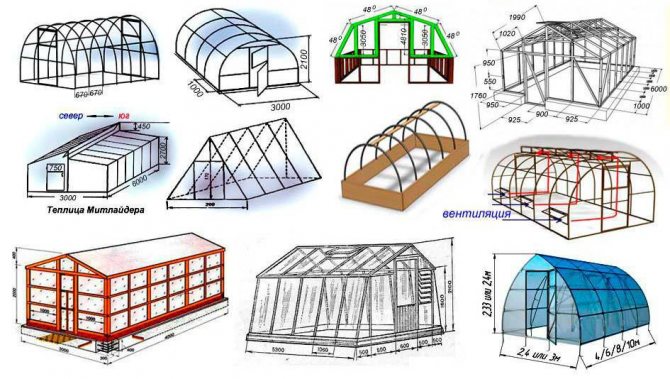
The most common types:
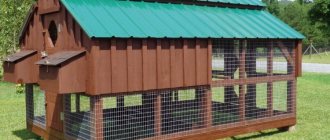
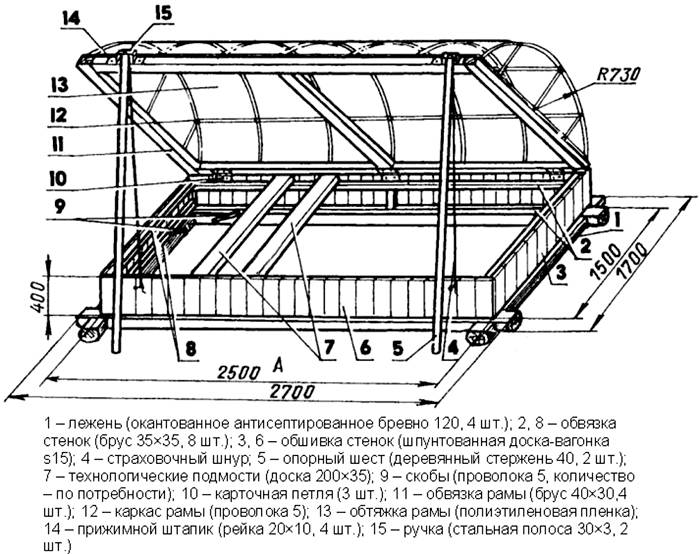
- Bread box. This is a small greenhouse that gets its name from the type of opening. One half is static, the other opens by analogy with a bread bin. A variety of such greenhouses are simple devices 40-50 centimeters high. Bumpers are placed and covered with either polycarbonate or old double-glazed windows. The sides can be either earthen or brick, or straw.
- Shed. A variation of a conventional greenhouse, characterized by a slope in one direction. It does not have any special advantages over the gable, it is more often placed against the adjoining wall of a residential building.
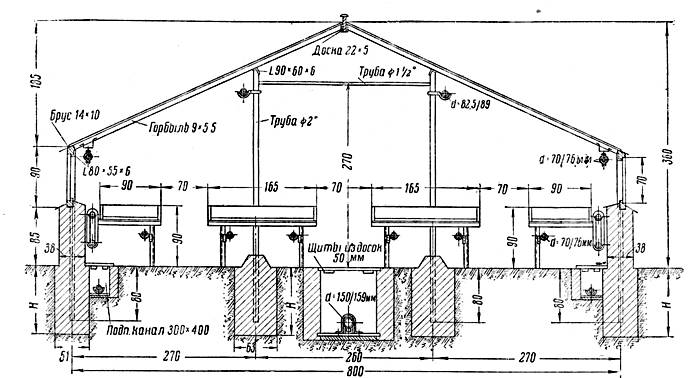
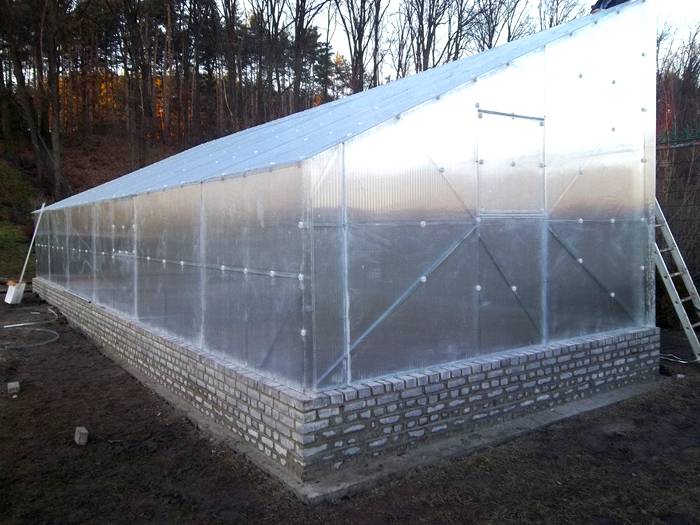
- Gable. This design is more expedient with a larger greenhouse area, the stiffeners in it are stronger and more reliable. Also - more space, it is possible to work at full height and equip a large usable area for plants, including in height.
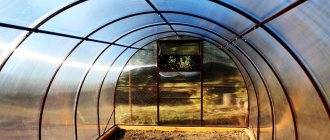
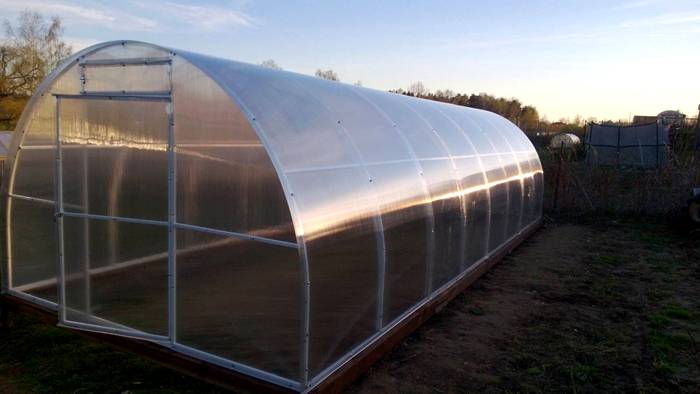
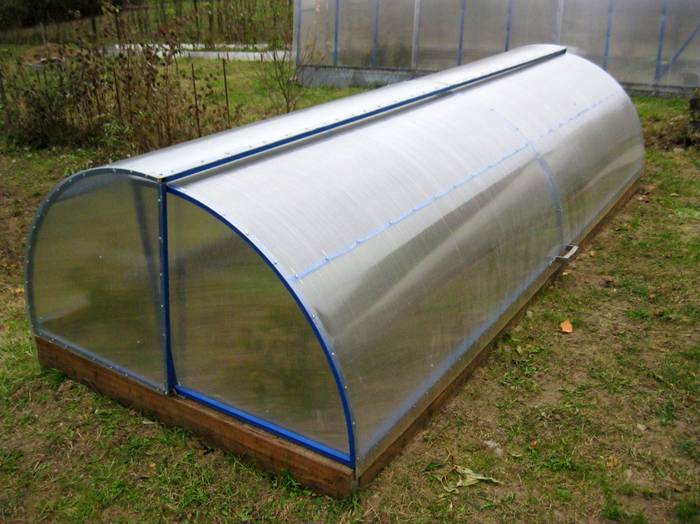
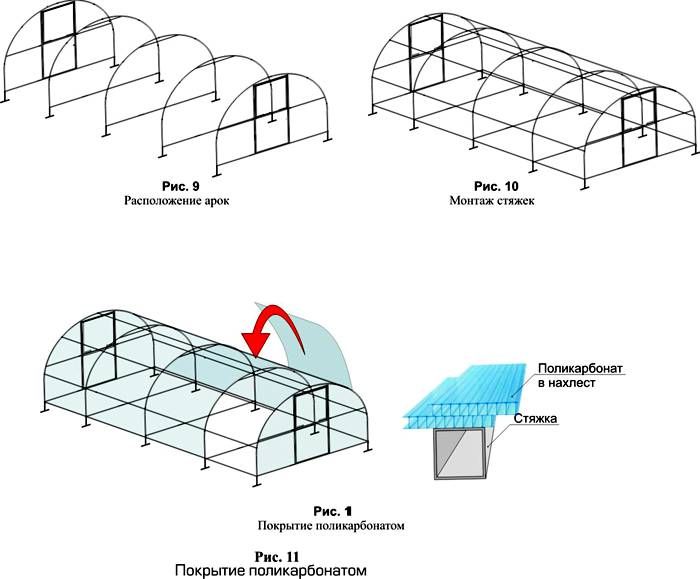
- Arched. One of the most common. The roof of such a structure in section is a semicircle, an arc, which contributes to the convenience of sweeping snow along its sloping sides, as well as a uniform flow of sunlight.
- Made of polycarbonate. By design, such a greenhouse can be of any kind, and either glass or cellular or duct polycarbonate is used as a light-transmitting material. As a rule, a thickness of four millimeters or more is sufficient. It is a plastic material with hollow channels that are filled with air. It in itself is a good heat insulator, moreover, it is much lighter than glass.
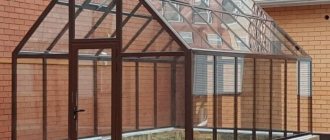
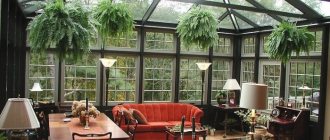
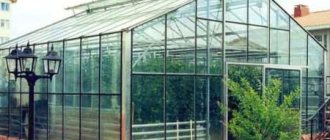
- Glazed. For winter options, it makes sense to use double glazing, as this option also involves an air cushion. It is especially good for arranging a greenhouse adjacent to a building. Allows you to equip a whole winter garden, recreation area. In fact, a separate extension is obtained, which can be used both as a greenhouse and as a utility room. Glass is more aesthetically pleasing, has better light transmission characteristics, is more durable and resistant to external influences. At the same time, it is a more fragile material, heavier and more thermally conductive. That is, such a greenhouse heats up faster and cools down faster.
- Wall-mounted. The shape of the roof can be any, but it is more practical to use a pitched roof. The advantages of joining the house are obvious - it is easier to connect such a greenhouse to existing communications.
- Dugout. It is known that in winter the earth freezes on average up to one and a half meters. In the northern regions - up to 2.5 meters. Below these marks, the temperature remains unchanged - 10-15 degrees, which is a significant advantage for heating. In situations where every factor is important, the use of an underground greenhouse can significantly reduce the cost of the entire range of measures. Some craftsmen do not arrange the whole greenhouse as a dugout, but prepare separate trenches around the perimeter. Cold air, sinking into them, heats up and returns already warm. The disadvantage of such a structure is the need to perform protection against flooding.
It should be noted that it is possible to combine almost all of these types. To reduce the cost of construction, old materials, window blocks, products of our own subsidiary production, such as straw, manure and other biological insulation, can be used.A typical simple heating oven can be assembled from bricks and old pipes, however, this option is more suitable for temporary structures than for uninterrupted production of products in a comfortable environment.
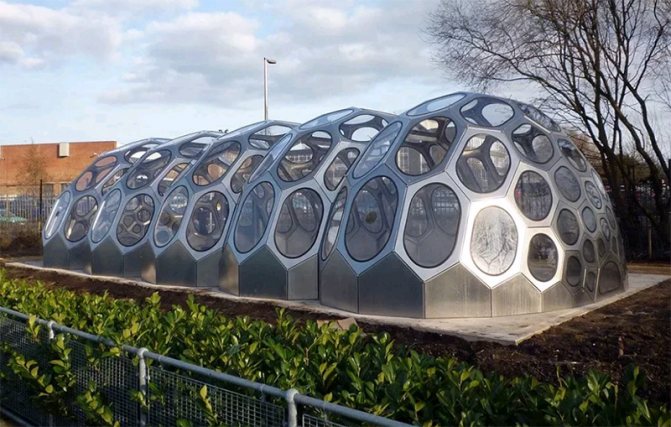
The geometry of the structure and the roof can be any geometry, for example, in the form of a cone or a pyramid. According to some reports, the least heat loss is observed in greenhouses, whose shape tends to be spherical. To comply with the principle of a greenhouse (thermos), the tightness of the joints, the absence of gaps and cracks is important.
A heating project depends on access to energy supplies.
Used as fuel:
- electricity;
- gas;
- diesel fuel;
- solid fuel (firewood, coal);
- biological (manure, compost).
In the case of gas and electric heating, proper development and approval of the project is required.
Air curtain
The air curtain is not installed in the greenhouse itself, but at the entrance. Therefore, this heating option is suitable for permanent, not temporary structures. A classic curtain can be purchased and hung over the entrance. The tambour can also be heated independently using stove, gas or electrical equipment. The main source of heating can also be placed in it, which will reduce costs: the boiler is not in a cold, but in a warm room. The use of the curtain is especially important for regions with cold climates and for winter growing of plants. In autumn and summer, there is no particular need for such equipment.
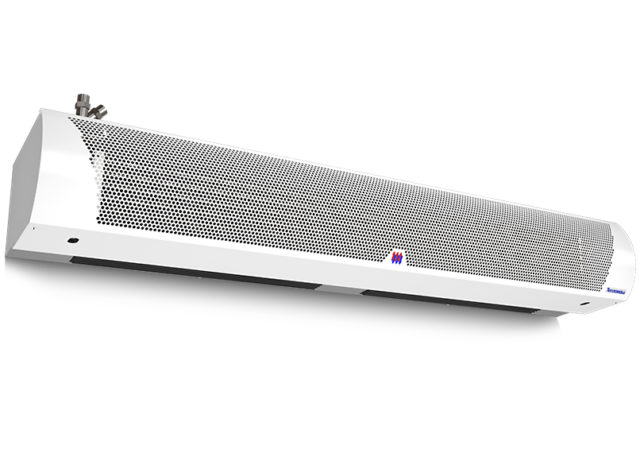
The thermal curtain can be purchased at an affordable price
System installation
Today, the greenhouse can be purchased as a whole or ordered from a contractor for its installation. You can also purchase its individual structural elements and assemble your own, unlike anything else.
If you decide to stop at independent construction, you must go through three main stages:
- design;
- installation;
- launch and operation.
Design
The greenhouse project can be developed by yourself.
This requires:
- determine the cardinal points;
- take measurements;
- designate a set of works;
- choose materials.
The simplest drawing can be made even on a napkin with a ballpoint pen, but it is a detailed project that is the key to success. Small miscalculations can lead to significant rework.
The best projects are not just blueprints, but a preliminarily thought out complex of works on the arrangement of the premises, which should become a supplier of fresh vegetables and other products all year round.
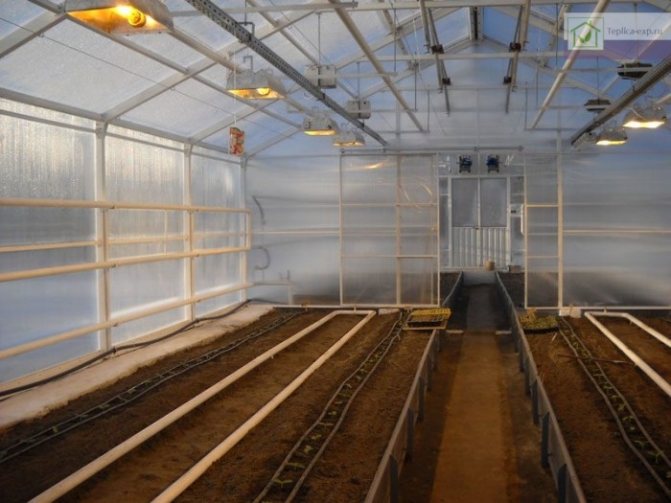
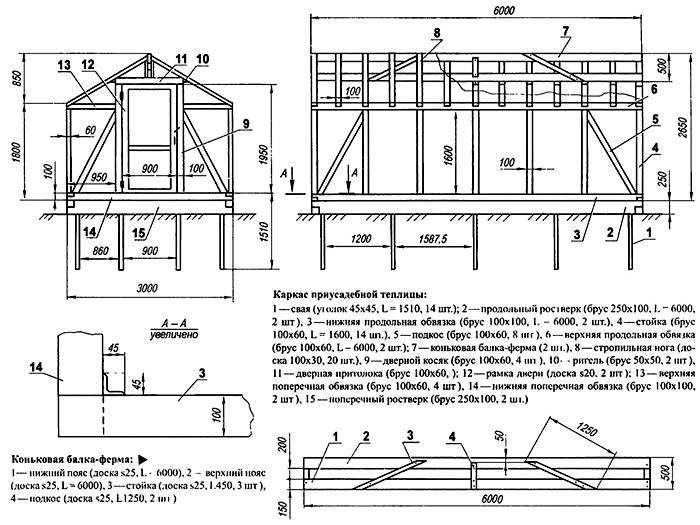
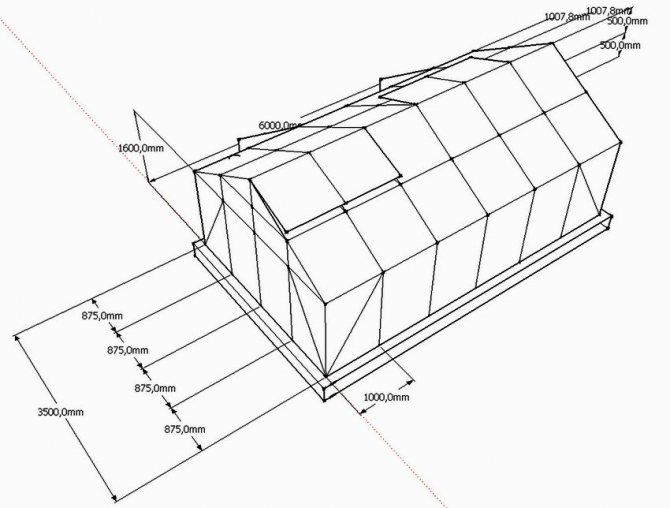
As an example, consider a conventional gable polycarbonate greenhouse with electric heating with infrared lamps and heating cables.
For effective use in winter, such structures are installed with their ends to the east and west, respectively, with one slope to the south, the other to the north.
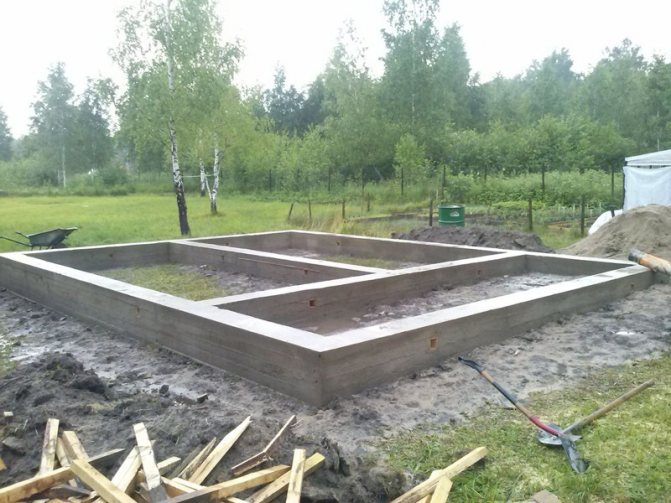
Some people set up greenhouses without a foundation. This approach is fully justified when used only in the warm season, and for a winter structure, the foundation is an indispensable element.
For the foundation you will need:
- cement;
- sand;
- roofing material;
- polystyrene.
The depth of the trench will be up to 100 cm. The cement is mixed with sand in a ratio of 1/3. Polystyrene for insulation is equipped only from the outside along the perimeter of the base. You will also need a sand cushion (30-40 cm) and a concrete path between the rows.
Next, you need to calculate the amount of material, mark the territory and frame.
For the frame you will need:
- metal profile 20x20 mm;
- reinforcing metal;
- windows and doors;
- paint and primer for outdoor use.
Between the ribs of the future structure, it is necessary to maintain a step, preferably no more than one meter. Slope angle - no more than 30 degrees. Reinforcing metal is laid in the foundation around the entire perimeter of the structure. Based on this, the frame is calculated.
You can order a ready-made structure, otherwise you will have to "cook" all the elements with your own hands. At the same time, welding will be needed when attaching the frame to the foundation.
You also need to prepare:
- polycarbonate (the need is calculated based on the area of the walls and roof);
- hardware (metal products);
- wiring for connecting lamps and heating cable;
- a place for a panel board;
- automatic machines.
Installation work
Installing a greenhouse is a fascinating and time-consuming process, but it will not be difficult for a good owner to understand the principles and features of such work.
During construction, you should adhere to the general sequence:
- The foundation is being set up. Ribbon means that it must be arranged under all the load-bearing walls of the structure.
- Along the perimeter, bumpers up to 100 cm deep and 10-15 cm high from the outside are poured. Reinforcement is laid in the foundation with connecting elements leading outward, and bearing supports are attached and poured with concrete for further fastening of the frame.
- The sideboard is sheathed with expanded polystyrene, equipped with a concrete screed. The concrete is treated with bitumen for greater moisture insulation.
- A monolithic foundation is arranged inside, preferably below the level of freezing of the earth. Expanded clay can be placed at the bottom, a sand cushion is placed on top of it, inside which a heating cable is placed.
- A concrete path is laid in the center of the room, which will serve as a kind of accumulator for accumulating heat from the operation of the lamps.
- The frame is assembled and attached to the foundation. Assembly can be carried out either by welding or by bolting. In places where doors and windows are installed, additional stiffeners are installed. You can also additionally provide for the presence of a vestibule, which will avoid direct heat loss.
- After carrying out these works, the metal is primed and painted, then the structure is sheathed with polycarbonate, doors and, if necessary, windows are installed.
- Polycarbonate is attached to self-tapping screws, while it is very important to do it carefully and not pinch it. In the corners, the indent from the edge of the sheet should be at least 40 mm, the fastening step - 30-40 cm. It is necessary to use rubber washers, and on top of them - aluminum.
- The ducts should be placed perpendicular to the ground and on the roof perpendicular to the slope so that condensation can flow freely. For the joint of the sheets, special profiles are used, ridge or corner, depending on the attachment point.
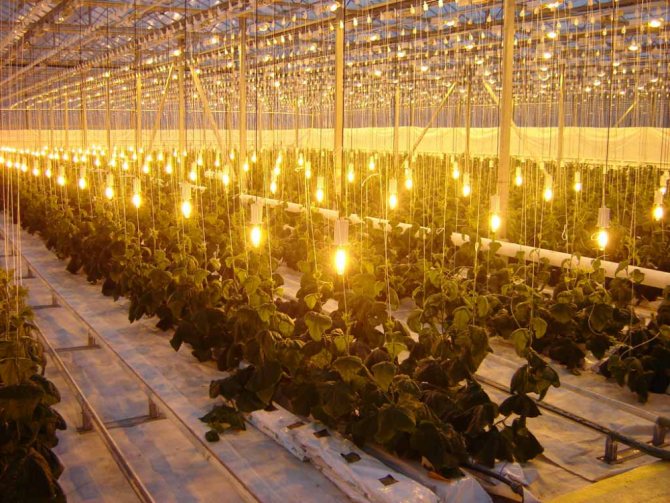
- Infrared lamps are suspended from the arch directly opposite the concrete path. A 1000-watt lamp is designed to heat an area of about 10 m2, based on this, the required number of devices can be calculated.
- Lamps and heating cables are connected to the machines located in the control room. For convenience and safety, all sorts of protection and sensors can be used, the most useful of which will be a thermostat and a moisture meter.
For convenience, artificial lighting can be carried out. Apart from the main function, it can shorten the period of growing seedlings.
Start-up and operation
After the sheathing is ready and the heaters are installed, the usable area is covered with earth. For the convenience of work, this is done after installing the frame. Mineral-rich soil can be used - the choice depends on the crops you plan to grow.
It should be noted that electrical installation work will require approval from the relevant controlling and supervisory organizations, so this issue should be approached responsibly.
After approval and commissioning, the greenhouse is ready for use.
Biological fuel
The remains of plants, wood, peat, manure are able to maintain heat for a long time. For example, many summer residents mulch the soil with peat or lay it under agrofibre, in which bushes and trees are stored during the winter period.
The same material can also be used to heat a greenhouse. The sequence of actions is as follows:
- A trench up to 50 cm deep is dug around the perimeter.
- The bottom is tamped down and the bark and branches of trees are laid.
- Then comes a small layer of earth up to 3-4 cm.
- After that, leaves, straw, rotted bark, old paper - any organic materials that may rot are poured.
- It is advisable to put manure (horse or cow) on top.
- Then comes a layer of fertile soil, in which the plants are planted.
Important! This method of insulation is optional - in winter, manure and wood will not help. It is better to lay them on a 50 mm layer of polystyrene foam, which provides excellent thermal insulation.
Heating service in the off-season
If for some reason the greenhouse is not used in winter, it is necessary to remove the equipment and carry out cleaning. The greenhouse can also be frozen, which allows it to be disinfected and disinfected, while it is permissible even to leave doors and windows open.
If the greenhouse is used all year round, it is necessary to constantly maintain certain temperatures and humidity.
How to properly maintain the temperature
Climate maintenance can be carried out by temperature sensors. Depending on the crops grown, a certain temperature must be maintained in the room.
If nothing is grown during the off-season, it is advisable to keep the temperature at a minimum level, but prevent the soil from freezing.
In addition, you must:
- remove the remnants of the previous culture;
- to cultivate the soil, and you can also remove the upper depleted layer (about 5 cm);
- treat with fertilizers using compost or other biofuel.
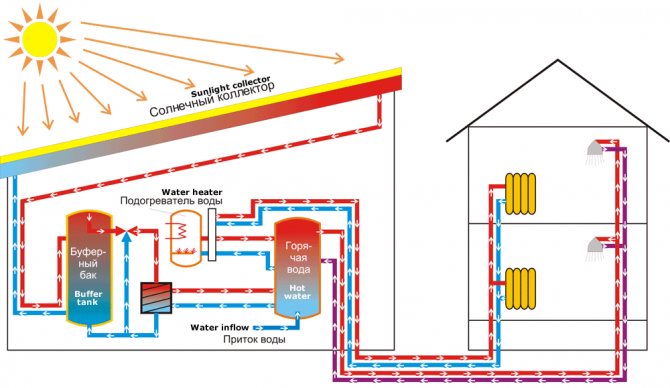
Solar accumulators
Penetrating through the greenhouse cover, the sun's rays heat up objects and soil in it, from which the air warms up. Therefore, the place for the greenhouse is chosen sunny and windless.
For additional heating of the greenhouse, you can make solar batteries with your own hands. They are made from the following materials:
- coarse sand;
- polyethylene film;
- heat-insulating material in the form of polystyrene.
A trench is being dug in the greenhouse, the bottom of which is covered first with a heat insulator, then with plastic wrap, granular sand and dug soil. The result is a simple device that will store solar energy and heat the air in a greenhouse.
Each greenhouse owner decides for himself which heating system to choose for it. In order not to be mistaken with the choice, you should carefully study all heating options, compare and analyze them. And you can install almost any heating equipment with your own hands, without the involvement of professionals.
Can infrared heating be used?
Infrared radiation does not pose any danger. Such rays come from any heated body - the sun, stove, heating radiator. The advantage of infrared heating is the absence of an intermediary, which in other systems is air: plants receive heat directly.
Heat losses, respectively, are reduced (in other systems, heat is carried away by air to the ceiling), so that infrared heating can be considered the most economical.