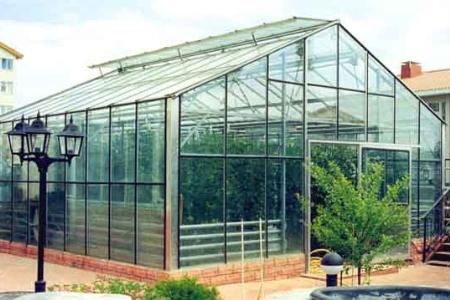
An increasing number of people are installing greenhouses on their backyards. The benefits of using these designs are obvious.
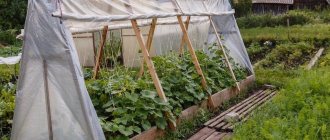
You can grow seedlings with their subsequent transfer to the ground, which allows you to get early vegetables from your site, or you can generally grow vegetables and greens all year round, regardless of weather conditions.
Which polycarbonate is best for a greenhouse?
One of the first questions that must be resolved even before the start of construction is selection of suitable material... Cellular polycarbonate sheets deserve a separate discussion:
- This is a very lightweight material. When using it, you can easily do without arranging a heavy frame, a powerful foundation.
- The design has sufficient rigidity at the expense of internal edges. The sheet bends easily if necessary.
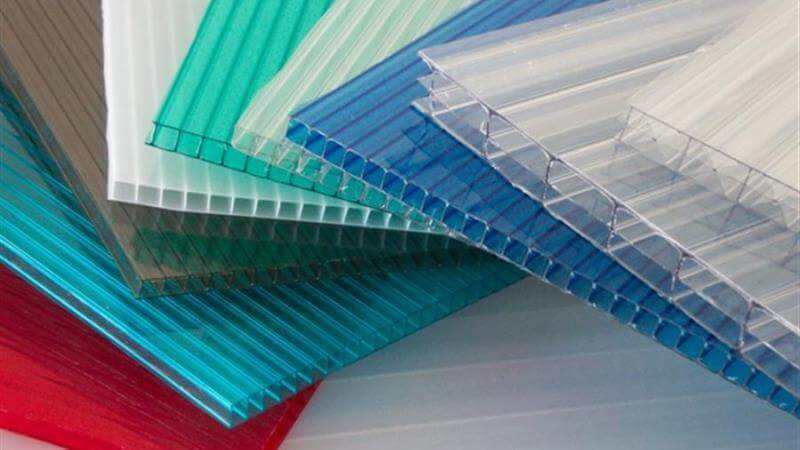
- By itself, the arrangement of sheets of cellular polycarbonate contributes to the formation of an air gap. It often acts as a heat insulator.
- Light transmittance is about 90%. This figure is quite enough for such a structure as a greenhouse. In this case, the dimensions do not matter.
Polycarbonate sheets perfectly withstand any kind of load. And they are able to perfectly resist mechanical stress.
The sheets can differ in thickness, color and size, you can always choose and buy a suitable cellular polycarbonate in Moscow at the Baller plant.
How to choose a polycarbonate greenhouse? Video:
How do thoughts about a greenhouse begin?
By choosing the right polycarbonate. It is beautiful and durable, and its various sizes and various colors make the material desirable for many. By structure, polycarbonate sheets are divided into honeycomb and solid, it is the first one that can be called the ideal solution for building a greenhouse. Why?

- The layers connected at different angles by stiffening ribs make the products extremely durable.
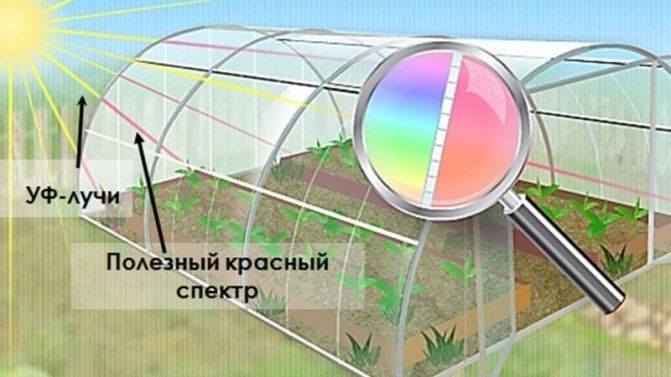
- Tolerance to temperature extremes and UV protection are the best qualities for greenhouses.
- Zero gravity, ease of installation and subsequent maintenance does not leave summer residents any other choice.
If you want the future greenhouse to serve for a long time, then when going to buy it, you should remember that:
- The thickness of the polycarbonate sheet must be at least 4 mm. Less is impossible, otherwise your structure will not last long.
- The weight of a sheet of standard sizes (600 × 210 cm) must be at least 10 kg. Lighter - the quality is worse.
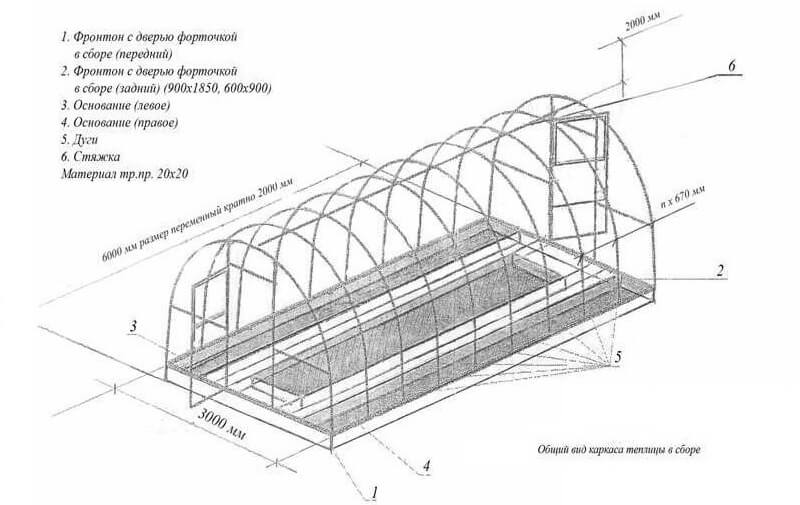
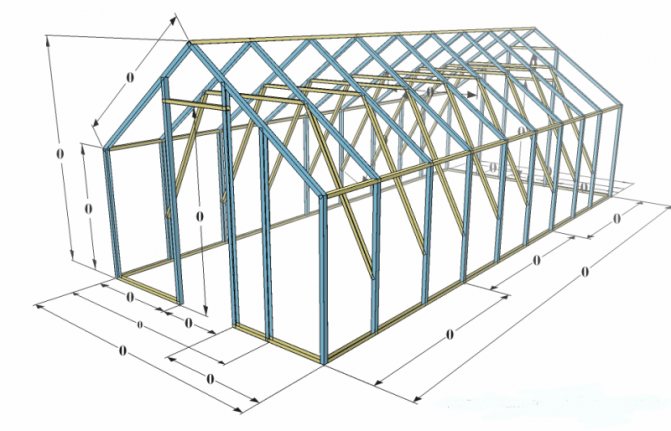
DIY polycarbonate greenhouses, drawings
It is imperative to draw up drawings. Accurate calculations are definitely indispensable. From the very beginning, you need to resolve the issue related to size and shape.
The size of the site itself, the wishes of the owner and the possibilities will determine which option should be chosen in this or that case. Everyone decides for himself, therefore it is not worth focusing on this.
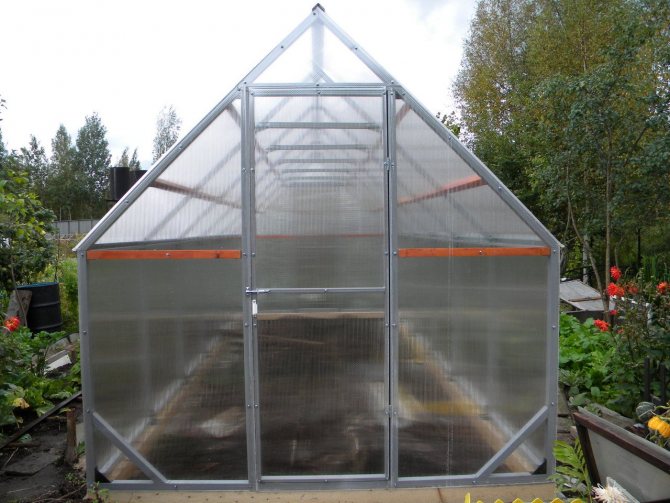
But the form definitely deserves a closer look.
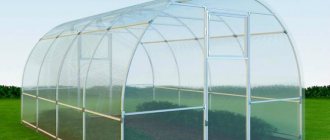
- In most cases, greenhouses are made with arched or straight walls.
- On sale most often you can find exactly arched types of products. This partly determines which polycarbonate is best for the greenhouse.
Assembly and its speed are not the most important thing.
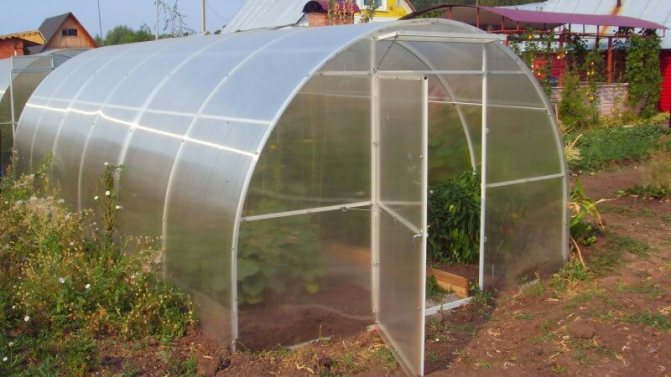
Advantages of arched greenhouses:
- Good resistance to snow load.
- The frame consists of a small number of elements.
- It is very easy to build such greenhouses. It is enough to bend the sheet and fix it.
These statements are completely true. But often there is not enough information that would relate to functional features.
First of all, they note that the assembly speed of just such a greenhouse is simpler, and the process itself takes very little time.
But there is still a serious drawback.
Such structures are inferior to the option with straight walls, if we talk specifically about functionality, that is, about the ability to give the right amount of heat and light to the plants that are inside.
Form and rules
If we consider arched greenhouses and structures with smooth walls, then it takes much more time to heat the first option. This is due to the light transmittance that a polycarbonate sheet has in a bent and straight position.
It is very simple to understand how to make a polycarbonate greenhouse with your own hands. The main thing is not to make a mistake in your choice.
However, this rule does not apply to large buildings. Indeed, in this case, the material is bent to a small radius. And the reflectivity becomes minimal.
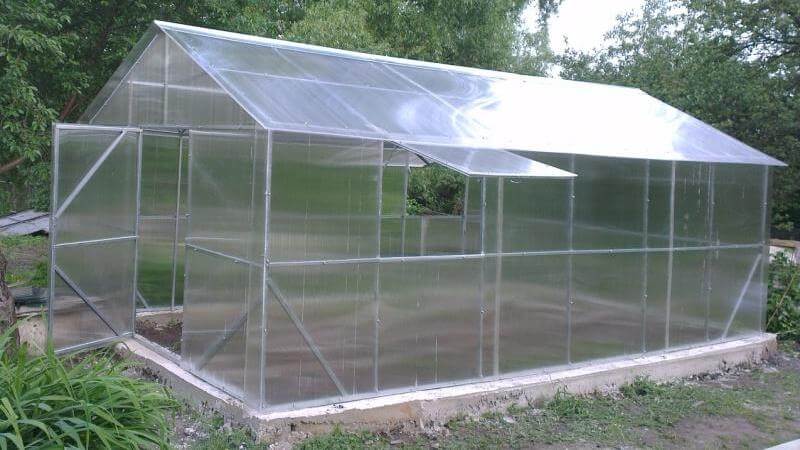
Therefore, it is worth choosing straight walls if you do not want to get the result as quickly as possible, but get a structure, thanks to which it will be possible to grow fruits and vegetables at no extra cost.
10 mistakes in installing greenhouses, video:
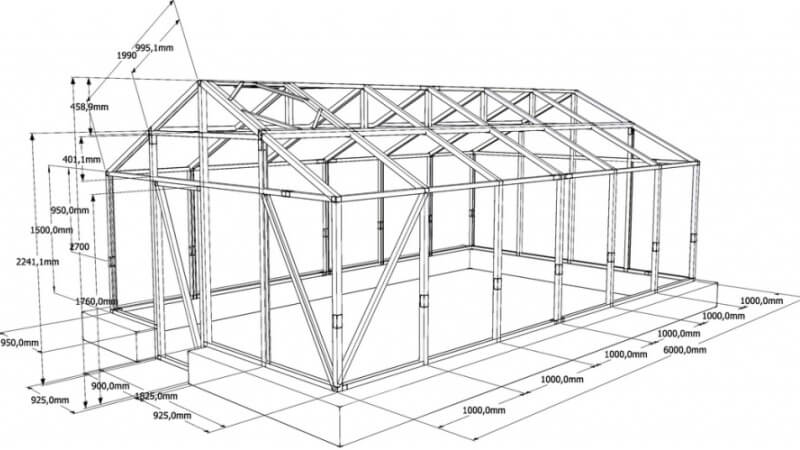
Polycarbonate greenhouse dimensions
First of all, you need to collect the required amount of tools and materials, drawings.
In order to draw up a plan, we first determine the size. It should be borne in mind that standard varieties of polycarbonate sheets have the following parameters: 2100 × 6000 mm... Considering this fact, it is easy to avoid trimming excess material.
What can you do to solve the problem?
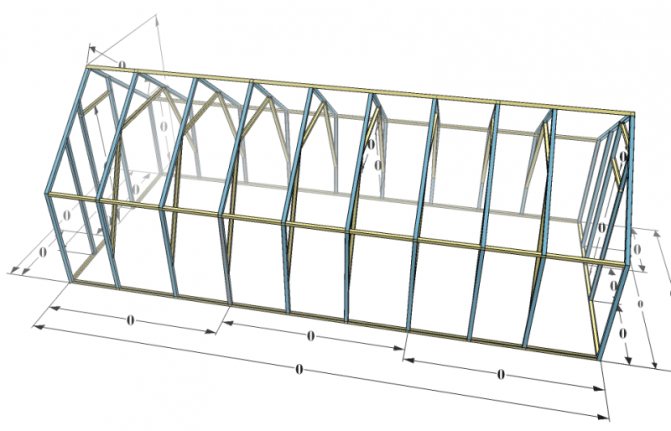
- For example, it is permissible to use four sheets with dimensions 2100 by 1500 mm.
- As a result, the straight wall itself will be in 4200 by 1500 mm.
- And you can choose materials half the size.
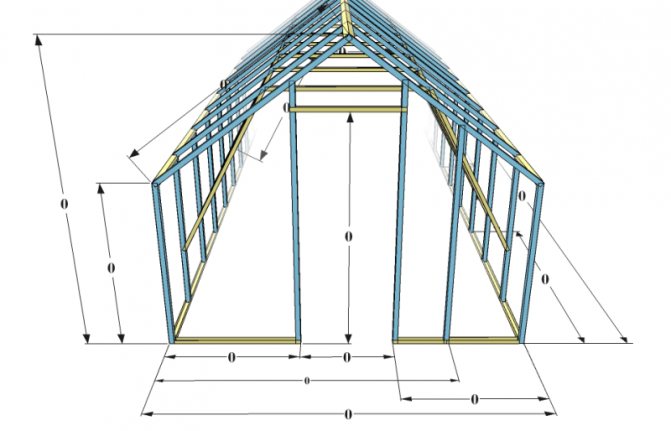
- The width of the structure will directly depend on the slope of the roof slope. In any case, accurate calculations can be made provided that one cut sheet is used per floor.
What's with the height?
- In our example, it will be equal to 1500 mm.
- The height will reach 1700 mmif the walls are raised by 200 mm. In this case, we do not take into account the height of the ridge.
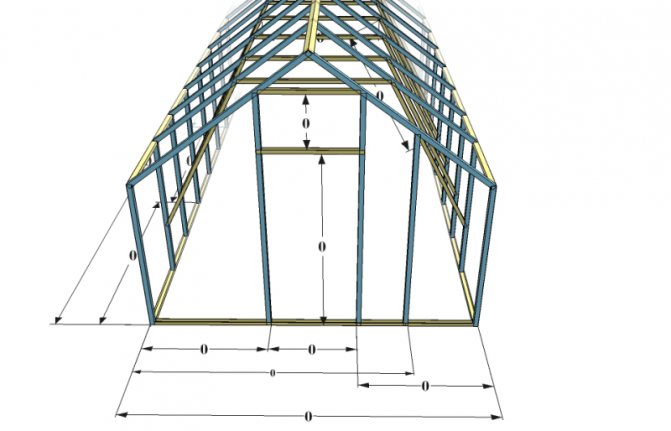
We solve the primary task - we organize the internal layout.
The above dimensions are optional, they just help you understand the general principles of the construction of the structure. To make it easier to experiment with your desires.
It is important to take into account the layout of the internal arrangement of plants.
First you need to decide which cultures will be inside. And only after that proceed to the drawing. This will help you quickly figure out how to build a greenhouse with your own hands.
Separately, it is worth taking care of the orientation of the structure relative to the position of the sun, typical for a particular region.
You need to try so that light and heat gets into the greenhouse as much as possible. In this case, less costs will be required to maintain the desired microclimate inside the structure. This will also have a positive effect on plant growth and maturation.
You need to pay attention to the position of the stiffeners when working with polycarbonate sheets. They bend in one direction, but you cannot change it.
If you understand this feature and remember about it, then no problems will arise in the construction of the greenhouse in the future.
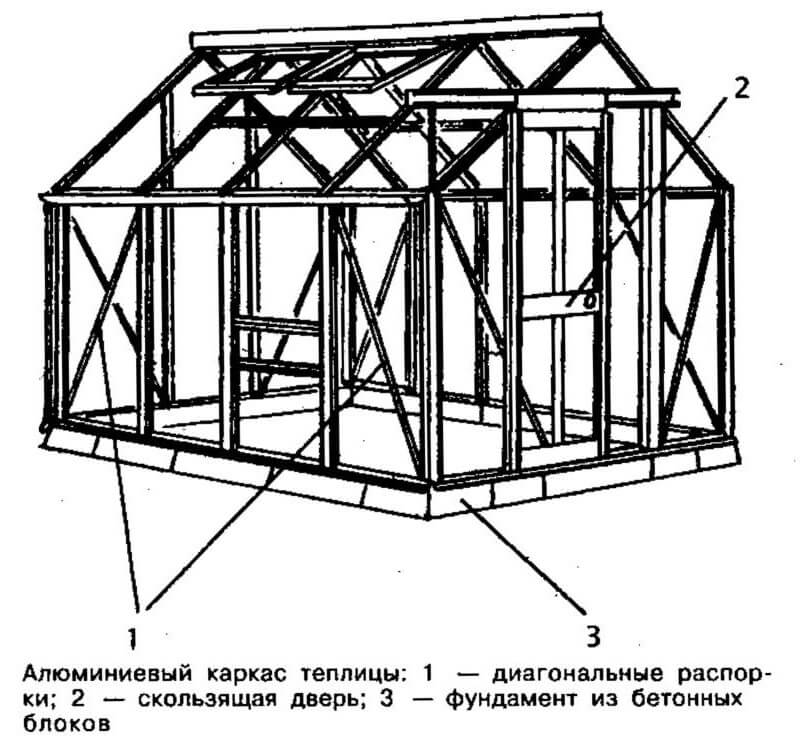
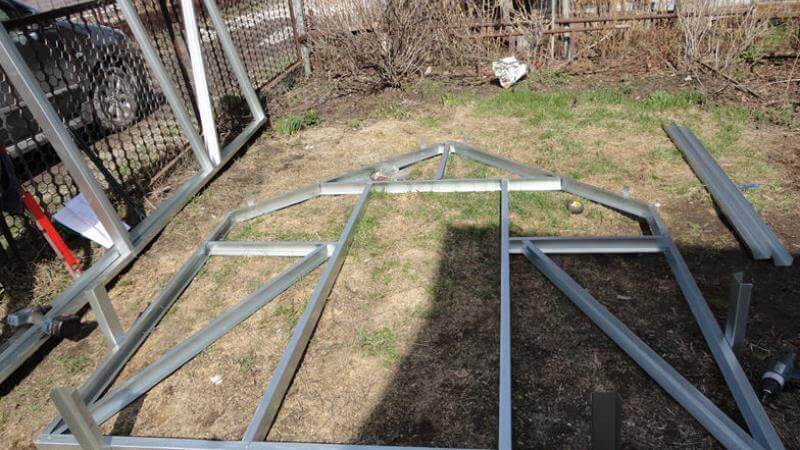
Frame. Choosing the right material.
- Metallic profile in this case it would be the best solution.
- You can use and wooden bar, but in such a situation, additional processing is indispensable for better protection from dampness. And the service life of such products is not as long as that of metal ones.
- A do-it-yourself polycarbonate greenhouse involves the use and steel pipes, metal corners... Welding may be required to work with such materials.
- Greenhouses are often made from PVC pipes. For more details, see the video:
Not every person can independently carry out all welding work. Not every household has special devices for this.
You can, of course, turn to ordinary fasteners, but then the assembly of the frame will stretch for a longer period of time and become a rather tedious task.
Still, experts agree that it is better to dwell on metal frame... It is usually used for mounting GKL sheets.
Lightness and durability Are the main advantages of this material. In addition, it is simply easy and pleasant to work with.
Of course, such structures do not always withstand a layer of snow up to 500 mm and thicker. But it is assumed that if a person is engaged in growing crops all year round, then he simply cleans the roof of precipitation himself. Otherwise, the plants simply will not see the sun in those short moments when it appears.

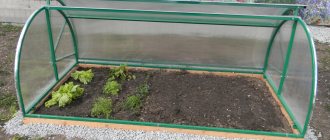
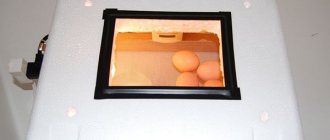
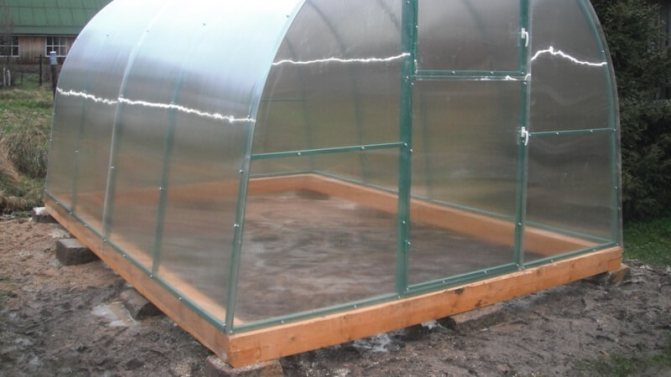
Greenhouse-bread bin: subtleties, and important nuances
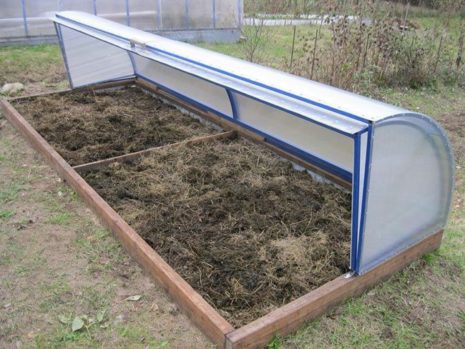
The main advantages of such a greenhouse:
- this structure is very ergonomic;
- the minimum number of connecting lines in the bread bin;
- the cover of the structure opens at an angle of 90 degrees, which makes it possible to effectively ventilate the greenhouse;
- it is very simple to assemble such a structure;
- you can fully use the entire area of the structure.
An approximate diagram of such a greenhouse will look like:
- Lezhen - 4 beams 120 mm each. in diameter.
- Wall binding - 8 bars of 3 x 3 cm in section.
- Wall cladding - s15 lining.
- Lanyard for belay.
- Pole-support - 4 mm wood rod. by diameter - 2 pcs.
- Scaffolds - boards 200 x 3 mm.
- Staples - the required amount of wire.
- Cardboard hinge - 3 pcs.
- Frame strapping - 4 beams of 3 by 4 cm.
- Frame frame - 5 wires.
- Frame covering - 4 clamping glazing beads from 2 x 1 cm strips.
- Handle - 2 steel strips 30 x 3 mm.
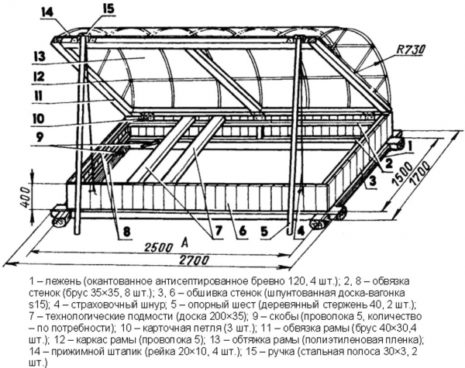
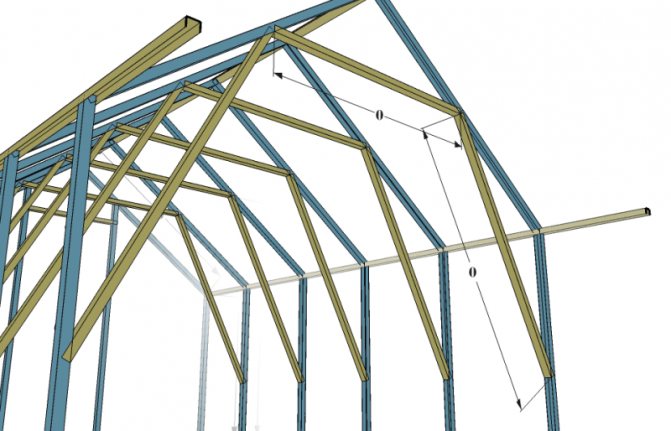
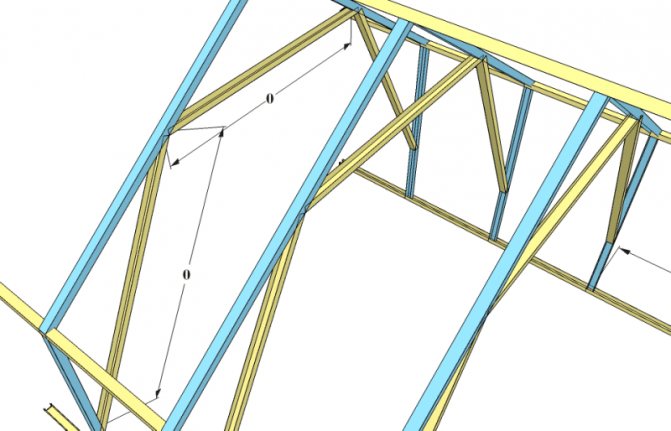
In the drawing, the upper frame is indicated, consisting of a pair of half-arcs, which are fixed on hinges. The frame is made of a small-diameter profile pipe. The covers should be selected along a radius so that they can open freely without interfering with each other.
Good to know!
Greenhouses of this small size are used for growing seedlings. The latter need to maintain a special climate. Therefore, these structures use polycarbonate sheets with UV protection.
The final size of the bread bin is chosen in different ways, depending on the purpose of the structure. Most often, they choose a structure 4-5 meters long, up to 1 meter high. The width is calculated based on how exactly the structure will open - on one side, or two. It is approximately 1 m.
DIY greenhouse from a profile
A 40 by 50 mm section profile is perfect for assembling a structure. It is best to purchase two elements, the PN guide and the rack-mount PS.
Compared to the rack-mount, the guide profile is much wider. If you combine these two parts, you get the most dense product.
With the help of the PN profile, it is necessary to fulfill all the elements of the frame, located horizontally.
Dealing with durability
Particular attention is paid to the stiffening ribs, then in the future you will not have to doubt the strength.
It is best to assemble greenhouses so that they contain as much as possible triangular shaped elements... Then the rigidity and strength will be sufficient even for operation in the harshest conditions.
We decide on the choice of fasteners.
Now we need to move on to the details that help secure other elements.
There are usually two options: riveting and self-tapping screws.
Each of these technologies has its own advantages. But, if in the future it is planned to dismantle the structure in order to move it to another place, change something, it would be best to use self-tapping screws.
You will need the following tools for further work.
- Level.
- Roulette.
- Straight cut scissors for metal.
- Electric screwdriver.
Greenhouse foundation
It is important to remember here that for about one and a half to two decades, polycarbonate itself serves as a maximum... This factor is important.
In some regions of our country, the cheapest option is considered use of a foundation from a bar... But can such a solution really be called expedient?
- First of all, it will create difficulties if you have to rebuild and change something. Here, one cannot do without destroying the integrity of the greenhouse itself.
- And the foundation itself in this case will serve three times less.
- The maximum service life of such a foundation is seven years.
Do-it-yourself brick foundation for a greenhouse
One of the most acceptable is the foundation all brick... The main thing is to properly equip it so that the whole structure stands as long as possible.
First of all, the arrangement of the so-called pillow becomes a mandatory step.
- First, the markup is done in the place where the foundation is supposed to be.
- To a depth of 200-250 mm the top layer of soil is removed.
- This distance is covered with fine gravel., it must be carefully tamped and leveled.
- The layer must be no more than 50 mm thick after all the work is over. This is necessary so that the heaving of the soil does not harm the foundation.
- Further concrete is being prepared based on a mixture of gravel and sand with cement.
Gravel and sand should be very well washed and cleaned of impurities.
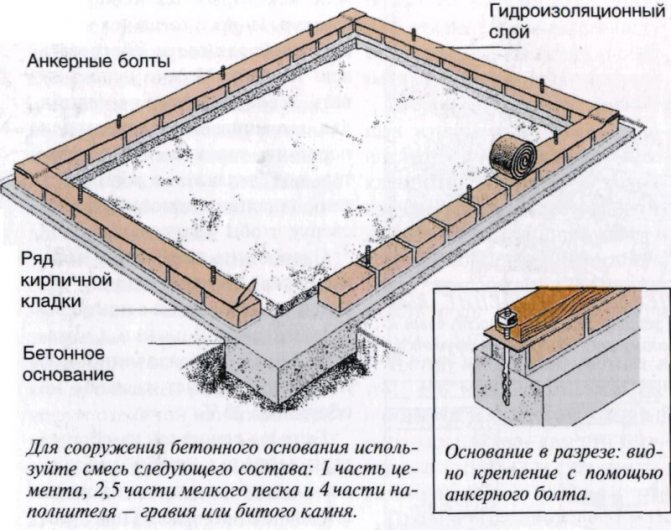
Mortar and quality of the foundation
To prepare the correct composition, you can use the following proportions:
- 5 pieces of gravel.
- 3 pieces of sand.
- 1 part cement.
The gravel layer after all this should not exceed 10–50 mm in size. The dug trench is eventually filled with the prepared solution. We made a pillow for the future foundation.
The foundation itself can only be erected two weeks later.
You also need to take care of waterproofing before starting work. The brick does not tolerate the aggressive effect of moisture from the soil.
It is necessary to use roofing material in order to equip the waterproofing. It is laid in one layer on a previously prepared pillow. That's it, after that you can move on to the foundation itself.
How to make a greenhouse with your own hands?
When a brick foundation is being erected for a greenhouse, it is imperative to mount all fasteners in the masonry. It is best to use a special building level so that the masonry itself is as even as possible.
The solution should be filled in all free spaces.that are created between the bricks. Otherwise, cold air will penetrate inside, and warm air, on the contrary, will leave the room. The size of the greenhouse itself completely depends on what size the pillow itself adheres to.
Tape type of foundation has long been known for its power. True, you will need formwork, which is easy to prepare from old boards.
- First, as in the first case, digging the ground by the size of the greenhouse itself. The depth of the trench should be no more than 300-400 mm, when it is the strip foundation that is being set up.
- Leveled and rammed, a layer of gravel is covered at the bottom.
- The formwork must be installed on the surface.
- Thereafter concrete is being prepared.
The proportions can be used the same as in the first case. It is best to pour the concrete in one go. Otherwise, cracks may form on the surface of the material.
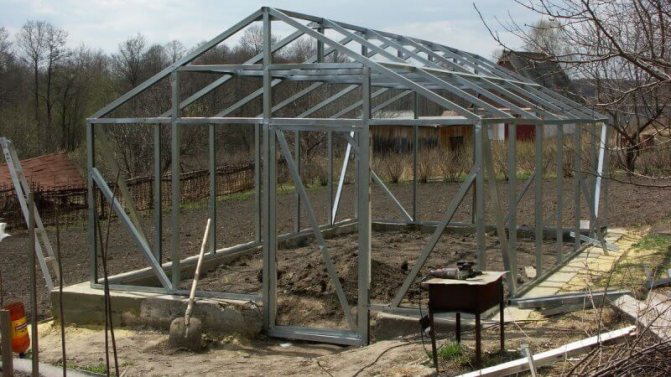
Assembling a polycarbonate greenhouse, instructions
It is necessary to adhere to the following work order to complete this stage.
- First, one frame structure is made. We just take the desired length, cutting off the profile part along it.
- The first frame is assembled with rivets or self-tapping screws. This will not be difficult for those who have already encountered GCR. It is worth carefully measuring what we got as a result.
- If everything is correct, then all prepared material is cut to the required size. Thus, we will have all the other parts ready.
- All parts for the frame are assembled into a single whole.
- Now that the individual elements are assembled into one structure, you can start assembling the whole frame.
GKL profile and service life
Many people believe that metal structures have insufficient lifespan.
This is motivated by the fact that the protective outer coating breaks its integrity when everything is drilled and cut. After that, as if moisture gets inside, which contributes to further complete destruction.
But this statement does not correspond to reality. After all, metal is specially designed for drilling and cutting. This does not affect the durability indicators in any way.
If polycarbonate sheets themselves are capable of serving 15 years or more, the metal will in no way be inferior to this material.
What about sheet mounts?
There are many technologies and solutions for securing polycarbonate sheets to the frame that we have assembled.
At the same time, again, buyers often think that polycarbonate sheets are not suitable for this due to the violation of the structure of the material. And moisture and other types of precipitation can get into the formed cracks. Including cold air, which harms not only the greenhouse itself, but also the plants.
But the whole point here is not in the fastening itself, but in the fact how to create the correct joints and seal them afterwards.
About the methods of fastening. In details.
For example, in one of the possible options, special overlays.
- The rubber strips are laid where the frame and the polycarbonate sheets are in contact with each other.
- The sheets themselves are then stacked on this rubber.
- Special metal overlays are placed on top, after polycarbonate. Self-tapping screws help to solve the problem of fastening.
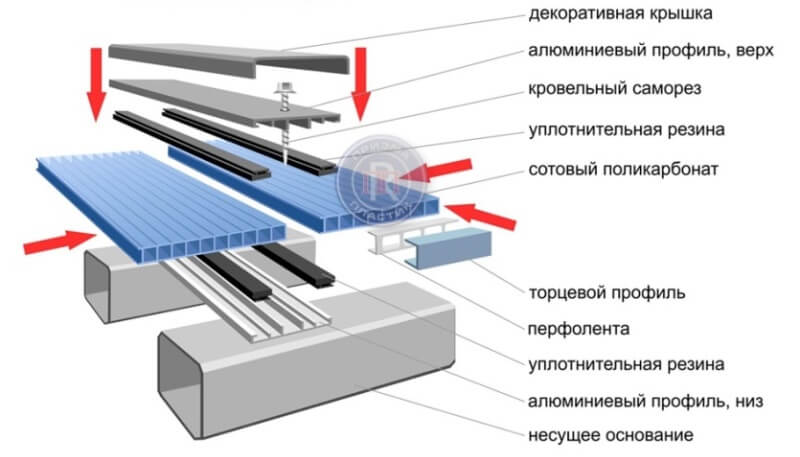
- Each of these self-tapping screws goes through a rubber gasket between two adjacent sheets.
- It is possible to use sealants to give the joints extra strength.
What other solutions are available now?
The second method applies H-shaped profile... It can be one-piece or detachable.
But it is better in this case, too, to use special rubber gaskets in order to achieve greater tightness.
Assembling a polycarbonate greenhouse. Video instruction:
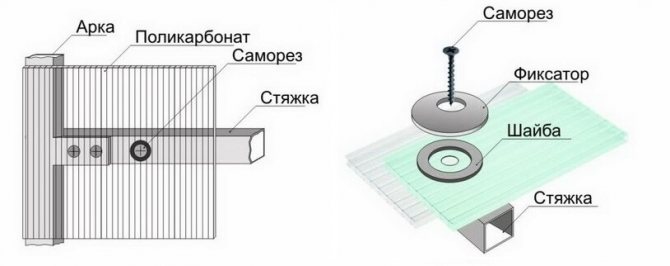
Fastening and installation. About some subtleties
Thermal washers it is worth using in a situation if it was necessary to attach a polycarbonate sheet with a through passage of a self-tapping screw.
Thanks to the thermal washer between the self-tapping screw and the polycarbonate sheet, the so-called cold bridge... And the connection will receive additional sealing.
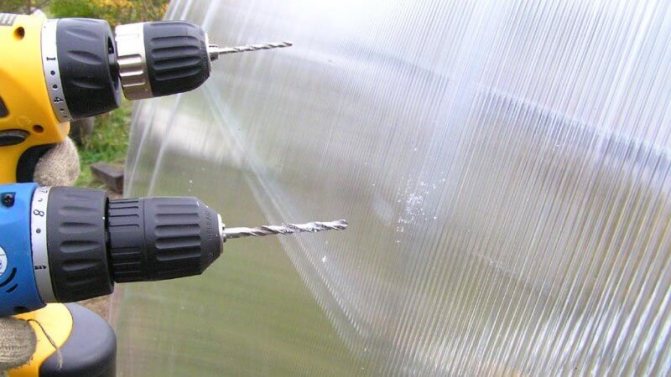
Inside the polycarbonate sheet, the size of the holes should be a couple of millimeters larger than those of the screws. This is necessary in order to compensate for possible expansion of the material under the influence of the environment.
In each case, the step of fastening for self-tapping screws is selected individually. But you should not do so that there are either too many or too few of them. Better to choose the middle option.
Pay attention to this material - DIY drip irrigation system.
Properties and characteristics of cellular polycarbonate
First of all, this material is famous for its practicality. Perhaps this is the most popular option specifically for the construction of all kinds of greenhouses and greenhouses.
- It retains heat well inside the building. Thus, minimal effort is required to maintain the desired microclimate.
- With direct contact with the leaves, the sun's rays can simply set them on fire. BUT polycarbonate ensures that the light is evenly distributed over the entire area. If the structure is used in the warm season, then it warms up evenly.
- Such structures can easily withstand any weather, even moisture in large quantities is not afraid of them and strong gusts of wind in this case will not cause damage.
- An excellent option for constantly maintaining the desired microclimate, which has only a positive effect on the growth of crops.
- Able to withstand a fairly strong drop in ambient temperature.
- Withstands serious loads, including in winter, which is especially important for our country.
Preparatory work
All preparation for construction is divided into several stages.
- Choosing a place. At this stage, they choose the most sunny and wind-protected place on the site. In this case, it is also advisable to focus on the geology of the soil. It is desirable that there were layers of soil with a high sand content under the greenhouse... This will provide drainage and reduce moisture levels inside the greenhouse.
At the cardinal points, the greenhouse is positioned so that the slopes are facing south and north. - Determining the type of greenhouse... With all the simplicity of working with cellular polycarbonate and galvanized profiles, the device of such a greenhouse will require at least several hours. Therefore, it makes sense to abandon portable or temporary options. A stationary greenhouse on a good foundation will be optimal.
If necessary, the selected materials allow you to do garden work even in winter. However, in this case, it will be necessary to attend to the presence of a heating system and to foresee the possibility of supplying the necessary communications in advance. - Preparation of the project and drawing... If the greenhouse will be erected seriously, for a long time and not from the remnants of old material, then the availability of design documentation will be highly desirable. Projects with a drawing will allow you to more accurately determine the volume of purchases of materials, as well as reduce the amount of waste. When drawing dimensions you need to focus on the typical dimensions of a polycarbonate sheet(210 × 600 mm).
- Selecting the type of foundation... A reliable foundation will extend the service life of the building several times. For greenhouses of the selected type, several types of bases can be used:
- columnar of asbestos-cement pipes buried in the ground with concrete filling;
- columnar brick or reinforced concrete blocks;
- tape. With a slight increase in labor costs, it is the strip foundations that make it possible to increase the quality of operation of a polycarbonate greenhouse on a frame made of a galvanized profile.
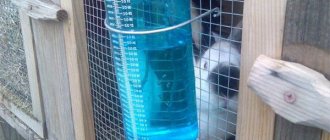
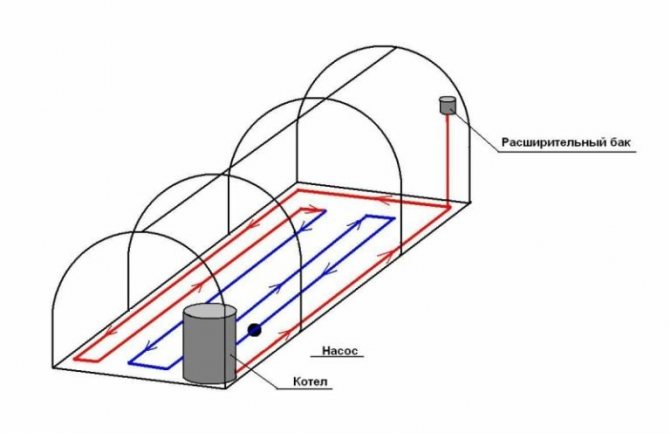
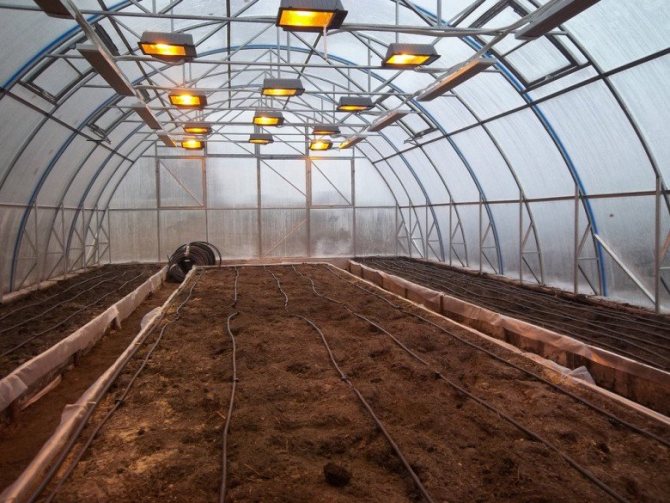
Do-it-yourself greenhouse heating
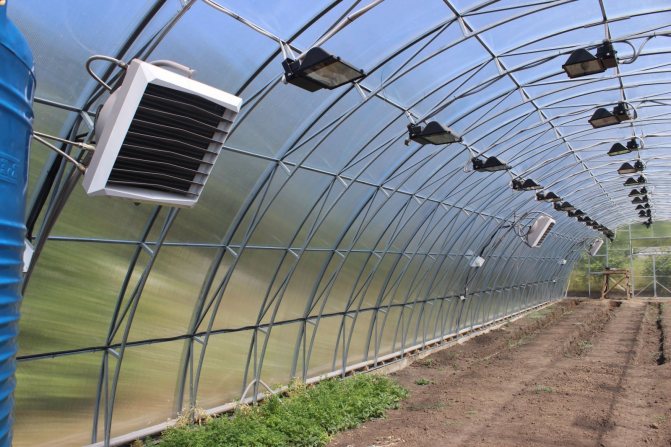
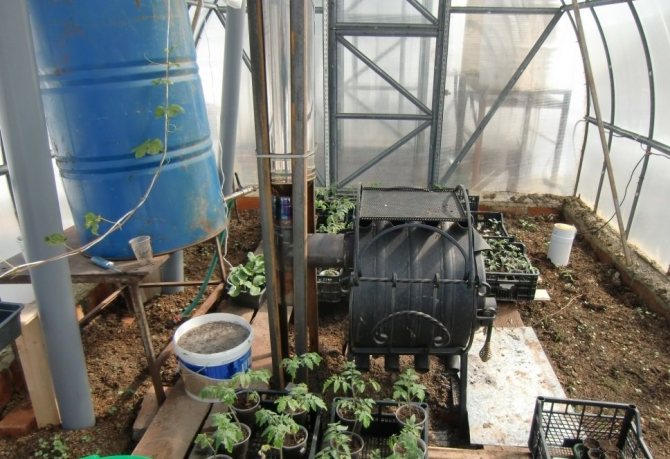
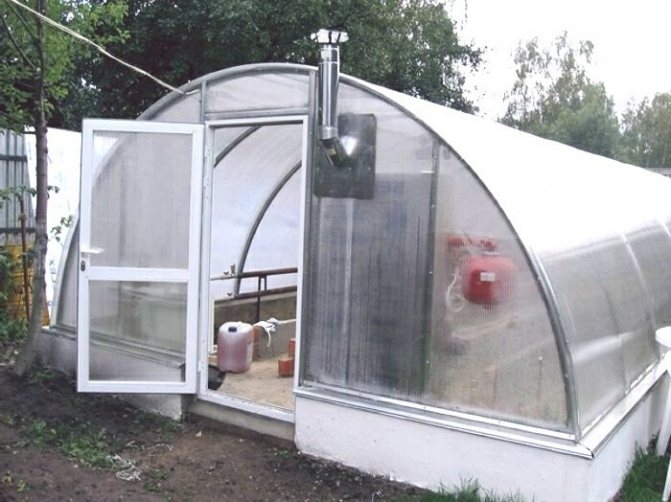
First of all, a do-it-yourself polycarbonate greenhouse is erected either with heating system, or without it. For growing crops in the winter season, the option with heating is most often chosen. Its role, in turn, can be played by gas or electrical equipment.
You will be interested in this article - Types of fences and barriers for home and summer cottages.
Heating of the greenhouse made of polycarbonate in winter. Video:
It is necessary to regularly ventilate the structure, regardless of whether artificial or natural light sources are used. Then the heated air masses will be more easily removed to the outside and condensation will not form on the surface of the materials. And its formation contributes to an increase in the level of humidity.
The advantages of a homemade greenhouse over a finished structure
Many materials are used to create a greenhouse, but some of them are too expensive, while others require skills and a special tool to work with them:
- Cellular polycarbonate is a versatile material that can be handled without difficulty.
- Thus, everyone can make a polycarbonate greenhouse with their own hands.
Note. An important advantage in favor of self-production is the ability to save money, since the purchase of all materials will cost less than a ready-made greenhouse from a store.
- Often, the site for its installation has a non-standard size, and it is impossible to find a finished product for such parameters.
Therefore, making a greenhouse with your own hands from polycarbonate is more preferable, because you can take into account all the requirements and bring them to life.
Good luck and a rich harvest!