What is the procedure, why is it carried out?

The procedure for tying raspberry bushes is one of the ways to care for this healing berry.
It is advisable to make a garter in order to:
- Protect raspberries from strong winds, snowfalls and rains that break bushes.
- Protect from pests, parasites and diseases.
- To increase the number of fruits and their quality, since when the garter is tied, the berries begin to evenly receive sunlight, which contributes to the early formation of fruits and their early ripening.
- You will reduce the time for harvesting, the tied raspberries are easier and faster to harvest, and you will also avoid injuries from thorns.
- Protect raspberry bushes up to two meters in height from debris.
- The fruits will be pollinated by bees much faster.
- Young shoots find themselves in the middle of tied up bushes, and this contributes to their unhindered growth.
When to conduct?
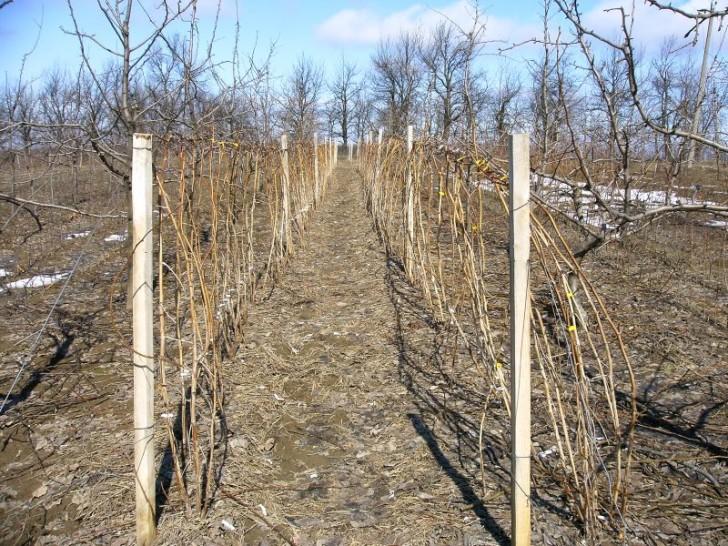
The procedure for tying raspberry bushes can be carried out in early spring after cutting off the shoots, during this period the budding does not yet begin or before the beginning of winter, after the end of the leaf fall process.
The reasons why you need to carry out the garter in the spring, we have already discussed above. In autumn, a garter is necessary to protect the shrub from the unfavorable weather conditions of a cold winter. If the raspberry bushes are properly positioned, which is facilitated by the garter, then the raspberry has a higher chance of surviving the harsh winter.
When tying in winter, the wire must be placed at a height of twenty centimeters from the ground in order to avoid freezing raspberry branches, which will go under the snow much faster. Do not tighten with a garter, it must be carried out at a time when the branches of the bushes are flexible. If the branches become stiff, they will become brittle, and you will simply damage them in the process of tying.
Why is it necessary to tie up raspberries
Obtaining a high yield of raspberry bushes is possible only if the peculiarities of planting care are observed. Tying the bushes is a must-have care process for excellent results. Failure to do this will result in seasonal picking of small sized and tasteless berries. Therefore, before tying up raspberries, you should familiarize yourself with the technical features of the correct conduct of this garden event.
In some cases, it is not necessary to carry out a raspberry garter in order to achieve a bountiful harvest. For a number of varieties, the garter is not an obligatory gardening event. However, most of the varietal varieties of yellow and common raspberries must be tied up.
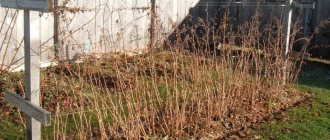
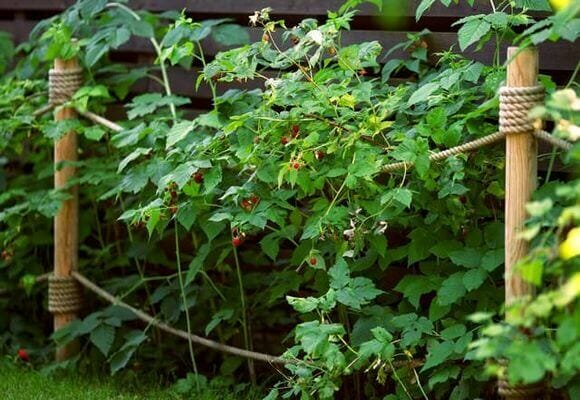
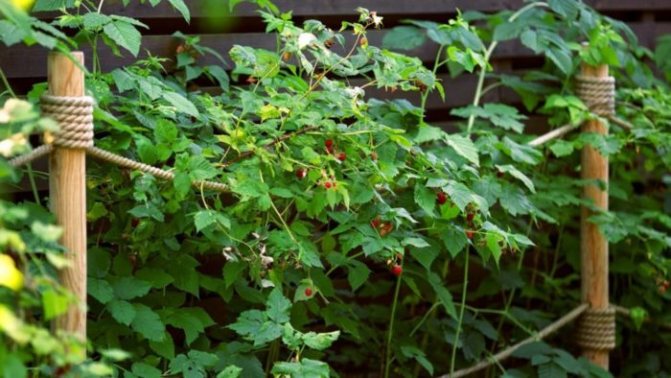
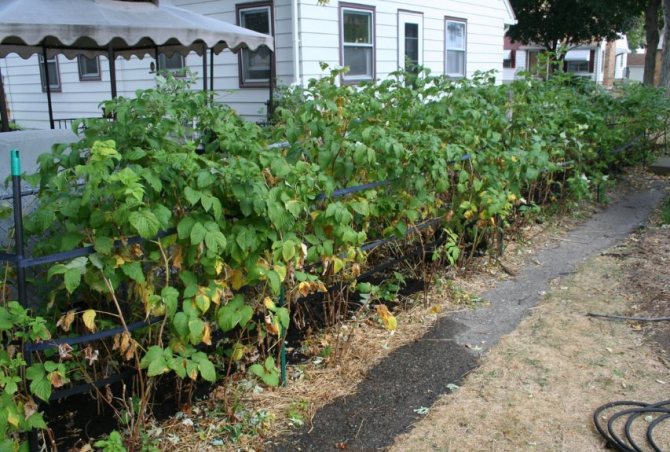
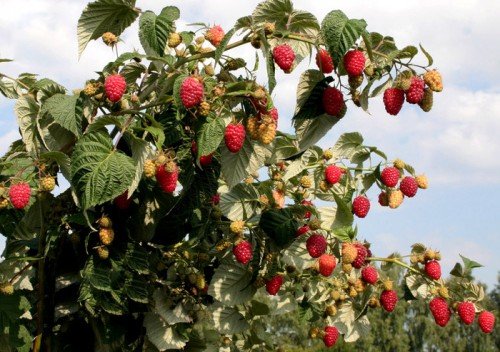
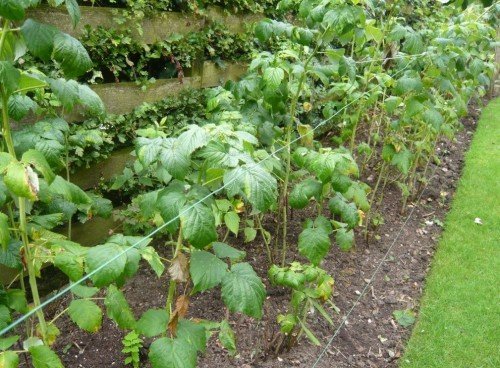
Raspberries on a trellis
This is due to the fragility and flexibility of their shoots, which break under a number of conditions:
- gusty wind of great strength;
- prolonged rainfall;
- abundant fruiting;
- too tall bush.
Important! If you tie up raspberry bushes, the harvesting procedure at the end of summer becomes easier - thorny and sprouting shoots in different directions are arranged in an orderly manner.
However, the primary reason for tying raspberry bushes is to increase the yield, since abundant lighting is needed to make the fruits sweet and large.
Note. Carrying out the raspberry garter in the spring is carried out before the budding on the shoots begins.Tying the bushes at the end of the autumn season is carried out to ensure the safety of the plant in the conditions of the arrival of winter.
As a plant, the raspberry bush is considered an unpretentious garden plant. But, if you do not carry out the necessary care measures, which include tying, the bush planting will overgrow with young shoots and run wild.
The advantages of the raspberry garter process are:
- protection against lesions by fungal diseases;
- prevention of the appearance of insects;
- improving germination conditions for central shoots;
Important! Landings that are in the thick, when planting dense rows, are subject to rapid withering away.
- a ripe crop from large berries does not contribute to the breakdown of the bush;
- unfavorable weather conditions do not affect the safety of the stems;
- tying and ripening of raspberries occurs rather quickly;
- uniform ripening of fruits;
- facilitating the harvesting process.
Interesting. Compliance with all the conditions for the correct raspberry garter will help to achieve excellent yielding results.
Garter methods
There is more than one way to tie raspberry bushes. Let's consider the most popular and more effective ones.
Among the methods of garter raspberries are known:
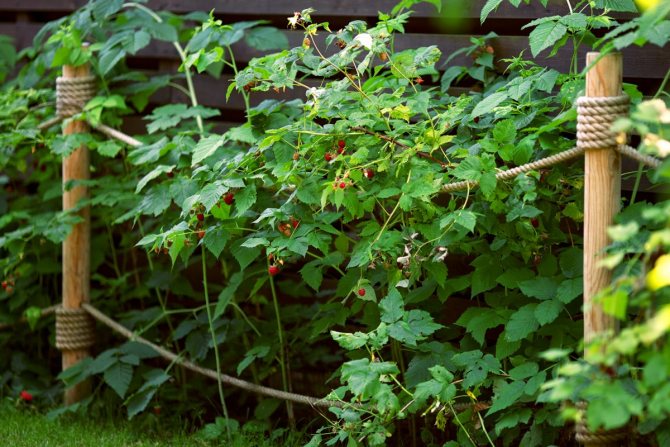
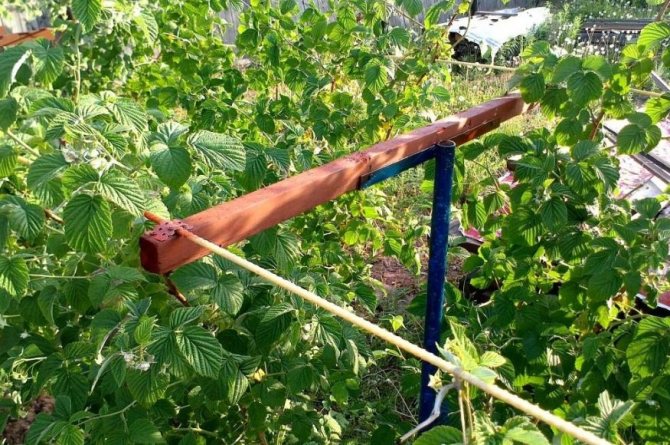
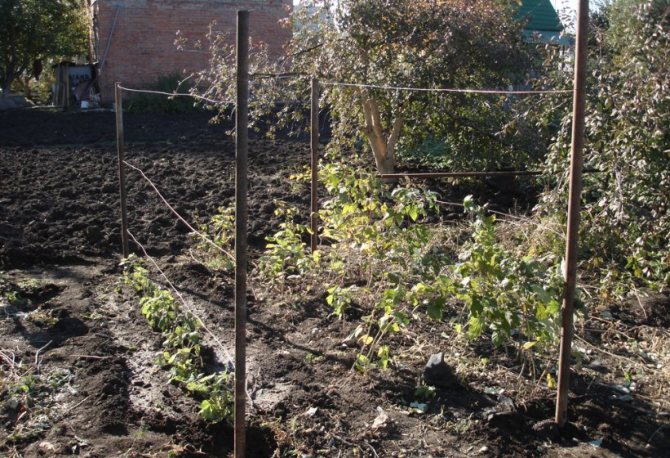
Column or beam method
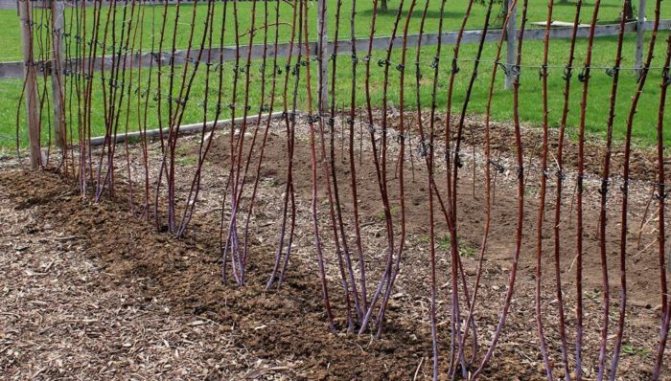
A high stake or rail about two meters high (should be 40-50 cm higher than the stems) must be driven in the center of the bush, then a small bunch of six to seven raspberry stems should be collected around the stake at a height of one and a half meters. We tie the upper part and the central part of the collected stems to a rail or stake, set the top of the raspberry bush to the side in an arc-like manner and also fix it. Instead of stakes, you can use metal pipes or reinforced concrete poles.
The disadvantages of this method are: slow development of ovaries inside a tied bush, raspberry bushes can still be prone to breaking off in unfavorable weather, there is a high probability of pest attacks and fungal diseases due to inadequate ventilation, sunlight is unevenly distributed between raspberry sprouts.
The plus is that this method is very easy, does not require extra effort, is economical, does not take much time and is easy to understand even for an inexperienced gardener.
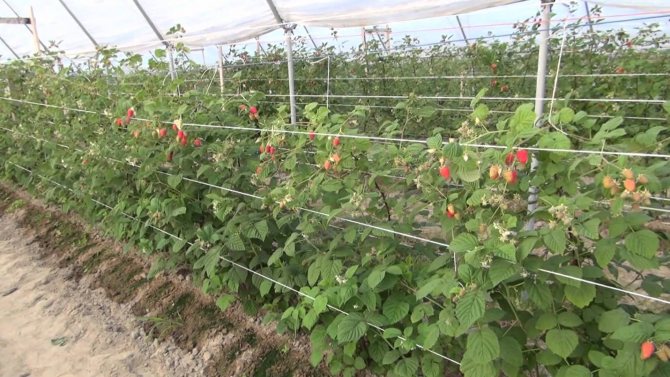
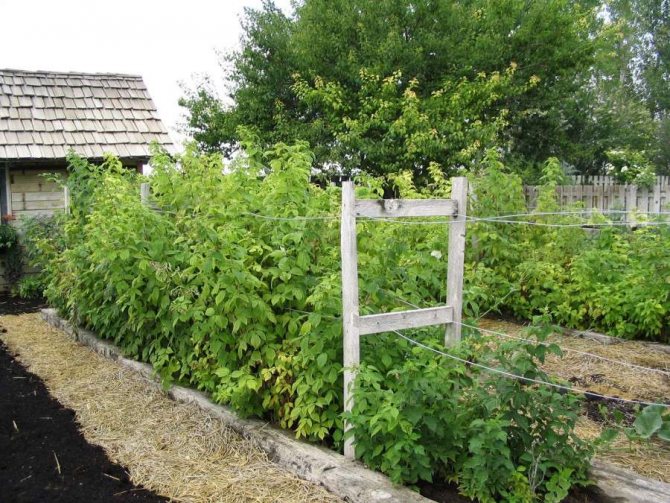
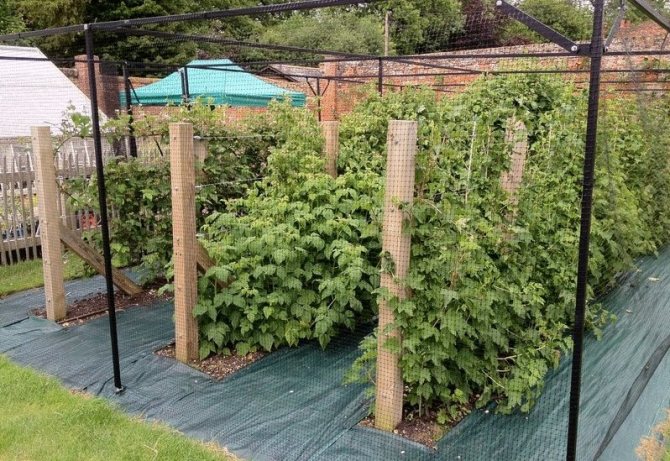
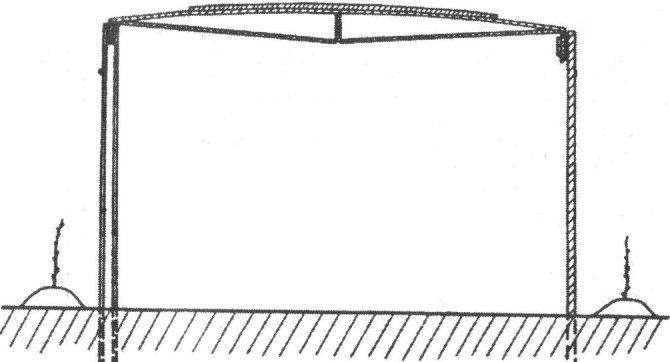
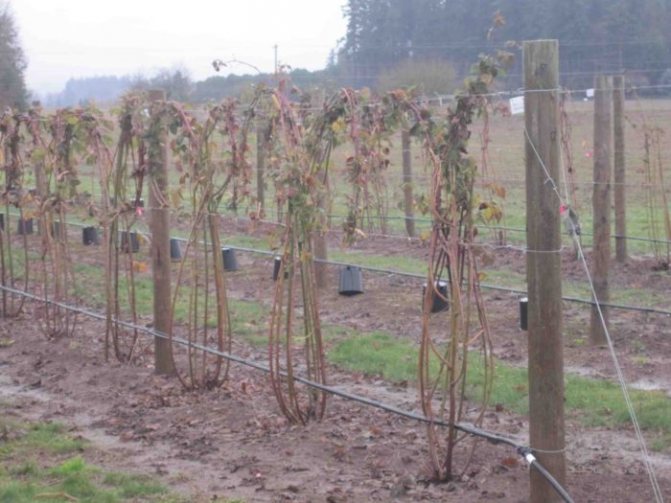
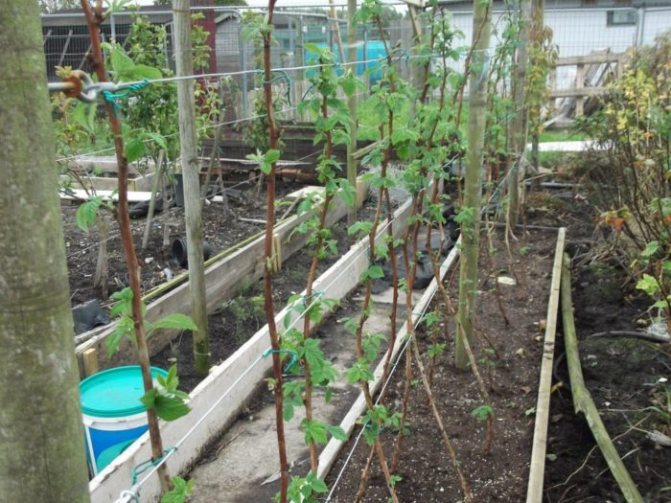
With a trellis
Tying with a trellis is the best method because it can be used in all cases. Any structures are used as a support.
The tapestry garter can differ in different tying options, below we will consider each of the options:
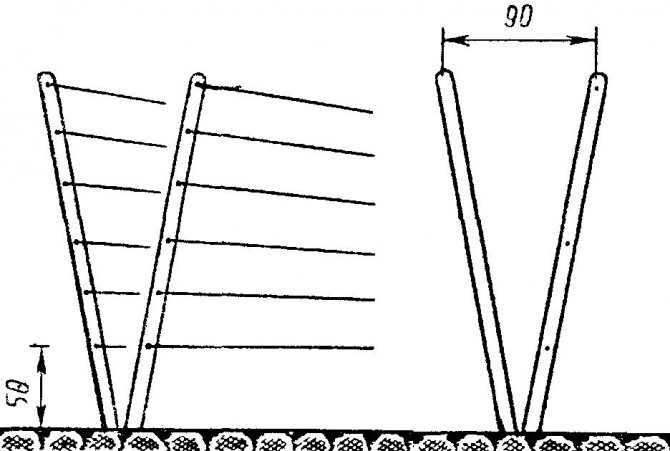
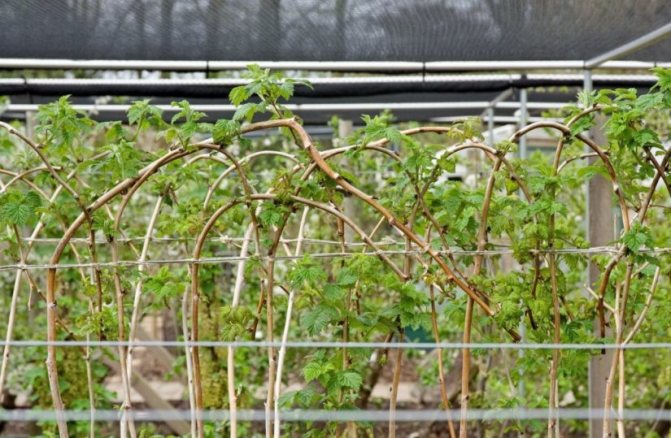
- Double garter or pistol. Take two slats of wood two meters high, set them four meters at a distance from one another. Then we stretch the plastic wires between the slats parallel to each other. The lower wire will be one meter above the ground, the top plastic wire one and a half meters from the ground. Then the sprouts are tied up in two places and spread on the sides, strengthening them half a meter apart. The advantages of this method are that the yield will increase, since there will be more young branches; enough sunlight will be available to each branch. The downside is the severity of the harvest, you will have to use gloves when harvesting, and the fact that the branches can break off.
- Scandinavian way practically no different from a pistol. The only difference is in the height at which the plastic wire is tied. In this method, it will be two meters instead of one and a half for the upper wire, the lower one remains at a meter height. The branches should not be tied up, they are wrapped around the wire in such a way that the English letter V is obtained. Advantages of this method: good ventilation of the branches, easy access to fruits, that is, easy harvesting and unhindered growth of new branches, it is easy to notice diseases or other lesions of raspberry bushes ...Minus in possible defects affecting the shrub.
- The single method works well for small berry orchards. How is a single garter made with a trellis? We take two pillars with supports higher than two meters and set them at the edges three to four meters apart into the soil up to 50 cm deep. Then we continue to install others. After all the pillars with supports are driven into the ground, it will be necessary to stretch the plastic or steel wires in two or three rows, arranging a horizontal structure. Tie each fruiting shoot separately to a steel wire, make sure that the tops do not rise more than twenty centimeters above the wire. If it is above twenty centimeters, then you will have to bend and re-tie. The advantage of this method is that with such a tie, the bushes will be perfectly protected from wind flows. Minus - there is a high probability of breaking off young branches. To avoid breaking off, you should tie the berry to a plastic wire, but to the bottom row.
- Movable turnstile - a method that allows you to change the position at different periods of the growing season of raspberries from horizontal to vertical and vice versa, and you can also change the slope of the bars (transverse) by one hundred and twenty degrees. Shoots are fixed on supports. The advantage is that for the winter you can not remove the shoots from the trellis and tie them up in the spring, facilitating harvesting, because the berries remain on one side when the trellis is tilted to the west. Minus the complexity of the design on the hinges.
Read also How to replace vinegar essence 9 with vinegar
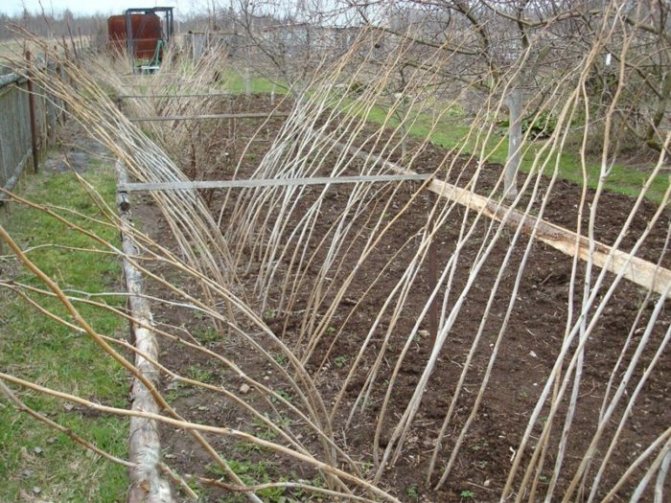
Fan garter
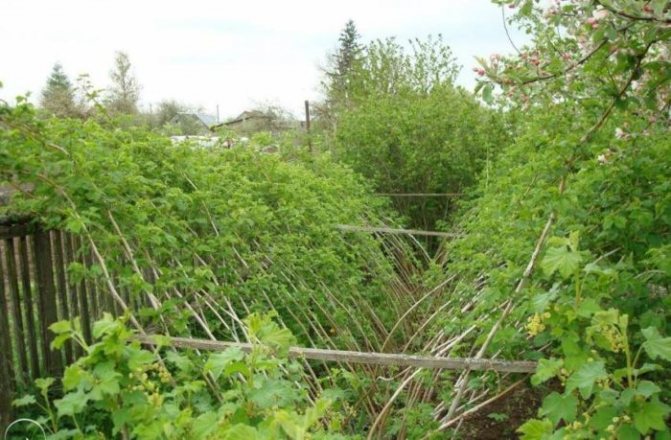
Fan garter is carried out as follows. Between the raspberry bushes, about two-meter stakes or slats are driven in, then the bush is divided into two parts and each of the parts is tied to a separate rail, that is, one part is tied to the rail on the left, the second part to the right rail or post. Raspberry bushes should be like a fan.
The fan-shaped method is considered the most effective, but difficult. The plant will be evenly lit, which is a plus. Other advantages - fruiting branches do not interfere with the growth of other sprouts, low susceptibility of branches to breaking off, good air circulation and ease of harvesting.
The downside is that this method is not suitable for large gardens, the garter will take you a lot of time.


Features of the raspberry garter in spring and autumn
It is best to carry out the procedure for tying raspberry bushes in the spring. It stimulates various beneficial processes required for the fruit. There are the following advantages raspberry's garter spring months:
- The event helps to protect against fungal diseases and various pests hiding in unlit foliage.
- Close placement and density contribute to the shredding of young shoots and their faster withering away.
- Shoots do not break under adverse weather conditions or under the weight of a formed load.
- The fruits are pollinated faster by bees, which provokes faster ripening and the same size of each of the berries.
- Harvesting is faster and without injury to both humans and shoots.
In the fall, raspberries also need to be tied up, but for a different reason. The peculiarities of the formation of the correct arrangement of the bushes in the months after fruiting increase the chances of surviving in the cold winter. Such a process prepares raspberries for winter and subzero temperatures.
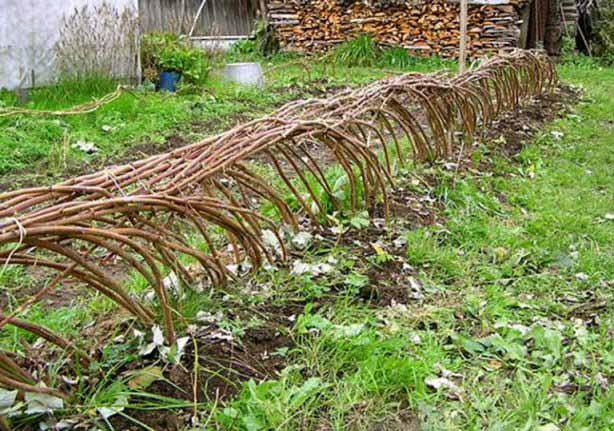
As a rule, the essence of the autumn raspberry garter boils down to the fact that for this you need to pull a wire between the raspberry bushes at a height of 20-25 cm. Before the first frost, all branches should be bent to the strengthening and tied. So the plant will not freeze, covered with a snow cover. Thus, the garter is carried out in an arched manner, with nylon threads or strong synthetic fabric that is not capable of rotting ahead of time.
Important! But it is not necessary to use the fan (arc) method of garter for the winter, you can tie up the raspberry bushes in any other way you like. But this garter in this way is best suited for further sheltering the bushes, which is a must if you have harsh winters.
Video: how to tie up raspberries for the winter
Attention! The procedure for bending to the ground should be started in time. If this process is delayed until the onset of the first frost, then the plant will lose its flexibility, become brittle and, under any influence, may break.
Thus, the garter of the raspberry tree at certain periods is important and necessary in its own way. Therefore, it is recommended not to neglect either the autumn or spring garter.
When is it not required?
A raspberry garter is of course a must, but you can avoid this procedure. For this variety, raspberry bushes must be distinguished by upright thick stems. The branches of the following raspberry varieties do not break off under the weight of raspberries: White Spirina, Modest, Bulgarian Ruby, Balsam, Coral.
In the first year, raspberries should grow freely, only then at the end of the season a hedge will turn out from the raspberry stalks. During the second year, shoots are cut out beyond 70 cm in width.
The next step is to cut through the bushes, leaving 20cm between the stems. Also, you do not need to tie up black raspberry bushes to the supports, because the shoots of this raspberry do not lie down. For black raspberries, the main thing is the correct formation of young bushes.
However, if you do not tie up raspberries, then often you will have to face the following problems: raspberries will be susceptible to fungus, pest attacks, diseases; fruiting shoots will begin to die off due to the density of raspberries, which grow in the middle. In this regard, it is better not to neglect the garter of raspberry bushes.
Height measurement and other calculations
The universal height for trellises is considered to be two meters; it is suitable for any variety. When installing trellis supports, it is necessary to give them a stable position, which is ensured by the additional height of the trellis, which is approximately 80 centimeters, dug into the ground.
The average distance between the supporting elements of the trellis structure is two meters, however, the exact calculation when drawing up the drawing is carried out based on:
- indicators of durability, altitude characteristics, the size of the diameter of the building materials used;
- the length of the rows;
- method of fastening bush plantings;
- the degree of tension of the ropes.
The raspberry garter is carried out by fastening at two points using one of the existing methods, which is selected based on the agronomic indicators of the variety. For tall varieties, the garter of the first row of shoots is carried out at the level of a meter, the next one - 1.5 meters higher. The first row of medium-sized varieties is tied at a height of half a meter, the second - at a level of 1.3 meters.
The list of building materials used for the construction of the rack of trellis supports:
- wood beams and bar-shaped fragments;
- cut pipes;
- fittings.
What errors can occur when landing?
Mistakes when planting raspberries can be as follows:
- young raspberry bushes must be planted instead of old ones;
- in young plants, the aerial part may be slightly cut off;
- deep landing;
- improper nutrition;
- choosing an unsuccessful landing site.
Raspberry garter is a difficult and painstaking task. This requires time and imagination. But on the other hand, the benefits from this process are colossal. Thanks to the garter, the fruits ripen more intensively and regularly. Bushes are much less deformed, branches do not break off. After the garter, the berries are better preserved, and in addition, raspberries are protected from powdery mildew and rot. And the greatest achievement at the same time is the convenience of harvesting.
The need for a garter
Some varieties of raspberries can do without a garter. Most of the high-yielding varieties bear fruit much better and are less susceptible to diseases only thanks to the tied bushes.
Why is a garter made in the practice of cultivating raspberries:
- After her, young shoots are located inside the bush. This greatly facilitates their unhindered growth and development.
- Each flower is much more efficiently pollinated by wind and bees.
- This is an effective protection of two-meter bushes from damage and deformation.
- Time for harvesting is significantly saved. Since it is more convenient to remove berries from tied branches, and injuries from thorns are minimal.
- The volume of fruits after the garter increases significantly, since the shoots receive more sunlight and are more evenly illuminated. Berries form earlier and ripen faster.
- Bushes are less susceptible to attack by pests and diseases.
- Raspberries are protected from strong winds, rain, snow, which can break the bushes.
Environmental conditions affecting the fragility and flexibility of raspberry shoots, and contributing to their injury and damage:
- significantly overestimated height of raspberry bushes;
- unexpectedly bountiful harvest of berries;
- heavy rains over a long period;
- strong gusts of wind.
When do raspberry bushes do not require a garter
Not all varieties of culture need tying up. Varieties with strong, thick, relatively short shoots do not need a garter, they are quite stable without it. They are grown in solid mass on beds 0.5-0.6 m wide and only thin out the excess shoots, leaving the necessary ones at a distance of about 0.2 m from each other (density - up to 20 pcs. Per square meter).
There are varieties of this berry that do not require such a procedure as the correct garter of raspberries. But at the same time, it is worth emphasizing that only erect varieties, whose pagons are thick and do not grow above 1.5 meters, can do without this manipulation. This group includes the following varieties:
- raspberry Ruby;
- Coral variety;
- Modest;
- Spirina is white;
- Bulgarian.
To grow such varieties without a garter, it is necessary to comply with some requirements for the correct formation of the raspberry tree, otherwise the gardener will fail. For these purposes, you will need to observe the following rules:
- in the first year of growing raspberry seedlings, all the new shoots that have appeared do not touch, but make it possible to grow and form a continuous strip up to 60 cm wide;
- for the next season, all shoots that grow wider than 60 cm are completely excised and in parallel they are thinning inside the shrubs in order to exclude strong thickening;
- thus, they do it annually to prevent the wild raspberry tree that is not tied up.
This method of growing raspberries is very effective, provided that one of the above varieties grows in the front garden.
The thing is that if you allow the thickening of the bush out of inexperience, then such an oversight will lead to the appearance of defects and parasites on the plant, which is fraught with the further death of the raspberry tree.
Raspberry is an unpretentious culture, the fruits of which have a pleasant taste and antipyretic properties. The jam from this berry turns out to be very tasty and aromatic. A dense raspberry tree looks beautiful in any area. You can plant raspberries in spring or autumn. Growing raspberries in the country is not as complicated as it seems.
It is necessary to carefully choose a place for planting raspberry bushes.
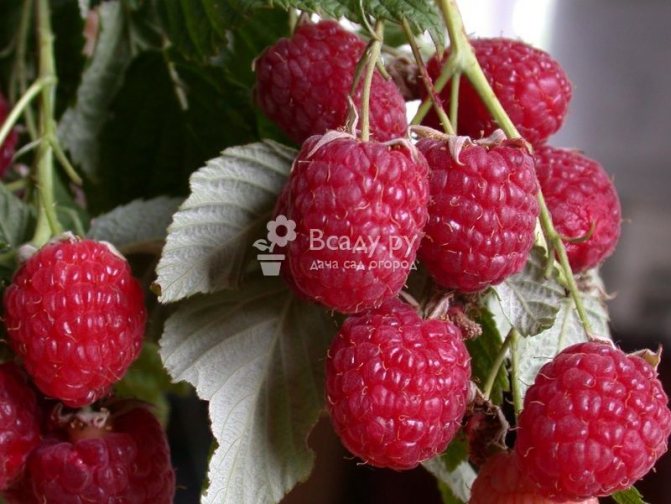
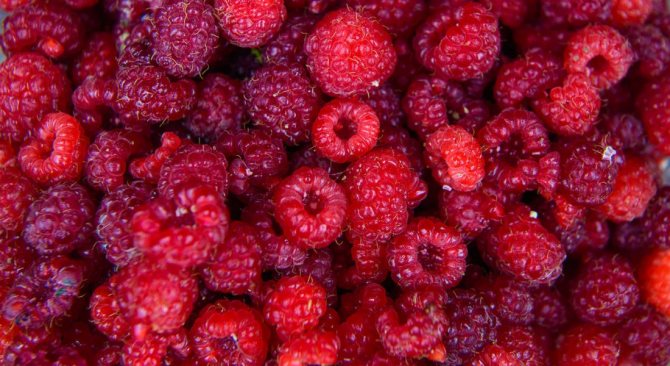
Raspberries belong to the Pink family. Usually it is an upright shrub with small thorns. The plant has a small flower. Fruits come in a variety of shades, from light pink to almost black (in the case of blackberry raspberries). There is a yellow raspberry.
The branches on which the fruits will grow appear in the second year of the plant's life.In the southern regions of Russia, fruits can appear already in the first year of planting raspberries. Currently, breeders have developed remontant varieties of raspberries that are capable of producing crops at lower ambient temperatures.
Raspberries should be planted on neutral or slightly acidic soils. It is better to find a place for shrubs that is sunny, protected from strong winds, with good snow cover in the winter season. You also need to make sure that raspberry precursors are not plants prone to the same diseases, for example, tomatoes, strawberries, potatoes.
You can plant raspberries in spring and autumn, the soil should be neutral or slightly acidic
The optimal planting time for raspberries is spring and autumn; green cuttings are planted in summer. It is necessary to prepare the soil for planting in advance, in the case of autumn planting - a month in advance. In spring, this can be done immediately 2-3 weeks before placing the plant in the ground.
Before planting, the future raspberry tree must be protected with slate, dug in to a depth of about 35-40 cm. This must be done so that the raspberry root system does not spread to other beds and areas. The distance from the raspberry bush to the fence should be at least 1 m.There are several ways to grow a plant:
- separate bushes - about 10 branches are left on the bush and planted in separate holes;
- trellis or tape method - plants are planted in one row in trenches.
For planting with separate bushes, it is necessary to make pits approximately 40 x50 cm in size.In each hole, you need to pour the planting mixture with a small mound. Before planting, it is recommended to moisten the roots of the plant in mullein nutrient solution or a special solution of the planting mixture. Then they lower the raspberries into the hole and sprinkle the roots of the plant with a fertile layer of earth.
Raspberries can be grown as separate shrubs or tied to a trellis
It is necessary that the distance between the bushes is about 1 m, and between the rows - about 2 m. The neck of the root should protrude several centimeters above the soil so that after complete shrinkage of the soil and watering, it will be at ground level. It is impossible to lower the roots of the plant too deeply, as this can lead to decay of the basal bud. A high seating position is also undesirable for raspberries.
In the case of trenching bushes, it is necessary to dig a groove about 45 cm deep and about 50 cm wide. The number of trenches depends on the number of intended rows of raspberries. The optimum row spacing is about 1 m, and the plant spacing is about 40 cm.
We suggest that you familiarize yourself with: How to get rid of flying ants in the garden
You need to fill the trench with a nutritious planting mixture. It includes:
- rotted manure or compost;
- fertile topsoil;
- mineral fertilizers - double superphosphate is best.
When planting in dug trenches, it is necessary to add a nutritious planting mixture
All components are added to the trench in layers, or a mixture is made by mixing the components.
After planting, the seedlings must be watered, and then the soil must be mulched with humus, peat or ordinary dry soil. If the soil is perfectly moistened with atmospheric precipitation, then additional watering is not required. Provided that the buds of the plant are well developed, they need to be cut off, leaving 30 cm.
Water the raspberries well, but in moderation, so as not to flood the roots. The plant especially needs sufficient saturation with liquid in the spring and summer.
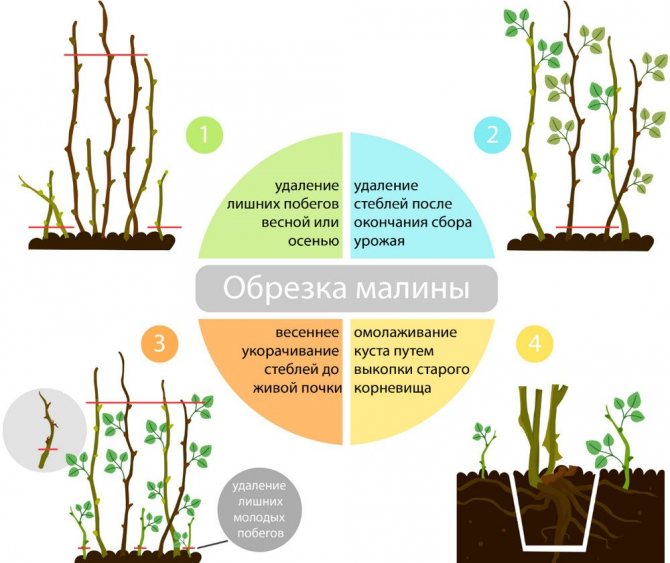
Raspberry stalks must be pruned annually after harvest or in spring
Pruning for raspberries is needed to shorten the fruiting shoots and remove too dense and unnecessary growth at the roots. Usually, in the spring after planting, the fruiting branches are pruned by about 20 cm. From the second year of life, the stems of the plant are shortened annually after harvest or in spring. After the winter period, the branches are pruned by about 10 cm to a strong bud.
In order not to often dig up the soil, the aisle can be mulched - covered with straw or peat. To prevent frost damage to raspberries, many varieties need to be bent down. To do this, you need to tilt the bushes to each other and tie them.
So that the bushes do not break under the weight of the fruit, they need to be tied up. The fan-shaped method is most often used. In this case, you will need to drive two sticks between the bushes - and already raspberries are tied to them at different heights: part of the shoots of one bush and part of the stems of the neighboring one. The result is a kind of fan.
To prevent raspberry bushes from breaking, it is recommended to tie them up
In the case of a trench landing method, the best option would be to use a trellis garter. You will learn more about how to make a raspberry trellis later in this article.
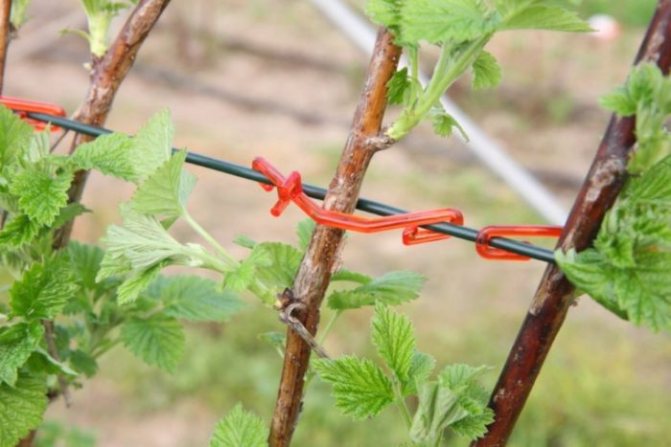
Materials used in the garter
The best materials for tying raspberry plantations have always been:
- nylon tapes or threads;
- wooden slats 2 m long;
- prefabricated concrete pipes;
- metal posts;
- stakes made of wood or plastic;
- steel bars;
- skeins of twine;
- synthetic fabric stripes;
- plastic-braided wire;
- twine made of harsh threads.
There are many more different products suitable for knitting. With the proper ingenuity, you can come up with many ways to attach branches to various props. In this case, it is important that the means used do not injure the skin and the branches of the plant themselves.
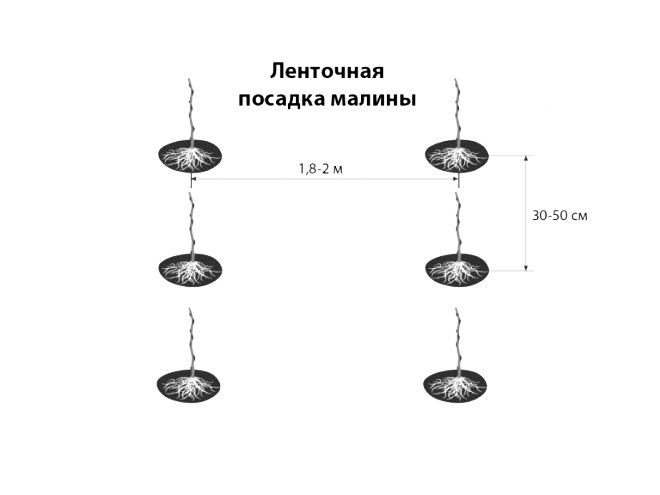
Scheme of planting raspberries on a trellis
The location of plants on the site plays a huge role. Convenient trellis for raspberries allow you to simplify the care of the berry, but require the placement of bushes strictly within the width of the row. With this method of cultivation, a tape planting method is used:
- After breaking the site, a 40x40 cm or 50x40 cm trench is dug.
- Organic and mineral fertilizers are introduced.
- We maintain a distance of 45-60 cm between the bushes.
- We leave the row spacing at least 1.5-2 m.
- The roots in the trench are vertical.
- After backfilling, the pits are watered and the soil is tamped.
Easy and quick ways for beginners
High productivity of a raspberry bush is observed only when it is tied up correctly and in a timely manner. After all, the skill of a gardener is not only about acquiring a high-yielding variety. Without observing the technological processes of cultivation, the bushes, no matter how productive they were before, will quickly wither away, the berries are crushed, and the yield will significantly decrease.
There are 3 methods of tying raspberry bushes that have been known for many decades. All of them have proven their viability by increasing the yield of this berry crop. You can choose any of the presented methods, it is only necessary to observe safety, avoiding damage to the raspberry branches.
Garter methods:
- beam or stab method;
- tapestry method;
- fan garter.
From time immemorial, all gardeners who successfully grow raspberries have been using these methods. The method is chosen based on the availability of materials and a creative approach to the shrub. An equally important role is played by external climatic and weather factors prevailing in a given area. All these methods have proved to be quite effective in practice. Combinations of all three methods are often used.
Fan tying
A fairly simple and extremely effective method. Between the raspberry bushes, wooden slats or stakes 2 m long are vertically hammered into the ground. The bushes are divided into two parts, one half is tied to the left column, and the second to the right.
When the entire technological process is completed, the raspberry tree becomes like a large fan. Among all methods, this is considered by gardeners to be the most difficult and at the same time the most effective. Since the raspberry bushes are evenly illuminated by the sun's rays, this is a great advantage.
Trellis garter
Tying raspberries to trellises has established itself worldwide as the most versatile method of care. It is used by agronomists all over the world, using a variety of tools and materials.
In turn, several variations of this method are practiced.
Double garter or pistol
Take a pair of wooden slats 2 m long. Drive them into the ground at intervals of 4 m. Using a soft wire, stretch two parallel stretch lines between them - at the bottom 1 m, and at the top 1.5 m from the ground. Tie up the crimson branches at two points evenly between the posts, spread apart. Then fasten it from each other at a distance of 0.5 m.
Benefits:
- there will be much more young shoots, this will increase the yield;
- each branch will receive enough sunlight.
Read also Ficus with a thick trunk
Minuses:
- more difficult to harvest;
- it is necessary to use gloves;
- breaking off branches is not excluded.
Scandinavian method
Structurally, it is very similar to a pistol, but differs in the height of the garter. The upper stretch instead of 1.5 m is located at a distance of 2 m from the ground. Below - at a height of 1 m from the ground. Crimson branches are wound on a stretched wire with the English letter V.
Pros:
- the sprouts receive excellent ventilation;
- when harvesting, the fruits are easily accessible;
- ease of examination for the detection of diseases and damage to germs.
Minuses:
- Damage and defects of branches are possible.
Single method for small gardens
Take 2 posts with supports, 2 m each. Place them at intervals of 3-4 m along the edges of the plantation. Bury to a depth of 0.5 m. Install the rest of the posts in the same way. Tighten 2-3 rows of plastic or steel wire on them. The structure must be horizontal.
Tie the shoots on which there is an ovary separately. The edges of the branches should not be more than 20 cm higher than the level of the upper wire. If they are higher, then they must be tied up lower.
Benefits: excellent barrier against gusts of wind.
Minus: young shoots with this method often break. To prevent this, you need to tie the branches at the bottom to a plastic wire.
Movable turnstile
This method allows you to change the coordination of branches at different stages of their growing season from vertical to horizontal and vice versa. Additionally, the slope of the cross bars is changed by 120 °. Shoots are attached to supports.
Benefits:
- with the onset of the winter period, you can not remove the branches from the trellises, tying them up again in the spring;
- since the berries only remain on one side of the trellis when leaning towards the west, harvesting is greatly facilitated.
Disadvantage: the complexity of the hinged design of the trellis.
Beam or stake method
Benefits:
- extreme ease of processing;
- availability for understanding even for a novice gardener;
- no unnecessary work;
- cost-effectiveness of the method;
- the process does not take long.
Disadvantages:
- slow development of the ovary inside a tied raspberry bush;
- under adverse weather conditions, shoots can break off;
- inadequate ventilation leads to pest attacks, the occurrence of fungal diseases;
- uneven distribution of light flux between the shoots.
Is it necessary to tie up raspberries
Not all gardeners carry out a spring garter of raspberry bushes. This is due to the fact that there are special varieties that do not need to tie up bush plantings to the trellis structure.
Growing raspberries without fixing them to a trellis is allowed, provided that the erect stems are strong and strong enough. Such varietal raspberries can be either red or yellow. The height of shoots on bush plantings of such varieties does not exceed the 1.8-meter mark.Even with an abundance of large-sized crops, varietal plantings do not fall to the surface of the earth due to the pressure created.
However, the bushes of this group of varieties are formed using a special technology:
- Replacement stems are not cut off after the first year of germination. The vegetative period ends with the formation of a wide strip of stems with green shoots;
- With the onset of spring, shoots whose germination point has gone beyond the ridge are removed;
- Landings planted within the ridge are thinned out. A twenty centimeter distance is maintained between the preserved stems. Usually, about twenty shoots remain within a square area.
Despite the absence of a garter, the yielding productivity of raspberry plantings remains at a high level. However, it is recommended that novice gardeners still carry out garter measures for several years before gaining experience.
Maturation in greenhouse conditions
There are several ways to carry out a garter of raspberry bushes on a trellis fence. To choose the right technique, how to tie raspberry bushes, will help the presence of certain knowledge about the varieties grown on the site, as well as the territorial conditions of the raspberry tree. Knowing how to tie raspberry plantations, you can significantly increase the quantitative indicator of yield. To build any of the presented trellises, only basic knowledge from drawing lessons and pre-prepared building materials are needed.
The raspberry garter is very important when caring for the bush, it is necessary for better fruiting, protection from diseases, breaking off and to avoid other difficulties that may arise when owning a raspberry garden.
There are three main methods for tying raspberries (stake, fan, trellis), in this article we consider each of them step by step and discuss in detail the pros and cons of all methods.
How to tie up raspberries soundly, correctly, beautifully?
In order to correctly carry out the garter, you should study all the norms of agricultural technology and the growing season of raspberry bushes. The procedure is best done in early spring after cutting off excess shoots. Since during this period the buds have not yet begun to bloom. The second possible period of the garter is before the onset of winter, when the process of leaf fall ends.
In late autumn, the garter helps to maximize the protection of the shrub from adverse weather conditions in severe winters. With a successful garter, the bushes will be correctly collected. That will significantly increase the chances of raspberries to survive during the cold season.
Pre-winter tying involves placing the wire at a height of 20 cm from the ground. This will prevent the branches from freezing. They will find themselves much faster under a thick snow cover, which preserves all living things from severe frosts.
How to stop the snow
If your raspberry grows in open areas that are very windy in winter, you need to take care of protecting the snow cover. To do this, you need to use sheets of plywood or polycarbonate, which can be tied to existing trellises, having previously dug into the ground. These barriers are installed on the windward side where the greatest amount of winds blows. How to determine this? It is enough to look at the website of the meteorological regional service and look at the wind rose in your area. Polycarbonate, by the way, is a more practical material than plywood, because it is not afraid of frost, does not rot and allows itself to be used for many seasons.
Residents of those regions where the winter is with little snow or is so windy that it leaves the bushes without snow even when protected, the use of additional covering material such as spunbond can be recommended. This material covers bushes that are bent to the ground, being collected in several layers.First, the branches are tightly tied to the wire, and then the covering material is spread on top and fixed in various ways. You can press it to the ground, you can dig it in from both ends, in general, as it is more convenient. Alternatively, you can use curved sheets of polycarbonate, which will serve as good protection for crimson lashes.
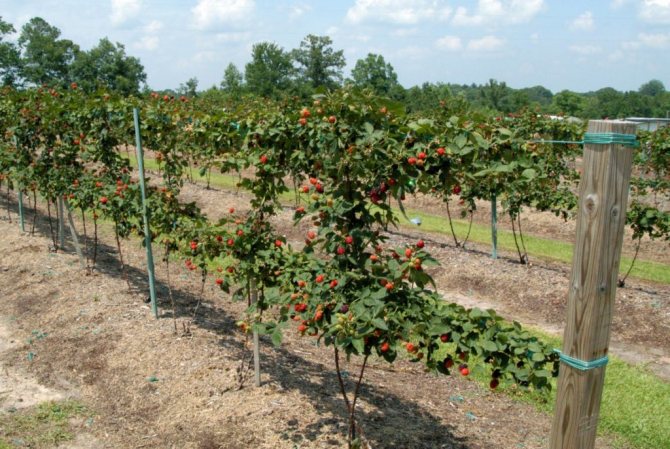
How to tie a remontant variety in spring with a photo
Tying such raspberries has a number of features:
- Bred 200 years ago, the remontant raspberry usually grows in a large and strong bush. It is resistant to wind, rain and bad weather. It would seem that such a raspberry does not need support. However, growing on trellises significantly stimulates its growth and ripening, significantly increasing the yield.
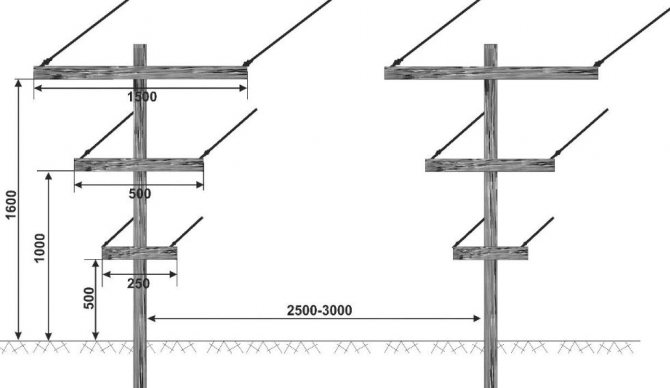
- All branches are evenly lit, well ventilated and do not fall on the ground under the weight of ripe berries. For the garter, a two-row trellis with a height of 2 m is used.This structure can be made with your own hands. Pillars are installed along each crimson row at intervals of 3 meters.
- A wire is stretched along them in 2 rows: at a height of 60 cm and 130 cm.As the shoots grow, a garter is carried out. Growing a double harvest, all branches are divided into 2-year-olds, which bear fruit in the summer, and young ones, which gradually grow back. They will bring the harvest in the fall.
- Single bushes are attached to pegs or form them in the form of a fan. Using for this a garter to the support, which is installed between the rows of the raspberry tree. Part of the shoots is fixed on one raspberry bush, and then on another.
By regularly tying up their raspberry bushes, every gardener will ensure himself a high yield, good crop growth and fast fruiting. At the same time, one should not forget about observing the timing of the garter and using all the methods listed in our article. And then raspberries will delight you with fragrant, juicy berries, high yield and good quality!
Various types of designs
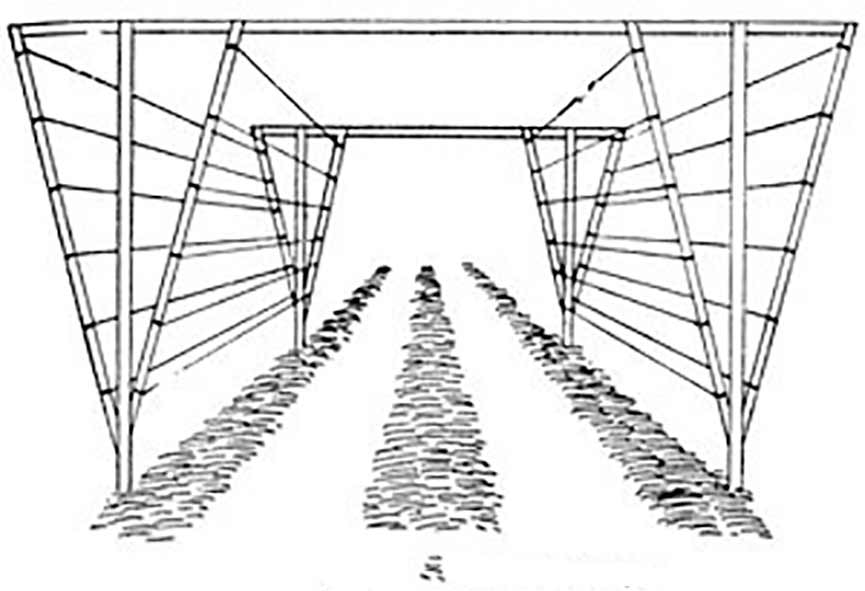
The simplest trellises are pillars that are interconnected by several rows of wire. They are divided into two groups according to the version:
- Single-strip trellis. In them, the wire rows are made in the same plane.
- Two-lane trellis. Rows of wire in this embodiment are placed in two planes.
Experienced gardeners believe that a single-strip fixture is inferior to a two-band fixture. However, for small shrubs in small areas, its use is fully justified.
Trellis in one plane
Single-strip trellis are designed to hold the branches of plants on the wire between the supports. Such devices can be divided into subspecies. Everything is determined by how to tie up the plants. They are:
- fan-shaped;
- vertical flat;
- free;
- inclined;
- horizontal.
All of the above species are required to retain raspberries during the growing season. The only difference in designs is the way the bushes are tied.
As for horizontal trellises, they are also designed to prepare shrubs for the winter period. When installing supports in the spring, last year's shoots must be tilted to the ground and fixed along the horizon. As a result of such measures, the vertical growth of fruiting branches begins along the entire length of the shoots. Note that the kidneys at the base are still dormant. This method of forming shoot growth facilitates the shelter of the berry for the winter.
For a raspberry tree with a small number of bushes, the single-lane type is quite effective. However, it has one serious drawback associated with the need to tie or wire each individual stem. For large raspberries, this turns into a serious disadvantage.
Two-lane trellis

For large-scale berry plantings, the ideal design option is two-lane trellis. They are classified into three types:
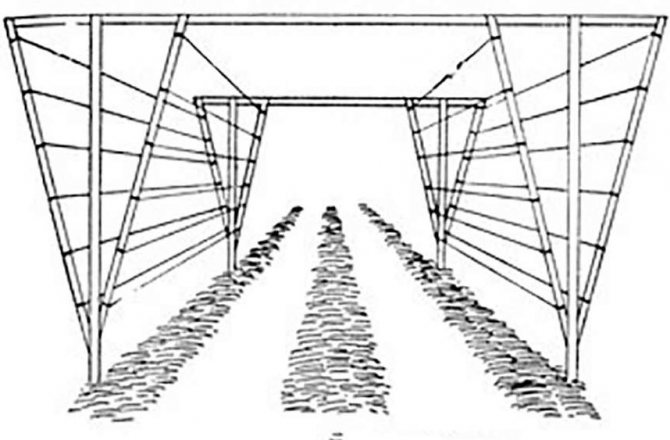
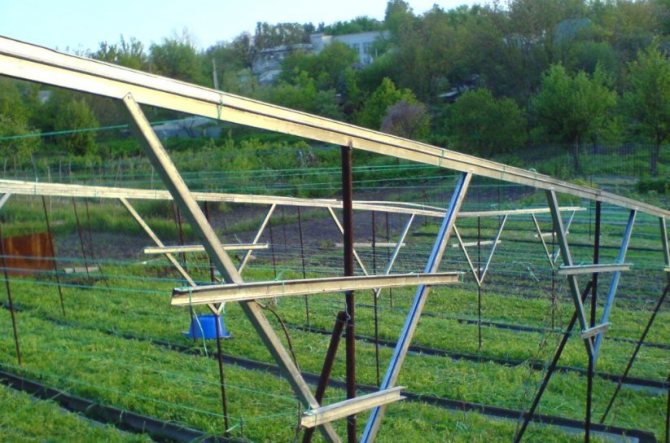
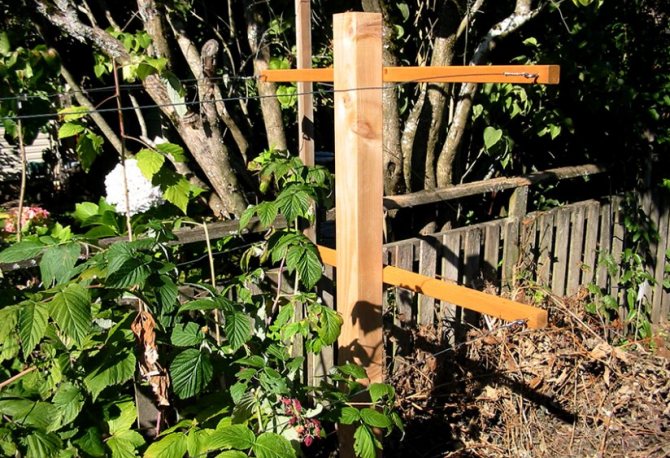
- T-shaped.The name speaks for itself. Their bases can be made from pipes, beams, or any piece of reinforcement that is fastened in a perpendicular position. A wire is pulled over the edges of the bar that protrudes. Forming a bush, shoots that bear fruit must be laid out in different directions, leaving the center free for future young shoots.
- V-shaped. Such a trellis is formed of 2 inclined planes, which are located at an angle to the horizon. Such trellises are also called two-lane inclined. The formation of bushes is similar to the first option. The only thing you need to pay attention to is the gap between the planes. It cannot exceed 2 meters.
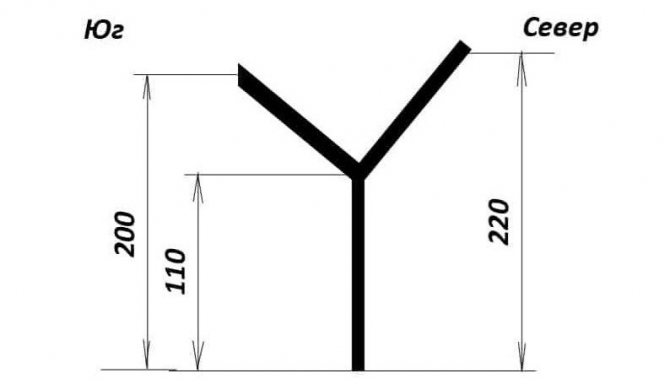
- Y-shaped. The modern type of raspberry supports has elements in the form of blades, which are able to move, as they are attached on hinges. The blades also lower or rise, and the angle of inclination changes at the device itself.

Two-lane trellis reliably support the bushes, thereby contributing to the correct formation of the entire berry. A similar structure looks like 2 wire rows, which are located at a distance of 50-300cm. It does not allow thickening of the bushes, promotes the cultivation of strong shoots to the sides, which has a positive effect on the yield. The photo of the tapestry answers the remaining questions.
How to prepare raspberries for wintering - when to start pruning and how to do it right
On the account of when to start the autumn care of the bushes, the opinions of gardeners differ. Some believe that it is necessary to cut them right before frost, thus, to cause minimal damage to the plant - the movement of the sap at this time stops, and it would be best to cut off some of the shoots. Others argue that immediately after fruiting, it is necessary to remove unnecessary shoots, which will give the rhizome more energy for development.
But most gardeners are sure that pruning should be done in early September, the deadline is early October. This is very simple to argue. The fact is that it is at this time that the amount of juice in the stems is still large, but its circulation is much lower than in summer, for example. After pruning, you need to wrap the bushes, tie and bend to the ground, and it will simply be impossible to do this at the end of October and in November due to the high fragility of the stem.
We have decided on the deadline, now let's pay attention to the pruning process itself. In order for the bush to be properly prepared for winter, we need to remove:
- Old dry shoots. Regardless of how you care for the plant throughout the year, dry shoots cannot be avoided and they will certainly be present in any quantity. We remove them at the root in order to clean the thickets a little and allow ourselves to move normally around the plantation.
- Young shoots. Many budding gardeners abandon them and make a big mistake. They will freeze out anyway, since the stem has no wood, and any frost will be fatal for it. A young shoot is only wasting the strength of the bush, that is, useful substances that could be sent to the rhizome and develop it. We remove such shoots at the root as early as possible!
- Unnecessary branches in too dense bushes. Please note that the number of shoots affects the weight of one fruit and the more thickets you have in the garden, the smaller the berries will be. You need to leave no more than 5-7 shoots on a 3-4-year-old bush - this is the best option if fertilizers are constantly applied. If they are not there, then 5 shoots is the maximum so that the root system has enough strength to provide the entire vegetative mass with a sufficient amount of nutrients.
The branches that you plan to leave for the second year also need to be pruned a little. If this is a regular raspberry variety (and not a remontant), then about 15% of the shoot length should be removed. As a rule, 15-20 centimeters.This will allow you to remove the part of the plant that is not resistant to frost, which freezes, rots and can lead to the death of the entire branch in the spring. The cut diameter should be at least 6 mm - only a stem of this thickness contains a large amount of nutrients.
Making a support on your own, at home
To make a raspberry fence you will need:
- wooden posts and bars for crossbeams;
- small pieces of metal or plastic pipe;
- fittings;
- wire.
Before making a trellis for raspberries personally, with your own hands, you need to make the appropriate markings on the raspberries.
Attention! Before starting work, you need to decide on the distance between the support pillars - this indicator is calculated depending on the spreading of a particular variety.
After that, following the step-by-step instructions and the drawing, they perform the following actions:
- Parts that will come into contact with the surface of the soil must be treated with special substances, which will prevent damage to them.
- Supports are installed depending on the type of trellis.
- Finally, you need to pull the wire.
Bending down raspberries - how to do it right and when
The main mistake of a novice gardener is bending raspberries just before the frosts. At this point, the stems may break. Even if a fracture is not visible, then in the spring such shoots, as a rule, still die, because the vessels are destroyed, and in the place where the stem was bent, nutrients do not pass to the top in sufficient quantities.
Read also How fast a mock-mushroom grows
That is why this process must be carried out not when the stem is already completely ready for winter, but earlier, when it is flexible and painlessly you can twist it into a ram's horn. This is best done at the end of September or even earlier. It is also not worth rushing too much - you need to wait until the root system grows properly.
Tying and leaving all the stems of the bush for the winter in the form of a bunch is one of the gross mistakes of a novice gardener. Despite the fact that on the Internet there are many photos of such "bundles" and those who support this method of wintering, it is extremely unsafe for raspberries. By and large, the same as not covering her at all - their bundle still does not protect her from frost if they are not under the snow. It is important to remember that tying is not a method to insulate the stems of a plant, but simply a type of organization that helps to make beautiful bunches and place them on a trellis just as beautifully in the spring.
Preparing raspberries for wintering also includes such a process as removing leaves. The procedure is quite important and should not be neglected. The fact is that with the onset of cold weather, the leaves begin to die off, but do not fall off, but adhere to the stem, just in the place where the buds are formed. In cold and humid weather, they can "burn" vegetative and generative buds and kill them. If the weather does not accompany you, then you can lose up to 40% of the harvest next year just because the leaves were not removed on time.
Such preparation of raspberry bushes for winter is as follows: take a stiff glove, and smoothly run your hand from the base of the branch to its very top. Leaves are weakly attached in autumn, so with this movement you can remove 100% of all "debris".
Important: never press down on the stem with your hand when running over it - you can damage the buds and rob yourself of the next year's harvest! Never reverse this process from top to bottom. - the kidneys are directed from below to the top and you will break them all by running your hand against the grain.
After all the leaves have been removed, the correct folding must be done. How to do it? It's very simple: we take a bunch of branches (you can even tie them for beauty), tie a stone weighing 1 kg and put it on the ground. This is done so that individual stems do not rise above the level of future snow, otherwise they will freeze out.If the raspberry was on the trellis, then you can simply tie it to the lowest wire, the main thing is that the height of the beam is no more than 25 centimeters above the ground. Some gardeners put the shrub on the ground and cover it with agrofibre (spandex), so that the stem will breathe air and is reliably protected from frost, even if there is very little snow this year.
We tie the branches, cover with mulch
In the fall, it's time to mulch the soil. It is necessary to protect the roots of the raspberry, ensuring the presence of moisture throughout the year. The most convenient way to achieve constant humidity at least at some level is to plant raspberries in trenches. But usually gardeners do not resort to this method, which means that raspberries need an additional covering layer that will help protect their roots. Autumn leaves, and just rotten last year leaves, peat and much more can be used. This is especially true for residents of those regions where severe frosts are possible in autumn before the snow cover falls.
In addition to peat and leaves, straw will serve well. You can also use sawdust, but in no case coniferous trees. The fact is that raspberries do not treat the alkaline and acidic reaction of the soil in the best way, which means you need to resort to organic materials with a neutral environment. Ordinary compost, which is a commonly used mulch material, contains a lot of nitrogen, and during a warm winter, it can cause undershoot of branches.
The thickness of the mulching layer should be between five and ten centimeters. If you make the layer smaller, its protective properties will not be enough. A thicker layer will simply make the plant rot in the spring, and in winter, during a thaw, it can even provoke the development of fungal and purulent diseases that will hit the immunity of the bush. Be sure to water the bush liberally before mulching. In no case should the plant remain with a dry root system in the winter.
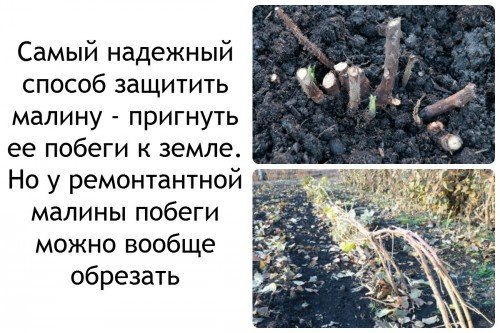
After falling leaves, it's time to start bending the bushes to the ground. For this purpose, several columns of wood or metal are dug in, between which a wire is pulled at a height of no higher than 20 cm from the ground. This is done so that during winter the branches are buried in the snow as early as possible. In the final form, they should be arcs. Nylon thread and tape are the best bindings for raspberry bushes.
Preparing remontant raspberries for winter - what are the differences
Many do not see the difference between regular and remontant varieties, but their preparation for winter is extremely different. To be more precise, in the second case it is absent altogether. The fact is that remontant varieties have their own peculiarity - they bear fruit not on a two-year shoot, but on a fresh, one-year one. Thus, the old branches are not needed at all and are cut out at the root. The main task of the gardener when growing remontant raspberries is to develop the rhizome as best as possible so that there are many one-year shoots next year.
That is, the main emphasis is not on preserving the bush, but on the maximum destruction of the entire vegetative mass, and this must be done immediately when the fruiting period ends. Then all this time it will be the root system that will develop. The most acceptable time for removal is mid-October, since the remontant variety bears fruit almost to frost and you can take a little time to enjoy the fruits. If there are a lot of bushes, you can leave a few of them on the berry, and cut the rest to develop the root system.
Earlier than thought (video - clever pruning of raspberries)
Many people think that it is time to prepare raspberries for winter in the fall. However, in fact, preparation should begin in the summer. Or rather, at the end of summer.In the last days of the summer season, fertilizers need to be applied in order to achieve ripening of the wood in raspberries. The best helpers in this matter are potash and phosphorus fertilizers, but by no means nitrogen fertilizers. Fertilized soil full of different vitamins is good for any plant, and raspberries are no exception. It is the top dressing, timely applied, that will give an excellent margin of safety to the root system, which next year will allow you to count on a rich harvest. The last dressing is applied at the beginning of October, that is, before the beginning of the period when severe frosts are possible.
When all the berries are harvested, it is time to start directly pruning the bush. Cut off those branches that bore fruit this year. They have served their purpose, have become covered with bark, and the plant no longer needs to spend its energy on them next year. But young green shoots that have grown this summer should be left, removing only the weakest and thinnest.
Fertilizer for the winter - is it necessary?
Many gardeners, sooner or later, stop at a choice - to fertilize raspberries for the winter or not. Some believe that an excessive amount of nutrients will lead to the circulation of sap and the bushes may freeze, others are sure that it is necessary to develop the root system as much as possible, despite the statements of the former. The correct answer is necessary, but only correctly and in a timely manner.
The first step is to learn one lesson - never apply a lot of nitrogen fertilizer after August. This can lead to excessive sap circulation in the stem, it will not “calm down” enough for the winter and can freeze even in -5 degrees frost. It is necessary to euthanize the plant as much as possible so that it can withstand extremely low temperatures. "But what about fertilization in the spring, because the bush needs to start quickly?" -you ask. This is very easy to solve. It is enough to add a little manure and other organic fertilizers before the onset of frost - the process of their decomposition is long, about 4-5 months at least. Just at the moment when the plant begins to revive, it will receive many useful substances. This completes the preparation of raspberries for winter and there is no need to invent anything else.
In the spring, when there is a lack of fertilizer, foliar can be used - the most effective way to give a boost to development. They act almost instantly, so they are suitable so that the vegetative mass of the plant is recruited at the time of flowering. But do not overuse these dressings, remember, your main task is not lush foliage, but a high yield of berries.