Watering is one of the most difficult gardening jobs. How many ten-liter watering cans were dragged to the beds - it's scary to remember. We are in the 21st century, but still many people are wary of irrigation systems - it seems that it is terribly difficult and expensive.
Liss1970FORUMHOUSE member
A lot of people come to our site, and the reaction of people is incomprehensible to me: “Oh! How interesting! But we'd better drag around with watering cans and then complain of back pain and drought! "
At FORUMHOUSE, we talked about the different types of irrigation systems available to every gardener. Today we will talk about how to make a drip irrigation system on the site - from the simplest, from what is at hand, to the serious, from the normal components.
Polypropylene pipes - main characteristics
Compared to conventional metal pipes, polypropylene products have a set of advantages that make them a good choice for installing a drip irrigation system in a personal plot.
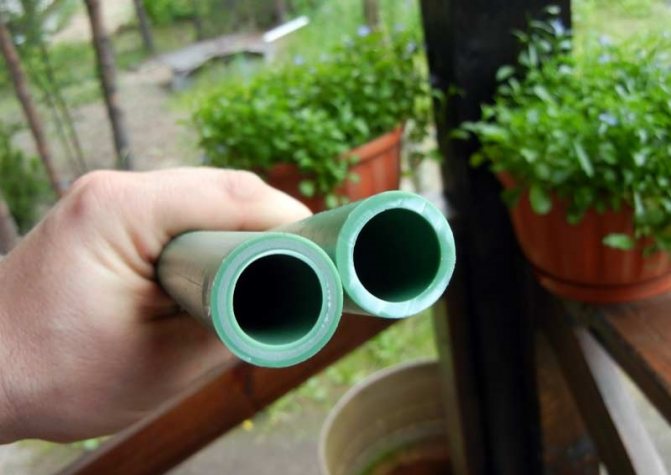
Polypropylene pipes
It is worth highlighting the following advantages of PP pipes:
- light weight;
- cheapness;
- ease of installation;
- no condensation;
- almost complete absence of deposits on the inner walls;
- service life of about 50 years.
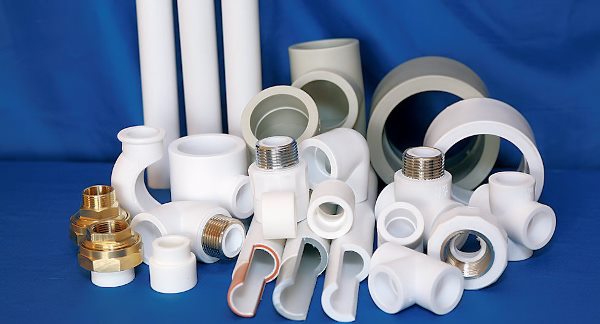

Polypropylene pipes and fittings
In order to standardize the characteristics, all polypropylene pipes are marked, dividing them into four groups.
- PN10 - pipes designed only for cold water (up to +45 degrees) and only at pressures up to 10 atmospheres. Due to their relatively weak characteristics, they are rare.
- PN16 - pipes designed to operate at pressures up to 16 atmospheres and temperatures up to +60 degrees. Suitable for drip irrigation systems.
- PN20 - the maximum working pressure is 20 atmospheres, they can withstand temperatures up to +95 degrees.
- PN25 - in terms of permissible temperature, they are similar to the previous type, the pressure in them can reach up to 25 atmospheres. They are supplied with reinforced interlayers that increase the strength of the pipe.
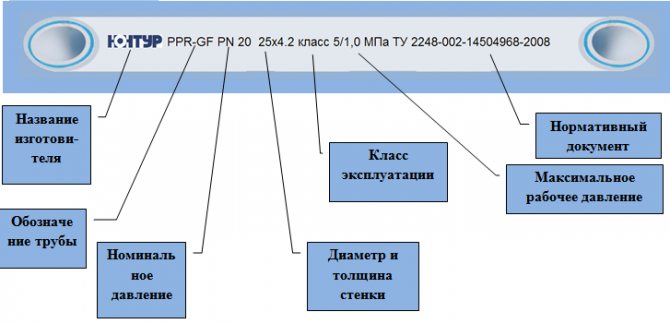

Designation of the main indicators on the pipe


Types of polypropylene pipes
In drip irrigation lines, the working pressure does not exceed 2-3 atmospheres, and the water temperature is equal to or lower than the ambient temperature. Therefore, here you can use polypropylene pipes PN10 and PN16. The use of PN20 and PN25 is acceptable, but their characteristics are redundant for such a system.
Prices for polypropylene pipes
polypropylene pipes
What is included in the drip system
Any drip irrigation system on polypropylene pipes, even the simplest one, consists of:
- A pipeline route through which water is constantly supplied to the dispensers;
- Drip propylene lines for garden irrigation.
The best source of water is a centralized water supply system, since there will be water in it constantly. In the absence of such a possibility, the pipe system of the irrigation device is connected to an autonomous pumping station or to a reservoir on the site. The main pipeline, from which the wiring to the drip lines will go, is laid from pipes Ø 25-32 mm, long sections are recruited with fitting connections. The route is assembled from metal, metal-plastic or polypropylene pipes.
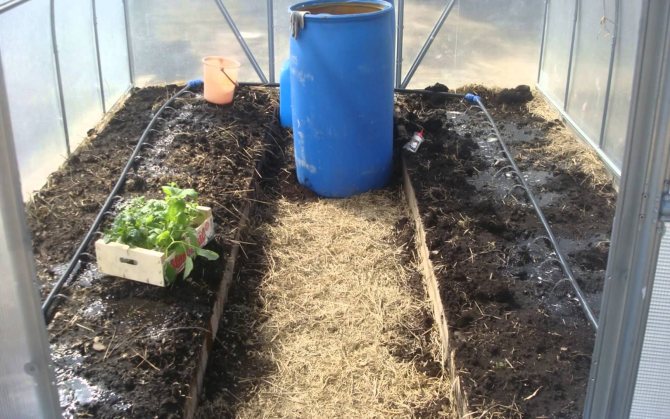

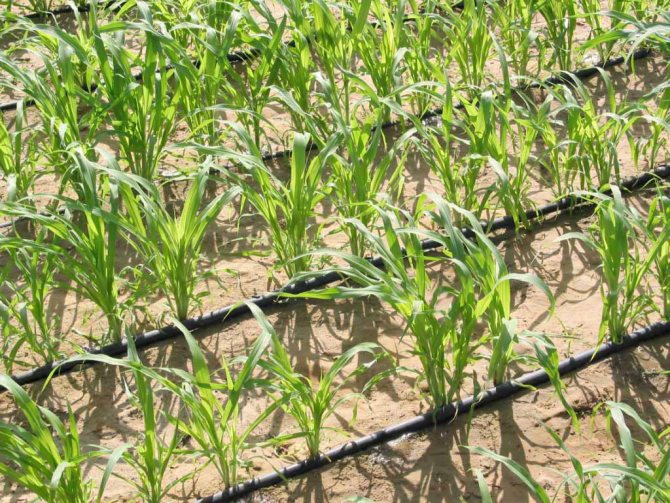
From the main pipeline to the plantings, drip lines are laid from polypropylene pipes.To carry out watering from polypropylene pipes with your own hands, two options for drip lines are used - polyethylene tapes or tubes. The diameter of such tapes (tubes) is taken in the range of 16-20 mm, polyethylene has a thickness of 100 microns. The tape is made from a strip of polyethylene by folding it into a ring and sealing the edges. Holes are punched on the surface of the tape with a pitch of 200-250 mm, through which water flows by gravity into the root zone of a plant or a group of plants.
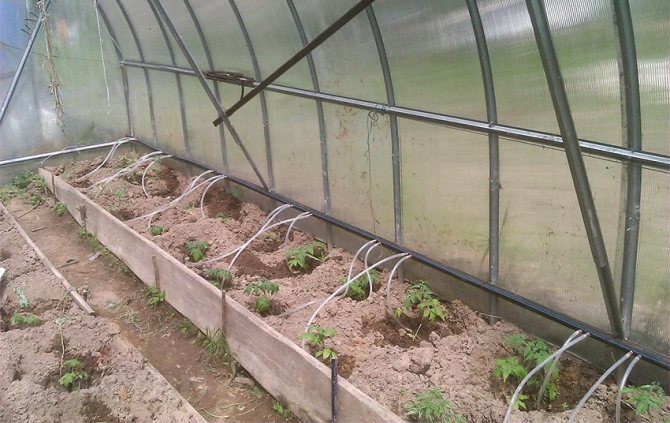

A self-made system of watering a vegetable garden made of polypropylene pipes is adapted for watering trees and garden plants: water is supplied with pipes to a tree or kut, and the garden is watered with ribbons.
Diy drip irrigation - drawing up a plan
This system consists of several elements, let's get acquainted with the features of each of them.
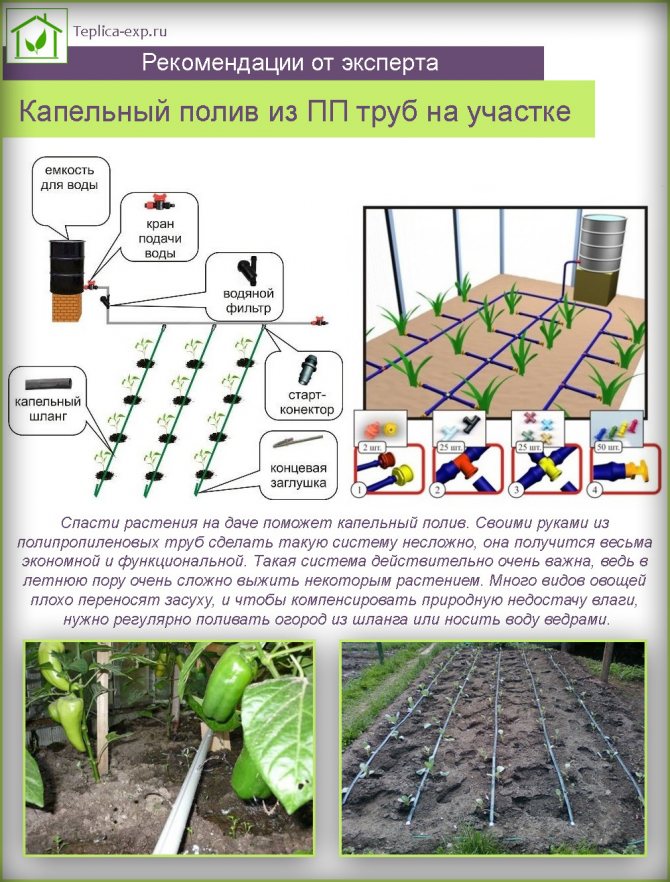
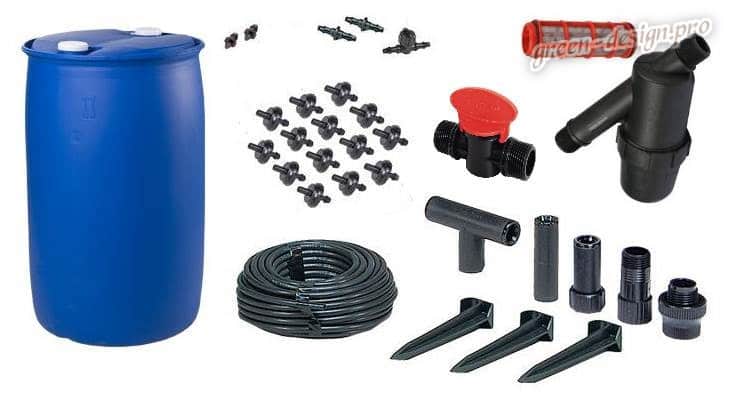
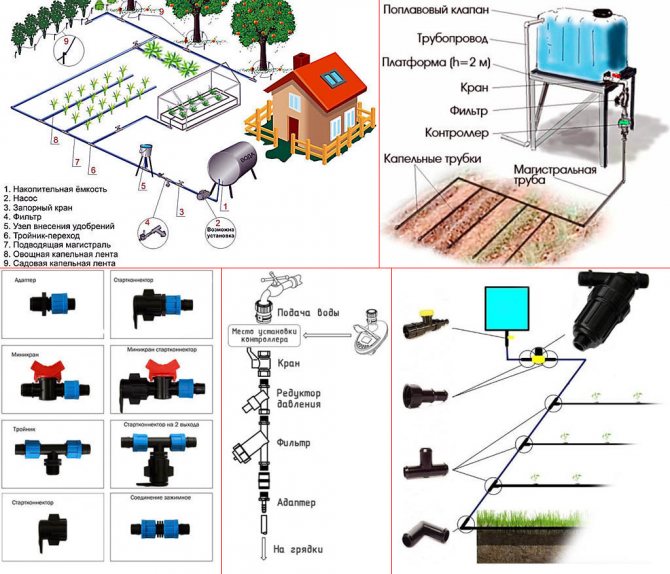
- Water tank... On the one hand, it is connected to the drip irrigation pipes, on the other, to the water supply from which it is replenished. It is necessary for storing water and heating it under sunlight to a temperature close to that of air. The presence of a container is necessary, since when the drip irrigation lines are connected directly to the water supply system, the moisture entering the plants will not have time to warm up and will be too cold. As a result, crops will experience "stress", which will affect their condition and yield.
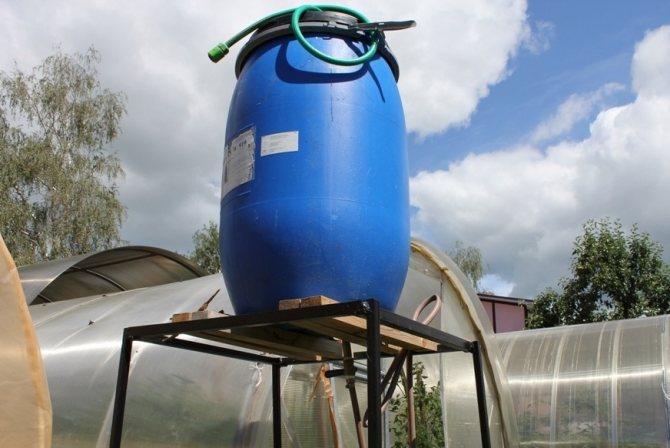

Container for water
- Ball valve - when it is opened, water from the container enters the system main, the drip irrigation process begins.
- Filter - it is necessary to purify water from impurities and small particles of dirt. If you neglect its installation, then over time, the drip irrigation system will clog up and fail.
- Fertilizer container - Plants with a drip irrigation system will require a large amount of nutrients.
- Main pipeline - the main line of the entire system, delivers water to the branches. At the other end of the tank, it is equipped with either a plug or a tap used to flush the system or drain water from it.
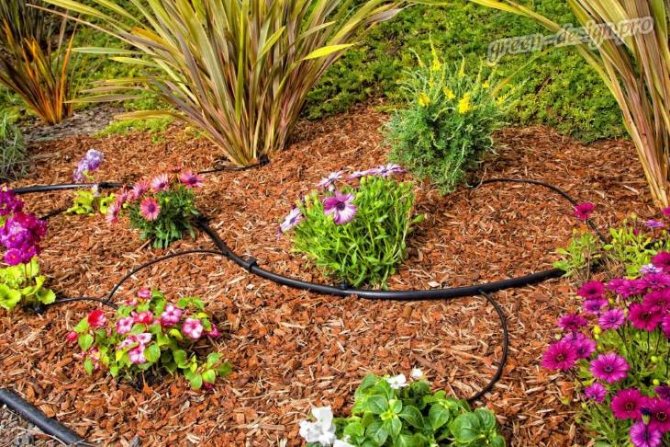
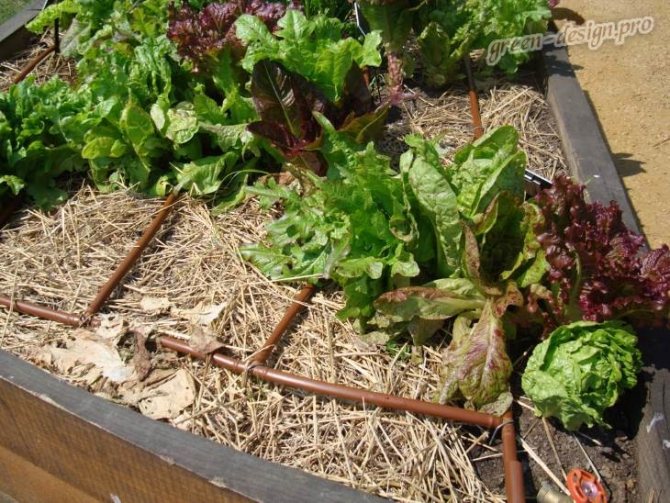
- Bends deliver water directly to the beds. Either drip tapes or small diameter polypropylene pipes with droppers mounted along the entire length can be used as branches. They are connected to the main line using tee fittings.
- If the drip irrigation system is automated, then it is additionally equipped with controller, a set of humidity, temperature and light level sensors, as well as solenoid valvesreplacing conventional ball valves.
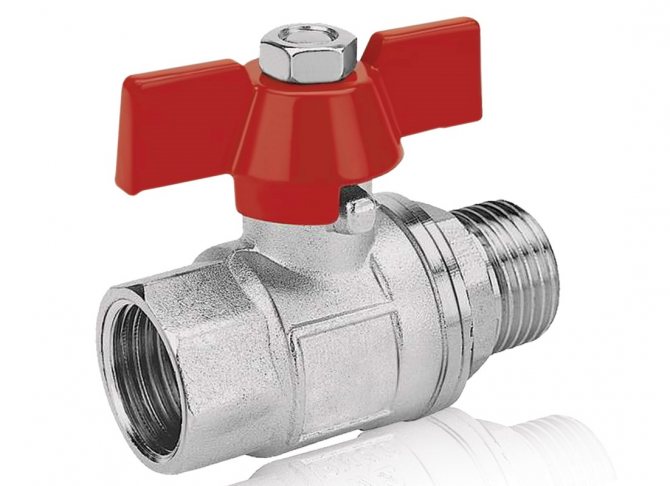

The thread of the ball valve can be internal and external
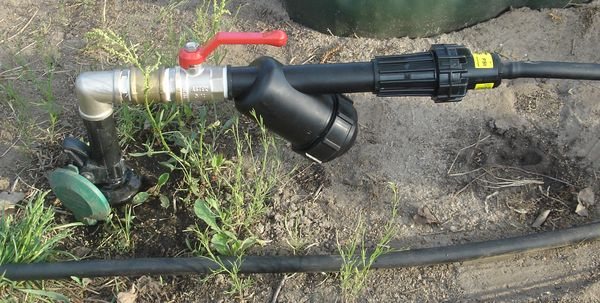

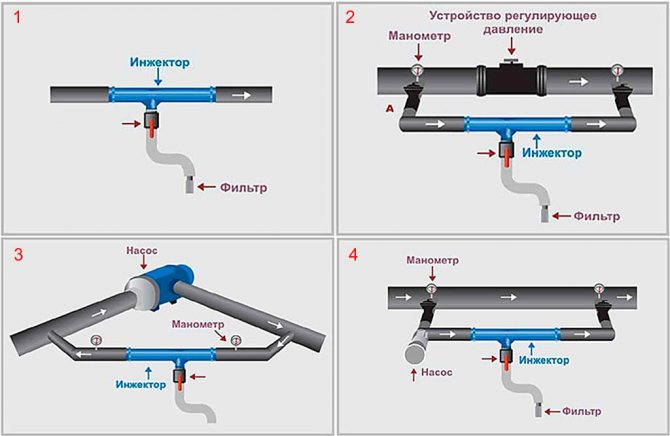
Node for connecting drip lines: tap, filter and water pressure reducer
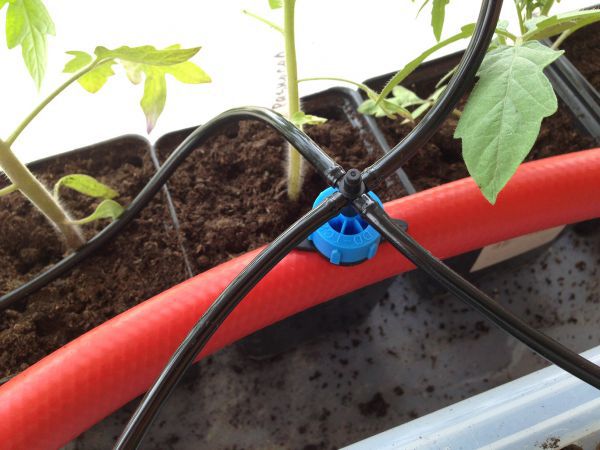

Taps in the drip irrigation system
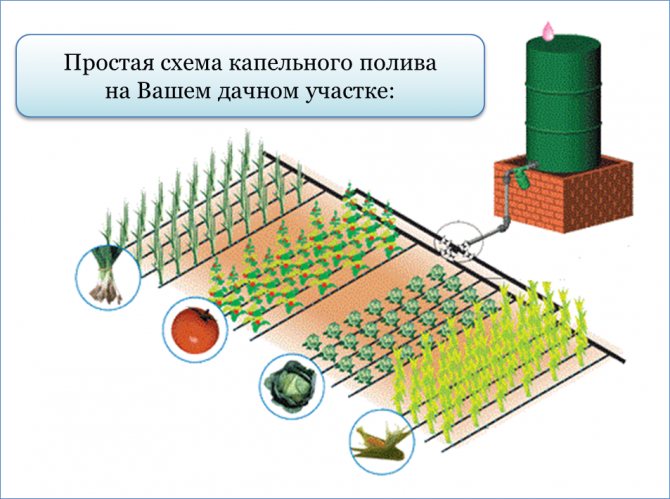

A simple scheme of drip irrigation on the site
Drip irrigation design for a greenhouse or home garden is broken down into several steps that are performed sequentially.
Step 1. Determine the area of the site for which you want to arrange drip irrigation. Take measurements, calculate the number and length of the beds, the distance between them, as well as the number of plants on each of them.
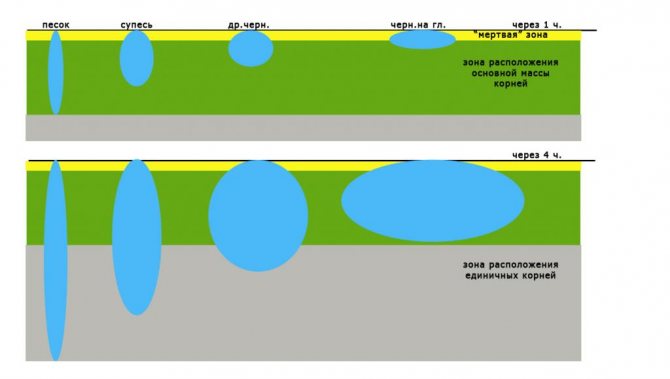

Wetting area for drip irrigation on different soils
Step 2. Calculate the amount of water needed to irrigate all crops in the area. On average, one square meter requires 15 to 30 liters of water per day. Calculate more precise values using the table below.
Table # 1. The daily water requirement of some crops.
| Crop type | Water consumption, l / day |
| Tomatoes, one bush | 1,5 |
| Cucumbers, one bush | 2 |
| Potatoes, one bush | 2,5 |
Keep in mind that water consumption for each individual plant is not constant.The value varies depending on the average temperature, rainfall and the characteristics of the soil on which the crops are growing. Excessive watering is also harmful, as well as insufficient, since it leads to rotting of the plant roots.
Step 3. Based on the figure obtained at the previous stage, determine the volume of the water tank and the cross-section of the main pipeline. The table below shows the maximum possible liquid flow rate depending on the pipe diameter. Choose the volume of the tank and the cross-section of the main line with a small margin of performance. This small reserve may be needed in case of an increase in water consumption for irrigation.
Table. Dependence of the maximum water flow rate on the diameter of the pipeline.
| Pipe diameter, mm | Water consumption, l / hour |
| 16 | 600 |
| 20 | 900 |
| 25 | 1800 |
| 32 | 3000 |
| 40 | 4800 |
| 50 | 7200 |
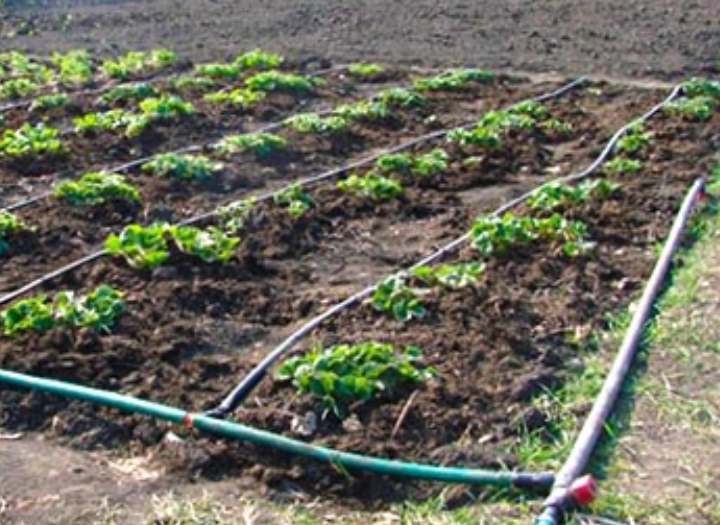
Step 4. Determine the number and length of the taps to be connected to the common line. If a tape for drip irrigation is used as a direct means of delivering moisture to plants, then proceed from the rule: one bed - one branch with a tape. And when using polypropylene pipes and droppers from one outlet, you can water two beds at once.
In the presence of long lines and branches, a pump must be used to maintain the pressure in the system.
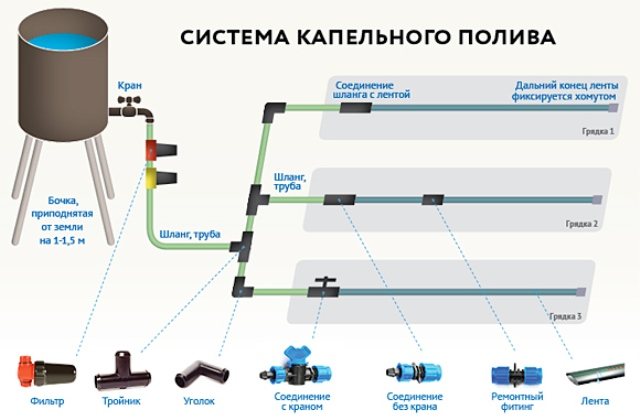

Drip irrigation system diagram
Step 5. Determine the distance between the droppers connected to the outlets from polypropylene pipes. One dropper can "feed" two plants on one bed (or four if the outlet is located between adjacent beds) if there is an appropriate adapter.
Step 6. Take a double squared notebook sheet or graph paper and draw a sketch of the future drip irrigation system. Transfer the location of the water tank, fertilizer container, tap, filter, main pipe, tee fittings and outlets to it.
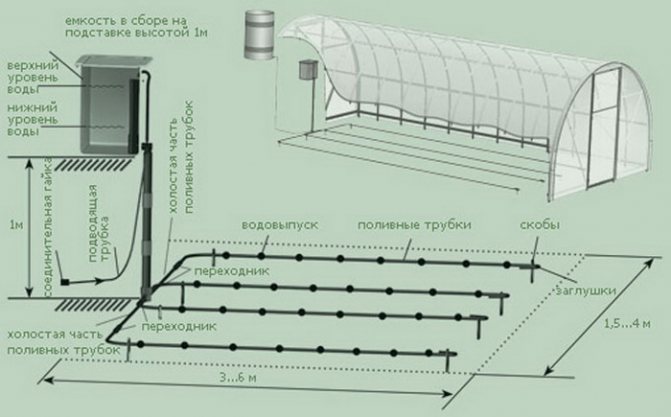

The diagram should indicate the placement of the pipeline, drip hoses and individual droppers, as well as valves
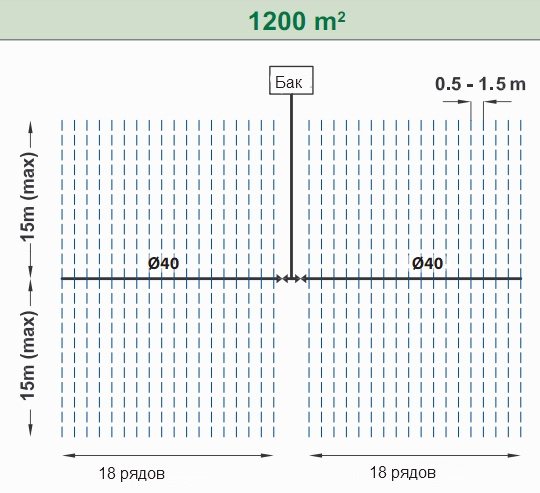

An example of calculating drip irrigation for 1200 m2
Step 7. Calculate the amount of materials needed to equip the irrigation system. The calculations and sketch created in the previous stages of design will help you with this.
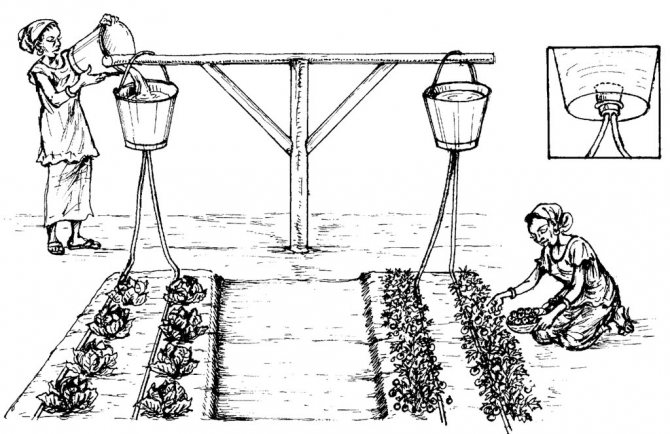

Simple drip irrigation with buckets and garden hoses
We start to drip
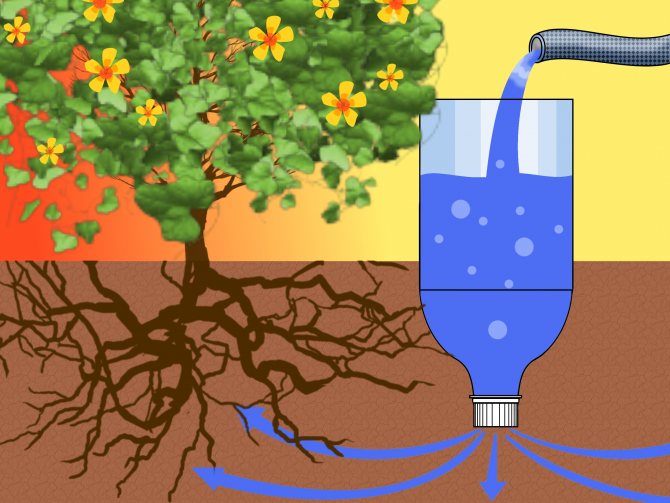
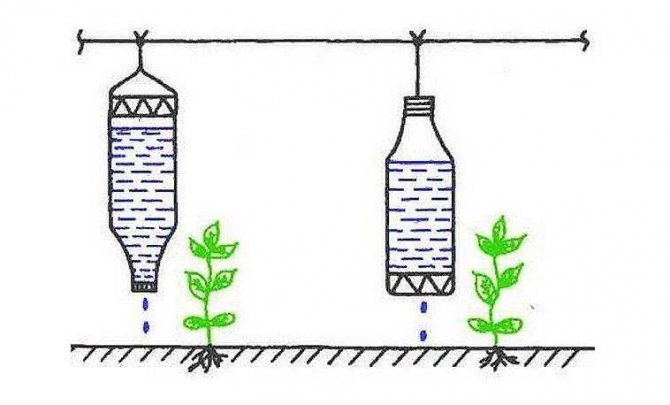
Let's start with spot drip irrigation systems from dosing tanks without water supply networks, as the simplest and cheapest. On large areas, they are unacceptably laborious, but on a plot of up to 2-4 acres, this has little effect. And do not think that you have to fence something high-tech: point irrigation of small areas of open ground at home is nothing more than drip irrigation from plastic bottles. It can be produced in 3 ways: microspray, surface and deep, see fig. Canisters and pipes can also be dispensers. But the former are not wasteful and expensive material, and the capacity of the latter, with optimal deepening, is insufficient for the watering rate of most plants.
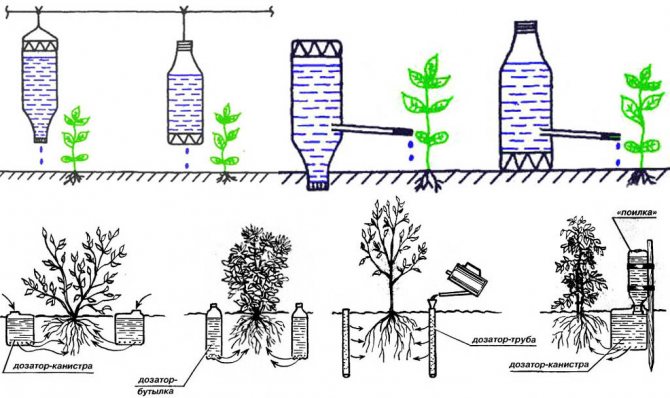

Methods for the device of drip irrigation from plastic bottles and other containers
Micro-sprinkling eliminates the clogging of the nozzles in the dispenser with soil, but requires stands for suspension, makes it difficult to fill dangling dispensers and does not allow water to be delivered exactly to the roots. Surface irrigation requires reworking the bottles, which, with the required quantity of dozens and possibly hundreds, is very laborious. Deep spot irrigation from bottles has recently undergone radical changes that have made it highly efficient, see below.
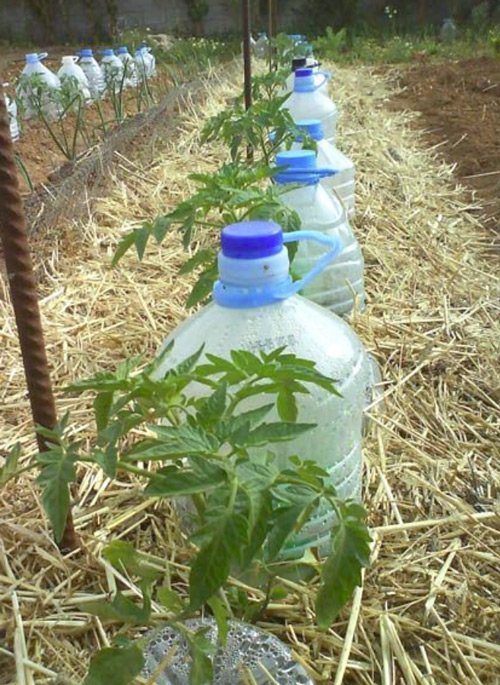

Simple drip irrigation from bottles
The simplest surface drip irrigation can be organized on the basis of plastic buckets or bottles from 1.5 liters, installed in rows between bushes, see fig. The dies in them are made at a height of 3-5 cm from the bottom so that the sediment in the water does not clog them.Such irrigation is suitable for moisture-loving and light-loving crops with fruits that are quite high above the ground, for example. tomatoes, eggplants. A serious drawback of this "system" is that mulching of the rows is required; why - see above.
Deep irrigation from inverted and cut bottles, left and center on the trail, gives much better results. fig. Mulch is no longer needed, it is more convenient to fill the dispensers, and evaporation from them creates a kind of microclimate for the plants. However, a small one, a real revolution in bottle-drip irrigation, was made by the appearance on the market of threaded nozzles for bottle necks with ready-made nozzles, on the right in Fig. They were invented at first by gardeners-roommakers; the tips of confectionery syringes were used. Among other benefits of deep irrigation, you can stick the dispensers into the ground obliquely, supplying water directly to the roots.


Submersible drip irrigation from bottles
Other options
In addition to bottles, medical droppers are sometimes tried to be used for individual spot irrigation, see trail. fig. However, the stable-positive long-term results of such experiments are unknown on the trail. reasons due to the fact that medical droppers are disposable equipment:
- The finest filter clogs up very quickly.
- Remove the filter - the needle becomes clogged with soil a little more slowly.
- The flow regulator clips quickly expand, the wheel pins come out of the slots and the adjustment stops altogether.
- Hoses also quickly become cloudy, slip inside, swell; the lumen of the hose is reduced, and then the tubes generally spread out.


In addition, honey. a drip costs money, and not too small. And if the medical staff, in spite of the strictest prohibition, does not destroy them in use (droppers for medicines are not subject to disinfection), then who knows what kind of patient they were given. And won't one of them share their ailments with you through a dropper ...
On fairly large areas, up to 6 acres or more, surface drip irrigation from relatively improvised materials can be arranged, as shown in the figure:
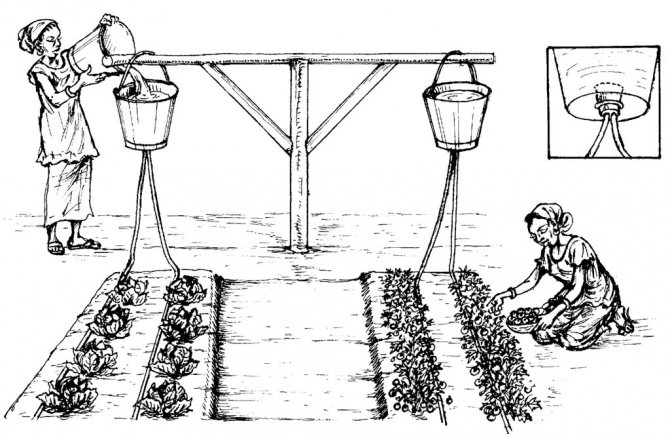

Simple drip irrigation with buckets and garden hoses
Irrigation lines (tapes) - from a PVC garden hose with a caliber (diameter of the lumen) 3-8 mm, it is relatively inexpensive. The dies in them are made as described above. The holes in the bottoms of the buckets are drilled along the outer diameter of the thread on the neck; such a spout is pulled together with a standard plug; possibly with a thin rubber seal. The holes in the plugs for the hoses are 1-1.5 mm less than their outer diameter, then seals are not needed here. For a weekend getaway, this is perhaps the best solution: the entire system can be easily deployed, and folded up and hid before leaving.
Note: a similar type of system, but much less expensive in all respects, can be built for growing seedlings at home, see the video below.
Video: drip irrigation for seedlings at home
Tank setting
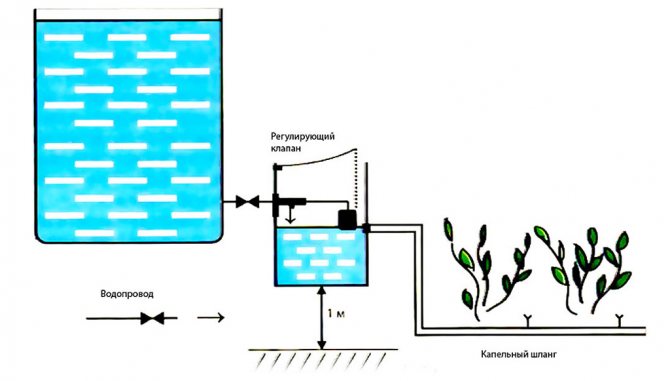
The water tank must be located at a certain height so that the force of gravity acting on the liquid creates pressure in the pipes of the drip irrigation system. On average, the container is raised to a height of 2 meters - thus, the pressure in the line is sufficient for effective irrigation of 40-50 square meters. If the area with the beds has a large area, then either the tank is raised higher, or a pump is installed in the main line.
Step 1. Build a support for the container. The easiest way to make it from a bar with a large section and thick wide boards. Drive the timber to a certain depth into the ground, lay the boardwalk on top. For greater strength, install crossbars between the struts. Instead of timber and boards, you can use bricks or steel pipes.
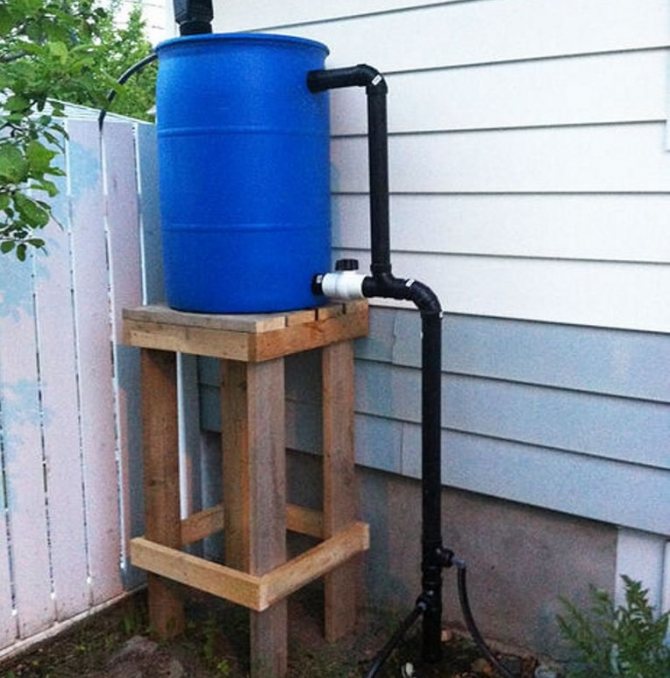

Water tank with wooden support
Step 2. Mount the connection to the drip line on the tank. Install the fitting and the valve at a height of 5-10 centimeters from the bottom of the tank - this way large particles of dust and dirt will not get into the pipeline.
Step 3. Establish a water connection on the opposite side of the container. Use a float shut-off valve - the device will automatically open to refill the tank and close when the water level reaches its maximum.
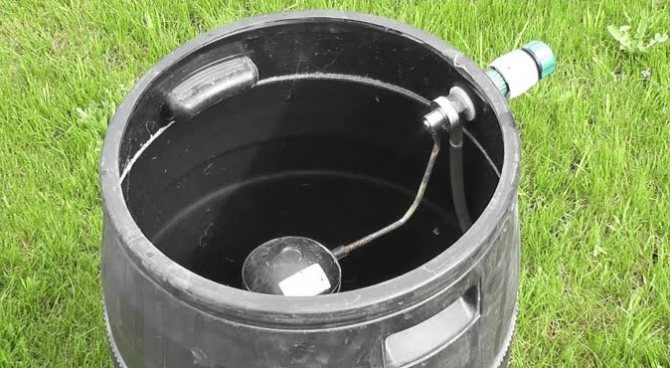

Float shut-off valve installed in the water tank
Step 4. Lift and place the container on the support. Set aside the direct connection of the tank to the water supply for the last stage of arranging the drip irrigation system.
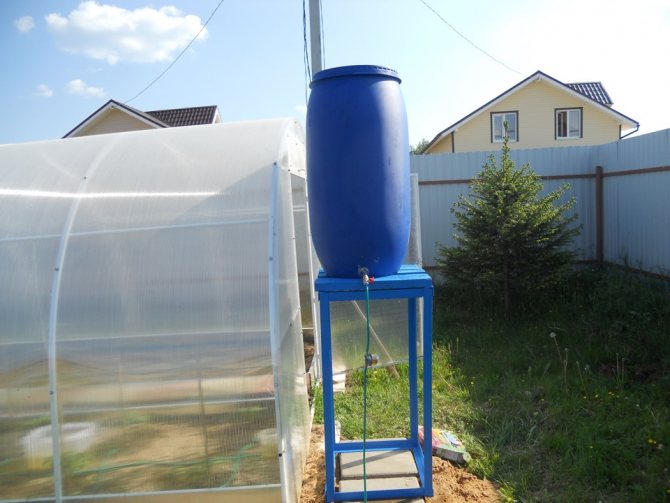

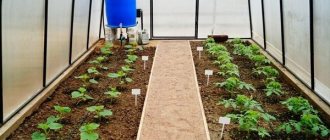
Due to its large dimensions, the container together with the support should be installed outside the greenhouse.
An open tank can be used as a container - in this case, it will be partially replenished by rain. But at the same time, take care of installing a good filter - along with precipitation, a lot of dust, debris and leaves will get into the container, which may cause clogging of the pipes.
Installation of drip irrigation system
So, the materials have been purchased, the plans have been drawn up - it's time to start making a drip irrigation system from droppers.
Step 1. It is necessary to make a hole for the water to exit in the tank. To do this, a few centimeters from the bottom of the tank, cut a hole for the ball valve and install the latter using seals and a coupling so that water does not ooze out.
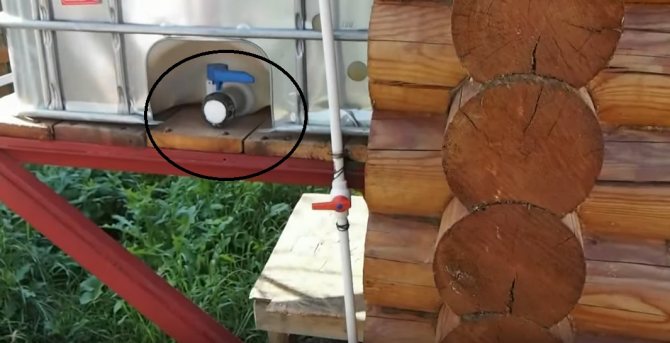

Installed tap for water outlet
On a note! If you envisage installing a filter in your system, then it is best to mount it at the water outlet from the tank so that all debris that gets into the water does not clog the tap and hoses. A piece of foam rubber can be used instead of the filter, but it will need to be changed regularly.
Step 2. In the hoses that will be located between the bushes, we make holes of such a diameter that the ends of the droppers are held inside. The number of holes will be equal to the number of plants watered.
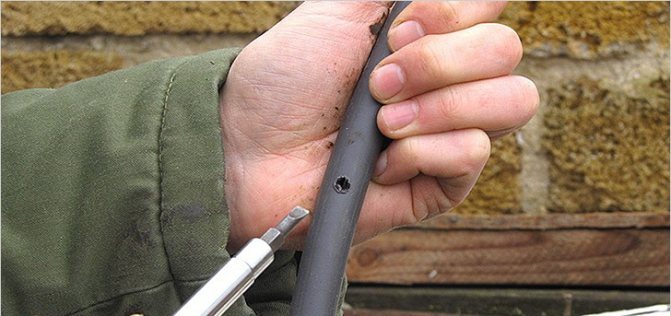

Dropper hole drilled
Step 3. We attach the main main hose to the crane, to which, according to the scheme, we also attach those that will be located between the rows of bushes. The connection is made using branch fittings.
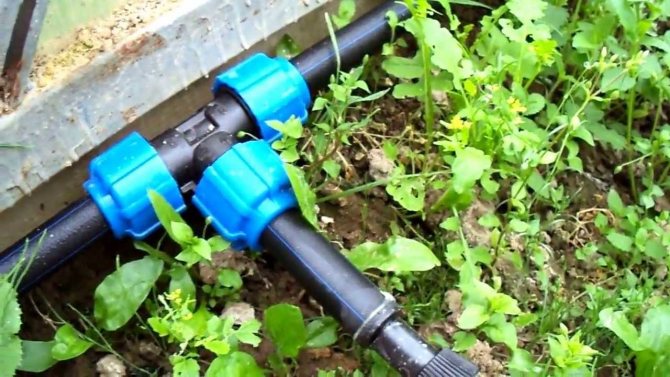

Hose connection example
Step 4. Pull the hose system and place it between the rows.
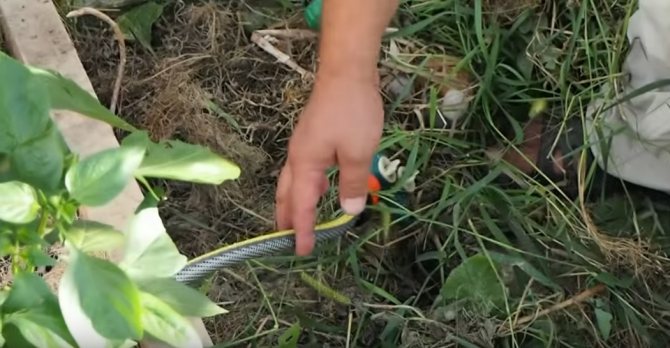

The hose is laid between the rows of plants
Step 5. We close the ends of the main hoses with plugs so that water does not pour out.
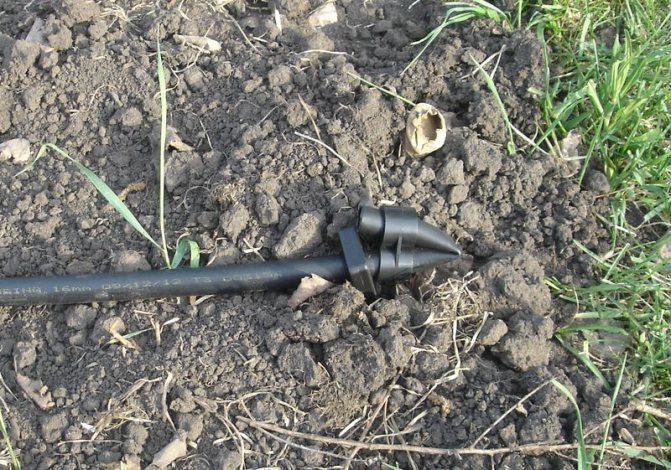

End of the main hose
Step 6. For medical droppers, we remove the needles, leaving the rubber tips in place.
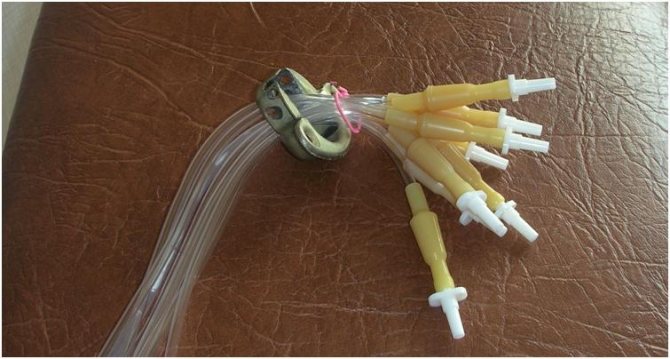

Medical droppers
Step 7. We insert rubber tips into the holes on the main hoses.
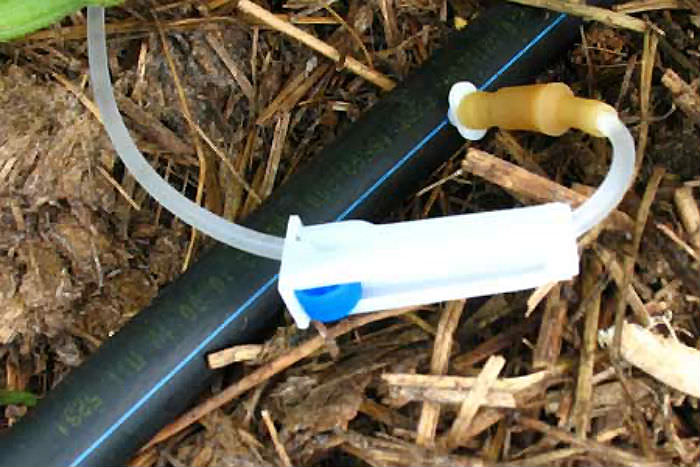

Dripper tip inserted into the main hose
Step 8. We stick the ends of the droppers with large plastic needles into the soil at the roots of the plants.
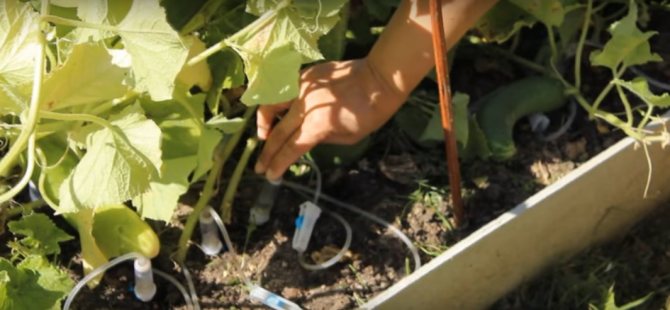

The dropper ends are inserted into the ground
Step 9. We open the tap and let the water enter the system.
Step 10. With the help of a regulator with a wheel on the droppers, you control the flow of water, adjusting the intensity.
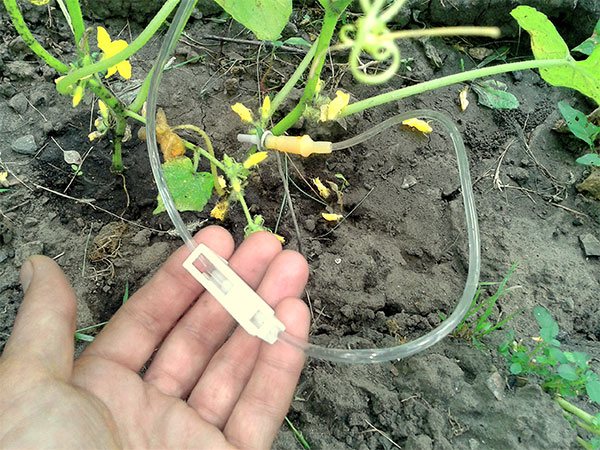

Wheel adjuster
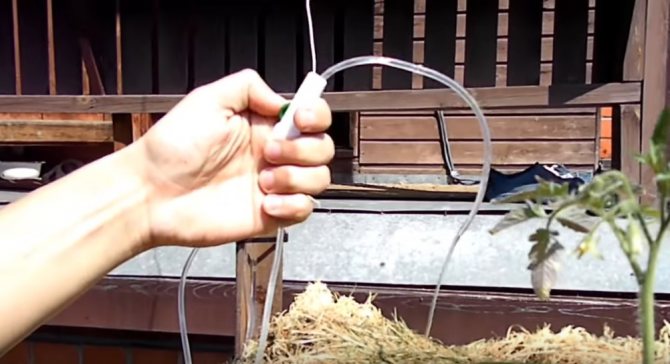

Adjusting the intensity of the water flow
On a note! Be sure to cover the water tank with something from the sun to prevent the water from blooming. Otherwise, microalgae will start in the tank, which will quickly clog the filter.
Video - Installation of drip irrigation from droppers
Laying the main line and branches
Since polypropylene pipes are used as the material for the main line and branches, it is necessary to familiarize yourself with how to properly cut and connect them to each other.
You can get a clean cut without burrs and deformations using special pipe cutters designed to work with plastic products.If, for some reason, the acquisition of such a tool is impossible, then as an alternative, use a hacksaw for metal or, when working with small-section pipes, a sharp clerical knife. But at the same time, the quality of the cut will decrease, and this will not affect the durability of the pipe and the quality of the connection with other elements of the system.
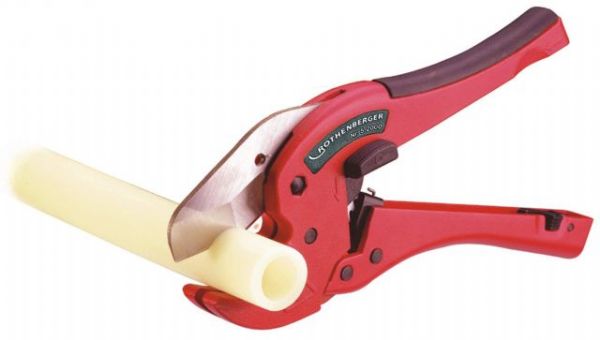

Plastic pipe cutting knife
The situation is more complicated with the connection of polypropylene pipes with fittings and other elements.
There are three ways in total:
The first method provides a strong and durable connection that can withstand high pressure in the system. But for it you will need a special soldering machine with a set of nozzles and some skills in working with such a tool.
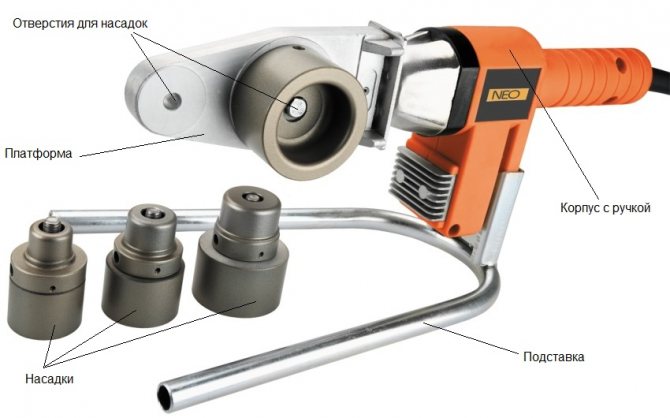

Soldering tool for polypropylene pipes
Step 1. Inspect the fitting and pipe section for defects or scrap.
Step 2. Degrease the outside of the pipe at the intended joint and the inside of the fitting.
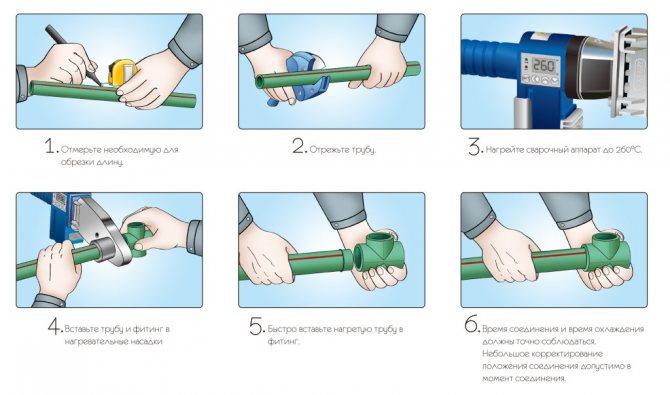

Instructions for cutting and brazing polypropylene pipes
Step 3. Install the appropriate nozzle on the soldering tool - the hole in the pipe part must match the outer diameter, and in the fitting part - the inner section.
Step 4. Warm up the soldering tool and tip.
Step 5. Insert the pipe at the same time and slide the fitting into the corresponding parts of the nozzle. Wait for the time specified in the instructions for the instrument. The soldering iron will heat the outside of the pipe and the inside of the fitting.


Welding table for polypropylene pipes of different wall thicknesses
Step 6. At the same time, remove the fitting and pull the pipe out of the nozzle and connect them to each other to a heating depth. Keep it on for five seconds, then let the compound cool down for a while.
The main disadvantage of using a soldering machine is the need for a soldering tool. It is quite expensive, and it is impractical to use it just once.
In addition, such a connection is obtained non-separable. An alternative is to use compression fittings and a crimp wrench. However, in the case of polypropylene pipes, the quality and tightness of such a connection leaves much to be desired. A simpler and cheaper way of joining is "cold welding" using a special glue.
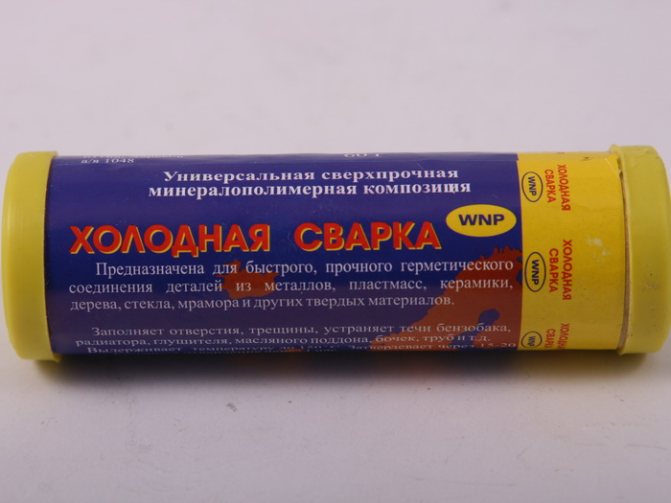

"Cold welding" for gluing polypropylene pipes
Cold welding prices
cold welding
Step 1. Examine the fitting and pipe for defects. If there are no defects, do the joint without glue, mark the depth of the joint using a marker.
Step 2. Degrease and clean the bonding surfaces of the pipe and fitting.
Step 3. Apply adhesive to the outside of the pipe and the inside of the fitting.
Step 4. Dock the elements together. Make sure that they connect evenly, without skewing to one side. Keep them in this position should be from 15 to 30 seconds. The supply of water in such a connection is permissible only after 24 hours.


Connection of PP pipes by the method of "cold welding"
It is possible to make the pipelines of the drip irrigation system detachable and easily dismantled using fittings of the "American" type.
Before starting the installation of the main line and branches, it is necessary to decide which method of positioning the pipes is preferable - surface or deep. In the first case, all elements of the system are simply laid on the ground (or above it using brackets-holders). Pipes lying on the surface are easy to repair and replace, but they can also be easily damaged by carelessness.
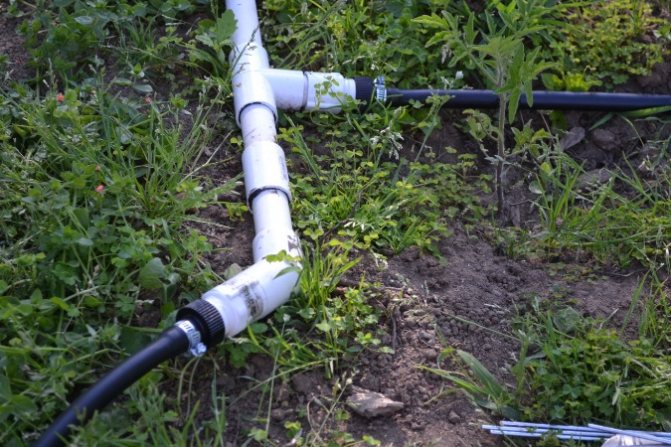

Surface mounting of pipes
When buried deep, the main and auxiliary communications are laid in a narrow trench with a depth of 0.3 to 0.75 meters.Inspection and maintenance of pipes in this case is difficult, but at the same time they do not interfere with walking around the site and collecting crops from the plants. Having decided on the method of laying the highways, you can start installing them.
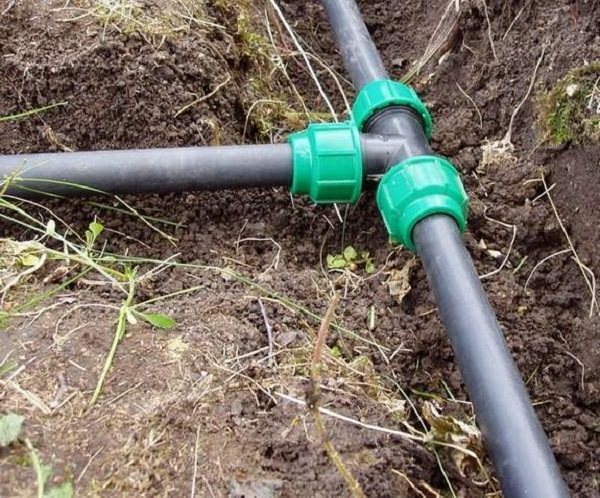

Laying highways in a shallow trench
Step 1. Attach a fine filter to the water tank and ball valve. If it is planned to install a container with fertilizers, a pump and a controller for automatic drip irrigation, install them.
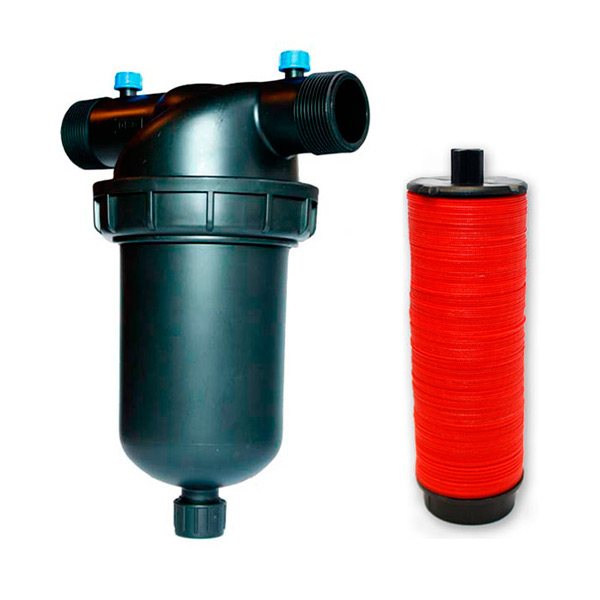

Drip Irrigation Filter
Step 2. Using an elbow fitting and an appropriately sized piece of pipe, bring the line to a height of approximately 5-10 centimeters above the ground. Install the holding bracket as a support.
Step 3. Cut pieces of polypropylene pipes according to the distance between the branches. Also consider the “seams” between the line parts and the fittings.
Step 4. Install and connect the lengths to the tee fittings in sequence. At the same time, maintain a slope - the end of the highway should be closer to the ground than the beginning. This is necessary for effective drainage of water before the onset of cold weather.
Step 5. Install either a plug or a ball valve at the end of the main pipe. The latter is preferable, because by opening it, you will be able to quickly drain the water or clean the pipes from the blockages that have accumulated in them.
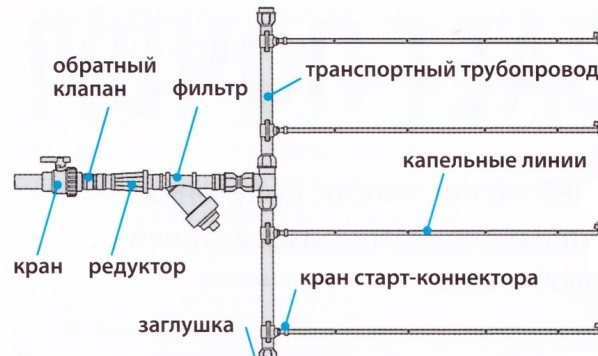

Drip irrigation pipeline diagram
The following list of actions depends on which type of bend you have chosen - drip tape or tube with droppers.
How to make drip irrigation for the garden and vegetable garden from plastic bottles
Perhaps the cheapest watering can be made from plastic bottles and small diameter tubes. I think it will not be difficult to find containers in the required quantity, and there are no difficulties in using such a system.
There are several ways to irrigate from eggplants:
- Surface watering. We hang the bottles over the plants -. A wire or metal rod is stretched over the ridge. We attach the required number of bottles. Make small holes in the bottom or lid. The advantage of this method is that the water enters the soil already warm, warmed by the sun's rays. Take the volume of the bottle so that the support can withstand. It is better to hang the eggplant closer to the ground, since many plants do not tolerate the ingress of water on the leaves or insert a dropper tube into the opening of the bottle. We cut off the bottom, but do not throw it away, it will serve as a lid so that debris does not fall and water does not evaporate. In the lid we make a hole for the tube and insert it at a slight slope. We turn the container upside down and hang it, of course, you can place it with the neck up, but it will be less convenient.

In fact, it looks like this:
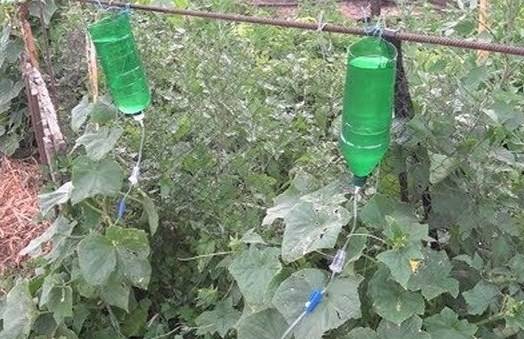

The drip tubes are convenient in that you can control the water flow rate
- Underground root irrigation
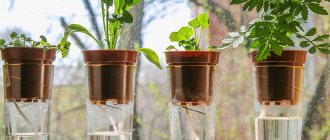
1. The next option is simpler. We dig in a plastic container between the bushes upside down by 10-15 cm, having previously made holes 3 cm away from the bottom. You determine the number of holes yourself, depending on whether the weather is dry. There can be 2-3 or all 10. If you plan to close it with a lid, then you need to make a hole in it. So that after all the water is gone, the bottle does not crumple under the ground.
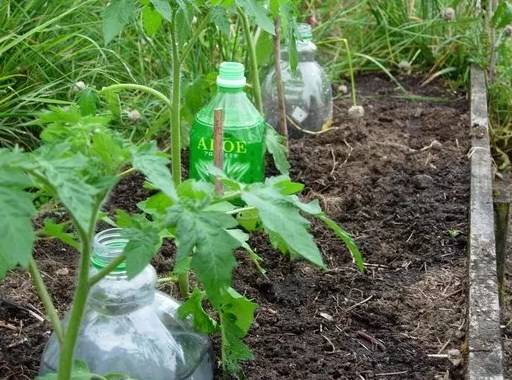

If cucumbers and tomatoes are irrigated on clay soil, the holes are likely to clog quickly. Therefore, first put on a stocking on the bottle or lay a piece of burlap on the bottom of the hole, you can also sprinkle it with straw.
Important! Water should not immediately go into the soil, but should be consumed gradually over several days. This is the whole point of this irrigation method.
This is how the plants are watered:
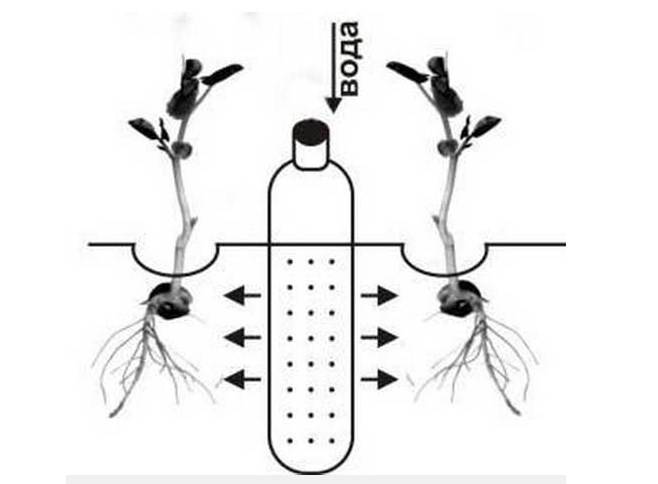

You can also dig in the eggplant with the neck down, make holes just above the lid. We cut off the bottom, but I advise you not to throw it away, but cover it on top so that the water does not clog with debris and does not allow evaporation.The optimum tilt angle is 30-45 degrees.
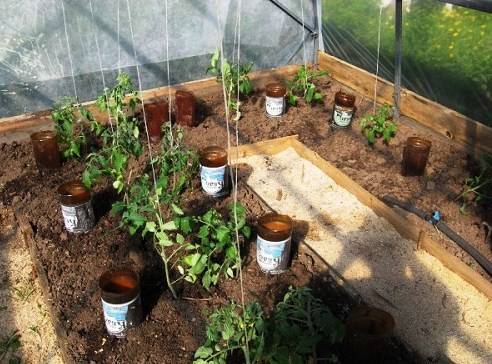

You can replace the plastic structure with a 5-6 liter eggplant, then there will be enough water for about 5 days of watering.
2. A simple way with a special attachment. Now this option is common among summer residents. The only thing they need to be purchased in specialized stores for gardeners. The nozzle has an oblong shape with holes, which is screwed onto the neck of the bottle instead of the cap. There is a volume limit of up to 2.5 liters; this method will not work for a 5 liter eggplant.
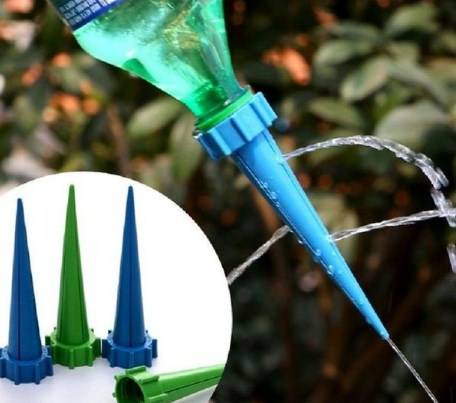

In action, it looks like this - a cap is put on, and now it needs to be stuck into the ground next to the bush along with the bottle. The bottom may not be cut off, after the water runs out, you can unscrew the tip and fill the container with water and repeat the manipulation.
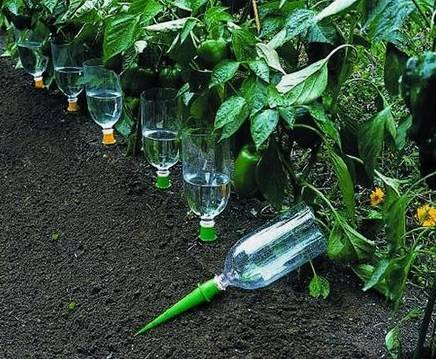

Also, plastic containers are actively used in the greenhouse, making a structure with a rod. That makes it possible to water the bush at a certain distance.


The finished construction looks like this:
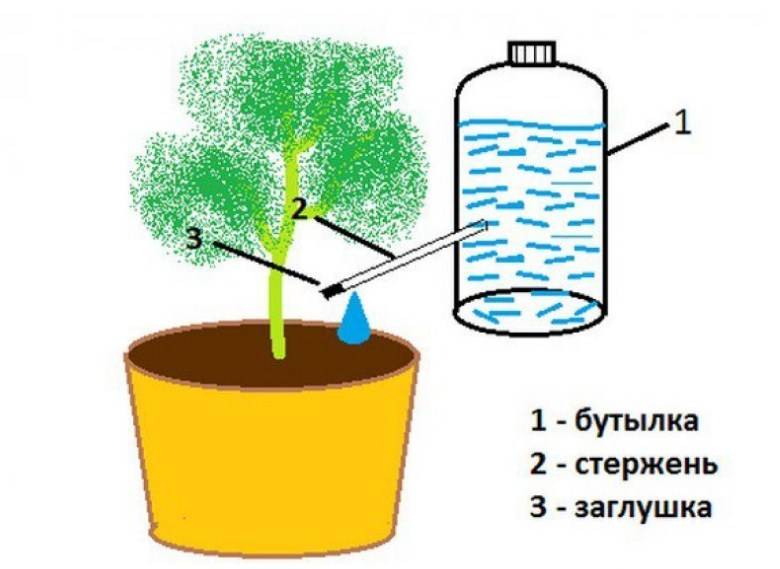

With the help of these structures, you can make plant nutrition. To do this, you need to dilute the fertilizers in water according to the instructions on the package, which must be strictly observed. The solution will be evenly distributed around the roots, allowing the plant to absorb it successfully.
The irrigation system using plastic bottles is an excellent alternative, and in some cases even a complete replacement for traditional irrigation. It will not be difficult to make such an irrigation system yourself, because the necessary materials are almost always at hand.
Option number 1. Drip tape
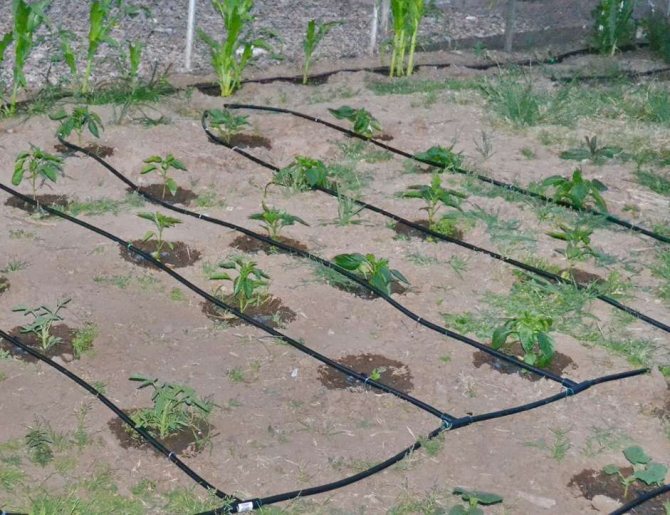
Let's look at the ribbon option first. The thickness of its walls and the pitch of the holes are selected depending on what kind of agricultural crop is planned to be supplied with moisture.
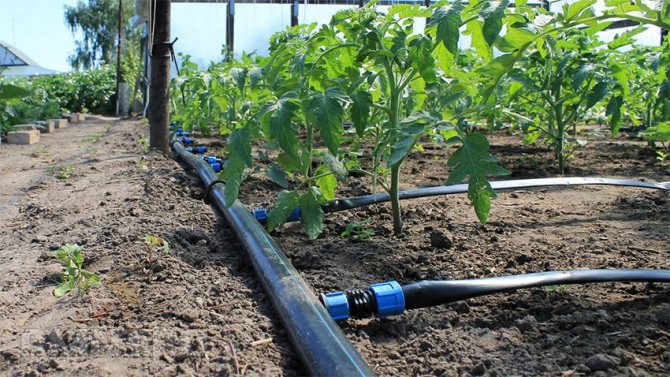

Drip tapes connected via start connectors
Table 3. The pitch of the holes on the drip tape, depending on the crops grown.
| Step, centimeters | For which crops is suitable |
| 10 | Carrots, onions, garlic |
| 20 | Cucumbers, strawberries and strawberries |
| 30 | Cucumbers, tomatoes, potatoes, eggplants |
| 40 | Melons |
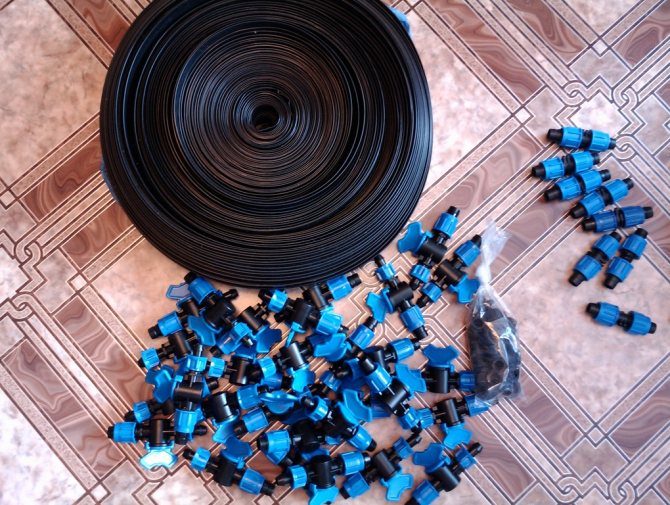

Drip tape and fittings with taps
The sequence of actions is as follows.
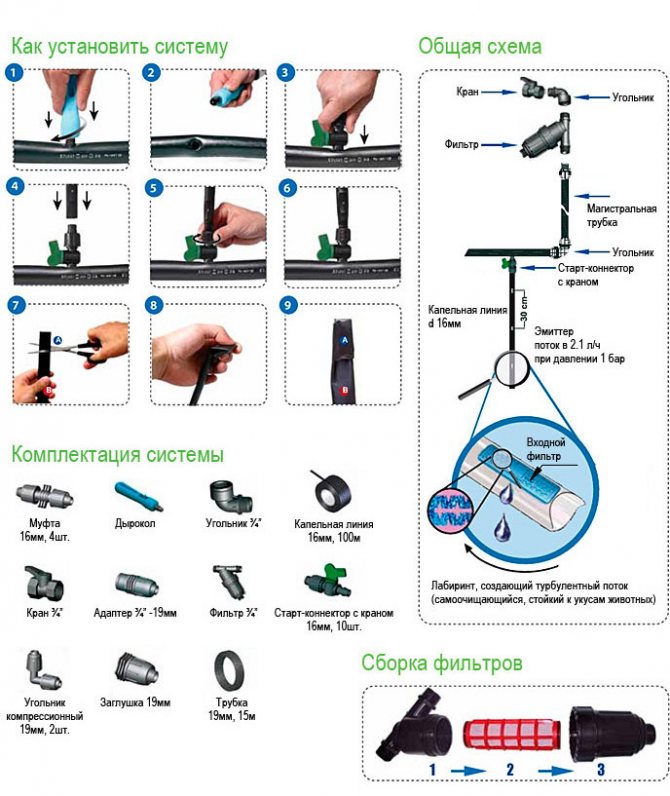

Diy drip irrigation assembly diagram, photo
Step 1. Install start connectors with valves to the tees perpendicular to the main line.
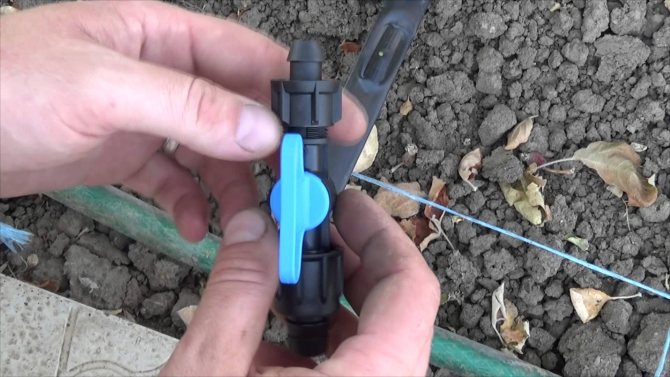

Faucet and drip tape installation
Step 2. Divide the drip tape into parts equal in length to the length of the beds (with a small margin).
Step 3. Fix one end of the drip tape in the start connector.
Step 4. Close the other end of the drip tape with a plug or roll up and tie with electrical tape.
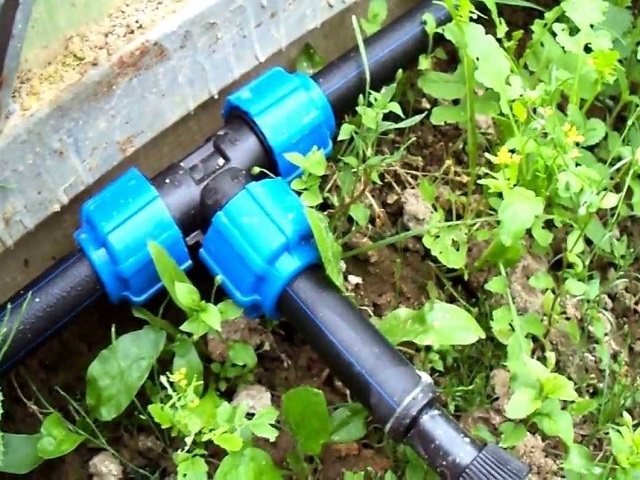

T-piece connection with drip tape
Drip tape is not ideal for areas where birds and rodents are abundant and can easily damage the thin walls.
Drip irrigation system made of polypropylene pipes
Regular watering is the key to normal growth and development of any plants. But many of them, primarily valuable vegetables, spices and flowers, are especially sensitive to the intensity of soil moisture. Water should not be supplied to their root system once, but within a certain period of time. Waterlogging is equally dangerous, because it leads to rotting of the roots, creates favorable conditions for the development of fungi and mold. The solution to the problem is drip irrigation. At the same time, it is not at all necessary to purchase complex and expensive irrigation systems - an excellent tool for drip irrigation can be made with your own hands from polypropylene pipes, which are sold in any building supermarket.
Related article: Water supply in the country
Option number 2. Dropper tube
In the second case, you will need small diameter polypropylene pipes (for example, 16 cm for small beds), an adjustable dropper with outlets, flexible tubes with a cross section of 3-5 mm and turbulent racks. One outlet can have 1, 2 or 4 outlets, respectively, one dropper can supply moisture to 1, 2 or 4 bushes.
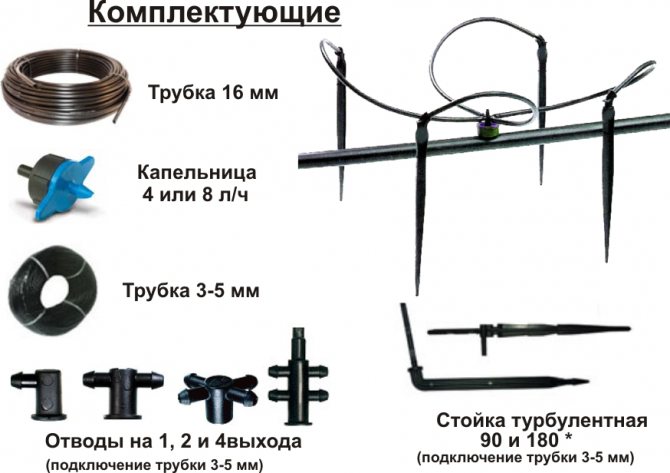

Components
Step 1. Using brazing or cold welding, connect the branch pipes to the tees perpendicular to the line.
Step 2. Drill holes with a certain pitch in the branch pipe.The diameter of the holes must match the diameter of the dropper seal.
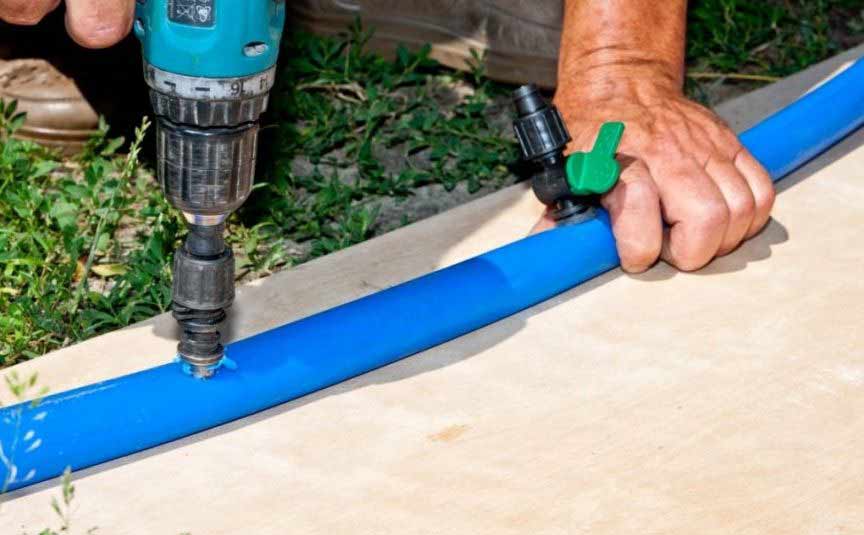

Drilling holes
Step 3. Insert the dropper seal into the hole, then the dropper itself. Next, mount the branch, connect the appropriate number of flexible pipes with turbulent struts at the end to it. Then stick them into the ground next to the plants.
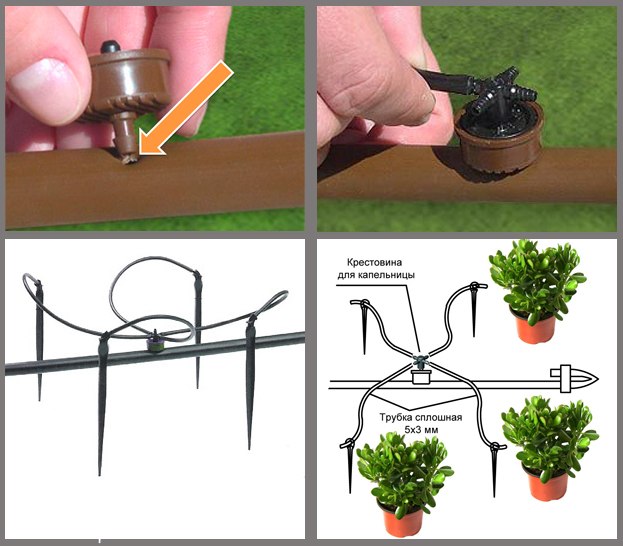

Connecting droppers with turbulent racks
Step 4. Install a plug at the end of the branch pipe.
Step 5. Repeat the previous two steps with all the holes in the branch pipes.
The final stages of installing a drip irrigation system are connecting the tank to the water supply, filling it with liquid and a kind of stress test, during which you need to make sure that all elements of the system are working properly.
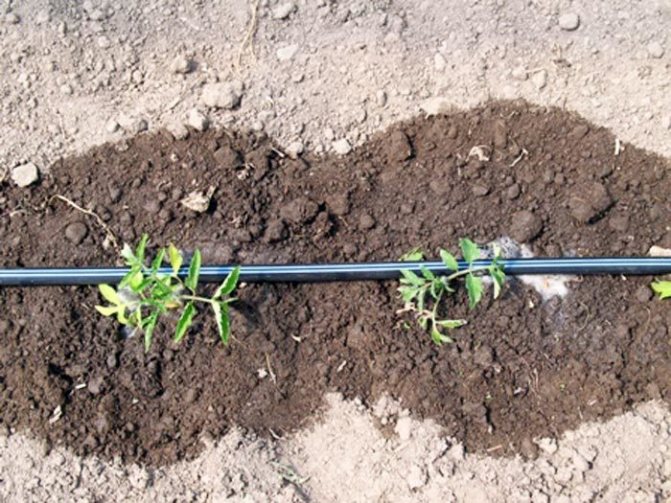

Drip irrigation in action
For a better understanding of the drip irrigation device, we recommend that you read the following video.
Video - How to do drip irrigation with your own hands
What is drip irrigation: advantages and disadvantages?
This is an irrigation method where water is supplied in a straight line to the root zone. That significantly increases the yield of summer cottage crops and the beauty of ornamental plants.
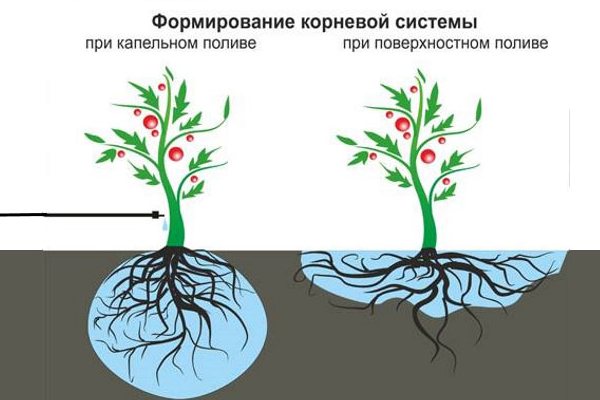

The advantage of the system:
1. Saving watering is that the water level is very low and accurate.
And most importantly, it is served in the amount that is needed for all cultures.
2. With conventional hose or watering cans, an earthen crust appears after the soil dries. But with a point one, this does not exist. After all, the ground part will remain dry, which will prevent the formation of weeds. Various diseases that seedlings are exposed to in a humid environment will also disappear.
3. Due to this irrigation, it is not necessary to constantly loosen the soil, as there is an improvement in the flow of air to the roots.
4. In this system, you can feed various crops, but only with liquid fertilizer.
5. If there is a timer, then a fully automated filing process can be made.
6. Leaves do not get burned in hot weather, because water does not flow to them.
7. Wind and bad weather do not affect this type of irrigation.
In general, if you follow certain rules, this type will last for many years:
- The water tank must be clean;
- The pipes are well rinsed;
- It is imperative to disassemble all connections and fittings in the fall;
- Cleaning the filter.
Disadvantages:
1. You need to buy different parts for this system.
2. The belts can become clogged, therefore water filtration is mandatory.
3. Also tapes and droppers have the ability to break mechanically.
4. For some types of crops, point irrigation is not suitable due to the depth of the roots, so they definitely need sprinkling.
Drip irrigation system automation
To date, it is impractical to use manual control for a drip irrigation system - it requires a daily presence on a personal plot, which can only be ensured in cases where you either live there or you have enough free time to come there in a day.
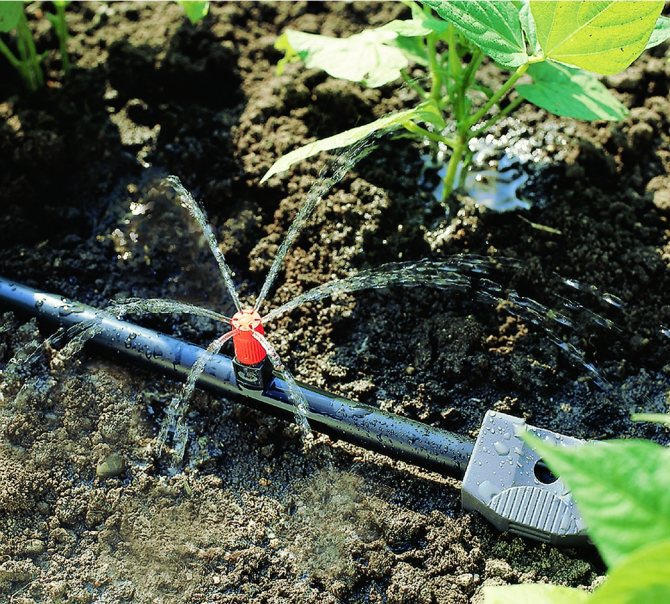

Drip irrigation system
The simplest way to automate the system is to install a specialized microcomputer. It consists of a programmable controller, a chipset with memory, an LCD display, control buttons and a housing that is resistant to moisture and temperature extremes. The microcomputer is installed on the central highway and the regular watering program is set in it. Switching on and off is performed using solenoid valves that replace conventional ball valves.
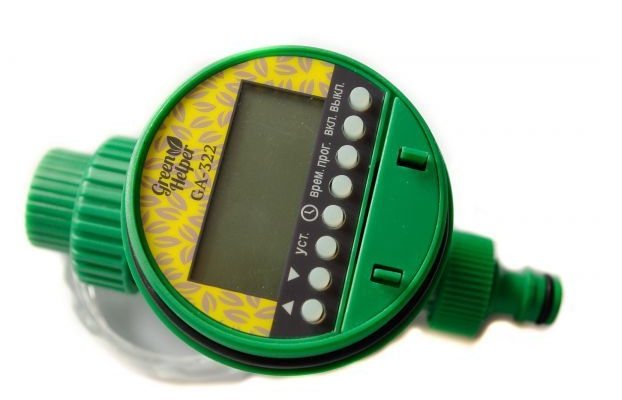

Controller for automatic drip irrigation
Prices for controllers for automatic irrigation
controllers for automatic irrigation
But such a system does not take into account the state of the environment, therefore there is always a risk that plants either do not receive the required amount of moisture, or receive it in excess.The solution to this problem is the installation of a complex of weather and humidity sensors. Depending on the weather and soil moisture, the irrigation program will be adjusted to increase or decrease the amount of water directed to each plant.
DIY drip irrigation from plastic bottles
The device of such a system looks like this: a plastic bottle is dug in near each individual plant in the greenhouse, in which small-diameter holes are made. Read more in this article.
A drip irrigation system based on polypropylene pipes and droppers will not only free you from the work associated with supplying plants with water, but will also help to significantly increase their growth rate and yield.
Drip irrigation: advantages
- With a drip irrigation system, you can water the entire country garden and crops growing in the greenhouse;
- Due to the possibility of adjusting the flow of water from the droppers, the system is suitable for the simultaneous irrigation of small garden crops, as well as large trees and shrubs;
- Drip irrigation eliminates the appearance of sunburn in the form of brown spots on the plant, since water is supplied to the root zone, abundantly moisturizing the soil, nourishes the plant itself and does not fall on the leaves.
- Drip irrigation does not require high pressure in the water supply system. Quite a very small pressure of some 0.2-0.3 atm.
- The water will naturally warm up in the tank. In this case, the plants will not suffer from temperature drops, as happens when watering them with water taken directly from the well.
- Batch watering saves water consumption, strength and time of the grower;
- An additional tank for filling liquid fertilizers made on the pipeline allows you to automatically apply fertilizer to the plants during irrigation. At the same time, all minerals and organic matter with drip irrigation fall directly into the root system.
- When installing a drip irrigation system, everything can be done without direct human participation. for this, it is enough to install a special control device. Automation will do absolutely everything, you only control the process from time to time.
- Thanks to drip irrigation, crop yields are increased by 2-3 times.
The main advantage of drip irrigation is the benefits for the plants. Water regularly falls under the root, while a certain portion of moisture does not allow the soil to dry out and does not swamp it.
How to equip your own spot irrigation in a greenhouse
Drip irrigation in a greenhouse is a little more difficult to install than to equip an entire vegetable garden. Therefore, for the greenhouse, it would be better to do surface drip irrigation.
Installation:
- You need to purchase a PVC garden hose. Its diameter should be 3-8 mm.
- We attach dies to it.
- For a container of water, ordinary buckets are suitable. We make a hole in the bottom of each.
- The spout is pulled together with a standard plug. It can also be sealed with a thin rubber band.
Such an irrigation system is very convenient if you are at the dacha on weekends. It rolls up freely and also unfolds.
In the photo below you can see the scheme of automatic irrigation of the greenhouse.
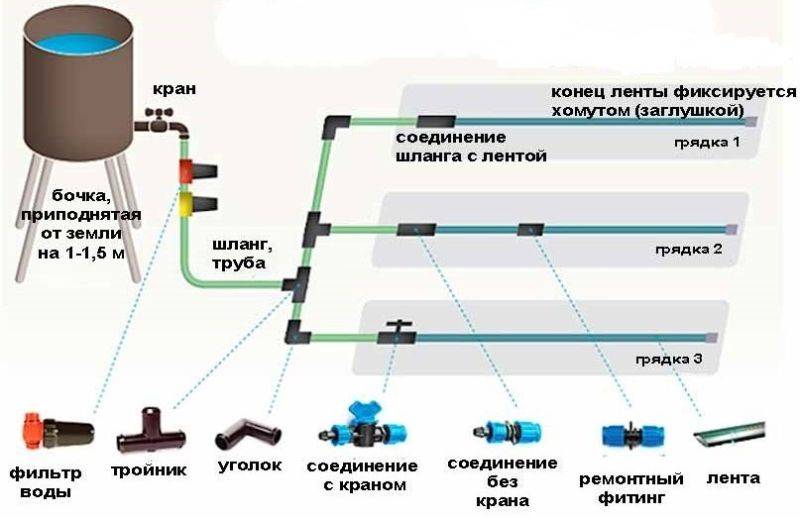

And here is an example of a simplified design without connectors:
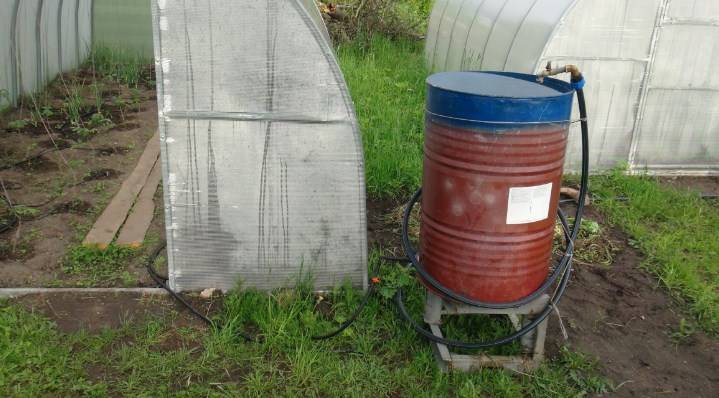

That's all for us. We tried to consider the most common homemade irrigation designs. Which one to choose, it all depends on your preferences. Or maybe you think that it is better to buy an irrigation system in an online store - it's up to you.
And we wish you a rich harvest in your beds!
If you don't feel like working with your hands
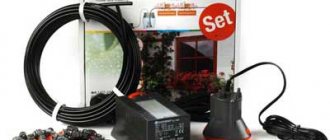
Don't want to start building a drip irrigation system yourself? Welcome to any agricultural or household goods store near you. Here you will find a lot of offers, you just need to determine your needs in advance in order to make the right choice.
Choosing a drip irrigation system
A newcomer can be confused by names, imaginary promotions offering big discounts, and other offers that aim to quickly sell out of stock. Therefore, when you go shopping, remember that the irrigation system consists of a main hose and drippers with irrigation dispensers. Also, the kit should include adapters, bayonets, plugs and clamps.
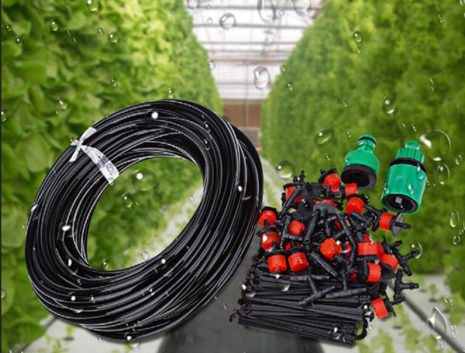

Advice! when buying a ready-made drip irrigation system, choose the one that has a built-in filter. It will cost a little more, and will last several times longer.
The pegs included in the kit will also be a plus, which will fasten the hose to the ground. Some modern offerings have a built-in timer. This is very convenient because allows you to customize the irrigation schedule.
And in other moments, the differences are only in price and name.
Installation of the system in a greenhouse or vegetable garden
Start with careful planning. First, make a plan of the site, determine where the irrigation system will be located. When in doubt, start with a small garden bed, then see how it goes and continue.
Mark the location of the container with water. Remember that it is advisable to position it in such a way that it is possible to collect rainwater.
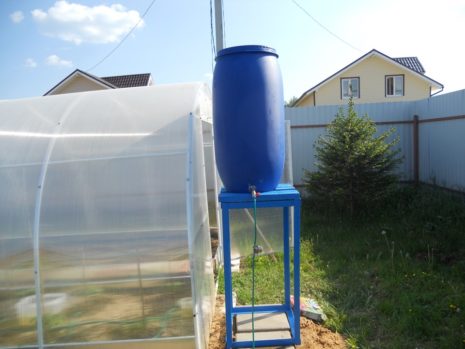

After that mark how the hoses will be routed, where the taps will be located, where are the plugs, etc. Calculate how far the plants will be from each other. It depends on the variety and type of crop. There are located at a distance of up to 30 cm, and there are up to 1.5 meters. This must be calculated in order to correctly make the holes in the hose.
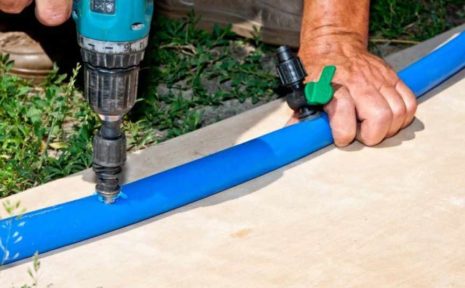

After unfolding along the beds, the tapes must be pressed to the ground, one edge must be connected to the main hose, and the other must be fixed with a plug.
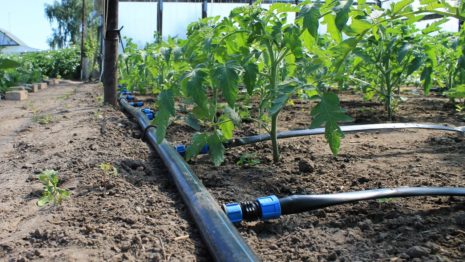

Everything! It remains to fill the container with water, open the main tap and check how everything has been done correctly.
Advice! Before the first use, the hoses must be thoroughly rinsed, but not in the beds. There may be unnecessary residues inside, which should not fall on fertile soil.

