What house plant is always held in high esteem by flower growers? Of course, it's a violet. She boasts not only the most delicate flowers, but also decorative leaves. Many novice breeders who have got one such flower fall in love with it rather quickly and do not want to be limited to one copy. And it is very easy to propagate a violet at home!
Reproduction of violets by a leaf: Detailed instructions
leaf propagation of violets
Despite the fact that, as we said earlier, this operation is incredibly simple and intuitive, it still has a certain amount of nuances and subtleties that you should definitely know.
Choosing the time of the operation
Of course, it is best to propagate violets with a leaf at a time when all other serious procedures are carried out on plants, namely, in summer or spring. It is at this time that the plant will be best prepared to painlessly endure the procedure and recover in speed. In addition, this timing will also allow the sprouts to prepare well for winter.
However, it is not always possible to carry out the procedure at a suitable time. For example, in the event that the plant is on the verge of death, and you need to save it, but, unfortunately, it is already deep winter outside.
Naturally, you have nothing left but to start breeding, but you must understand that any procedures in winter are a big risk, and therefore the chances that everything will go smoothly are, of course, reduced.
However, all this is relevant for you in the event that you have not yet gained experience. A wise and trained florist can easily carry out such a delicate procedure in absolutely any weather.
Which sheet to choose?
violets home breeding
Of course, no procedure will go smoothly if you select the wrong sheet, since this is where at least half of its success lies. We believe that it is quite obvious that a weak or diseased leaf simply will not give the desired effect, and therefore the larger, healthier and stronger the planting material you choose, the better the reproduction of violets will occur.
In order not to be mistaken with the choice, it is advisable to choose the right stems on which they grow. The fact is that, for example, on the lower stems that constantly grow in the shade of their upper neighbors, of course, nothing worthwhile will grow.
In addition, for an hour all old and unusable leaves remain on the lower stems, therefore, of course, you need to choose the leaf that most often sees the sun during the day - the one that grows higher.
However, this does not mean that the topmost leaf is always the best and only correct choice. In the end, the selection process must be approached wisely, and therefore, if, for example, on the second or third tier of stems there is a much more suitable specimen, why not take it?
By the way, there is one more rule. We strongly recommend that you use only those leaves that have grown on your violet as planting material. Those that appeared on a flower in the store where you bought your plant are likely to be weak, drooping and unusable due to the fact that the flowers there simply do not have such good care that you can provide at home.
In addition, the leaf can be significantly damaged on the way to your home, although you will not see any noticeable physical injury.Nevertheless, if you simply do not have a choice, and you want to take leaves from a drooping plant and bring out a new healthy generation from them, it is advisable to steam the weak leaves in hot water. This is done for no more than two hours, since otherwise everything may not go as planned, and the leaves will simply become unusable.
By the way, it is highly recommended to add potassium permanganate to the water, since without it there is a high probability of bacteria, viruses or fungi entering the seedlings, which can disrupt your entire procedure in the bud.
After steaming, it is recommended to dry the leaf on a dry cloth. Now that he is completely ready for planting, you should prune his stalk a little. It is advisable to leave so much length from it that only four centimeters remain to the base of the sheet. The cut angle, however, does not matter.
Preparation of planting material and planting dates
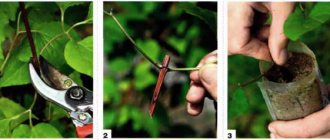
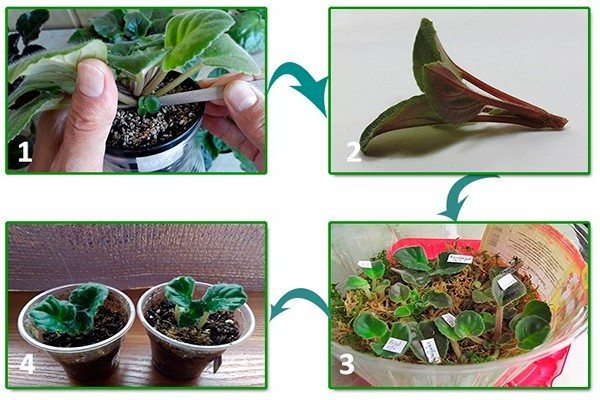
To prepare the planting material of a violet for reproduction step by step, its leaf must be properly cut and planted.
This is done in several ways, any of them has a positive effect. For example, you can simply break off the leg of the leaf with your hands. However, it is more correct to use a sharp knife, regular blade or pruner for cutting. Most flower growers prefer the second method, as it is painless for a flower, simple and convenient. But some reproduce miniature violets with a leaf horizontally across (or, in other words, propagation by the top), by an incision, or they are planted in a substrate without a petiole.
However, you need to remember that the cut must be correct, so the stem of the violet leaf is cut at an angle of 45 degrees. After cutting, a small stump of 1-4 cm should remain, the rest is removed. The place of cutting a leaf on an adult violet is sprinkled with activated carbon powder or wood ash. Before planting, the cut of the leaf must be fresh, it cannot be dried for a long time. If it has dried out, then it is renewed, retreating 5 mm.
When everything is ready, you can proceed to planting a half-mini violet leaf. For this, specially prepared soil is used, which is steamed in a microwave oven for 30 minutes. After this time, the ground cools down and is ready for planting. This measure will help kill disease-causing organisms that multiply in the ground. The best time to plant micro violets is spring, summer and early autumn, when there is no scorching sun and enough light and warmth. That is why exhibitions of violets and other indoor plants are organized at this time.
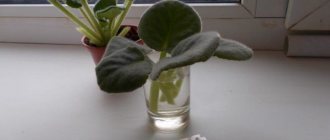
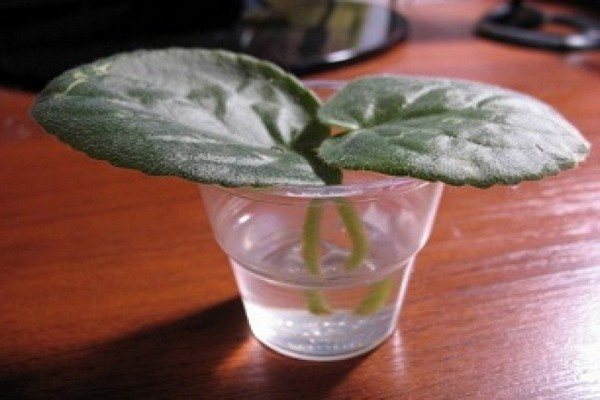
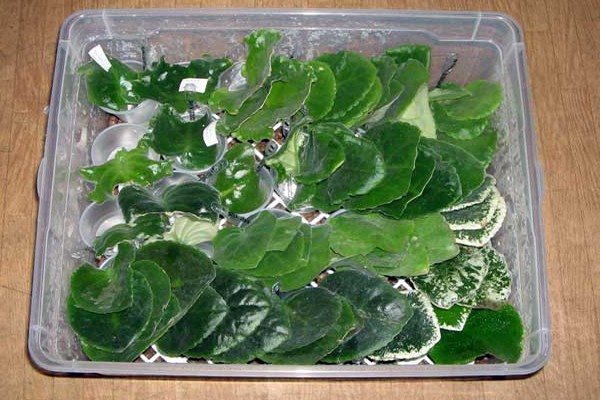
Reproduction of violets in water: Rooting a leaf
This method is also very common, but it implies that you will act quickly and immediately. The faster the leaf gets into the water, the better your chances of breeding will be successful.
However, it still remains the simplest and most recommended for beginners, since it, in the event that the reproduction of violets takes place in boiled or settled water, offers you the following advantages:
You always know in what state the planting material is, and you can also determine for sure if something bad happens to it and you will quickly react by saving your seedlings.
It will also help you prevent the fungus from entering the plant, which, if infected, can cause rot and death of the seedlings.
In addition, you will be able to watch in real time how the root system of the leaf is formed, and how it turns into a poor violet, which will soon become a wonderful decoration for your home.
However, there are very strict rules that are associated with this method, and violation of these rules can lead to the death of the leaf, and, accordingly, the inability to carry out the procedure further.
First of all, it is very important to rinse and disinfect well the container in which the shoot will grow. If we are talking about disposable dishes, then it is completely desirable to completely sterilize it in order to exclude any possibility of harmful compounds and bacteria getting into the leaf.

photo: Reproduction of violets in water
However, we still do not recommend that you take risks and choose disposable dishes: they are simply unreliable, and therefore it is much better to choose some time-tested glass made of as dark glass as possible. Such a remarkable quality will not allow green algae to form on the surface of the water and pollute it, and, accordingly, will not interfere with the growth and development of our leaf.
A slight deepening of the leaf cutting into the soil, which will provide it with greater safety and preservation. Nevertheless, the deepening should not be excessive, and therefore two centimeters will be sufficient.
While the leaf is in a vessel with water, its cut should not touch the walls. The fact is that this is the most delicate and sensitive part of a young plant, and therefore any effect on it can lead to unpleasant consequences. In order to prevent unwanted contacts, you can use the fastening with a sheet of paper or a piece of cardboard.
So that certainly no diseases can attack your leaf while it is in the water, we highly recommend that you throw a tablet of activated carbon into the container of your choice.
You must be prepared for the moisture to gradually evaporate from the surface of the liquid, and therefore it will need to be added over time. Nevertheless, when carrying out such pouring, you need to be very careful, since if the water touches the leaf itself or, on the contrary, it is not enough, the leaf may die.
In order to root the leaf, after you put this method into action, you will need to follow this plan, which implies:
Before the roots start to appear, of course, you have to wait. Of course, there simply does not exist a definite time for a leaf to stay in water, since one must take into account the huge number of varieties and species that are cultivated in our time.
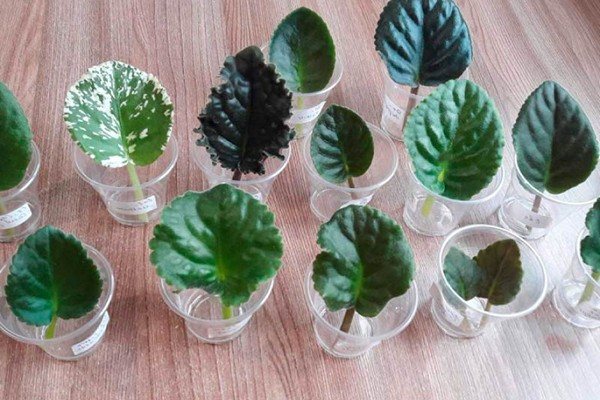
photo: Reproduction of violets in water
Nevertheless, if we try to find the average value, we will get about two to four weeks of waiting before you see the first roots growing from the cutting of your leaf.
However, unfortunately, during the procedure, things may not go as smoothly as you would like, and the leaf may develop rot. In this case, you should not hesitate and urgently get the seedlings from the container with water. After that, it is very carefully dried and part of the stalk with rot is completely removed.
After that, you can try to carry out the procedure again, however, the water, of course, is completely replaced, and an activated carbon tablet is thrown into the new one, which will not allow rot to appear again.
Coal, by the way, for greater confidence, you can also rub the place of the cut. Most likely, if you did everything correctly and quickly enough, the roots will nevertheless begin to form, and as soon as they reach a length of one to two centimeters, they can be taken out of the water and placed in the ground, where they will grow in the near future.
Nevertheless, in some cases, pulling a leaf out of the water when it has roots is not the best solution. In this case, experienced flower growers are waiting for a small rudiment of a rosette to appear on the sprout.
However, 0 should be warned that if you are a beginner, determining when it is best to get the sheet early and when - later, will be an incredibly difficult task for you, which we recommend that you leave it on the shoulders of professionals. In any case, if the leaf already has roots, it will definitely not die in the ground. Of course, if you take good care of him.
However, before proceeding with watering and, in principle, care, you should select a suitable container for the sprout. Unlike the previous stage, when our leaf was in water, you can already use disposable dishes at this stage.In addition, it is more convenient, since a drainage hole can be easily made in the plastic cup.
However, the hole alone will not be enough to ensure the leaflet has a good drainage of water, and therefore the glass needs to be filled about a third with small pebbles, and soil is placed on top of it almost to the very edges.
As for the planting procedure itself, it is quite simple, but it still requires a certain accuracy and delicacy from you. First of all, you need to dig a small hole. However, you need to calculate its size so that the plant is not too deep. As already mentioned, two centimeters is quite enough, well, more is too much.
The reason for such a small deepening is simple: if you plant the leaf deeper, the socket formed underground simply cannot break through to the surface and will be suppressed by the layer of soil that is above it.
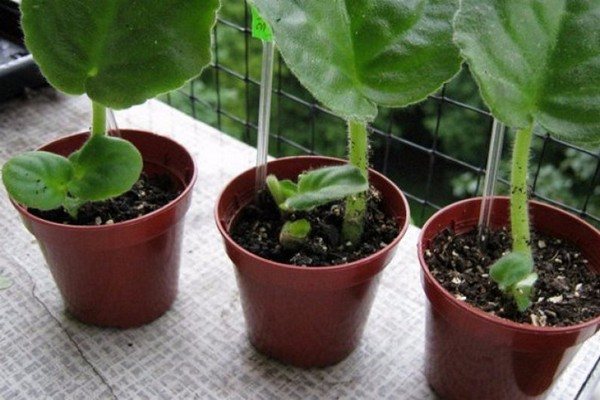
After successful planting, the soil around the cutting needs to be compacted a little so that it stands firmly in the pot without wobbling. You also need to make the first careful watering, after which the impromptu pot is either placed in the greenhouse or covered with a bag, thanks to which a mini-greenhouse effect and a favorable atmosphere for the successful growth of the plant are created.
Of course, if you propagate several varieties at once, it is very desirable to sign the pots, since in the early stages of development, different violets are very similar to each other and it is almost impossible to distinguish them from each other, which can create a huge number of problems in the future.
When should you get the plant out of the greenhouse / remove the bag from it? Usually it needs to be kept in this state for no more than two weeks, since it is this time that is most often enough for the leaf to grow enough to rise above the ground level.
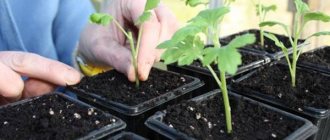
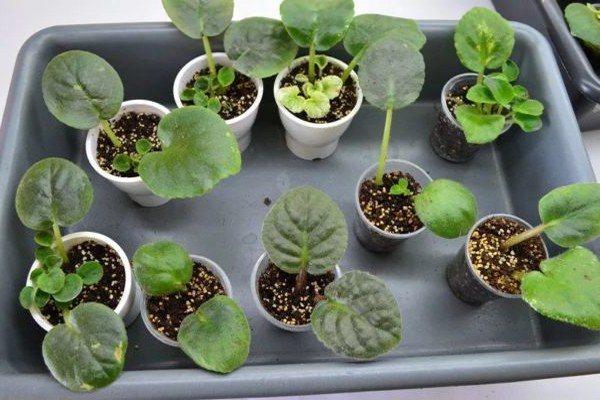
Transplanting babies into pots
For transplanting violet babies at home, small pots with a volume of 80-100 ml are used, so plastic cups may be suitable. Each bush is transplanted into a separate container, at the bottom of which there should be drainage holes. The soil for planting is airy, light and nutritious. For transplantation, the children are separated from the legs of the mother's leaf and shaken off excess soil. When doing this work at home, there is no need to rush, as tiny babies are very fragile, so it is easy to damage them.
It may be that all the leaves of young children are strongly intertwined, so they are carefully separated, and then the root system is examined. It should be intact. Children are seated separately in prepared containers with drainage, making a sufficient deepening in the soil. A young bush is planted in the center, leaving its entire green part on the surface. It is advisable to place the transplanted children in a greenhouse for several days and do not forget to ventilate it. After being removed from the greenhouse, the children are poured with warm boiled water. Also read the article: Forest violet: characteristics of the best varieties for indoor cultivation.
How to root a violet in potting mix?
This procedure has a very good effect on the future development and growth of the plant, since it is in a good soil mixture that the leaf and its roots show their best side.
In addition, this method will most likely allow you to solve the problem that the leaf you initially chose was a little painful and weak. It is in a well-prepared ground that he will "get a second wind" and a second chance will appear.
In order to crank this procedure, you will need to follow approximately the same instructions as in the previous case, however, the cutting will need to be rooted even more, leaving not four, but only one and a half centimeters. This is especially true for miniature varieties.
For planting, you can prepare exactly the same cup that we prepared for transplanting violets growing in water into the ground.
However, you can also use an ordinary pot. Its volume should be equal to about a hundred milliliters, and its diameter should not exceed five centimeters.
As in the previous method, we fill a third of the total volume with drainage in order for the plant to feel more comfortable with stagnant water. In the event that you use expanded clay as a drainage material, you should thoroughly disinfect it, since the chance of developing a fungal infection will not be small.
Almost the entire remaining volume of the pot is filled with soil. You need to make a small hole in it, into which our cutting will be placed. This recess, which will already be inserted by the handle, is not filled with simple soil, but mixed and very loose. This is done so that the small rosettes that form at the roots have a better chance of breaking through the soil and not being buried under lean soil.

Sometimes, however, you can find instructions that suggest that you completely fill the pot with just such loose soil, however, in our opinion, this can be extremely detrimental to your plant, especially if you have not yet had time to gain experience.
The fact is that such loose soil, obviously, retains moisture rather poorly, and therefore you will have to greatly increase the frequency of watering, which in the end will definitely not lead to anything good.
In order for the soil, on the contrary, to be good, saturated and useful, you will need to add a little sphagnum moss to it, which is responsible precisely for retaining moisture. In addition, this moss is antibacterial, which makes it an excellent additional protection for your plant.
When you plant a cutting, the soil should already be slightly damp. However, the deepening should be very small, since, despite the fact that we use very loose soil, it will be incredibly difficult for young roots to break through it, and therefore there is no need to deepen the cutting by more than five millimeters.
Nevertheless, if the leaf and the stalk itself are large enough, this depth can be increased up to a centimeter. In addition, even several sheets can be planted in one glass at once, but this also requires certain skills, and we do not advise you to do this if you are not at a sufficient level.
By the way, in order to more clearly look at how all these procedures are carried out, we strongly recommend that you watch the videos related directly to the propagation of violets by a leaf. This way, you can even better consolidate the information you received while reading this article.
And again, as in the previous case, if the roots of your leaves have more or less formed, the soil around them can be slightly compacted and moistened, and the glass with the plant is placed in the greenhouse. However, as you remember, you can cover it with a bag.
Nevertheless, keeping them in this state is not very useful, since in such a humid environment there is a huge risk of mold formation, and therefore the seedling, both in the greenhouse and under the bag, needs to be ventilated.
Peduncle propagation
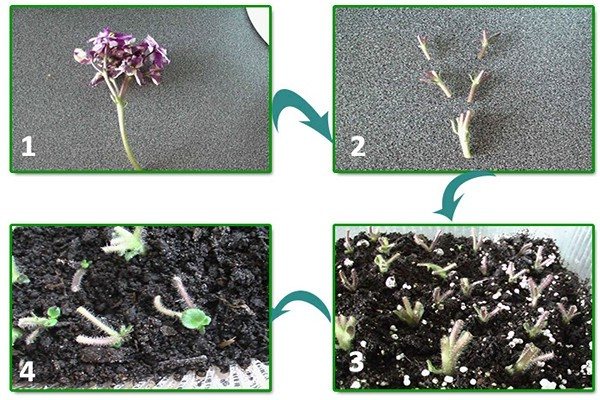
Peduncles are planting material that fully retains the shape of the buds, the coloring of the mother plant. How do violets propagate from a flowering branch? Choose a blossoming inflorescence or with wilting petals. The stipules should be large. The peduncle is cut, separating the stalk, flowers. It turns out a small fork.
In the trefoil, a baby is often formed, before the rooting of the peduncle, the young rosette is separated, it is better to grow it separately.
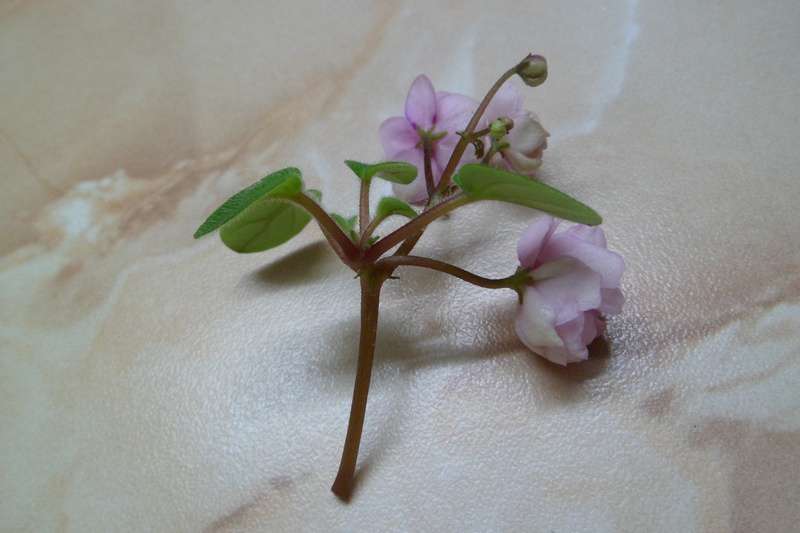
Baby separated from the mother's flower
Features of germination
For rooting of the peduncle, it is better to use the ready-made Greenwall soil mixture.Add 1 part of any baking powder to 2 parts of the soil.
Note! In species with variegated foliage, peduncles with a large number of white spots do not take root, you need to choose dark branches.
Optimal conditions for germination
The humidity is maintained at 85%, the temperature regime is from 22 to 27 ° C. Mini-greenhouses are made for plants, where it is easy to create tropical conditions. Regular airing, moistening, supplementary lighting is recommended. Full rosettes, ready for planting, appear in 40–45 days.
Stages of work step by step
Basic operations progress:
- Prepare small cups with soil mixture, spill it with a solution of biofungicide and a growth stimulator.
- The peduncles are shortened so that the cutting size is no more than 2 cm, peduncles up to 1 cm.
- Before planting, the sections are dried for 10 minutes.
- Deepen the planting material so that the edges of the stipule are in contact with the surface of the substrate.
Follow-up care
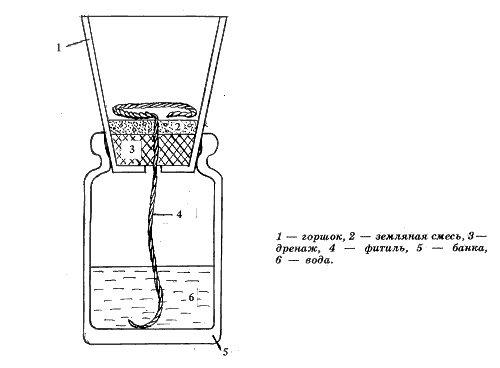
For young violets, wick watering is recommended, a cord is pulled into the pot, which absorbs water from below. With such watering, salinization does not occur in the soil. The rosettes from the peduncles are strong, quickly gaining green mass. Before planting, the root is cleaned of soil, dipped briefly in a growth stimulator.
Reproduction of violets by a leaf in a peat tablet
This is our last, but not least, method. The fact is that, despite the fact that it is relatively unpopular, it still remains very effective and efficient, and therefore, if you have already tried other methods, you can experiment and use a peat tablet.
The conditions created with this wonderful potting mix will not only allow the violet rosette to break through the soil with ease, but will also provide it with ample nutrients and will also perfectly retain moisture and prevent rot.
Let's summarize
In order for the procedure for propagating violets by the leaf method to be successful, you will need to provide the plant with some of the conditions listed below so that you can repeat all the most important aspects mentioned in this article.
First of all, of course, you need a fairly loose, but at the same time, well-retaining soil, which will allow your leaf to grow without any difficulties. Mixed soil can also be used.
It is equally important to maintain an optimal room temperature between twenty-two and twenty-six degrees Celsius. A greenhouse or an ordinary plastic bag can help you with this.
It is necessary to provide the sprout with a sufficiently long daylight hours, thanks to which it will be able to receive enough energy to grow and develop effectively.
Watering should be not only regular, but also with correctly calculated portions, since only in this way can you help the plant get used to new conditions and maintain an optimal growth rate.
The place where you grow the leaf should be humid enough. Otherwise, there is a high probability that the plant will dry out and, most likely, die, not having time to turn into a wonderful adult.
It is equally important to find a good place to grow your seedlings, and therefore, if you have racks for plants on which you can place several pots at once, you can do nothing better than placing your violets there.
Ideal potting mix
After reading all of the above points, you probably noticed that one of the most important, if not the most important part of a violet leaf propagation is good soil. Therefore, we strongly recommend that you make it yourself, as what you buy in the store may not be good enough and will not meet your expectations.
The preparation of the soil should be started a few days before the direct planting of the boring in the pot, since all the ingredients need to be thoroughly mixed with each other. As a basis, we advise you to use not ordinary soil, but ready-made soil for violets, which can be freely purchased in any store or market.
Nevertheless, since experienced gardeners do not like to use at least something purchased, we can recommend them the following recipe, with which you can prepare not only healthy, but also natural potting mix:
You will need one part of deciduous humus, three parts of high-moor peat, one part of clean river sand, two parts of sphagnum moss and one part of ordinary garden land, which will not be difficult to find at all.
Also, to provide soil looseness, you can use substances such as, for example, perlite, which have become especially popular and widespread in recent years.
Also, it will not be superfluous to introduce crushed charcoal into the soil, which will provide your sprout with protection from viruses, bacteria and fungi, and, of course, a little sphagnum moss on top to maintain a sufficient moisture content in the soil after watering.
In the event that you have already used sphagnum to make the base of the potting mix, you will have to grind it. But as a whole, it can be used even as a drain.
Separation of outlets during leaf propagation
The fact is that in all the previous paragraphs, considering pots and cups for growing seedlings, we, of course, talked exclusively about a temporary dwelling, since these plants grow quite quickly.
Soon enough, several young outlets will form underground, and then the question of where and how to put them will become quite acute.
To resolve this issue, the usual transplantation procedure is used, however, you should take into account that if the leaves have a slightly unhealthy color, in no case should they be transplanted. It also means that they need to be taken care of a little more diligently, and then in a few weeks everything will return to normal.
If you are going to cut the rosettes, then you need to take into account that each of them must have at least a couple of leaves, and preferably three, so that each plot can easily support its own existence through photosynthesis.
It is also worth remembering that separation is a rather exhausting procedure for a plant, and therefore it must be carried out not only carefully, but also observing the following rules:
The soil must be very well moistened so that a "warm welcome" is given to the new pot.
The plant must be transplanted together with a clod of earth, since otherwise you run a very high risk of damaging its root system.
Pots, by the way, of course, should be tiny. In diameter, they may not even reach five centimeters, however, while the plots are only growing and gaining strength, these sizes should be more than enough for them.
However, a very unpleasant situation can happen during a plot of land: some children will simply not have enough roots to maintain normal life. In this case, you will need to make the soil for them as loose as possible. Also, after planting, it is advisable to plant such a painful sprout in a greenhouse.
After some time, when the diameter of the plant is twice the diameter of the pot itself, you can think about transplanting the flower to a permanent place of residence, where you can take care of it like a full-fledged adult plant. The pot, accordingly, should also be enlarged, but the violet leaves should still be slightly larger than it.
Otherwise, the final transplant before entering adult violet life is no different from what you have already done.
Reproduction by stepchildren
The stepson is a sprout that forms in the axils of the leaves or at the stipule of the peduncle. Some varieties are prone to the formation of stepchildren, they constantly grow new rosettes.
How to propagate rosemary - ways
They provoke the growth of stepchildren in several ways:
- Root nitrogen fertilization is introduced - nitrogen stimulates the growth of green mass.
- Violets are transferred to wick or hydroponic irrigation, grown in perlite.
- Transplanted into a large pot. As a result, a new growth point forms on the stem within six months.
- Apply mechanical damage to the top of the rosette: at the violet intended for breeding, pinch the growth point.
Interesting! At home, some growers set up small nurseries for growing stepchildren.
What should be a stepson
In most Saintpaulias, the air root comes out only in stepchildren, more than 4 cm. They are separated first. On small-leaved species, varieties with variegated foliage, stepchildren are formed in the lower leaf tier. Separate the layers for rooting when there are at least 3 leaves.
Optimal conditions for germination
For root growth, it is important to maintain a constant temperature regime; soil cooling below + 22 ° C is not recommended. The humidity is kept constant.
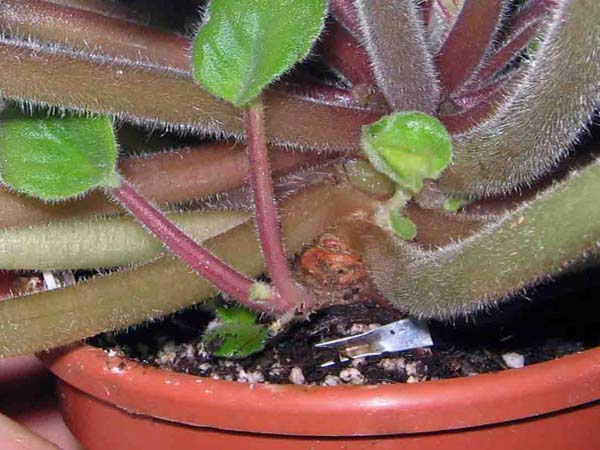
Young stepchildren are visible when the plates of the mother plant are lifted
Stages of work step by step
Stepson Separation Procedure:
- Determine which leaves belong to the young rosette.
- With the left hand, a young sprout is separated, lifting the leaves of the mother bush.
- With a sharp disinfected knife or blade, press on the base of the stepson.
- After the incision, the young rosette remains in the left hand.
- Remove damaged leaves.
- Dip the sprout into a mixture of perlite with sphagnum moss or directly into the soil mixture.
It will take up to 14 days for root formation.
Important! It is not worth rooting stepchildren in water: there is a great risk of the growing point getting wet, the rosette will rot.
Follow-up care
After rooting, the violet is transferred from the nursery to its permanent habitat. A young plant is looked after in the same way as for age violets.
Watering
Water the flower should be warm water and quite generously. The soil under the plant must always be kept moist. Water should be watered once a week, and in the summer they watered after two days. Excessive moisture should be avoided, as it can provoke root rot. It will be great if you can water your pet with rainwater. But still, remember that it must be warm. The violet responds very well to spraying with water, but the water should not contain lime, otherwise stains will appear on the leaves.
Top watering
This method of watering is most suitable for violets, but it is actually the most difficult. With this method of watering, water is poured in a thin stream into the ground near the edge of the flower pot. In this case, the water should not erode the soil. It is imperative for violets that the young leaves and the growing point remain dry. For this method, both a syringe and a small bottle or watering can with a small hole are suitable.
Pallet watering
This option takes an order of magnitude less time, but it also has its own nuances. You need to pour water into the pan as much as the soil is able to absorb. You will understand that there is enough water when you see the topsoil become wet. After 30-40 minutes, the water remaining in the pan must be drained off.
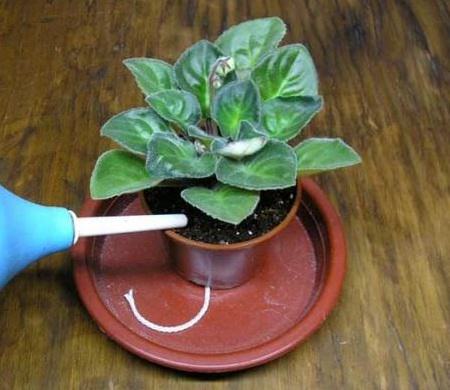
Wick
This method is essentially a modification of the previous one. A piece of fabric or a rope (not synthetics) is brought out through the hole in the bottom of the pot, and lowered into a container of water located under the pot, which should not touch the bottom of the water. The other end, accordingly, remains in the ground.