In the Middle Ages, statues adorned suburban areas solely for practical reasons - to ward off evil spirits and bring good luck to the owners of the estates. Today everything has changed and concrete garden figures are being installed for decoration. Of course, in order to create a classical sculpture, you will have to spend money on expensive bronze or marble and hire a sculptor who can erect a monument to human height. However, the growing popularity of art sculptures, sculptural additions and small plastic allow the owners of suburban real estate to try their hand at their creative endeavors.
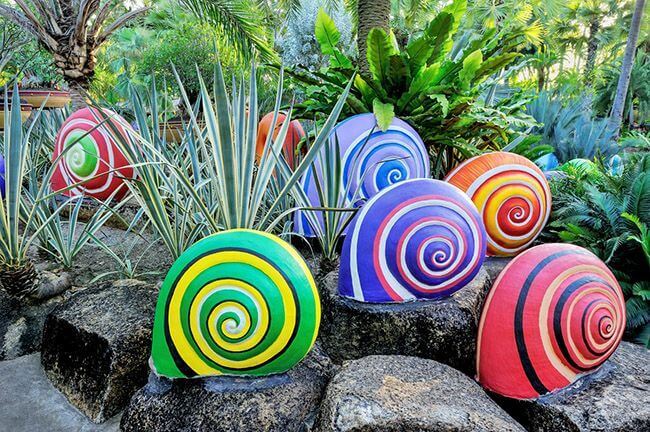
The garden plot can be decorated with bright decorative concrete figures
To make unusual figures for the garden with your own hands, you can take on board several popular ideas.
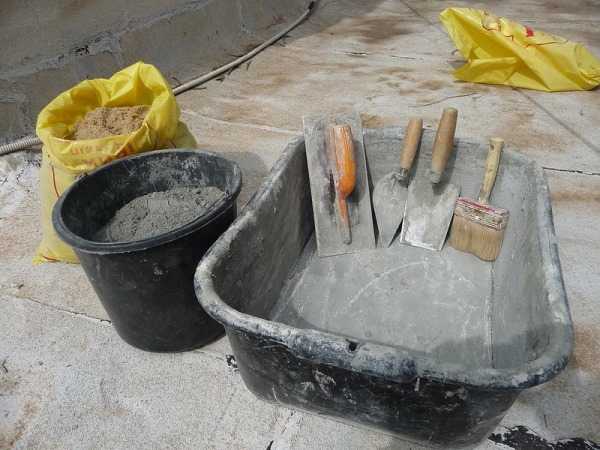
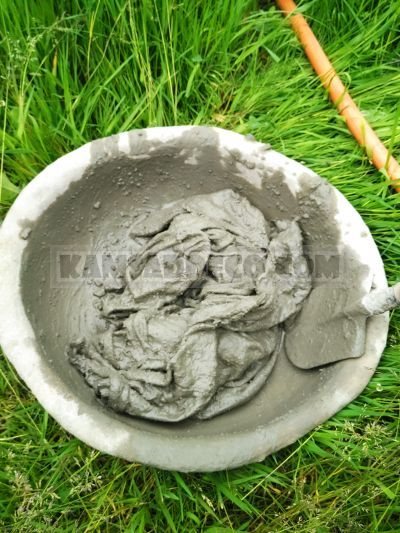
Concrete mix
To prepare the grout, you will need:
- Cement - 1 part;
- River sand is fine-grained and always clean - 1-2 parts (it can be washed);
- Construction plasticizer (optional) - 0.5 parts;
- Coloring pigment (if you want to get a colored craft right away).
From tools and materials you need:
- A trough for mixing the solution (you can have a bucket);
- Construction mixer or corded drill with paddle attachment;
- Shovel, trowel;
- Water bucket;
- Protective thick gloves and respirator.
Tip: the ready-made solution has a negative, irritating effect on the skin of the hands. Therefore, be sure to wear gloves.
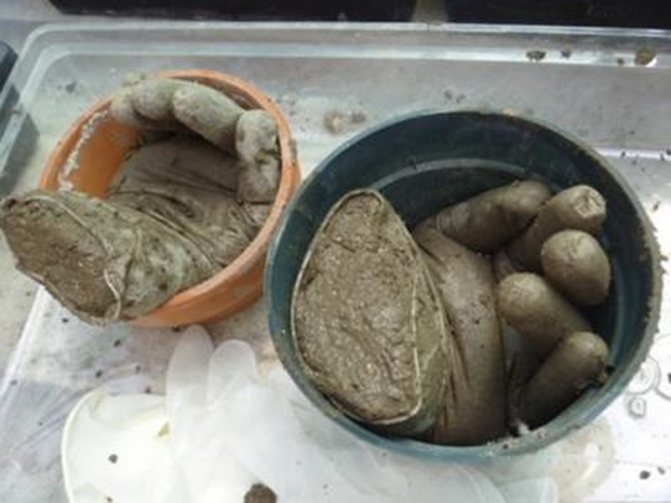
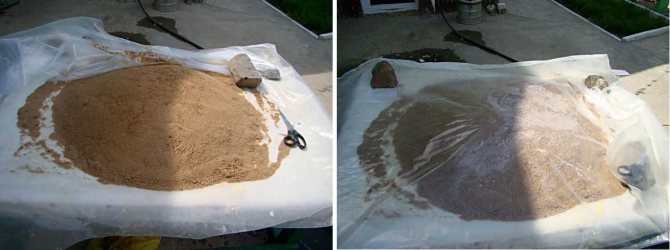
To make durable country crafts from cement, the solution is prepared as follows:
- Mix bulk items in a bucket or trough. Be sure to wear a respirator so as not to inhale small particles of building materials.
- Add a little water to them, and combine everything well so that both the sand and the cement get wet. Then add a little more water and plasticizer until you get a mass with the consistency of thick sour cream.
- Mix the concrete mass with a shovel or mixer until smooth. There should be no lumps.
- The cement mixture is ready. You can start filling the figures.
Tip: if you have large-scale work on filling large crafts, then for preparing a mixture with a volume of more than 30 kg, it is better to take a concrete mixer. It is impossible to cope with such a volume manually.
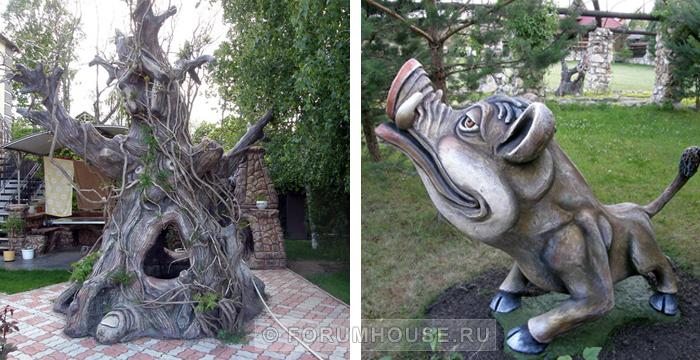

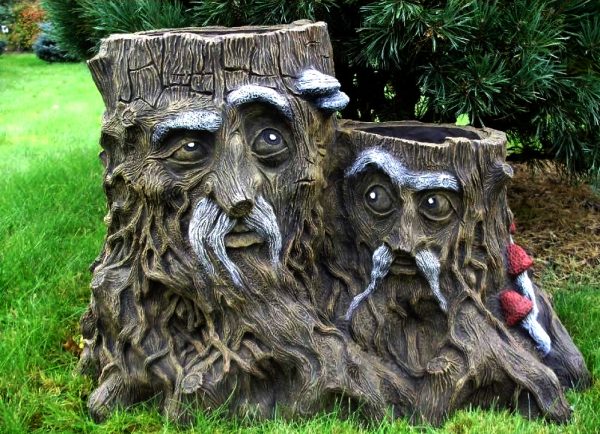
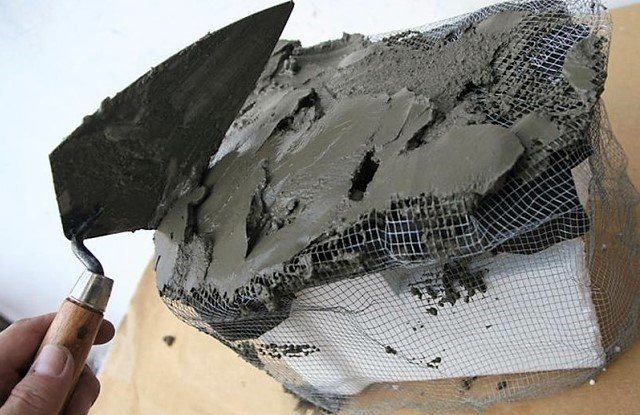
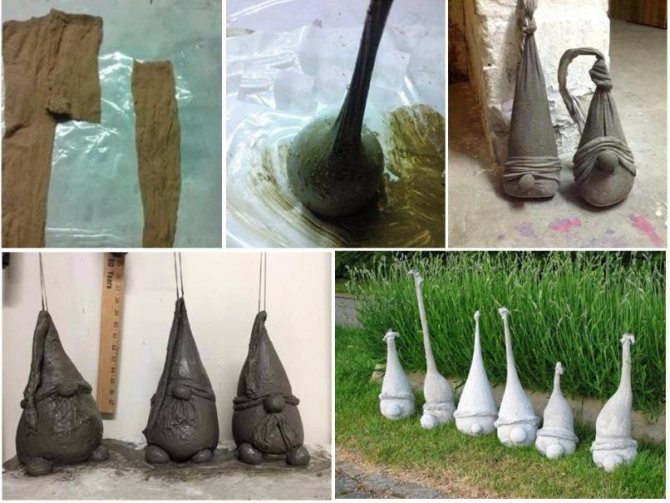
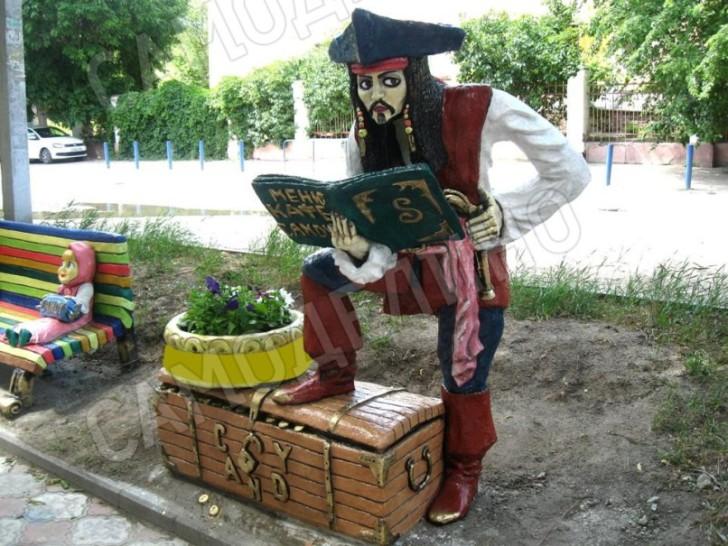
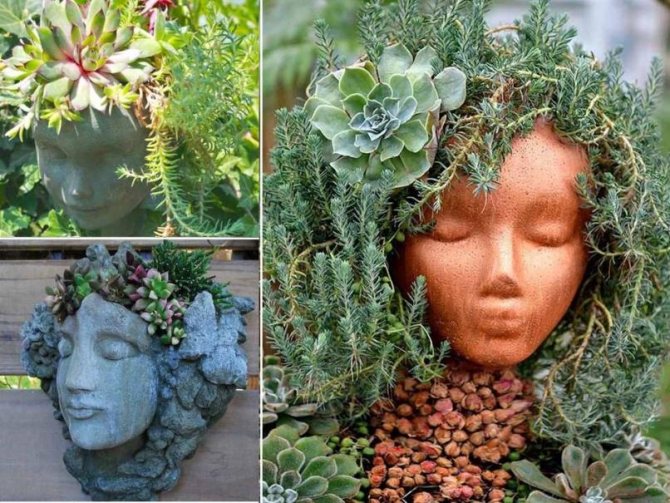
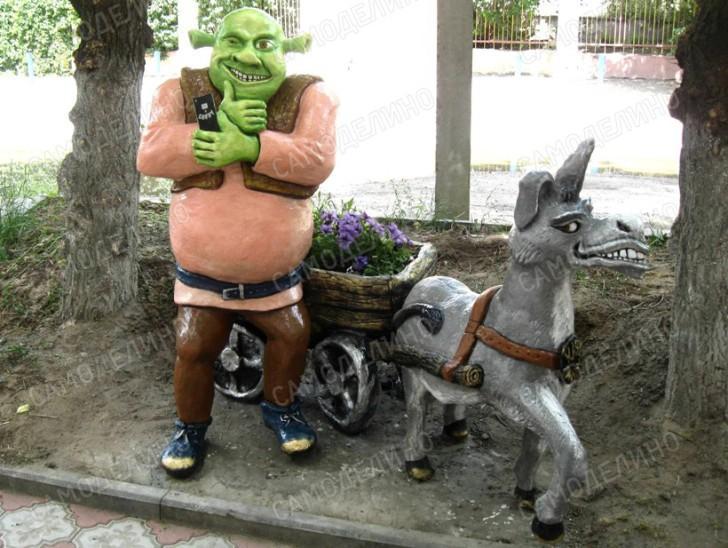
Complex shapes with wireframe
It's more fun to decorate your country house with sculptures of animals and mythical characters. Such creations involve pre-fabrication of a strong framework and layering of grout.
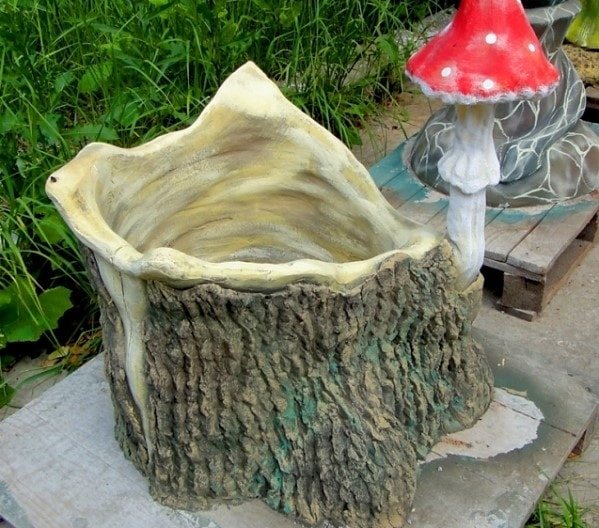
Interesting flowerpots can be made using buckets from building mixtures. At the first stage, a container of a suitable size is wrapped with a plaster net and covered with a thick layer of cement. At the second stage, until complete solidification, a decorative adjustment is carried out, making an imitation of an old stump with natural wrinkles on the bark.
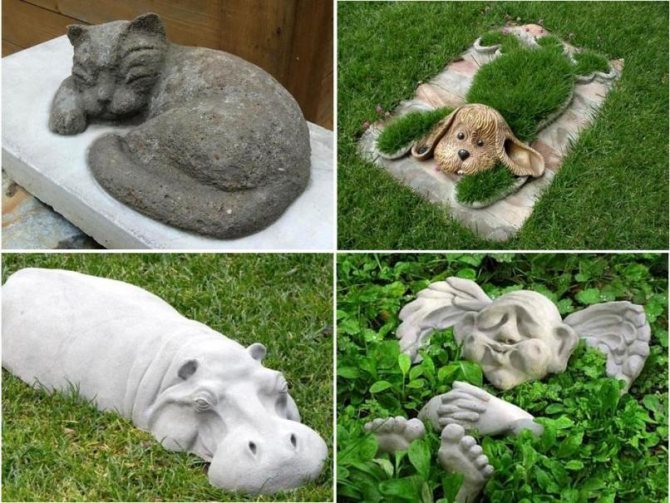
A monolithic figure of a hippopotamus will look appropriate near artificial reservoirs. The place for it must be determined immediately and carefully aligned, since in the future the figure will be stationary.
As a frame, two elongated plastic bowls are suitable, which must be fastened with wire. another option is also possible: a thick cement mortar is covered over a pile of broken bricks or gravel.
The figure itself does not contain complex elements and is easy to perform. After hardening, the product is treated with a fixing impregnation and dry pigment for concrete, rubbing the powder with a hard sponge.
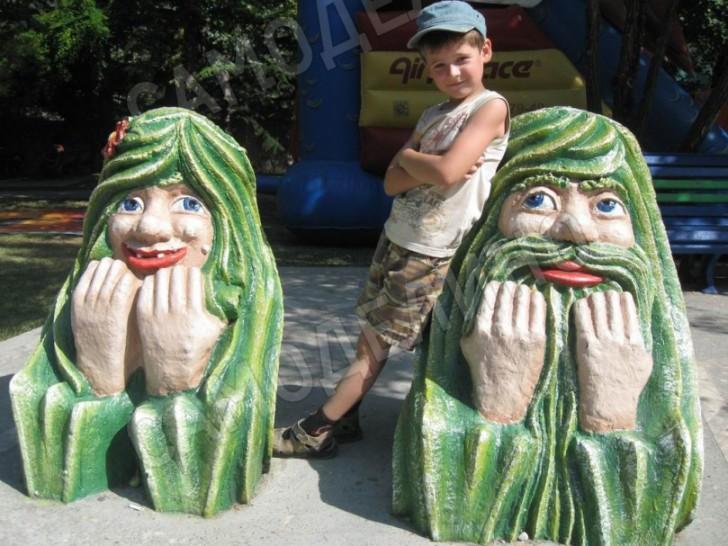
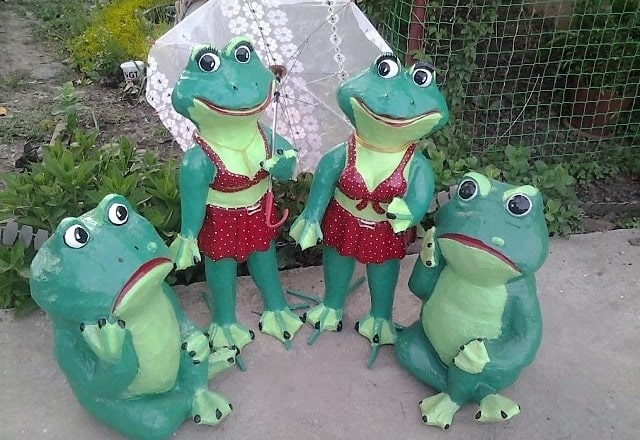
More complex sculptures are performed in several stages: 1) making a frame from wire and foam or containers; 2) covering the workpiece with a plaster mesh; 3) applying the mixture in several layers; 4) the formation of small details (facial features, special texture, folds of clothing, etc.); 5) priming and painting of the finished work.
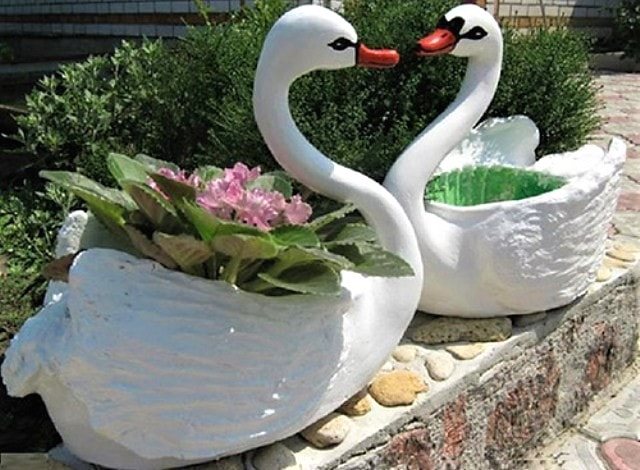
Flower pots in the shape of swans will become an elegant decoration of the garden. The torso frame is an old plastic basin, the neck is twisted wire. The head, wings and imitation of plumage will have to be made from a cement mixture, showing the skills of a sculptor.
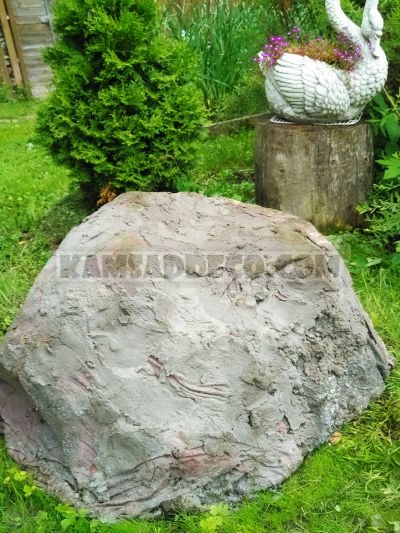
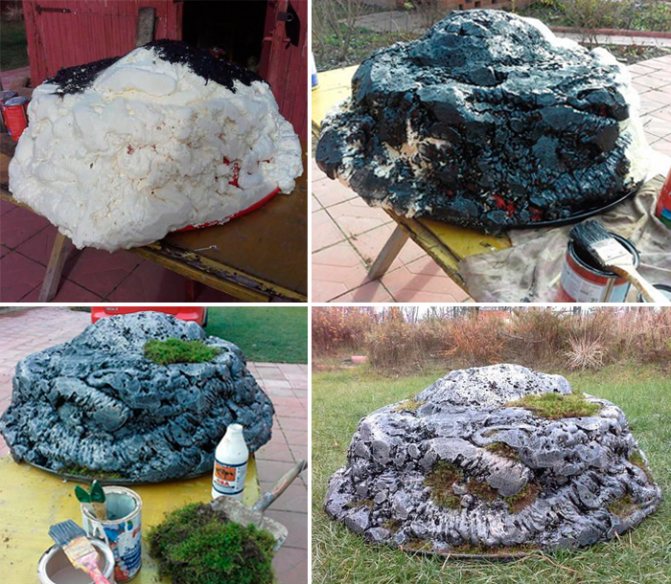
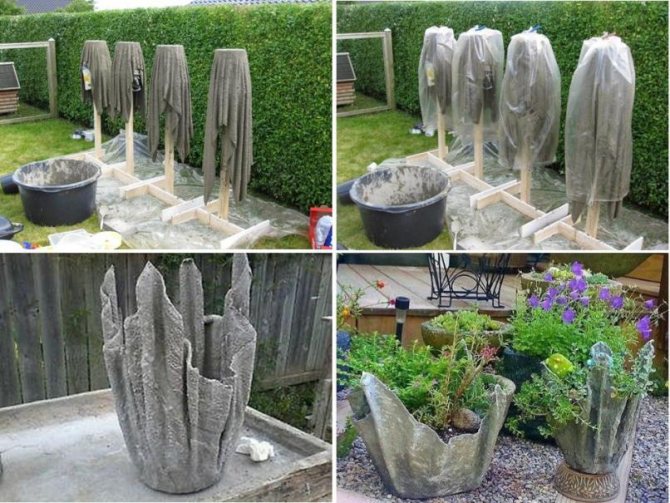
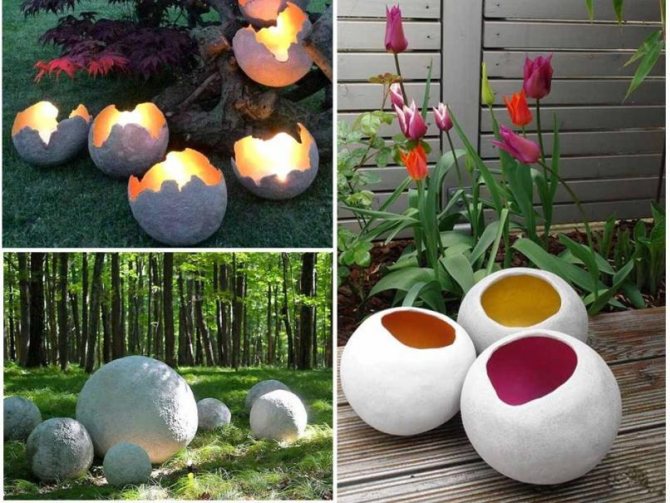
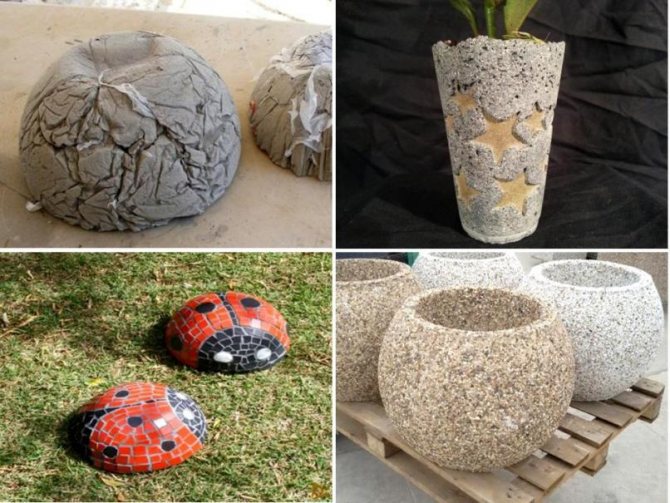
Monolithic shapes are heavy, so there is an alternative way to create lightweight large objects. You can decorate your garden with boulders of different sizes.
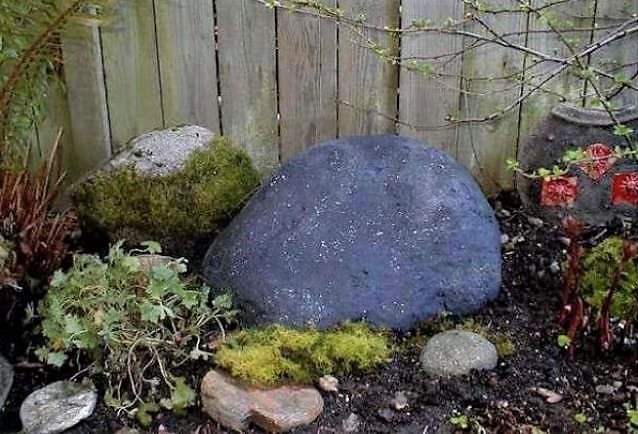
For their manufacture, any unnecessary and light material (trimming foam, plastic bottles, polystyrene) is tied with a wire into a tight lump.
The resulting base is wrapped in a plaster mesh and covered with a thick cement mortar. The more irregularities and protrusions there are, the more natural the "stone" will look.
Small garden figurines are made from a mixture of cement with the addition of gypsum or Portland cement.
Here you can use the manufacturing methods described above, as well as any basics: old toys, clothing, household utensils.
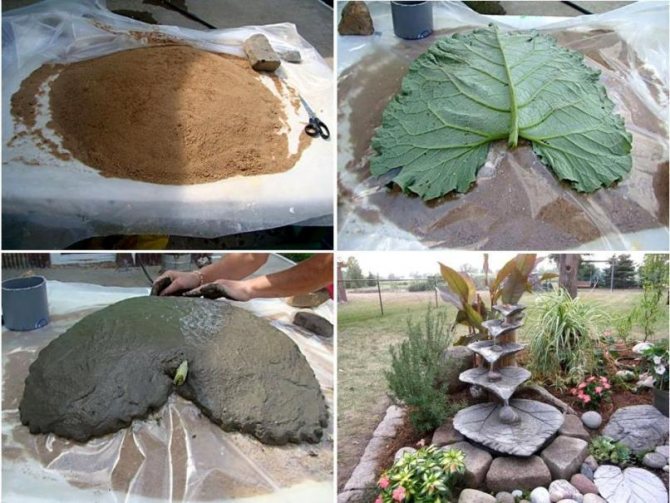
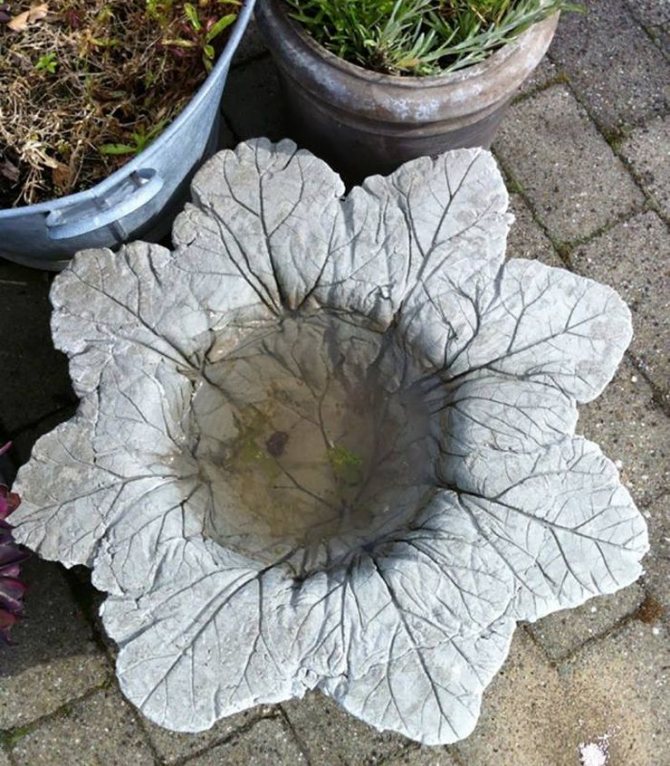
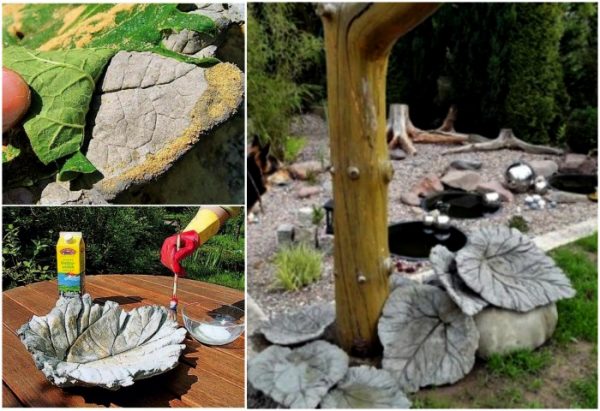
Drinking leaf
This is the simplest version of the product. They do it like this:
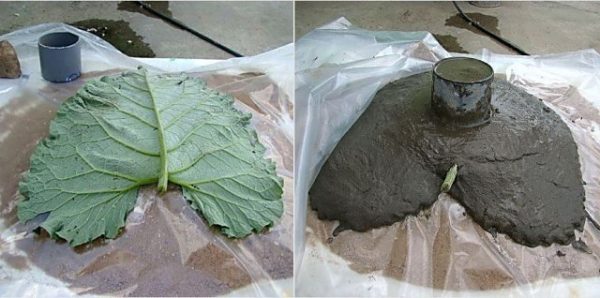
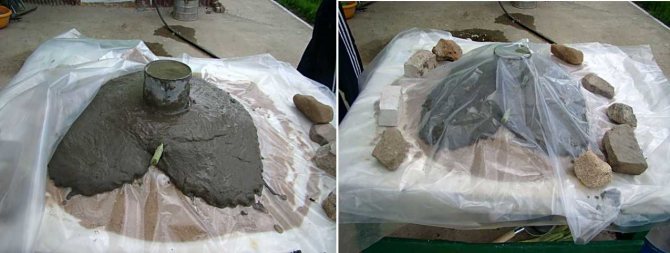
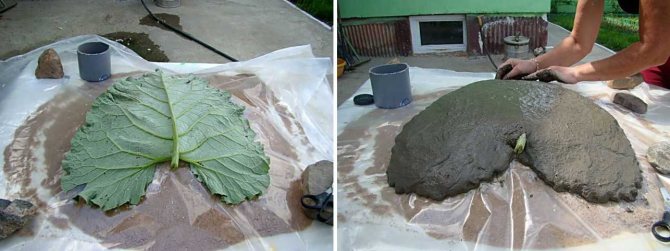
- Take two of the largest burdock leaves. One of them is laid on an oilcloth so that its edges are slightly raised upward. To do this, you can put some objects under the sheet around the perimeter or sprinkle a little earth on it. Or just dig a hole a little and put the sheet there.
- A layer of cement is applied on it with a thin layer (2-3 cm). Another sheet is laid on top to form a relief.
- In about a day, such a craft for decorating the garden will dry out. The top burdock is removed and the product is dried in the shade for a couple of days.
- The finished drinker, if desired, can be painted green and laid in the garden.
Tip: dry concrete crafts in a shaded place. Otherwise, the quickly drying solution will crack in the sun.
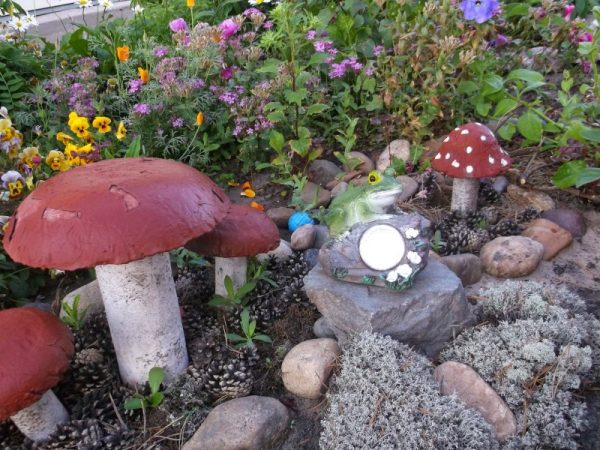
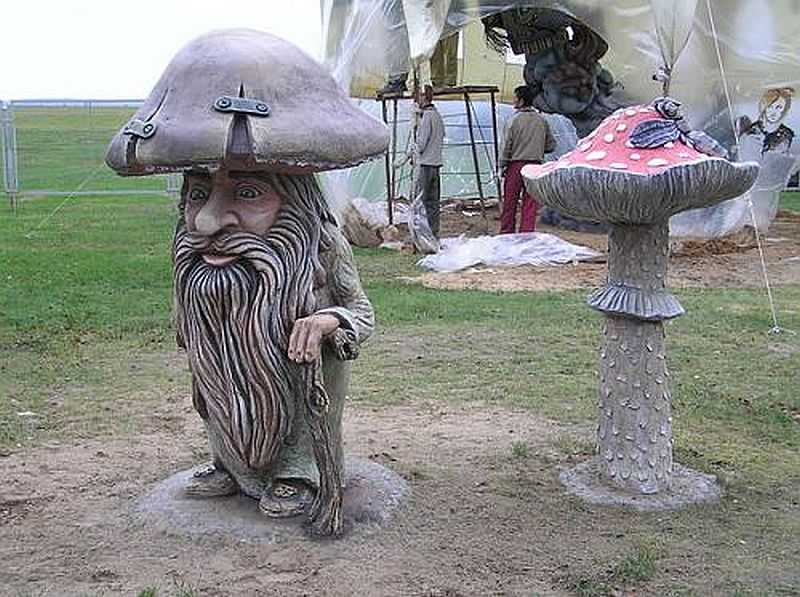
Mushroom glade
To make one mushroom, you will need:
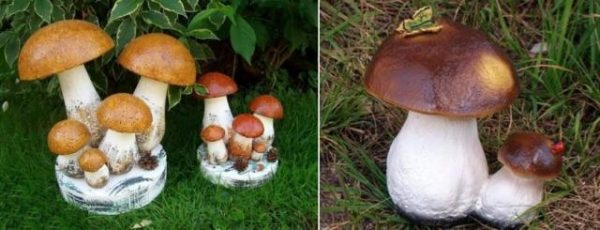
- Old rubber ball (the size of the future mushroom cap depends on its diameter);
- 1-1.5 liter plastic bottle (it should be proportional to the mushroom cap);
- Metal rod;
- A bucket of sand.
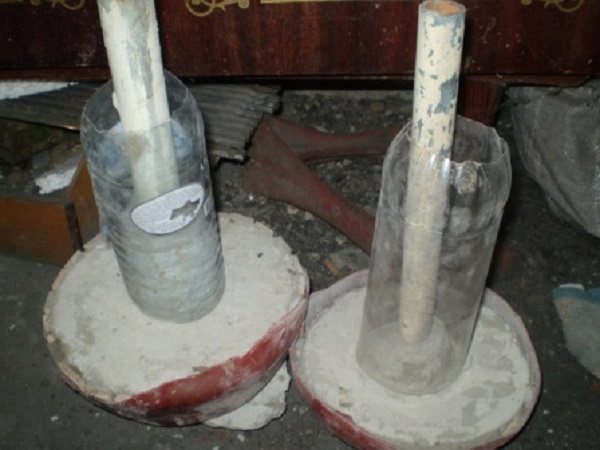
The work is performed in the following sequence:
- First, take a bucket of sand, filled 2/3 or a little more. A recess is made in it for an inverted mushroom cap.
- The rubber ball is now cut in half to form two hemispheres.
- One of them is placed in a depression in the sand and poured over with a ready-made solution. It is well leveled.
- Now they take a bottle and cut off the neck and bottom of it. The resulting cylinder is inserted 3-4 cm in the center of the cap.
- At this stage, you need to drive a metal rod along the installed bottle into the solution of the cap so that its end does not end up reaching the upper edge of the leg by 4-5 cm.This is a kind of reinforcement of a handmade cement craft for a garden.
- The "leg" is poured with a solution and the mushroom is waited for 3-4 days. After that, you can gently release the product from the mold. If desired, the mushroom cap can be decorated with glass pieces, pebbles, paint.
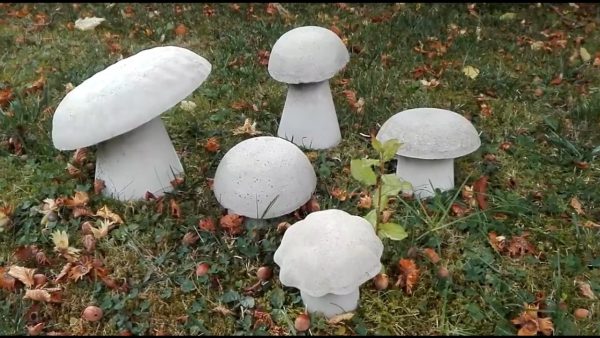
Tip: similar garden crafts for the garden can be made not only from cement, but also gypsum. Only in the latter case, they must be painted. Otherwise, seasonal precipitation will damage the fragile product over time.
Interesting: Garden design: options
Classification of landscape gardening sculptures
Landscape design specialists distinguish the following types of sculptures:
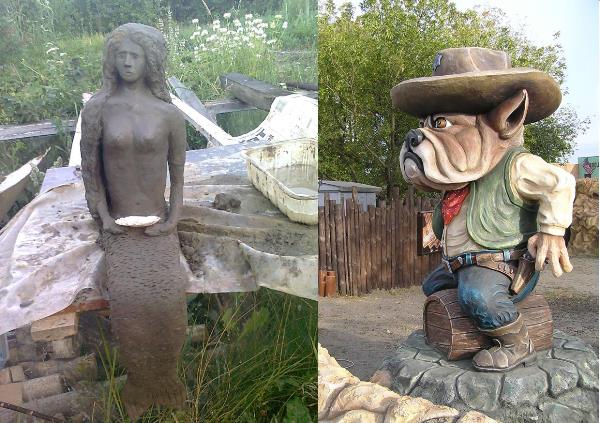
- Classic and neoclassical in durable materials. Examples include stone lions and bronze maidens.
- Abstract compositions made of polyurethane foam, wire or metal. If you connect your imagination, you can actually make a pond with swans or a fountain from these materials in the country.
- Sculptural additions that perform not only aesthetic, but also practical functions.
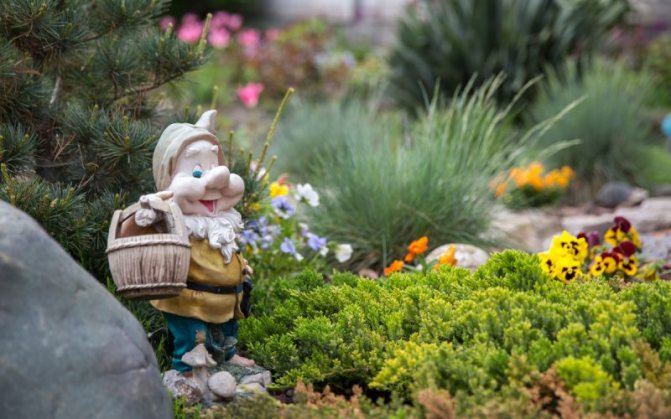
- Small plastic made from light lumber. As a result, we get small but beautiful little mermaids, fairies, goblin and other characters that complement the overall picture of creation.
Based on the area of the site and the style of the garden, experts can recommend a stele. This refers to a stone slab with an artistic relief. Other varieties of landscape gardening include human statues, inscriptions, and pyramid-shaped obelisks.
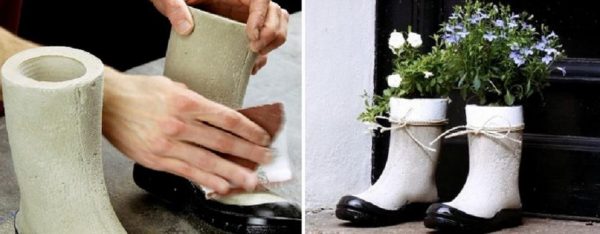
Flowerbed boot
A very interesting solution in the form of a boot, in which bright flowers grow. It is very simple to make such a craft. It is enough to take old rubber boots and pour the solution into them. In the upper part, you need to install (drown) a container (glass, jar) into the concrete mixture in order to form a hole for planting flowers. As soon as the solution dries, the boot is cut off. A nice pair of "shoes" is installed in the garden and bright one-year crops are planted in it.
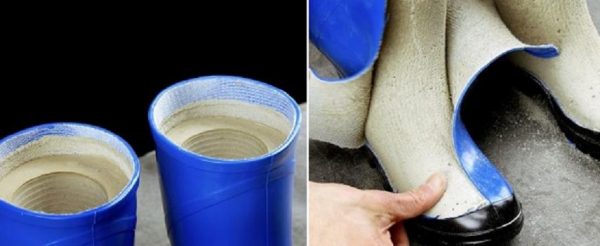
Advice: according to the same principle, you can make a handicraft "legs" that will funny stick out of the flower bed, as if a person dived there. You just need to bury the finished boots in the ground at an angle.
Interesting: We create rockeries on our own

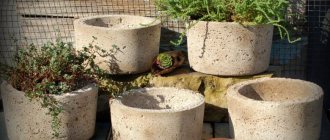
Flower box
Here we need two wooden or metal boxes of different sizes. One must freely enter the other. We carry out the work as follows:
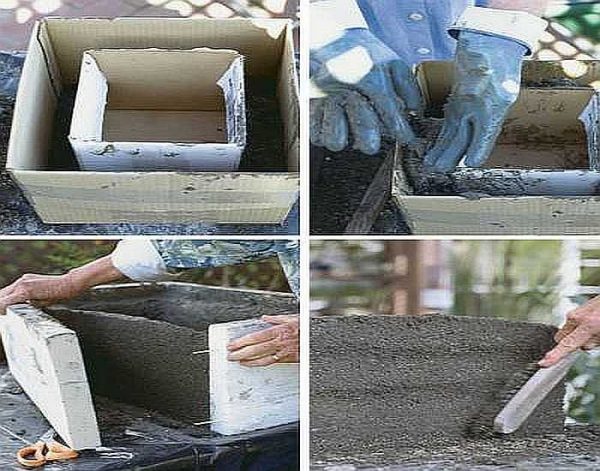
- In a larger container we cover exactly the oilcloth. It should completely cover the bottom and sides.
- Pour a small amount of cement mortar so that the bottom is covered by 5 cm. You can put a couple of metal rods here. Drown them. That is, to make reinforcement.
- Now we put the smaller one inside the larger box without pressing. It is advisable to wrap its walls with oilcloth.
- We also place rods on its sides so that they enter the lower layer of the mortar by 2 cm and do not stick out from above when fully filled.
- Fill all voids around the smaller box with concrete. We are waiting for drying.
- After 1-2 days, you can remove the outer and inner boards of the box.
- Plants are planted in the finished flower garden.
Tip: on a slightly frozen solution, you can make a nice inscription. If you wish, you can carefully remove one plank of the outer drawer, free the oilcloth from the wall and write something funny.
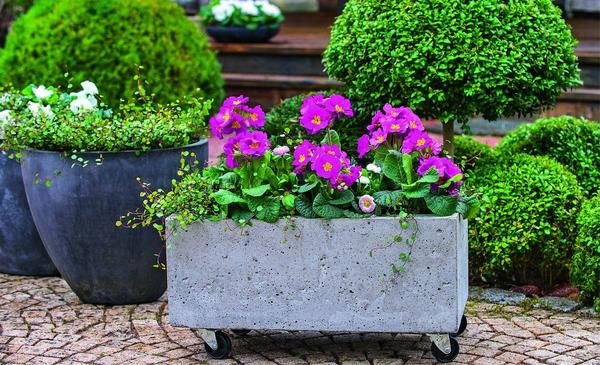
Flower box
Cement figurines: what are good and how to make
You can make garden figures from cement - this is one of the most used and affordable materials. It is inexpensive, it allows you to create a variety of figurines - from simple and small ones to full-length sculptures. There are several ways how you can make garden figures from cement mortar: with a frame, without it, from a semi-dry mortar. More about everything further.
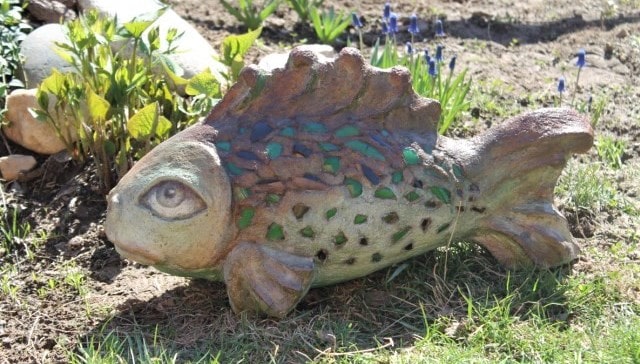
Very often mushrooms are made of concrete, but they are not always the same ...
What to add to the solution
There are many additives to cement that improve / modify its properties. There are a lot of them, but they are sold in rather solid volumes, which may be needed only for the manufacture of garden sculptures on an industrial scale. But there are common substances that also change the properties of the concrete solution.
- PVA glue - increases the frost resistance of the finished product and the plasticity of the liquid solution. It fills out the form better, but “grabs” faster. Dried cement with the addition of PVA can be processed much worse than usual.So don't miss the time while it can be molded.
- Liquid glass - reduce water permeability, the solution sets faster. But it should be added no more than 1% of the total mass of the solution.
Not a very common technique: the drawing is copied onto a semi-dry block of concrete, then scraped out with chisels or spoons. The main thing is to have time before the concrete becomes unyielding for processing.
- A plasticizer is an additive that increases the plasticity of a semi-dry (with a small amount of water) concrete solution. You need to add very little, literally a teaspoon per bucket of solution.
- The HYPERTUF additive will help to make concrete easier.
- Washing powder or dishwashing liquid - works as a plasticizer and speeds up the hardening. Add 0.5-1 teaspoon to a bucket of solution.
- To make the surface of the figure smoother, it can be covered with putty. But the putty is not needed for the walls, but for the wooden floor. After drying, it becomes very tough, and adheres firmly to concrete.
These are the main additives that are needed when making concrete garden figurines. It's easier to work with them. But don't add much. Maximum - one teaspoon per bucket, otherwise you will only make it worse.
How to paint and some technological nuances
After the concrete figure has dried, it must be sanded to smoothness, dust removed and you can paint. In order for the paint to lay down smoother and less wasted, you first need to cover the product with a layer of primer. The primer is selected depending on the type of paint. The painting process itself is no different - usually you need brushes of different sizes. But it is worth knowing some features.
- Acrylic paints become brighter after varnishing.
- Can be painted with floor paint (enamel PF 115).
- Spray paints in cans are good - from automobile to interior. But the best option is for outdoor work. They last longer.
Regular floor paint holds well
- Can be painted with facade paint. They are just designed to withstand weather conditions. One problem - they are sold in large packaging.
- To make homemade garden figurines better tolerate precipitation, after the paint has dried, they must be covered with two or three coats of varnish. The best option is yacht varnish, but it is expensive and incompatible with acrylic paints (they have a different base). For acrylic paints you need a water-based varnish, just be sure to take it for outdoor use. And see the degree of gloss. There are glossy, matte, semi-matte.
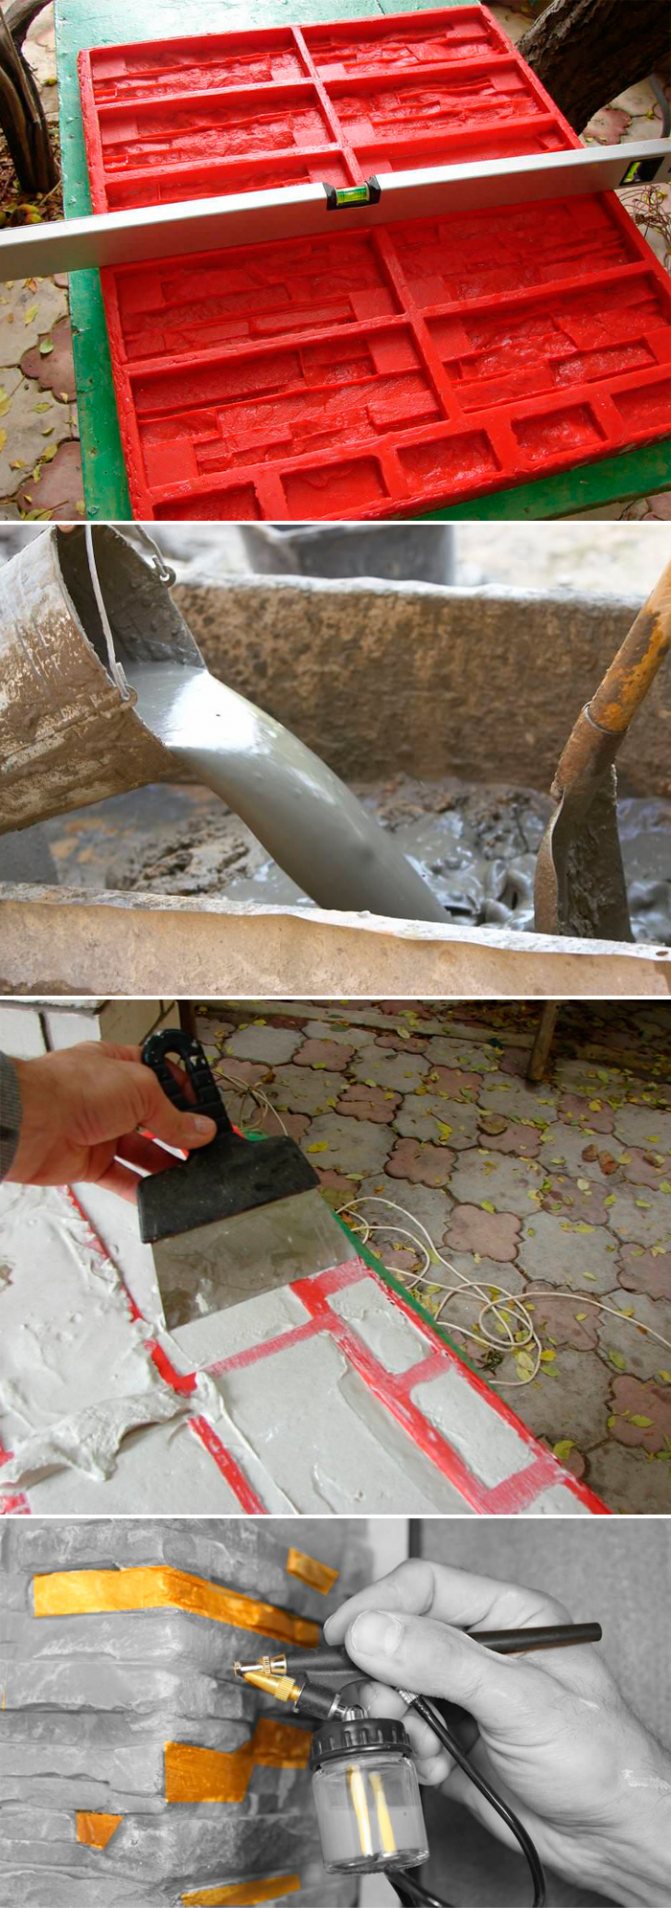
- If molds are used to make garden figures, before pouring them, they must be lubricated with oil (any, even sunflower, even technical) - so that they can easily come out.
This snake was "scraped" from a concrete monolith
- Sand the concrete with fine-grain sandpaper before painting. In the process, not too well-adhered sand is scraped off, the surface becomes smoother.
- Wool on animals can be made from an old faux fur coat soaked in liquid concrete.
- Feathers or short hair can be imitated by adding long (or not so) shavings to the solution.
There are still a lot of different technological nuances, but these are the main ones. The rest you will master or come up with in the process of work.
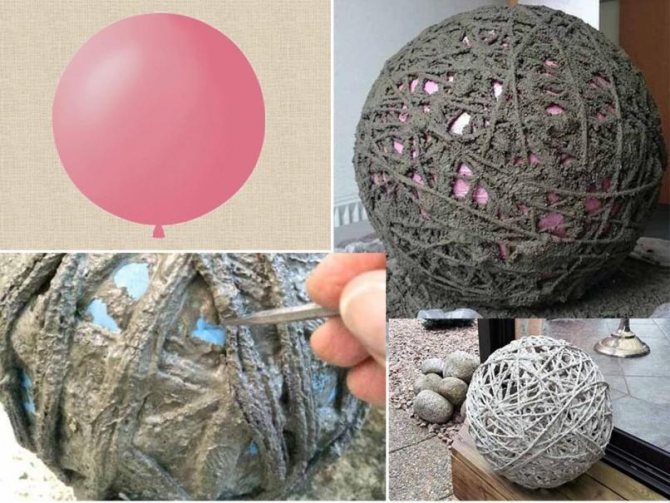
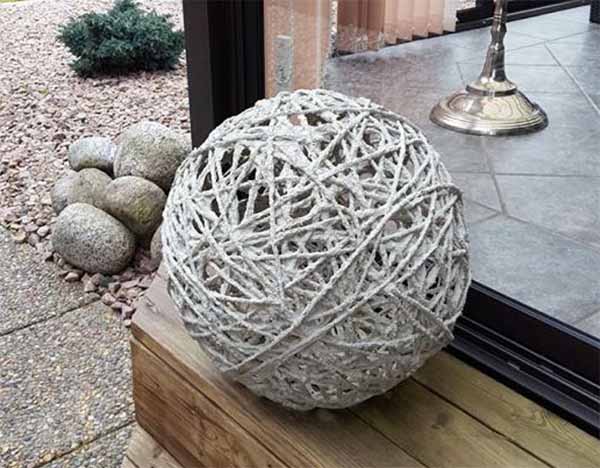
Thread ball
Remember the cute balls of PVA glue and knitting threads? The same can be done from concrete. To work you will need:
- Rubber ball or fitball ball.
- Knitting threads are thick or trims from old T-shirts that have been pre-twisted in strands.
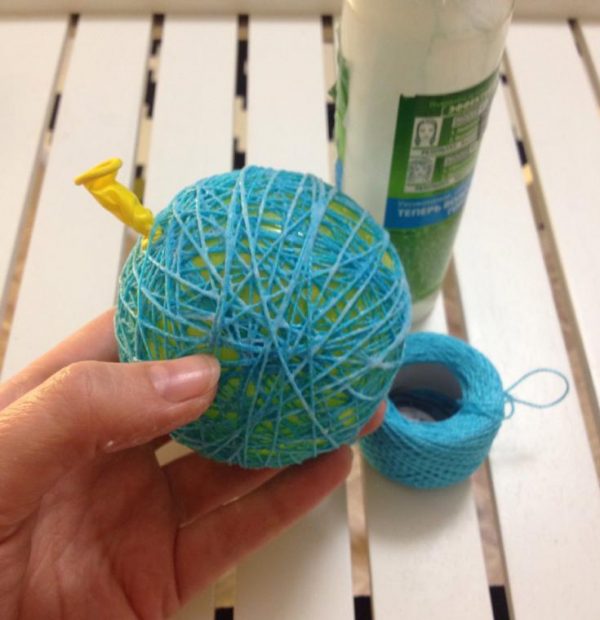
We carry out the work as follows:
- Place the ball on the bucket. This will be a drying area.
- We take the threads or trims of T-shirts one by one and dip them well in cement.
- We wrap the ball / ball with them like a New Year's ball.
- The finished structure is left to dry for 2-3 days.
- Then a ball or ball is pierced through the bottom hole and carefully pulled out.
- The sphere is installed anywhere in the garden.
Tip: These crafts can be used as overhead lights for light bulbs on a garden path.
Thread ball
Interesting: DIY Alpine slide
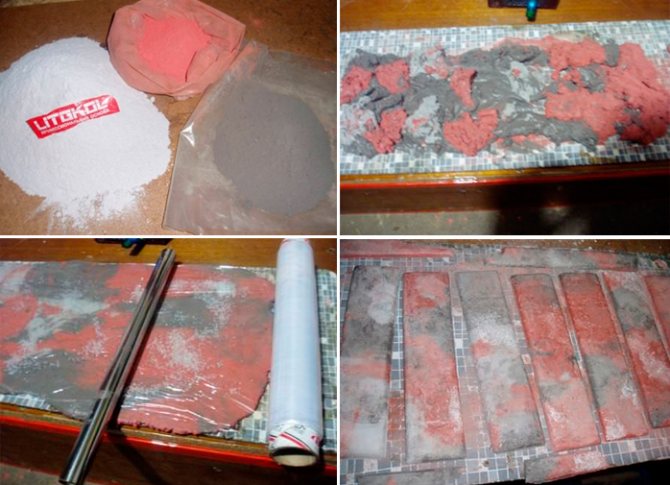
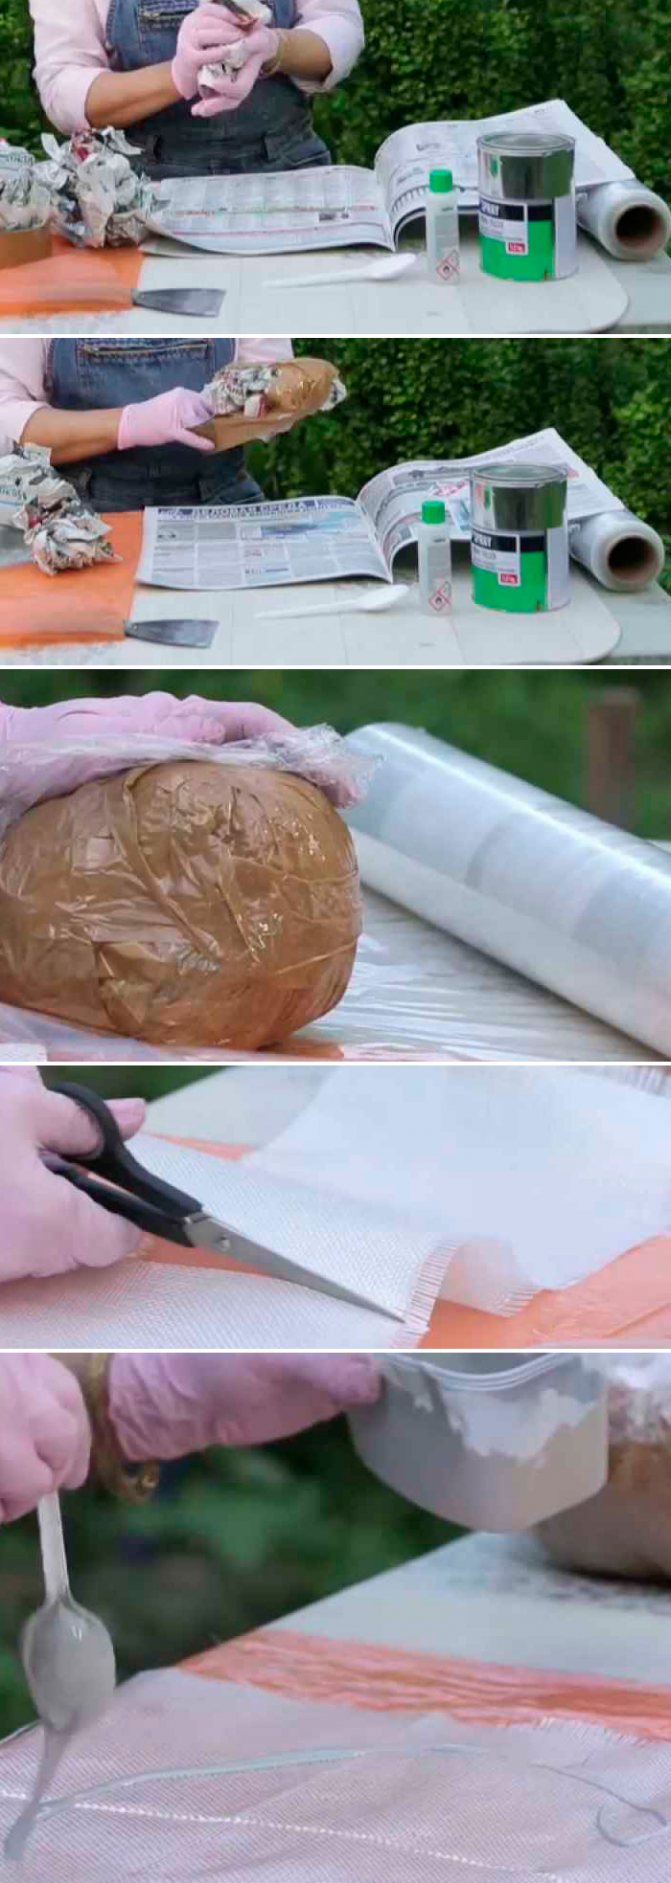
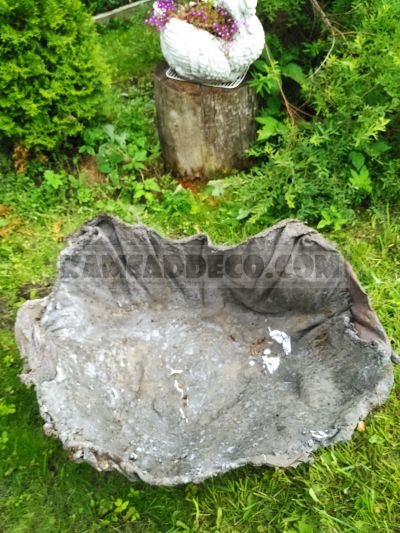
Artificial stone made of fabric
The manufacturing process was as follows. The large stone, on which the vase was temporarily installed, was decided to be used as a shape for our future boulder.
First, we found a piece of loose fabric that suited us in size, since it completely covered the entire stone.
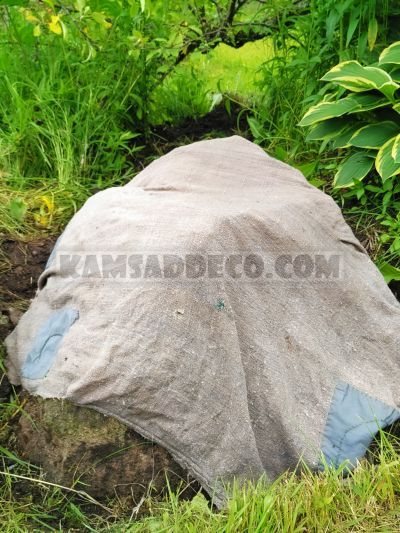
The excess parts of the fabric were cut off. The fabric was soaked in water and, squeezed out, placed in a previously prepared cement mortar.
By rinsing and squeezing the fabric, we achieve its complete impregnation with cement.
To protect the stone, cover it with plastic wrap.
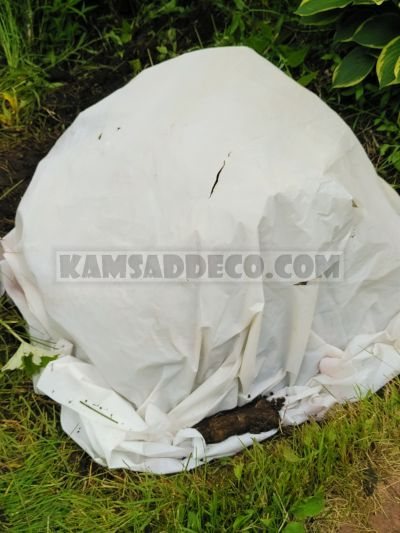
We put on it, leveling, the fabric soaked in cement mortar.
We also cover it with plastic wrap and wait a day.
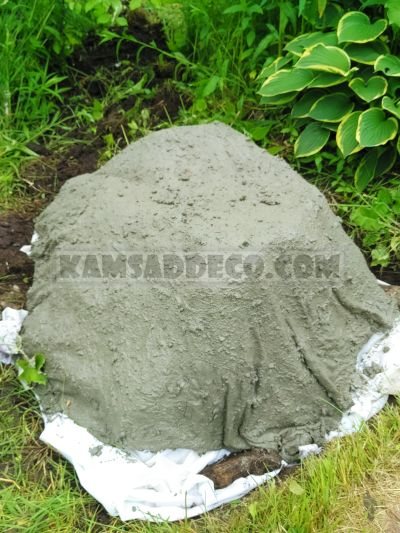
After waiting for this time, we remove the film and evenly apply a thin layer of ordinary concrete mixture (1: 3) to the hardened fabric, but so that it does not drain and remains on the fabric.
Before that, we (as with the first fabric) soak the scraps of old fabric (which absorbs well) in a cement mortar.
Then, in random order, we put them on our disc. Thus, a blank is formed into two layers of fabric.
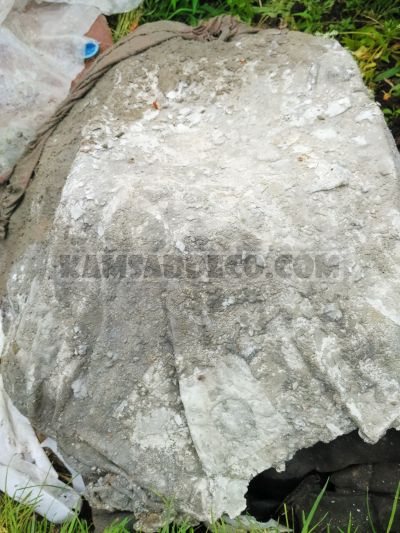
We again cover the workpiece with plastic wrap and wait a day. Then we check the quality of the resulting "hat". If everything is done correctly, you can safely turn it over and make sure it holds its shape.
And so far the future artificial boulder looks like from the front side.