Horses are magnificent animals that amaze with their grace and extraordinary endurance. It doesn't matter if she works in the field or competes. To ride a horse, you must first curb it. A simple snaffle bridle (headband) is the easiest way to do this. How to put a bridle on a horse correctly? Let's figure it out in order.
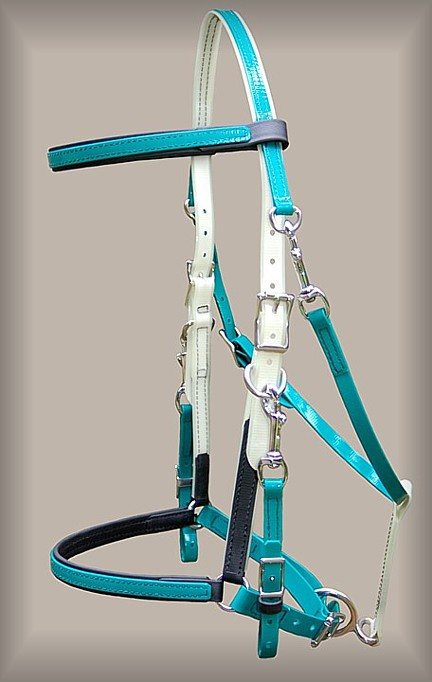
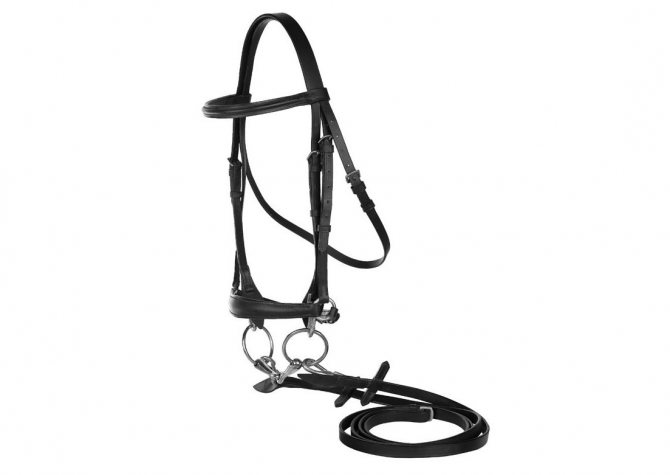
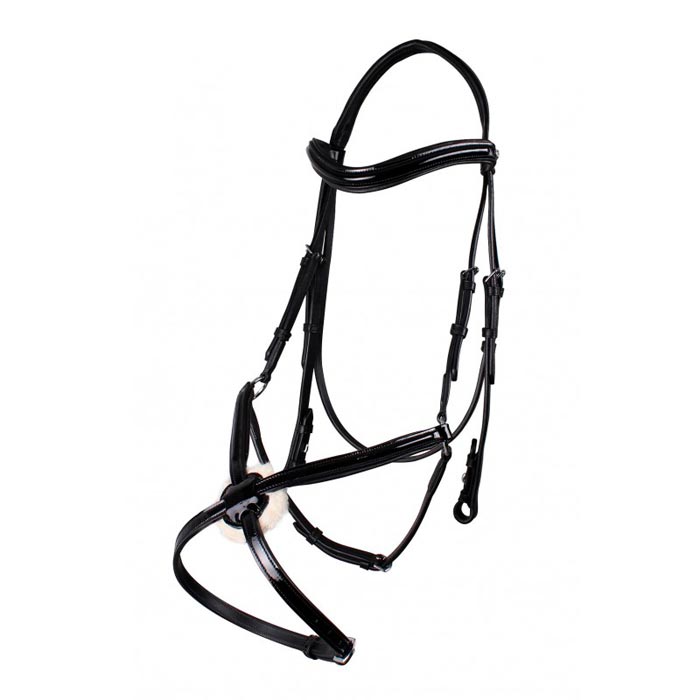
The bridle is one of the main pieces of equipment that serves as a control element for the animal. In order to put a bridle on a horse, you first need to understand the product itself. For an inexperienced person, it looks like a bunch of straps of different lengths and pieces of iron.
Bridle straps
What is a horse bridle
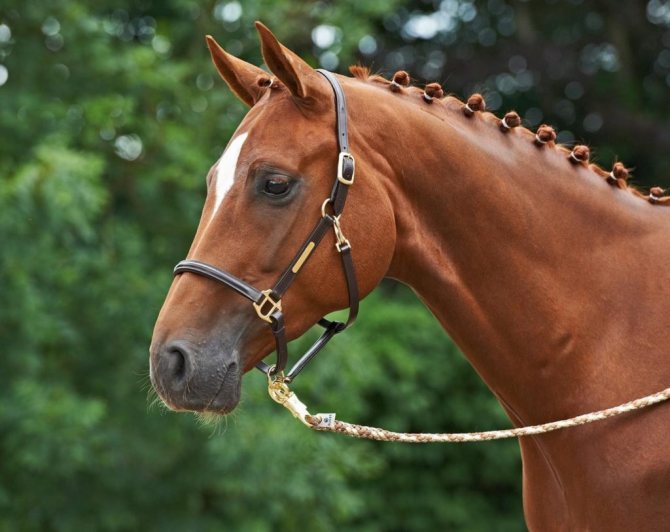
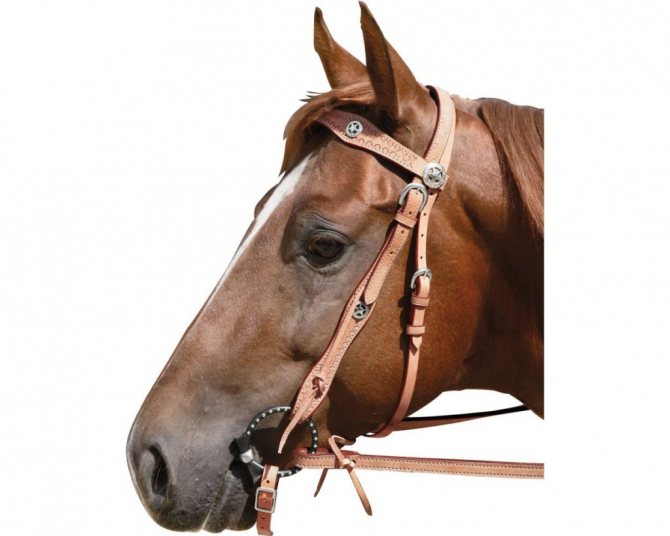
The horse bridle is the means by which the mare is controlled. Outwardly, the bridle can be compared to the muzzle that we are used to seeing on dogs. However, with horses, not everything is so simple: it is important to know which version of the bridle is best for which case and what is the difference between their structure.
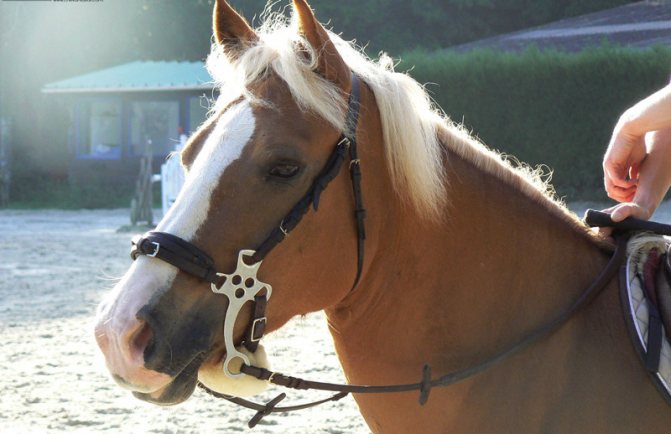
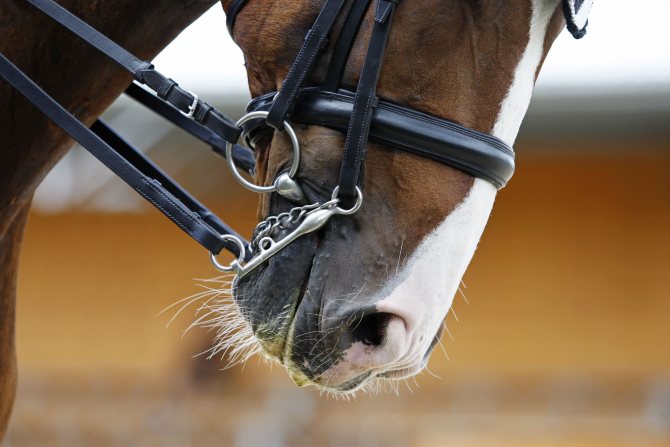
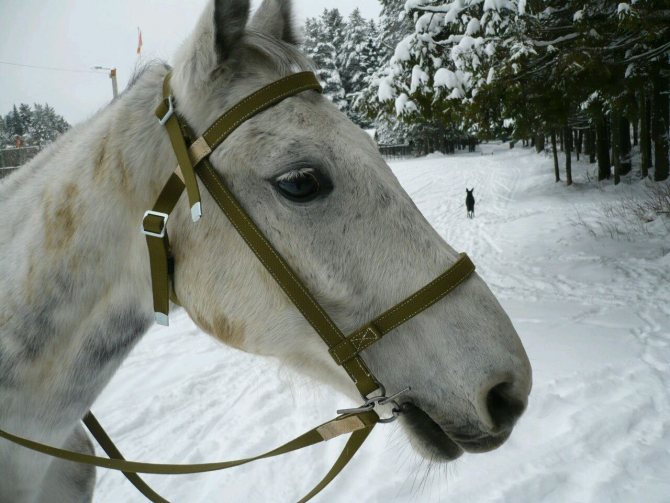
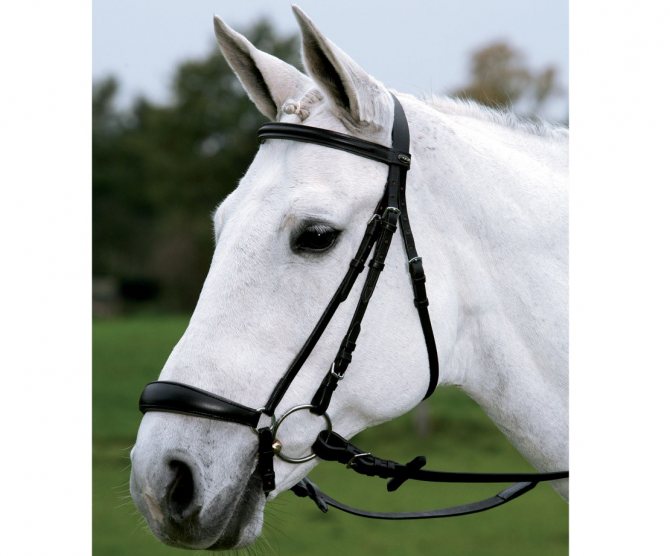
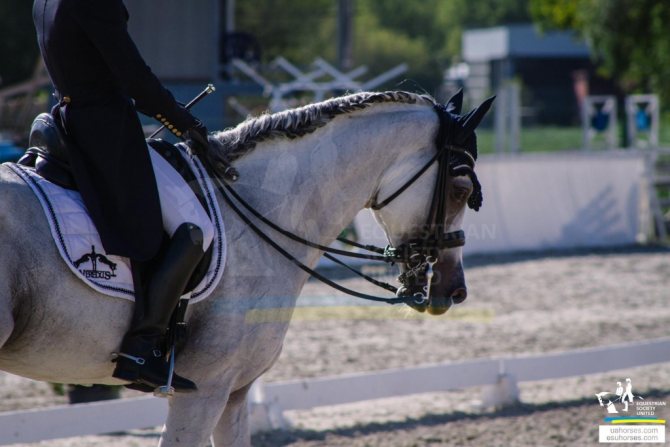
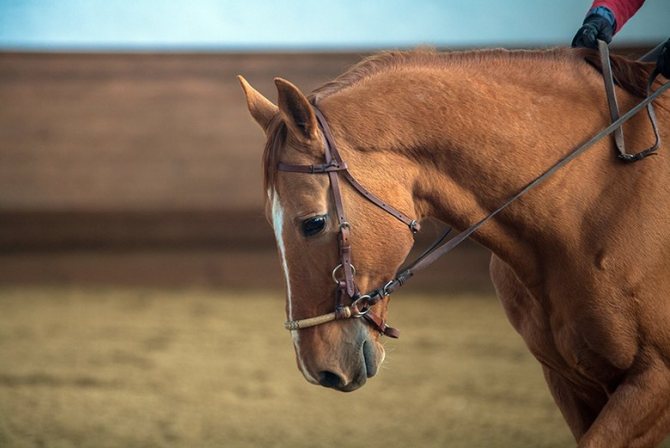
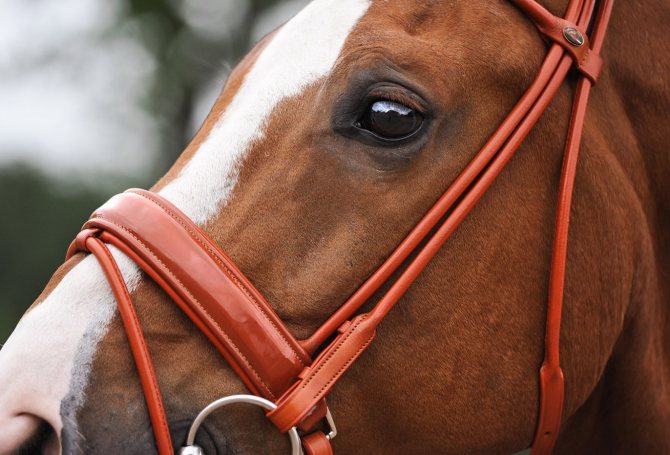
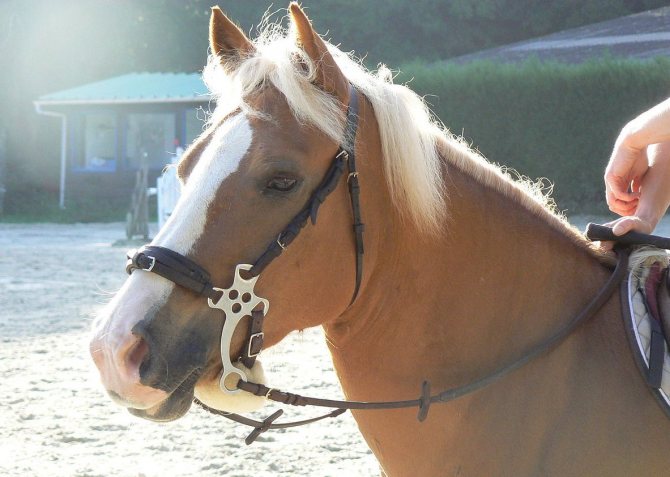
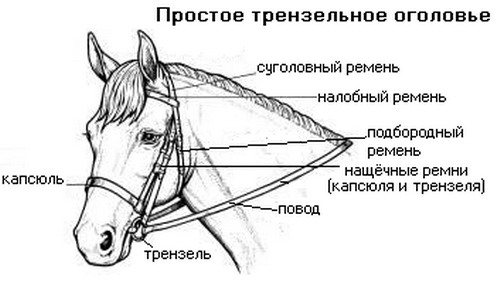
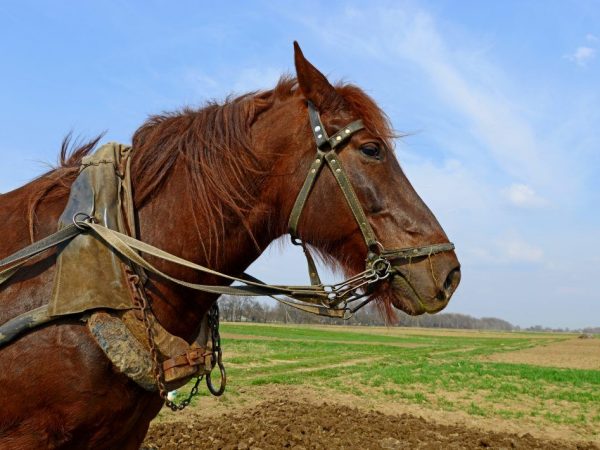
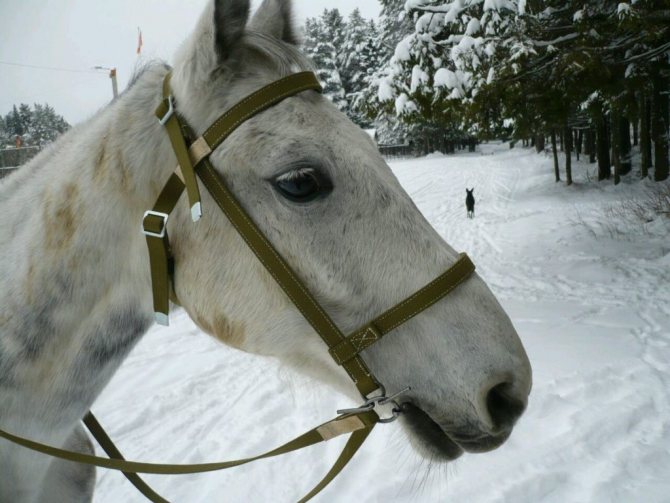
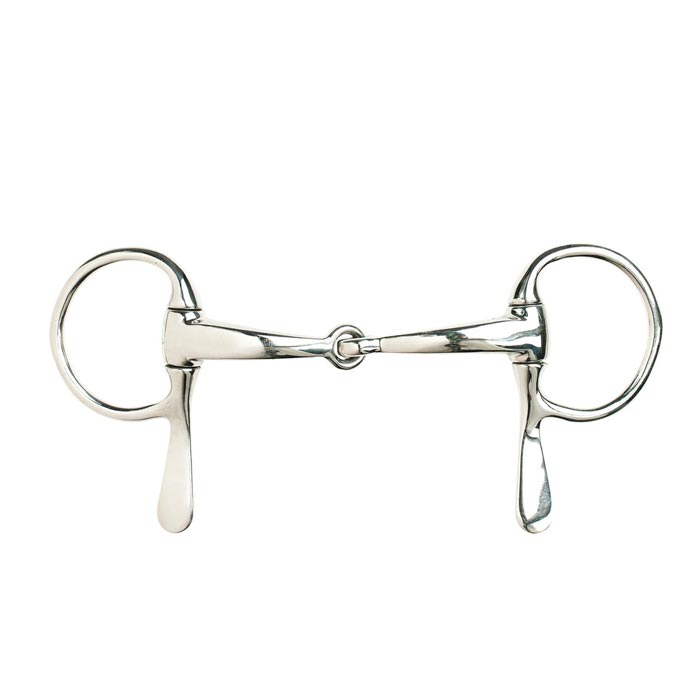
The first thing to look out for is the bit. This is an iron piece that must be in the horse's mouth. It is the bit that allows you to turn in time, stop the horse, and also, if necessary, increase the speed of movement. Of course, the animal experiences some discomfort, because a foreign object gets in the way in the mouth. However, for a person, the process of controlling a horse is much easier.
In addition to the bit, the mandatory standard elements of the bridle are:
- straps that are located on the back of the head, chin and on both cheeks;
- capsule;
- forehead;
- reins.


Details
The horse bridle consists of three parts:
Consists of a metal gnaw and rings attached to it. The bit is inserted directly into the horse's mouth.
Made of leather or braid. They are attached to the bit rings.
- Belt system:
- Cheeks - located along the cheeks of the horse, are subdivided into snaffle and primer.
- Sugolovny - located on the back of the head behind the ears.
- Forehead - located on the horse's forehead in front of the ears.
- Chin - fastens loosely under the horse's head.
- A portable (impudent) capsule strap - fastens on the horse's face above the nostrils.
The structure of the bridle
The structure of the bridle
Let's figure out in more detail what is the structure of the bridle. The first part is a strap on the back of the head, it is needed so that the whole structure does not fly off the horse's head. The lower belts, located on the cheeks, or cheek belts, play the role of a connecting element, since they connect all the belts to each other, making the bridle a single device. The last strap, the chin strap, has recently been abolished; it is almost impossible to meet it in a new type of bridle. Previously, its function was to stabilize the product on the horse's head.
What is a capsule? The capsule is the mechanism that holds the bit in the animal's mouth. Naturally, the horse by all means wants to get rid of the bits, which interfere with the normal swallowing of saliva and chewing, block the normal functioning of the tongue. So that she does not spit out the bit and a primer was invented. Its place is in the region of the nose of the animal.
The principles of the structure of the bridle
What is a forehead? This detail has more aesthetic value.Horse breeders make a beautiful decoration from a forehead, decorating it in every possible way with ribbons, sequins, stones and rhinestones, everything is limited only by a person's imagination.
The last part of the bridle is the reins. Everyone has ever seen how they look in a photo or video. These are 2 ropes or ribbons of the same length attached to the horse's bit. They can be bought ready-made in a specialized store or made by hand. It is with the help of the leash that the bit is set in motion and the horse performs the required actions.
Curbing
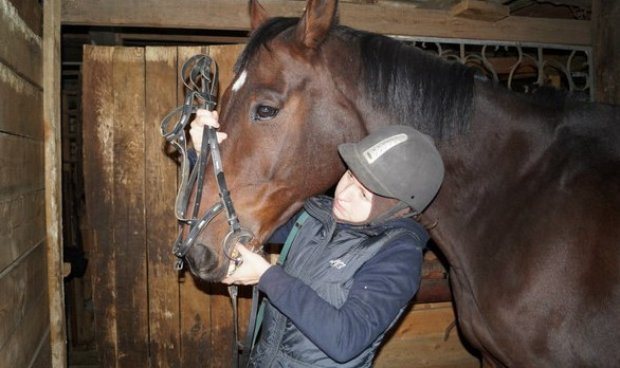
So, the horse's head lies on your shoulder, we proceed to dressing the bridle:
- First, we throw the reins over the horse's head.
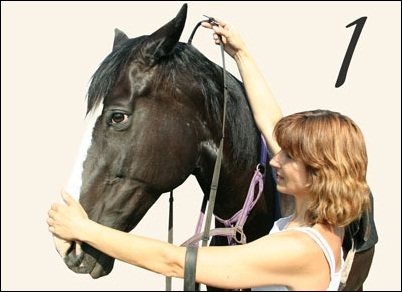
Throwing in the reins
- Then we bring the straightened bit to the horse's mouth (oral cavity) with our left hand. The snaffle bit must be placed in the toothless part of the mouth so that it does not touch the teeth and at the same time, with the right hand, raise the bridle up to the horse's ears.
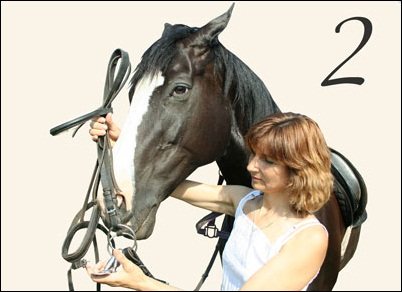
The beginning of the curb
- Carefully insert the ears between the headband and the back of the head straps, making sure that the cheek straps do not twist. Straighten the bangs.
- Fasten the chin strap under the head so that the fist passes freely.
- We fasten the capsule, but not too tightly, two fingers should go between the snoring and the belt.
- Once again we examine the bridle for twisting of the belts and folds on the horse's lips. If the horse is uncomfortable, he will show it by twitching and throwing his head back.
Types of bridles
Several types of bridles have been developed so that each rider can choose the one that suits him, and will also correspond to the loads in which the horse is involved. We list the main types of bridles for horses and horses:
- mouthpiece;
- used for runs and walks;
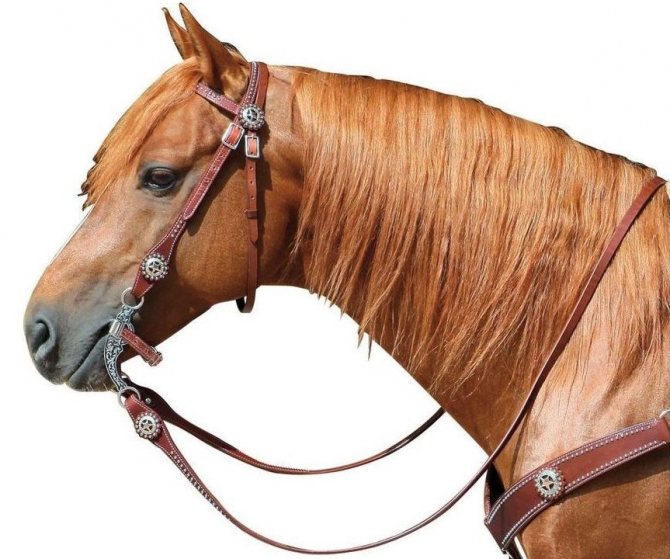
- bridle western;
- a la cowboy, also used for bulls;
- snaffle;
- hackamor.
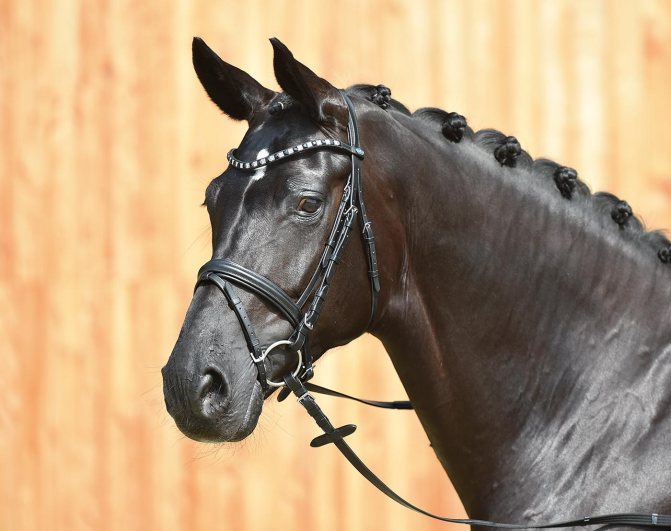
Snaffle
It's time to find out how this or that bridle model is different. Let's start with the most commonly used bit bridle. It contains all the basic elements. The only thing a rider can refuse is a capsule.
There is a significant difference between this type of bridle and the rest, because the standard bits are changed to bridles made of iron, rubber, they can also be plastic. It should be said that snaffle bridles should be used only by those who are confident in the saddle and confident in the behavior and character of their horse.
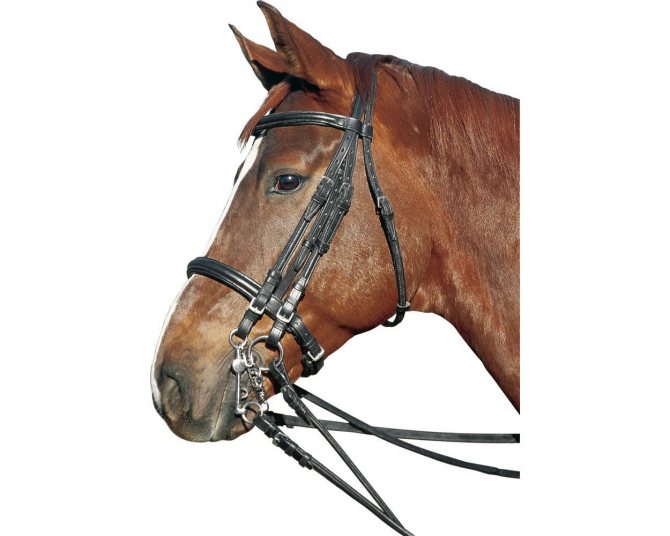
Mouthpiece bridle
The mouthpiece bridle is a kind of bit version, only in this case additional attachment parts are installed on the headband for one more bit and reins.
This method allows you to maintain maximum control over the horse, it is most often used at times when the animal simply has no right to let down: at races or important public events.
Cowboy bridle
The cowboy bridle does not include the standard capsule, bit and mouthpiece, while the standard set of 3 straps remains. Moreover, depending on how the neck strap will be made, cowboy bridles are usually divided into 2 subspecies:
- Slit, when in a thick belt, often of leather, 2 slits are made for horse ears.
- A belt that provides slots for each auricle, and the size must be removed from the horse so that the product does not cause discomfort during wear. It is quite possible to sew such a bridle on a horse yourself, following simple recommendations.
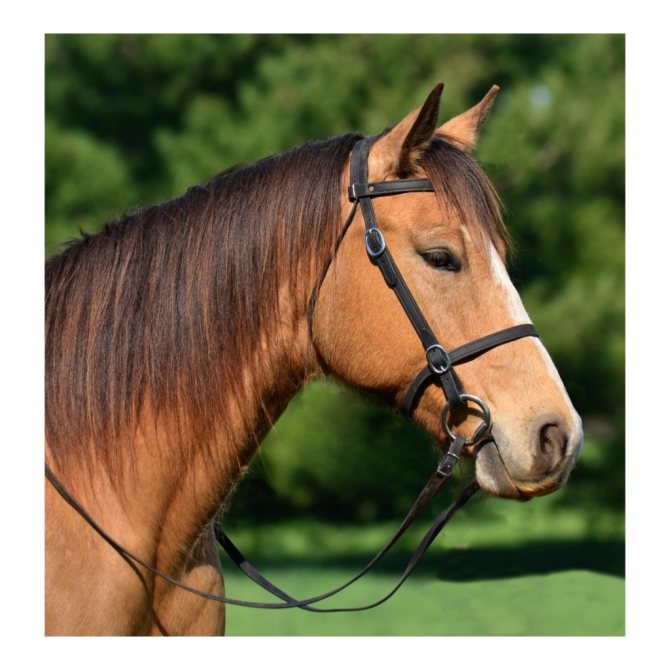
Walking bridle
In cities and small horse farms, you can most often find this type of harness. What is its advantage? Riders note that it is quite easy to use: if a long horse ride is supposed, the horse will definitely want to drink.
Having a walking bridle, it will not be difficult to water the horse.To do this, with the help of simple manipulations, the bit is taken from the horse's mouth, which gives him the opportunity to get plenty of drink and rest without a bridle wearing. The horse bridle is a mixture between the standard bridle we talked about earlier and the halter.
Hakamor
This version of the bridle proposes to abandon the use of the usual iron bits, hakamor proposes to control the animal without using them. How, then, will the horse's behavior be controlled? Hakamor suggests that the control will be done by acting on the back of the head and chin of the horse.
For example, it is advisable to use such a bridle if the horse is injured in the oral cavity or has bad teeth. Such a product is made strictly according to individual sizes so that the mare is as comfortable as possible in it. Experienced horse breeders say that the correct bridle is a big half of the success in horse riding. This applies to both adults and foals.
Speaking about the choice and selection of a bridle for horses, you need to be guided not only by the appearance and price of the product. Everything must be done to make the animal comfortable. It is good if it is a new product, which will be made strictly according to individual measurements, taking into account all wishes and preferences. Fitting is strictly mandatory, and it should be done only when the horse is standing, while acting very carefully and not making sudden movements.


Problems and their elimination
A horse is a wayward animal, with character, and if it does not want it, then it can take a lot of time to put on the bridle. Tall horses like to throw their heads up, which makes it very difficult to put on the bridle, because it is impossible to reach and even throw the rein, let alone put on the bridle. In this case, the horse must be stroked, talked to it in a calm voice. It is better to hide the bridle behind the back, you can offer a treat. Even the most harmful horse will reach for the delicacy.
It happens that a horse is mischievous and never takes a gnaw in its mouth, clenching its teeth tightly. Experienced horse breeders use this method. You need to put your finger in the horse's mouth, where there are no teeth and press on the lower jaw with a finger, while the reflex is triggered, and she opens her mouth for a short time. But during this time it is necessary to have time to put a snaffle in her mouth and tighten the bridle. You can also put in the bit along with a treat, sugar or carrots, but it is better to achieve this with patience and perseverance and then give the horse a treat.
Horses have a good memory and next time they may not pick up the bit until you give them a treat. This can lead to the formation of wrong habits in the horse, it must always be remembered that in this union there should be the main person, not the animal.
Video: How to put on a bridle
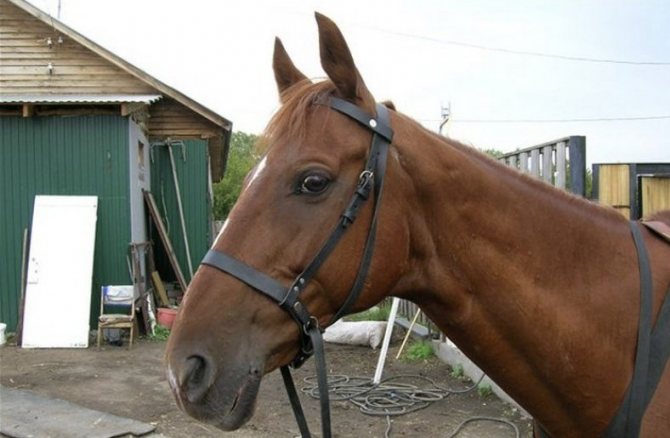
What is a halter
Earlier we mentioned in the article such a concept as a halter, now it's time to figure out what it is. This is a special device that serves as a secure hold when the horse is standing. For example, a halter will be useful when you need to wash a horse or take any medical measures or routine examinations. In addition, with the help of a halter, it is possible to significantly facilitate the movement of an animal over short distances, for example, from one stall to another or to a pasture.
Why does the product have this name? The fact is that this is an imperfect bridle, in which the most important element is missing - the bit.

What is a halter
Recommendations for using the halter:
- You need to use the halter correctly, so if you need to lead the horse out, you should keep the reins as close to the head as possible so that the horse feels that it is being driven, and not vice versa.
- Always be on the left side when using the halter.At the same time, it is necessary to keep pace with the animal, not lagging behind, but not going forward either.
- You should always be on the alert, because even the kindest animal can show character and kick a person well with a hoof.
Ammunition
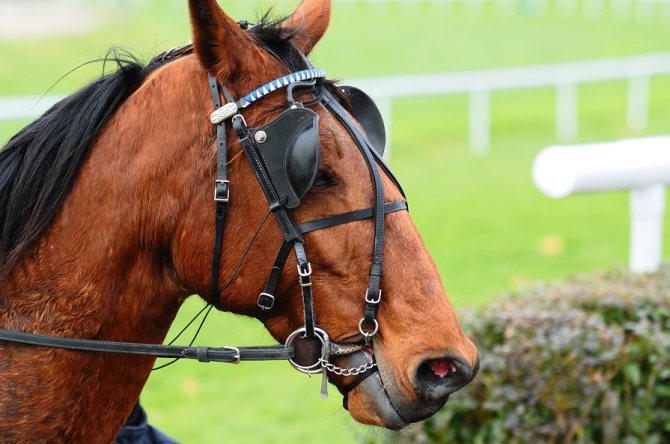
To saddle a horse correctly, you need to figure out what the harness consists of. Its main parts include:
- Bit - a special rod that presses on the folds in the corners of the mouth, tongue. There are rings at the end of the element. Bits are needed for control. A common option is a metal or rubber bit.
- Bridle - a set of belts, worn on the horse's head and controlling the bit.
- Halter - with its help, they not only saddle, but also tie, take out the animal. The set includes a chumbur - a special occasion.
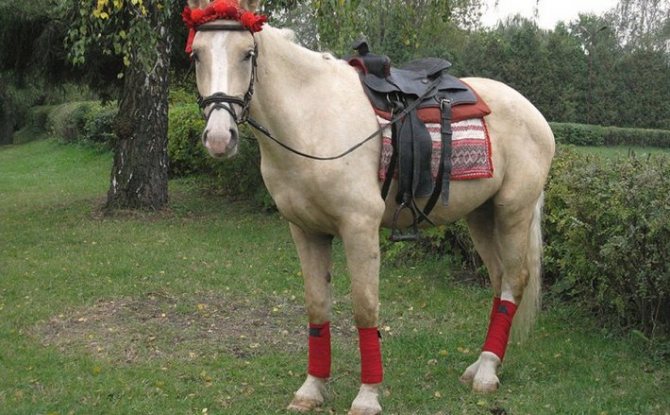
- Saddle - "heart" of all equipment. The saddle connects the rider to the horse. It is necessary for the convenience and distribution of the rider's weight. There are many types of saddles, so you need to choose an option based on the purpose of the trip, the skill of the rider.
- Reins - connect with bit rings. This is the main control, especially for a beginner. The reins are used for turning, moving backward, stopping. Most often they are made of leather.
- Girth - a belt under the belly of the animal that fixes the saddle. It is fastened with a strap. This is a strap on either side of the saddle: under the fenders.
- Stirrups - They contain the rider's legs.
Since the taming of wild horses, many different equipment have been invented. In addition to the main parts of the ammunition, there are auxiliary ones. Each of them is needed in a specific case. This harness is used to create additional comfort and training for horses. This includes, for example, linings:
- special saddle blanket - saddle cloth;
- a fur coat between the girth and the belly.
Bit
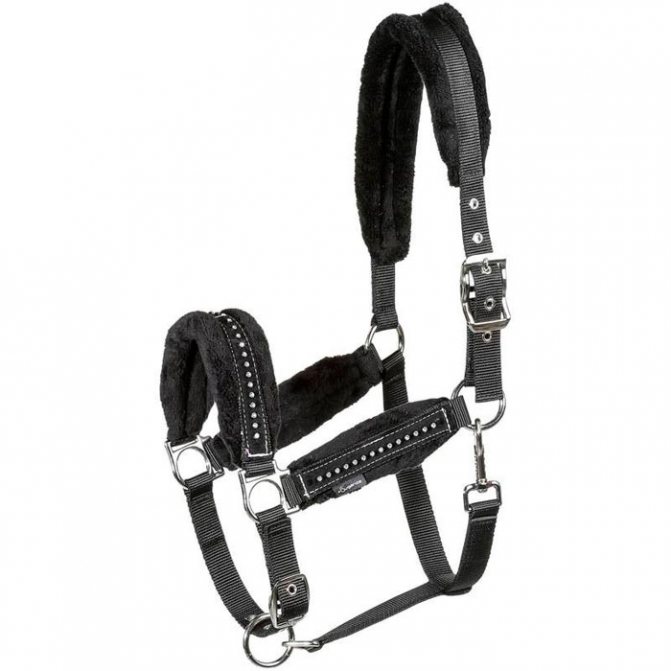
Halter
Bridle
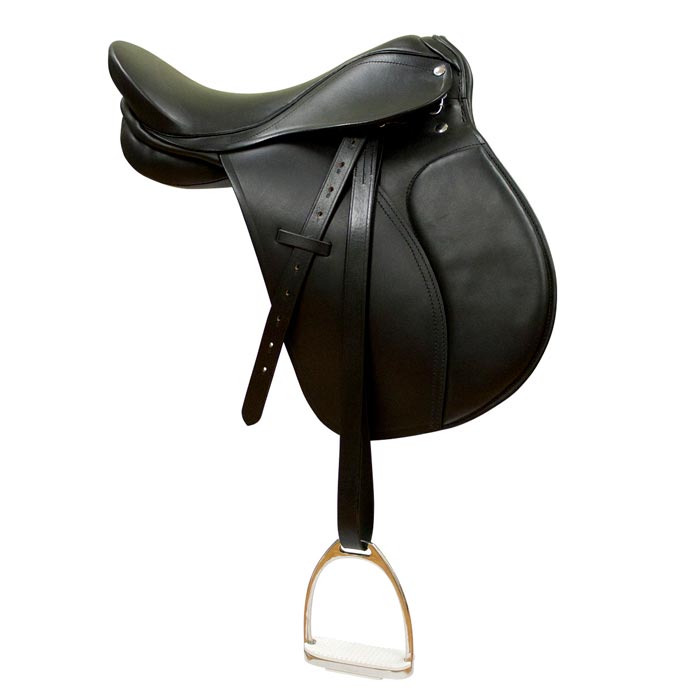
Saddle
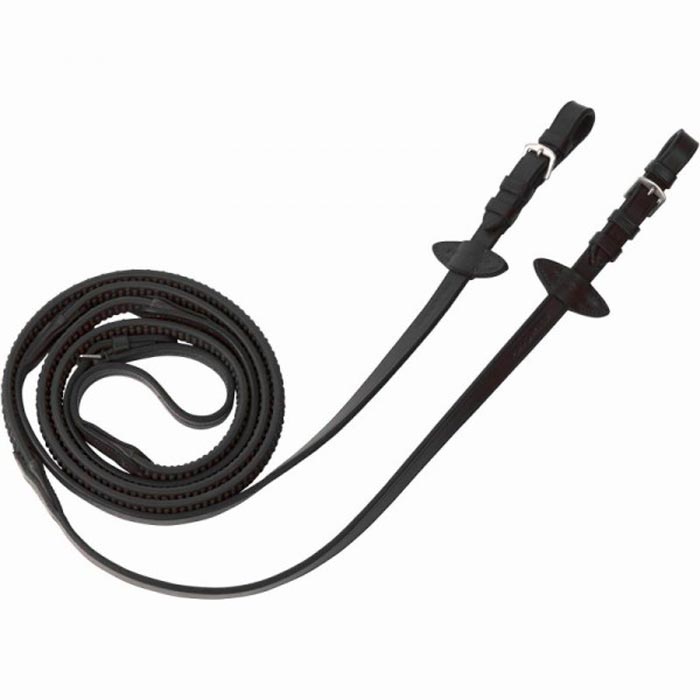
Reins
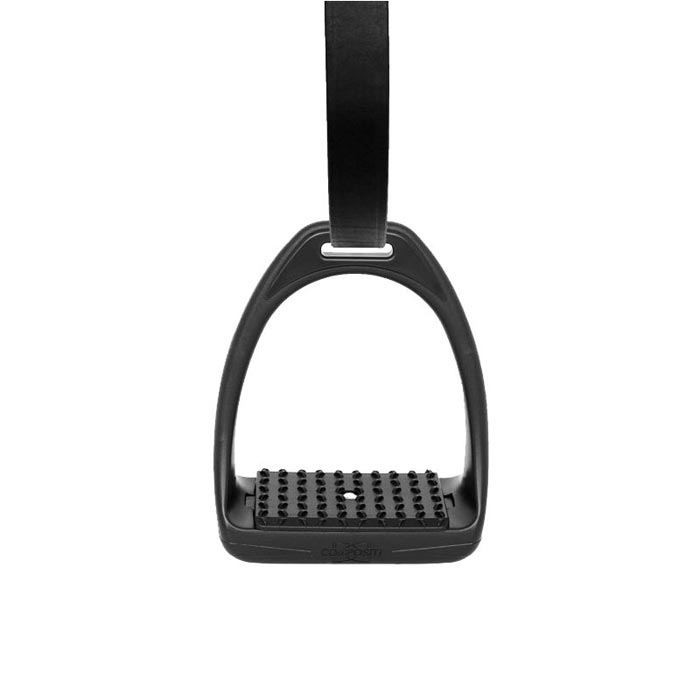
Stirrups
Features of using a rope halter
A rope halter is most often used for the most delicate and sensitive horses. The horse owner has a choice whether to buy a product in a store or make it with his own hands at home; for this, nylon threads or twines used in yachting are suitable. Of course, if there are several individuals on the farm, there is no need to talk about weaving a rope halter for a horse with our own hands, it is easier to buy a ready-made one than to tie it. Anyone who prefers this particular option should pay attention to the manufacturer Schleich, reviews of their products are mostly positive.
How to make a halter yourself, how to tie it correctly? It will not be so easy to weave the product, because the twine or thread will constantly slide in your hands, which will greatly complicate the weaving process. It also happens that the animal categorically refuses to use store halters, then a do-it-yourself halter will come in handy more than ever. When creating it, it is possible to use a variety of weaving styles, but the most common one is knotted, where each knot should be located at a distance of about 2-5 cm from each other. More details about its description can be found on numerous videos and photo instructions on the Internet.
DIY horse halter
It is easiest for a beginner horse breeder to get used to the simplest rope halter. You need to use it as follows:
- The rider or breeder should check the strength of the carabiner.
- Next, you need to take a stable position on the left side of the horse.
- You need to find a common language with the animal: pet the horse, talk to her affectionately. The meaning of words is unimportant, the main thing is intonation. Before putting on the halter, you need to make sure that the animal does not show aggression.
- A leash is thrown around the neck.
- The rider takes the harness in his left hand, with his right hand takes his horse by the head.
- They put on the halter, then the head strap is pulled.
- The carabiner snaps into place. Now the halter is fully clothed.
Read more: When can you plant cucumber seedlings in a greenhouse
Having successfully mastered this most primitive type of harness, you can begin to master the bridle itself. When putting on the halter, all movements must be calm and smooth, otherwise the horse may get scared and behave aggressively. In no case should you pull the reins. The bridle is worn according to the same principle as the halter.
Important! Before using a halter for a horse, you need to look at the condition of the carbine and chumbura every time. Damage to these parts, not noticed in time, can lead to tragedy while riding: the horse will simply get out of control, becoming uncontrollable. In the presence of even insignificant, at first glance, damage, it is strictly forbidden to harness the horse.
With your own hands, you can make both a simple and an exclusive bridle. It will be exclusive, since various options for its creation and decoration are possible. The only limitation can be the imagination of the creator. But first you need to learn how to sew a simple snaffle bridle. For sewing, you can use a sewing machine or you can sew by hand.
- We measure the distance along the line from the corner of the horse's mouth along the cheeks to the ears, behind the ears and from the ears to the opposite corner of the mouth, plus 10 cm for loops on each side. These will be the cheek and back straps together. If we want to lengthen the bridle along the length of the horse's muzzle, we will need to sew in a buckle on each side at a distance of about 7-10 cm from the ends;
- measure the distance for the forehead strap - from the point of intersection with the cheek strap across the forehead to the point of intersection with the other cheek strap plus 10 cm for the loops;
- from the same points we measure the distance down through the ganache and up for the chin strap plus 10 cm for sewing in the buckle. We select the place where the buckle is sewn at a distance of about 1/3 of the length of the chin strap;
- we make loops at the ends of the forehead strap and thread them into the cheek-occipital strap so that the forehead strap moves freely;
- sew the chin strap to the cheek-occipital strap slightly in front of the frontal;
- we sew or attach the cheek-back strap to the bit rings through the buckles;
- for the reins we measure about 1.5 m and sew or connect by means of buckles sewn at a distance of 7–10 cm from the ends of the buckles to the bit rings.
It remains to try on the bridle on your horse.
The headband for the horse should be comfortable and fit in size to its head.
Braid or leather halters are made up of two rings. The diameter of the first for the nape-chin strap is about 105. It is made with an adjustable buckle. In the second ring with a diameter of about 65 cm, where the horse's muzzle is inserted, it is necessary to sew a metal ring for the chumbur, which is used for tying or driving the horse.
How to make a halter with your own hands from a rope
The advantage of the rope halter is its lightness and the ability to exert a stronger influence on the horse through the knots. The rope for weaving should be 6-8 mm thick, round, preferably nylon. In addition, you need scissors, matches to singe the ends and a marker.
To create such a halter for a horse with your own hands, there are measurement tables depending on the snoring girth of a particular horse and the weaving pattern from knot to knot. They can be found on the Internet. You will also need to learn how to knit simple knots, and on their basis - double round knots. It is important that the double knots turn out to be round, since it is such a knot that will properly exert the correct directional effect on the animal. Having mastered the weaving technique, you can easily make a halter. It remains to try it on your favorite horse.
Warning
Since the resulting horse halter will be made of solid rope, it has increased durability.To avoid an accident with a horse, never leave it unattended in a rope halter, neither in a stall, nor in a levada, nor on a leash.
In order to make a rope halter with your own hands, you should use the following materials and tools:
- yacht rope - 670 cm (this is the length for a medium-sized Cob-Large halter);
- a marker of a contrasting color to the color of the rope;
- scissors;
- lighter;
- ruler.
Did you know? The earliest horses were domesticated by Asians around the fifth millennium BC.
When weaving a halter, follow these steps:
- Cut the rope to the required length (670 cm). We burn the edges of the cut piece with a lighter so that they do not bloom.
- Measure with a ruler from the end of the rope 90 cm (point A from the size table) and mark with a marker. Tie a knot at the designated place - hold the rope with your left hand, and then throw it with your right hand over the top with your left and stretch the rest of the rope through the resulting loop. Gently tighten the knot so that it is in place.
- We measure and mark the distance to the next point 22.5 cm (point B). We tie the exact same knot as described in the previous paragraph.
Did you know? The horse's hoof is an extremely complex and sensitive organ. When the horse's weight weighs on the hoof, blood is forced out of it up the veins. Thus, the hoof acts as a circulation pump. - We measure already a distance of 25 cm (point B) and again tie the knot from point 2.
- Now we measure and mark with a marker 82.5 cm (point D) and again knit the same knot (point 2).
- Now we retreat from the last knot 25 cm (point D), outline and tie a different type. Holding on to the intended area, we make a loop from the free end, wrap the marked area with a folded loop, push it into the resulting ring. Pull the end of the loop towards you. It turns out a small loop of about 5 cm, tied in the marked place for the neck strap. This loop will be near your ear.
- We retreat and mark 25 cm (point E). We move our marked place to the beginning of the largest interval (point B). Slightly loosen the knot tied at point B, and pass the entire long unused end of the rope through it towards ourselves. Then we throw it from ourselves over the knot and stretch it into the loop of the knot and into the new loop obtained from it when thrown over. We pull out the remaining length of the rope from ourselves to the side from the resulting knot and carefully tighten and align it so that it is on the marks at points B and E.
- We pull the free end of the rope 25 cm (point G) back to the knot at point B. We slightly loosen the knot at point B, pull the free end of the rope towards us and tie the same double knot as in the previous paragraph. We carefully tighten the ends on the marks of points G and B. It turns out that two identical segments are tied together, which will act as a snatch belt and will be on the horse's nose.
- We measure with a ruler from the last node 82.5 cm and mark (point H). Pre-fold a slightly unfinished product. The loop will go to the ear, a double segment will be on the nose, the remaining rope in the form of a large loop with knots will go under the throat, and long segments running parallel to each other should coincide at point G. We dissolve the knot at point G a little and pull it through it towards ourselves free end of the rope to the mark. We tie a double knot as in paragraph 7, only the points G and Z should coincide. These are the cheek straps.
- We retreat and mark a gap of 25 cm (point I). Again, we pre-assemble the product on the hand. We take for a double segment that will be on the nose, for the loop of the ear, for the cheek strap and lead our point And to point A, the very first knot. Expand it again and tie a double knot as in step 7.
- From the resulting last knot, we equal two pieces of rope - they must be equal and be 80 cm long.Cut off the rest of the rope to this length and burn the ends with a lighter, applying them to each other so that they stick together along a length of about 4 cm.This will be the back strap.
- We put on a double section on the hand like on a horse's nose. We push the long occipital end, welded by fire, into a loop so that it would seem to go through the back of the horse's head, and tie a knot. To do this, push the welded end under the loop from the side of the animal's cheek and pull it into the loop formed at the same time. Gently tighten the knot at the top of the hinge. It will be easy to untie if necessary. We adjust the size of the halter with the long looped ends of the rope - we tie them together with a double flat knot, but not tightly so that it is easy to adjust it already on the horse. At the same time, at the ends of the knot, we leave loops of the required length through which we will thread the chumbur.
You need to be able to put on the halter correctly. If worn unsuccessfully, it can be annoying to the animal. He should not cause a feeling of discomfort in the pet. And if everything goes well, then the horse will work with positive emotions.
Important: Do not stick the horse's nose into the halter when placing the neck strap behind the ears. Moving up from the back will cause the animal to instinctively raise its head up. You need to try to direct the movement downward when performing any work around the head of the animal.
- Before carrying out any actions with the horse, make sure that it is calm and not in a nervous state. You should also not approach the horse from behind - this can scare it.
- In the process of putting on the halter, it is advisable to talk affectionately with the horse, praise it, give it something tasty (a carrot or a lump of sugar).
- Approaching the horse from the left side is easier to control. Therefore, most of these devices are left-handed. This device is taken with the left hand and shown to the horse. Chumbur is thrown over the right hand or over the withers of the animal.
- They throw their right hand over the neck and hug the horse slightly.
- When the right hand is thrown over, the end of the occipital strap is taken and carried over the horse's neck. If the horse decides to leave, then there will be a loop around its neck, which will be enough to control the animal.
- The nape strap is in the right hand and the portable strap in the left. From this position, gently put the halter on the nose with a smooth movement.
- Then we attach the occipital strap. Most horses are comfortable with this procedure and turn their nose towards the person for convenience.
Read next: How to make a cage for a pet ferret with your own hands
What else you need to know about halters
There is no iron in the construction of the halter, so there will be no total control over the horse. A special interlacing of threads helps to keep the animal on a leash, which, like belts, twine around the horse's face. Due to the special structure of the halter, it is important to remember about precautions that will help protect both the animal itself and the person who cares for it from injury. In short, the outline of the rules required for compliance is as follows?
- Even if the halter is securely fastened, you cannot leave a mare or horse tied for a long time. The horse is a strong and powerful animal.
- The horse must not be allowed to frolic at the moment when the halter is fixed on it.
- You cannot buy products from your hands, it is important to make a halter strictly according to individual measurements, so that it fits in size and features of the physiological structure.
- Ropes, even if they are braided in a special way, can injure a horse, so you cannot keep him on a leash for too long.
How to saddle a horse correctly
Horseback riding is challenging but exciting. He needs to be trained. And before you mount a horse, you should saddle it.If done correctly, horseback riding will soon be a pleasure for you and the animal. We will talk about parts of the harness, the important points of saddling and riding a horse in the article.
The process of saddling a wild horse can only be carried out by experienced riders. It is unlikely that beginners will succeed the first time. Here are some guidelines to help you accomplish this daunting task:
- Since a wild animal captures the emotions and mood of a person well, then you need to approach it without fear, confidently and necessarily calmly. Fear and irritation will be transmitted to the horse, and then contact with him will not work.
- Eye contact should be avoided when approaching the horse. The approach must be accompanied by gentle words spoken in a low voice.
- The approach should be carried out gradually from the left side, avoiding sudden movements and not stopping to give praise to the animal.
- Slowly put your hand to the horse's muzzle so that he can smell it.
- Carefully stroke her mane, back along the growth of the coat.
- If the horse allowed you to do all of the above, then you can start saddling it. If, when touching the body, the odd-hoofed one expresses dissatisfaction, then you should not saddle it. Better to come back to this later.
Before approaching a wild horse, you can stroke another equid. Smelling the scent of a relative on your palms, most likely, the horse will make contact faster.
Thus, a person who is going to ride a horse needs to learn how to contact the animal, clean it, put on the bridle and saddle, and also correctly give the messages that control the animal's movements. If all these actions are done correctly, then the riding process will be comfortable for both the rider and the horse.
How to dress the halter correctly
How to put on the halter correctly? In order for the product to sit correctly, it is important to follow all recommendations. Let's describe the whole scheme in stages:
- The first thing to do is to carefully examine the halter, it may have cracks or other damage, or it may have changed its size. Leather halters last longer than ropes.
- Stand to the left of the animal and show a friendly attitude.
- With a sharp movement of your hand, throw a chombur around the horse's neck, and then unfasten the upper strap at the back of the head.
- Proceed to straighten the exit ropes after the chumbur, if a rope halter is used, then put the bridle itself on the horse's head directly, then close the carbine.
When working with an animal for the first time, you should not make sudden movements while throwing on the chumbura. Also, you should not show your fear in any way: horses feel it. It is better to wait for the time when the horse will be more located.
Now you know how to choose the right bridle, how to make a bridle for a horse with your own hands. In conclusion, we will say that all the devices described above are designed to simplify the care of horses, as well as the implementation of control over them. It is important to choose the correct model of a bridle or halter, using it only strictly for its intended purpose and according to the instructions exactly as long as it will be in a normal state, that is, without cracks and holes.
Preparatory stage
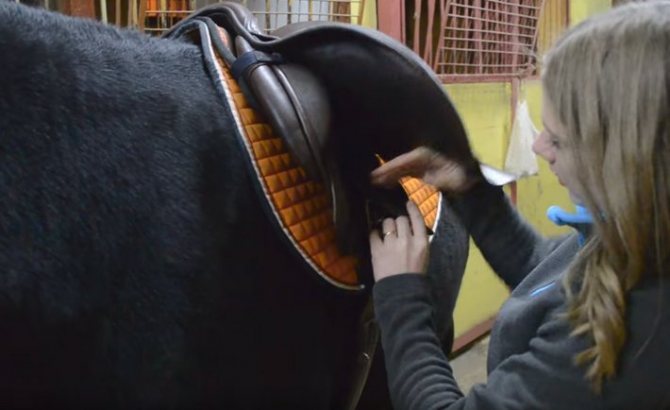
The saddle process can be divided into 3 stages:
- Preparation.
- Putting on the bridle.
- Securing the saddle.
Before you begin to saddle your horse, you need to prepare it:
- examine his body for damage;
- clean;
- establish contact.
All these activities are carried out simultaneously.
It is necessary to carefully inspect the back, belly, sides, withers, the area under the front legs. The places that come into contact with the bridle and saddle must be clean, without swelling and wounds. Otherwise, parts of the saddle will cause discomfort and pain to the animal, and it may behave inappropriately. If there are wounds, they should be treated with antiseptics and, possibly, the saddle should be postponed until healed.
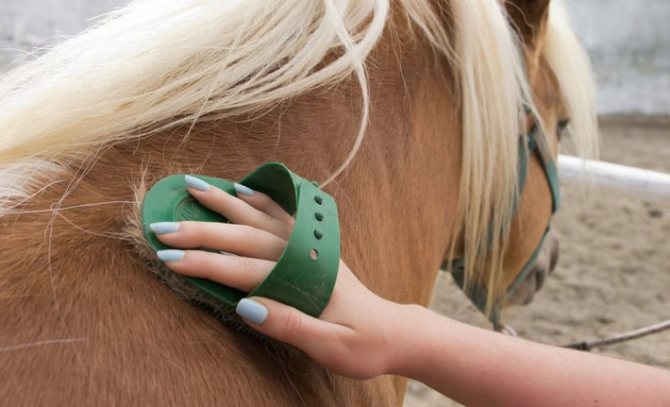
During the inspection and cleaning, a person who plans to become a rider should talk friendly with the animal, call him by name, with affectionate words. This will establish contact, which in the future, when riding, will allow the rider and the horse to feel each other better and trust each other. If no damage is found during inspection, the person needs to start cleaning the wool.
This will require special brushes and scrapers. Cleaning starts from the left side. Movements should be gentle and follow from the head to the rump. The cleaning ends with the feet. And he finishes the preparatory stage by combing the mane and tail. It is produced with special combs made of metal or plastic.
Read next: How to control a horse: the rider's rein, commands needed, body position, whip and spurs