
Greetings, friends.
Alexander Alexandrov is in touch with you.
Today I will tell you how do it yourself correctly.
When building a private house, you should take into account various nuances. Including - prevention of flooding of the foundation with rainwater. The constant flow of water under the foundation can lead to very undesirable consequences. The action of atmospheric moisture on the concrete of the foundation leads to cracks and other damage. The roots of plants begin to sprout into these cracks and produce a destructive effect on the foundation. Sometimes, when building a building, for some reason, builders forget the existence of such a problem, and the owner of the house has to solve it himself. Some owners do not realize the need to protect the foundation of the building, and this significantly reduces the operational life of the dwelling.
In order for the water not to drain under the foundation, a blind area is made - a special strengthening of the perimeter of the structure. If you have experience in construction work, this element of the construction of the house can be done independently, thereby saving on the services of specialists.
So, how to make a blind area yourself?
Why is a blind area needed
The blind area is designed to carry out the following important functions:
- protection of the foundation of the structure from such destructive factors as moisture, plant roots, and so on;
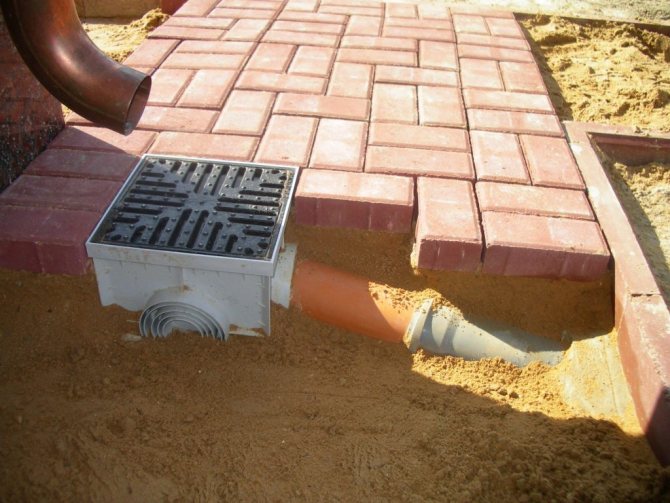
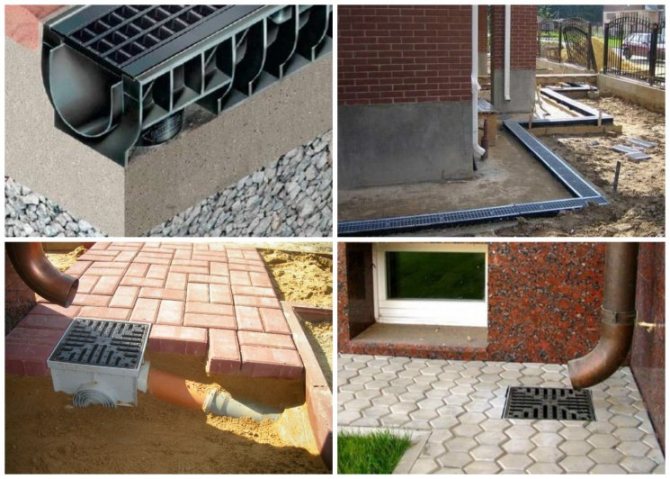
- drainage of rain or melt water from the walls of the house into the drainage system, for which the blind area is equipped with gutters for drainage - this design reduces the risk of dampness of the foundation;
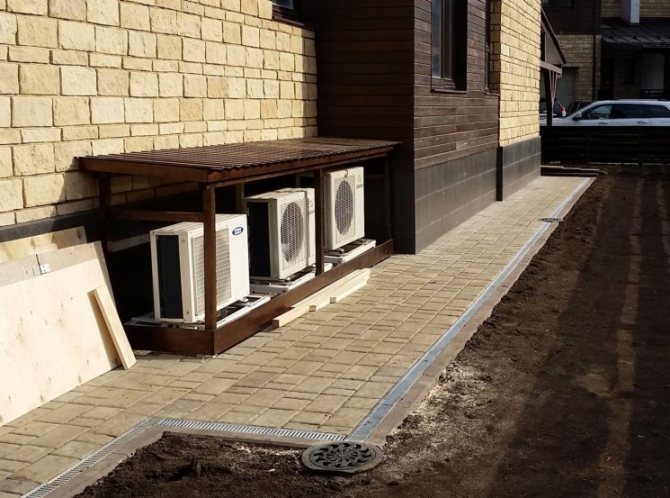
- increasing the aesthetics of the appearance of the house, giving it harmony and completeness;
- reduction of heat losses in the cold season.
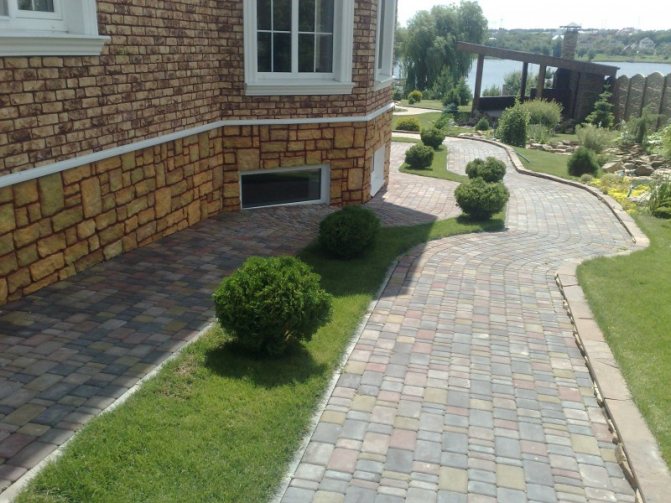
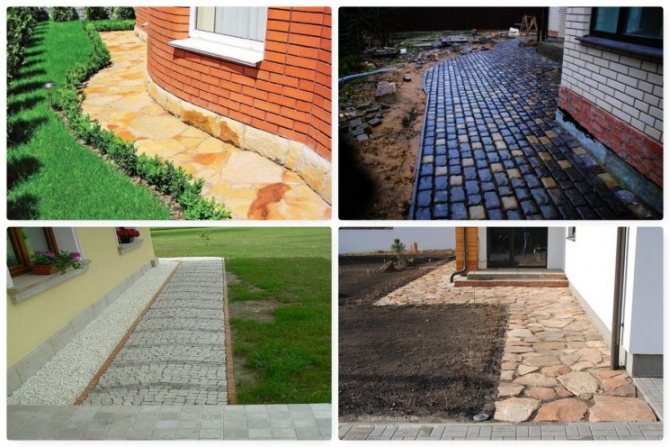
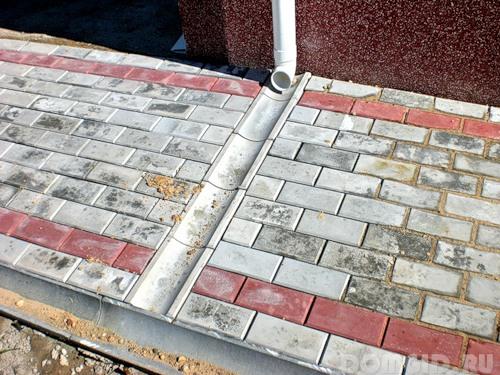
In addition to fulfilling its main purpose, the blind area can additionally be used as a path along the perimeter of the house. Also, paving slabs are laid on the concrete blind area.
What is a blind area?
The main task of the blind area is to protect the base of the house and basement from erosion by groundwater. Outwardly, it looks like a wide strip of concrete or a strip of paving stones or gravel, with a slight slope from the building. In its absence, the soil saturated with water will swell and destroy the structure in winter.

Blind area device
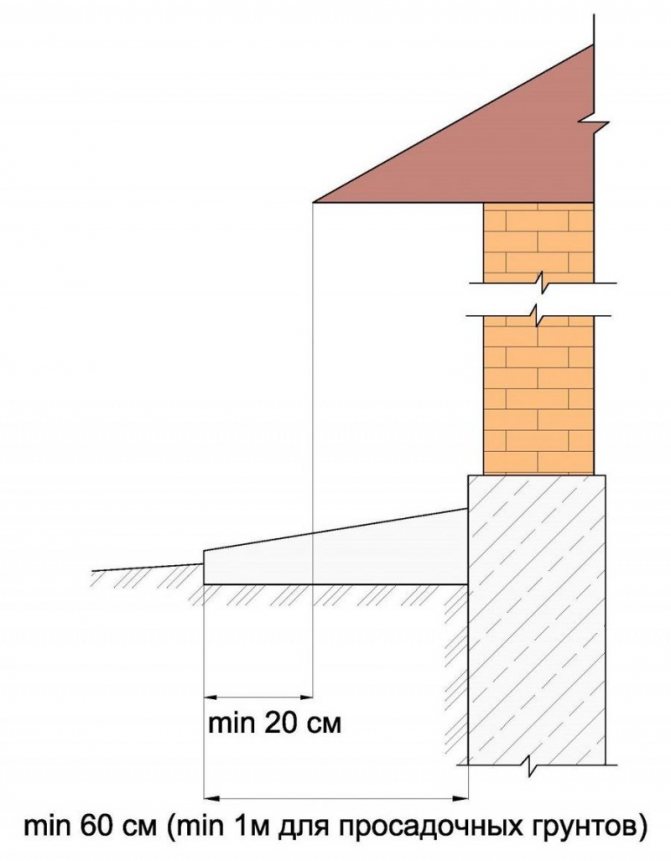
A building with a blind area looks more decorative and has a finished look. She also plays the role of a sidewalk. Its width depends on the type of soil and the removal of the eaves. Such a strip is made wider than the roof overhang by at least 30 cm. Optimal width - 0.6-1.0 m.On heaving soils - at least 1 m.With complex subsidence soils and the presence of karsts (voids) in them, the width increases to 1.5-3 m.
The depth of the structure is selected depending on the type of soil and the thickness of the finishing layer. On average, it is 30-40 cm.
Blind area with drainage system
By the type of materials used, blind areas can be of two types:
- soft: using clay, gravel, gravel or even lawn grass; such structures are less durable and require periodic top-up and repair
- hard: are made of concrete, stone or paving stones with a thickness of 6 cm
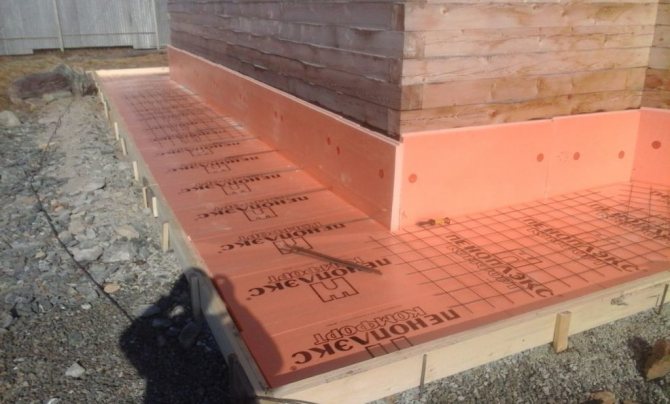
To protect the foundation from frost heaving, thermal insulation is laid in the blind area. You can use any materials that do not give in to decay: polystyrene, expanded polystyrene, expanded clay, etc.
A stronger and more durable do-it-yourself blind area for a house is a rigid monolithic slab. However, in swampy areas, this option is unacceptable. Concrete will quickly collapse under the influence of moisture. In these cases, it is replaced with crushed stone or gravel.
Soft blind area
back to menu ↑
See also: How to make drainage on a site with your own hands: we remove excess water on different types of soil, correctly and inexpensively (20 Photos & Videos) + Reviews


How is the blind area

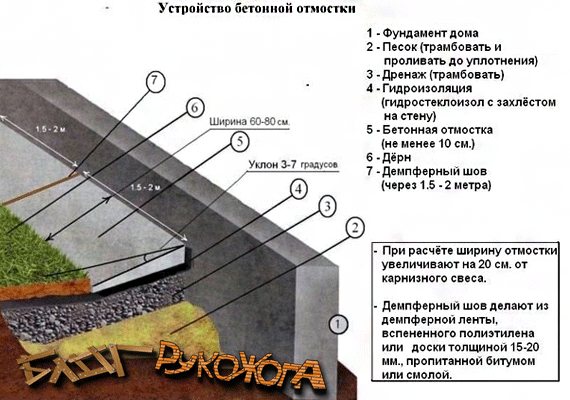
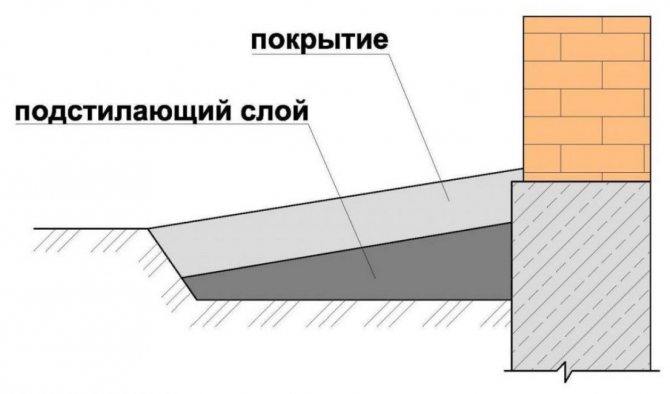
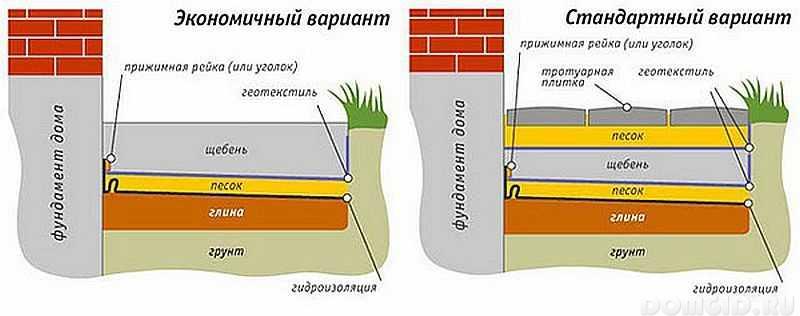
The basis of the blind area is the underlying layer, on top of which the covering layer is applied. Often, different materials are used to create them. To ensure drainage from the walls of the structure, the surface of the blind area should have a slight slope.
The cover layer is often made of concrete. In this case, the surface of the base layer must be horizontal, while the slope of the surface of the cover layer is created when the concrete is poured. The standard slope is five centimeters by one meter.
The underlying layer is most often made of clay, crushed stone or gravel. The most practical material is crumpled clay due to the fact that it does not allow water to pass through well. Typically, the underlying layer is made with a thickness of 0.25 to 0.3 meters. When using clay, sufficient thickness for the sub-base will be from 0.15 to 0.2 meters.
If, when creating the underlying layer, crushed stone or gravel is used, then a layer of sand with a thickness of 0.07 to 0.1 meters should lie between it and the covering layer.
The covering layer is made of durable and waterproof material - natural stone, asphalt, concrete. In some cases, brick or sidewalk tiles are used for this.
Preparation for work
The first step in preparation is to establish the main parameters of the future design. The standard minimum width of the blind area is 0.6 meters. However, when designing it, it is necessary to take into account the following factors, including those related to the features of the architecture and design of the building:
- The position of the edge of the eaves of the roof of the house: the edge of the blind area should protrude beyond this edge by at least 0.25-0.3 meters. This will prevent water from flowing from the roof to the ground in the absence of a drain or problems with it.
- The compatibility of the blind area with the general design of the building and the surrounding landscape.
- Features of the soil around the building. So, if the house is surrounded by subsiding soil, then the minimum recommended width of the blind area is one meter. This size provides the convenience of using the blind area as a track.
- Features of the climate of the area in which the house is located.
- Materials that are supposed to be used for the construction of the blind area. So, if you make a covering layer of paving slabs, then the slope can be made smaller than in the case of using crushed stone.
After establishing an acceptable value for the width of the blind area in this situation, it is necessary to determine the angle of its inclination. To ensure effective drainage, this angle should be between two and five degrees.
The slope of the blind area can be created both during the laying of the underlying layer, and during the installation of the external coating. The choice of one or another approach is determined by the materials used.
Materials and tools

The next step in preparing the construction of the blind area is to calculate the required amount of materials and the selection of the necessary tools. To lay the bottom layer, you need crushed stone, sand or clay.
The most common overlay material is concrete.If it is intended to use it in the construction of the blind area, then the following tools and additional materials will be needed:
- concrete mixer or trough for stirring cement mortar;
- wire;
- reinforcing bars;
- bayonet shovels for digging soil and shovels for working with mortar;
- ruler or tape measure;
- level.
Design features
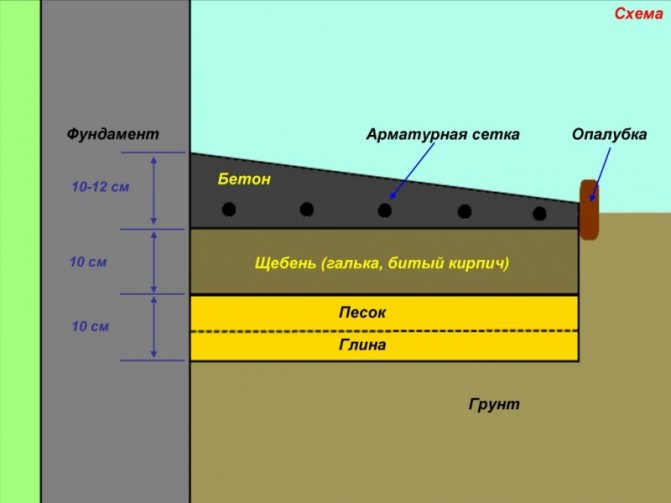
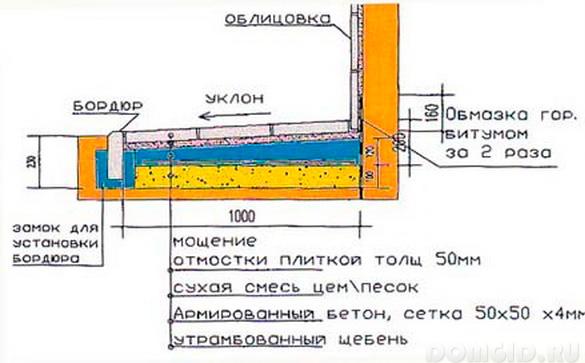
The rigid blind area consists of 3 layers. As the first the underlying clay is used, which has waterproof properties. Its thickness is 10-15 cm.
The blind area is made at an angle
Second layer - ASG (mixture of crushed stone and sand). Its thickness is 15 cm. When using paving slabs, so that it lies flat, sand is poured over and compacted on top of it. You can also use a gartsovka - a mixture for the preparation of masonry mortars. Since there is no large load on the surface, the thickness third the protective concrete layer is 5-10 cm.
To ensure the flow of water, the blind area is made at an angle... According to the norms, it should be at least 5-10%. For example, with a strip width of 1 m, the height difference should be 10 cm. To drain water, gutters (recesses in concrete) are prepared or pipes are laid along the perimeter of the entire building.
Determining the roof overhang is easy. A plumb line in the form of a cord with a weight tied to it is attached to its edge anywhere. In the place of its contact with the ground, a peg is driven in, and then the resulting distance from it to the building is measured. To determine the width of the blind area, you need to add 30 cm to the resulting figure.
back to menu ↑
See also: Natural ventilation in a private house: device, diagrams, DIY arrangement
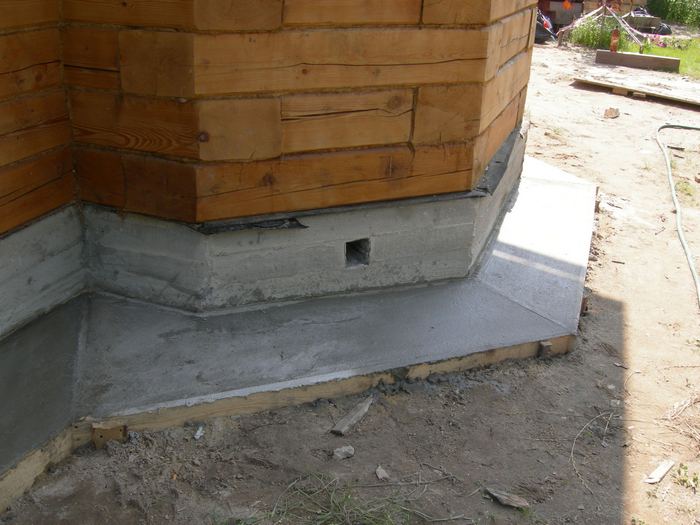
Preparatory work for the creation of a protective structure around the house
In order for the base of the house to be reliably protected, you need to know how to make a blind area
In order for the base of the house to be reliably protected, you need to know how to make a blind area. For its construction, use only high-quality materials and carry out the entire work process correctly. When erecting a blind area, determine its width, if possible, make it maximum. The wider the structure, the less likely it is to absorb moisture into the soil and damage the foundation. The minimum width is 80 cm across the entire strip of the house. It should be borne in mind that the blind area also plays the role of a sidewalk, therefore, for its comfortable use, take a width of 2 m. It is necessary to erect foundation protection taking into account the slope, which will ensure that water flows away from the wall of the building. According to building codes, there is an approved slope size of 50-100 mm per 1 m of width, i.e. the width of the structure of 1 m in height will be 50-100 mm near the walls of the house, and its second end will lie in the same plane with the ground. In the presence of this slope, the water will leave without hindrance and without stagnation on the plane.
The main stages of manufacturing
You should start making the blind area around the house as early as possible, preferably immediately after the construction of the structure. It is better to do this at the same time as the wall cladding and basement.
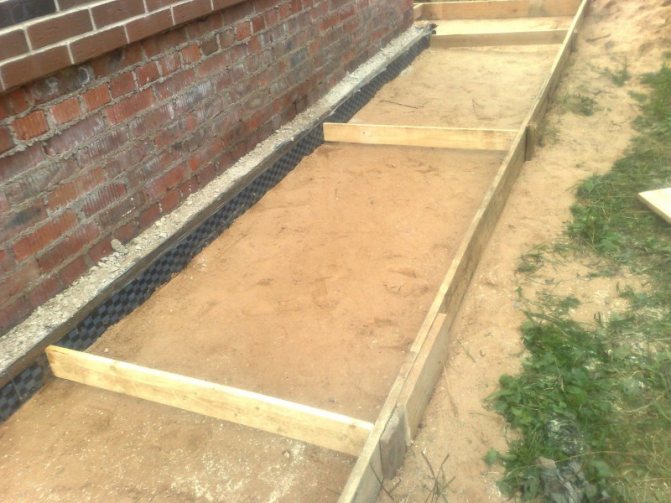
Insulation of the blind area
Preparation of the pit. Warming
- After sampling the soil to the required depth (average depth 30-40 cm, that is, on the bayonet of a shovel), it is leveled and tamped. If it is too loose, you should make a bed of sand with a slight slope from the building or fix the pit with carefully tamped clay
- With heaving soils, a layer of clay is laid at the bottom of the underlying layer, and then sand is poured. On ordinary soils, only a layer of clay is enough
- The next layer is filled with a mixture of sand and gravel. It is carefully leveled and tamped.
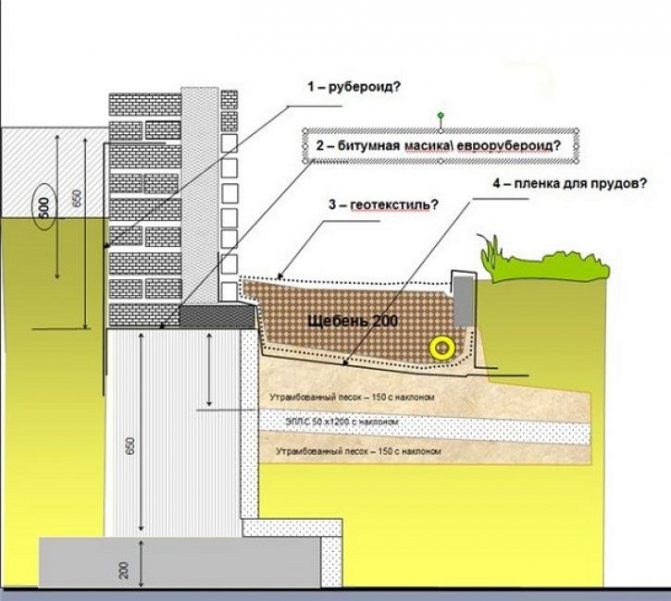
- A heat-insulating material is laid on top that is not subject to decay (polystyrene, expanded polystyrene) or expanded clay is poured. So then waterproofing will be applied, it is not required to fix the thermal insulation
- It is better to use a polypropylene film as a waterproofing layer. Polyethylene or roofing material is less durable and will last a shorter period. Roll materials overlap each other with a 15 cm approach to the foundation. The seams are additionally glued with construction tape. To prevent the film from moving away from the walls, it is fixed to them with mastic or wooden blocks.
back to menu ↑
Read also: Fiber cement panels for exterior home decoration: high-quality cladding with unique properties (65+ Photos & Videos) + Reviews
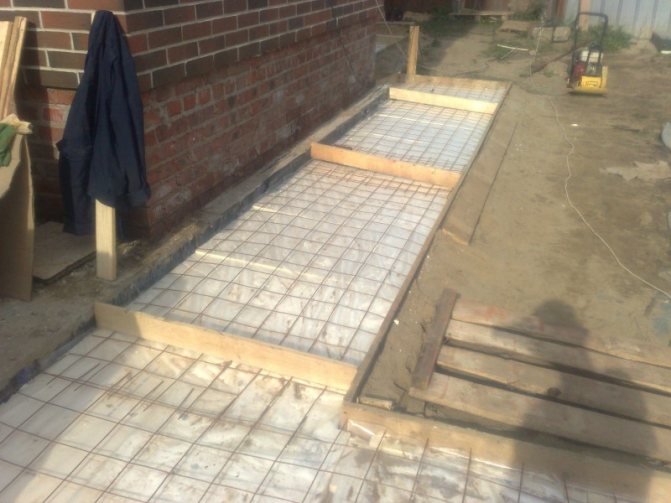
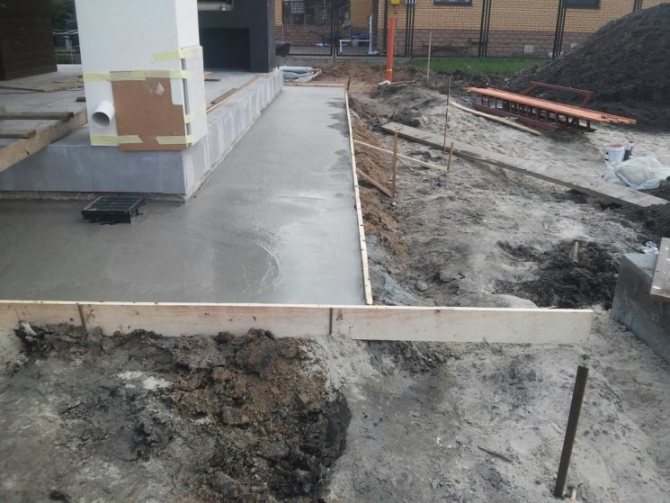
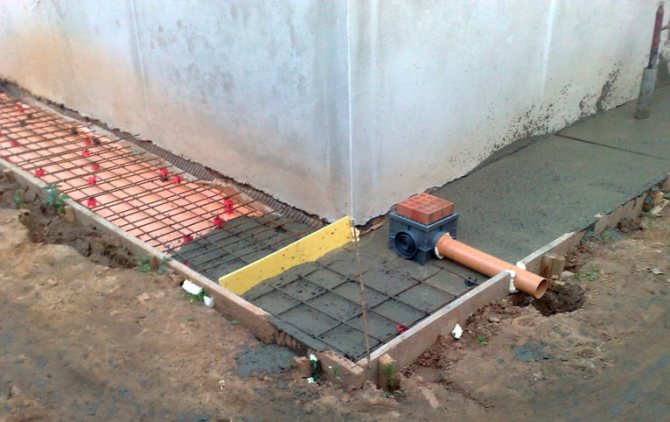
Formwork manufacturing
A monolithic concrete strip is more durable and will last longer. You can also use ready-made concrete slabs.
Formwork with expansion joints, ready for pouring concrete
For the manufacture of a concrete strip, formwork is prepared:
- Before proceeding with the installation of the concrete blind area, you should determine its thickness
- When calculating, it is assumed that reinforcement will be laid inside it, for which 30 cm should be retreated on both sides.Thus, the minimum thickness of the blind area will be 70 mm
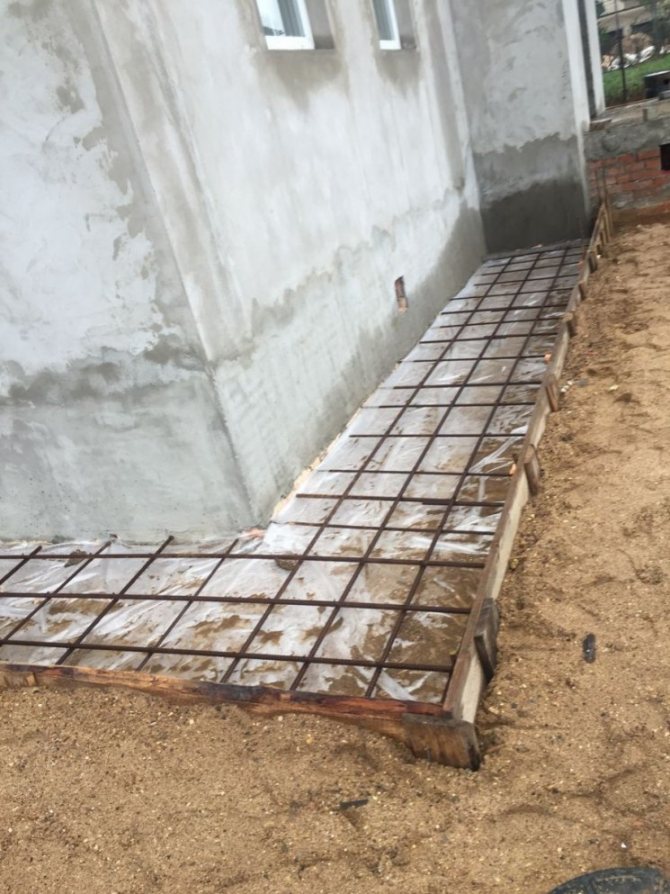
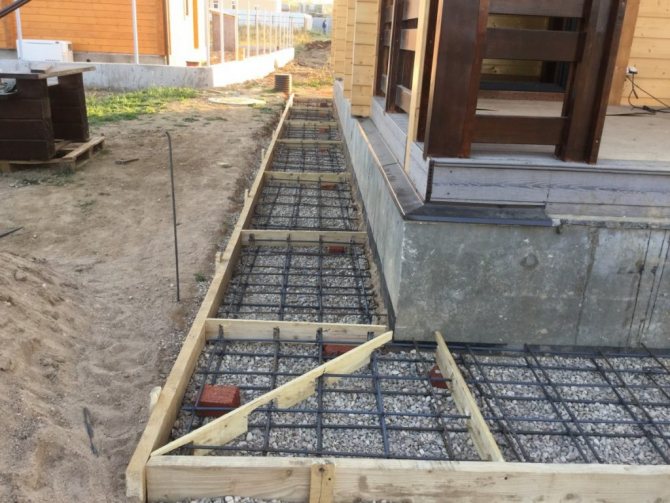
- As reinforcement, a metal mesh with cells of 100x100 mm or rods with wire strapping is used. When using rods, the mesh size is at least 50x50 cm.A strong metal frame is required so that the concrete does not crack under strong temperature changes and under the influence of physical factors
- For the manufacture of formwork, pegs are driven in along the perimeter of the pit, to which boards installed on the edge are screwed with self-tapping screws. They are connected using 40 cm wooden blocks and self-tapping screws.
- At the corners and at the joints, it is necessary to additionally strengthen the formwork using stakes and metal corners
- To protect against cracks, thin wooden beams must be laid across the formworkimpregnated with bitumen. They will act as expansion joints. The distance between the bars is 2.5-3 m. The structure, broken by them into squares, will not be afraid of ground movements. They are laid in such a way that the upper ribs are flush with the concrete pavement. It is also required to take into account its bias. When pouring the solution, they will serve as beacons for alignment.
- Formwork can also be made permanent... Curbs dug into the ground are often used as it. They also need to provide expansion joints. In the future, they are filled with sealant.
- When using drainage pipes to collect and drain water from the blind area, they are laid in the formwork
Expansion joint
In the future, such an expansion joint is covered with sand or sealed with a sealant or covered with roofing material.
back to menu ↑
See also: How to insulate a private house with your own hands: roof, walls and foundation, a description of the thermal insulation materials offered on the market + Reviews
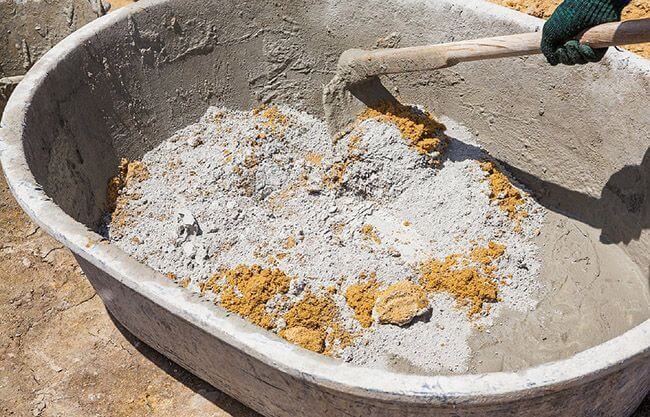
Preparation of the solution
Strength and durability of the concrete blind area, directly depends on the quality of the solution. It is advisable to use cement with the VRTs marking - waterproof.
According to SNiP, cement M200 and higher is allowed for the blind area. But, since its quality has not been up to date in recent years, it is better to insure yourself and use the material of the M300-400 brands. For pouring on difficult soils, it is better to purchase cement of the M400 brand. He is not afraid of moisture and tolerates sudden changes in temperature.
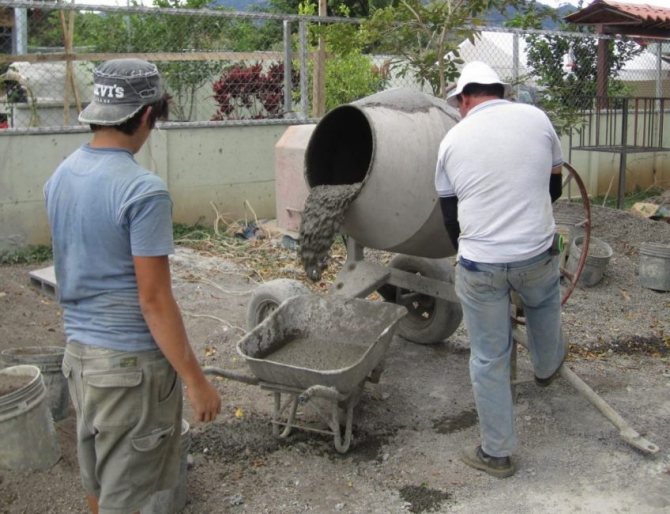
Preparation of concrete mortar
When calculating the amount of concrete, it is taken into account that about 350 kg of mortar will be needed per cubic meter of the structure. Recommended thickness of filling is 10-15 cm.
Highlights when making concrete:
- Crushed stone or rubble stone is used as a filler to relieve the stress of concrete. It is undesirable to use gravel. It is too smooth and does not adhere well to mortar
- The proportions of the solution are selected depending on the brand of cement.For example, for cement M400 with the addition of crushed stone and sand, the proportions will be 1: 3.2: 1.6. Please note that the calculation is based on volume as an example, that is, in liters, not in kilograms. To calculate the mass, use the table (see photo)
- To avoid the formation of lumps, you must first mix dry materials, and only then add water to the mixture.
- After adding water, the solution should not stick to the shovel, but also not drain from it
- It is necessary to knead it at a temperature not lower than 5 ° С, therefore, in the cold season, work should not be carried out. Otherwise, the quality of concrete will not be up to par.
- The sand is used only clean, better than river sand, without any admixture of clay and debris. Mix it with water to test. If the liquid becomes very cloudy, you should not use sand - it contains clay impurities
- To increase frost resistance and reduce water impermeability, special additives can be added to the solution, for example, powdered "Betonoprav" or "Dehydrol". For 200 kg of dry components, they will need 0.4 liters. The order of adding them can be specified in the instructions.
- The solution should be used within an hour. After this time, it will grab and will be unusable for work.
back to menu ↑
See also: Visor over the porch: what are the types, device, drawings, step-by-step instructions for making your own hands (80 Photos & Video) + Reviews
Solution proportion table
| Concrete grade | Mass composition (C: P: U) kg | Volumetric composition for 10 liters. cement (P: W) l. | Concrete output from 10 liters. cement, l. |
| M100 | 1:5,8:8,1 | 53:71 | 90 |
| M150 | 1:4,5:,6,6 | 40:58 | 73 |
| M200 | 1:3,5:5,6 | 32:49 | 62 |
| M250 | 1:2,6:4,5 | 24:39 | 50 |
| M300 | 1:2,4:4,3 | 22:37 | 47 |
| M350 | 1:1,6:3,2 | 14:28 | 36 |
| M400 | 1:1,4:2,9 | 12:25 | 32 |
back to menu ↑
See also: How to make an alpine slide in the country with your own hands? | Device and Step-by-Step Tips (60+ Photos & Videos)
Blind area - step-by-step instructions for performing
Since the quality of the blind area, designed to protect the base of the house, can affect the integrity of its walls and extend the life of the basement, attention should be paid to the process of its arrangement.
We have already mentioned that the materials for making the blind area can be different, but most often concrete pouring is used on an appropriately prepared base. The recommended width of the base is 0.7 m. This is quite enough to exclude the ingress of additional moisture on the base.
At the first stage of preparation, measure 0.7 m from the walls and install pegs around the entire perimeter of the foundation, mark the edge of the blind area with a rope. Then you can start excavation work, namely, to sampling the soil, you can use it to level the site. The depth of the trench should be about 15-20 cm, this will create a good sand cushion.
A trench is dug around the entire perimeter of the house, while observing the specified width and depth. The surface of the foundation should be cleaned of soil and dust - this will ensure a higher level of adhesion of materials when pouring concrete.
The base for the sand cushion will need to be leveled using the usual building level; at this stage of work, an ordinary shovel can be used.
It is not recommended to refuse to fill the sand cushion, it will serve as a kind of buffer that softens the effect of the soil during seasonal temperature fluctuations. This is especially important in the case of construction on soils prone to swelling. Sometimes it happens that within one year the concrete blind area becomes covered with cracks, its appearance becomes unsightly.
To avoid problems of this kind, you should:
- Take sand for filling clean, without adding broken bricks and various construction debris, when the soil swells, these inclusions will be squeezed out onto the surface of the sand filling and can contribute to the destruction of the lower layer of the blind area.
- At the bottom of the trench, sand is filled with a layer of the required thickness and leveled.
- Next, sand is tamped, this can be done with the help of a simple device made with your own hands from trimming a wooden bar.
- The compacted sand is moistened with water, the procedure is repeated several times, until a pillow of the required density is obtained. You can make sure that the proper quality is achieved by standing on the sand - a clear mark should remain on the surface, the pillow should not fall under your feet.
- As for the thickness of the pillow, it should be at least 5 cm, while its surface should be about 5-7 cm below the ground level.
When building on non-rocky soils, red clay is sometimes used as the bottom layer of the pillow, the thickness of the clay layer can reach 10-15 cm. If the soils have a slope to swelling, it is better to use sand for filling the pillow.
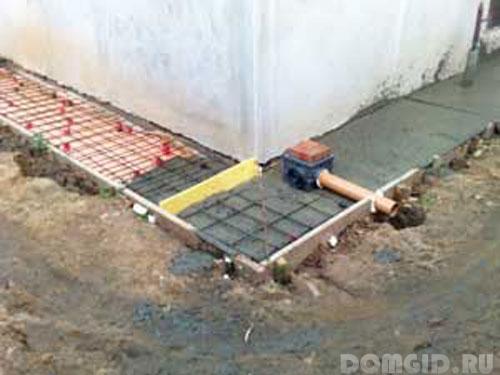
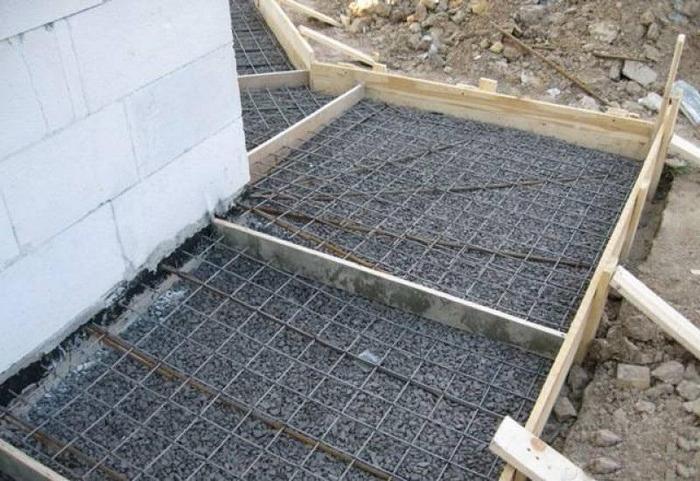
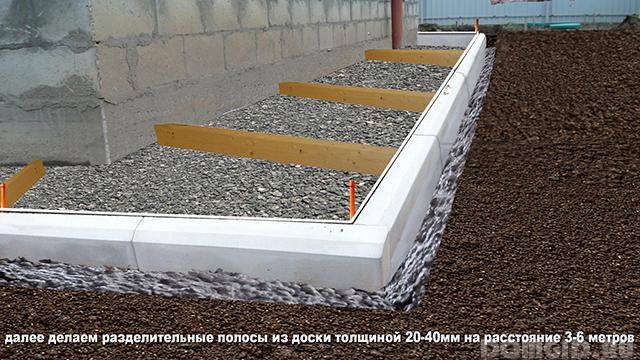
At the next stage of work, you will need to set the curb. Curb stones are installed on the outside of the blind area, strictly along a stretched cord, tracing the horizontal level of laying and checking the verticality of the installation of each fragment. It is recommended to leave a distance of about 1-1.5 cm between the curb stones. When pouring, concrete will fill these gaps; when solidified, sufficiently strong bonds are formed. After installing the curb, you can fill in gravel, its layer should be about 3 cm. For convenience, we divide the blind area into sections, installing at a distance soaked with protective solutions or tarred boards. Ideally, the distance between the two planks should be filled with the amount of concrete obtained from one batch of the concrete mixer.
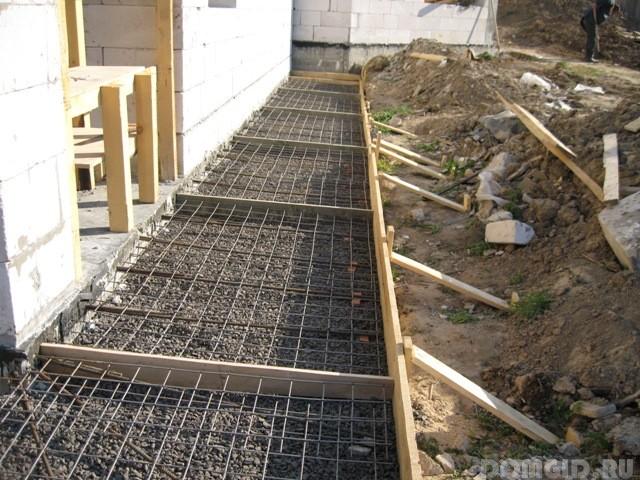
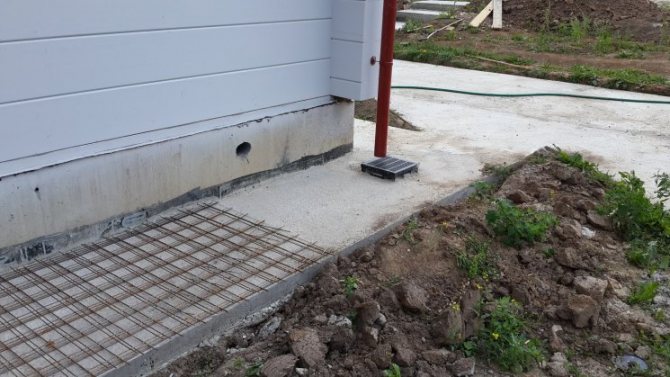
Next, a reinforcing mesh with a cell of 5 cm is laid.It should be laid in such a way that the distance to the gravel layer is about 5 cm, and to the planned level of the concrete layer - 3 cm.
After completing the preparatory work, you can start pouring concrete. To prepare it, you can use a standard recipe:
- 3 pieces of gravel,
- 1 part cement
- 1 part sand
- water - until a creamy consistency is obtained.
Concrete should easily fill all existing voids, but it is not recommended to make it too liquid, excessive moisture can cause bubbling.
More about the construction of a concrete blind area:
Some helpful tips
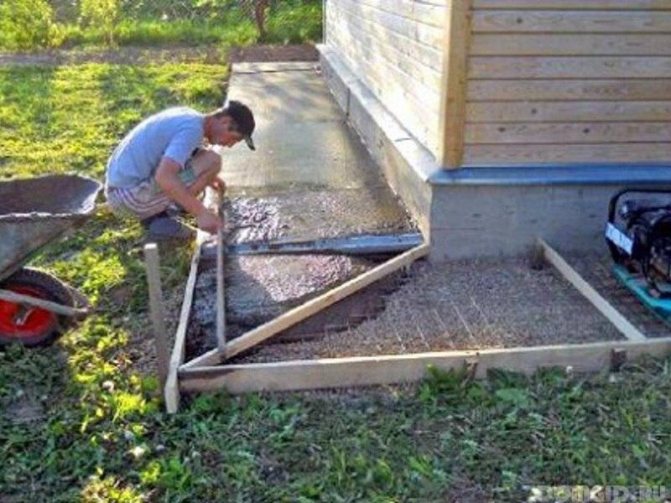
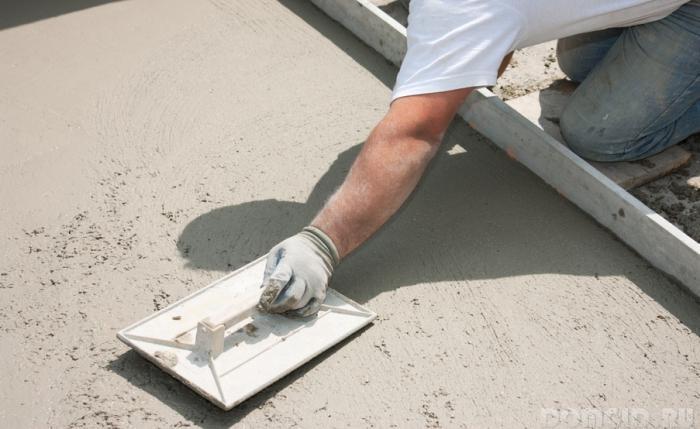
In order to ensure an even distribution of concrete, it is recommended to periodically tap on wooden lintels. After filling the section with concrete, you will need to level its surface either with a wide trowel or plastering rule. Do not forget that the slope of the concrete surface towards the curb should be at least 5 degrees.
Experts do not recommend making the concrete blind area continuous, the threat of its destruction after the first wintering will be very high. It will be correct to install expansion joints every 2, 5 - 3 m, they should be installed across the blind area. Laths treated with melted bitumen can be used as seams. Install them on the edge.
To increase the moisture resistance, the surface of the concrete is iron-treated. The process consists in filling the surface of not yet solidified concrete with a layer of cement and smoothing the surface with a metal trowel.
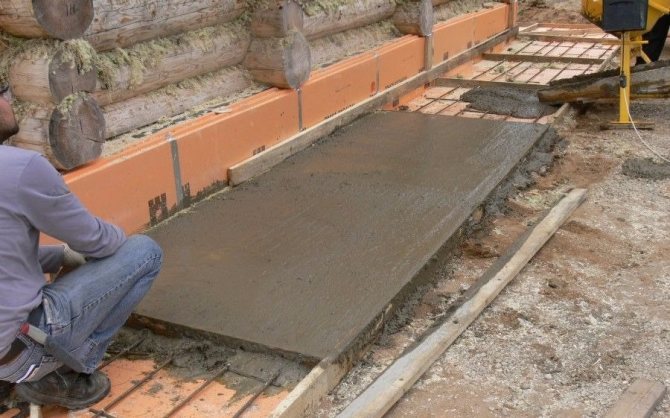
Further, the entire blind area is covered with a cloth, moistened and left for a week. During this period, the hardened concrete is watered twice a day from a garden watering can, the fabric should be wet all the time.
As you can see, filling the blind area with concrete is not particularly difficult; it is quite possible to do all the work with your own hands.
Features of the construction of a cobblestone blind area

After digging a trench, it will also be necessary to create an underlying sand layer, its thickness can be from 10 to 20 cm.When using crushed stone of a fine fraction, the thickness of the underlying layer can be reduced to 3-5 cm. The recommended thickness of the cobblestone is within 10 cm, for filling the space, which will remain between the individual fragments of the blind area will need to be covered with sand.
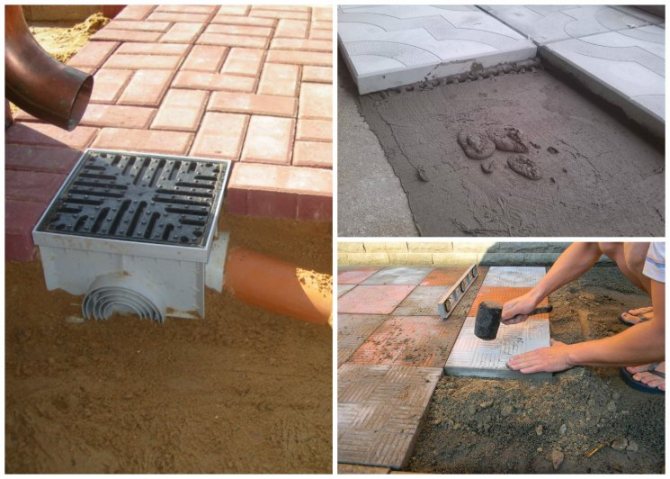
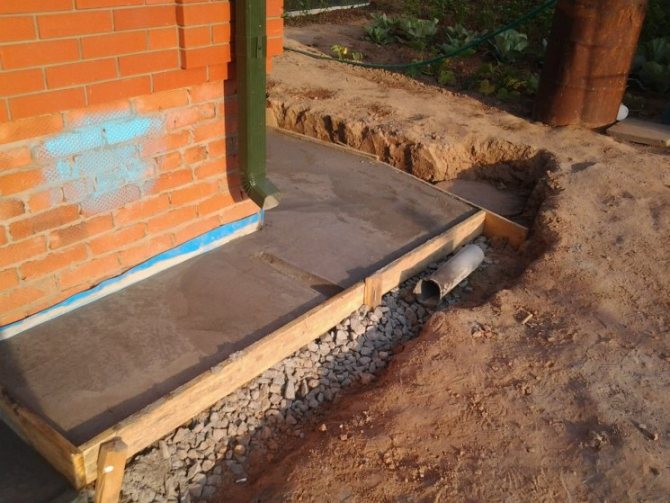
Pouring solution
Filling and leveling mortar
The order of filling the solution:
- Since the concrete layer has a small height, the correct filling of the blind area is done in one step.
- Wooden cross bars are used for pouring beacons, with which the concrete is leveled. To do this, use a metal rule (a tool in the form of a long metal rail) or a flat board
- To avoid the formation of voids after pouring, the solution is compacted with a shovel or metal pin
- After pouring, the concrete is covered with a film or a damp cloth and left to dry for a week. During all this time, it is periodically (preferably a couple of times a day) watered with water. This will ensure uniform drying of the concrete and protect it from cracking.
- Remove the formwork no earlier than in a week... But concrete fully gains strength only after a month.
- To enhance the waterproofing properties of concrete, after the solution has completely set, it is better to iron it... This can be done even a couple of hours after pouring in a still wet solution. To do this, it is sprinkled with dry M400 cement in a small 3-7 mm layer and evenly distributed over the surface.
It is highly discouraged to pour cement mortar on the sand layer. Such a blind area will certainly shrink and crack. Therefore, the pillow is made from a mixture of sand and gravel. Clean sand is used only for leveling in the manufacture of paving stones.
back to menu ↑
See also: Do-it-yourself porch attached to the house: the secrets of building reliable structures made of concrete, brick, metal and wood | 60+ Photos & Videos
How to repair a crack in the blind area of a house?
Cracks or damage on the concrete surface can also appear due to certain circumstances. Shallow cracks can be filled with a slurry of cement, larger ones are pre-cut out for the entire length of the damage, cleaned of debris and dust. After cleaning, the crack is filled with a mixture of bitumen, asbestos and sand.
Large damages can also be filled with fresh concrete mass, having previously primed them. Further, the "patch" is looked after in the same way as for a regular screed - the surface is moistened until the concrete is completely hardened.
If the damage is serious, then additional reinforcement of the cracks is made, followed by their filling with a sand-cement mixture with the addition of crushed stone. After complete hardening, "patches" are treated with a primer.
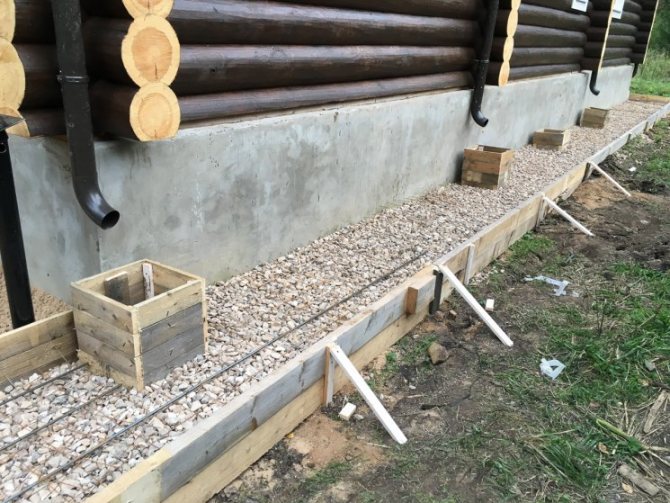
Making a soft blind area
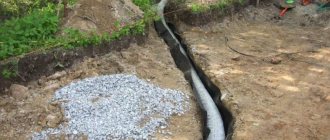
We will tell you in detail how to make a soft blind area. If the drainage of water with the help of a concrete coating is more often carried out using open trays located on the surface, then in a soft blind area is used a drainage system in the form of perforated pipes, which are laid along the entire perimeter of the building.
Drainage device around the house
On wet swampy soils, when the installation of a concrete pavement is not possible, such structures are the only way out. Moreover, their cost is an order of magnitude lower, and the manufacturing process is much easier. It will not be damaged even by ground movements and will not move away from the wall.
The only drawback is that you will have to add it regularly. It is curious that in Finland this type of foundation protection is most common.
The order of the blind area with a drainage system:
- After preparing the trench, curbs are laid along it. They can be replaced with a small groove dug around the entire perimeter of the building.
- A 15-20-cm layer of wet compacted clay is poured into the bottom of the pit. In order for it to mix well with water, it is left to stand for several days, stirring occasionally. Clay for these purposes requires clean, without admixtures of sand, otherwise the layer may swell over time. On loose soils, a small layer of sand is poured over the clay
- When leveling it, it is necessary to provide a slope to the side of the building.
- On uncomplicated soils, clay can be replaced with a layer of well-compacted soil
- The next layer is a polypropylene film waterproofing. It is laid with an overlap with an approach to the walls of the foundation.
- To stabilize the coating, a layer of coarse gravel or pebbles is first covered. It will help to evenly distribute the load and protect the coating from subsidence
- A layer of crushed stone or pebbles of a finer fraction is poured over it
- The final leveling of the blind area is done using screening or sand
- To stabilize the layer between sand and gravel, it is advisable to lay a layer of geotextile
- The last layer is crushed stone 20-25 mm in size. Its thickness is 60 mm
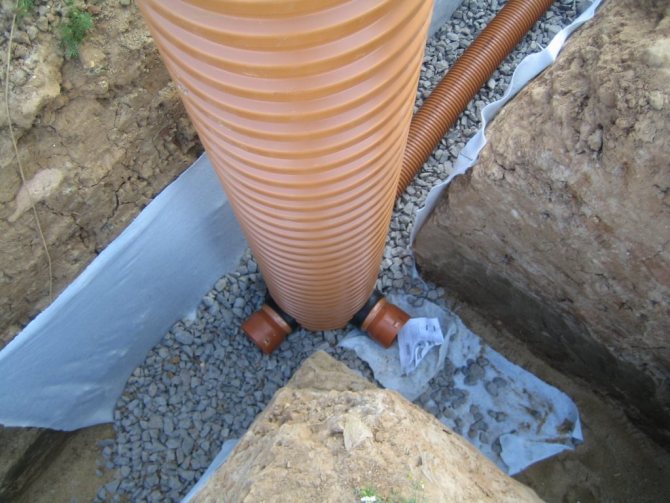
- A groove is immediately formed in the layer of clay or compressed soil for the installation of perforated drainage pipes. They can be replaced with metal pipes in which 20 mm holes are made.
- To protect the holes of drainage pipes from siltation and clogging with soil, they are wrapped in geotextiles
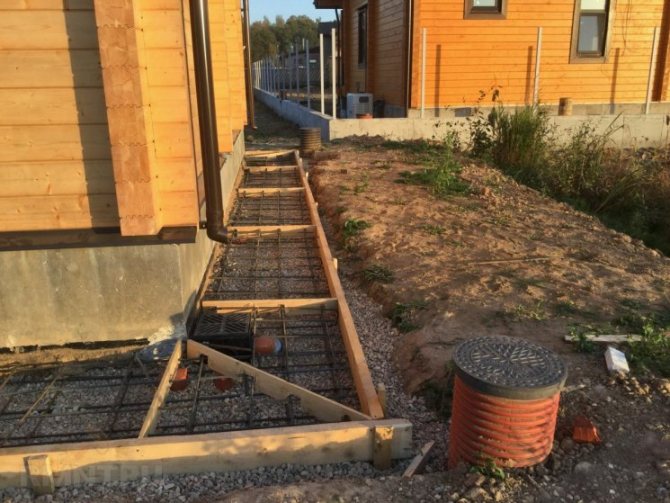
- Water is discharged into a trench dug to a depth of 1 m, which is covered with a mixture of rubble and soil in a ratio of 7: 3
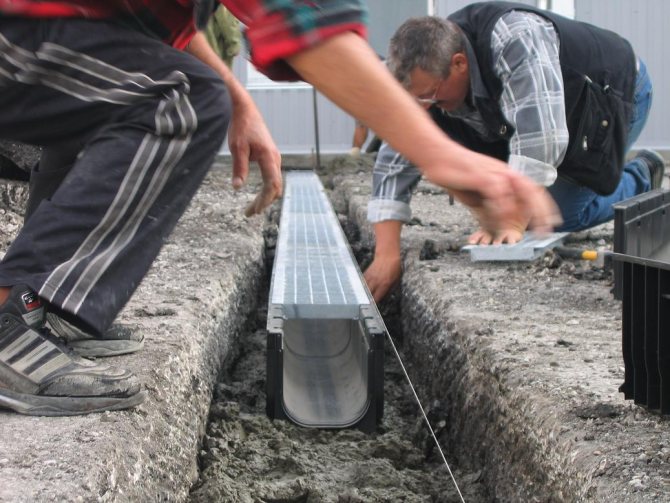
Laying of drainage trays for water drainage
When using crushed stone or gravel as a blind area, additional installation of curbs is required.
back to menu ↑
See also: How to securely connect wires without soldering: simple step-by-step instructions
How to make a blind area around the house with your own hands
Since the main task of the blind area will be to drain water from the foundation, then it should be planned in such a way that the side adjacent to the house is higher. The slope angle is calculated depending on the covering material. For example: when constructing an asphalt blind area, the slope angle can be 3-5 degrees, but if the blind area is made of cobblestones, then it is recommended to make an angle of about 10 degrees.
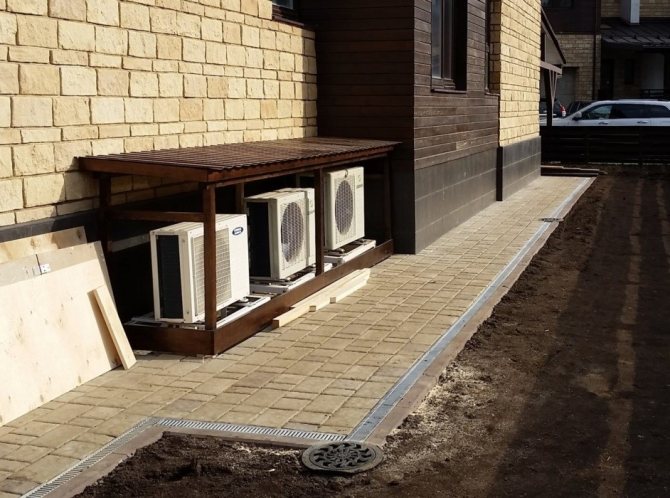
To calculate the optimal width of the blind area, you should take into account the type of soil and the width of the eaves overhang. If the soil is dense enough, then the blind area can be made wider than the eaves overhang, if the soil is planting, then the width of the blind area should be at least 1 m.In any case, the width of the blind area should not be less than 0.6 m.A useful addition to the design can be a drainage tray , install it around the entire perimeter of the blind area. It can be concrete or made from a regular pipe sawn lengthwise. Lay it on a prepared concrete base.
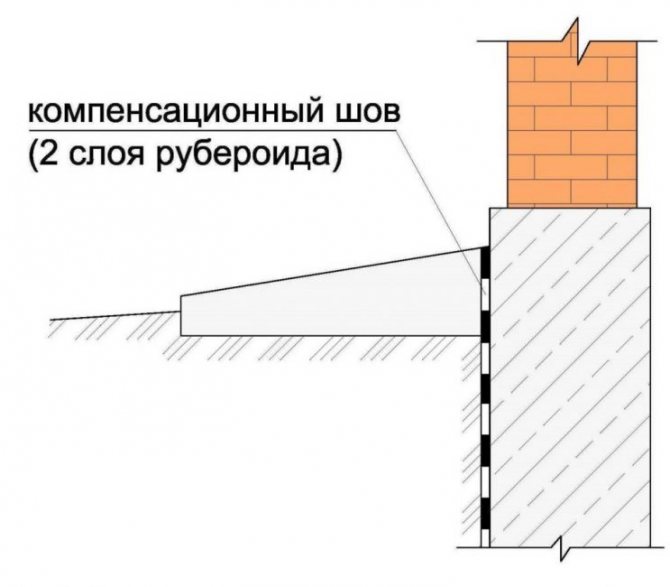
Special attention will be required to design the joint between the blind area and the foundation, here it is recommended to perform an expansion joint, its width should be from 1 to 2 cm.It can be filled with sand, but it is better to use a strip of roofing material in two additions for this. You can just as well use bitumen or special sealants.
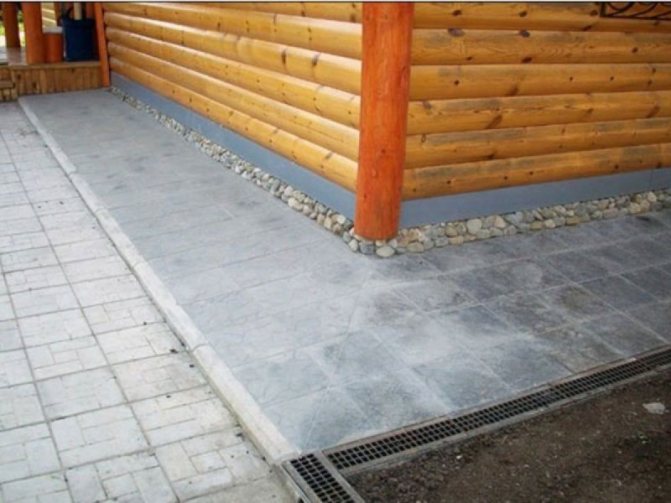
A simpler implementation will be the option that involves waterproofing the foundation; waterproofing will need to be continued to the level of the blind area. It is not recommended to connect the plinth to the blind area - even in the case of slight shrinkage, the plinth finish may be damaged.
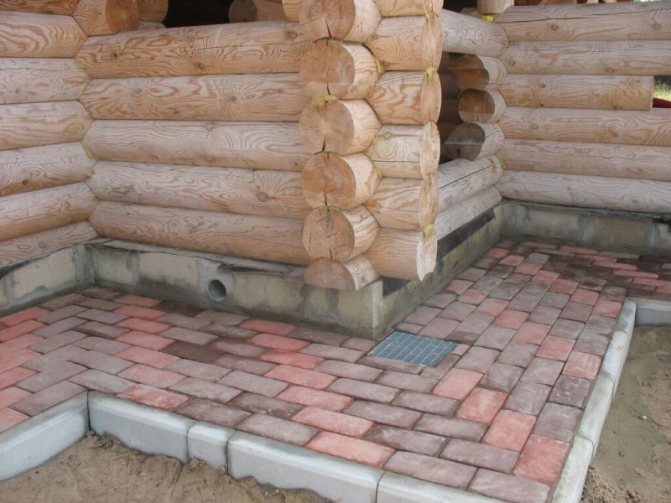
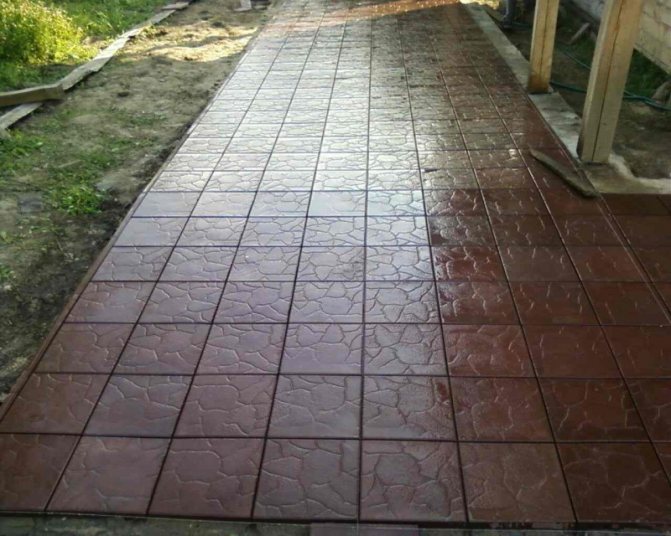
Making a blind area from paving stones
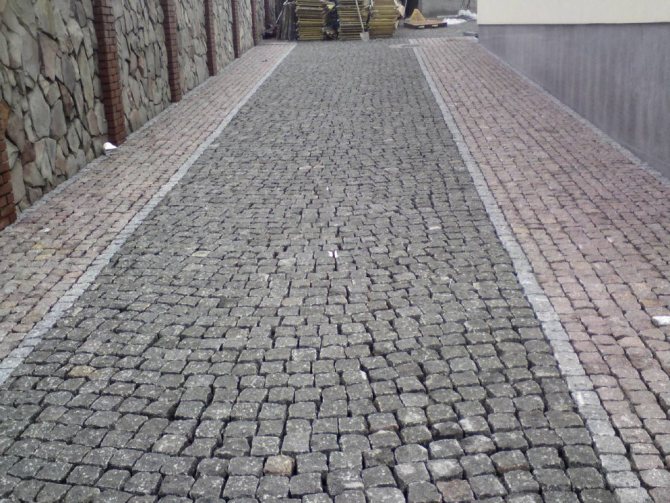
Blind area from paving stones
In addition to protecting the foundation from moisture, such a blind area also performs a decorative function. It looks much more solid and attractive than a concrete coating.
back to menu ↑
See also: Campfire site in the country: we observe safety, maintain ergonomics, create coziness with our own hands (60+ Photo & Video)
Pit preparation
The main points of preparation of the pit:
- Just as in the case of concrete, the paving area consists of two main layers - a hard surface and a bedding (cushion) of rubble and sand
- If you have never worked with tiles, it is better to lay out small ones. Working with large paving stones is more difficult. In the absence of experience, it will take a lot of time to lay corners.
- The width of the blind area must be calculated in such a way that the tiles do not have to be cut
- After determining the size of the blind area along the perimeter of the building, the sod layer is removed and the soil is taken out to a depth of 30-40 cm. The soil in the prepared pit should be carefully tamped.In this case, it is immediately necessary to take into account the slope that is made to the side of the building.
- A compensation gap of 1-2 cm should be left between the blind area and the foundation.It is filled with roofing material folded in half or covered with sand
- At the bottom of the pit, to protect the soil from moisture penetration, it is recommended to provide a clay castle - a 10-15 mm layer of wet, carefully trampled clay. It is pre-soaked for a couple of days in water so that it becomes plastic
- Pegs are placed in the corners of the prepared bed and a string is stretched, which will serve as a guide when laying out paving stones
- The curb is laid strictly along the cord. The horizontal position of its location is verified by the building level. To avoid displacement, it is temporarily fixed with pegs. After filling the rubble, they are removed
- To prevent the blind area from creeping, the curb from the outside should be fixed with cement mortar
- To protect against moisture, the pit is covered with a layer of roofing material, film or geotextile. They are laid with an overlap on the foundation, pressing the edge with wooden slats
- Perforated pipes are laid along the perimeter of the blind area to equip the stormwater system
- Next, a layer of sand is poured, and then crushed stone. They are filled with water and thoroughly rammed
- Inexpensive foam or more durable polystyrene foam are used as insulation. To level it and protect the insulation from damage after filling the crushed stone, add a little more sand on top. It is unacceptable to lay polystyrene or expanded polystyrene immediately on crushed stone
- The last, finishing layer is a mixture of cement and sand in a 4: 1 ratio. Tiles will fit on it. Remember to align it with the slope away from the building.
back to menu ↑
See also: Cold smoked smokehouse: device, drawings for making with your own hands from brick and wood | Photo & Video
Appointment of the blind area
Let's say right away that there are no regulatory documents in our country that would regulate the correctness of creating a blind area. Separate standards tell about its purpose, required dimensions, angle of inclination and other information. The sequence of actions is not scheduled. However, there is a large world experience in this matter, which would be foolish to ignore.

A well-made blind area will protect the foundation from the harmful effects of moisture
These documents say that the blind area is arranged near the building in order to protect the soil from wetting along the perimeter of the building. That is, it is part of water protection measures. Why protect the ground, you ask? And then, when it is saturated with water, moisture begins to penetrate into the foundation, if it is poorly waterproofed. During frost periods, this causes increased heaving of the soil and destruction of concrete.
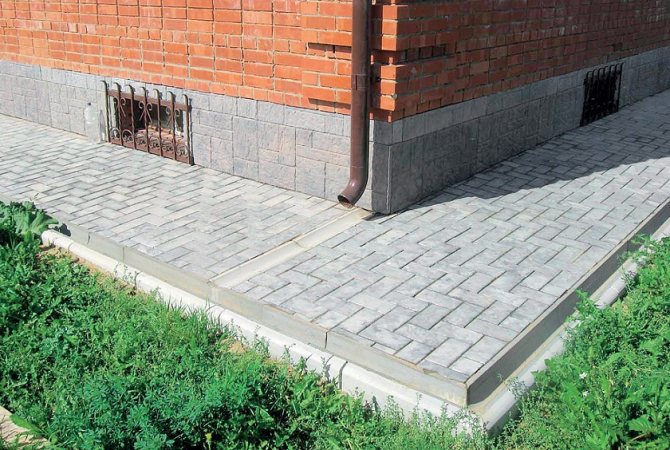
The blind area around the building is lined with concrete tiles
Also, the abundance of water in the soil can affect its bearing properties. This is inherent in clay and loamy soils. As a result, they cannot cope with the load from the structure, and it begins to sag, causing serious deformations, which can lead to cracks in the walls and foundation. Therefore, it is so important from the very beginning to take care that the soil around the house does not get wet. In addition, it reduces the stress on the foundation waterproofing.
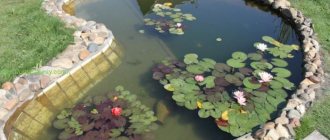
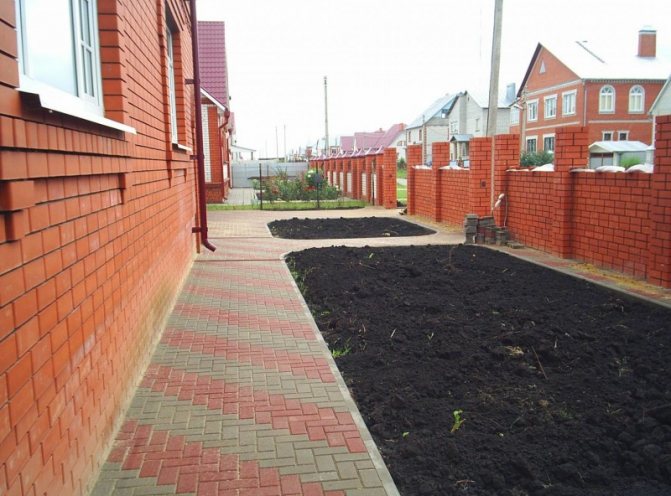
The blind area is also a part of the architectural appearance of the whole house - without it, the building will not look attractive, even if expensive and beautiful materials are used to decorate the facade. Everything should be harmonious. And again, the blind area can be used as a path - it can be masked and made into one piece with the decoration of the local area.
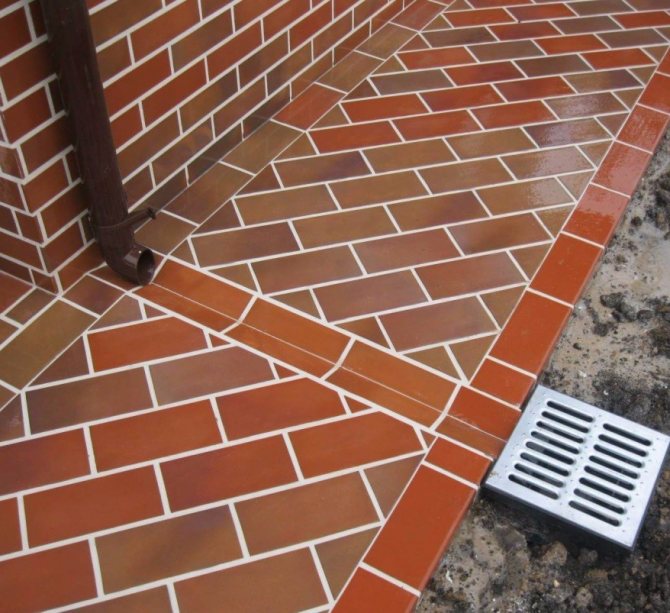
The blind area and the basement of the house are lined with clinker bricks
Laying paving stones
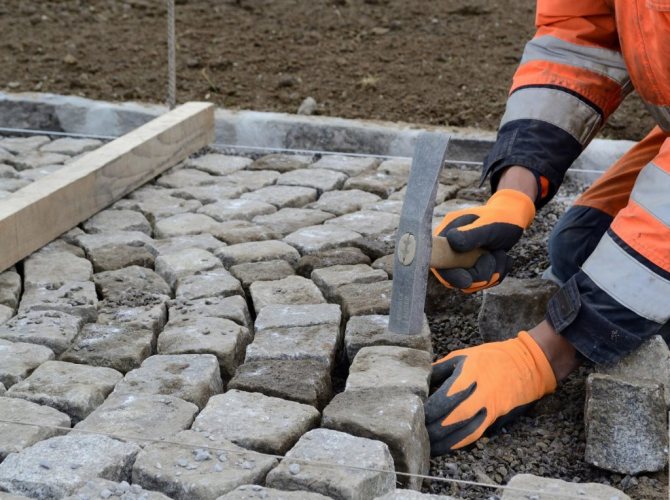
Laying the blind area from paving stones
Tile laying procedure:
- Tiling starts from the foundation. It is more convenient to do this on your own so as not to damage the compacted cement-sand cushion
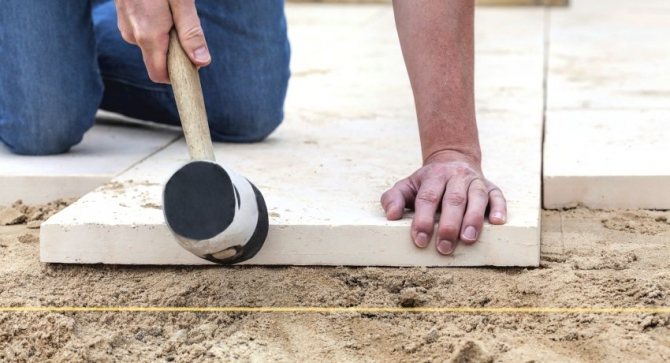
- Each tile is leveled with a building level and adjusted to the adjacent one with a rubber hammer. In order not to damage the paving stones, this must be done through a wooden block. If the tile is uneven, a small layer of cement and sand is poured under it
- It is better to set the gap between the tiles with plastic crosses. The size of such a gap is 2 mm
- Cut tiles and edging paving stones (used in the absence of a curb) are laid last
- Grouting is done with the same cement-sand mixture that was used to backfill the pillow. After grouting, the surface is swept with a broom so that the mixture is well distributed in each of the seams, and then spilled with water
back to menu ↑
See also: How to create beautiful flower gardens and flower beds in the country with your own hands? (220 fresh photos and video ideas) + Reviews
Blind design
The concrete blind area has a fairly simple design, for the preparation of which the following materials will be required:
- Bed (pillow). It is performed before pouring the solution. A variety of materials are used as a bedding: coarse or medium sand, sand and gravel mixture, crushed stone, fine gravel. The foundation blind area does not fit onto fine sand due to the likelihood of shrinkage, since in this case there is a risk that the base will crack. It is best to prepare a two-layer cushion: first lay gravel or crushed stone, which will compact the soil, and then the sand.
- Reinforcement. The presence of a reinforcing mesh for the concrete blind area will give the structure more strength. The size of the cells of this product is usually 30 x 30 or 50 x 50 cm. The mesh diameter should be about 6-8 mm, but it all depends on the type of soil.
- Formwork. Wooden guides located around the perimeter of the pavement are required, as they will prevent the concrete mix from spreading. The width of the formwork boards is usually 20-25 mm.
- Concrete mortar. Pouring the blind area is performed using a specific composition of the concrete mixture.

Concrete classes, depending on the strength of the composition
The brand of the solution must be carefully selected, since the strength and durability of the entire structure will depend on its quality and characteristics. For such a coating, Mixture M 200 is usually used, the strength class is at least B 15 (a higher grade can also be purchased). It is also worth paying attention to the frost resistance of the composition, which should not be less than F 50. To provide better resistance to temperature extremes, it is recommended to give preference to compositions with an F 100 index.
To get a high-quality coating, it is most profitable to make a concrete mixture on your own.
Typical mistakes
Inexperienced builders often make the same mistakes when building a blind area.
Here are the most common ones:
- insufficient width: water draining from the roof will fall on the open ground, soak into the ground and gradually destroy the foundation
- small slope of the surface and, as a result, the accumulation of water in the area of the foundation
- violation of proportions in the manufacture of concrete: measuring the components by eye often leads to the preparation of a poor-quality solution, cracking of the concrete blind area; through the cracks formed, water will freely penetrate into the ground, and there will be little benefit from such a blind area
- no waterproofing layerprotecting the soil from moisture penetration
- lack of insulation: in the process of frost heaving due to the formation of cracks, the foundation will begin to collapse; therefore, it is not worth saving on heat-insulating materials
The author of the following video shares his own experience in replacing the old blind area on loamy soil:
See also: Gazebos with barbecue and barbecue - (80+ PHOTOS) Drawings of projects that you can implement yourself
VIDEO: Blind area at home, doing it right!
Blind area around the house: views, device, schematic drawings, instructions on how to do it yourself (30 Photos & Videos) + Reviews
back to menu ↑
See also: Do-it-yourself well construction in the country: detailed instructions, water supply from the well, original decorative design ideas (75 Photos & Video) + Reviews
The role of the blind area in the structure
Foundation protection plays an aesthetic and decorative role
Foundation protection plays an aesthetic and decorative role. It prevents the ingress of sedimentary moisture and uneven erosion of the base of the house. If your site is constantly wet soil, then in winter it will begin to press on the base of the house and entail planting and the appearance of cracks on it. If the soil is heaving, then it is recommended to insulate the base protection.
Important! It is extremely dangerous to leave the house without a blind area for the winter.
Simplified blind area
Great way. Less costs. The soil is excavated by at least 6 to 10 cm. The bottom is carefully tamped personally. A selected waterproofing material is placed on top from 20 to 30 cm. Requires 2 coats. The best and most economical materials: roofing material or plastic wrap. Gravel with sand is poured on top. On this layer: crushed stone with gravel. Pour everything with cement with the addition of sand.
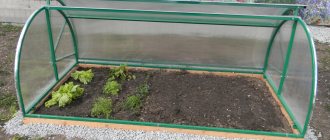
On such a blind area, you can break a lawn. You can pour 30 cm of fertile soil onto the crushed stone and sow it with grass, break a flower bed. Experiment. You will have a beautiful landscape.
filling the blind area
Making a concrete mixture for the blind area at home
To organize a concrete blind area around the house, it is not necessary to buy a ready-made mixture and order an expensive delivery with a concrete mixer. Knowing the proportions of the components, you can make concrete M 200 yourself, this will require:
- 1 part of cement (optimal is Portland cement 400);
- 3 parts sand (better than medium, but fine-grained will do);
- 4 pieces of coarse aggregate (gravel or crushed stone);
- ½ part water.
Self-mixing concrete for the blind area of a country house
Accordingly, to get 1 cubic meter of concrete you need to mix:
- 280 kg of cement;
- 1100 kg of crushed stone;
- 800 kg of sand;
- 190 liters of water.
Also, using the PC 400, you can get other brands.

Concrete grades that can be made from PC 400, sand and crushed stone
Helpful! First of all, cement and water are mixed, and only after the composition is homogeneous, sand and gravel are added to it.
To make the construction of the blind area strong, and concreting was durable, certain rules and requirements are provided.