Poultry »Chickens
0
1866
Article rating
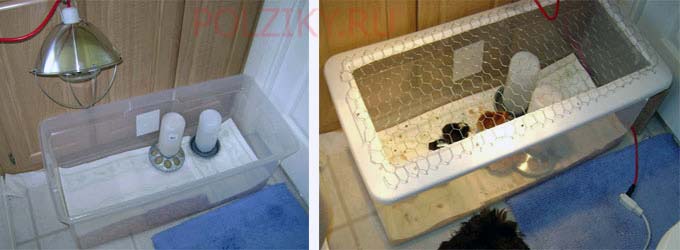
When hatching chicks in an incubator, a brooder is required, in which they will be kept in the first days of life. Many people make this device on their own, without buying it ready-made, because the price of ready-made boxes for chicks is often unjustifiably overstated. And it's easier to make a do-it-yourself brooder for all chickens by choosing the right design and the right materials. But during the manufacture it is necessary to take into account a number of requirements that must be met by a fully assembled device. How to make a brooder for chickens with your own hands? What determines the size of a chicken brooder?
DIY chicken brooder
What is a brooder for?
A brooder is a place or room reserved for the life of chicks. It should have an accessible place for feeding, drinking and heating chicks.
Primary requirements:
- dry, non-slippery floor;
- good ventilation and no drafts;
- reliable coating that protects against precipitation;
- the presence of a heating system. A heater and a thermostat are installed;
- adequate lighting. For the passage of ultraviolet radiation, some walls are made of mesh, and at night they are covered with a cloth to reduce heat loss;
- the presence of a separate removable pallet or container under the floor for excrement;
- the structure should be easy to disinfect and clean.
We recommend two useful articles: on assembling a home incubator and designing a foam incubator with your own hands.
Design features for young animals
A chicken brooder means a box with:
- there is a space in which the chicks receive food and water - they are called the feed compartment;
- in another room, the young are spending time, resting, sleeping and gaining strength.
The name is derived from the English "brood" (to carry). The box replaces the cludge, it is warm in it. Broilers are located in a heated area and are protected from external influences and hazards.
Important information! The hatched chicks gradually get used to life outside the egg and additional heating. They must learn to peck at food and drink water.
Necessary materials
To make a reliable do-it-yourself brooder, you need to use high-quality, wear-resistant materials. It is desirable that they withstand exposure to moisture, light and heat. You can use the following materials:
- plywood or OSB sheet - for the base of the structure and its walls;
- wooden bars and slats - for the frame, doors and other elements;
- galvanized mesh with cells 10 × 10 mm - for protection from other animals;
- slate sheet - to protect against precipitation;
- hinges - for doors;
- sheet of tin, pallet, oilcloth or plastic panel, net - for excrement.
- The net is taken depending on the age of the chicks. The smaller they are, the smaller the grid cell size;
- screws or nails;
- incandescent lamp from 25 to 60 W;
- reflector;
- lamp cable and plug;
- thermometer;
- heater;
- thermostat - to regulate heating, as well as auto shutdown and turn on the incandescent lamp.
Expert advice
Victor N. Travnikov
For about 20 years he has been breeding laying hens, broilers, geese, ducks and other poultry. Our expert who is always happy to help readers.
Ask a Question
When designing a brooder, you need to remember that the chicks will stay there for up to 2-3 months.And one chick should have at least 0.1 m2. Therefore, it is worth considering how many chickens are planned to be kept in the brooder. And already from their number, calculate the size of the structure.
Selection criteria for the finished structure
When buying a ready-made brooder, you should pay attention to the overall structural strength. The frame should be strong and not "walking", the lid should fit snugly against the body.
Particular attention is paid to checking the reliability of the insulation of lighting wires and heating elements.
Chicks should not have access to a light bulb or wires, that is, the height from the floor to the lamps should not be less than 50 cm (situations are known when chicks pecked a light bulb and it broke, sprinkling the floor with fragments).
Be sure to read:
How to make a cage for chickens with your own hands: photos, video instructions, sizes and options?
Different elements are used as a heater: IR lamps, ceramic. The latter are the most reliable and economical. The installed thermostat will make it easier to maintain the desired temperature.
Important! There should be ventilation holes in the walls and lid of the brooder. There should be no gaps at the junction of walls and floors.
It is necessary to smell the materials from which the box is made. Sometimes plywood is coated with paint or varnish to protect it from moisture, which begins to exude a strong odor from heating.
You should refuse to buy such a brooder, the chicks can be poisoned by fumes.
How to make a chicken brooder
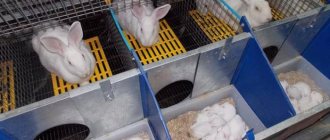
A brooder for raising chickens is different in design from other birds. The table below shows the 4 characteristics of these brooders.
| Features of the | Explanations |
| Small size | Optimally 1 × 0.6 × 0.6 m. |
| Durable materials | Particleboard or plywood is used to provide warmth, protection from drafts and moisture. Since chickens have runny droppings and often splash water, the chipboard will not get wet. |
| Retrieved pallet | Once the sand under the chicks' feet is dirty from the droppings, the pallet can be easily removed and the sand replaced. |
| Stable drinker and feeder | Thanks to them, the chickens will not turn feed and water, will not enter there with their paws and will not contaminate them with droppings or sand. |
Start building a brooder
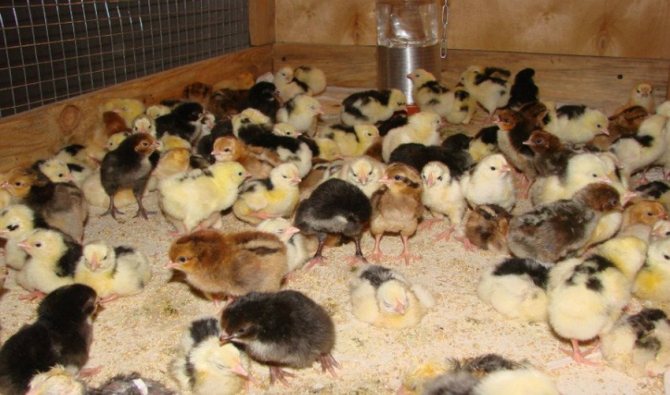
In this room, farmers keep both broilers and regular chickens. But you need to know that a brooder for small broilers in its design is no different from other similar designs. The size of the box is calculated according to the following principle: a room with a volume of 0.5 cubic meters is enough for 100 chickens. Moreover, the height is always equal to half a meter. Well, for fifty kids, the already described model is used: a meter in length and half a meter in height and width. Given this density, it is not difficult to calculate the dimensions.
The first step in creating brooders for the mass rearing of chickens is to prepare drawings of the finished design. If you have the skills of a draftsman, you can draw them yourself or print them on a printer. It is advisable to look at the video of what the typical drawings look like and prepare everything in exactly the same form, then you need to start making the box. The manufacture of a brooder for small chickens with their own hands begins with the assembly of the frame. We will consider the classic wooden version, which is most convenient for most farmers.
Frame for brooder
How to make a spacious chicken brooder? The frame for the brooder should be made of sturdy wooden slats or beams. Here it must be borne in mind that the assembled creation must withstand the weight of the entire structure, drinkers, feeders and chickens. You also need to treat the tree with a composition against parasites and odors, but you need to use a mixture that will not harm small chickens. All parts of the frame must be made from the same type of wood so that they can withstand the same load. Too expensive wood is also not worth taking: it is not beauty that is important, but functionality.
It is not difficult to calculate how many rails are required to make a frame. A brooder for 50 chicks needs eight strips of one meter and four strips of half a meter. In terms of dimensions, everything must be observed with millimeter precision. An error of even 1 centimeter will lead to a skew, which may cause cracks or the box will become unstable. Legs need to be made of four-meter slats. In the middle, 2 meter and 2 half meter slats will be attached to them (they will be the base for the floor).
From above, the last 4 slats are fixed, on which the box lid is installed. Everything should be connected with screws or self-tapping screws. If it is planned to make a tray for collecting droppings in a brooder, then there should be 4 more racks. It is necessary to make another 2 meter and 2 half meter slats. They are fixed under the base for the floor so that there is a gap into which the pallet will enter. And the floor itself in this case must be made of a fine mesh, on which the chicks will walk.
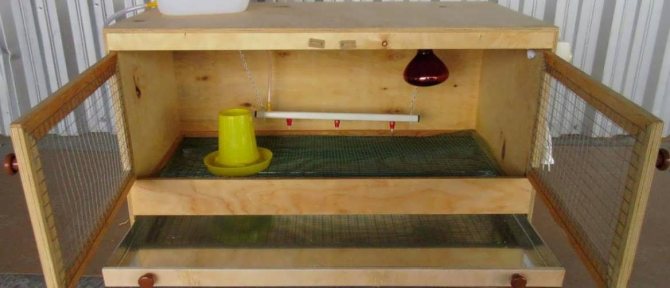
How to make a simple brooder:
- Make a rough design drawing, depending on the number of chickens.
Tip: try to use a ready-made structure, for example, a drawer or bedside table. This will make the work easier and help to avoid errors in calculations.
- Dimension the plywood and cut out the side and back walls.
- Cut 6 strips from the bars for the walls of the same length (stiffening ribs). They are fastened, retreating from the edge by a few centimeters.
- Do the same with the lower part, observing all dimensions. Otherwise, the bottom and stool tray will not be able to slide out easily.
- Drill a hole for the wiring, stretch the wires, attach the cartridge, lighting fixture and heater.
Optimal brooder sizes
Interesting: if there is not enough light from one lighting device, you can also install an infrared lamp.
- All walls can be insulated with foam to avoid drafts and keep warm inside.
Expert advice
Victor N. Travnikov
For about 20 years he has been breeding laying hens, broilers, geese, ducks and other poultry. Our expert who is always happy to help readers.
Ask a Question
Attention: if you just glue the walls with Styrofoam, the chickens will perceive it as food and peck at the white balls. Therefore, it is advisable to sew the foam on top with cardboard.
- Bring all sides together. If everything is done correctly, then the grooves on the bottom wall will coincide with the side ones.
- Cut the front wall out of plywood, and attach the hinges on the side for future doors.
- Make a hole or window of strong mesh in the sheet for observation of chicks and ease of maintenance.
- Cut a sheet of metal or plywood for the cover.
- Make a pull-out tray from a material that does not get wet or rot. Fix the pallet with wooden blocks.
Tip: it is better to use sand with small pebbles as a filler in the pallet. The sand absorbs moisture quickly and the pebbles help the chicks digest well.
- Place the food and water containers.
- Warm up the brooder and let the chickens in.
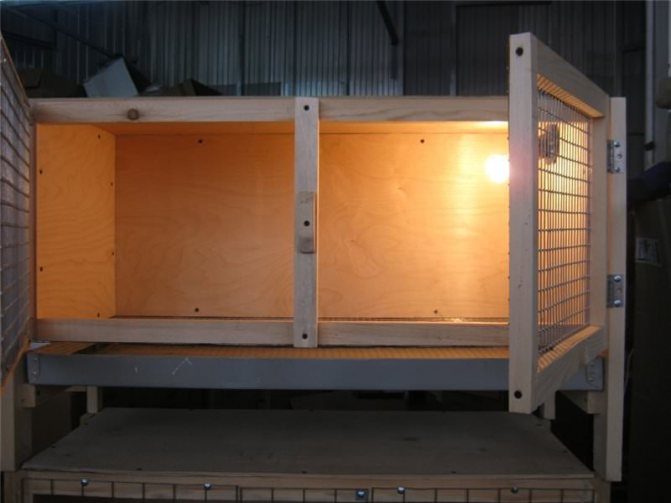
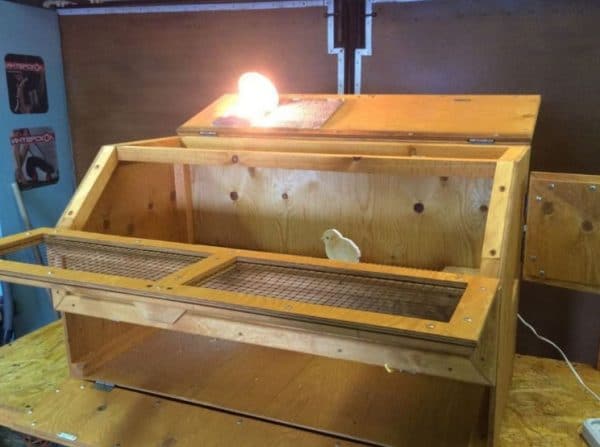
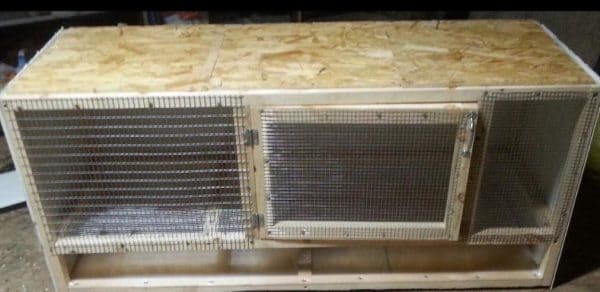
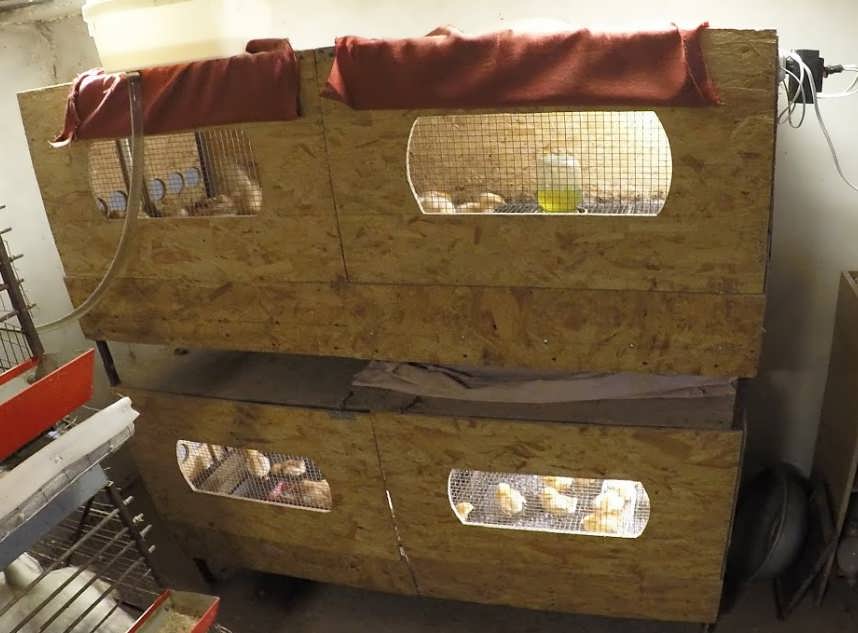
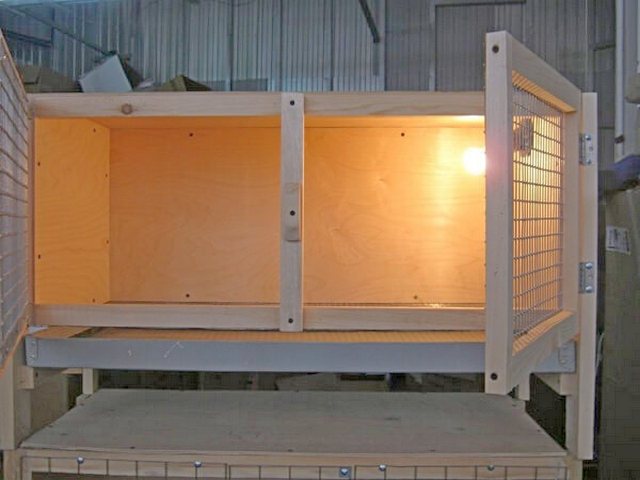
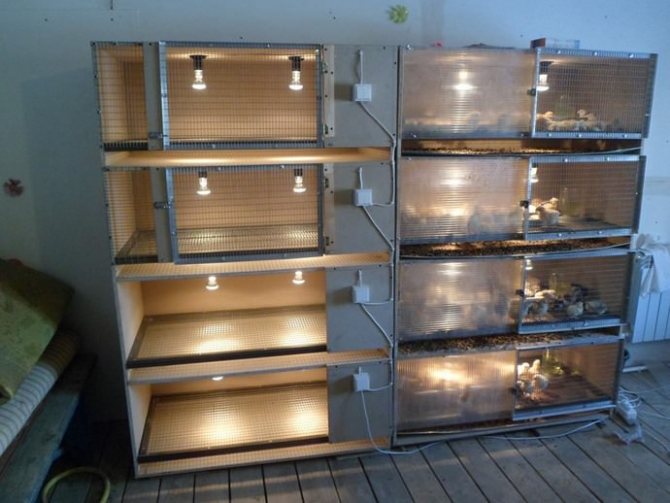
Step-by-step making a wall brooder with your own hands (personal experience)
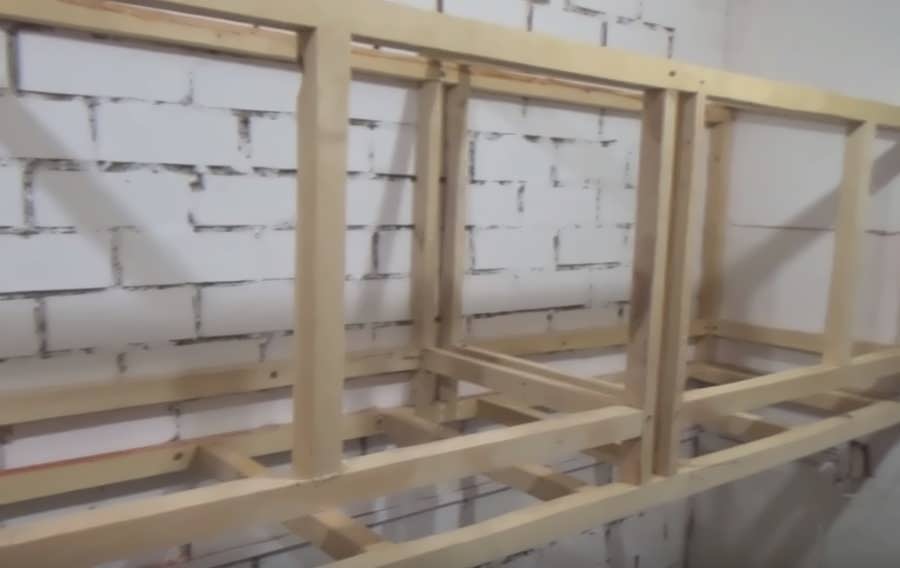
According to the drawing, we assemble a frame from a bar, fasten it to the wall
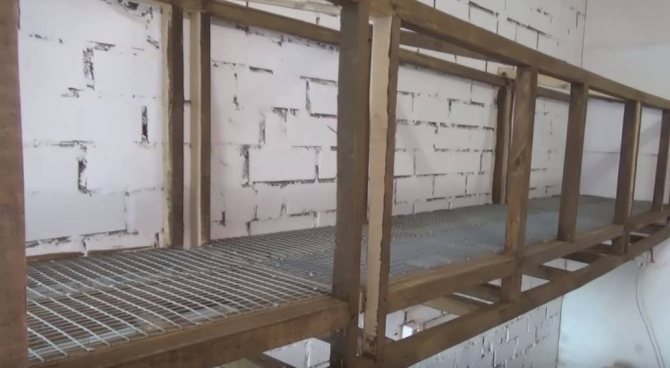
We lay the net on the floor
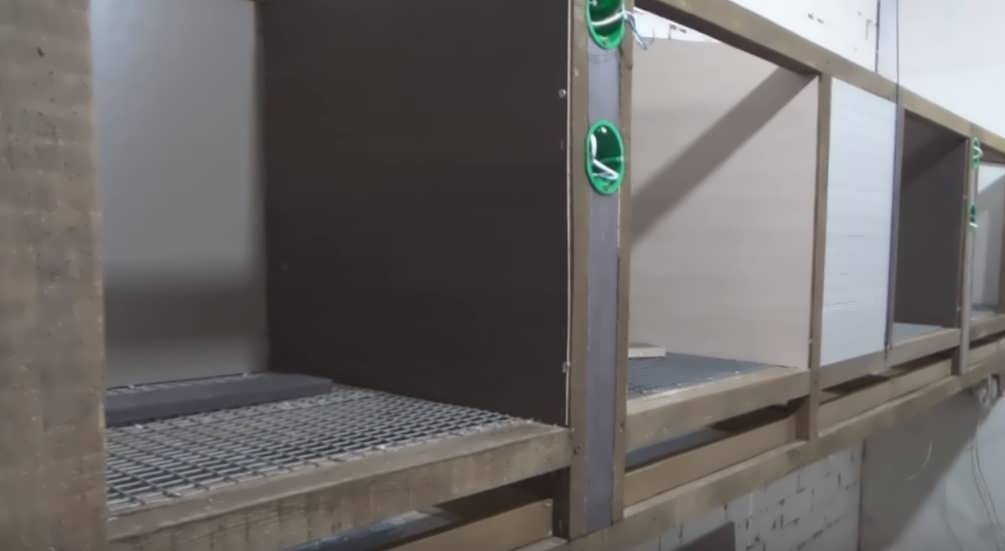
We sheathe partitions, inside which we let cables on to the display cases and cartridges
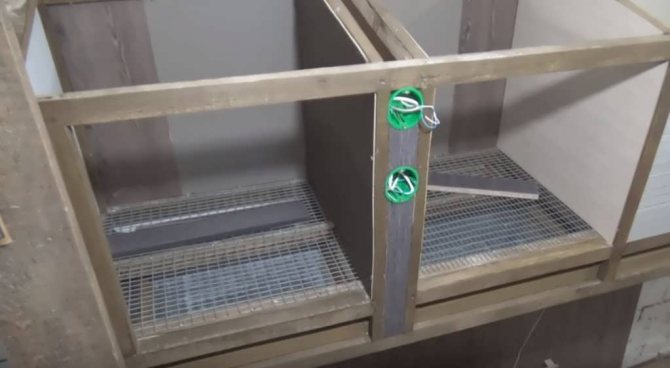
We install the socket boxes
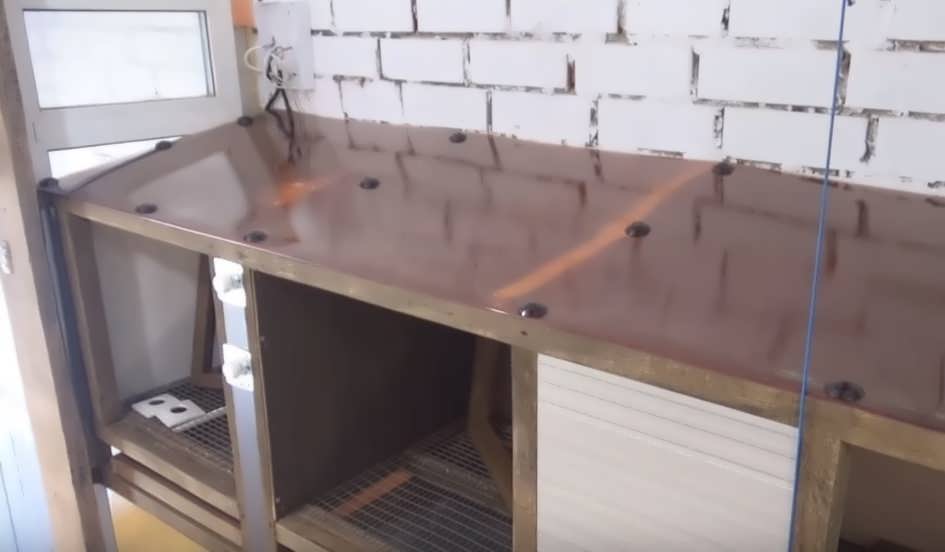
We cover the top with polycarbonate
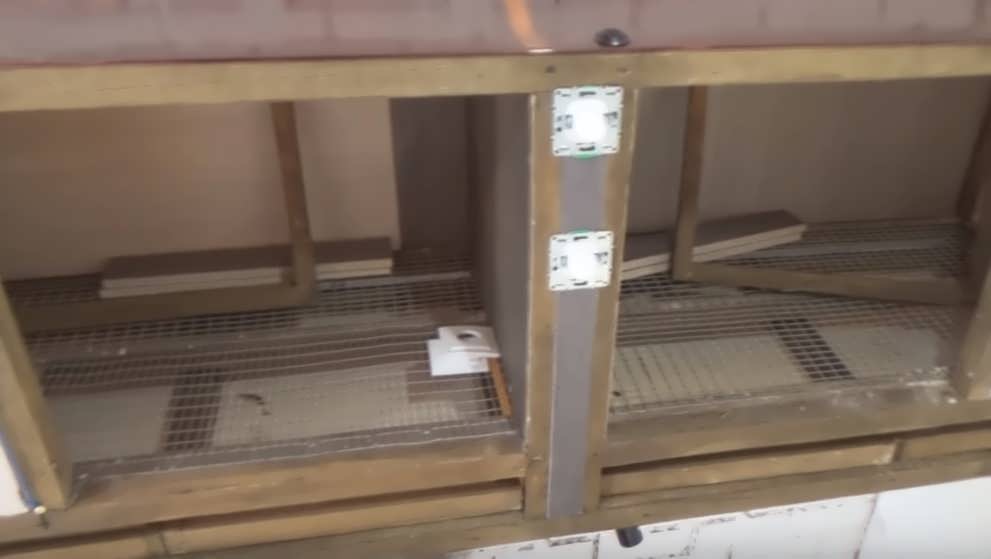
Installing regulators for lamps
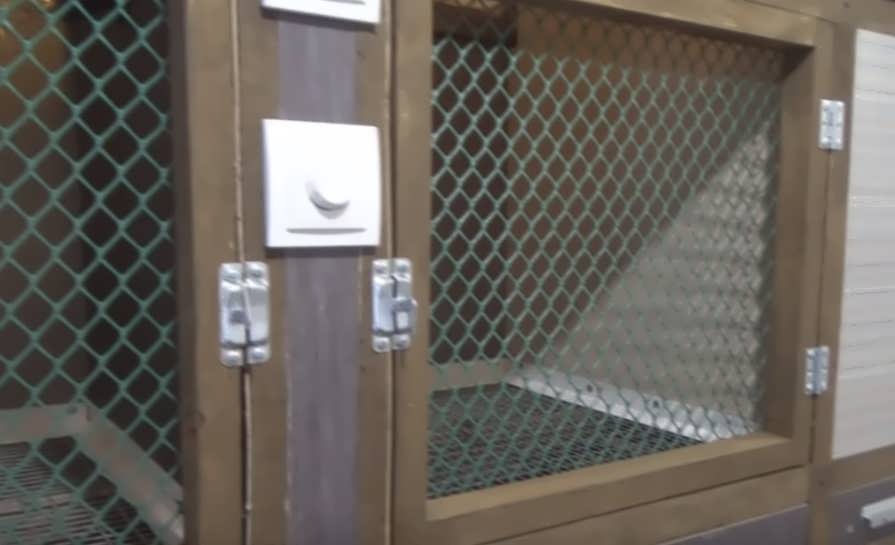
We also make doors from a bar and sheathe it with a net. We put on the hinges
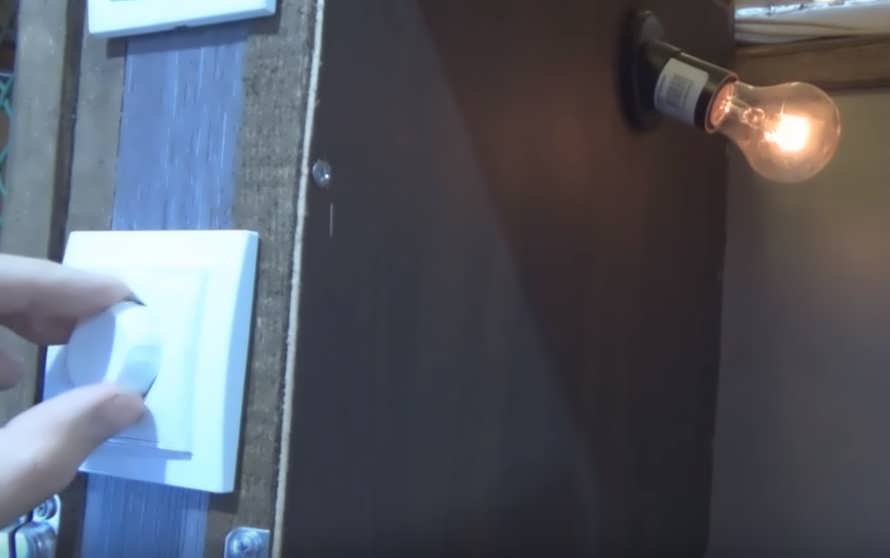
The glow of the lamps is controlled by a special regulator, which can be bought at any electrician store. You can set any brightness, thereby adjusting both the lighting and the temperature inside.
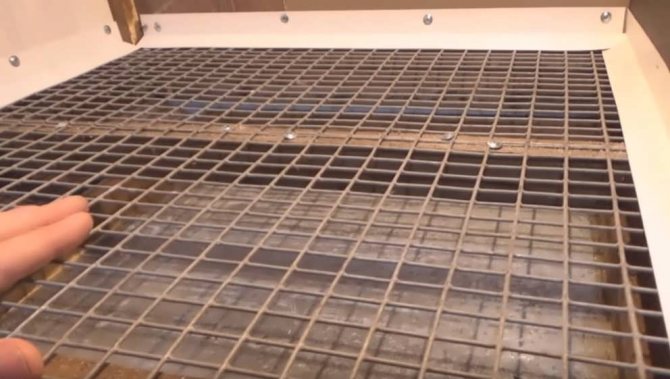
Pull-out trays under the floor to remove droppings
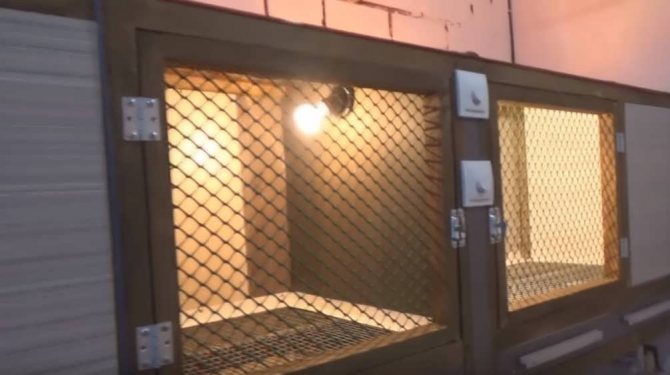
Brooder is ready to receive chicks!

Brooder: concept and main functions
A box made of wood, plastic or a mesh cage, equipped with a light bulb and heating elements, for keeping day-old chicks is called a brooder.
It is necessary to have a poultry farmer who is engaged in raising chickens in an incubator or buys day old chicks.
Brooder
Placement of young animals in a special structure:
- increases the safety of chickens, protecting young animals from the encroachment of cats, rats and birds of prey;
- allows you to reduce the time spent on cleaning, feeding;
- saves electricity;
- allows the breeder to artificially maintain a comfortable temperature and light for the chicks.
Brooder is stirred in living quarters, sheds or chicken coops. Thanks to the reliability of the design, the separate heating of the chicks is not in any danger.
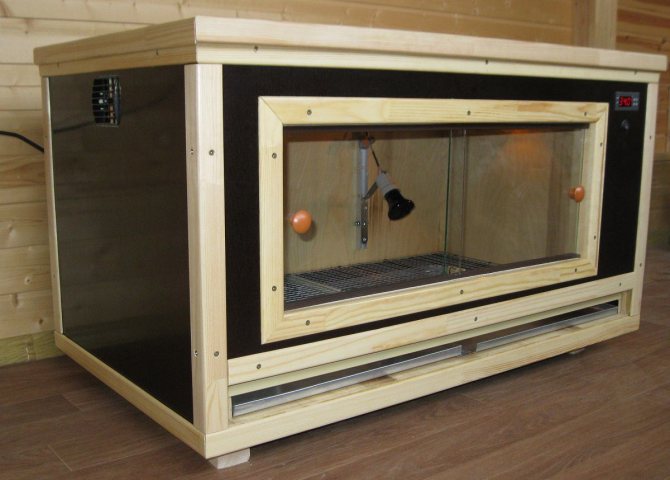
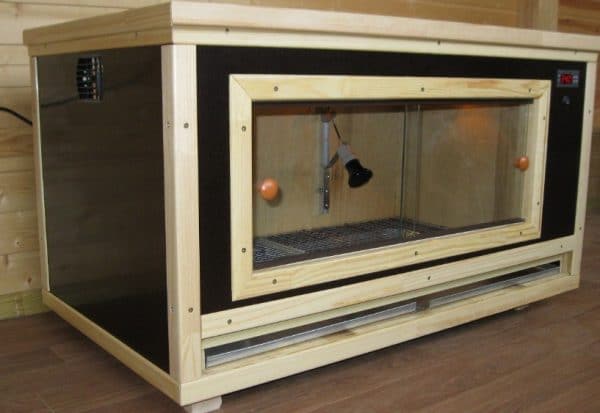
Design features
The size of the finished brooder depends on the number of chickens, but the optimal dimensions are: length 120-140 cm, width 60 cm, wall height 50 cm.
In such a box, 60-70 day old chickens of egg or meat and egg breeds can be placed, broilers will fit 10-15 heads less.
If only 20-30 chickens are planned to appear, a smaller box is prepared for them.
The size of the finished brooder depends on the number of chicks
According to experienced poultry farmers, in a spacious brooder with a small number of chickens, electricity for lighting and heating will be wasted irrationally.
Attention! The poultry farmer must take into account that babies grow quickly. The above recommended planting density is relevant until the age of 15-18 days. Adult young animals need to be relocated to a spacious room.
A brooder is constructed from inexpensive materials that retain heat well and are easy to clean:
- wood (plywood, thin board, OSB), covered with lime whitewash, 10 millimeters thick;
- plastic;
- polycarbonate.
A metal or plastic mesh with a fine mesh is used in the construction of the brooder floor. A plastic or metal tray is installed under the mesh floors.
A plastic or metal pallet is installed under the mesh floors
While the chicks are small, the net is covered with paper or nappies so that the babies' paws do not fall through the holes. The cover of the brooder is removable, lamps and heating elements are mounted in it (sometimes they are the same thing).
Quail brooder
Quails need special conditions. For quail, it is important that:
- The lighting was around the clock for the first 7 days. They are sensitive to light and grow faster if there is enough light. From the second week, the lighting is turned off for 3 hours, then for 12 hours.
- The temperature in the brooder for quail on the first day of life was about 37 ° C. Then, 1 ° C every 3 days, the temperature is reduced, bringing to 22 ° C.
Expert advice
Victor N. Travnikov
For about 20 years he has been breeding laying hens, broilers, geese, ducks and other poultry. Our expert who is always happy to help readers.
Ask a Question
Infrared lamps can serve not only as a heating source, but also as an additional illumination. Quails develop better in red light.
- The room was well ventilated, there was no smell of hydrogen sulfide and no dust.
- The humidity was about 60-70% in the first week and 50-60% in the following.
- There was a remote supply of food and drink. Quails are shy chicks, so the constant replacement of food in a saucer or drinker leads to stress for them. Solution: You can remove the hose from the drinker and the bottle from the saucer to the outside. At the right time - add food and water, without interfering with the space of the chicks.
- There was enough room in the brooder. Experienced quail breeders advise making a brooder with dimensions of 700 × 500 × 400 mm.
To keep the quails from getting sick, the brooder must be kept clean. Do not put cardboard on the bottom, as it is fire hazardous, fragile and does not withstand antiseptic treatment. For this case, plywood or boards from 20 to 30 mm are suitable.They must be treated with safe disinfectants. The removable litter net should be cleaned regularly.
Advice: a net with mesh sizes depending on the age of the chicks is placed on the bottom. For example, for quail up to 5 days - a 5 × 5 mm mesh, up to 2 weeks - a 10 × 10 mm mesh, up to a month - a 25 × 15 mm mesh. In the early days, you can put two layers of fine mesh so that the chicks' legs do not fall through.
DIY instructions for making and arranging
With minimal carpentry skills, making a brooder with your own will not be difficult... It will cost several hundred rubles cheaper.
Preparation of tools and materials

With minimal carpentry skills, making a brooder with your own will not be difficult
The master needs to decide from what materials he will build a brooder.
The simplest and most inexpensive "chicken house" is a box: three walls are made of wood (plywood, OSB), and the fourth one is made of transparent plastic.
The floors are mesh, the pallet under them is made of plastic or metal (galvanized iron, stainless steel).
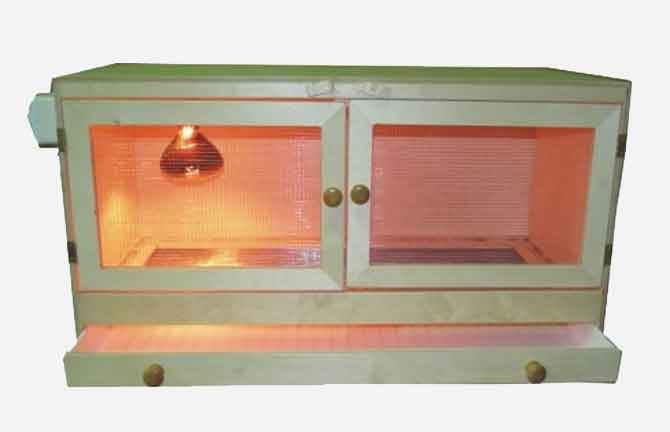
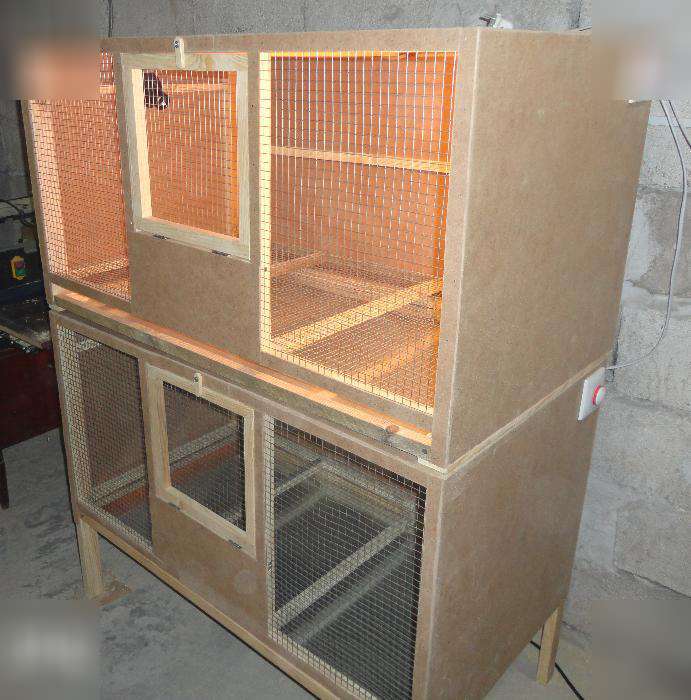
Some poultry farmers adapt old cabinets, chests of drawers for keeping chickens... But it must be borne in mind that the chipboard, from which the old furniture is made, quickly absorbs moisture and collapses. Brooders made from these materials are difficult to clean.
Tools that will be needed in the work:
- sheet, pencil, ruler for drawing a drawing and marks on the material;
- hand saw or electric saw;
- hammer or screwdriver (screwdriver);
- sandpaper number 80;
- nails, screws;
- pliers, wire cutters.
Blueprint brooder
Some poultry farmers adapt old cabinets, chests of drawers for keeping chickens
Having decided on the size and type of construction of the future room for chickens, the types of construction are drawn on paper - from the side, from above and from the end.
Draw all the necessary details of the brooder:
- a frame made of a wooden block or a metal corner;
- the method of attaching the walls and floor to the frame (how many nails or screws are required).
Separately, a drawing of a brooder cover with a built-in lighting and heating system is prepared.
Focusing on the pictures, they calculate the amount of materials required, making a margin in case of errors in calculations.
How to build a brooder
When all the materials are prepared and cut, they start assembling.
- Going frame, the bars or corner are tightly pulled together. If the length of the drawer is more than 160 cm, it is necessary to additionally install a tie-down crossbar between the bars.
Going frame
- Mesh floor is attached... If the mesh is plastic, so that it does not sag, wooden slats and steel strips are attached under it every 25 cm. The metal mesh does not need additional reinforcement.
A stationary or pull-out pallet is installed under the floors. For the convenience of cleaning, the distance between the floors and the pallet should not be less than 8 cm. A non-removable pallet is made with a slight slope towards the outside. The droppings are removed with scrapers, raking into the substituted containers.

Mesh floor is attached
- Attach the walls to the bars with screws or nails... Make sure that there are no protruding ends of the nails left inside the structure.
Be sure to read:
DIY chicken coop for 10 chickens: drawings, materials, step-by-step instructions
Attach the walls to the bars with screws or nails
- Collect the cover and mount the lamps and heating.
- A wooden brooder is whitewashed from the inside with lime or impregnated with a special odorless agent to protect against moisture.
The brooder does not need to be made with access to the chicks from above. It is possible to provide a door in the front wall, but practicing poultry farmers argue that this is not so convenient.
Babies can jump out when the door is opened; when removing the cover from above, this will not happen.
Recommendations for the manufacture of feeders and drinkers
Feeders are bought ready-made, made of plastic or stainless steel
For feeding day-old chickens, modern poultry farmers use dry compound feed.Boiled eggs and cereals are rarely used due to the need to wash the feeders after feeding.
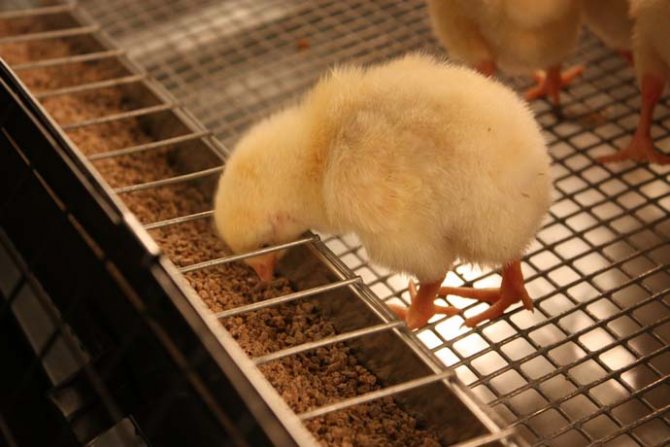
Troughs with cross bars are suitable for dry feed so that the chicks do not throw out the feed with their feet. Feeder sizes: width 6-8 cm, length up to 40 cm.
Feeders are bought ready-made, made of plastic or stainless steel. You can make it yourself.
The simplest options are:
- from plywood;
- from a plastic bottle: 3-4 cm windows are cut into a container laid on one side.
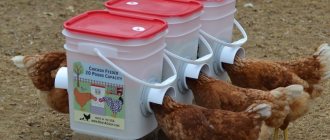
On sale there are bunker feeders for bulk feed, which can be filled every few days.
For damp mash, it is best to use plastic or ceramic deep saucers as they are easy to clean.
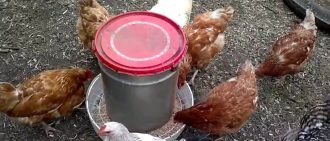
A chick drinker can be constructed from a simple can with a special lid with a hole and a groove. The jar filled with water is turned over and placed on the lid.
Through the opening, water fills the groove of the lid from where the chickens can drink.
Nipple drinkers are popular among poultry farmers.
The water tank is suspended from the outside of the brooder, nipples (one per 5 heads) are distributed inside the box on the walls. The height of the attachment of the nipple nose should be at the level of the backs of the chicks.
If it is impossible to buy a ready-made drinker, you can make it from a plastic bottle.
For day old chicks, the light must be on in the house around the clock.
It is more convenient to take large 5-liter containers with a wide bottom or use a plastic canister.
At a height of 5 cm from the bottom, windows 4x3 cm (height) are cut along the entire circumference of the bottle. So that the sharp edge of the cut does not hurt the chicken, it is insulated with adhesive tape.
Water is poured so that it does not reach a few millimeters to the window. The drinker is placed in a box and a couple of chickens teach a lesson by forcibly dipping their beak into the water. Soon the kids will figure out where the water is.
Lighting, heating and temperature in the brooder
For day old chicks, the light must be on in the house around the clock. Little chicks go up to the feeders up to 20 times during the day and peck the feed, drink water.
Chickens begin to arrange "night" from 12-14 days, turning off the lighting for 2-3 hours, gradually increasing the darkness to 7-8 hours.
The lighting should not be too bright, one 40-watt bulb is enough for a standard 150 cm brooder. The bulb holder is mounted in the lid of the box in the cut-out hole.
The cable is outside. It is convenient to connect the lamp to the network through a dimmer, having the ability to change the brightness of the lighting.
Be sure to read:
How to make a chicken feeder: drawings, dimensions, examples from wood, plastic bottles and pipes
If the brooder with chickens is in a warm room, there is no need to install an additional heating element. The heat from the light bulb will be sufficient.
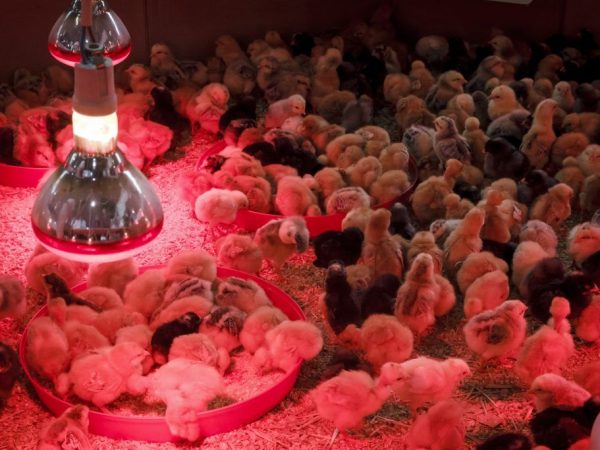
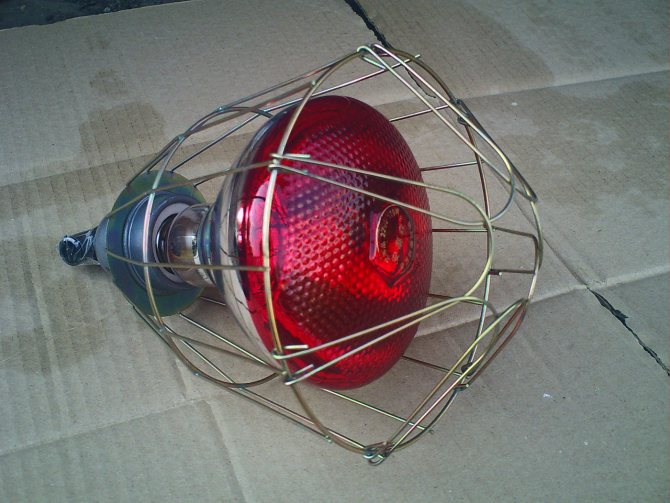
Heating of chickens in a brooder is carried out by IR lamps, incandescent lamps, film heaters, and ceramic elements. In domestic conditions, infrared lamps (red lamps) or heating film are used.
Place the heater correctly in the brooder lid. Sometimes a heating film is hung on the wall of the box with chicks.
Important! Wires, switches, dimmer must not be in the reach of chickens! Heating elements must not be fastened without isolating them from the brooder frame.
To accurately determine the temperature in the chicken house, a thermometer is hung. The normal temperature inside the brooder for chicks 1-6 days old is +33 degrees. Further, every week the temperature must be reduced by 6-8 degrees.
When installing heating in the poultry house, you need to move it to one corner of the brooder. This creates a cool zone in the opposite corner and the chickens themselves can move to that part of the structure where they are more comfortable.
Brooder for ducklings
Breeding ducks should take place in a comfortable environment for the chicks. There is a misconception that ducks love dirt and moisture.But this leads to illness of chicks, weight loss and poor quality of feathers and down.
Therefore, you need to keep them clean. If paper is laid on the floor, then it should be changed at least once every 2 days. The feeder is cleaned regularly and the drinker is washed with hot water and disinfected every day.
Ducklings need space in the brooder. On 1 m2, about 40 newborn ducklings or either 10 chicks, which are up to 3 weeks old, or 3 adults feel comfortable. The optimal construction area is 300 cm2, and for musk ducks it is 500 cm2, and the height is 40 cm. Then the birds will not need to bend their heads while in the brooder.
Tip: It is better to use a metal mesh with 2.5 x 1.2 cm meshes.
In a brooder, it is important to maintain a temperature of about 32 ° C - for young ducklings, and for those who are 1 week old - 16 ° C. Do not allow the temperature to drop to 11 ° C, otherwise the chicks' productivity drops by 20%.
Drawings for making a brooder
Before purchasing materials and assembling the structure itself, it is necessary to make drawings.
Each owner may have their own, individual, conditions for installation, placement, use of such structures. Therefore, even if you decide to use someone else's example you like, it is better to remake it to fit your parameters, focusing on the step-by-step construction instructions (see p. 2.3).
This will help you calculate the required amount of materials and save you money, as well as provide an opportunity to anticipate a number of errors.
Brooder for broilers
There are several features of the mounted structure that are worth considering:
- Make the floor non-slip so that the paws of broilers do not come apart.
- An ordinary egg tray can become a dish for food. Thanks to this design of the feeder, each broiler can easily get to food.
- Choose feeders and drinkers that will not injure broilers or turn over due to their excessive activity (they like to walk around the edges).
- The assembled product is painted to increase its service life.
- It is advisable to treat the finished brooder with a soapy disinfectant solution.
Choice of materials for brooder
The simplest brooder for small chicks is a regular cardboard box or wooden box of a fairly large size. But, although these are the most inexpensive options, they have certain drawbacks. If we talk about a cardboard box, you need to understand that it is easily destroyed, and just as easily flammable. A wooden packing box needs additional insulation. And both of these options are inconvenient because it is extremely inconvenient to clean them by hand, so you have to make a brooder by hand, that is, build a brooder for small chickens with your own hands.
If we talk about size, then the classic version of a homemade brooder for newborn chickens is 1 m in length, and 0.5 m in height and width. Moreover, this option is suitable both for growing broilers and for ordinary chickens. But for growing broiler chickens, it is necessary to prepare a larger structure, into which they will move at the age of 1-2 weeks. However, if you make a brooder for these chicks of large dimensions, then they can live in it up to one month of age. Here are the materials used for assembly when we make a brooder for all the chicks with our own hands:
- Cardboard from cardboard boxes. A cheap material, but it is too flammable and degraded, which is why it is not always suitable. Its only plus is its low price.
- Plastic. Plastic crates are used by some farmers, but they have certain drawbacks. First, plastic can start to melt when heated continuously. Secondly, it does not always keep heat well, and good, dense and durable plastic is not cheap to buy.
- Metal box. The main advantage of such a material is its durability, although you need to make sure that the metal will not oxidize from constant exposure to wet fumes.Among the shortcomings, it should be noted that the metal box is not warm enough, and it requires additional heating and an insulation system.
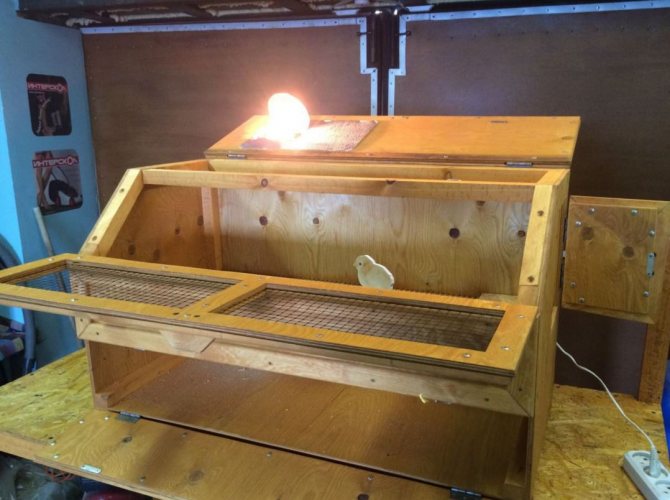
- Wooden box. The best option that you can do with your own hands. Quite inexpensive, with decent thermal insulation, and even a novice craftsman can work with wood.
After choosing the material, you must first prepare a drawing, and along the way, decide on the dimensions of the structure, then you should make sure that all the necessary materials and tools are available, after which you can start assembling and make a brooder for all-aged chickens with your own hands. There is one more recommendation here: you cannot assemble a too complex and large structure, which then still cannot be used. Better to make simpler, more reliable brooders for successful rearing of chicks, which will also be easy to handle.
Brooder for turkey poults
25 turkey poults are allowed per 1 m2. Born chicks need constant lighting. For this, an infrared lamp is used, which also serves as a heater.
Read: How to properly hatch turkey poults in an incubator at home.
A nipple drinker, which is attached to the wall, can become a container for water, preventing liquid spillage. Since turkey poults tend to pull food across the entire surface, it is better to equip the feeder with separate cells or put restrictions on the food intake area. It is important to wash dishes for food regularly so that chicks do not get infected from unsanitary conditions.
Turkey brooder drawing
Do you use a brooder in your poultry industry?
Without him nowhere, no, not needed
Features of keeping broiler chickens
The chick breeding process begins with the acquisition of a parent flock. It is optimal to buy 1 rooster and 10 layers. Chicks must be of the same size and healthy looking. You need to ask the owner for a veterinary certificate of the vaccinations received. There are 2 ways to raise broilers:
- floor;
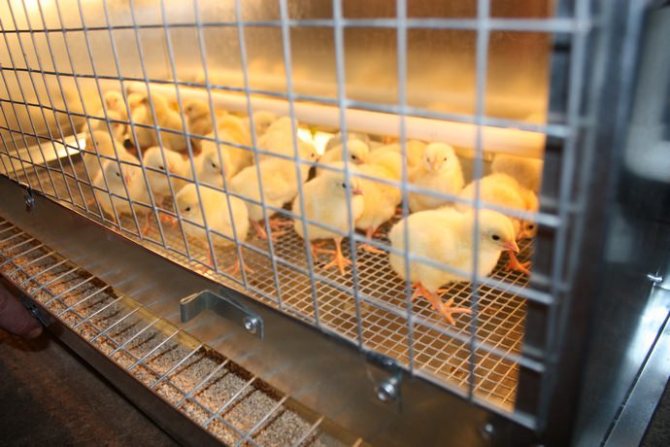
- in cages.
The room must have good ventilation. With excessive moisture, young animals develop poorly, there is a risk of diseases.

Brooders should be located in a barn or other room where there are no drafts and the temperature does not drop below 10 degrees.
Chickens are often sold in the markets at the age of 1 day. They have a poorly formed immune system, it is not recommended to acquire them. A rational choice would be chicks that are already 10 days old.
The first feeding of chickens is a mash of wet feed and finely chopped grain mixture. Later, different types of compound feed are consistently applied: start, growth and finish. In the last week of rearing, young broilers are fed up to 115 grams of feed per day. It is recommended to grow broilers for meat no longer than 60 - 80 days. Then they do not gain weight intensively, but eat the same amount of feed.
Temperature regime for day-old and grown-up chicks
One of the important parameters for keeping chicks is a comfortable temperature. The temperature regime for young birds is higher than for adult birds. The measurement is made in two places: near the heater and indoors. The optimum temperature depends on age:
| Chicks age, days | Temperature, С | ||
| Near the heater | In room | ||
| 1 — 5 | 33— 34 | 26-27 | |
| 6 -12 | 30 -32 | 22 – 23 | |
| 13 — 20 | 25 – 29 | 21 – 22 | |
| 21- 30 | 22 – 23 | 20 – 21 | |
| 31- 61 | — | 19 -20 | |
In the last week of cultivation, the additional heating source is removed.
Chicks purchased at the age of 1 - 3 days are especially needed. But excessively warm air is also bad for the well-being of birds, especially if the air is too dry.
Humidity and ventilation
The second important parameter when raising chickens is air humidity. The room in which the brooder is located must also be equipped with a hygrometer. The optimum humidity level for the first 30 days is 70 - 80%. After that, it drops to 60 - 65%. It is possible to achieve such figures with the help of properly organized ventilation. There should be no drafts in the room where the cages are.

Open drinkers additionally humidify the air. The water level should be such that the chicks do not drown.
Litter
Regardless of how they are raised, chicks need dry and clean litter, especially when rearing outside. The optimal material for this is sawdust, sometimes straw is used. Algorithm for preparing the premises:
- Carry out a complete cleaning, disinfection with denatured alcohol or 2% lysol solution.
- Cover the floor with a thin layer of slaked lime.
- Pour a layer of sawdust on top.
The litter is changed 2 times a month, as it gets dirty. It is not worth doing this too often, as the birds partly eat the litter. It is an additional source of nutrients.
Read about the bedding for the chicken coop with bacteria here.
An alternative to dry bedding is a fine mesh brooder floor. This design makes cleaning easier as the droppings fall down through the cells.
Lighting
The first 2 weeks, the cages should be illuminated around the clock Later this time is reduced to 16-18 hours. It is advisable to use infrared lamps for illumination. They provide a soft light that does not irritate birds. At the same time, they provide additional heating of the cells. The light in the brooder is generally installed not for lighting, but for heating. Read about how to build a chicken coop for broilers with your own hands here.
From May to October, the cages can be placed under a canopy in the fresh air, or grown broilers can be released into the corral. Sunlight provides additional vitamin D production.
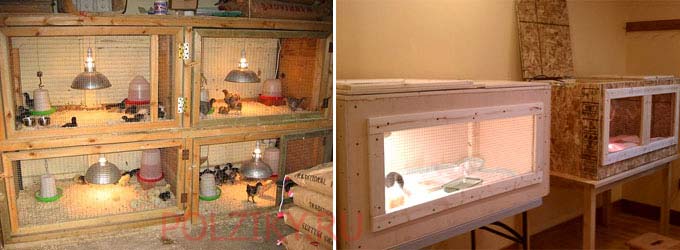
Photo: DIY options for brooders


What to make
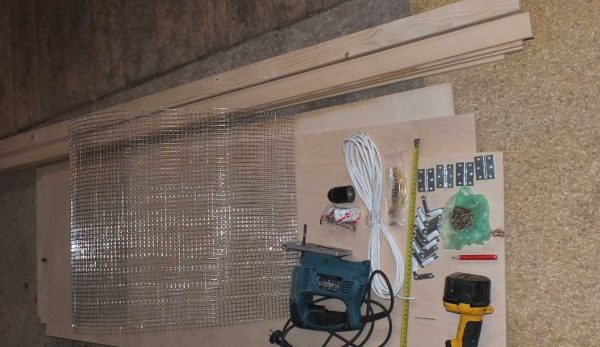
The most important point is deciding what to make a brooder from. In this matter, there are no strict rules and recommendations, the main thing is that the birds are dry, warm and comfortable. Therefore, craftsmen for the manufacture of a brooder resort to the most unexpected solutions - they re-equip old bedside tables and furniture, use wooden barrels and spacious boxes, boxes made of durable multilayer cardboard, OSB sheets, bars and boards. In our workshops for manufacturing, we will use sheets of plywood of a standard size (150 * 150 cm) with a thickness of 10 mm. You will also need a galvanized mesh with a small mesh size, wooden slats, oilcloth.
Important! Keep in mind that it is quite difficult to maintain optimal conditions in cardboard structures and boxes. And since chicks are extremely susceptible to temperature and humidity in the first days of life, the risks to the health and life of chicks will be very high.
The set of tools may differ depending on what material you choose to work with. General list of tools:
- hacksaw or electric jigsaw;
- tape measure (ruler), marker, pencil;
- screwdriver;
- fasteners: screws, nails, door hinges;
- a hammer;
- pliers and wire cutters.
You may be interested in: nests with a do-it-yourself egg collector.
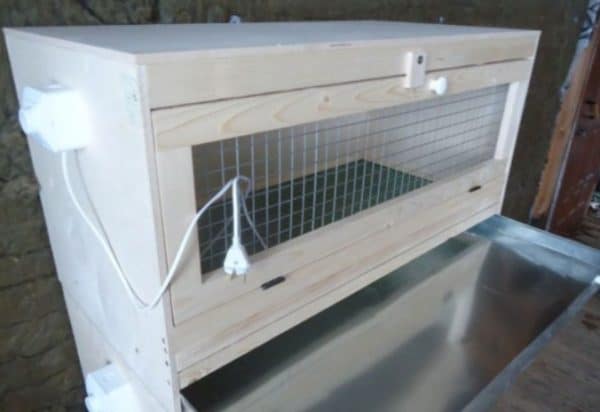
Option 1
For manufacturing, you can use this drawing:
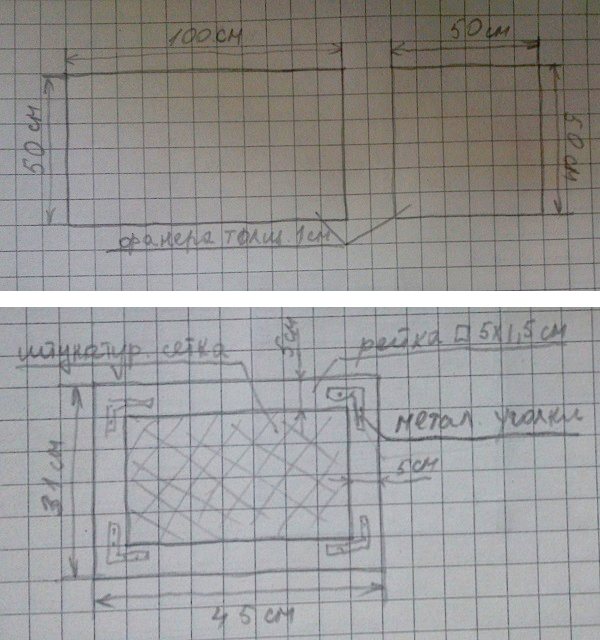
Drawing of a brooder for chickens.
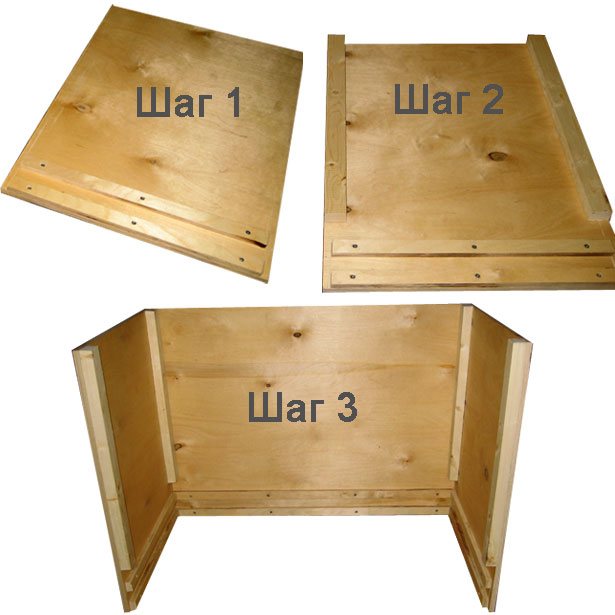
Manufacturing process step by step:
- On a sheet of plywood, measure out a 50 cm piece and cut to the full length. Divide the resulting piece of 150 * 100 cm into three equal parts and cut. We have obtained blanks for the roof, bottom and rear wall of the structure with dimensions of 50 * 100 cm.
- From the separated piece of 50 * 100 cm, cut two square pieces with a side size of 50 cm. These will be the side walls.
- Make a frame of the structure from the rails, attach the back and top walls, side halves to it.
- From the rails, put together a frame that will be placed at the bottom of the structure. Its parameters are 50 * 100 cm. We attach a sheet of plywood of the appropriate size to it and cover it with oilcloth - this is the bottom of the pallet. The bottom of the structure itself should be made of galvanized mesh. Instead of plywood for the pallet, you can use a galvanized sheet.
- To make doors from slats, it is necessary to put together a frame, sheathe it with plaster mesh or other similar material and attach it to the structure with hinges.
- In the top cover or at the very top of the side cover, it is necessary to make a hole for the cable through which the light and the heater will be connected. Finally, the brooder must be equipped with feeders, drinkers, etc.
Tip: the mesh must be fixed on the outside and on the inside of the doors. When cutting the mesh, divide it not at the center of the cells, but closer to the connections.
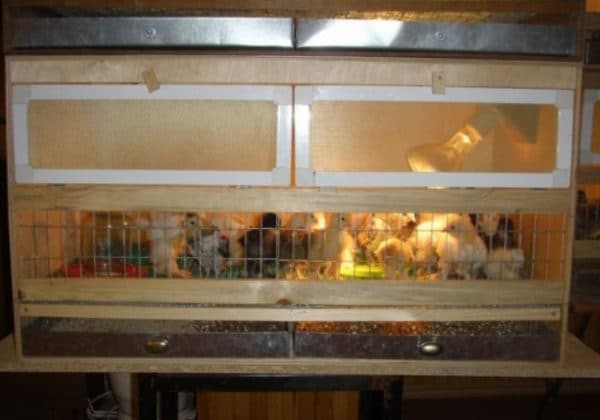
A poultry brooder is a finished product.
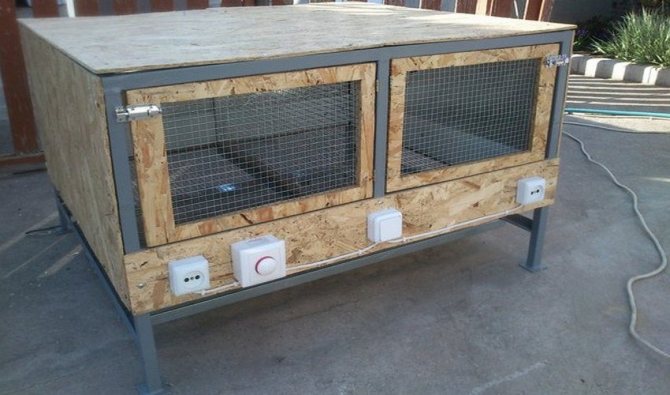
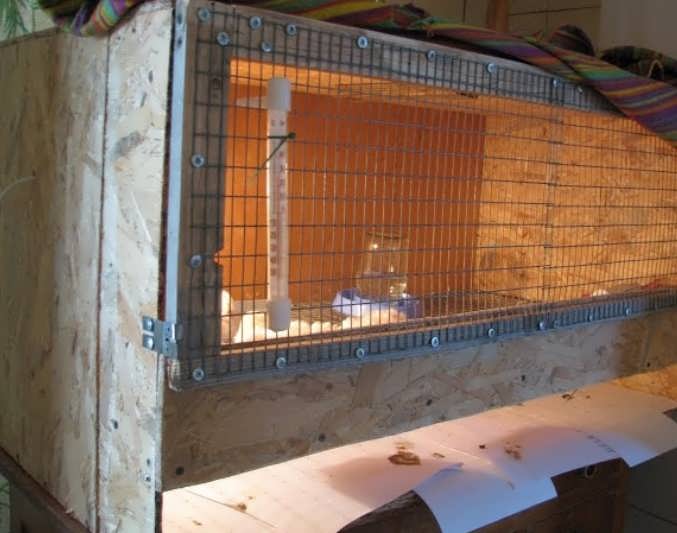
Option 2
Required materials for manufacturing:
- wooden beam;
- plywood (galvanized steel sheets);
- galvanized mesh;
- plexiglass (ordinary glass).
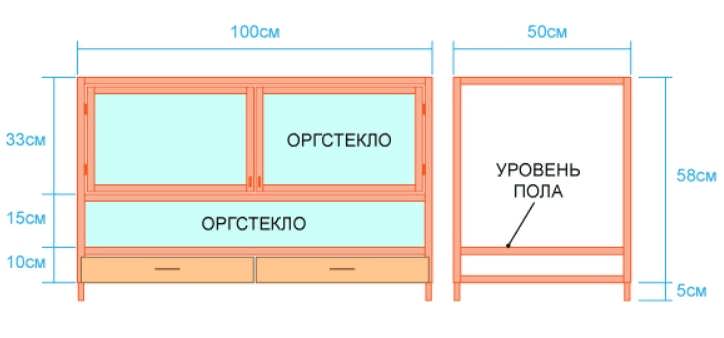
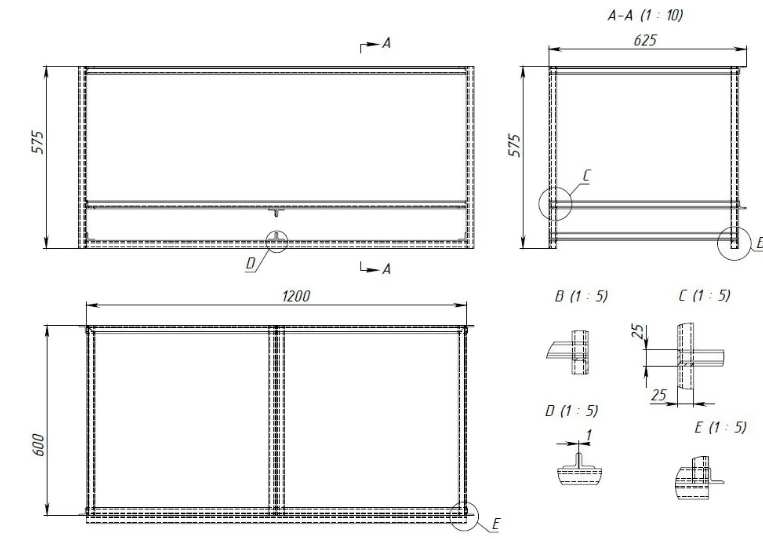
Drawing:
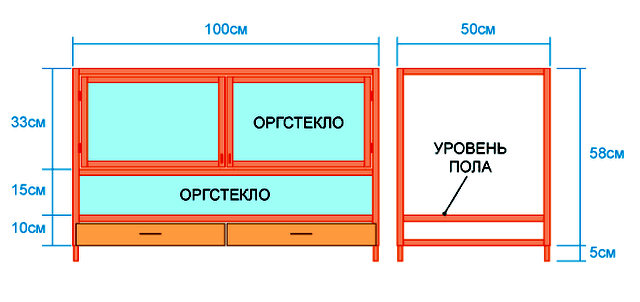
Brooder drawing.
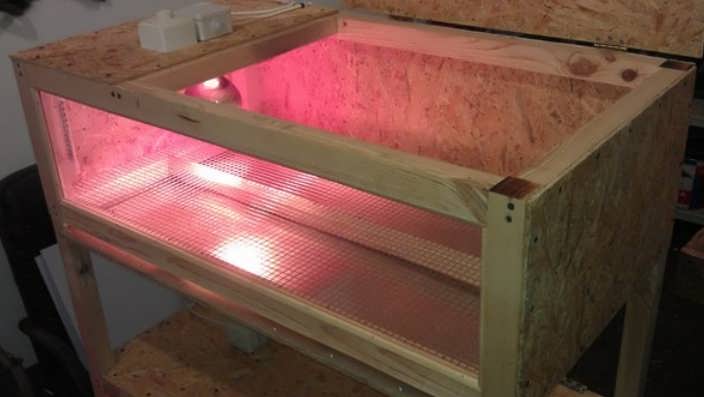
Step by step instructions:
- From a wooden bar, put together three identical frames for the top and bottom of the structure. Their dimensions: 150 * 50 cm. Be sure to use jumpers in the middle to increase the rigidity and strength of the structure.
- Use perpendicular jumpers to connect all three pieces. In this case, the distance between the lower frames should be about 10 cm - this space will be used to accommodate the pallet.
- Cover the back wall, top and side parts with plywood cut according to the appropriate parameters.
- Install a metal mesh on the first lower frame. Place a sheet of plywood covered with oilcloth on the second lower frame.
- For the doors, make frames from slats, fill them with plexiglass or real glass. Attach to the frame using loops.
- As in the first option, drill holes in the upper part of the frame for installing the devices.
Tip: You can also use medium density plastic wrap for the doors. When the chicks grow up and get stronger, it can be replaced with a net.
Also read: do-it-yourself chicken coop.
Useful video about assembling a homemade brooder
Like the author! 5
- Even more interesting:
- DIY home incubator
- Incubator thermostat: do it yourself
- We assemble an ovoscope with our own hands quickly and easily
Discussion: 5 comments
- Hermann:
10/29/2018 at 11:02Thanks for the info. Made a brooder for ducklings, in fact, not difficult, as it seemed at first glance.
Reply
- Igorek:
12/15/2018 at 20:39
I decided to try breeding chickens. So far, I do not have money to buy everything I need, and therefore it was decided that everything I can do is do it myself. Of course, I hurried to use the instructions provided above and everything worked out for me. so thank you for it and recommend it to everyone.
Reply
- Pavlik:
20.12.2018 at 20:56
I was puzzled by this question for a long time and still could not find decent instructions on how to do this, I could not start raising chickens, since the equipment was not ready. But now the process has been launched and is proceeding successfully. The equipment itself turned out to be made quickly, no difficulties arose. Works great.
Reply
- Gringo:
12/27/2018 at 14:27
Wife forced to make a brooder, assembled from penoplex - quickly and not expensive
Reply
- Mitya:
31.01.2019 at 16:44
He began to master poultry farming and so far there is not much money. So I do everything with my own hands. I mastered this business. Thanks for the instruction.
Reply
Floor construction made of cardboard or plywood
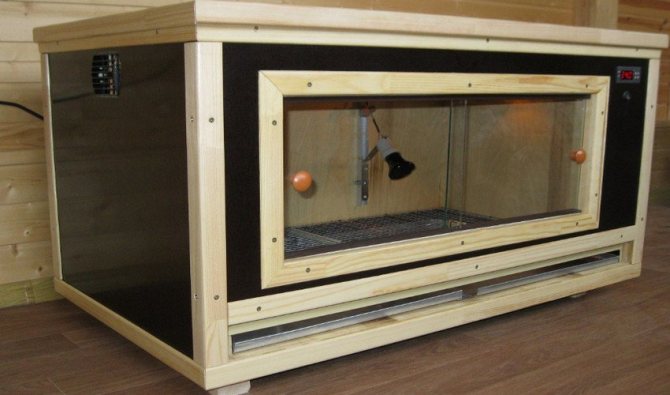
The simplest in design, a brooder is made from sheets of thick cardboard or plywood. Such a device is usually placed inside a heated (winter-spring) room, it can be easily moved from place to place. Infrared light sources are used as a heat source. Special incandescent lamps with a mirror coating inside the body, which contributes to the directional reflection of heat, have proven themselves well. The incandescent filament in lamps of this type is at a lower temperature (in comparison with conventional incandescent lamps), which leads to a shift in the radiation spectrum to the infrared region and increases the thermal efficiency, as well as the lamp life.
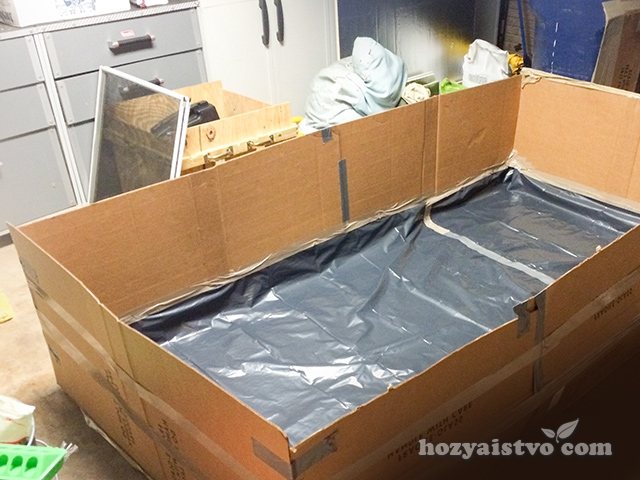
Constructions of a box-pen made of thick cardboard and adhesive tape.
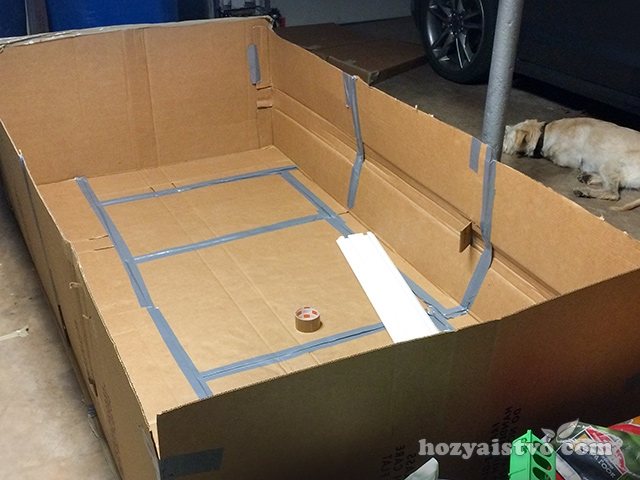
Insulation from the floor with plastic sheeting.
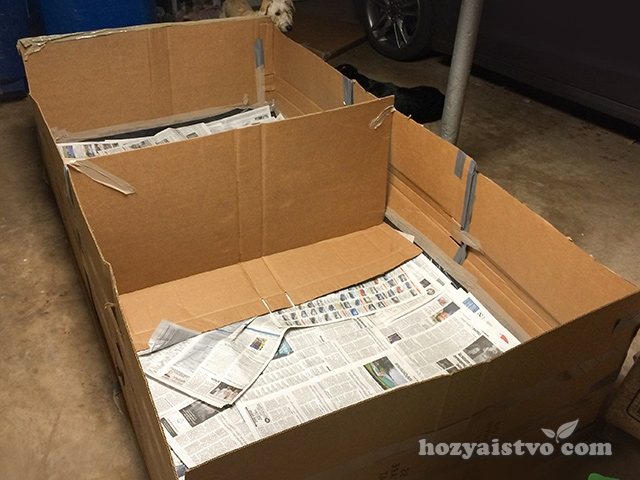
On top of the film, the bottom is covered with newspapers, you can use old wallpaper.
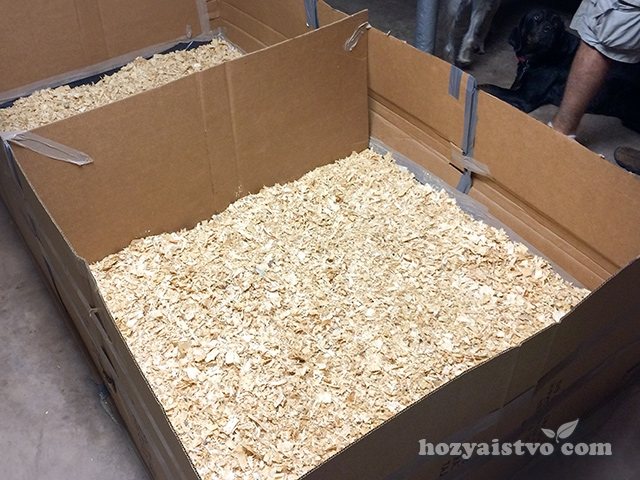
Backfilling with large shavings (sawdust cannot be used).
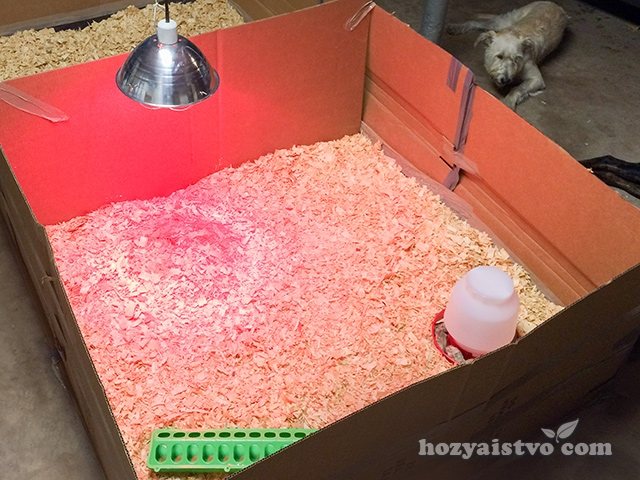
Installation of a drinking trough, connection of an infrared heater.
Basic requirements for a floor-standing device:
The floor must be dry, non-slip and well heated. Chickens, turkey poults and quails avoid direct contact with water, it is quite easy to keep the litter dry for them. The situation is different with goslings and ducklings, the chicks of these types of poultry love to swim, which creates additional inconveniences and complicates caring for them.
The heat source must be protected from direct access by chicks and must be regulated. When using lamps for heating, it is enough to adjust their position in height by placing a thermometer on the bottom of the brooder. The temperature on the floor should be between 32 - 35 degrees. When there is a lack of heat, the chickens cluster under the lamp, with an excess, they are scattered around the perimeter.
Stagnant odors are unacceptable, the structure must be well ventilated.
Dimensions of the structure
The dimensions of the lightweight plywood or cardboard brooder are easily adjustable and can be varied over a wide range. It all depends on the number of chickens, goslings, turkey poults placed at the same time ... To accommodate five hundred head of one day old chickens, at first, 2-2.5 sq. M. Is enough. meters of area and two infrared incandescent lamps of 250 W for heating.
It's important to know! Overpopulation of the brooder and unsanitary conditions should not be allowed, this can lead to cannibalism.
Industrial brooder drawing
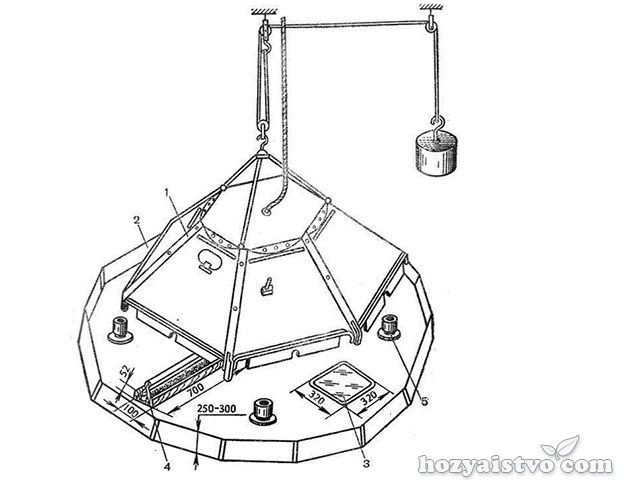
- heater based on heating elements;
- plywood fencing;
- trough-type feeder;
- trough feeder;
- vacuum drinker.
Lightweight floor structures are easy to use and scale easily. Similar structures are widely used in industrial poultry farms.
Purpose and device of a brooder
In the conditions of modern poultry farming, brooders are special devices that allow you to maintain optimal temperature indicators of the air when growing young poultry in the first days. In the first days after hatching, the chicks experience increased stress, as well as increased susceptibility to disease, so so-called "nurseries" are constructed.
As a result, an increase in mortality is observed and the uniformity of growth of young stock is reduced. To ensure optimal conditions of detention, a brooder is used, the design of which may vary slightly, but most often it is represented by the following components:
- drinker;
- feeder;
- equipment for maintaining optimal temperature and humidity;
- lighting;
- ventilation;
- litter.
It is very important that the brooder is not only at a comfortable temperature, but also at the optimum planting density. Only ideal starting conditions allow you to grow healthy and large poultry with high productivity rates.
Recently, point brooders have been increasingly used in home poultry farming. In this case, the houses must be preheated. The use of this design allows the use of special brooding barriers to help control the movement of the chicks. The technology requires strict adherence to the temperature regime, which will reduce the risk of overheating of young stock. As chicks grow and develop, the diameter of the dotted brooding zone gradually increases. After a couple of weeks, the brooder fence can be removed from the house and the young can be transplanted into cages.
Things to consider when making a brooder for turkey poults and quails
The standard dimensions of the structure for keeping and raising turkeys should be slightly increased, but it is allowed to use a brooder for chicks, slightly reducing the stocking density. The size of the cells of the mesh floor depends on the duration of the quail keeping:
- when grown up to two weeks of age and then transplanted, mesh floor cells should be 10 x 10 mm;
- when keeping quail chicks for a month, the size of the cells is 25 x 15 mm.
Poults can be kept in brooders with a larger mesh floor. The height of the structure also needs to be increased. The period of keeping young stock in nursery cages exceeds two to three weeks, after which the bird must be transplanted into adult cages or transferred to free housing.
How to collect
In order to properly make and assemble a brooder, you need carpentry skills as well as tools. The production process includes:
- frame assembly;
- fastening walls, floors, ceilings and doors;
- installation of a lamp and a thermostat.
The heater and light source can be simply installed in a ready-made brooder, but it is better to provide them at the installation stage.
To build a bird house you will need:
- plywood sheet;
- wooden beam with a length of 2x3 cm;
- galvanized mesh with cells 10x10 mm;
- PVC panel or galvanized iron sheet;
- self-tapping screws;
- hinged piano-type hinges.
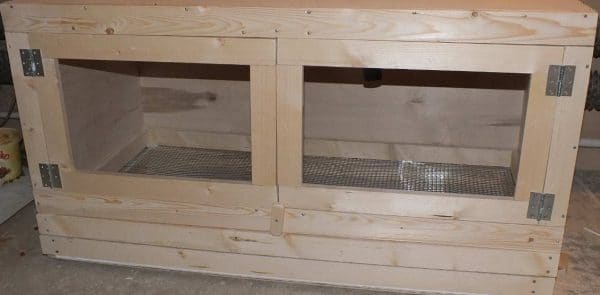
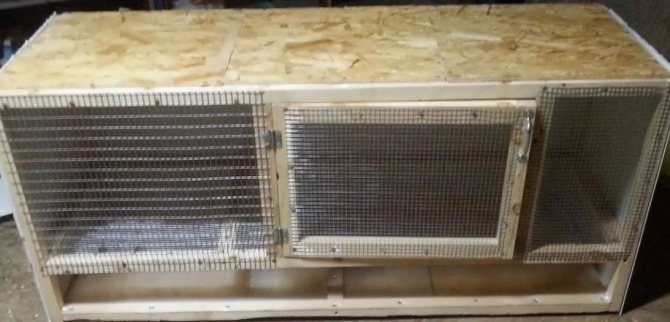
This material can be used to build a 70x50x50 cm brooder. Such an area can accommodate 20 chickens under the age of 14 days. In the presence of a removable bottom and a heating system, the height of the inner wall will be about 40 cm. On 15-16 days, young animals are usually transferred to a corral or cage.
The work begins with the preparation of all the nodes, from which the house is then assembled:
- The bar is sawn into four pieces of 40 cm in length.
- 2 pieces are cut out of plywood. sidewalls of a brooder, measuring 48x50 cm, 3 rectangles 70x50 cm - one each for the floor, ceiling and back wall.
- Prepare guides for the excrement collector and removable bottom (2 pcs. - 68x2 cm and 4 pcs. - 46x2 cm).
- For the front of the house, 4 parts are prepared:
- top (64x5 cm);
- bottom (64x6cm);
- 2 sidewalls (40x5cm).
- 2 doors (40x30 cm) are attached to the finished structure.
Frame elements of the sliding pallet:
- 2 pcs. - 66x2 cm;
- 2 pcs. - 48x2 cm;
- 2 pcs. - 68x2 cm;
- 2 pcs. - 46x2 cm.
Litter collection elements:
- front part (70x9.5 cm);
- plywood slats - 2 pcs. - 67.5x2 cm, 2 pcs. 65.5x2 cm, 2 pcs. , 2 pcs. 45.5x2 cm 47.5x2 cm.
The assembly algorithm for all parts is as follows:
- To the sides and the back wall of the house are attached guides for the manure collector, as well as the removable bottom. To the smaller side of each side, using self-tapping screws, the strips 46x2 are screwed tightly to the edge, not reaching 1 cm to the sides.
- They do the same from the back: a 68x2 cm bar is fixed along a wide cut, moving 1 cm to the sides. Further, at a height of 2.5–3 cm, parallel to the first guides, the rest are fixed.
- Stiffeners are placed on the side parts of the brooder. For this purpose, the elements of the wooden beam are fixed tightly to the upper and side edges of each, above the guides. Then they are connected with self-tapping screws to the back side. When all the elements are prepared and fastened correctly, a single groove for the pallet is obtained.
- The frontal parts of the brooder are attached to the finished frame: first of all, the side ones (40x5 cm), and then the upper and then the lower parts are placed on them, from the inside, with a 2 cm approach. A gap for the pallet is formed at the bottom.
- Hinged hinges are mounted on the front of the sidewalls, the doors are screwed on. After that, the bottom and ceiling are fixed.

Doors can be mesh. With them, it is more convenient to look after the chicks, and the house will become better ventilated. For installation. For the manufacture of mesh doors:
- They take plywood 5 mm thick, as well as 2 pieces of mesh measuring 40x30 cm. Planks are made of plywood - 3 cm wide, 24 and 40 cm long, 2 pcs. on the door.
- The strips are fastened with self-tapping screws along the perimeter of the mesh, forming a kind of sandwich. After that, they are hung to the hinges on the house.
- A removable mesh bottom is made separately. The principle is the same as for doors - a mesh is placed between the frame elements and sequentially fixed with self-tapping screws.
- The litter box is assembled from slats and PVC sheet like a sandwich, like doors and bottom. Then put the front part.
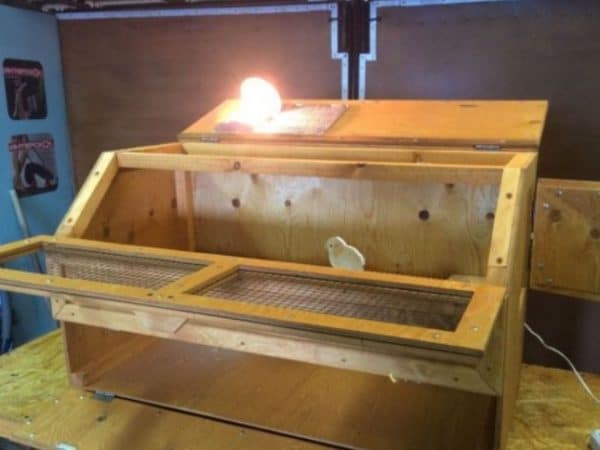
- At the final stage, a heating lamp and a temperature controller are mounted in the brooder.
In the first days, the light in the house is not turned off, and the temperature is kept at the level of + 32 ... + 33C, subsequently lowering it by 2 ° C per week.
Alternatively, for heating, a "warm floor" system is sometimes made along the back wall, and lamps are used only to maintain daylight hours.
Filling
However, such a box is not suitable for raising chickens - it must be equipped and filled.
You can provide light and warmth inside the house using the following options:
- conventional incandescent lamps;
- infrared lamp;
- infrared film.
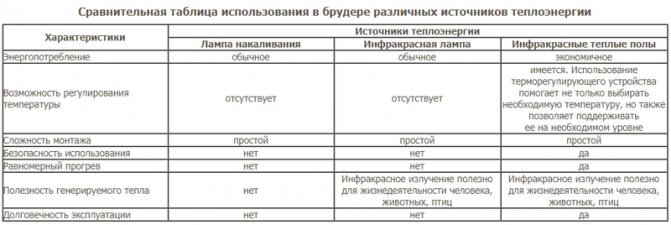
Sources of heat energy for a brooder.
Select the length of the cable suitable for the distance from the appliance to the outlet. Thread the cable through the cutout on the cover or side of the brooder and attach the socket. Attach the cable to the plug from the opposite end. However, it should be borne in mind that when using an incandescent lamp, there is a risk of overheating.
An excellent heating option is to install a warm infrared floor on the walls of the structure. Besides the fact that such heating will turn out to be more economical, it will also be more useful, since infrared radiation has a beneficial effect on the bird. Also, together with the infrared floor, it is possible to install a temperature controller, with which it will be possible to select and maintain the desired mode. This is the safest heating option for chickens.
Adjust the temperature to suit the chicks. Above in the table, we indicated the temperature norms for chicks of different ages. However, you can understand how comfortable the birds are by their activity and location in the brooder:
- Chicks are noisy and restless, crowded in one part of the box - most likely there is a draft from which the birds are trying to hide.
- Chicks are inactive, lethargic, located closer to the walls of the brooder - perhaps the temperature regime is too high and they are hot.
- Chicks are crowded in the center of the structure, closer to the heater, they behave alarmingly and noisily - there is not enough warmth in the brooder.
The optimal temperature can be judged by the uniform distribution of chicks in the cage, their calm and moderately active behavior.
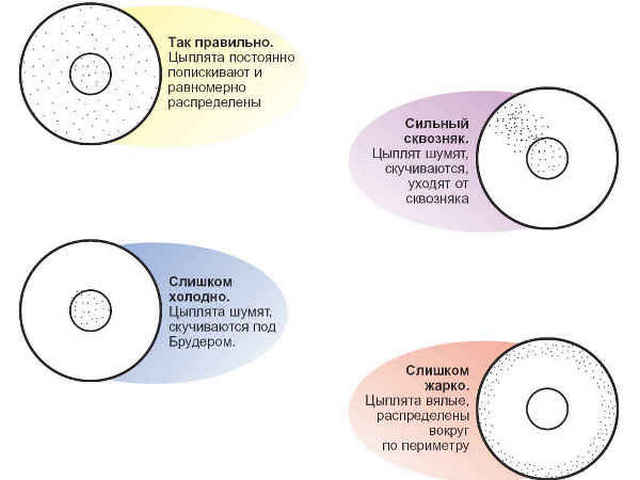
The position and activity of the chicks depending on the temperature.
The pallet must be cleaned of feces daily. This will help keep the humidity at the desired level of 60-70%, as well as avoid dampness, which can develop mold and mildew.
As for feeders and drinkers, their choice should also be approached responsibly. The best option is bunker feeders. They are installed outside so you won't disturb the chicks. Of all the designs of drinking bowls, it is better to choose the nipple option - thanks to them, it will be possible to avoid dampness in the birdhouse.
You may be interested in: do-it-yourself drinkers for chickens.
Thus, a brooder for chickens can be easily built with your own hands using drawings and dimensions. With such a device, you can be sure of the comfort and well-being of the chicks.
The video below shows how to make a do-it-yourself brooder for chickens:
Similar publications
- To read
How to make a drinker for chickens with your own hands
- To read
How to assemble karting with your own hands
- To read
Do-it-yourself PVC-pipe football goal
- To read
DIY chicken coop for 20 chickens - step by step instructions
- To read
DIY decorative pillows
- To read
Raising chickens in a brooder
Raising chickens
Raising chickens in a room as small as a brooder is not difficult at all. All you need is to be attentive and take care of the kids on time. What are the responsibilities of a breeder?
- Regular feeding.
- The water is changed several times a day, because the chickens quickly smear it or a nipple drinker is placed.
- Temperature and lighting are regulated as needed (more on that below).
- Cleaning is carried out as needed. Often too bad, because the chicks are nervous and for them any interference in their space is a great stress. But they shouldn't sit in the mud either.
- It is important to keep the inside of the brooder dry at all times!