Manual potato ridger
Potatoes have always been considered one of the staple vegetables in the kitchen. It is used to prepare first and second courses, desserts, etc. The cultivation of this vegetable is associated with great labor costs, because in order to obtain a good harvest, it is necessary to huddle potato bushes several times per season.
Thanks to hilling, the access of oxygen to the roots is improved, the channels in the ground are destroyed, as a result of which less moisture evaporates, and the number of tubers also increases.
Hilling bushes is carried out in summer cottages mechanically using a hoe. However, this is a long and arduous process.
To help farmers and gardeners specializing in growing potatoes, a special tool has been created called a hiller.
Helpful hints for proper hilling:
- The procedure must be done at a specific time. Ideally - 2 times in 1 season. The first time, when the potatoes grow by about 10 cm. The second - already somewhere by 20 cm. The flowers should not be opened.
- Prefer cloudy weather. If this is a rare occurrence in your area, then choose early morning and late evening. Ideal after rain or watering.
- Forget about the rake and the hoe. Trust the modern tool - the potato tiller.
So, without such a procedure, you will not see a good result. And without the right device, you cannot make it as easy and effective as possible.
Advantages and disadvantages of hillers
The use of mechanisms always allows you to increase labor productivity on farm and summer cottages.
Benefits:
- reduces labor costs and increases the efficiency of the farmer;
- can be a multifunctional tool that can be additionally used for loosening the soil, planting potatoes, as well as during harvesting;
- You can freely buy a potato beaker in a store or make it yourself.
Disadvantages:
- in order to use the device, it is necessary to purchase it, which means that material costs for the purchase and further maintenance will be required;
- when working with the device, you must comply with the safety regulations.

Testimonials
Maria
Previously, potatoes were always spud with hoes, they did not even know that there were other options. Then a neighbor saw an interesting device, it turned out that he made it himself. The husband asked for a drawing and also decided to try it, he did it quite well. Now working with the land has become much easier and there is even time for other things.
Alexei
We have a large vegetable garden, which is not easy to huddle up, but it still needs to be done. I was thinking how to modernize this process, I found information on various hillers on the Internet. At first I wanted to buy it in a specialized store, but I realized that I would save a rather big amount if I made it myself. There were no difficulties with the design, I am very pleased with the result.
Vladimir
Growing potatoes, it is impossible to avoid such tedious work as hilling bushes. Without this, a good harvest from the beds cannot be obtained. My back is aching, so it's hard to loosen the ground with a hoe. It's good that I accidentally heard about hand tillers.I assembled such a structure myself, now it has become my main assistant in the garden.
Types of potato growers
Depending on the design, the following types of devices are distinguished:
The propeller mechanisms allow you to move the soil between the rows into the grooves.
The most common are lister and disk devices.
Lister mechanisms
Interesting! Attachments of this type are available with a fixed working width. Otherwise, they are called plows, as they look like a plow.
They are produced with an adjustable angle of attack (the angle of inclination of the cutting part of the hiller to the ground) and fixed.
Adjustable ones allow you to change the depth of loosening and, accordingly, the coverage area.
Advantages of the device:
- consumes less power compared to disk devices;
- simpler in design;
- the price is less than for a disk device;
- has a low weight, therefore it works perfectly on low-power mechanisms (walk-behind tractors and cultivators).
Disadvantages:
- does not work well on wet and heavy soil;
- planting potatoes should only be flat, with a strictly fixed row spacing.
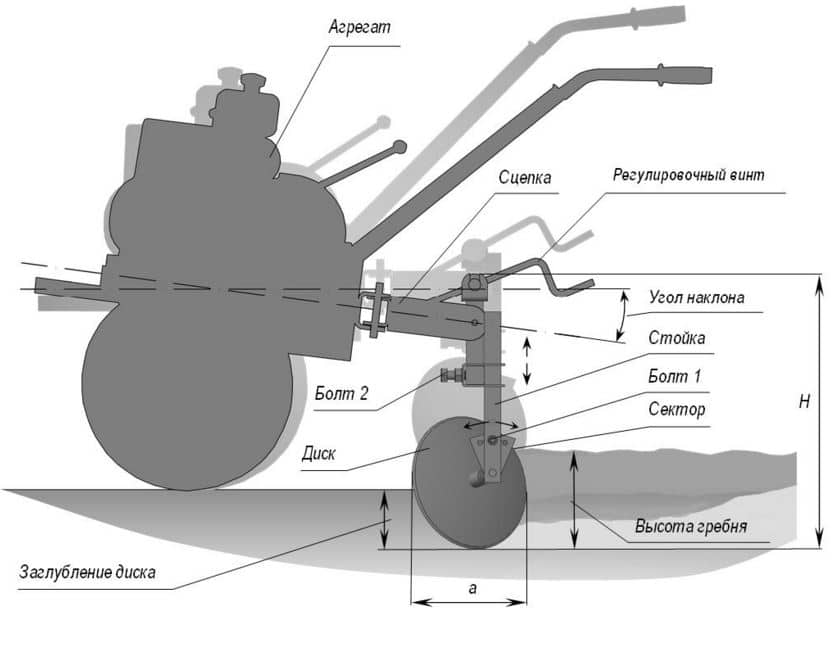
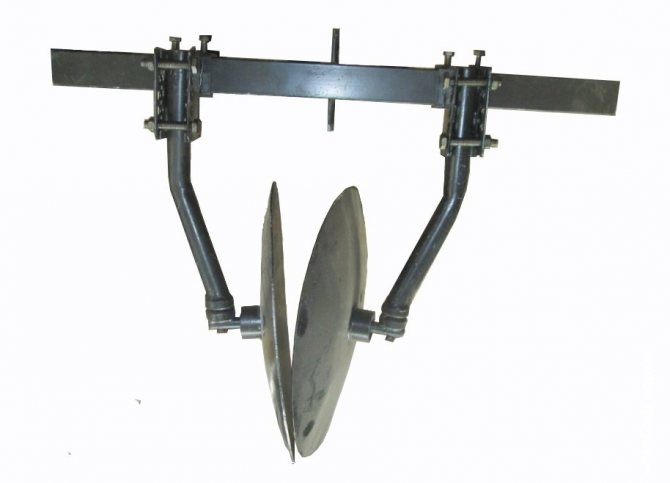
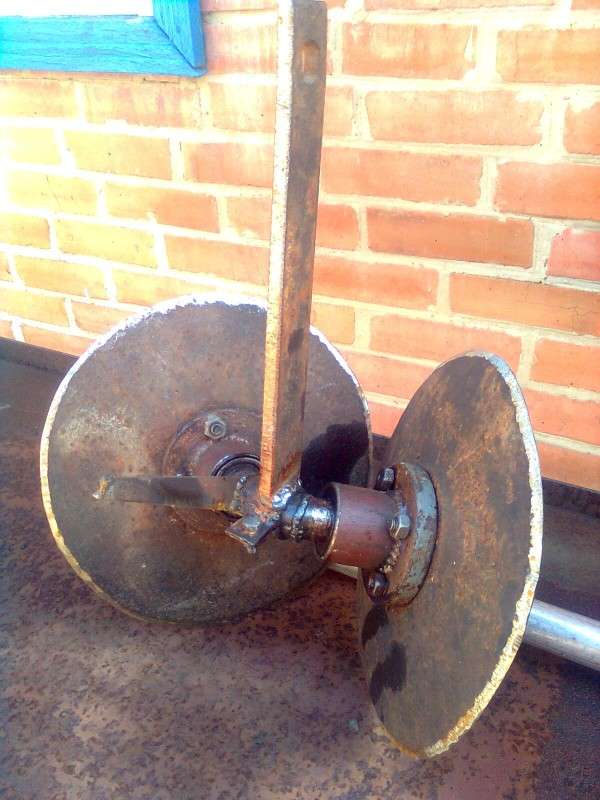
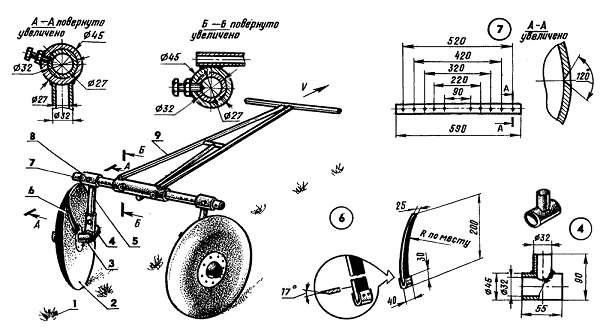
Disc hillers
Structurally, they consist of two discs with a sharpened edge. When the hiller moves, the discs rotate and crush the soil. They have a convex shape. Due to this shape, the soil is simultaneously loosened and an earthen roller is formed.
The discs are attached through ball bearings to the racks, which are located on a horizontal holder frame.
Note! They can be adjusted vertically, less often horizontally. With vertical adjustment, the angle of rotation of the discs changes, due to which the amount of soil that is needed to form a ridge also changes. Horizontal adjustment moves the discs vertically (up or down). Thus, the angle of attack is adjusted.
Advantages:
- better performance of hilling, the ridges are smoother and higher;
- can be used with different row spacing;
- allows hilling on heavier soils.
The disc hiller can be used with different row spacing
Disadvantages:
- higher price;
- higher fuel consumption.
Depending on the volume of work performed and the degree of mechanization, the potato tiller can be:
Fact! Manual - designed to perform only hilling, automated - used to perform several types of work: hilling, loosening, planting, harvesting.
Manual - moves due to the fact that a person pushes or pulls the mechanism.
The automated potato bucket is an additional suspension device for a walk-behind tractor, cultivator or tractor.
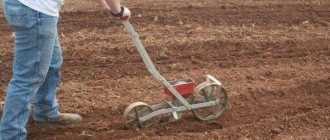
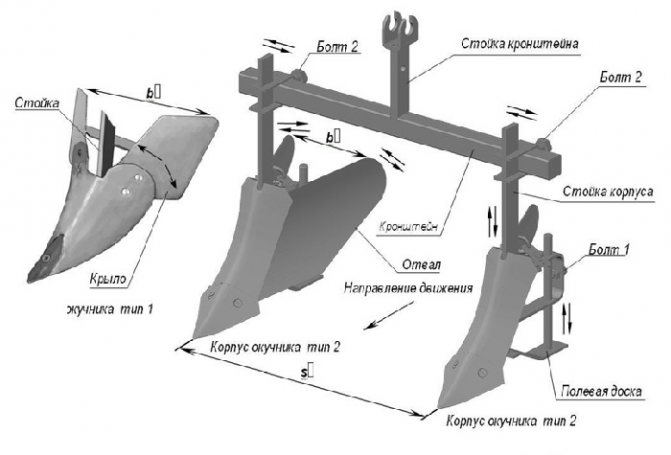
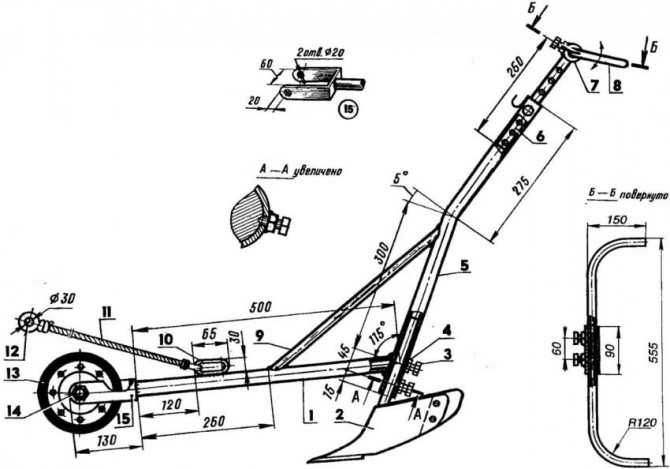
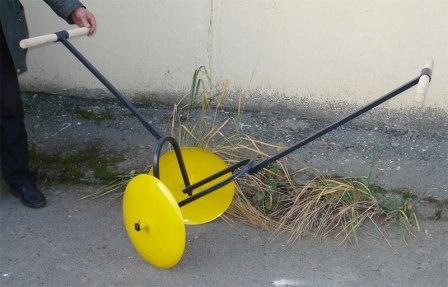
Manual potato ridger
Allows you to process potato beds, regardless of the presence of a walk-behind tractor or a tractor. For manual types, the most common designs are lister and disc mechanisms.
Potato ridger at work
Advantages:
- can be used in areas where the use of motoblocks or tractors is impossible or impractical;
- cheaper in terms of purchase and maintenance.
Disadvantages:
- more expenditure of physical forces of the employee;
- the processing of the site takes longer;
- lower quality processing of plantings is possible;
- when working with the mechanism, two people are needed: one must pull the potato bucket forward, and the second must push it from the back using the handles.
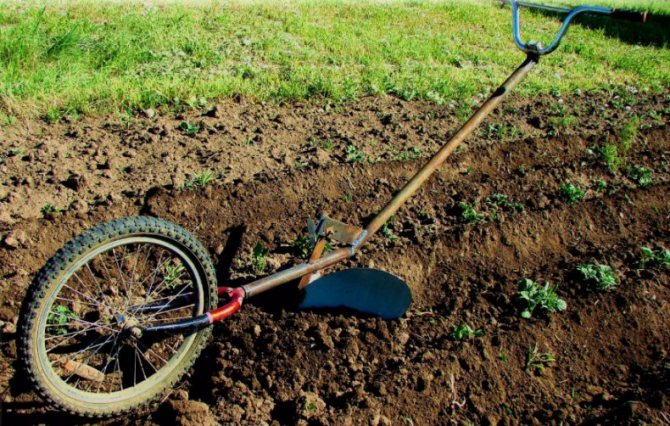
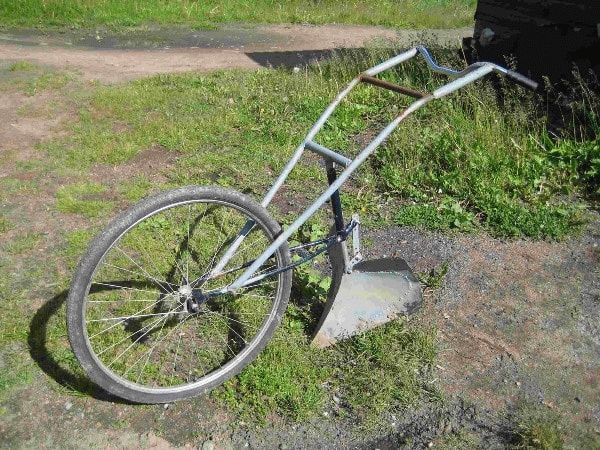
To make it easier to operate the manual mechanism, and so that one person can handle it, you can upgrade the manual hiller by equipping it with a bicycle wheel. In this case, the plow is attached to the bike frame. The steering wheel allows you to direct the device in the desired direction.Why is it convenient to use a bike? Because it is lightweight and the handlebars are at the optimum height for the job.
Upgraded manual hiller
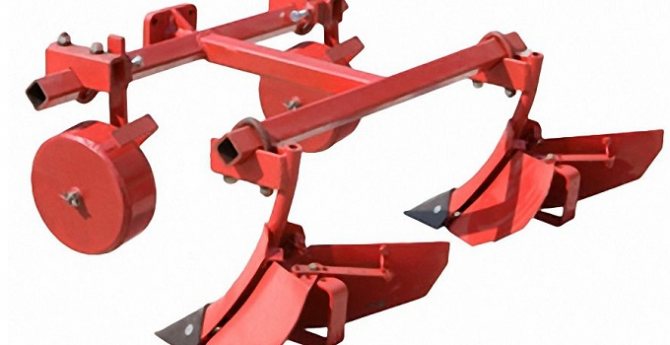
Tractor hiller
These devices allow you to loosen the soil and hilling potatoes.
The design includes:
- metal frame;
- hitch;
- two wheels (usually stamped);
- lancet paws;
- dumps.
Related article: Bicol for potatoes from Colorado potato beetles: instructions
The tines are designed for cutting the soil to a depth of about 150 mm when hilling. Thus, the mechanism can be used as a plow for potatoes.
The attachment is fixed to the tractor by means of a hitch. Lattice plows are used directly for hilling plants.
If there is no need to loosen the soil, then unscrew the paws.
Tractor hiller
Typically, such a device is used in conjunction with tractors that have a small traction force, for example, the T-25.
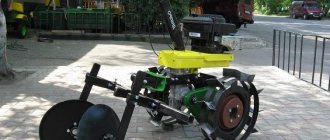
Tiller for walk-behind tractor
To fix it to the walk-behind tractor, you must first dismantle the opener and install a device in its place. Potato pickers designed for walk-behind tractors can also be installed on a mini tractor.
The industry produces not only single-row, but also two, three and n-row mechanisms, which can speed up the hilling process.
Attention! If it is planned to install a hiller with a fixed working width, then the motor-block engine should have a power of less than 3.5 hp and a weight of about 30 kg. Attachments with adjustable working width are installed on more powerful mechanisms.
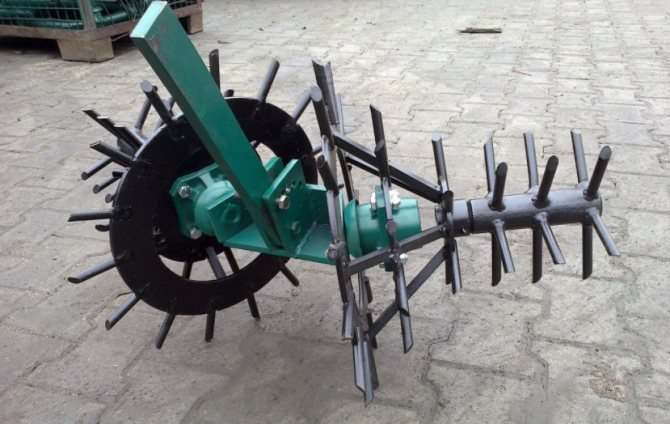
For cultivators and walk-behind tractors with an engine similar to a Neva-type walk-behind tractor, a rotary mechanism can be used. In this case, the wheelset is removed from the walk-behind tractor, and a hiller is installed on the gearbox shaft. The cogwheels perfectly grind the soil, pruning the roots of weeds, and at the same time hilling the potato beds.
Potato pickers can be installed on mechanisms with gasoline or electric motors. In this case, electric potatoes for processing potatoes are lighter and more mobile.
You can buy the device without any problems in any city in the country, be it Moscow, Novgorod or Rostov. Usually, a specialized store allows you to buy a hiller of the desired type, but most often you can purchase a Chinese product that is far from adequate quality.
Hiller for walk-behind tractor
So that you have a reliable assistant in your country house or on a farm, you can make a homemade manual or automated tiller for processing potatoes.


Operating principle
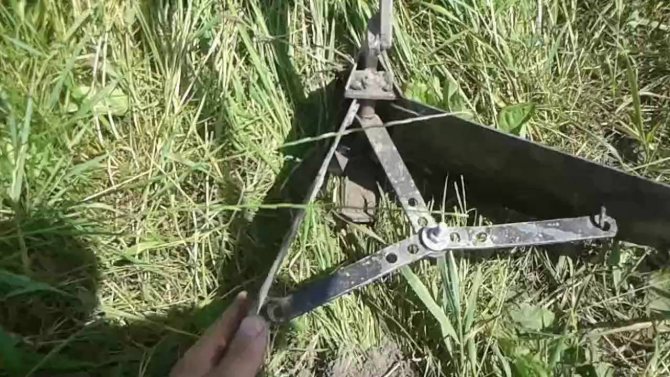
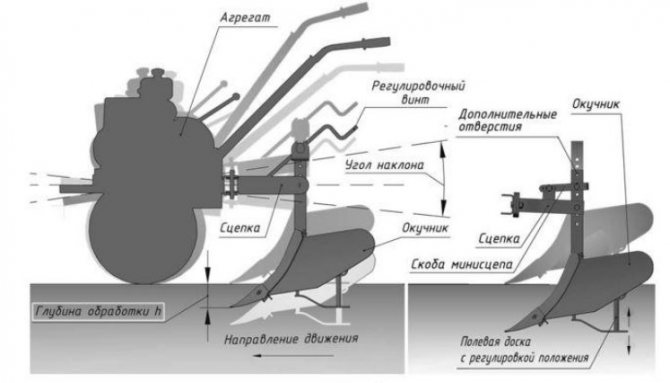
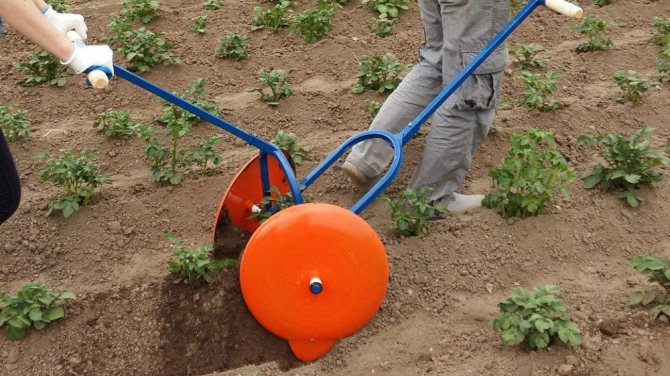
The key part of the manual hiller is the cultivator or plow. It is he who will do what is done manually with a hoe or a hoe - to plow the soil. This plow, with the help of its sharp end ("nose"), slightly digs into the soil and distributes it to the sides of itself, covering the potato rows with earth.
If a self-made model from a bicycle acts as a hiller, then the cultivator will be fixed on its frame. By slightly changing the structure of the unit, grabbing the steering wheel, you can control the device, directing it in the right direction. The very same movement of the hiller is carried out at the expense of a single wheel in the front of the frame.
More concisely, you can summarize the essence of the work of a manual hiller with the following algorithm:
- the cultivator crashes into the ground;
- the controller with the help of the steering wheel directs the hiller in the right direction and moves it forward;
- the movement is carried out at the expense of the existing wheel.
Homemade lister hiller
To make a homemade manual or automated tiller for any type of potato, you first need to make a drawing of the mechanism on paper to scale and indicate the required dimensions of the device.
Manufacturing equipment
In order for the work to be done quickly and efficiently, you must first prepare the tool. For this you will need:
- Bulgarian;
- welding machine with electrodes;
- drill with a set of drills;
- a hammer.
A grinder and a welding machine are needed to make a hiller
From the materials you need to prepare:
- metal sheet, 2-3 mm thick;
- iron pipe, with a section of 20mmx20mm or 30mmx30mm;
- if an adjustable device is to be made, then additionally you need to purchase 4 hinges and metal strips (3 mm thick).
Progress
- Cut out the sides of the plow (ears) from a metal sheet. The wider the width of the sides, the more land will be captured and, accordingly, more of it will be covered under the bush. In the narrower part, intended for cutting the ground, the width of the ears should be 5-7 cm. For narrow row spacings, ears are made of smaller width than for wide ones;
- We bend the sidewalls and give them the desired shape. The bending radius should be the same for both the left and right halves;
- We weld both halves and clean the weld spot;
- We connect the ears to each other with metal stripes. If the hiller is not adjustable, then the strips are welded to the ears, if it is adjustable, then we fix it with loops. It is desirable that the angle between the stripes is 90 ° and between the ears 120 °. We weld the other ends of the strips to each other;
- We attach the nose to the narrow ends of the ears by welding. The angle between the metal stripes and the spout must be 150 °;
- After making the working part of the hiller, it is welded to the bracket. Using the bracket, then the hiller is connected to a mechanism, for example, a walk-behind tractor.
Required materials and tools
To make such a homemade product, the following materials are needed:
- cold rolled sheet steel 2.5 mm thick;
- steel corner 20 × 20 × 3 mm;
- loosening duckfoot share from a cultivator or a disc from a potato digger, disc harrow;
- steel billet for a rack with a thickness of 10 mm and a width of 20-30 mm;
- pipe (round or profile);
- a wheel from a folding bicycle, a garden wheelbarrow;
- 4 bearings.
Of the tools in the process of making a homemade hiller you will need:
- welding machine;
- Bulgarian;
- drill;
- compressor with a spray gun;
- emery;
- vice.
From consumables, you will need cutting discs for metal, electrodes, a primer and oil paint, sandpaper, a grinding nozzle for a drill, and a solvent.
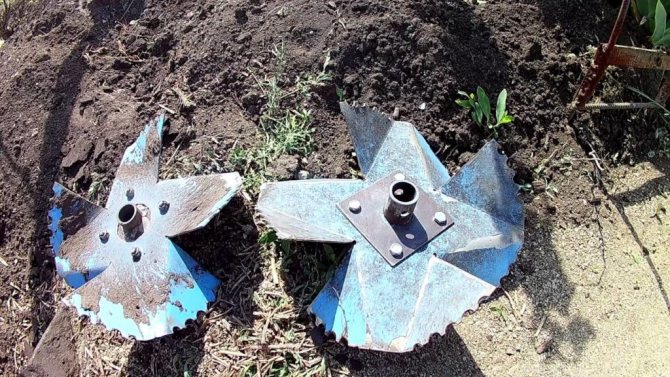
Homemade disc hiller
Consider how you can make a disc hiller for potatoes on a walk-behind tractor with your own hands.
To make discs you will need:
- metal sheet, 3 mm thick, for the manufacture of two circles, 45-50 cm in diameter;
- two screw lanyards (designed to adjust the position of the discs relative to the axis);
- two racks (made of a metal rod with a diameter of at least 30 mm);
- metal pipe;
- two bearings.
Manufacturing procedure
- We sharpen and bend the discs along the edges so that there is a convex part on one side;
Attention! The discs must be bent symmetrically, otherwise the device will not work properly.
- We install them on racks placed in ball bearings and fix them with bolted connections;
- We fix the racks to the metal pipe. The distance between the tines must match the row spacing. The discs are located at an angle of 10-15 ° in relation to each other;
- If we plan to install it on a walk-behind tractor, then we weld a metal plate to the pipe, which will allow in the future to attach the device to the walk-behind tractor.
The use of hillers will automate the care of potato plantings.
Tool Facts
What materials are needed
To create your own hiller you need:
- water pipe - it serves as a stand (Diameter - 1 inch, length - meter)
- tube 0.37 inch - it is necessary for the front and rear rods
- steel sheet (thickness - 2 mm.) - dumps will be made from it
- lanyard - which will secure the front link and rack
You also need to have with you: any tools for bending pipes and a blowtorch (you can use a regular gas torch). She needs to heat the metal parts in the places where they bend. You will also need a welding device and a grinder.
Where can I find blueprints
The Internet has answers to all questions, even those. Drawings for making a manual hiller can be found on the net, or in any magazines on the theme Garden / Vegetable Garden.
Installing a homemade hiller on a walk-behind tractor
To install a homemade hiller on a walk-behind tractor, you will need bracket... A homemade leash is attached to the bracket by means of a stopper and bolts to flat washers. The stopper is sent inside the pipe in the shape of a square and securely pressed against its outer surface
How to make a manual hiller with your own hands, drawings
Potatoes are considered one of the main vegetables, and the most common crop grown in vegetable gardens. And our own potatoes have always been distinguished by the best quality and taste. But in order to achieve a good result, you need to make every effort in caring for it. And the hilling process is simply necessary for potatoes, since in loose soil it is just fine, it grows. Traditionally, the hilling process takes place with hoes.
Naturally, this method takes a lot of time and effort, especially if the site is huge. In order not to make great efforts, you need to resort to using the device. Such a device is a manual hiller. With the help of it, in a short period of time, you can huddle a plot, for example, 10 acres. And if you are interested in such an invention, then here we will tell you about how to make a manual potato hiller with your own hands. Here we will provide useful information, as well as provide our readers with drawings and videos.
Related article: Sulfur for potatoes: types of fertilizers and application rates
But what is this summer cottage tool, and can you do it yourself? In this article, we will try with you to understand this issue, whether it is possible to make a hiller at home with your own hands.
Why is the hilling process needed?
Everyone knows that when potatoes are in the growing stage, they require regular hilling. But not everyone knows for what purpose this is done. Potatoes must be hilled for the following reasons:
- Due to the loosened soil, the roots of the potato receive air, due to which it grows faster;
- Due to the penetration of air, the rate of tuber formation is increased.
- Thanks to the hilling process, you get 20-30 percent more yield.
Note: In those regions of the country where it is cool and rather humid, the hilling process is carried out with regular consistency. Due to this, unnecessary water leaves the soil, the heating process begins and the potatoes are enriched with air. And in arid regions of Russia, hilling can negatively affect yields, as moisture is removed from the soil.
Here are the important points in the hilling process:
- Hilling must be done at a specific time. Typically, potatoes are loosened twice a season. Initially, they spud when potatoes grow in length by ten centimeters from the ground. They begin to loosen the ground again when the plant has reached twenty centimeters in length. It is very important that the flowers do not open.
- Do the hilling process in cloudy weather, in the early or evening hours. Ideally, this process is done after rain, watering, or after dew.
- Do not huddle in hot weather. Since parts of the plant that are subsequently exposed to the sun will burn.
- Hilling is done with a tool such as a hoe, rake, or hoe. This is a very time consuming and time consuming process. We recommend that you use a manual hiller, which, after reading our article, you can assemble yourself.
Types of manual hiller
If you want to know how to make a manual potato hiller, then this article is created especially for you. After all, here we will talk about this issue.
There are two popular types of manual hiller:
- Hiller in the form of a plow;
- Disc hiller.
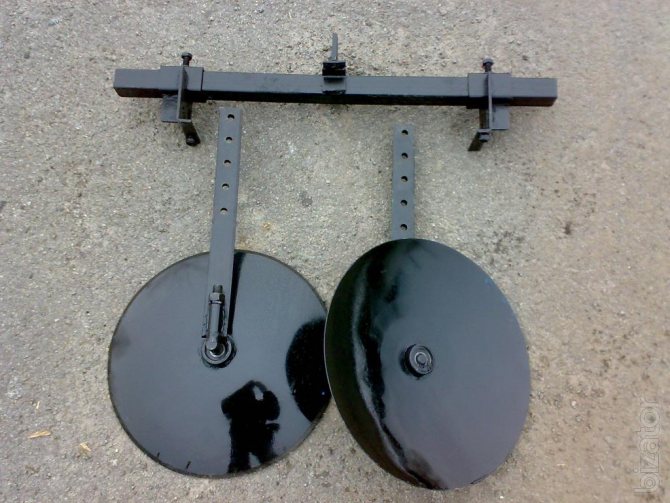
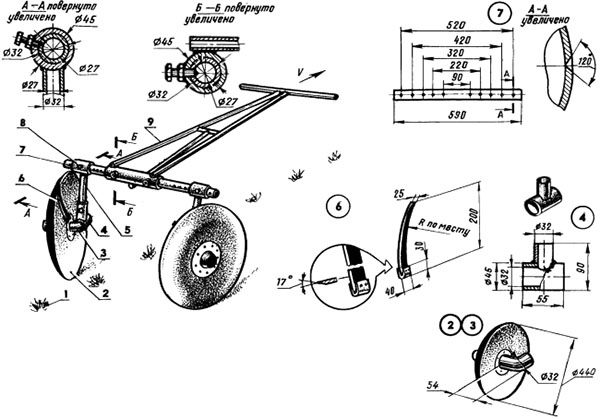
When you look at the disc tiller, it is made in the form of a frame on wheels, and discs are fixed to it.
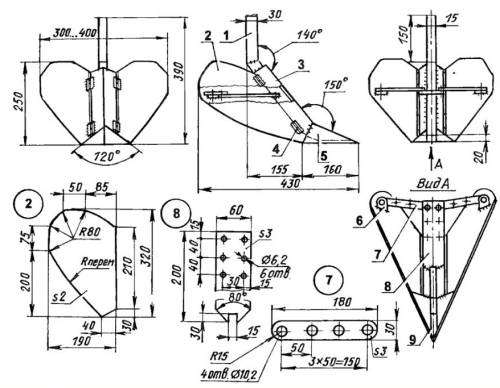
Such a hiller is made of the following components:
- T-shaped leash;
- screw-type lanyards, in the amount of two pieces. They are needed to adjust the mobility of the disc plows.
- racks - 2 pieces;
- disc plows - 2 pieces.
Note: This type of hiller is suitable when you need to plow the land before planting or after you have harvested. It can also be used when plowing the land between the beds. You can change the turning distance of the discs, and accordingly you change the distance between the beds (the maximum adjustable distance is 75 centimeters). Make sure that the angle of rotation is the same on all sides, otherwise the hiller will pull. The diameter of the wheel is 70 cm, the width ranges from 10 to 14 cm. These dimensions are considered the most acceptable for the plowing process.
The hiller in the form of a plow is also a fairly convenient invention to use, and thanks to it you will quickly huddle your entire plot in a short period of time. Often it is installed on a walk-behind tractor, and in the process of movement it is held in the furrow. This joint application will allow you to huddle a large area, even on dry ground. Here you can also adjust the plowing width and depth. The ideal plowing size ratio is 20 centimeters wide and 15 centimeters deep.
Note: most gardeners prefer the disc hiller as gardeners, as it is easier to use. And also with the help of it, beautiful, even rows are obtained. But the price of such hillers is high, and we suggest you make it yourself. But get ready, this is not an easy task. First, carefully study the drawing of a homemade hiller. Well, then do the following.
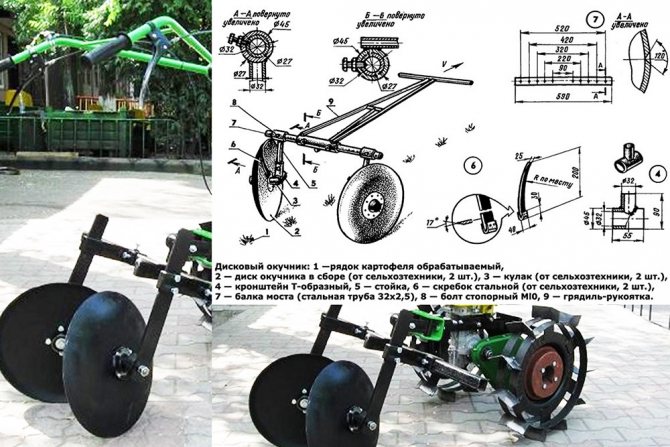
First, the first step is to make discs for our homemade potato hiller. Therefore, you must first prepare a drawing of all elements and parts. Consider with you an excellent visual drawing: when making discs, you should choose a very strong metal. Some craftsmen make discs from pot lids.
Then you should make the mount to the discs. For more convenient control, you should make two bends at the manual hiller.
Diagram of a homemade hiller where:
Drawing: do-it-yourself manual hiller
- A bed for processing.
- Disks.
- Cam mechanism.
- Mounting bracket.
- Rack.
- Steel scrapers - 2 pieces.
- Bridge beam.
- Locking bolt.
- Lever.
What you need for a homemade hiller:
So, let's start making a manual tiller, you need to prepare the following details:
- Disks are concave, they need two pieces. As described above, lids from pots with a diameter of 40 to 60 cm are also suitable;
- Screw tarleps, they also need two pieces;
- A 1 meter hollow tube that will serve as a vertical post should be 1 inch in diameter. Another ¾ ”hollow tube that will serve as front and rear linkages;
- T-shaped leash;
- Gas lamp or pipe bender;
- Adjustable disc adapters;
- Bolts and welding for fasteners.
Related article: Mineral fertilization of potatoes: types, timing and application rates
Making a manual tiller with your own hands
Probably you have already understood that it is quite possible to make a potato hiller with your own hands, but here it is worth showing your skills and knowing some of the moments of making this invention. And we will talk about the manufacturing features below.

The stages of work are as follows:
- Adjustment. It is best for a homemade hiller to be multifunctional. For this reason, it is worth treating the regulatory functions with great responsibility. The height is adjusted using a special telescopic device located in the central part. The smaller tube is inserted into the larger tube and becomes the rear link. Thanks to this, the manual hiller can be adjusted to the size of a person's height.
- Control of the attacking angle is provided by tilting the stance in the center. This effect can be obtained by varying the angle difference between the vertical bed and the front linkage.
- The bed can then be set in motion. The front link should be hinged to the strut in the center section. Tarlepay will be regulated.
- We fasten the rear racks and discs to the rack using a welding machine.
- Next, we attach the front link. To do this, you will need a swivel tool and a long bolt.
- Thanks to these actions, you have a rear traction in the form of the letter "P", the width of which is a maximum of fifty centimeters. The minimum handle length is twenty centimeters.
- We attach a vertical pipe in the center of the fork (here we again use welding equipment). And thanks to the end of the tube, the whole structure made is attached to the vertical rod.
- So that you can adjust the rack, we make openings in its upper part. We drill the same openings in a vertical fork.
Note: Before you start installing the drives, go through the process of stripping the drives from all edges. If you use covers instead of discs, then you should bend them so that one side is concave and the other convex.
Finally
So we finished the manual build process. From this article, you could learn how to make a manual potato hiller yourself. And if you have created a tiller, then you need to test it. This is a very handy tool that will make your job easier many times over. Of course, many will think that it is impossible to collect it, but we assure you that you can. Just study all the blueprints carefully and apply a little resourcefulness. Further, you can watch a video instruction on how to make a manual hiller in your summer cottage.
Video of making a disc hiller for potatoes
DIY hand-made potato hiller drawings
The main types of devices
The potato hiller is rightfully called the indispensable assistant of every farmer. During operation, it does not cause any particular difficulties. With its help, you can process a large plot of a vegetable garden of several hundred parts in a short time. The effectiveness of this method of hilling is much higher than when using hoes, hoes.
By loosening the soil, air enters the roots and they grow better. In addition, hilling contributes to the rapid formation of root crops and an increase in the productivity of the bush by 20-30%.
It is recommended to use the potato hiller twice a season; it is advisable to do this at a certain time. The first time, loosening the soil should be carried out at a plant height of 5-10 cm. The second procedure should be performed when the bush reaches a height of 14-20 cm. It is advisable if the buds are not opened at the same time.
There are many models of homemade hillers. Depending on the type of working element, the manual hiller is available with a constant or adjustable working width.
According to the principle of work, hillers can be divided into two groups.
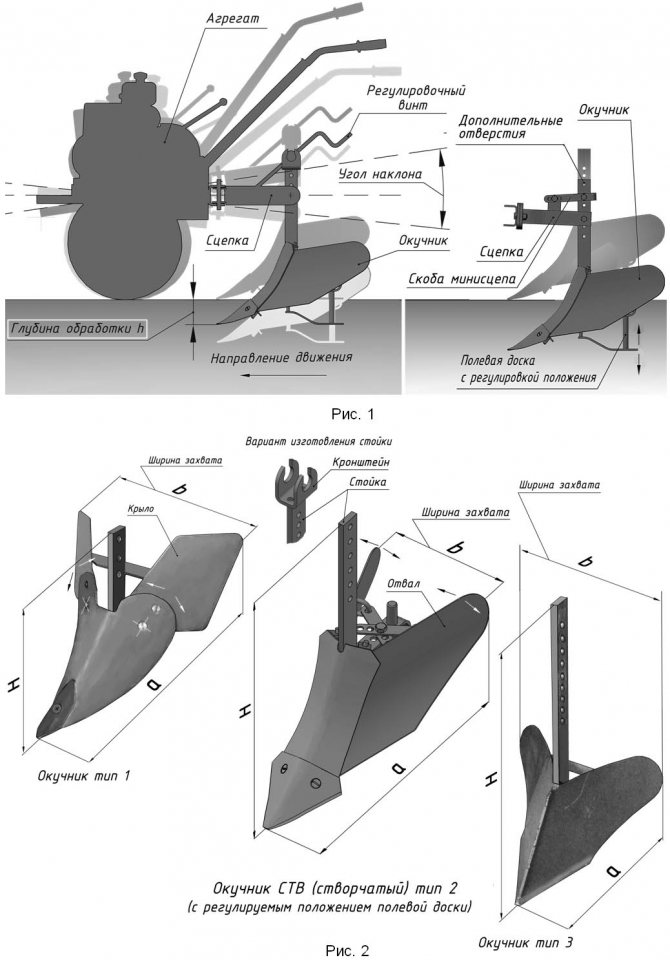
Disk
The manual or disc-type hiller is designed for loosening and hilling the soil. Disc models are often used for automated processing of beds. The device for hilling the beds is attached to the tractor.
The main advantage of a homemade disc cultivator lies in the ability to adjust the tines between the discs. You can install the racks in accordance with the row spacing.
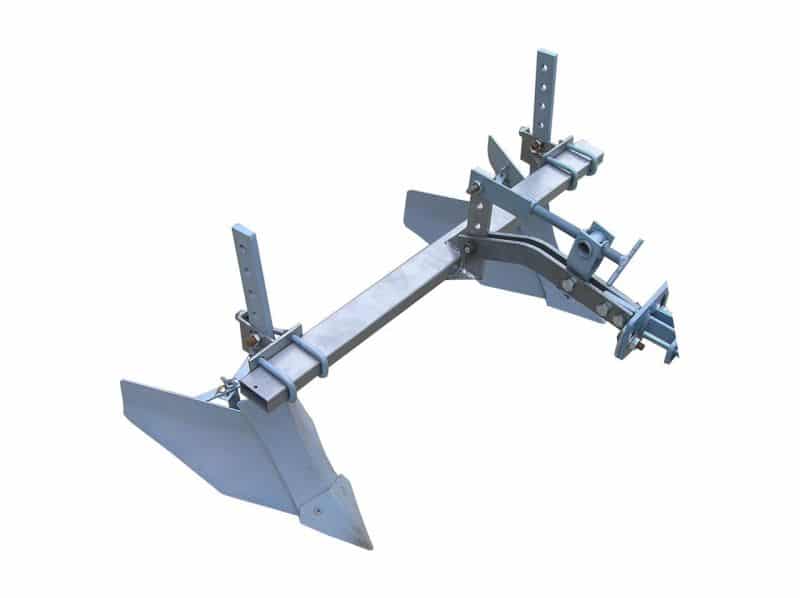
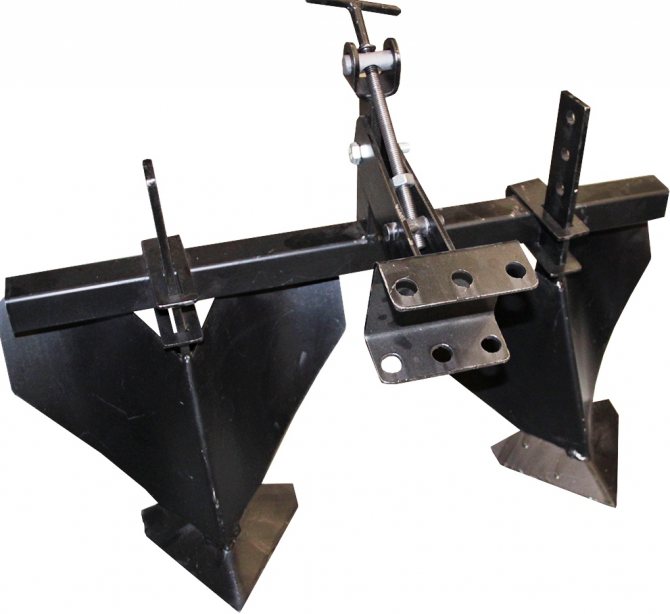
Plow type
In terms of its mechanism of action and equipment, the model in the form of a plow is similar to a disc cultivator. But this model of a manual potato hiller is considered more convenient to use. For greater efficiency, the plow-type hiller can be attached to the walk-behind tractor.
The plow for hilling potato beds helps to loosen the soil, huddle potato bushes, cut furrows and beds, plant various crops.
Do-it-yourself manual disc hiller for potatoes
When growing potatoes, there are techniques that can not be ignored and even less overlooked. One of them is the hilling of grown potato bushes, the purpose of which is to create air exchange in the soil. If the area occupied for planting potatoes is small, then many manage on their own and with a hoe, but when the area is large enough, then a mechanical assistant is already required to facilitate physical labor and reduce processing time. Learn how to make a hand-made potato ridger with your own hands according to drawings and videos.
Terms of hilling
The first hilling of potatoes is carried out when the sprouts reach 10-15 cm in height. If we are talking about the northern regions, then the first hilling is carried out as soon as the first green shoots appear. This will help protect them from possible frost.
When potatoes are planted in early May, hilling can be carried out by the end of this month. The height of the hills during hilling should not exceed 10 cm.
The second time, the procedure is carried out 15-20 days after the first time. And the third hilling is carried out when the potato shoots reach 25 cm.As a result, the height of the ridges should not exceed 19 cm.
The best period for these activities is morning or evening, ideally after rain or watering.
Master class: potato hiller
In stores you will find hillers that are designed for agricultural machinery. You will have to make manual models yourself if you want to make it easier to grow vegetables in the country. Hillers are divided into two types:
- plow;
- disk.
The plow is made in the form of a small plow with long handles, and the disk one is in the form of two discs, narrowed downwards, also with two long handles. The structure of such a tiller is pushed forward, and the discs or plow turns the earth layer over. It is better to work with these devices together. Experienced gardeners advise using a disc tiller, because it forms better and more accurate swaths of the earth.
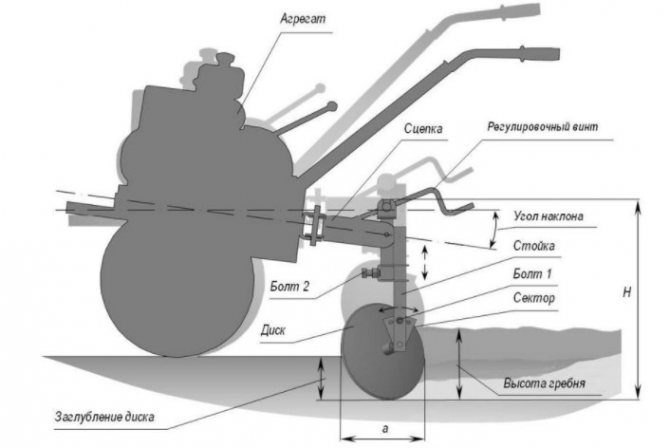
How to install a hiller on a walk-behind tractor?
Since recently agronomists are increasingly using a two-row hiller, the specifics of installing a hitch of this particular plan should be considered. Often, fixation occurs through the operation of special couplings SV-2 and SV-1/1. A prerequisite for proper installation is the presence of lugs, the diameter of which should not be less than 600 mm. Otherwise, it will not be possible to avoid squeezing the potato tops by the reducer.
It is important to correctly direct the tiller, because the required result can be obtained only when it is oriented parallel to the soil surface. This can be done simply by adjusting a few bolts on the bracket. In the process, special attention should be paid to the selection of the width of the furrow and the depth of immersion in the ground, because after processing the ridges should be at the same level. This depth is adjusted in several ways:
- The craftsman should be guided by the height of the mounting holes;
- The presence of screw adjustment (for adjustable objects) will allow, while turning the handle, to change the angle between the nozzle frame and the unit itself.
To adjust the width of the grooves, you must use the frame fastening brackets (move or move them apart). You can also follow the directions in the following videos:
Watch the video: Disc tiller for walk-behind tractor
To make a potato tiller, you need to follow these steps:
- First, the two discs are fixed at the desired angle by welding or pins (bolts). The deflection of the discs should be outward. With this mounting option, the gap between the discs is not adjustable.
- To make discs with adjustable spacing, holes are drilled on the support beam to optimize the work to be done to secure the tension chains from the outer edges of the discs.
- Further, either handles for human control or holders for agricultural machinery are designed. For manual control, it is better to make control for two at once.
If the hiller is assembled to be operated by one person, then it becomes heavier from above and a skimmer wedge is installed on it, in order to steer when pulling. Various mounts, cam mechanism, brackets, and other parts are useful for work.
The above drawings and models of the potato hiller are conditional, because each craftsman will assemble the structure in a way that suits his needs and convenience. When working with a manual potato tiller, you need to get used to it, calculate the pressure force in order to turn out a layer of soil of the required height. It should also be noted that hilling is best done after precipitation. Such a tiller can also be used for digging furrows for planting potatoes.
The process of creating a hiller
The manufacturing process can be divided into 5 stages:
- The rear wheel mount is trimmed so that there is only a "triangle" from the bike frame in the end.
- The cultivator will be placed instead of the wheel, it must be fixed there.
- Screw on or weld on the cultivator. This should be done with high quality, because this part of the hiller will be the greatest load.
If the cultivator is screwing on, then tighten the nuts as tight as possible, otherwise the manual hiller will not last even a couple of days. This is where both wrenches come to the rescue: for bolts and nuts. Wielding them at the same time, it will be possible to firmly and permanently fix the parts.