Advantages and disadvantages of a portable chicken coop
The good thing about a mobile chicken coop is that it can be relocated together with the chickens to a new place with fresh grass as needed.
Thus, the use of this structure gives the following bonuses:
- birds diversify their diet with greens, insects, worms;
- they will need less feed;
- there will be no need to regularly change the litter;
- a relatively small portable structure is easier to clean than a stationary house.

Features of the
For breeding chickens in a summer cottage, it is important to choose the right type of chicken coop and find a suitable place for it. This is very important for the successful rearing of birds, since comfort and convenience depend on the location of the house.
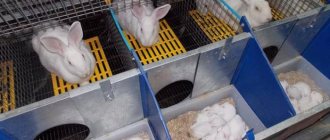
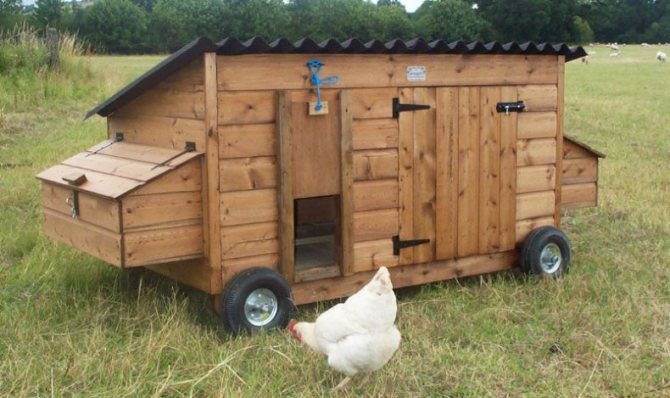
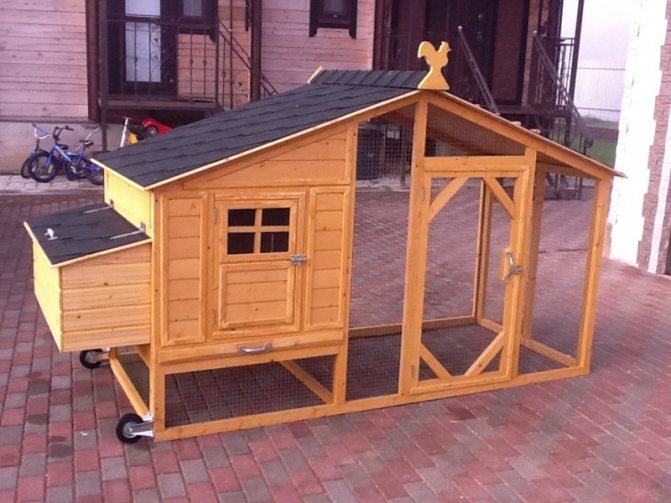
Mobile chicken coops are used to keep a small number of birds - a maximum of 10 individuals. Outwardly, the design resembles a portable booth. They also make structures on solid wheels. In them, chickens spend the night, hide from the rain and wind. The booth is fenced with a metal mesh fence. This provides walking.
The most important feature of mobile poultry houses is the ability to quickly move the building to a new location. This gives the chickens access to new grass and fresh insects. It is quite easy to clean such a structure. If necessary, it can even be moved to a pond and washed.
Types of portable chicken coops
Mobile poultry houses can vary in the way they are moved from place to place, in size, in design. Let's take a closer look at these differences.
Transfer method
Such structures by the method of movement are divided into two types:
- can be moved manually;
- which move around the site on built-in wheels.
Manually, these structures can be carried by either one person or two people - it all depends on their size. For carrying, handles are provided in the design. Wheeled poultry houses can have a pair of wheels, and then they roll like wheelbarrows. But there are also four-wheeled structures, which, if necessary, can be taken on a trailer.
By size, mobile chicken coops are divided into those in which 15 chickens or more can fit, and into smaller structures. Small lightweight structures designed for 5-10 chickens have become widespread among summer residents - they are easy to maintain, easy to move, and a small livestock does not require much time to care, but regularly provides owners with fresh eggs.
Construction type
All mobile poultry houses have common structural elements:
- place for nests,
- roosts,
- paddock for walking.
They also contain a drinker and a feeder. There are many designs of such structures, we will briefly describe the most common of them:
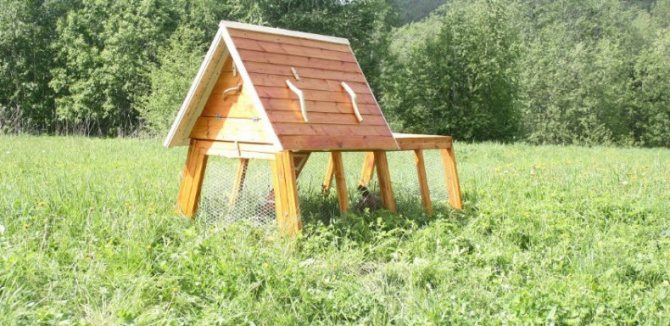
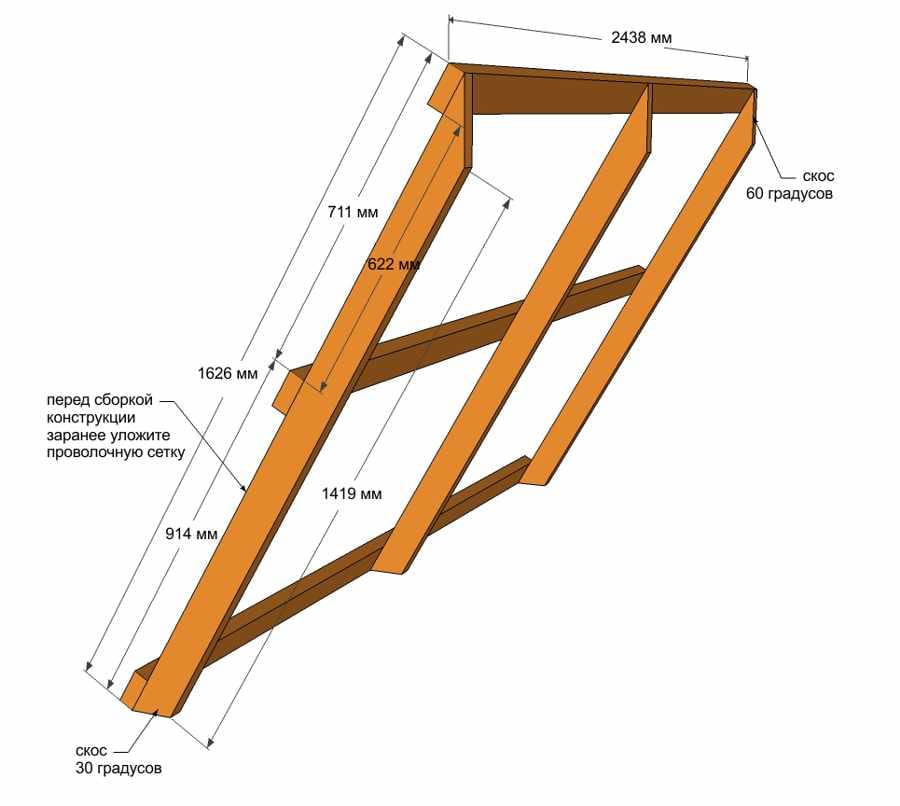
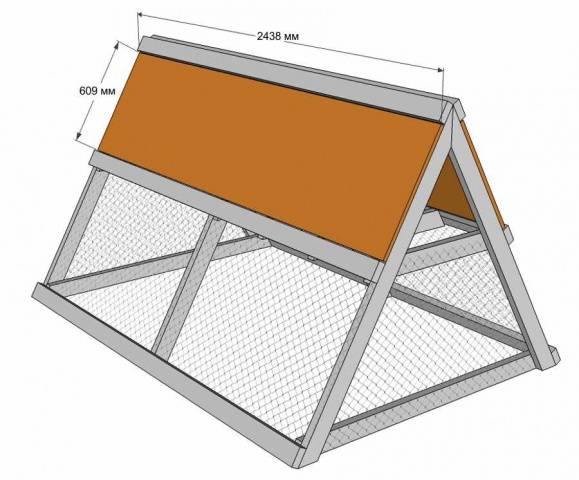
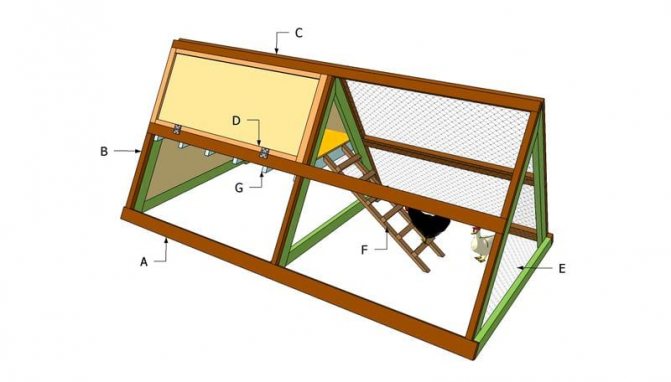
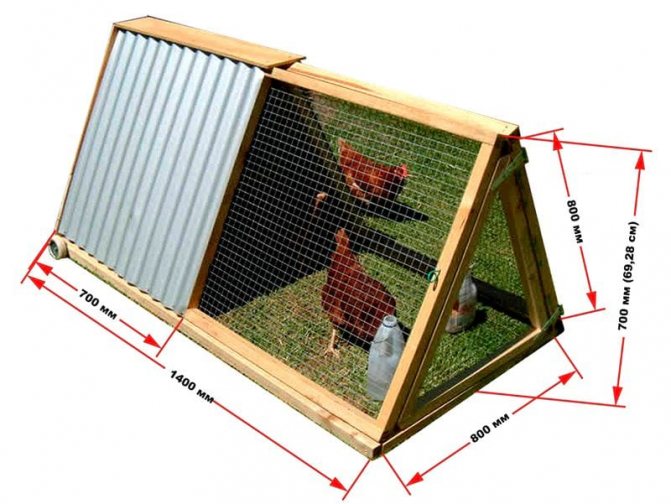
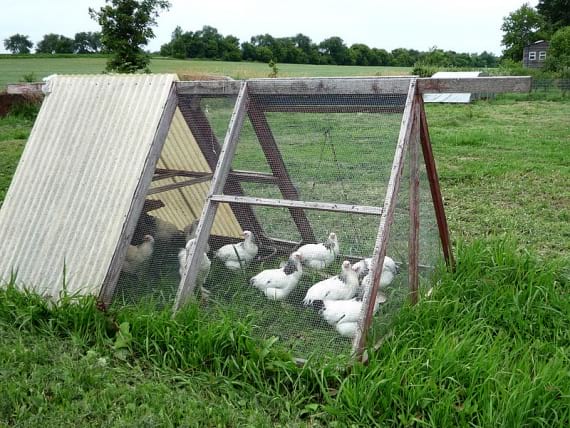
- Triangular two-level chicken coop. It is based on a frame in the form of a straight triangular prism, the rectangular side of which is located on the ground. The lower level of the structure, covered with a net, is provided for the bird to walk, on the upper, protected by a roof, there is a nest for layers and perches. Carrying handles are provided. This design is usually designed for no more than 5-6 birds.
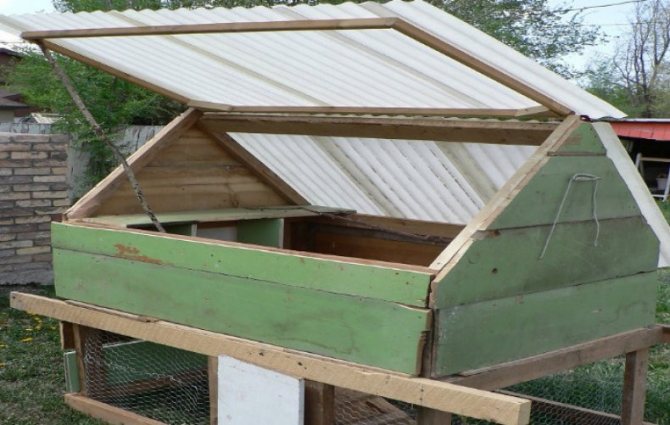
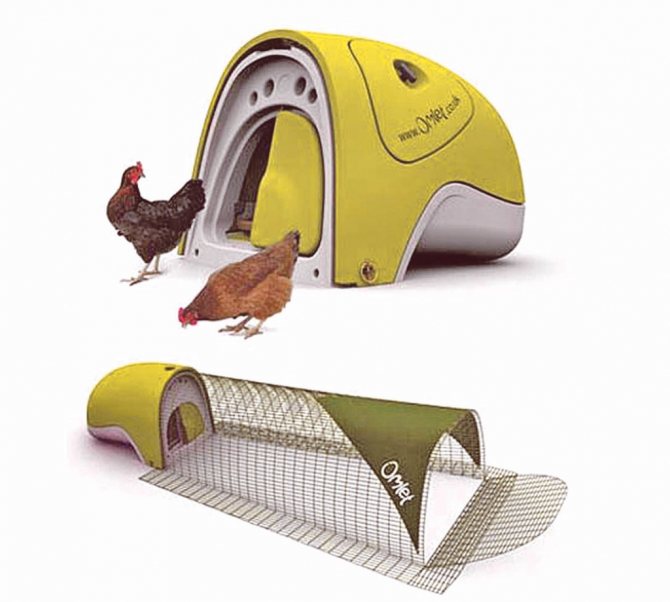
- Single-level portable chicken coop, which can be arched, box-shaped or triangular. Part of it is sheathed with opaque material, such as plywood, and perches and nests are arranged in it. Usually accommodates several chickens.
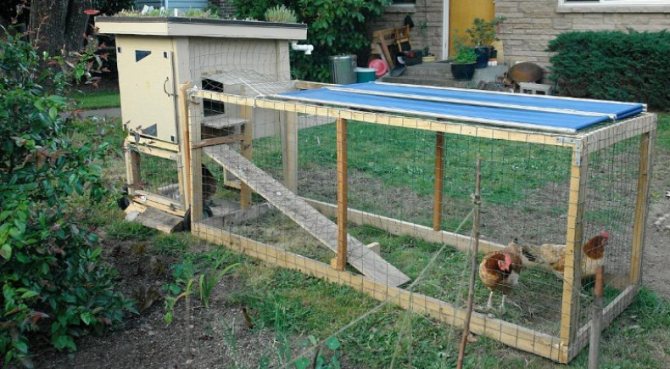
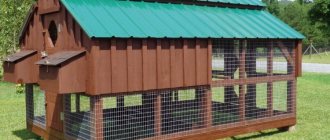
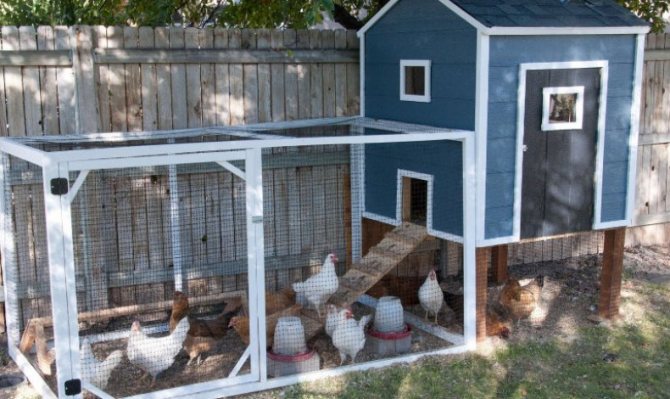
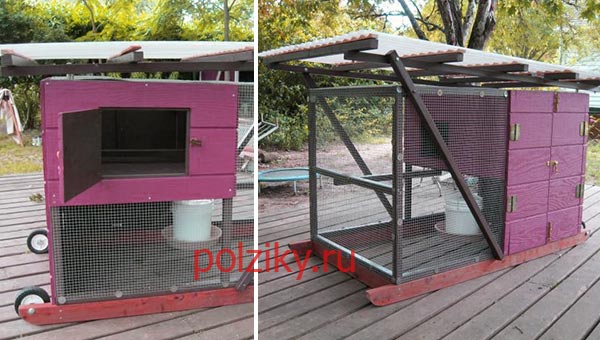
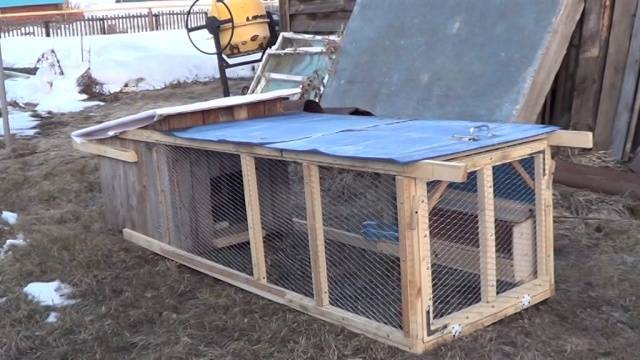
- A chicken coop with a lattice aviary for walking birds. Such a structure is often equipped with wheels, it is heavy for manual carrying. The house itself can be located both above the aviary, and at the same level with it, end-to-end. There are also split designs, when these parts are disconnected before transportation, and reassembled at a new place. The capacity can be very different: from two or three chickens to a couple of dozen individuals.

Arrangement of a mini-chicken coop inside
A small coop requires the same amenities as a larger room. When making a poultry house with your own hands, you should carry out the internal arrangement before settling in domestic chickens.
Perches
One hen needs 30 cm of free space on the pole. To accommodate 5 females in one chicken coop, the length of the perch can be increased to 3 m. To make the perch, a 5-6 cm thick bar is used and the corners are rounded off with a plane. In a small room, it is advisable to place a vertical roost with a slope so that the droppings fall into the prepared container.
Nests
The nests are placed in a shaded area at a distance from each other. The optimal size of each nest is 40 x 40 cm. The exact dimensions are selected depending on the breed and age of the chickens.
Litter
Inside the room, there must be a litter of sawdust or straw on the floor. This is necessary to maintain dryness and reduce the risk of spreading disease. If possible, it is recommended to change the litter daily. The most suitable option is grain waste flooring.
Feeders and drinkers
Feeders with a jumper or mesh are placed against one of the side walls to prevent food scattering. Drinking bowls are placed at the other wall. It is recommended to use the nipple variety to help keep the area dry.
Chicken coop manufacturing technology
As stated above, there are many designs of mobile poultry houses. Consider the manufacturing technology of one of the simplest and most practical options - a triangular two-level poultry house.
Materials and tools you will need
For manufacturing you will need:
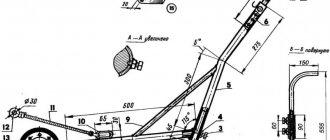
- construction drawing;
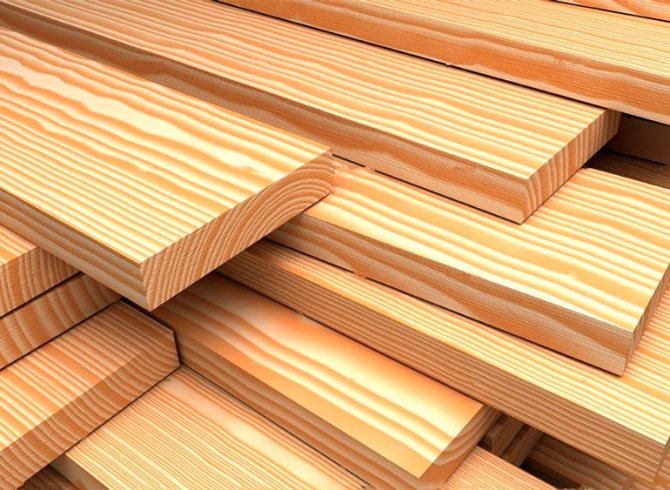
- wooden beam 20x40 mm;
- slats 30x15 mm;
- boards 30x100 mm;
- crossbar for roost, circular section with a diameter of 20-30 mm;
- waterproof plywood 18 mm thick;
- lining;
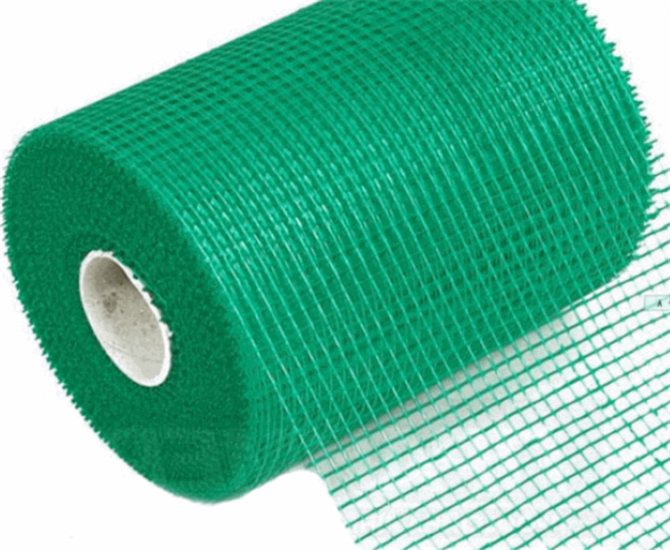
- galvanized steel mesh (not galvanized quickly rusts) with cells of 20x20 mm;
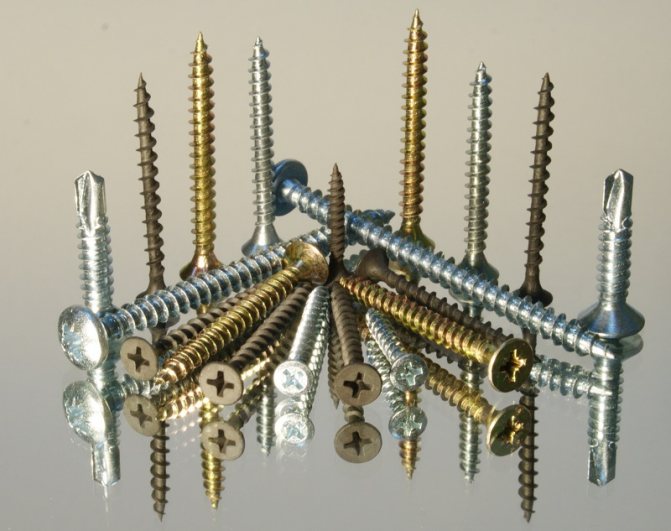
- fasteners (screws, nails, construction stapler);
- nippers;
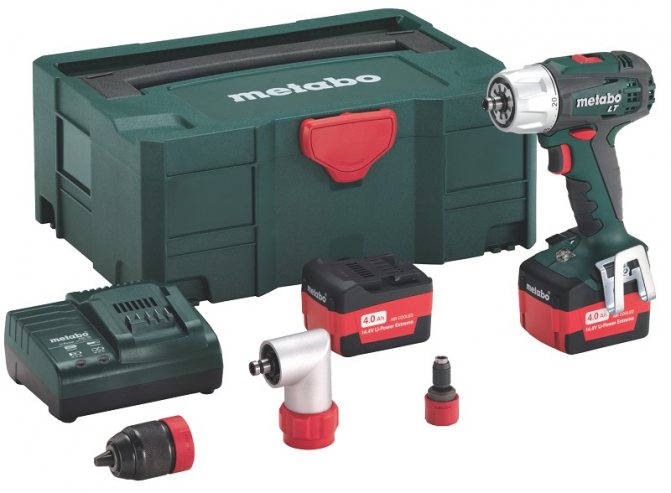
- screwdriver;
- a hammer.
Video: do-it-yourself portable chicken coop
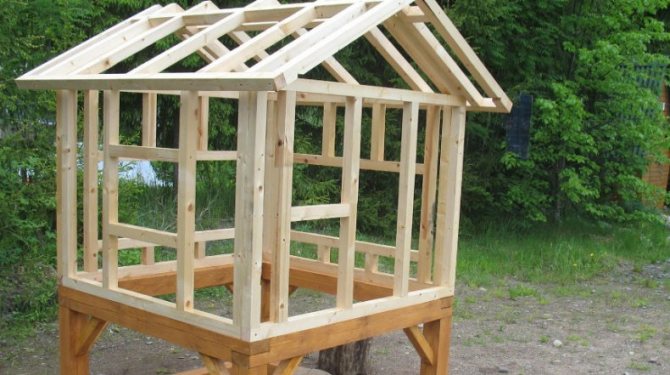
Frame formation
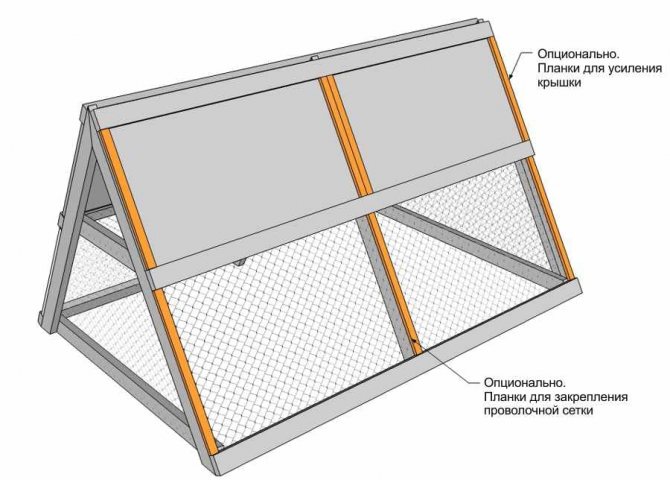
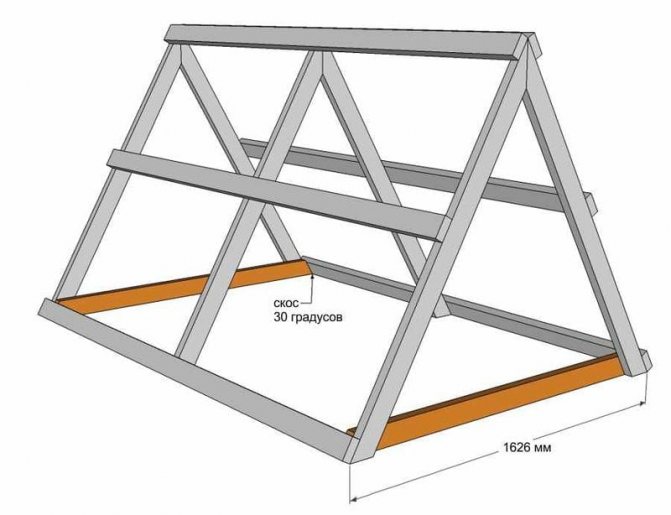
First, triangular sidewalls are made of 20 x 40 mm timber. They are connected with boards that are fastened in the middle of the triangles. At the last stage, handles for carrying the chicken coop are nailed onto the same boards. There is also an alternative option - to make these boards protruding beyond the boundaries of the frame, their protruding part will serve as carrying handles.
Construction of walls
The sides for the first level are made of 30x15 mm slats. The sidewall is a rectangular frame with a spacer in the middle that divides the frame in half. A mesh is attached to the frame with a stapler.
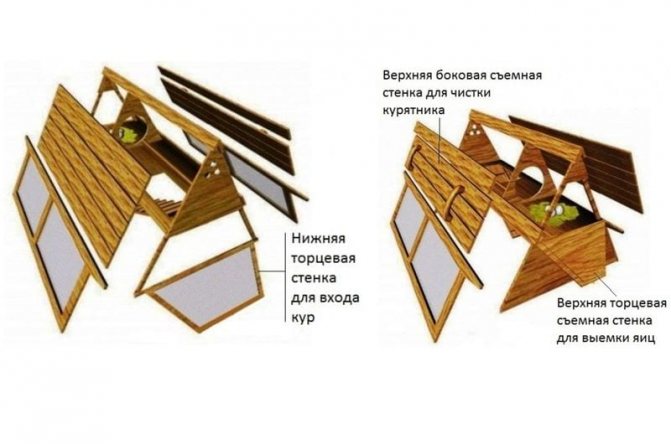
The end walls are done as follows:
- from one end, the upper and lower walls are deaf, made of plywood or lining, but the upper one is made removable so that there is access to the nest for removing eggs;
- from the other end, the lower wall is taken away with a net and is made removable so that there is access to the feeder and drinker for replenishing them, the upper one is not removable from plywood or lining.
Location of roost and nest
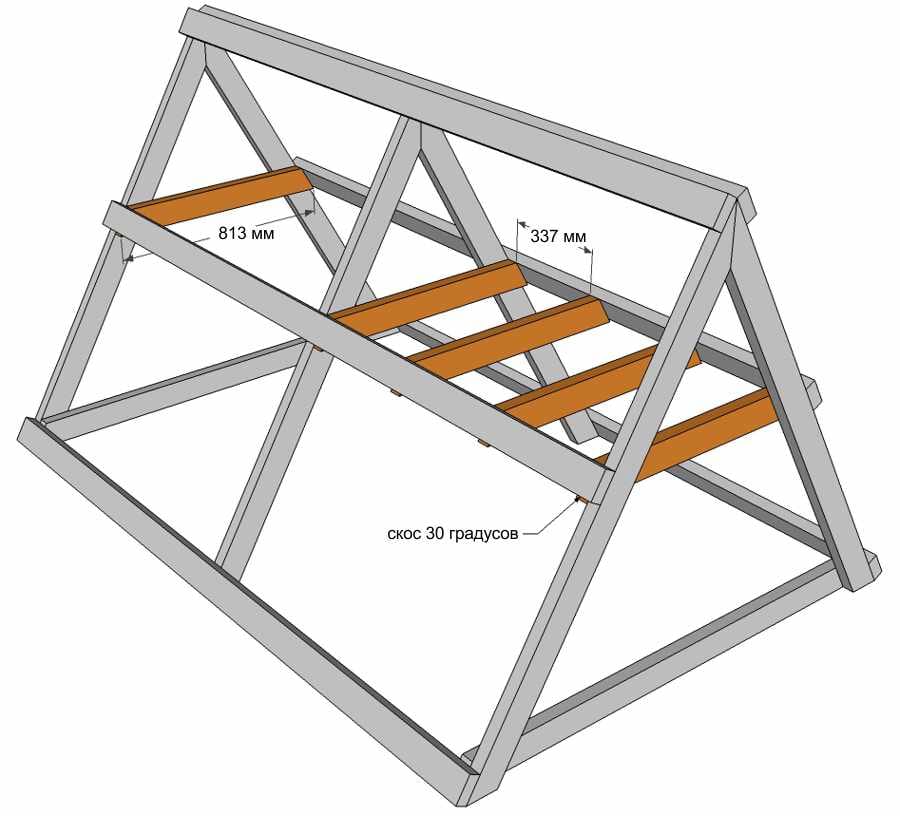
The floor for the upper level is made of plywood. A 200 x 400 mm hole is made in the floor, through which the chickens get up.To raise chickens to this level, a ladder is made and installed from a trim board with slats nailed across it.
A round cross-section with a diameter of 20-30 mm is used as a perch; it is attached along the upper level. The roost should not run along the entire upper level, as part of it will be occupied by the nest. The nest is arranged near the end wall. It is made in the form of a box. Recommended socket sizes:
- width - 250 mm;
- depth - 300-350 mm;
- height - 300-350 mm.
Instead of a drawer, you can use a suitable basket.
House top covers are usually made of clapboard or waterproof plywood. But in principle, you can use any suitable material, as long as it does not emit harmful fumes and does not get too hot in the sun. One of the covers should be removable for easy cleaning of the chicken coop.
Outside processing
At the final stage, it is recommended to cover the wooden elements of the chicken coop with any composition that protects the tree from the effects of the atmosphere and moisture. It can be water-based paint, varnish, etc. As you can see, in certain cases, a mobile chicken coop is a very good option for a private courtyard.
Its design can be of varying degrees of complexity, there are also options that can be made even by a person who is not very experienced in carpentry. In addition, the cost of such a structure is low.
Read also: Viburnum jelly for the winter without cooking: recipes
How to make a portable PVC pipe poultry house
For the construction of a box and a canopy 2 * 2 sq.m. 80 cm high you will need:
- 9 pcs of PVC pipes with a diameter of 32 mm and a length of 2 meters;
- 4 pcs of PVC pipes 80 cm long d 20mm;
- 4 pcs of PVC pipes 80 cm long d 32 mm;
- 8 pcs 90 degree elbow with 32mm diameter;
- 10 pcs of tees d 32 mm;
- 2 couplings for connecting tees on the top of the cover;
- 8 pieces of reducing tees 32 * 20 * 20 mm;
- galvanized wicker mesh with cells with a diameter of 13 mm 0.9 * 8.1 meters;
- a sheet of dark polycarbonate or siding 1.1 * 2.1 meters (for shading a bird on a hot day).
For a lifting lid:
- 2 pipes d 32 mm 2 meters;
- 2 pipes 32 mm 1 meter;
- 4 knees with an angle of 90 degrees d 32 mm;
- galvanized wicker mesh with cells with a diameter of 13 mm, section 1.1 * 2.1 meters;
- 2 or 3 door hinges (depending on length and quality);
- self-tapping screws for attaching mesh and polycarbonate to PVC pipes;
- screwdriver.
- We carry out the assembly as in the photo - first we assemble the frame. Due to the absence of an elbow with a tee for PVC, the support corner pipes will be located behind the corner joints.
- We take the mesh and shading material with a small margin. We attach the wicker mesh to the self-tapping screws from the inside of the mobile chicken coop.
- The hinged house cover is hinged to the upper transverse tube.
You can make shading not only from the roof of the walk-in, but for half of the structure, reducing the area with a grid.
This mobile house is easy to move to the desired location.
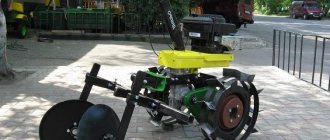
For greater mobility, wheels are made: holes are made in the lower rear pipe for the rail to which the wheels for the trolley are screwed.
We make a wooden mobile chicken coop with our own hands
In shading, it is necessary to supply water and food so that the bird feels comfortable.
Mobile chicken coop design
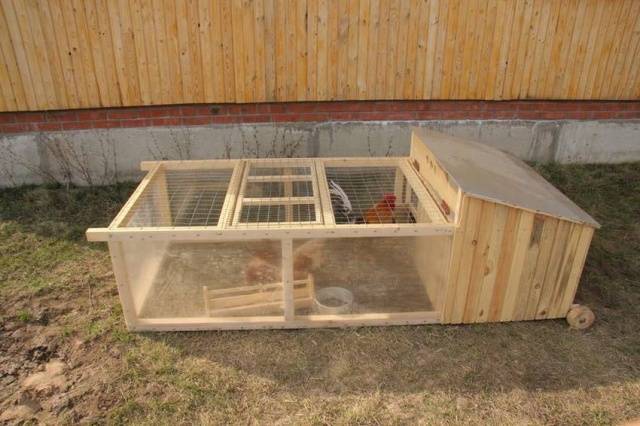
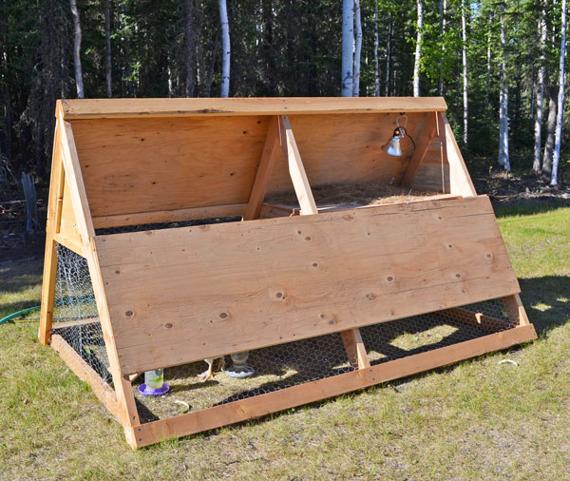
Simple portable poultry houses are arranged quite simply, as you can see in the photo. Similar designs have several tiers:
- the top is made of wood;
- the lower tiers are upholstered with a net.
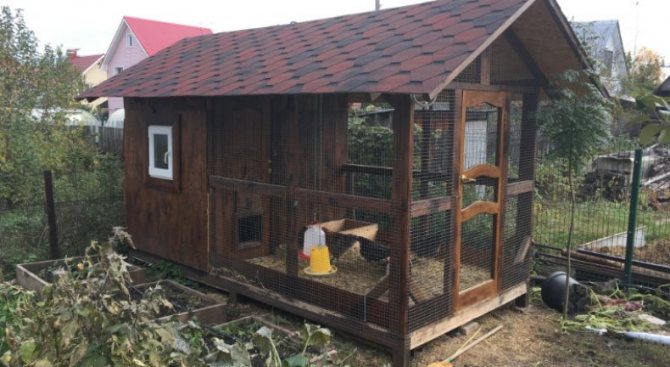
The poultry houses are also divided into two zones. In one of them, the hens incubate their eggs, and in the other, the birds rest. Roofed houses are often created that can be installed on the lawn. Thanks to this, the bird gets the opportunity to be in natural conditions.
Types of poultry houses
Portable structures can be divided into several categories according to the following criteria:
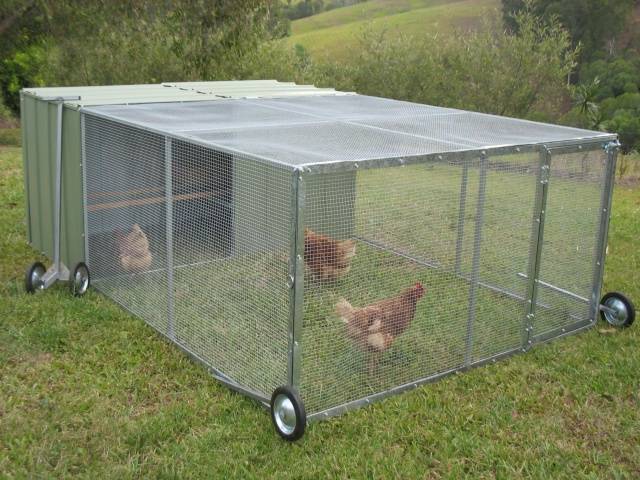
According to the transfer method, they are divided into structures on wheels and poultry houses that can be carried by hand. In the presented photos you can see such products.
The fence allows you not to watch the birds while walking. Thanks to this, it is not necessary to additionally equip the area in which the chicken coop is located.
By size, the designs described can be divided into houses that are used for several birds and into products designed for more than 20 individuals. The first option is more convenient, but not suitable for everyone.
Advantages and disadvantages of portable chicken coops
Before purchasing or creating a portable chicken coop made of wood with your own hands, you need to consider all the pros and cons of such designs. It is also important to consider photographs of structures in order to understand which one can be installed on your site. Such products have the following advantages:
- The mobile chicken coop can be moved to another location at any time. If the birds are walking on fresh grass, they will be healthier. Moving should be done about once a week. This is enough to eliminate bacteria that begin to accumulate in the house. Also, in a new place, birds can find additional food in the form of beetles and other insects.
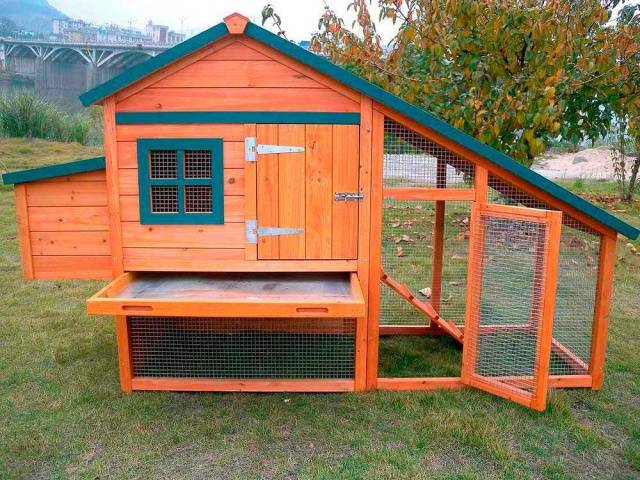
- When creating an original design house, you can decorate the site by making it part of the landscape.
- Portable products are much easier to clean than stationary structures. If there is a water source on the site, you can move the chicken coop closer to it.
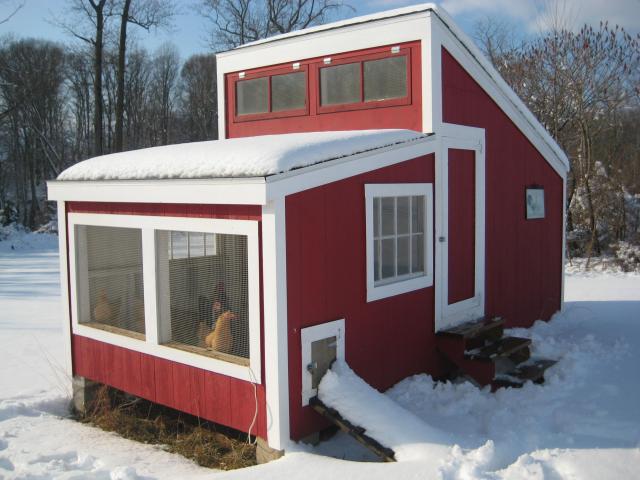
- Mobile chicken coops can be designed for both summer and winter use.
- Portable chicken coops can be easily made by hand. And if you decide to purchase such a design, you do not have to spend a lot of money.
But the described products also have disadvantages. The main disadvantage is that they cannot accommodate as many chickens as is necessary for a large farm.
pros
Each chicken coop, made with your own hands or bought in stores, has a number of pros and cons. Main advantages:
- The design of the mobile chicken coop can be quickly rearranged to any place in the personal plot. From this it follows that chickens will always be able to feed on animal feed and green grasses - this is an important moment in their development.
- The ability to change the design of the building. It will be not only functional, but also decorative, it will decorate the site.
- The structure is easy to clean, you can place it in a convenient place where you will carry out all the hygiene procedures.
- The portable chicken coop can be both summer and winter. In the cold season, the building can be placed close to the house to simplify its maintenance.
- The structure is notable for its low cost, it is easy to build it with your own hands, having minimal skills in construction.
Chicken coop technology
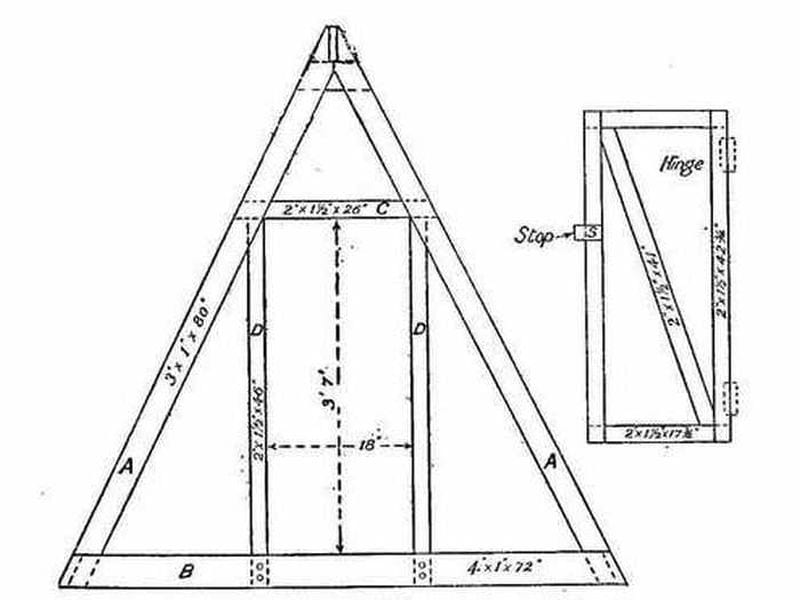
Before you create a mobile chicken coop with your own hands, you need to draw up a drawing in which the dimensions of each structural element will be displayed. The construction of a small poultry house is carried out as follows:
- First, the frame is formed. For this, two triangular frames are created from a bar with a section of 2x4 cm. They are connected by hewn boards that have handles for moving the structure.
- After that, the side walls are created. They need to be made from slats with a cross section of 1.3x3 cm. A mesh with small cells is stretched between the walls. Plywood can serve as an overlap between the tiers. It is necessary to make a hole in it for chickens, to which a staircase will lead. One of the side walls must be removable. The entrance to the poultry house will be located in it. The second wall should be created from the lining.
- The next step is to divide the second tier into parts.About a third of the entire space needs to be separated. This is where the perches should be placed. The rest of the territory is intended for resting birds.
- Then the roof is made. It can be made from plywood sheets. The roof can be raised at high temperatures. It is worth remembering that one of the parts of the roof of the portable chicken coop must be removable. This is necessary so that, if necessary, you can clean the structure.
- At the last stage, the outside of the house is treated with varnish. Such compositions are able to protect the tree from moisture and insects.
The procedure for creating a house can then be completed. At this stage, you need to think about ventilation.
Wall and roof fabrication
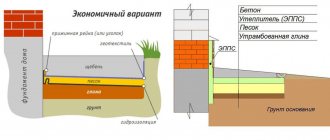
The material for the walls is used differently, based on the characteristics of the climate and financial capabilities. For a small house for 5 chickens, it is irrational to use stone or brick, therefore the walls are usually made of boards, making them wood-chopped or frame-sheathed. The timber and boards are pretreated with a composition that protects against decay. The junction of the foundation and wooden walls is covered with roofing material. When choosing frame construction, the work is performed in a specific sequence.
- A rectangular frame is twisted from a beam with sides of 10 cm, which will serve as the basis of the structure.
- Corner vertical posts are attached to the frame with the help of corners. At the top, they are connected with another frame made of timber.
- The interior of the structure is sheathed with plywood, chipboard or other material
- From the outside, foam or mineral wool is attached to insulate the poultry house, waterproofing is performed
- The outer part is sheathed with wooden planks.
- Doors for chickens and the owner must be equipped. Windows are cut for natural light and ventilation. The dimensions of the windows are calculated so that their area is at least 1/10 of the floor area.
After arranging the walls, the ceiling beams are strengthened, plywood is sewn from the inside. Insulation is placed between the beams. After that, a gable or pitched roof is set up so that water does not stagnate on its surface. For construction, rafters are laid at an angle of 35-50%, on top of them any roofing material.
Lighting and ventilation in the chicken coop
The portable chicken coop is equipped with ventilation so that the birds are not hot or cold. If a ventilation system is not created, chickens can get sick. It is also necessary to get rid of the unpleasant odor in the chicken coop. It is important to remember that chickens need sunlight. Its absence can negatively affect the health of the bird.
When creating a structure, you should take into account the characteristics of the climate in a particular region. Rain and strong winds can damage the structure. For example, if parts of a chicken coop are not properly secured, in strong winds they can come off, leading to destruction.
If you live in such an area, there are several things to consider:
- To prevent drafts, it is necessary to make a structure in which there will be no cracks. At the same time, do not forget about the need to open the house for ventilation.
- When installed on a hill, moisture will not accumulate in the chicken coop. When installed in a low-lying area, chickens may end up in the water even after a little rain.
- To protect the bird, it is worth putting a mosquito net on the windows.
A standard portable poultry house can house about 10 chickens. When they grow, half must be removed from the chicken coop. In winter, chickens can be kept on the second tier. To protect it from the cold, the mesh is covered with heat-insulating materials. At the same time, in winter, you can move the chicken coop to a shed or garage.

Features of a winter home: how to make it and how to insulate it
To maintain an optimal and stable temperature during the cold periods of the year, a winter chicken coop is built. It will ensure the survival of the livestock of chickens at this time, which summer options for buildings are not capable of. The presence of windows on the south side of the chicken coop will allow its room to be heated, but additional elements or devices are needed to maintain heat. An important point will be the constant observance of the temperature inside the chicken coop, not lower than 12 degrees Celsius. The peculiarity of this chicken coop is that chickens need less space in winter. They nestle against each other and because of this, you can calculate 1 m² for 4 chickens. For meat breeds you need 1 m² for 3 birds. For 10 layers in winter, 2.5 m² is enough in the hen house. Its height will be about 180 cm.
Keeping the room dry is a prerequisite for keeping chickens healthy. For this, ventilation openings must be equipped.
Many people use concrete or bricks to build a winter chicken coop, but such walls do not retain heat well. Therefore, the best option for erecting a chicken coop structure, for keeping birds in it in the winter, will be a building made of wood.
Chickens will be safe and comfortable in it.
To make a house for chickens for the winter, you need to design a structure and prepare the following materials and tools:
- Bricks or concrete blocks.
- Metal fittings.
- Cement mortar.
- Sand and gravel.
- Wood (boards).
- Hammer and nails.
- Sawdust and mineral wool.
- Insulation (linen-jute linen).
- Metal grid.
- Roofing material.
- Glass.
- Roofing material;
- Plastic pipe.
- Jigsaw or hacksaw.
- Tanks and shovel for cement.
- Building level and tape measure.
- Sander or sandpaper.
- Cord.
- Pencil.
After carrying out all the necessary calculations and preparing materials and tools, you can go directly to the construction site:
- Before proceeding, you need to prepare a site for the foundation. To do this, you need, using a cord and tape measure, to make a markup for the foundation. In our case, it will be columnar.
- Remove the topsoil to a depth of 20 cm. This soil is fertile, so it can be applied in the garden.
- Along the perimeter of the future building, at a distance of 100 cm from each other, forge holes 50x50 cm wide and 70 cm deep.In the northern regions of our country, the freezing point is greater, in this case, the holes should be made deeper, up to 100 cm.
- At the bottom of each hole, pour wet sand 10 cm thick, which must be tamped.
- Pour a 10 cm thick layer of gravel on top, which is also compacted. The result is a sand and gravel pad, which is the basis for the brick pillars.
- In each hole, make a masonry of four bricks, fastening it with a cement-sand mortar. The pillars should protrude 30–40 cm above the ground and have a flat surface relative to the ground and each other. Put a double layer of roofing material on each pillar
- Install the lower crown of the structure on top of the pillars. To do this, using anchors and bolts, fix the beams with a section of 100x150 mm on them. Their ends should be connected in a “thorn-groove” manner. This will create additional structural rigidity.
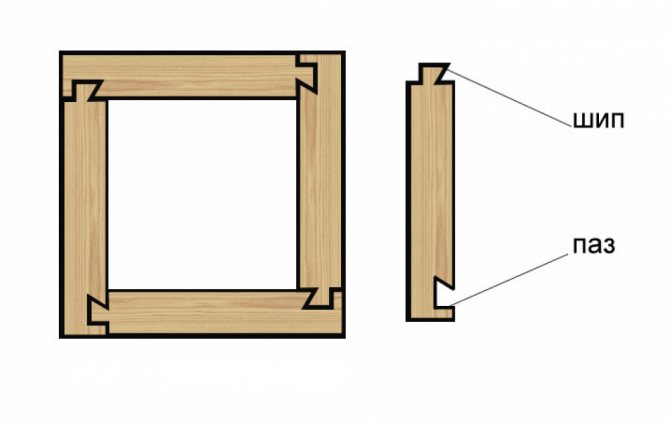
"Thorn-groove" will add reliability to the structure at the joints of wooden parts
- Pour expanded clay into the space between the logs. Its layer should not rise above the edge of the timber frame.
- Lay floor logs from beams with a section of 100x150 mm. Grooved boards are fixed on them from below. The logs are installed in 50-60 cm increments, then covered with tongue-and-groove boards or OSB boards.
- In the same way as laying the first crown, lay out all the walls 180 cm high. Between the crowns, lay a linen-jute canvas, which will serve as a heater.
- Attach vertical wooden logs with a pitch of 50 cm to the walls inside. Place mineral wool slabs between them. It is necessary that it be covered with a vapor barrier on both sides. Cover the top with OSB boards.
- Go to the construction of a gable roof. To do this, you need to prepare wooden rafters from beams with a section of 100x25 mm. The optimum angle of inclination of the roof is 20 to 45 °.When the rafter system is assembled, a wooden crate is installed on top, on which the roofing material is mounted.
- Cover the floors of the winter chicken coop with a 15 cm layer of sawdust. This will additionally insulate the room from below.
- Doors are insulated in a similar way.
It happens that it is not enough to maintain the optimal temperature in the chicken coop with only insulated walls. For this, heating devices should be used. If you equip a winter chicken coop with electricity, then it can be heated with fan heaters and infrared lamps. It is most profitable to purchase a programmable fan heater that works in automatic mode, responding to time or temperature.
Infrared heating lamps are widely used. Their peculiarity is that they heat objects close to them and do not consume a lot of electricity. For the purpose of fire safety, wire mesh is made for them. If the lamp falls out of the base, it will not break and ignite the sawdust on the floor.
An inefficient way is to heat the chicken coop with oil radiators, since there is a lot of energy consumption, and little heat is supplied.
Heating the premises of the chicken coop with a potbelly stove is popular and quite effective. The only disadvantage is that it requires a lot of firewood. It will be more productive to use this method if you attach a pipe to the potbelly stove, which is laid along the entire perimeter of the chicken coop. In this case, the heat remains for up to two days.
The method of heating with a wood-burning stove has proven itself very well. Heat is retained for a long time in the brickwork, heating the air and surrounding objects.
Video: Building a winter chicken coop
With a little effort, you can build a comfortable place for chickens to move in. By connecting creativity and imaginative thinking, from a simple chicken coop, you can build a building that fits into the surrounding environment. It can be designed in the form of a fairy-tale house on chicken legs or a hobbit's dwelling, flower beds can be placed on the roof, and the walls can be painted in beautiful shades. In such a dwelling, the chickens will feel comfortable, and you will always be able to enjoy a fresh omelet or scrambled eggs.
Rate the article:
- 5
- 4
- 3
- 2
- 1
(0 votes, average: 0 out of 5)
Share with your friends!
Chicken coops on wheels
Building a chicken coop on wheels is easy enough. All work takes place in almost the same way as when creating a small triangular structure:
- First, a schema is created. It should contain information about the dimensions of all elements. Without a drawing, it will not be possible to correctly create a solid structure, since it is impossible to keep in mind the location of all the parts and their dimensions. It should be noted that some experienced builders can carry out work without a drawing if the structure is small.
- At the second stage, a frame of a mobile chicken coop is created from wood with your own hands. It has a rectangular shape and can reach a height of 2 meters. It is necessary to determine in advance where the closed part of the chicken coop will be located. It is on this side that the wheels will be fixed. This is due to the fact that when the structure is moved, one of its sides has to be lifted. If the wheels are installed under the netted part of the coop, it will be difficult to move it due to the greater weight of the closed part. The frame of the chicken coop on wheels should be made of 7x5 cm bars.
- Then it is necessary to fix additional structural elements that are necessary to create walls and partitions. According to the drawing, it is necessary to arrange them in such a way that the chicken coop is divided into two main parts - an open space enclosed by a net and a closed structure with a window.
- Regardless of the size, it is necessary to create several compartments in the closed part of the chicken coop. The smaller section will house the roosts, while the larger section will allow the birds to rest.Also at this stage, the walls of the structure are created and they are insulated, if it is planned to use the chicken coop in winter. In the wall that will separate the open section of the chicken coop from the closed one, you need to create a small entrance. A ladder for birds needs to be brought up to it.
- The next step is to make the roof of the chicken coop. It must open so that you can clean the inside of the structure if necessary. It is best to place the parts of the roof on hinges. During such work, do not forget that the structure must be reliable and not have weak points.
- After that, the open part of the hen house is sheathed with a lattice. It is important to choose a grid with small meshes. Products with a mesh width and height of 2 cm are often used.
- When creating such a chicken coop, the nets are fixed on top and on the sides. Thanks to this, the birds are able to walk on the grass.
- After that, it is worth taking care of creating handles for transporting the chicken coop. They must be securely attached to the sides of the structure. Also at this stage, the wheels are attached. They should not have a small diameter, as they can simply sink into the ground under the weight of the chicken coop. But you should not install too large wheels, as this will lead to the fact that the transportation of the structure will take place with great effort.
Read also: Red currant sauce for the winter: recipes with photos and videos
Layout
When choosing a place for the construction of a mini chicken coop, pay attention to the fact that the site you have chosen does not end up in the lowland. During heavy rains and melting snow, water can collect in the house. And this will negatively affect the health of poultry. Experienced breeders recommend choosing a location with a subtle bias. This will allow precipitation to flow downward without accumulating around the house and flooding it.
You should not build a house near large trees and massive buildings. Chickens need to get sunlight to synthesize vitamin D, which improves egg production. Birds need normal daylight hours, and should not be limited to this.
The ideal option would be to locate the house near a small bush. The shade from it will protect the birds from the excessively bright sun.
After the place for the construction of the poultry house has been selected, a construction plan has been drawn, it is necessary to decide on the materials from which the structure will be made and purchase them.
Perches
Roosts are an indispensable element of the chicken coop equipment. It is better to use well-planed wooden blocks for manufacturing. They are placed in a warm part of the room, on the opposite side from the windows. It is better not to place them on top of each other, since the chickens located higher will stain those sitting on the lower plank with droppings. It is better to make perches collapsible. It is convenient for cleaning and disinfection. You can put a litter shield under them, from which it is easier to remove droppings later. If the chicken coops are light in the form of summer houses, then roosts can be arranged around the entire perimeter of the room. Sanitary and hygienic requirements for the norms of placing chickens on perches:
- The length of the perch per head is from 25 to 50 centimeters. For chickens of egg breeds from 25 cm, and for meat breeds up to 0.4 meters;
- The cross-section of the perch bar is from 5 to 7 cm;
- The recommended distance between the bars is 25–35 cm;
- The height from the bedding for meat chickens is 60 cm, and for egg breeds - 90 cm.
Nests
Nests are needed for the poultry farmer to conveniently collect eggs. Therefore, the bird must be tamed to fly in a specially equipped place for this. The basic rule of placement is a little shaded, available for laying hens. It must be remembered that a laying hen can be in the nest for up to an hour, so there must be the right amount of them in the chicken coop. Optimum placement rates and nest sizes:
- Number of heads per nest - 3;
- The parameters of the nest are 0.3 x 0.4 x 0.4 m;
- The laying place is set at a height of 0, 4 - 0, 8 meters from the floor.
For egg breeds, you can mount two or three tier nests, and for meat breeds, single tier nests. The area under them can be equipped with ash baths. At the bottom of the nest, straw is laid or shavings are poured. And as it gets dirty, the litter must be changed. To arrange a place for egg-laying, you can use ordinary wicker baskets, plastic boxes. And also independently knock down in size from planed boards. Read about the broiler chicken coop here.
Chicken coop decoration
So that the chicken coop can become part of the landscape and not spoil the impression, you can paint it. It is important to take care of the protection of wooden structural elements with special compounds that protect against moisture and pests.
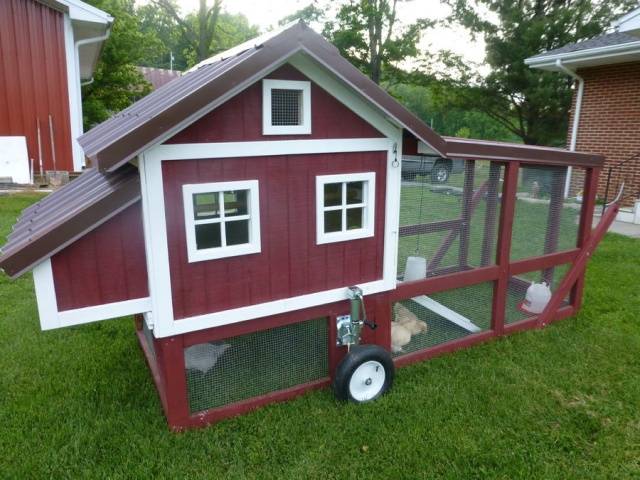
Some site owners decorate the chicken coops with plants that are located in niches created near the roof of the structure (as in the photo). You can also stylize the design for a fairy-tale hut. But in most cases, only paint is used to decorate the chicken coop.
How to assemble a portable chicken coop
A portable poultry house is convenient for summer residents who do not want or do not have the opportunity to build a full-fledged poultry house. In this case, a mobile room for chickens is an excellent choice, as it has many advantages over a stationary one.
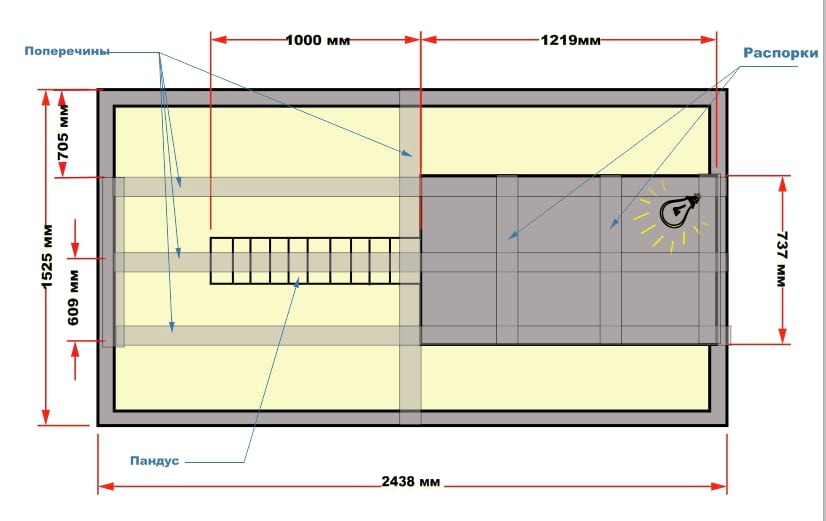
Project for the construction of a triangular portable chicken coop
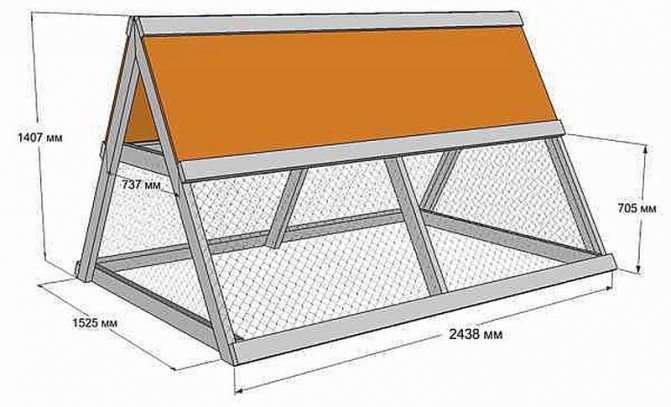
A mini chicken coop for 5-10 chickens with your own hands can be built within one day. Optimal dimensions (LxWxH) 120x120x180 cm.
For construction, the following materials will be required:
- Bars with a section of 20x40 mm;
- Slats with a section of 30x20 mm;
- Galvanized metal mesh with a mesh of 20x20 mm;
- Two planed boards;
- Side wall handles;
- Self-tapping screws for wood;
- Door hinges;
- Metal corners;
- Sheets of moisture resistant plywood;
- Antiseptic for wood processing;
- Round bar for roosting.
You will need tools:
- Drill screwdriver;
- Hacksaw for wood;
- Paint brush;
- Roulette;
- Building bubble level at least 60 cm long.
Materials and tools
If chickens are kept only in the summer, then sheds or summer houses can be used. When the bird is planned to be bred all year round, a capital structure will be needed. Therefore, you need to decide on the right material and tools:
- Concrete mortar. It will be needed to fill the foundation;
- Wall material. Brick, foam blocks, adobe are used for capital structures. A lighter version is a frame chicken coop. For this you need bars;
- Boards. Used for wall cladding;
- Plywood sheets. Needed for internal insulation of the poultry house;
- Roofing material, slate, tile... These materials will be needed for the roof;
- Metal grid. If poultry walking is supposed.
For the construction of a frame chicken coop, the following tools will be needed: a tape measure, a trowel, a container for concrete, a plane, an ax, a mallet, nails, and so on.
Stages of installation of a portable chicken coop
The house is assembled in several step-by-step stages.
Wood processing
All wooden elements of the chicken coop must be treated with a protective agent: an antiseptic that prevents wood from rotting. This is done with a paint brush.
Frame construction
Sequence:
- For the construction of a frame made of wooden bars with a section of 20x40 mm, two triangular frames are constructed;
- Install them opposite each other at a distance equal to the selected length of the room for keeping chickens;
- Then they (frames) are connected together with two longitudinally laid boards. Fixation is performed using metal corners. These boards will not only strengthen the frame, but also serve as handles for moving the mobile chicken coop.

Wall arrangement
Sequence:
- One side of the house is sewn up with plywood.This will eliminate the appearance of a draft and reduce the risk of morbidity in chickens;
- The second wall consists of two parts: the upper one, which is a removable or folding frame on the door hinges, and the lower mesh one;
- If the length of the chicken coop exceeds 120 cm, then both parts of the wall are reinforced with vertically installed crossbars, the fixation of which is carried out using self-tapping screws and metal corners;
- A metal mesh is pulled between the sections of the lower frame and reinforced with wooden slats. The optimum height of the mesh wall is ½ the length of the slope.

Installation of the perch
The height of the perch depends on the breed of chickens. For small birds, 70-80 cm is enough, for medium ones, 80-90 cm are required, for large ones - 100-110 cm.
- The roost can be single-row or multi-row, single-tiered or two-tiered. For a portable chicken coop, one bar must be reinforced at the required height. This is quite enough for the number of chickens for which this small room is designed.
- To make it easier for the bird to climb to the perch, you can make a ladder from large branches. The optimal position of the pole from the wall of the hen house is 25-30 cm. This is enough so that the chickens do not touch them (the walls) with their tails.
Installation of a perch consists of several stages:
- At the required height, horizontally laid bars are attached to two opposite walls;
- A rod with a rounded cross-section is laid on these bars and fixed with nails or self-tapping screws.
Floor device
The floor in the hen house can be plank or mesh.
- If the first manufacturing option is chosen, then make sure that there are no gaps between the "floorboards", the lower part of the floor is chipped or pasted over with roofing material.
- If the floor is mesh, then the structure is installed on legs, between which a tray is placed for collecting droppings.
Read also: Soaked pears for the winter in jars, recipe - Popular about health
A triangular chicken coop can be made two-story. In the upper part of which there is a room for keeping poultry, and in the lower part there is a walking area closed on all sides with a net.
A portable bird house is equipped with not only one, but also two aviaries located on both sides of the laying room. In this case, a collapsible design of areas for walking poultry is required, otherwise the chicken coop will be difficult to move even with wheels.
Climatic conditions
Home chicken coop
When building your house, consider the climatic conditions in your area. Rain, snow, strong wind and other atmospheric phenomena can not only damage the structure for chickens, but also destroy it in case of poor-quality performance.
Consider what to do if such weather conditions do occur.
- You can build a structure without any cracks at all, in order to exclude the possibility of a draft. This will not prevent you from periodically checking the birds - you just need to open the structure.
- Build a house at the highest point of your site. This will ensure good drainage and, as a result, moderate moisture levels.
- Install a mosquito net on windows and doors (you can also use metal wire).
Coop on wheels
This is a very convenient design that can be easily moved to any convenient place.
- A mobile poultry house can be made on 1-4 wheels, located on one or two axles.
- Wheels need pneumatic or molded rubber. The best choices are those used for garden wheelbarrows. Pneumatic in many respects are better than cast ones and are often equipped with metal brackets necessary for fixing to the platform. Fastening is carried out with bolts.
- A chicken coop on wheels is installed permanently or made removable. The second option is more profitable, as it allows the use of a platform with wheels not only for moving the house, but also for other purposes.For a stationary installation of the structure, the aviary must also be equipped with one or two wheels.
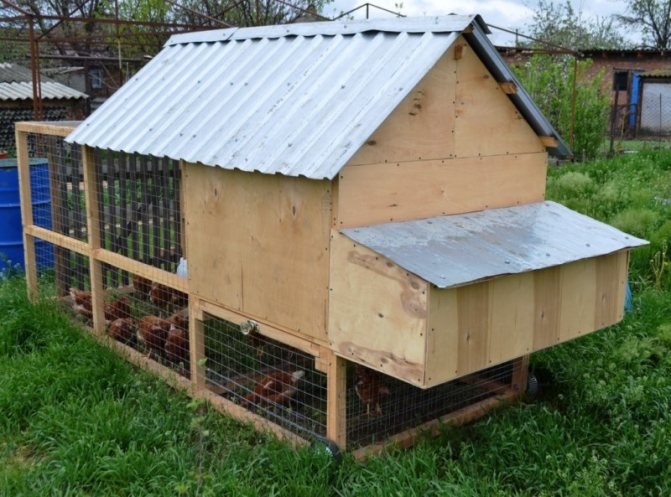
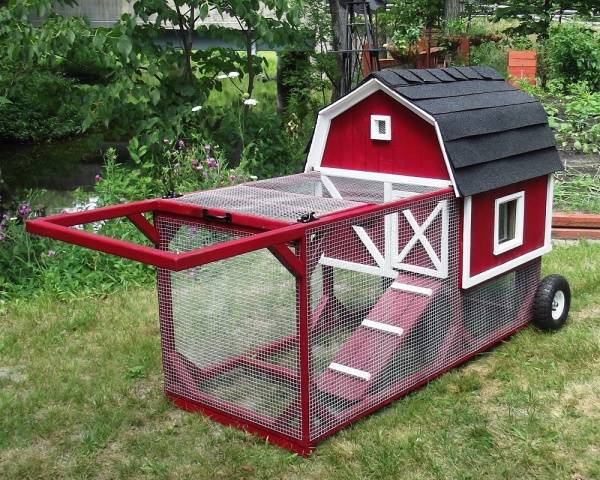
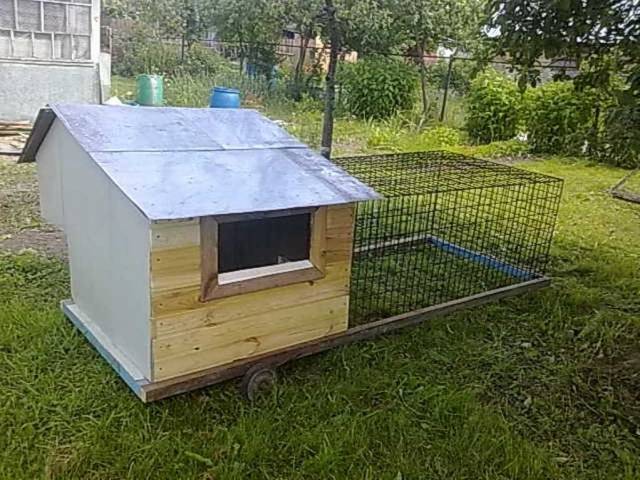
- A portable platform house for poultry is built in the form of a house with a pitched or gable roof. Triangular designs are less suitable for this type of house.
- In the bird house, zones for laying hens and feeding are allocated, and a roost is arranged.
- The floor can be sloped slightly to allow the eggs to roll against the front wall of the house and make them easier to assemble.
- A feeder and an auto-drinker are installed in the feeding area.
- The roof of the mobile poultry house is made removable. This will make it easier to clean and collect the eggs.
- The portable structure accommodates from 3 to 10 birds. It is important to avoid crowding them and take into account the space recommended by zootechnicians: at least 0.6 m2 per head.
Drafting and calculation of dimensions
Before proceeding with the construction of a structure, you need to draw up a project in which drawings are drawn and the dimensions of all sides are determined. For the free existence of 5 chickens, it is enough to have a poultry house with an area of about two squares in the country. The base can be made in the form of a square with an aspect ratio of 1.5 x 1.5 m or make it rectangular 1 x 2 m. The height is calculated taking into account its own height and 15-20 cm is added to simplify the process of cleaning and disinfecting the room.
The perches are placed at a height of up to 1.2 m and equipped with a ladder. A tray for collecting excrement is built under the base of the structure. Bird nests should be between 40 x 40 cm.
Zoning and arrangement
In a portable chicken coop, it is necessary to create the same comfortable conditions for birds as in stationary buildings.
Ventilation, which will not only provide an influx of fresh air, but also eliminate dampness and odor. In small structures, there is no need to install hoods and fans. It is enough to make two holes with a cross section of 50-70 mm in the lower and upper parts of the walls. The first (bottom) is in one wall, the second (top) is in the opposite one.
Place for laying hens... The simplest ones can be built from wooden boxes with low sides and filled with hay and straw. The layer compartment can be moved outside the house and made into a balcony with a waterproof roof and walls protected from the wind.
Floor... For more convenience in servicing the mobile poultry house, a mesh floor is made in the poultry house, and under it is a pull-out tray for collecting manure.
What to take care of in winter
One light bulb will be enough in the house
The temperature in the house in winter should not drop below + 14 ° C. There are panels with high thermal conductivity on the building materials market. Birds in a small space produce enough heat so that additional heating is not required.
As for lighting, then according to sanitary standards for 1 sq. m of area should have 3-4 watts of lighting. Therefore, in a poultry house for 5 layers, it is enough to install 1 light bulb. In winter, artificial lighting will help preserve the egg production of chickens. When installing lighting, you can provide 1 outlet and a place for installing a heater in case the air temperature outside is kept below –20 ° С.
To organize the access of fresh air to the room, a small door is quite enough through which the chickens enter the aviary. If you need to quickly ventilate the chicken coop, you can open the large door and the air will be refreshed in a matter of minutes.
Building a house for 5 chickens will take no more than 1–3 days and will provide the birds with a comfortable environment that is optimal for small populations. Modern building materials will maintain an optimal microclimate inside and will help preserve the health of birds.
Design options
There are two options:
- Triangular, with a similarly shaped aviary;
- Traditional rectangular or square.
Both options are convenient in every way.But the first will require fewer materials, therefore it is more profitable in order to save money.
To reduce the area occupied by the structure, you can raise the room for chickens above ground level, and under it by arranging an aviary. This will also provide a shaded area in which birds can stay during the heat.
The chicken room can be one- or two-story.
Two-storied
It will be more cumbersome, making it much more difficult to move. Therefore, it can be equipped with pneumatic wheels of small diameter.
On the second tier of the poultry house, boxes with soil are often placed for growing fresh greenery.
Triangular
It can be made sectional, which will allow increasing the area of living and walking areas by attaching new, similar section, sections.
There are two roof options: single-slope or dual-slope. A bird house is made with an open exit or closed with a door or crossbar.
Advantages and disadvantages
The mobile chicken coop differs from the usual one primarily in that it can be made the most comfortable for the hens. Not every owner equips an aviary for poultry, but in a mobile poultry house it is an integral part of it.
The presence of a walking area will allow chickens to look for insects and not be left without fresh greenery. This will have a positive effect on the well-being of the birds and we can confidently expect high egg production from them.
The benefits of a mobile bird house include:
- Ease of cleaning the room and caring for the bird;
- The ability to install the poultry house in the most convenient place at the moment;
- They choose such a chicken coop design so that the design harmoniously fits into the surrounding landscape;
- Possibility of equipping with wheels for easier movement.
There is only one drawback: it is optimal to keep only 3-7 chickens in mobile structures. That is a small livestock, but sufficient to provide one family with fresh eggs.