Potatoes are the second most popular crops. If you are growing potatoes, then you will need a walk-behind tractor with the appropriate attachments on your farm, below we will describe why you need to sprinkle potatoes and how to make a disc hiller for a walk-behind tractor with your own hands, in order to save you time and money.
Potato is a rather tenacious plant and has a fairly high germination rate. It is from the cultivation and hilling of potato beds that a high yield depends. Hilling is one of the most effective and beneficial agronomic technologies used when growing potatoes.
During hilling, oxygen saturation of the soil occurs, i.e. there is a process of aeration, which leads to an increase in the growth and number of bush tubers. Thanks to this, a high yield of potatoes is achieved.
Since in modern conditions potatoes are grown on large agricultural areas, this cultivation method is simply impossible without the use of mechanisms. In our time, one cannot do without a hiller even in the beds of summer residents.
On large cooperative or farms, tractors carry out the work of hilling potatoes. Summer residents just work with a shovel. It becomes physically unbearable if the potato plantation exceeds one hectare. In this case, resort to the help of small-scale mechanization.
About the device of the hiller
The design features of the hiller directly depend on the type of device, of which there are several.
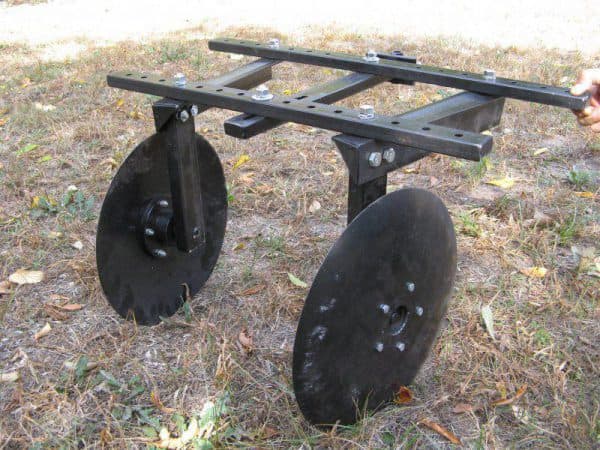
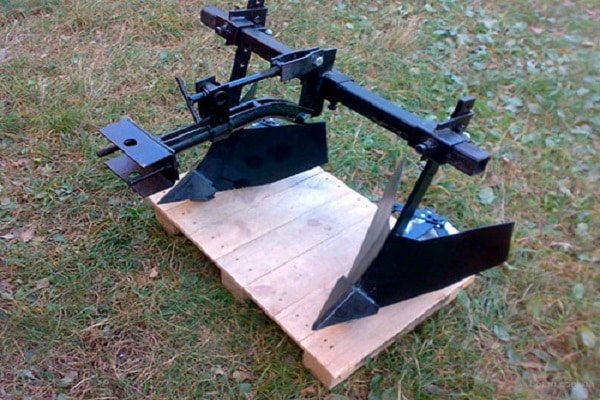
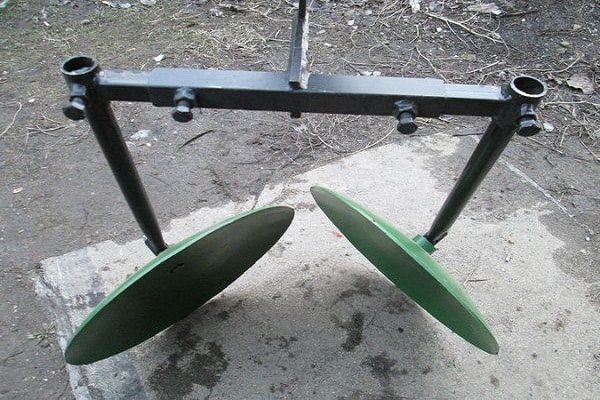
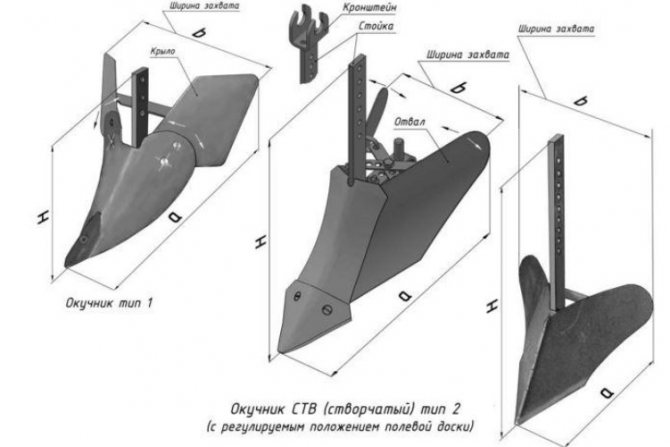
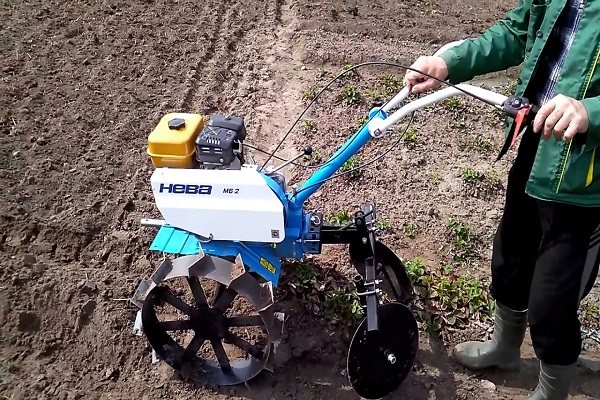
- Disc hiller. Already from the very name it is clear that in the construction of this hiller, discs are used, more precisely two discs located to each other at a certain angle. In addition, these discs are attached to a special frame, which is directly aggregated with the walk-behind tractor through a hitch.
For more information about the disk hiller, see the video:
- Active hiller... This type of hiller is also called propeller, because it uses translational and rotational motion. Such hillers are installed on walk-behind tractors, which have two forward gears.
- This is necessary so that in second gear it is possible not only to loosen the surface, but also to throw the earth from the inter-row spaces.
- Lister hiller. This is the simplest type of hiller, which is gradually losing its popularity due to its lower efficiency compared to the two previous types of devices. Structurally, they are two sheets connected to each other, in shape they are similar to something like wings.
Lister hiller
With the help of these tools, you can form furrows, and then plant the potatoes. In the future, when the bushes are formed to the optimal size, hilling can be done with the same tools.
Thus, the rows are very even and neat, which not only improves the visual perception, but also helps the potato tubers to form better and ripen faster in the bush.
Hiller for the walk-behind tractor Cayman, Patriot, Texas, Foreman, Crossser, Viking, Forza, Sadko with his own hands, drawings and videos of which can be found in the public domain, represents the best way out of the situationwhen there is no extra money for the purchase of attachments.
In addition, the independent manufacture of one or another technical tool will significantly save on the subsequent operation of the walk-behind tractor.
Do-it-yourself hiller
Variety of choices
A walk-behind tractor or cultivator will help facilitate planting and caring for potatoes. In work in the garden or garden, they are considered indispensable helpers. The plow is an integral part of the walk-behind tractor. It can be reversible and disk. An additional adaptation to the technique is a hiller, which can be of several types.
https://youtu.be/IwXYxv73vvc
It will not be possible to immediately determine which hiller is better. The choice of tillers is influenced by many factors, including the characteristics of the soil, the size of the land plot, the financial part of the issue plays an important role. Therefore, in order to make the right choice, you need to get acquainted with the description of the most common hillers for a walk-behind tractor:
- Hillers, which do not imply self-adjustment of the width between the metal wings. The furrow for all crops will be the same distance, which is not very convenient. It is convenient to use such types of structures for a motor cultivator weighing no more than 30 kg. In addition, the legs of the device are thin and are not suitable for cultivating hard soil.
- Equipment that involves changing the width between the wings, so the distance between the furrows can be made different. It is also possible to use two units at the same time on the same hitch. It is recommended to install it on a walk-behind tractor weighing more than 30 kg.
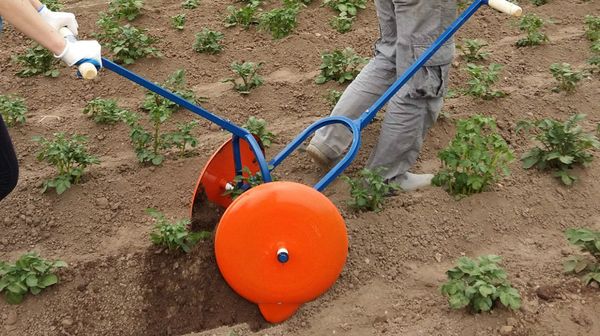
- The most popular type is the single-row hiller. The device is designed to work with light soil, pre-treated with a cultivator. If a single row plow is used, the lugs are installed close to each other. This is necessary because the hilling is carried out one row at a time. There is a more modern two-row hiller for a walk-behind tractor.
- Another device for hilling vegetable crops is the Dutch hiller. It allows you to adjust the wings not only horizontally but also vertically.
- The active hiller (rotary) of the propeller version is convenient to use. He has a completely different principle of work. The rotary hiller instead of wheels has rotors with parallel teeth. The device can be installed on a walk-behind tractor and a cultivator with two forward gears. The propellers mounted on the crossbar are convenient for chopping and loosening the soil, removing weeds from the roots and hilling plants.
- The best, judging by the reviews of the owners of walk-behind tractors with an additional device, is considered a disc hiller for a walk-behind tractor. It consists of a T-shaped leash, screw adjusters, two posts and two discs. Work items do not look like wings, but discs. You can change not only the width, but also the angle of inclination. The result is ridges in the work area of the desired height and width.
See also
Description of the potato variety Zhuravinka, cultivation and yieldRead
Before starting work on your land, you need to know about the settings of the selected attachment. Improper use or installation of equipment can lead to loss of crops and other adverse results.
The preparatory stage is the cultivation of the desired area, it is better to loosen the soil. At the same time, organic or mineral fertilizers can be applied. The looser the soil, the easier it will be to make furrows.
Before planting potatoes with a walk-behind tractor, you need to set marks at a distance of about 65 cm. Then, furrows are made with a walk-behind tractor with a hiller and the planting material is laid out.After that, the wheels are changed to rubberized ones, and the wings of the potato hiller to the walk-behind tractor are set to the maximum width. The tiller is installed in the row-spacing and the plow is driven along the furrow, filling up the planted potatoes.
Necessary materials
Before proceeding with the analysis of this or that method of self-production of a hiller, you need to list the minimum list of what we will certainly need in the course of work.
KamAZ 65115 belongs to one of the oldest series of this plant, the production of which began in 1998. Here are all its technical characteristics.
One of these oldest companies is Vogele, which manufactures a wide range of asphalt paver models. Vogele pavers are German quality and a commitment to progress.
The T 70 tractor on wheels is the brainchild of the Chisinau Tractor Plant. By clicking on the link, read all the information on this tractor.
Of course, no one forces us to retrain as a blacksmith in order to forge all the necessary parts using the ancient method that was used several decades ago. But we still need an elementary list of welded and locksmith equipment:
- Welding machine (it is preferable that this machine is designed for arc welding).
- Grinder with a set of different discs and attachments.
- Electric drill with a set of reliable drills.
- Electric emery.
- Gas burner, which is necessary for heating the metal during hardening.
- Vise or workbench.
- Various files and other consumables (bolts and other fasteners).
This list relates directly to the tools we need. In addition, the material itself will be needed, from which self-assembly will be made, but we will talk about this in more detail in the process of describing the methods of making hillers.
What is a hiller and why is it needed
Potatoes are the most common garden crop grown by garden owners in their summer cottages and suburban areas. Farmers who are faced with the processing of these root crops every year know how difficult it is.
Note!
The disc weeding machine is a special metal attachment for the walk-behind tractor, which is used for plowing and hilling beds with potatoes.
This tool is actively used in home farming and facilitates the hard work of gardeners. The device was widely used among farmers, and "folk craftsmen" learned how to independently make useful attachments for a walk-behind tractor with their own hands.
Additionally, you can create a second row for the device, which doubles the speed of the tool. In a two-row hiller, add traction devices to the finished structure, and make the mountings movable on hinges. The mobility of the bindings, in this case, performs the function of adjusting the rows. Unlike a single-row hiller, a double-row one allows processing the beds simultaneously from both sides.
Motoblock hillers are:
- listeric;
- disk type;
- propeller.
Instructions
I would like to start by considering the process of making a disc hiller, because this type of device is the most in demand today.
In addition, the use of this type of hiller allows you to synchronize it with the capabilities of your walk-behind tractor, i.e. adjust the power and speed of movement.
By setting disc sizes of different diameters, you can hilling potato bushes different lengths.
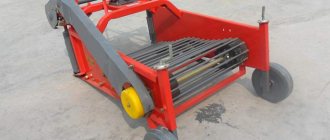
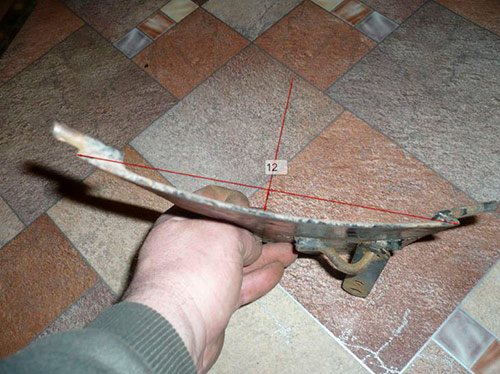
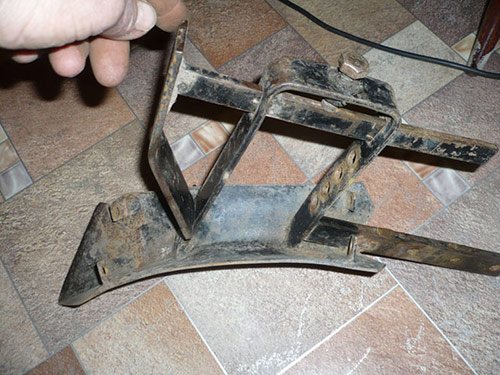
Disc hiller
Many people ask the question - how to make a hiller for a walk-behind tractor with their own hands? At home, this is quite possible if you follow certain recommendations.So, we will describe the manufacturing process in stages (for example, take a disc hiller for the Neva walk-behind tractor):
- For making us need cutters from an old seeder, or metal sheets 2 mm thick. They are attached using bearings with oil seals.
- You need to put them at an angle to each other. The distance between the lower parts of the discs must correspond to the track width of the walk-behind tractor. They are connected by welding, or using ordinary bolts.
- Here you need to follow a strict recommendation - the disks should be symmetrical to each other. Otherwise, the walk-behind tractor with a hiller will move to the side, which will significantly complicate the whole process of work.
- In addition to the discs themselves, the hiller design includes screw lanyards, T-type leash and stand. Lanyards, in this case, perform the adjusting function of turning the discs along the vertical axis.
- A do-it-yourself hiller for a walk-behind tractor, the drawings and photos of which you see below, must be made in strict accordance with the dimensions. There will certainly be improvisation, but with the first assembly experience, it is best to use other people's best practices.
- Depending on the possibilities, it is possible to make a fixed and adjustable working width. The second method is more convenient, because you can change the disc spacing by simply rearranging the racks.
- To aggregate a hiller with a walk-behind tractor, you need use the hitch bracket, on which there is no bead. The hiller leash is attached to the hitch with a stopper, connected with bolts and washers. The stopper itself is inserted into the square tube and then tightened.
The disc hiller for the Salute walk-behind tractor is made in the same way, because the design itself and the method of connection with the walk-behind tractor are completely identical with the Neva.
Active hiller
To make such a hiller, we need exactly the same list of materials and tools that we used in the manufacture of a disk hiller:
- welding machine;
- sheet metal;
- Bulgarian;
- fastening connections.
Using a similar toolkit, you can make an active hiller for the MTZ walk-behind tractor, Plowman, Champion, Carver, Husqvarna, Lifan. The manufacturing principle is in many ways similar to the disk version:
- The axles also need to be adjusted to the parameters of the walk-behind tractor, and the parts themselves are welded using a welding machine.
- As previously reported, this type of hiller makes certain requirements for the walk-behind tractor. It must have two forward gears, as well as a PTO - a power take-off shaft. Many sellers of walk-behind tractors, speaking of the fact that a walk-behind tractor has two gears, mean one rear and one front.
- So when buying, you need to clarify this point.
- It would be advisable production of several bushings with brackets, as well as additional blades made of metal.
Double row hiller
The double-row hiller is the same lister species of the hiller, but in double volume... Let's consider the whole process of work in stages:
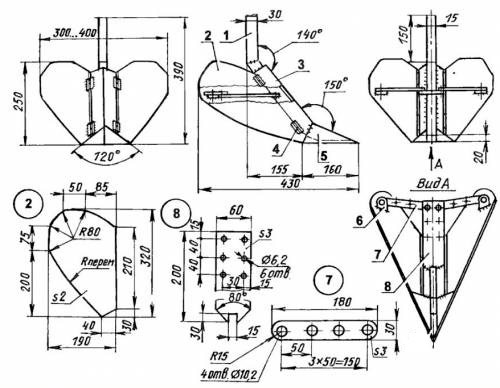
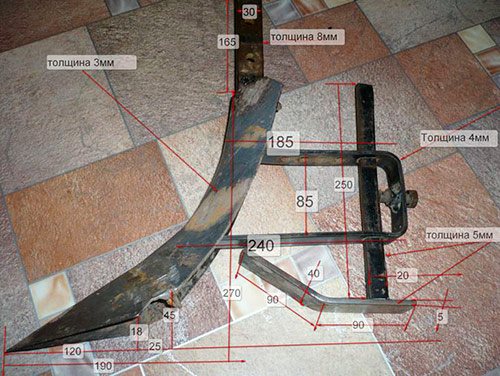
- For work, we need a sheet of metal about 3 mm thick. From this material, it is necessary to weld the base of the hiller.
- A 4 mm steel strip can be used as a bracket. The field board is made from a 5 mm thick sheet of steel.
- Rack hiller takes over the main burden at work. Therefore, you need to make sure that it is the most stable and reliable in comparison with the rest of the hiller.
- The hiller wings can be made from a sheet of steel with a thickness of 2 mm. They need to be bent slightly using a pipe of the desired diameter.
In principle, this is where the process of making a two-row hiller ends. Can I have some more make an adjustable hiller wing system, which are attached to the base using hinged technology. In the tail of the structure, there are rods that regulate the angle of inclination of the wings.
Otherwise, the manufacturing principle is completely identical to that of the fixed Lister version.
How to make a simple do-it-yourself hiller for a walk-behind tractor: drawings and videos
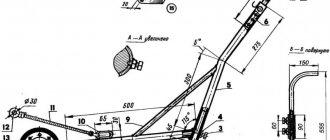
For work, you need to prepare welding equipment, a hammer, a vice, a grinder for metal, a pencil, fasteners for expanding the sidewalls, a drill with a drill for metal (drilling machine), a sheet of metal 2 or 3 mm, a hacksaw and other tools and materials. For the manufacture of parts, use the dimensions indicated in the drawings in the photo:
This figure shows the exact dimensions, shape and bending lines of parts of a simple hiller for a walk-behind tractor. The size was used as standard, which is suitable for any technique
I. Preparation of hiller parts
At this stage, you need to make a drawing of all the parts and transfer them to paper or fabric. If you have a piece of waterproofing material or dense agrospan left in your garage, then it can become an excellent basis for preparing parts, instead of paper. The outlined templates must be cut out, attached to the metal and outlined with a pencil. Lay out the workpieces on the sheet so that there are fewer clippings when cutting them - this will help save metal. Now you need to cut parts from the sheet using a grinder.
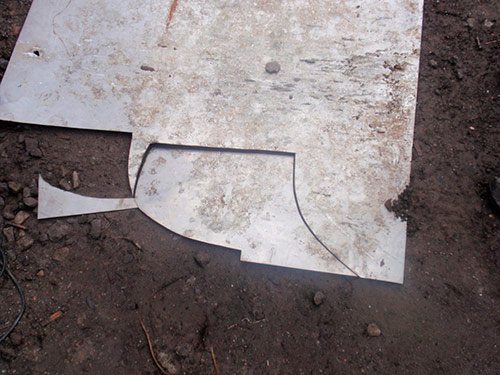
Details of the main part of the hiller are cut from sheet metal 2-3 mm. For this, it is convenient to use a blank made of paper or thick material. The drawing is laid out on a sheet, outlined with a pencil or chalk and cut out using a grinder with a disc for metal
In order to quickly and efficiently cut the necessary parts on a sheet of metal, you must use a disc for iron. The marked lines must first be cut from above by 1 mm so that the drawing does not get worn out and the accuracy of the parts does not change. Then we make full cuts in the metal and cut out every detail. We rub the edges of the parts.
II. Bending of parts and welding of the body
The two halves of the front part of the hiller are welded first. To do this, they need to be bent so that the radii of the workpieces coincide. Bending is performed with a hammer and anvil. The front parts are welded with a continuous seam on the front side and at several points for strength - on the inside of the corner. The seam is overwritten with a grinder or a file.
What is the best way to make the front part of the hiller?
The spout for the front part of the hiller can be made as a separate piece in the form of a metal triangle. The bending of a triangle can be performed by placing a metal plate under the bottom (with an edge to the bending point), or by holding the triangle in a vise up to the bending line. The part is bent with a hammer to the desired angle. The sock is then welded to the front.
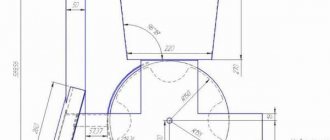
In the photo we see a detailed description of the size of a simple wedge-shaped hiller for a walk-behind tractor. If you have a grinder with a disc for metal and welding equipment, then you can easily translate this drawing into reality
The hiller's wings must be bent with an anvil and a hammer. The bend lines of the right and left parts must match each other. The detail should approximately correspond to the drawing that you see in the photo.
Both wings of the hiller bend in the same way as shown in the photo. The sides can be welded to the front thoroughly or fixed with hinges and bolts. The latter option allows you to adjust the width of the row to be hilled. To create a moveable version, you need to weld four lugs on each edge of the front from the inside. And, accordingly, there are two ears on the edges of the butt parts of each wing. Connect the parts together with bolts. The lugs or hinges can be replaced with bolted nuts. A corner 50, about 18 cm long, is welded to the top of the nuts. The corner is cut at an angle of 45 degrees. To fix the selected wingspan (row width), weld the loops to the inside of the blades. In the hinges, first insert the strips with holes for the bolt, which will fix the wings to the rack.
III. Final assembly
Next, we need to make a sole for the hiller, side strips with holes for adjusting the blades and a central stand, which will also connect the nozzle to the walk-behind tractor. The center post must be made of 10 mm metal. If you want to adjust not only the width, but also the hilling height, then you can weld a U-shaped strip with holes to the inner corner of the central part (see photo and video).
You can adjust the width and height of hilling with the help of a U-shaped strip with holes, which can be welded to the inner corner of the central part of the hiller. A bolt-adjustable rack will pass through the end plate
A "shoe" - a bolt-adjustable stand will pass through the end part of the strip. All parts are welded and cleaned with a file or grinder. Fastening to the walk-behind tractor is carried out based on ready-made locks on the equipment itself.
Additional tips and warnings
After completing the self-assembly of the hiller, the most important is trial work with it in the garden. Successful manufacturing does not yet guarantee quality work, because it depends on the combination of many factors - weather conditions, soil condition, correct sharpening of the hiller elements, etc.
Before starting hilling, you need to walk on an ordinary piece of land... In the course of work, you will feel the correct operation of the hiller, you will be able to adjust the optimal values of depth and angles of entry into the soil.
The second important point is the speed with which you will carry out the hilling process. A correctly selected pace of work can be no less useful in work than the very presence of a hiller, because at high speeds the unit will simply scatter the earth in different directions, without hilling.
How to set up a disk hiller?
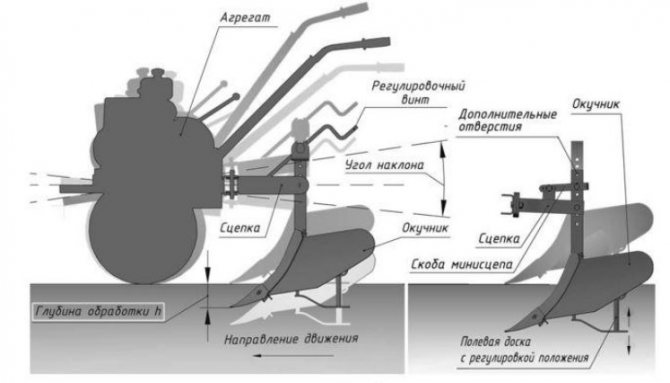
Adjusting the equipment assumes correct direction in relation to the furrow. It should be parallel to the beds on the land with a certain angle of inclination and furrow width. A good technique setting will allow you to avoid mistakes and achieve good results during work.
To set the angle on the unit, there is a special screw adjustment that tilts the entire device relative to the walk-behind tractor. The depth of the furrow depends on the part to be adjusted. In addition, the adjustment is carried out when installing the hiller to the walk-behind tractor. This is done using holes made in the rack for fasteners. If moving hillers are installed, the width and height of the ridge produced can be adjusted.
The disc hiller has a higher quality than the plow, despite the fact that it takes more time to cultivate the land. The work is carried out not on two furrows, as is the case with a two-row hiller, but with one.
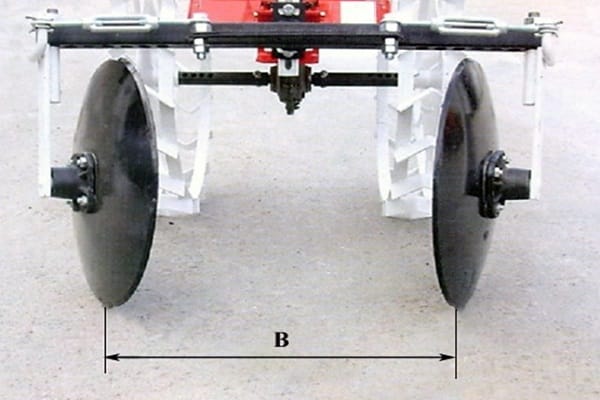
It is easy to set up the disc weeding machine. The lower points of the discs are spread apart approximately 40–70 cm (it all depends on the distance between the rows, the recommended width between the furrows for potatoes is 60–65 cm). When setting up the equipment, one must not forget about the angle of inclination and be sure to make sure that the disks are symmetrical to each other.
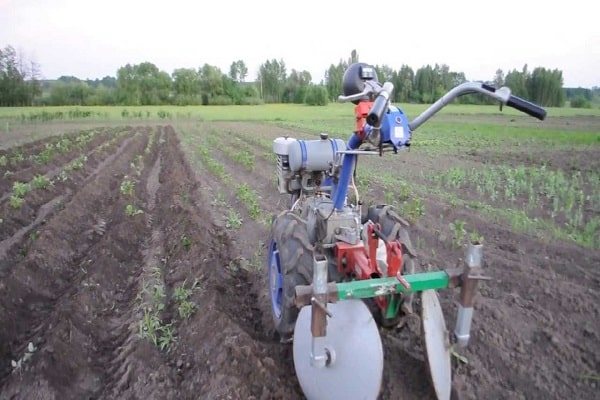
The tiller is placed in the furrows so that the cultivated furrow is between the working discs. Lead exactly along the aisles, without affecting the vegetable crop. The discs pick up the soil, forming a ridge, and at the same time loosen and crush large clods of soil.
For the entire period of growing potatoes, three potato hilling is done. The first time the work is carried out when the height of the bushes is about 16 cm, the second time when their height is about 23 cm and the last time after the end of flowering.
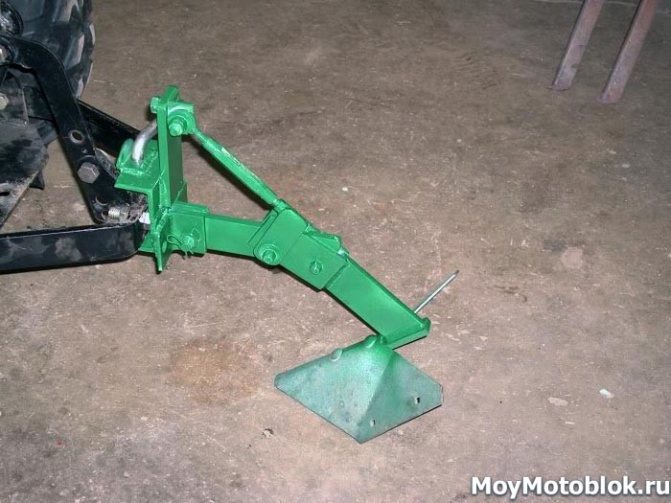
Making a lister plow
Such agricultural equipment for motor vehicles is a classic unregulated device that is most often used.For its manufacture, it is necessary to sketch or use ready-made drawing documentation, according to which it will be easy and simple to carry out all the activities.
- We build the base from an iron sheet 3 mm thick. She will face the opposition of the soil, therefore, must be extremely strong.
- The holder is made of a metal strip, 4 mm wide, the spare part must be hardened.
- The field board is made of 5 mm thick steel. It is hardened in several steps by means of a gas burner.
- The rack is made of iron 8 millimeters thick, since it will be the component on which the entire load will fall.
- The wings for the gun are made of iron 2 millimeters thick, they must be consistent with the parameters of the chosen scheme, since this is the only way to dock them to the base.
- Then they bend a little and cook to the base.
If you need to adjust the row crop, you need to fix the wings to the base by means of hinged joints. The rods for adjusting the angle are mounted in the tail of the base. You can also create a 2-row attachment that doubles the pace of work. In this case, it is necessary to add traction mechanisms to the constructed structure, and create the fasteners movable, which will make it possible to adjust the size of the rows.
Rules for the use of a hiller in soil cultivation
First of all, you need to prepare the walk-behind tractor itself: fix the wheels, the hitch and the hiller on it. Then you should correctly set the parameters for the depth and dive angle. The tiller must be installed on flat ground, the hiller must be lowered and fastened to the hitch. Make sure that the stand remains strictly vertical: this will help you easily set the desired angle.
If a hiller with discs is used, then 2 more parameters should be set: the distance between the discs and the angle of rotation (in relation to the horizontal axis). There is another important parameter - the angle of inclination in relation to the vertical axis - but most often it is automatically adjusted and does not require adjustment.
It is believed that the best indicators of the motoblock wheels are as follows: 0.7 m in diameter and 10-14 cm in width. With other parameters, the walk-behind tractor can damage the fit, so you should carefully consider the selection of wheels.
Next, you should work according to the instructions. The only advice: if in the process of work the hiller goes deep into the soil or, conversely, comes out of it, then you need to tilt the stand in the right direction. The rest of the technique for working with a hiller is simple: after 1-2 tests, even a novice gardener will learn how to operate the device.
Terms of hilling
The first hilling of potatoes is carried out when the sprouts reach 10-15 cm in height. If we are talking about the northern regions, then the first hilling is carried out as soon as the first green shoots appear. This will help protect them from possible frost.
The second time, the procedure is carried out 15-20 days after the first time. And the third hilling is carried out when the potato shoots reach 25 cm.As a result, the height of the ridges should not exceed 19 cm.
The best time for these activities is morning or evening, ideally after rain or watering.
Equipment setup
Before planting potatoes or hilling them, it is necessary to carry out trial work in order to eliminate the shortcomings, if necessary. After fixing the disc hiller on the OKA walk-behind tractor, you need to check the tightness of the connection by inspecting every detail. Next, select the site where the trial work will be carried out.
Make any necessary adjustments to the hitch in advance. When the unit is operating, you should listen to the sound emitted by the equipment. There should be no creaking or other suspicious sounds.
Check the stroke profile, the quality of the grip and the distance between the working elements immersed in the ground. Set the angles of attack on the discs.It is important to take into account the speed of soil cultivation, which will correspond to the power of the OKA and the hinged mechanism itself.