Overview of hand tools
Now, indeed, it will be easier to plant potatoes using original devices, and in this case you will no longer need a shovel. The tools that replaced the spade not only make the process easier - thanks to them, the rows are perfectly even.
The plantation looks neat, it is more convenient to huddle bushes on it. Each of the proposed devices allows you to maintain the planting pattern, so the potatoes will actually be harvested in a mechanized way.
The device can be bought in a store or ordered online, but it is cheaper to make it yourself. Special material is not required here - available means will do. The drawings of homemade tools are simple, so even a person without skills can make them.
Planting potatoes without a shovel
Who among the summer residents at least once saw this device in action is interested in how to make a marker for planting potatoes with their own hands. Craftsmen have invented several types of convenient devices. As a material, it is proposed to use metal pipes, wooden stakes or a solid board.
Simple model
It is not difficult to make an instrument - it is enough to take a stake with a diameter of 6-7 cm and a height of 0.9 m. The depth of the hole for the tuber will be limited by a support from a rod, fixed horizontally at a height of 15 cm from the point.
Mittlider device
This model is a little more complicated than the previous one. A frame is made from a metal pipe with a diameter of 2.1 cm. A cone with a diameter of 5.5 or 6.5 cm is welded to it, which makes it possible to make indentations of the order of 25 cm. From the support leg to the marker 30 cm - this will be the distance between the holes.
3-hole device
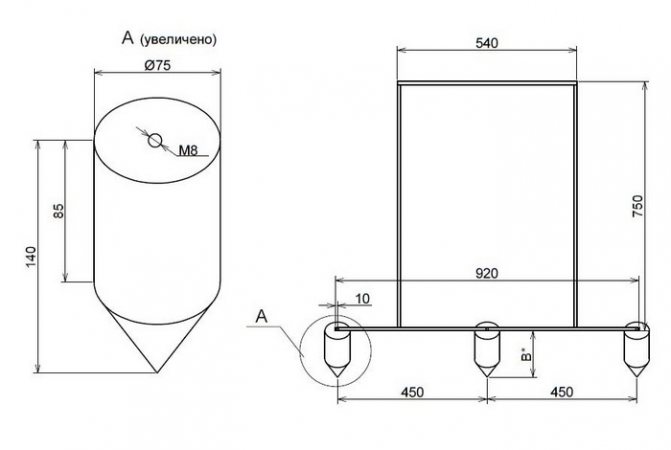
With this tool, planting potatoes will go faster, since 3 markers are already attached to one frame. To make the device not heavy, it is recommended to use lightweight steel pipes for its manufacture (these are usually used in gas and water pipelines). For cones, aluminum and sturdy wood (oak, acacia) are suitable.
The given drawing (Fig. Below) will give a visual representation of the structure. All sizes are indicated on it.
3 hole marker
To make a homemade tool reliable, you need to follow the given algorithm during manufacturing:
- a long pipe is bent with the letter "P" and welded to the horizontal cross member;
- in the upper part of the cones, a thread is cut in the center;
- in the pipe on which the markers will be attached, through holes with a diameter of 9 mm are drilled in the center and along the edges;
- cones are attached to the frame by means of bolts;
- plugs are put on the ends of the pipe.
With the help of bolts, you can adjust the height of the markers, depending on the required depth of the holes.
On a note. In the drawing of the 3-taper attachment, the approximate dimensions of the frame height are given. Each summer resident determines this parameter for his height. To make the device last longer, metal parts are coated with a rustproofing agent. Wooden elements should be coated and varnished, then the earth will not stick to them.
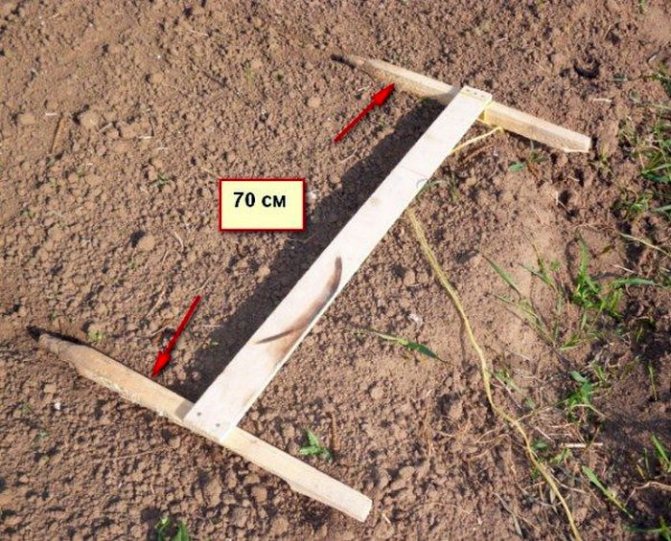
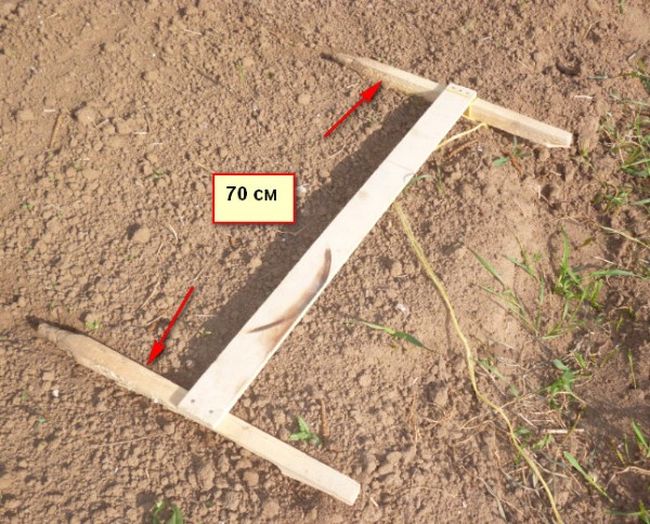
Perfectly even rows when planting potatoes will help you get a scribe. This is the most primitive device that is easy to make in an hour and a half.To create a structure, you will need 2 pointed wooden stakes, 10 cm in diameter and length for your height. For the convenience of working on the upper edges of the beams, it is worthwhile to arrange handles.
The stakes are connected with crossbars made of strong boards 1.5 m long. The gap between the stakes should correspond to the distance between rows. If it means manual processing of a plot with planted potatoes, up to 50-55 cm is enough.When using a cultivator in caring for a plantation, the distance is increased to 0.60 m.If the work is carried out with a motto-tractor, then it is better to maintain the gap of about 0.75 m.
On the protruding part of the lower crossbar, a vertical rail is attached at the same distance from the stake - this will be the starting point. The lower horizontal bar itself should be located at a height of 10-15 cm from the tip of the stakes (under the depth of the pits).
A simplified version of the scribe
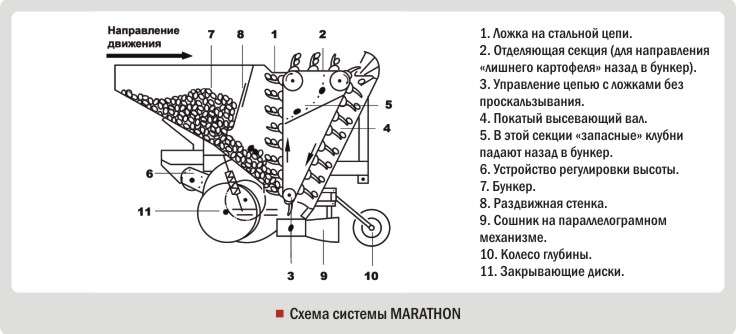
Planting plow
A hand plow will help to plant potatoes without a shovel. To make it with your own hands, you will have to make some effort. But they are worth spending, since the device turns out to be universal - the plow is used not only for planting potato beds, but also for the subsequent hilling of bushes and loosening the row spacing.
Related article: Gothic potato tubers (fusiform): symptoms, struggle
Since hollow pipes and sheet metal are used in the manufacture of the structure, you will need welding equipment, a gas burner or blowtorch, and a grinder.
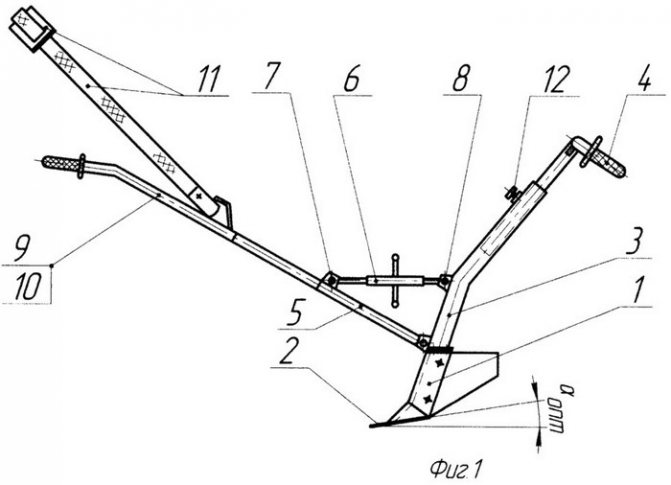
To create a universal method of planting potatoes, follow the following algorithm:
- a meter-long pipe with a diameter of 2.5 cm is filled with sand and closed with plugs;
- bent at an angle of 10-15 degrees at a distance of 30 cm from the edge, using a blowtorch; get a stand, in the drawing indicated by the number 3;
- removing the plugs, pour out the sand (it is only needed for a neat bend of the pipe);
- a double-mold working element with a cutting knife is formed from pieces of metal and fixed from the bottom of the rack with bolts, for which holes are pre-drilled in the pipe;
- the control handle 4 is inserted into the pipe from above and fixed with the bolt 12; there should be several holes on the handle to make a telescopic retractable system;
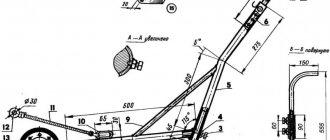
- the front link 5 is shaped as indicated in the drawing and welded to the strut; positions 9, 10 indicate the presence of a horny handle;
- With brackets 7 and 8, a lanyard 6 is attached to the rod and the riser, which allows you to adjust the level of attack of the knife.
Manual plow with pull
For convenient plow control, a strong neck-axillary tape can be attached at the base of the traction arms (position 11). It will allow the leading worker to evenly distribute his efforts when driving with the plow over the area.
Planter (seeder) for garlic
To facilitate farm labor, craftsmen constantly invent some kind of mechanisms. Of the most popular devices, a garlic planter can be distinguished. With the help of a simple device, the soil is prepared for planting onions and garlic.
How the planter works
You can watch a video of the principle of the planter's operation on the YouTube channel, in a few words we will try to explain its principle of operation.
- opener, which forms a furrow, and after planting covers the teeth with earth;
- a bookmark container in which prepared garlic cloves are placed;
- a seeder that distributes the cloves over the garden bed;
- wheel;
- shaft;
- chain;
- regulating brushes;
- handles.
All necessary parts are mounted on a metal frame.
The work of the planter for garlic is possible only on soft, loosened soil. The device makes it easier to fit, making it faster. There are two models of planters.
Types of planters for garlic
The manual look is very economical. It is transported by hand, suitable for novice gardeners, and is manually adjusted.The time it takes to land will take more than using a walk-behind tractor, but you can save fuel.
A garlic planter for a walk-behind tractor requires high fuel costs, but it is convenient to plant it, and most importantly, quickly. There are a large number of adapters, so the planter can be used for any model of walk-behind tractor.
The four-row planter differs in that the planting of garlic takes place in four rows at once. A pinpoint fit is made possible by the precise lowering of the tines into the furrows. Planter for garlic, onion is very effective in different areas of work. The device can also be homemade.
Planting garlic with a planter (seeder)
The seeder is a versatile device, it will help to accurately plant not only garlic, but also small potatoes, saffron, and onions. If the crops are planted correctly, a rich harvest is guaranteed.
- Prepared garlic cloves or other seeds must be poured into a special container.
- With the help of the opener, grooves are made for sowing garlic.
- The seeder sows seeds in loose soil.
- The planted material is sprinkled with loose soil.
It should be remembered that it is necessary to carefully prepare the garden, dig it up so that the soil becomes soft. If you try to start the device in an unprepared area, it may break.
The manual seeder is functional, easy to clean and environmentally friendly. It is perfect for a small suburban area. For growing in areas of a larger area, it is better to use a walk-behind tractor.
Making a device with your own hands
For manufacturing, you can use the material at hand, which is at each site. This is wire, pipe trimming. The manufacturing method is simple, but you will have to use the drawings. The seeder must perform certain functions:
- place the tines evenly in the soil;
- observe the width and straight line of planting between the rows;
- reach the required planting depth.
For the production of a simple agricultural seeder, a hole must be made in the center of the prepared material container. There is a small hole in the lid for garlic or onion sets. Make a small valve for the cut out hole from the lid for the can. You can use other available material.
Insert a small piece of plastic pipe into the center hole. Insert a metal pipe into this pipe. Place a bolt with a nut in it and secure it on both sides with washers for free rotation. Screw the handle (wooden or plastic) onto the seed container. Attach the opener to the handle. You can use a slightly bent hoe.
Some gardeners equip the planter with seal wheels. They can be crafted from plastic toy car wheels. You can use a seeder from a tractor, it is driven by a bicycle chain. The seed container can be made with a double bottom by inserting a movable metal plate into it. This will help to plant the crop evenly and control the planting density of the area.
How to use the fixtures
The devices described above facilitate and speed up the planting process, but you need to get used to using the tools. It is recommended that the work be done with a partner to keep things going.
How to handle markers
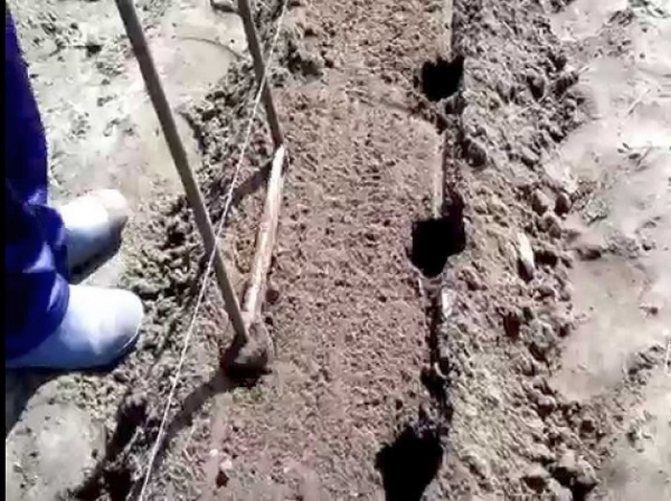
It doesn't matter what type of this device is used, the principle of operation is the same for them. To begin with, mark the first row with a twine and, parallel to it, make indentations in the ground with a marker, applying some effort to this. Moving along the twine, one worker forms holes, followed by - places the sprouted tubers in them.
Using a 3-cone marker, the landing can be handled in a short time. The next rows are drawn up, focusing on the nearest planted one.If the site is small, then the holes are outlined in a checkerboard pattern for the convenience of subsequent processing.
Landing with a scribe
As simple as the design of this device is, so are the actions of the farmer when using it. Even a large potato patch is easy to plant within a couple of hours by following these instructions:
- holding the tool with both hands, set a landmark (side rail) at the beginning of the section;
- press on the lower crossbar with your foot so that the stakes enter the soil to the desired depth;
- by moving the tool back and forth for a few seconds, expand the hole to the required size.
Having passed in this way along the site in one direction, 3 ridges of pits are obtained: 2 from the stakes and one more from the vertical rail. Turning in the opposite direction, the scriber is set as a reference point in the hole of the last ridge. While the sower fills the first 2 rows with potatoes, his partner continues to mark the ridges with a scribe, walking towards him.
Landing under the plow
Despite the fact that the manufacture of this structure will take some time, the planting of the tubers itself will be easier, compared to the situation when you would have to work with a shovel. True, in this variant, a trench is formed, into which the potatoes are laid by a third person (two people control the plow).
It will be difficult to maintain a uniform distance, but the row will turn out to be even if you focus on the stretched twine. Before starting plowing, the tool must be set up:
- rotating the lanyard nut in one direction and the other, set the desired angle of attack of the knife;
- adjust the height of the control rack handle to fit your height with a bolt;
- the cervical-axillary belt is adjusted to the figure of the partner walking in front.
The pulling force in the process is provided by the actions of the person pulling the plow. It is on him that the belt is put on. Its main task is to keep the angle of attack constant. The person from behind, controlling the rack, pushes the device forward.
As a result, the knife easily cuts into the ground, the dumps throw the soil to the sides, creating a neat trench for planting. If the wings are adjusted correctly, then the shifted ground will partially fill the previous groove, in which the tubers are already laid.
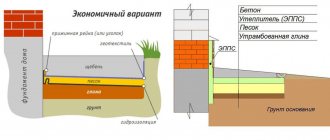
Site preparation for planting
The design of this device is so easy to use that it can be operated by 2 people with different builds, differing in height. The use of the plow throughout the season will provide convenient cultivation of potatoes on a large plantation.
But even the simpler devices described above significantly increase the productivity of planting potato tubers, allowing planters to work smoothly.

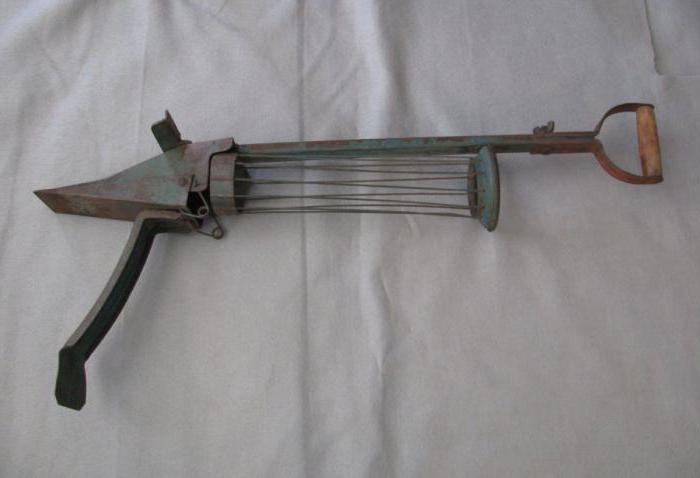
Bulb planter with two handles
This instrument works like a forceps. At the end there are two curved metal plates, similar to small sharp blades, which, when closed, form a cone. When opened, the device is driven into the ground, rotated several times around its axis, and then carefully removed along with a lump of earth.
Such forceps will become an indispensable assistant in a neglected area. Indeed, with their help, you can make holes even in the turf. They will also become indispensable during the digging of the bulbs after flowering.
Advantages: comfortable body position during planting, versatility, ability to cut through the heaviest ground.
disadvantages: Muscle strength must be applied, the mechanism must be handled with care.
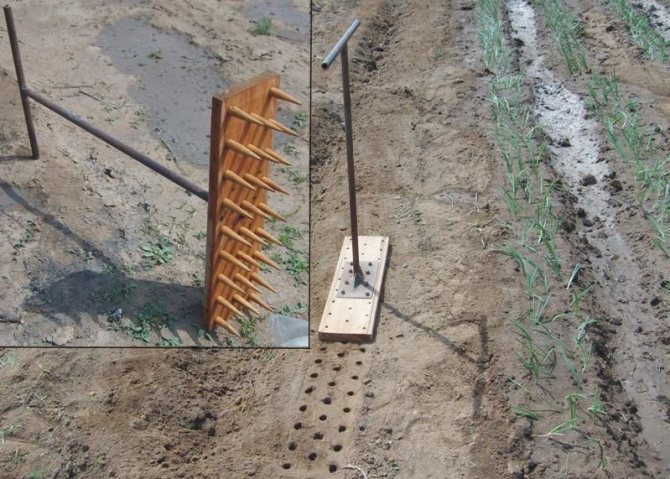
How to make a simple marker
Making a simple marker is easy. It is enough to have on hand a regular board and pegs made of wood.
The potato planting marker is a stake made of wood with a diameter of about 65 mm. The stake must be at least 90 centimeters high. At a height of about 15 cm from the sharp edge, a transverse bar is attached. It will serve as an emphasis that limits the depth of the hole.
Before starting planting with this tool, you must first mark the locations of the holes with the help of a rope. The ropes are pulled along the rows at a distance of 40-80 cm from each other. Everyone sets the distance independently, it depends on whether the hilling is carried out by a walk-behind tractor or manually. A gap of about 25 centimeters, plus or minus five centimeters, is left between the bushes, depending on the size of the potatoes planted and the variety.
Why is a homemade device better than a store-bought device? In the marker, you can set the exact distance, which will be equal to the distance between the wheels of the cultivator or tractor.
Planter with two paddles
Another variation on the theme of a planter with a spring mechanism. However, this time the place of the cone was taken by two blades, which are set in motion not by a button, but by pressing a horizontal jumper. This tool is good for making shallow holes that are suitable for planting small-bulbous ones. It can also be used for transplanting many other plants. However, such a planter is not suitable for preparing holes for larger flowers.
Advantages: easy to handle, suitable for various types of work.
disadvantages: open mechanism requires regular cleaning, you cannot dig deep holes.
Marker for planting potatoes according to the Mittlider system
The American agronomist Mittlider invented his own method of planting potatoes. According to his method, the vegetable garden should be divided into planting beds up to nine meters long. The width of the beds is 45 centimeters. A distance of about 100 cm is made between them. The method of narrow beds allows you to water and fertilize only the ground on them.
To plant potatoes using this method, you need to make a more complex device. In order to understand the principle of this device, you need to look at the diagram.
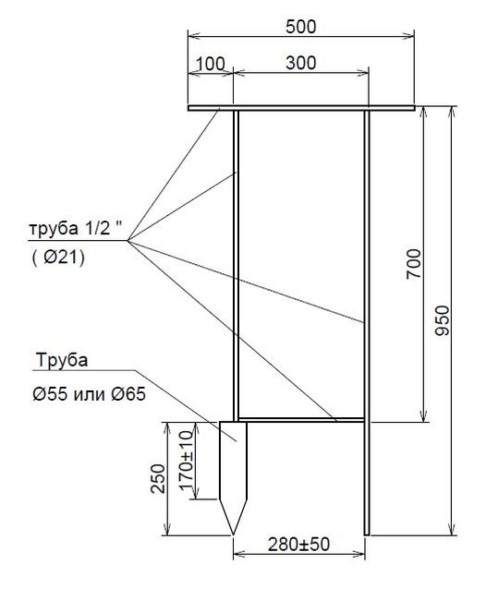
To make a marker for planting potatoes with your own hands, you need a metal pipe with a diameter of 21 mm, it serves to mark the holes. Thus, the holes are obtained at a distance of 29 cm from each other. Another pipe with a diameter of 55 (65) mm is welded to the frame, a cone is obtained from it, which will punch holes.
Before planting, first pull the cords along the beds. The frame is placed parallel to the stretched lines, starting the landing of the first row, it is pressed into the ground. The marker pin will mark the hole, you need to stick a cone there. This is how the holes are made to the end of the row. On the other row, holes are made in a checkerboard pattern.
Using this device, you can grow a decent crop even in a small area.
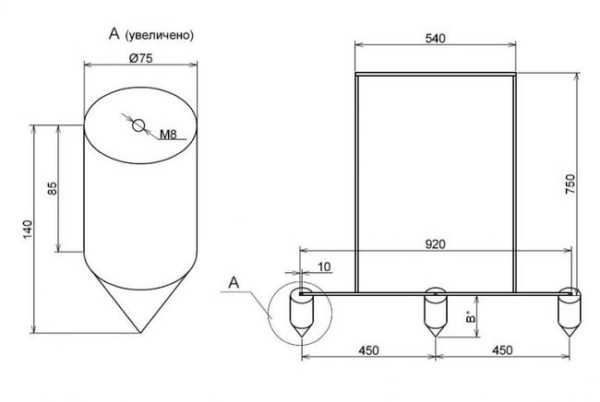
Superior three hole marker
Using three cones and metal pipes, you can make a device that will allow you to make three holes at once. It is necessary to take a pipe made of steel D 32 mm. Steel is easy to weld, although duralumin pipe can be used.
The cones are made of high-strength wood, such as oak or acacia, but aluminum is better.
The cones are screwed to the lower crossbar with long bolts. The depth of the hole depends on the length of the bolts. The longer the fixing bolts are, the deeper the hole will be. A distance of 45 cm is made between the cones.
What to look for when buying a bulb planter?
Each of the above models has its own advantages and disadvantages. If you have already decided on your preferences and are ready to go shopping, be sure to pay attention to the following criteria.
Material must be strong and free from signs of damage or rust. If metal, then stainless steel is better, if plastic (for infrequent work), then strong and stiff. Be sure to inspect the instrument from all angles before purchasing. Keep it free of scuffs and scratches. If the planter has managed to get damaged already in the process of transportation, consider whether it will be able to “survive” several hours of working with the soil.
Mechanism... When buying a planter with a spring or in the form of tongs, check the working mechanism - it should go smoothly, without jamming.
Ruler... Most cones (especially models with a conventional handle) have graduations that help to more accurately determine the depth of the hole.
Notches... An optional but desirable element that greatly facilitates the work process.
At first glance, a planter for bulbous plants is not the most indispensable thing in gardening. However, once you try it, you will be able to appreciate the delights of working with this tool.
DIY potato planter
The simplest device for planting potatoes can be a potato planter. Any man can make a potato planter after spending a couple of hours. You will need to take two boards 1.5 meters long, as well as two stakes with a diameter of 10 cm.
The pegs are made from thick spruce branches. They are processed, sharpened, handles are made. Wooden transverse strips are nailed to them. A distance of about 60-65 centimeters is made between the stakes, if subsequently the planting will be processed by a cultivator or mini-tractor. The distance should be no more than 55 cm if the processing is manual.
The bottom board should be with a margin, a note is made on it from a narrow rail at the same distance as the stakes. It will help determine the origin for the pits.
How do I use this device? Put the device on the ground, holding the handles in front of you. Press down to make holes. Two rows of holes are immediately obtained, the third will become a note, followed in the opposite direction. The second person will follow the marker and plant the potatoes.
Long Handle Bulb Planter
Planters with a long handle are very convenient in that when working with them, a person does not have to bend over every time when it is necessary to make a hole with a diameter of about 10 cm.Most of these tools are made according to the principle of a shovel with a special footboard, stepping on which, you can easily drive the device into the ground.
Dignity: Can work without bending over, handles heavy ground.
disadvantages: takes up a lot of space, not suitable for small bulbs, there is a risk of an earthen clod getting stuck inside the cone.
How to make a hand plow
The manual plow will become a home-made machine for planting, hilling, loosening the earth. It can be operated by two people. Making a plow is worth the effort.
For manufacturing you will need:
- A meter long hollow pipe with a diameter of 2.5 cm.
- ¾ in. Hollow tube.
- Metal sheet 2 mm thick.
- Metal plate with holes or lanyard.
- Gas-burner.
- Bulgarian.
- Welding machine.
The large pipe is bent, stepping back from the beginning by 30 centimeters. To facilitate this procedure, you can use a pipe bender. Use a blowtorch if there is no bender.
The small pipe must be bent. To adjust the height, you need to make holes on the upright and on the top edge. The height of the rack is made individually so that the person who will hold the plow is comfortable. It can be adjusted with bolts.
The vertical part at the ends is made flat. Its height is about 60 cm. A lanyard is placed between the rod and the strut in order to be able to adjust the angle of attack. Attach the view from below. More details on the video:
Planter-shovel for small-bulbous
If you plan to plant crocuses, muscari, galanthus or any other small-bulbous plants on your site, a planter will come in handy, which makes shallow holes with a diameter of no more than 5 cm.A cylinder-blade with a beveled edge is the best for these purposes.
Dignity: durable, suitable for small-diameter planting material, easy to cover with bulbs.
disadvantages: Not suitable for planting large and medium-sized bulbs.
How to make it easier and faster to plant potatoes with a cultivator
Planting and caring for potatoes is a tedious and tedious process. Typically, the areas that are allocated for potatoes are quite large, so planting, hilling and harvesting potatoes takes a lot of time and effort. And, of course, this process must be automated. There are many tools that make life easier for the gardener. These are both mechanized devices and manual equipment. There is plenty to choose from, given the area of the site and financial capabilities.
Related article: Is it possible for a cat to give potatoes - how to make a diet
Potato cultivators
Land cultivation implements are called cultivators. The cultivator can loosen the soil, plow the land, remove weeds, apply fertilizers, plant, huddle.
Motorized equipment used on personal plots and farms is divided into three types: motor cultivators, walk-behind tractors, mini-tractors. They differ in power and scope of functions performed.
Motor cultivators are divided into classes depending on their weight. Mechanisms up to 30 kg belong to the first class and are designed to work in small areas. Motor-cultivators up to 60 kg belong to the second class, they work on large areas. Units up to 100 kg belong to the third class. For work on personal plots, cultivators of the second class are purchased, and attachments are purchased separately.
Table: comparison of motor vehicles
Photo gallery: types of cultivators
For all types of cultivators, there is a set of attachments for various jobs.
Hillers are used for hilling potatoes and creating a furrow during planting. The potato digger makes it easy to harvest potatoes. With the help of mounted mowers, they mow the grass. The potato planter will help when planting potatoes. The pumps are used for irrigation of land. Large tracts of land are plowed with a plow.
Hedgehogs for planting, equipment features
The hedgehog device consists of two parts, each of which is a set of discs of different sizes with thorns fastened together at a certain distance. These two disc structures are interconnected in such a way that they form an angle. The presence of an angle makes it possible to form an earthen ridge when the cultivator moves.
When processing ridges, structures are used both from one hedgehog and from several, fastened together by a frame.
Photo gallery: varieties of hedgehogs for weeding potatoes
The main function of hedgehogs is weeding, loosening, hilling potato plantings. Two weeks after planting, when there are no potato shoots yet, it is recommended to carry out pre-emergence treatment of the field with hedgehogs. The hedgehog removes weeds from the roots and loosens the soil. After such treatment, the growth of the root system is enhanced.
Hillers for planting
Hiller is a cultivator device designed for planting and hilling potatoes. This device can be single-row, double-row, three-row, or have more than three rows. The more the number of rows, the higher the productivity of the cultivator. The technique for using more rows of hillers should be more powerful.
Photo gallery: varieties of hillers
Hillers are available with fixed or variable working widths. With a fixed working width, potatoes are planted with a row width of at least 70 cm for ease of hilling. If you rebuild the working width at the hiller, then the row spacing can be any. The technology of using a two-row hiller when planting potatoes involves the use of a marker for marking. The hiller is placed at the markings and the furrows are cut. After turning, one hiller can be lowered into the cut furrow, or you can continue cutting furrows along the marked lines. After cutting the furrows, start planting the potatoes. The tubers are placed in the furrows at a distance of 35–40 centimeters, then the furrows are covered with earth.
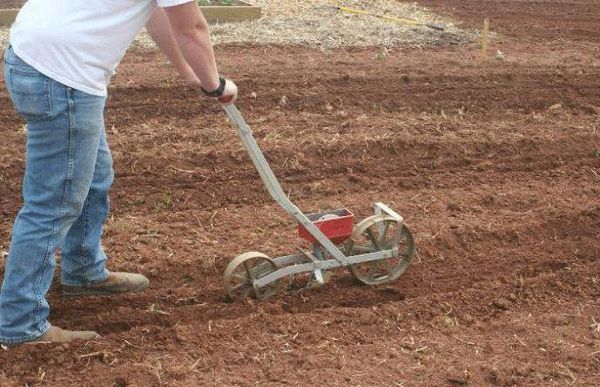
Mini planters
The mounted potato planter consists of several units:
- small plow for cutting furrows;
- compartment for potatoes;
- special hillers for filling potatoes with soil.
Like hedgehogs and hillers, the potato planter can be uniform and multi-row. The use of one or another modification depends on the power of the equipment and the composition of the soil.
Photo gallery: varieties of potato planters
To complete the landing, you need to replace the rubber wheels with lug wheels. When a potato planter passes through the site, all operations are performed simultaneously: grooves are made, tubers are laid, the tubers are covered with earth. Simultaneously with planting potatoes, fertilizers can be applied if an additional device is used.
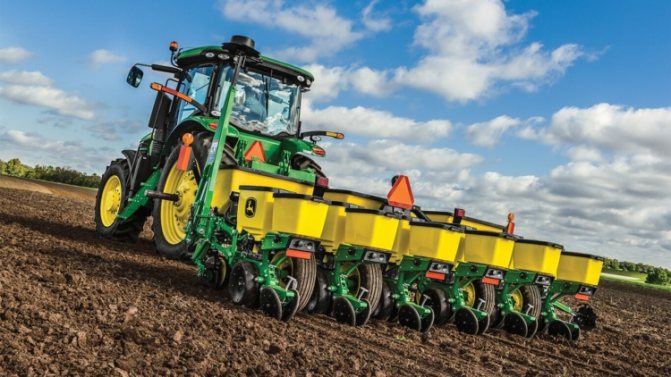
Landing with a mini tractor
The mini-tractor is used in areas with any relief. Of course, for a small area, this technique is not suitable, there is nowhere to turn around. Such a mechanism must be purchased if the area of the site is more than 50 acres. Mini tractors are divided into light (up to 14 hp), medium and heavy (up to 35–45 hp). Using a mini-tractor, you can perform the following work:
- plow;
- plant;
- cultivate;
- apply fertilizers;
- mow the grass;
- clean the area from debris;
- remove snow;
- fill up holes and trenches.
For planting with a mini tractor, it is preferable to use a potato planter. The hiller is not suitable in this case, because the width of the furrows differs from the track width of the tractor, and during subsequent hilling, the tracks will not match. Experienced farmers use an unusual technique. For the first pass, only two hiller bodies are used, placing them at a distance of 30 cm from the middle of the wheels. The potatoes are laid out. Then they add a third hiller, follow the first track and bury the potatoes.
Planter with beveled edge and long handle
This type of planter was created specifically in order to dig holes for medium-sized bulbs without bending over. It differs from a conventional planter with two handles in the shape of the planting cone (cylinder beveled at the top) and in the presence of only one support for the leg.
Dignity: comfortable working position, relatively light weight, it is possible to work with small bulbs.
disadvantages: not suitable for making holes for medium to small bulbs.
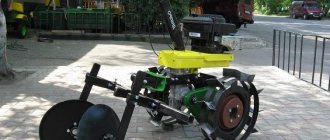
Accessories for planting potatoes by hand
Hand tools include a hand plow, markers and a hand cultivator.
A very handy device is the Vyatsky Plowman plow. Planting potatoes is done in this way. Furrow No. 1 is dug, tubers are laid in it. They begin to dig the second furrow, while digging in the first. Furrow No. 2 is used for fertilization. When digging the third furrow, the second is covered with earth. Tubers are re-placed in furrow no. 3. And the whole procedure is repeated. The row spacing with this planting is 60 cm.
Sources:
Is it possible to do without weeding
If the potato field is large, and it is not possible to purchase mechanical devices, then you do not need to weed at all. But the harvest will not please either. Without air and nutrients, tubers will grow small and sick.
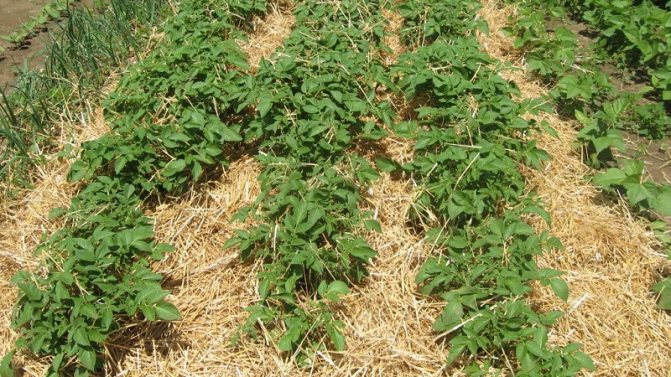
Planting potatoes under straw
This landing method interesting in that it allows you not to weed and loosen... It is based on the method of mulching the beds.
The landing technology is: spread the seed on even warmed-up soil and sprinkle it with a little earth. Then the plot is covered with a layer of straw 30-50 cm thick. Under such a blanket, the earth retains moisture, weeds do not grow, and the soil remains loose. Digging up potatoes is easy, even a shovel won't come in handy. The tubers grow large and even.
Important! Another advantage of this type of cultivation is the improvement of the soil structure. It is useful for heavy clay soils.