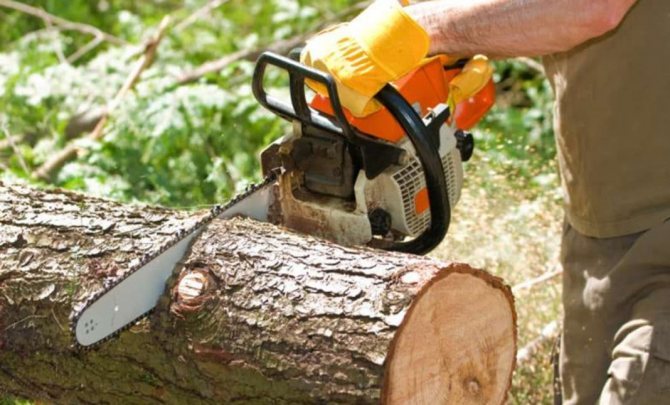
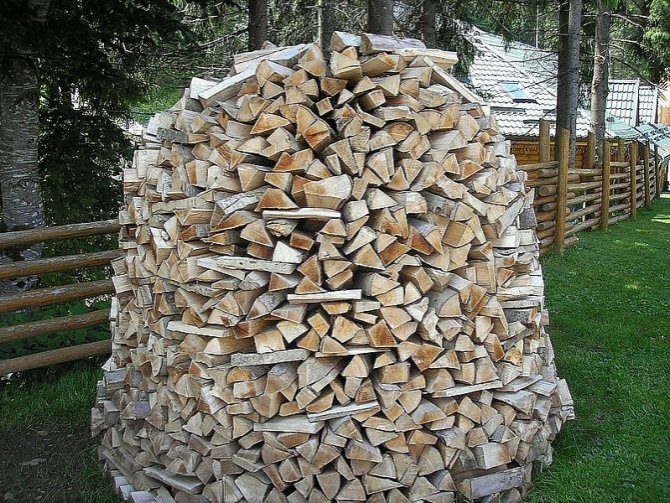
Waving an ax over a huge pile of firewood, you involuntarily think about how to facilitate this hard labor.
The chainsaw is not an assistant here, since it is designed for cross-cutting wood. Only in a desperate situation, with its help, you can dissolve a board or timber. A thick wedge and a heavy hammer will help to split a particularly hard and thick log, but this work cannot be called productive.
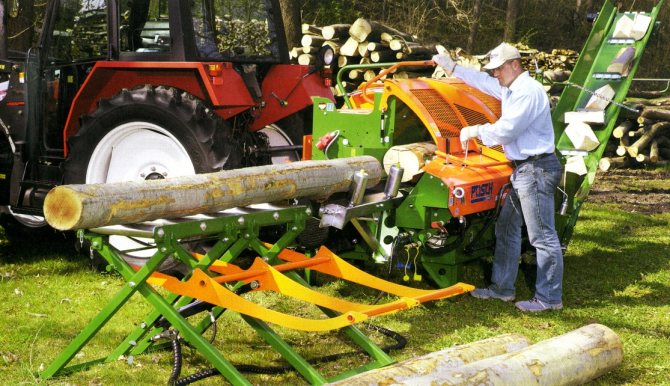
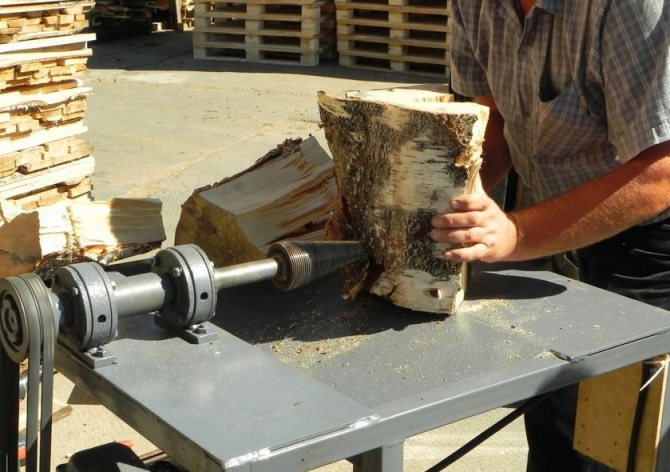
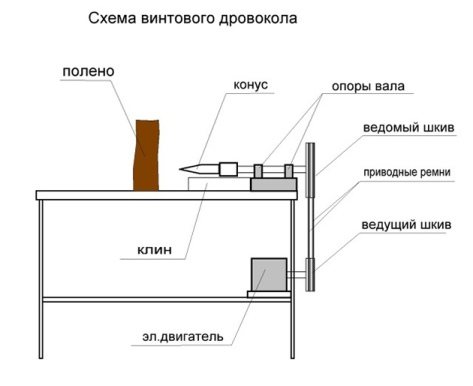
A screw wood splitter - a simple and reliable device - will help to combine a high speed of splitting firewood with minimal physical effort. Its principle of operation is based on the ingeniously simple combination of screw and wedge.
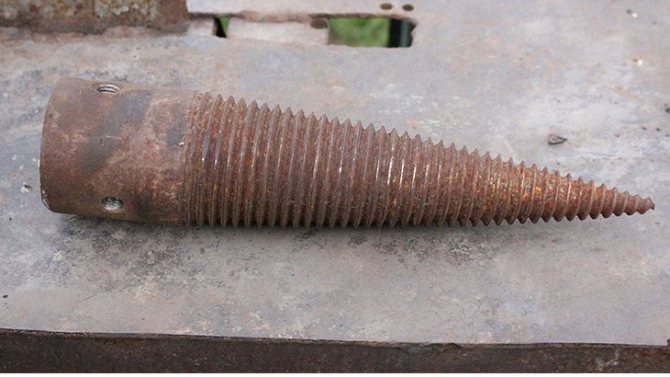
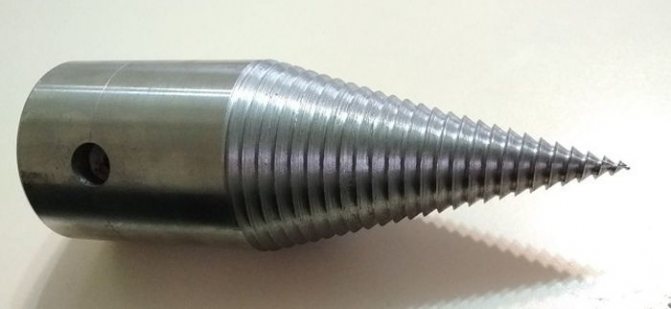
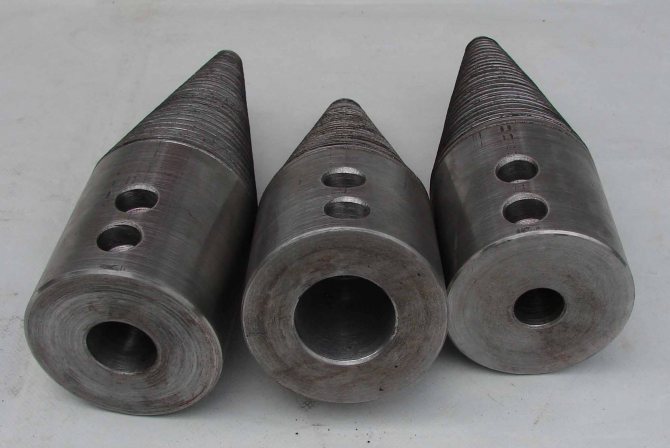
An ordinary screw can easily be screwed into wood, but at the same time it is only able to slightly expand its fibers. But when a double-start thrust thread is applied to the steel cone, the desired result is achieved.
Expert advice! It is important to pay attention to the type of thread: it is precisely a persistent two-start thread that is needed, if you use a single-start thread, you will have to force the block onto the carrot cone. Ask sellers for double-start stop threads. Otherwise, when using a single-start thread, you will have to push the blocks onto the screw cone with great effort!
Only the double-start cone can be easily screwed into the log, due to its wedge-shaped shape and persistent thread splits it into two parts.
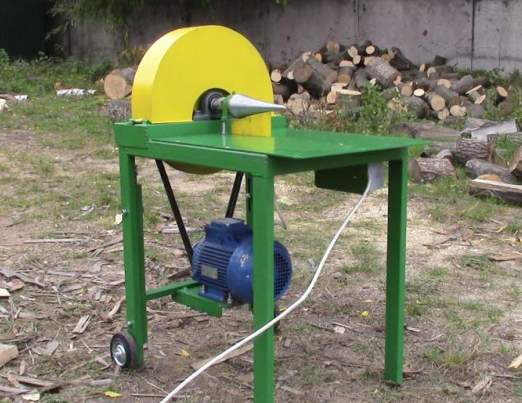
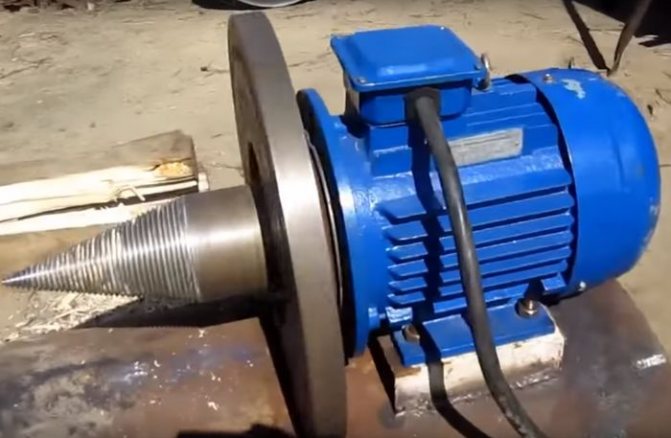
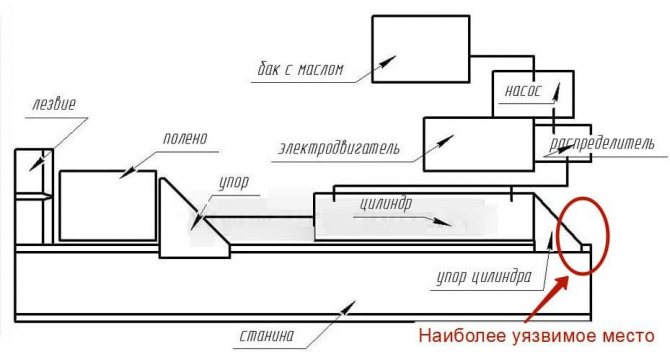
There are two main constructive schemes of cone wood splitters. In the first, the screw cone is installed directly on the shaft of a low-speed electric motor with a power of 3-5 kW (the number of revolutions is not more than 500).
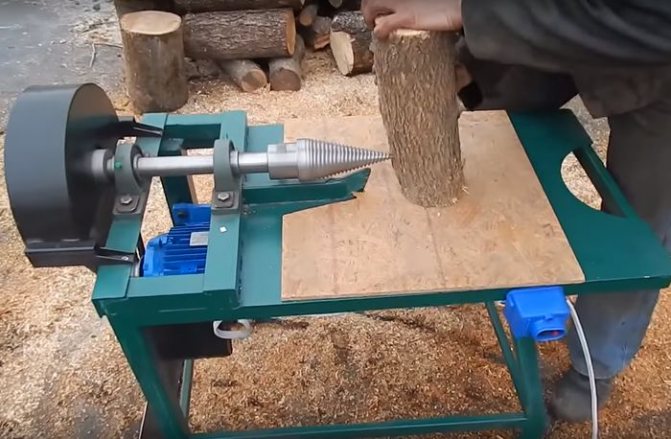
Another option is realized through the use of double-strand pulleys of different diameters and flexible drive belts. A small pulley is placed on the shaft of the electric motor, and a large pulley on the shaft of the wood splitter.
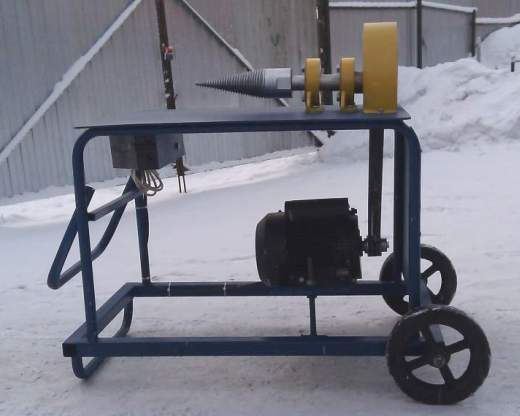
The ratio of their diameters is selected in such a way as to reduce the rotor speed in comparison with the engine speed by 2.5 - 4 times to 300-400 rpm.
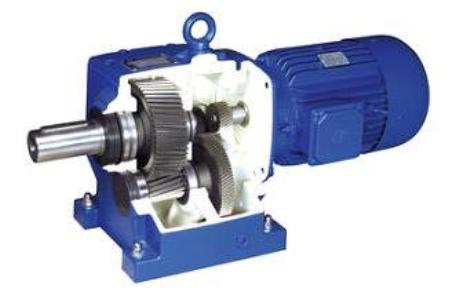
It is possible to reduce the rotation speed of the cone screw using a geared motor - a single unit in which the electric motor is structurally connected to a reduction gear. However, such models are not widely used in the screw splitter market.
Those who want to make such a machine with their own hands should remember that the high rotation speed of the screw cone (more than 500 rpm) increases the risk of injury, since in this case it is difficult to hold the log in their hands.
In order to reduce the risk of injury to the machine, a fixed steel wedge is placed under the screw cone, which protects the log from jumping off.
The main types of wood splitters
Today, the most in demand are 2 main types of electric wood splitters. Their difference lies in the use of working bodies (a mechanism that directly splits the block of wood). Let's consider them in more detail:
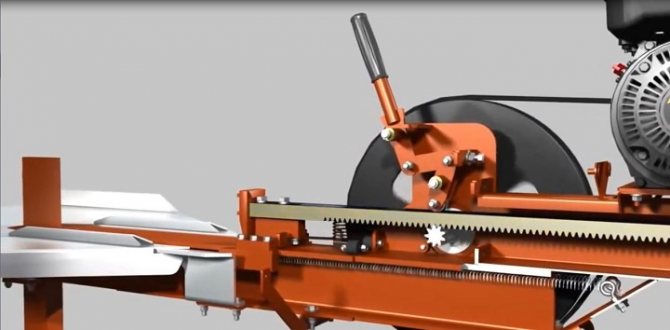
- rack and pinion wood splitter. Its design includes a vertically mounted cleaver connected to a pusher. A sharpened steel plate is often used as a cleaver. The pusher transmits efforts to the plate, which, penetrating into the block, splits it. This design is quite effective, but requires a powerful electric motor;
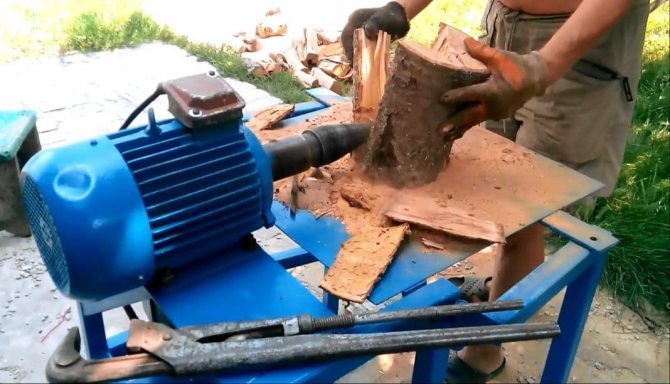
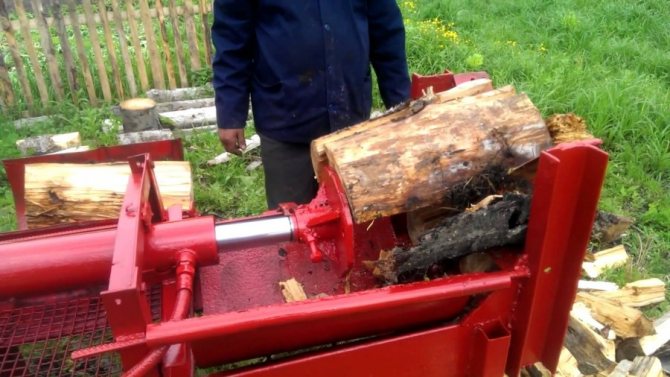
- screw wood splitter.A metal cone with a screw thread cut into it acts as a working body in it. This cone is called a "carrot". In a wood splitter of this type, the "carrot" literally bites into the block, causing it to split.
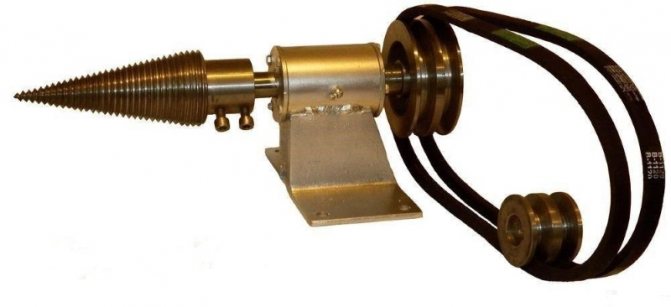
Screw - this is the simplest, easiest to manufacture and inexpensive wood splitter design. It is not difficult to assemble a screw wood splitter on your own, as well as to find all the necessary components for it. Its construction is simple and includes:
- electric motor;
- a screw cone called a "carrot";
- a pair of bearings, a shaft and a gearbox.
The work of the gearbox can be organized on a belt or chain drive, and some craftsmen even make it toothed using suitable gears. I chose the easiest and most reliable option - a belt.

Electromechanical rack and pinion wood splitter.
This wood splitter can be called one of the most productive. Its movable knife is fixed on a toothed rack, which is driven by a gear. In manufacturing, it is quite complicated, since it requires such parts as a rack, gear, flywheel, but the speed of its operation covers all the disadvantages of manufacturing. I recommend watching a video about the operation of the rack and pinion wood splitter and an overview of its design.
Watch the video: rack and pinion splitter versus screw.
All the pros and cons of a screw wood splitter
This mechanism has many advantages:
- the prevalence of components makes it available for production and further repair;
- the mechanism is easy to use: both a woman and a pensioner can easily cope with it;
- the wood splitter is also universal: suitable for harvesting firewood, regardless of the type of wood and the size of the block;
- the speed of harvesting firewood when using a wood splitter increases several times;
- unlike manual labor, mechanization of the process reduces fatigue, allows you to perform large volumes of work in a short time without consequences for the body.
But it is important to take into account that the wood splitter does not provide full automation of the firewood harvesting process, therefore, at least a little fatigue, it will still be. It is also very important to note that the mechanism of this machine is open, therefore non-observance of safety precautions can cause serious injury.
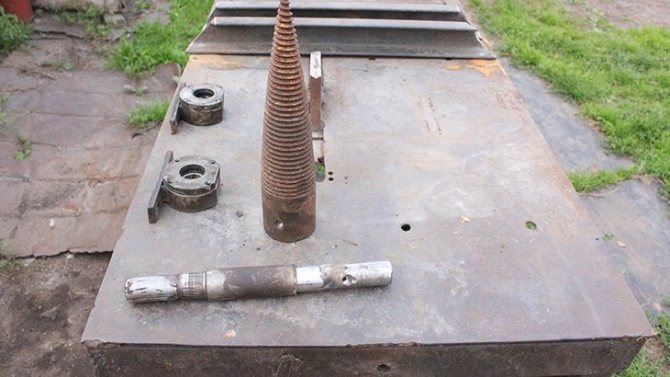
What you need to assemble a wood splitter
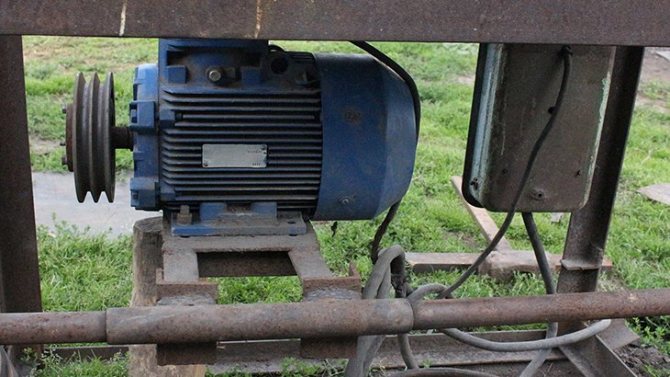
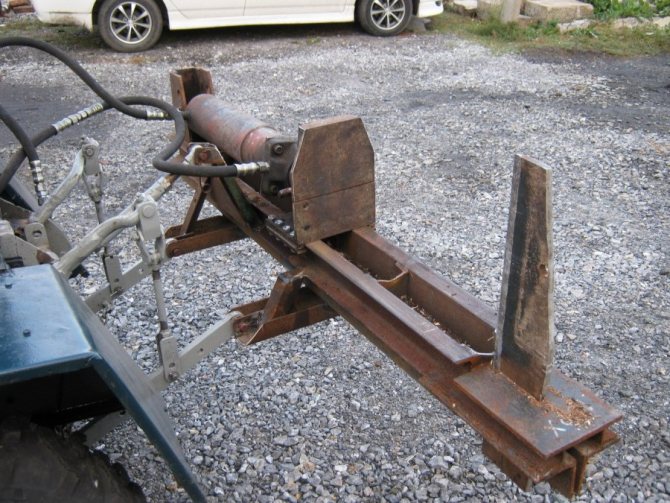
The basis for my machine is an old woodworking machine. From it I took the hulls and the electrics. Also, an electric motor with a capacity of 5 kilowatts at 1400 rpm was used from it.
As a table for the wood splitter, I used a table from an old circular saw. Since I decided to organize the drive on a belt drive, I additionally had to buy 2 pulleys. I found them at the nearest metal acceptance - the price for two pulleys was 1000 rubles. A pulley with a diameter of 160 mm was installed on the motor, and 340 mm on the shaft.
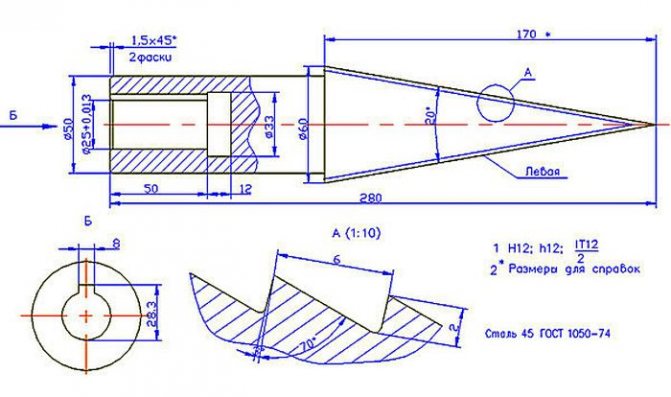
The shaft itself and the "carrot" had to be ordered from a turner. This pleasure cost me 600 rubles.
Now a little about the taper screw "carrot". Some "experts" recommend cutting a part from a suitable size cone using a grinder. The use of such a craft can reduce the efficiency of the wood splitter several times and negatively affect its safety.
Therefore, the only correct option is to order a "carrot" from a turner. Alternatively, you can try looking for ready-made cones on the Internet or in shops like "everything for the garden".
As you can see, the manufacture of a wood splitter does not require the use of rare and scarce parts. You can easily find most of all the knots and elements of the wood splitter in the garage at your place or at your friends.
And if I used an old circular and a woodworking machine as a basis, then a considerable number of designers use the following materials:
- —
- the shaft does not have to be ordered from a turner: in most cases, you can use a suitable-sized hub from agricultural machinery;
- as bearings with housings, car cardan shaft supports are ideal;
- for the bed, profile pipes and corners are used, as a working table - a steel sheet with a thickness of about 4 mm;
- if the use of a belt drive is planned, then a belt of suitable length and pulleys are needed, if a chain one, then a chain and sprockets. Both can be easily found on autoparsing: parts from both cars and some motorcycle models can be suitable;
- as a motor, it is worth using a single-phase electric motor with a capacity of about 3.5-5 kilowatts. After all, three-phase electrical networks are rarely in any areas, and the use of capacitors to start three-phase motors from a single-phase network is not always convenient and economically profitable;
- for wiring, you can use stranded wires with a cross section of at least 2.5 squares. For their additional protection, you can also take a corrugated pipe;
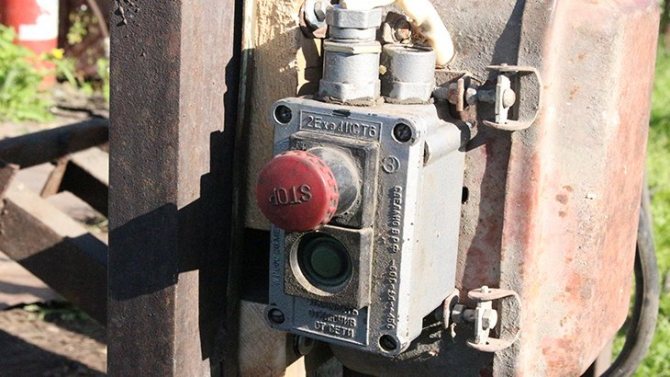
- be sure to install a switch (or a magnetic starter) and an RCD;
- also do not forget about the sets of bolts, washers, nuts and studs.
Most of all the necessary parts can be easily purchased at auto parsing shops, spare parts stores for automotive and agricultural equipment, electric and gasoline tools.
When all the necessary components and assemblies are purchased and prepared, it will be possible to proceed to the final stage - the assembly of the screw wood splitter.
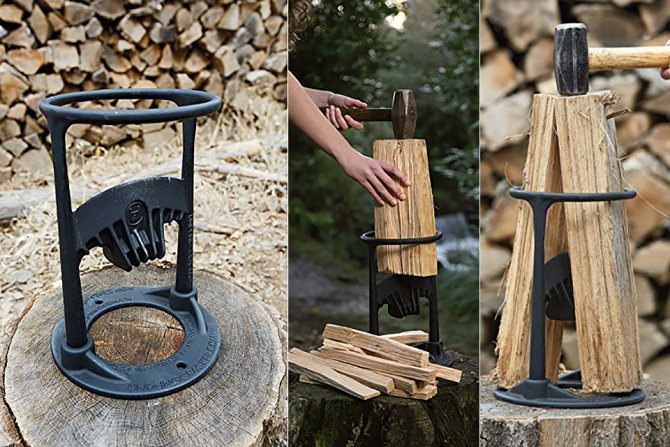
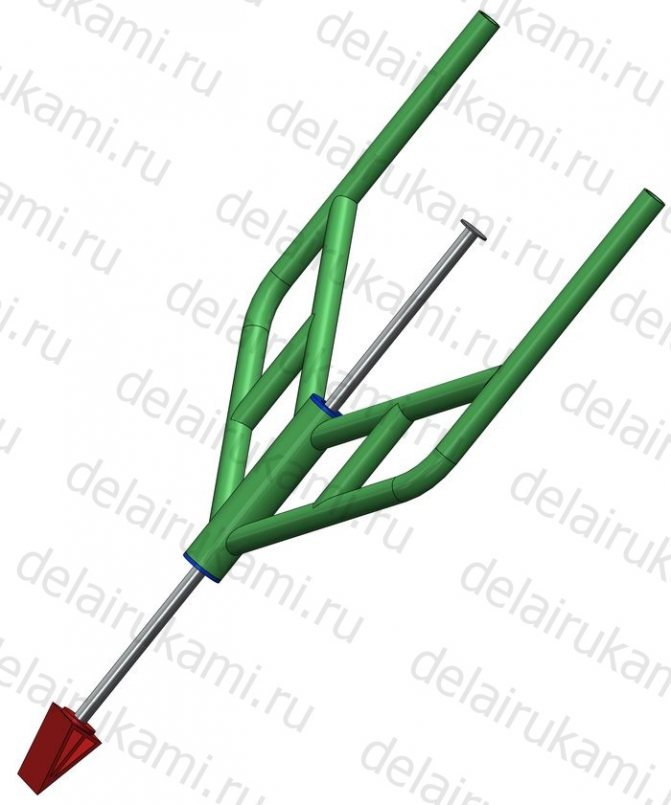
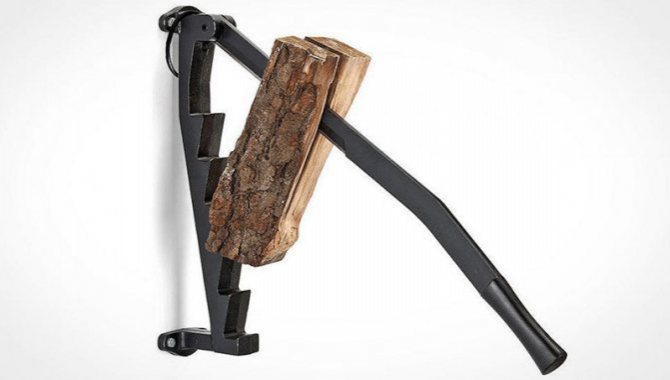
Manual wood splitter scrap-cleaver
This wood splitter is the easiest to manufacture. Its principle of operation is based on the energy of hitting a cleaver with a heavy object. The effect is almost the same as if you put an ax on a log and hit the butt of the ax with a sledgehammer. But this scrap cleaver is more convenient in work and the speed of work is higher.

Wood splitter scrap-cleaver
Its advantage is that it is safe to use, easy to manufacture, and takes up little space. Does not require the delivery of each log to him. With him it will be convenient to move from one log to another. While working with it, the back remains straight, which is important when chopping large amounts of firewood. You don't have to bend over every log to split it.
But it requires the use of human physical strength and emits a loud metallic sound during operation. To protect against sound, you will have to work with headphones.
The splitter has only two parts. The first part is directly a splitter with a guide pipe, and the second part is shock. The striking part can be external, that is, wrap itself around the guide tube, or internal - enter the inside of the guide tube. For this cleaver to be effective, one rule must be followed in its manufacture. The part of the cleaver with the guide and the blade should be as light as possible, and the striking part as heavy as possible, but within reasonable limits, since you will have to raise the striking part manually. The greater the difference in mass between the two parts, the higher the efficiency of the cleaver.
Wood splitter scrap-cleaver.
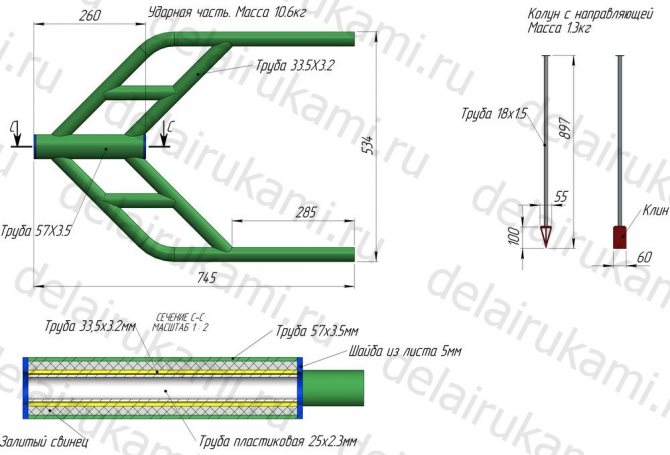
Drawing of a wood splitter scrap-cleaver.
When making a splitter, the main thing is to observe the rule of a large difference in the masses of the splitter parts and maintain a sufficient stroke length for the striking part to create a strong blow. This length should be approximately 50-60cm.
To make the first part of the cleaver as light as possible, you need to use a thin-walled pipe as a guide and make the cleaver blade narrow.
If during the impact vibration is transmitted to the hands, then it can be significantly reduced if the handles are made of wood. If the handles are made of metal, then they must be welded onto the heaviest and most massive shock part, this will also help reduce vibration.
To smooth the stroke of the striking part and reduce the sound of metal parts rubbing against each other, you should use a polypropylene pipe between these parts.
To avoid rapid riveting of the metal at the point of impact of the two parts of the scrap-cleaver, the contact patch between them should not be too small.
For the convenience of working with a splitter, the logs should be placed inside the old car wheel. This will prevent the chipped pieces from scattering from the logs, and they will always be in the same position.
Watch the video: manual wood splitter scrap-cleaver
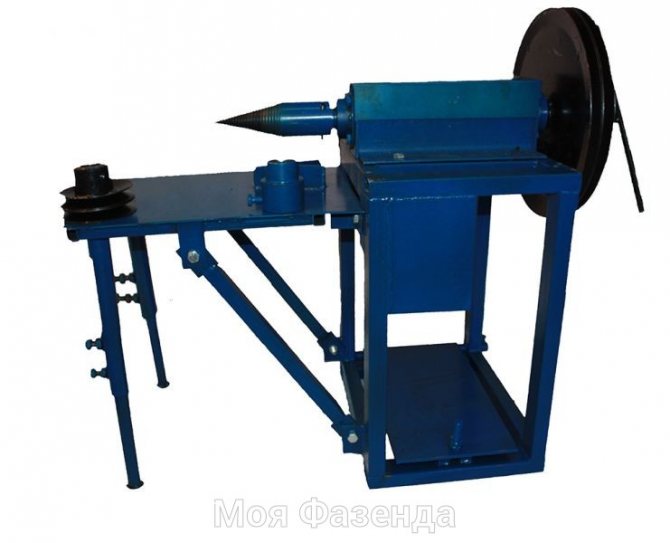
Assembling the screw cleaver
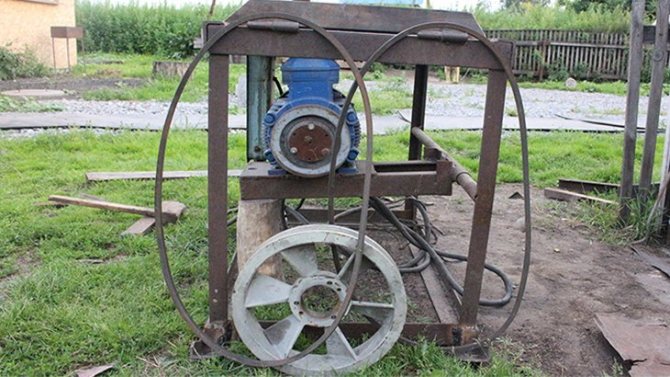
The base of the whole structure is the bed. It is to it that the electric motor, the shaft block and everything else are subsequently attached. Since I myself have used a circular table, for those who do not have this option, I recommend:
- Weld a frame from metal elbows or pipes.
- Place a metal sheet on the top of the frame. Cut a square window into it for the large pulley and drive belt.
- An electric motor must be installed in the lower part of the resulting frame (under the metal sheet), securely fixed with bolts.
- A small pulley must be put on the motor shaft.
- The next step is to organize the drive shaft unit. To do this, it is necessary to attach the housings with bearings inside to the bed.
- Then it is necessary to secure the shaft in the bearings.
- A large pulley must be installed on one side of the shaft (where a window was cut in the metal sheet of the table).
Then you should connect the pulleys of the electric motor and the working shaft with belts, be sure to check the ease of movement. The shaft should rotate easily and freely, beating and vibration should be free. Otherwise, it can lead to mechanical damage to the machine or even cause injury.
After checking the quality of work and the reliability of the belt drive, it is necessary to install a screw cone - "carrot" on the output shaft. The final stage of the entire assembly is the installation of electrical wiring and the connection of the electric motor to the power supply through the start button.
Then it was time to test the self-assembled wood splitter. This requires:
- Start the electric motor. It should spin smoothly and without jerking. The "carrot" itself should also not vibrate strongly and deviate from the axis of rotation.
- Then you need to bring the log to the steel wheel and press lightly on it.
- Thanks to the tapered thread, the carrot will literally bite into the wood, causing it to split.
This completes the procedure for assembling a screw wood splitter with your own hands. You can proceed directly to the process of harvesting firewood. But only with strict observance of safety measures - I will tell you about it below.
Safety measures when working with a screw log splitter
To safely use a screw wood splitter when harvesting firewood, you must strictly follow a number of recommendations:
- according to the rules of electrical safety, it is forbidden to install the "carrot" directly on the shaft of the electric motor - only through the gearbox;
- the electrical circuit must be necessarily equipped with a circuit breaker or RCD;
- the installed belt (chain) transmission must be covered with a protective cover;
- pulleys must be selected in such a way that the minimum rotation speed of the "carrot" is about 250-300 rpm. The optimum value is around 500 rpm;
- all elements must be rigidly fixed to the bed: vibration and runout must be excluded.
Some "masters" advise, instead of making a reliable and safe machine, purchase a drill or hammer drill with a capacity of at least 2 kilowatts, then install a "carrot" on them.
It is worth noting that in this case the hands will be occupied with the tool and it will not be possible to achieve reliable fixation of the log. And this is fraught with injuries.Therefore, the only option is only a professional electric wood splitter, which is not so difficult to assemble on your own.

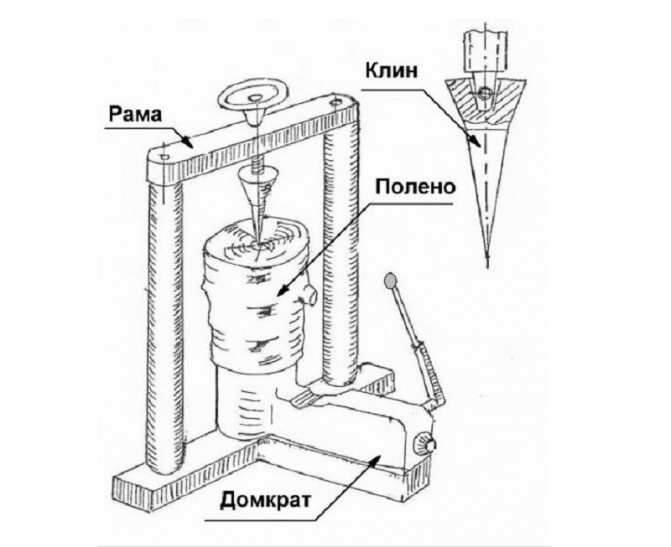
DIY screw wood splitter
For owners of solid fuel boilers or wood-burning stoves, the approach of the next heating season is associated with vital annual chores - the procurement of firewood. This process includes several stages:
- harvesting in the forest, more often buying ready-made round timber;
- delivering it to the courtyard;
- sawing into logs;
- chopping logs.
For those who are familiar with the preparation of firewood, the last of the stages is associated with exhausting, time-consuming and physical effort.
In an attempt to simplify the most time-consuming procedure, the creative thought of folk craftsmen gave birth to the idea of a cone wood splitter, a simple but productive machine that allows you to chop wood at high speed and with minimal effort. However, the main advantage of such a wood splitter is considered the possibility of making it with your own hands.
How to make a wood splitter on a spring
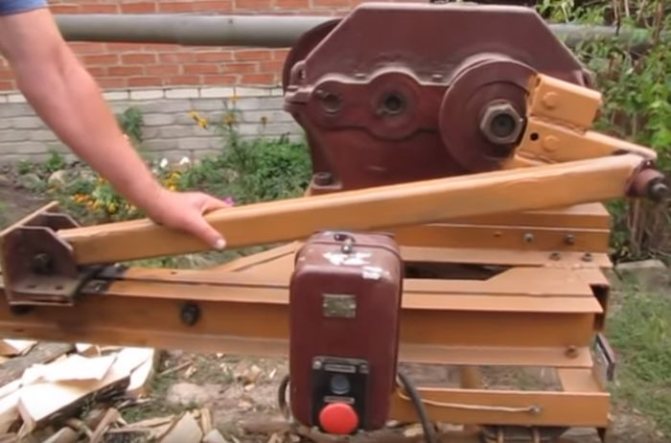
We already wrote above that the frame design is chosen arbitrarily, the main thing is stability. But before you make a lever, you need to calculate the basic dimensions according to the force distribution scheme. The challenge is to achieve the perfect balance between boom length, end weight and pivot-to-spring distance. The mechanics of this system is described by the equation:

- M is the mass of the counterweight at the end of the beam, kg;
- F is the spring force;
- l is the distance from the hinge to the spring, m;
- L is the total length of the lever, m.
If we neglect the calculation, then 2 scenarios are possible: you will have to make a lot of effort to swing the arrow or the cleaver will hit very weakly. The physical meaning: the farther the spring is from the hinge and the higher its stiffness, the longer the lever and the mass of the load will be required.
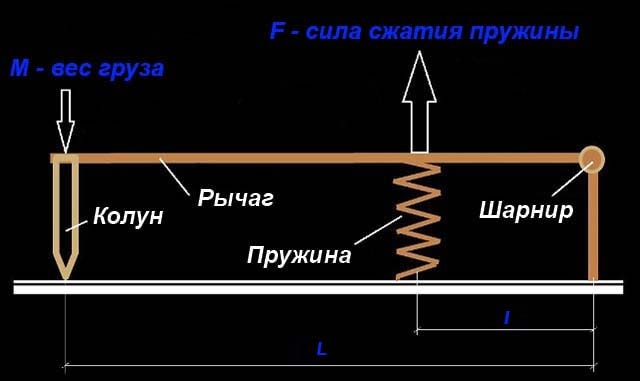
Calculated diagram of the arm length and weight of the load at the end
An example of determining the basic dimensions of a beam. We take the spring from the Zhiguli car, which compresses with an effort of about 200 kg (the weight of the car is 0.8 tons), and move it away from the rack by 30 cm. The rest of the indicators are calculated by the selection method - we take the boom length 2 m, then the weight of the load is 30 kg including the weight of the cleaver and the lever. Checking: 30/200 = 0.3 / 2 = 0.15.
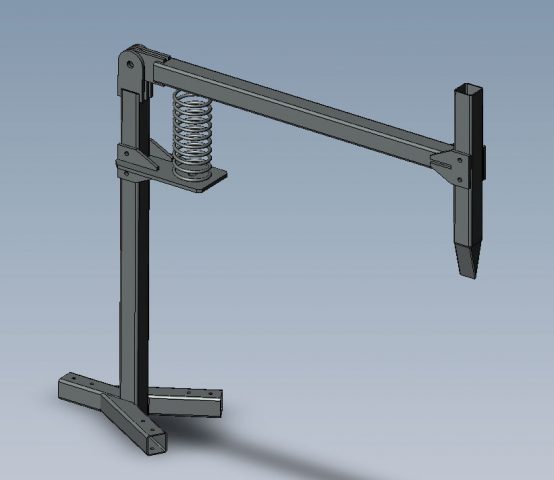
Use simple materials to assemble the lever log splitter:
- a spring from a small car (VAZ, "Tavria" and the like);
- a ready-made blade from a manual cleaver or a blank made of low-carbon steel 20 mm thick;
- a pipe along the diameter of the spring - for making cups;
- various rolled metal products for the frame - corners, round and profile pipes with a wall thickness of 3 mm.

Advice. It is not necessary to use a shaft on bearings as a hinge; this is an overkill. The mechanism is quite rough, so a simple articulated shaft-bushing pair, as shown in the photo, will do. Similar details are placed on garage doors as awnings.
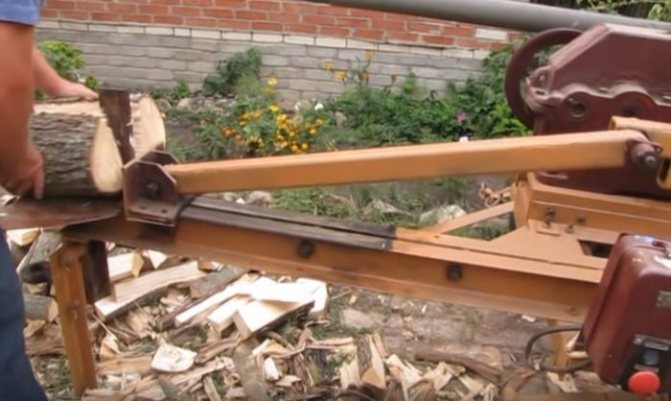
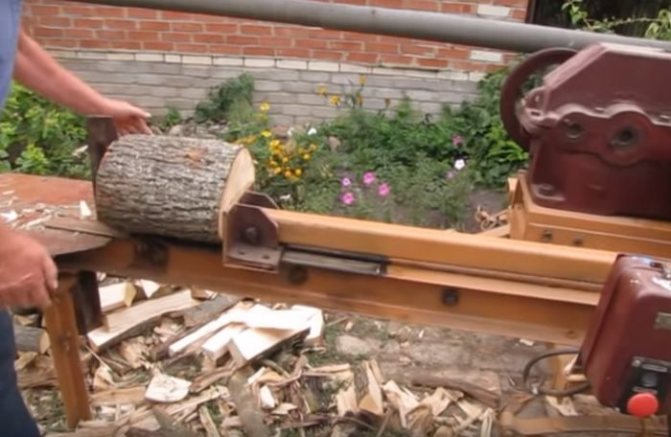
The assembly process is quite simple and does not require a detailed description. Guided by the drawing, weld a stable frame, make cups and install a spring with a lever. Finally, attach a weight and a splitting blade to the beam.
If the structure turns out to be unstable, simply slide additional pipes onto the horizontal supports. For an overview of the finished cleaver with dimensions, see the video:
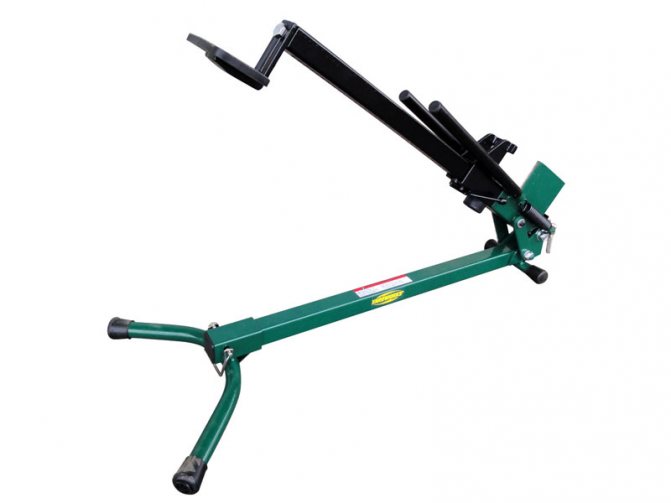
Mechanical splitter for firewood
A spring-loaded wood splitter is the simplest device for splitting firewood.
The main element of the device is a spring. It is attached to the bed. The upper part of the spring rests against a fixed crossbar, on which the cutting splitter is installed.
In this case, the entire load is taken over by the spring, its responsibility is to hold the cleaver. We are faced with the task of choosing a spring and a cleaver so that minimal efforts are applied for work, but sufficient to split hardwood.The spring stop can be made mobile. Such a wood splitter must have a minimum height of 800 millimeters. If only one person will use the device, then the height can be made to suit your height. The wood splitter allows one-handed operation. You can also install a special clip for logs, so it will be safer. Install wheels on the frame to move the wood splitter.


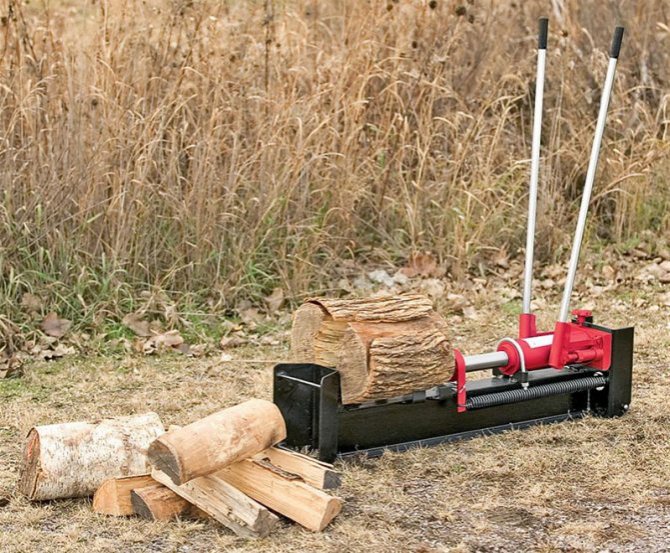
Professional wood splitters: champion lsh 5000 model overview
Along with the fact that it is quite possible to make a wood splitter with your own hands, you can also purchase a factory model. Products are usually more powerful, longer lasting and more productive.
Let's consider the features of operation and technical parameters of the device using the example of a champion lsh 5000 wood splitter, operating on an electric motor.
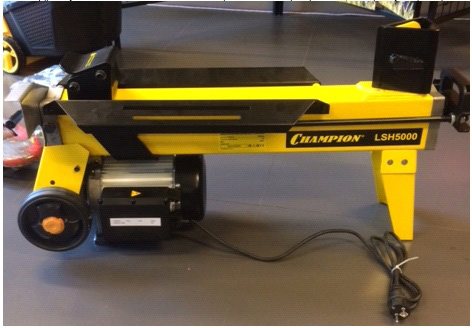
Specifications
The wood splitter belongs to hydraulic mechanisms operating on electric traction with an engine power of 2700 W. Its main characteristics are as follows:
- Chock dimensions: in diameter from 50 to 250 mm, length up to 520 mm.
- Product dimensions 950 * 280 * 520 cm (respectively length, width, height).
- Product weight 43 kg.
- The volume of oil is 3.5 liters.
- Pressure in the hydraulic system (average) 20 MPa.
Device diagram
The constituent elements of the structure are shown in the diagram.
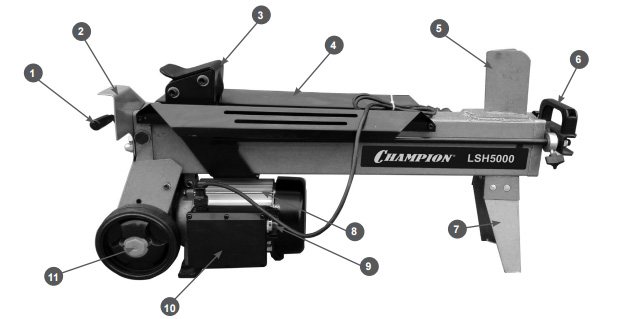
The numbers indicate:
- Lever with which the hydraulic drive is controlled.
- Protective surface.
- Pusher.
- The plate that guides the movement of the tree.
- A device for splitting chocks.
- Transport handle.
- Supporting elements.
- Electric motor.
- Lever for shutdown.
- Block with control elements.
- Wheel.
The side view shows the bolt that controls the oil level in the system (1) and the screw that supplies air to the hydraulic system (2).
Terms of Use
The log splitter is used under the following environmental conditions:
- temperature regime from +5 to + 40 ° C;
- 1 load cycle lasts within 10 minutes;
- the maximum operating time under constant load conditions is 4 minutes, after which a break is made for 5-6 minutes.
It is better not to use the wood splitter in extreme weather conditions (severe frosts), as well as in places with constantly high air humidity. To take into account electrical safety, grounding is done using:
- metal pipe (diameter from 50 mm, length from 1600 mm);
- metal rod with a minimum diameter of 20 mm, a minimum length of 1600 mm;
- zinc-coated iron sheet with dimensions from 900 * 400 mm.
NOTE. Residues from pipelines containing flammable liquids (oil, gasoline, etc.) are not allowed as ground electrodes.
Preparing the wood splitter for work
Before starting up for the first time, make sure that the protection plate is correctly installed and mounted sufficiently securely. Next, you need to prepare the log splitter for work:
- First, you need to inspect all items of the equipment to make sure that there are no bolts, nuts and other foreign elements.
- If defective parts are found, it is best to replace them.
- The mechanism is installed on a flat surface approximately 50-70 cm high from the floor. The work area should be wide enough.
- Make sure that the wood splitter is secure and does not swing; if necessary, ensure its stable position with improvised means.
- Before starting work, slightly loosen the position of the air plug (screw) so that air can enter the oil tank. At the end of the work, the screw is accordingly tightened back.
- Before starting work (especially after a long break), you need to make sure that the device is functioning normally - for this you need to let it idle for 1 minute. If there are no extraneous sounds and noises, you can get to work.
Features of working on a wood splitter
During work, you need to follow several rules:
- During the splitting of the lumber, the control levers are activated and held for a maximum of 5 seconds, otherwise the installation may break.
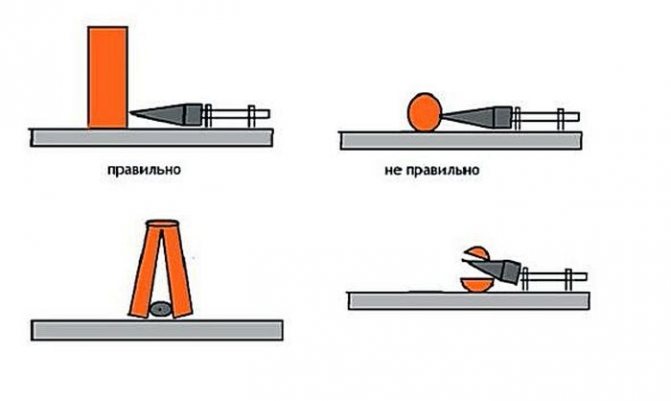
- It is important that the motor does not run in the opposite direction, as this is more likely to break. The log should only lie flat, no tilt angles are allowed. The correct position of the chock on the splitter and a comparison with the incorrect operation are shown in the figure below.
- It is important to pay attention to the fact that the splitting is even and is carried out using the entire surface of the blade, evenly, and not on one side.
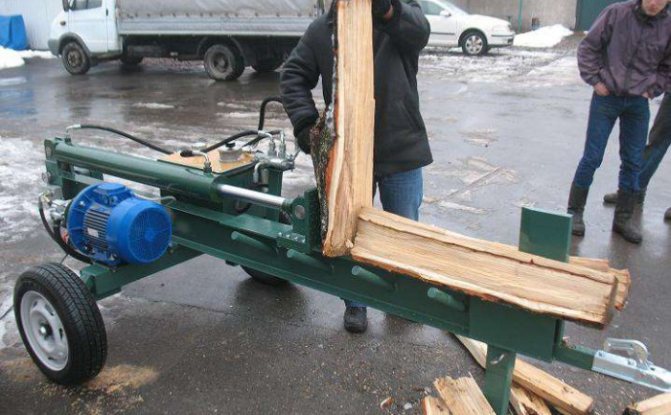
- If a log gets stuck in the blade, stop working immediately and release the handles. If the chock cannot be removed manually, this must be done using a wedge that is driven into it so that it rises slightly above the work surface, as shown in the figure below.

NOTE. Knocking out a stuck block with a hammer, ax, crowbar and other similar items is quite risky - such actions can lead not only to damage the working surface of the device, but also to its accidental start. In this case, the wood splitter may fail, and it will not be possible to fix such a breakdown with your own hands.
Change of oil
Along with periodic inspections and replacement of failed elements of the mechanism, the maintenance of the wood splitter consists in the timely change of the oil. This must be done in this order:
- The log splitter is disconnected from the network.
- The oil level control bolt is removed.
- Next, the wood splitter must be tilted towards the support and the remaining oil must be drained into the previously supplied container, as shown in the figure.
- To fill in new oil, tilt the splitter to the side of the engine as shown in the figure.
- After the oil is filled, you need to make sure that its level lies between the two grooves of the control bolt.
- Next, you need to tighten the bolt firmly.
- To check that the system is tight, you need to set the mechanism in the working position, horizontally, and make sure that no oil is spilled.
NOTE. During operation, it is important to regularly check the level of the oil. The test position is between the two grooves of the bolt surface.
Possible malfunctions
A list of possible malfunctions and recommendations for their elimination are presented in the table.
| type of problem | alleged reasons | remedial measures |
| wood does not split | wrong position of the chock | the chock should be laid flat on the work surface |
| the chock exceeds the permissible dimensions | you need to take a log of other sizes or reduce the chock | |
| cleaver blade frayed | sharpen the blade | |
| the pushing element does not move evenly, but with jerks, extraneous noises are heard | insufficient amount of oil in the hydraulics | check the level and top up until the oil reaches the line between the grooves of the inspection bolt |
| air has accumulated in the hydraulics | bleed air from the system | |
| the engine is running normally, but the cleaver does not move | valve does not open | check. how does the valve work |
| levers are deformed | give them the correct shape or replace them with new ones |
To clearly see how to work on this model of a wood splitter with your own hands:
Power point
We will consider making a wood splitter using an electric drive.
If the installation of the cone-screw will be directly on the shaft, then the motor for the power plant should be low-speed 500 rpm, and powerful - from 3 kW. If we use a chain or belt interface, then any electric motor can be used.
The number of revolutions of the cone screw is reduced due to the difference in the diameters of the pulleys or sprockets in the case of a chain drive. You can also use gearboxes for this.
Spring loaded wood splitter
Other simple mechanical wood splitters have a slightly more perfect spring design, they provide not only the safety of the user, but also greatly facilitate his work.
A spring wood splitter is made from waste materials, its manufacture is within the power of almost any man whose hands grow from where it is necessary. The wood splitter mechanism consists of movable and fixed parts.
Types of tools for splitting
There are mechanical cleavers, electric and hydraulically driven attachments, with a screw drive. The first type with a manual drive is easy to do on your own, since its scheme of work is simple. The components of a homemade cleaver are a metal wedge and a spring mechanism.
The adjustment of the fixture is achieved by adjusting the spring. With a change in her position, that is, by decreasing or increasing the distance to the working wedge, it is possible to process logs of different lengths. The hand-operated cleaver is used with a solid base. A log is installed on the device, the worker lifts the tool up, with a little effort lowers the wedge onto the log, splitting it. Due to the action of the spring, the mechanism returns to its original position.
The main auxiliary forces in the operation of a mechanical device:
- gravity;
- elasticity of the steel wedge.
A big advantage of the device in comparison with a conventional ax is the reduction of the workload on the worker during work. So, for an equal period of time, the cleaver manages to split more firewood.
Preparatory work: approximate dimensions and drawings
Folk craftsmen place detailed instructions for making and carrying out work in videos. The purchase or search for spare parts for the wood splitter should be carried out after the drawing is made, and the assembly should be done after watching the video. Here is the whole process in sequence, demonstrating how to equip the bed, install the electric motor and place the working shaft:
the design is simple, and almost everywhere it is compiled according to the same principle.