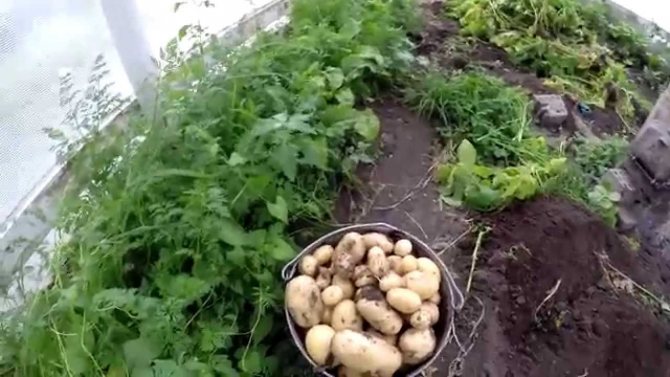
Preparing for planting potatoes
Potatoes grow almost everywhere, but it is preferable to plant them on fertilized, light, well-drained soil. To improve the composition of clay soils in summer cottages, experienced gardeners recommend adding sand. To obtain consistently good potato yields, it is necessary to add manure, potash fertilizers or ash to the soil.
In addition, according to agricultural technology, it is not recommended to plant potatoes in the same plots for several years in a row. Pathogens, Colorado potato beetle larvae and other pests persist in the soil. If you constantly fertilize the land, apply peat-mixtures, manure, periodically renew the seed material, you can plant potatoes for several years in the same place, but all these measures are not as effective as adhering to the principles of crop rotation. Best of all, a root crop will be born on virgin lands.
With intensive cultivation of a summer cottage, legumes are the best predecessors of potatoes. It grows well after rye, legumes - vetch, alfalfa. Potatoes feel great after rapeseed and white mustard. The use of these crops as green manure not only enriches the soil with mineral compounds, but also prevents the spread of diseases and pests.
Research carried out at the Agricultural Academy named after K.A. Timiryazev, showed that the introduction of a mass of green manure into the soil gives the same effect as half-rotted manure. Of the vegetables, root crops (carrots, beets, radishes), cucumbers and other pumpkin crops turned out to be the best predecessors of potatoes. Experts do not recommend planting potatoes after cabbage.
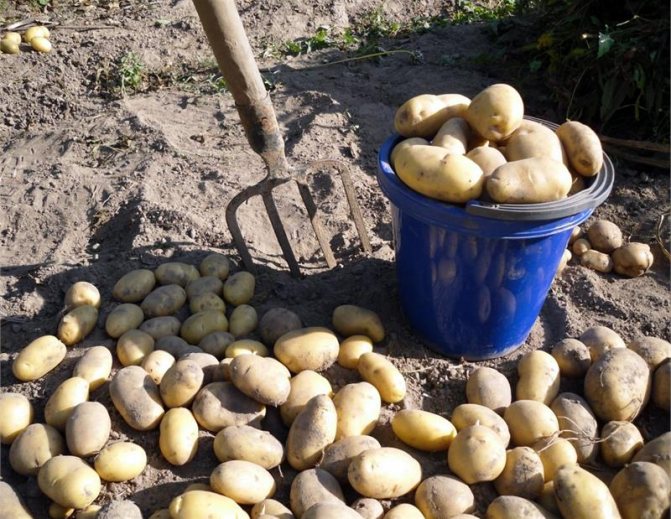
To harvest a good potato crop, you need to prepare the site and tubers for planting.
Regardless of the method of planting potatoes, you need to carefully select the tubers. Seed material should be exceptionally healthy, tubers clean and dry, without foci of decay. After sorting the tubers, they begin to germinate them. This is optional, but allows you to speed up the time of emergence of the first shoots after planting the potatoes in the ground, and also makes it possible to select the best tubers again, discarding those that form eyes too slowly or give weak thin seedlings.
For germination, it is recommended to keep the tubers in a sufficiently lit room at a temperature of + 12-15 ° C for 2-4 weeks. At this time, some gardeners treat the tubers with growth stimulants and weak fertilizer solutions. Often, tubers are disinfected and treated with various means to prevent potato diseases.
The proven popular method of disinfection with ash has been successfully used to this day. A bucket of water is poured into 1 kg of ash, tubers are dipped into this solution before planting. There are many other methods of processing potatoes both before germination and before planting: for example, use a solution of phytosporin or complex preparations such as Prestige, Maxim.
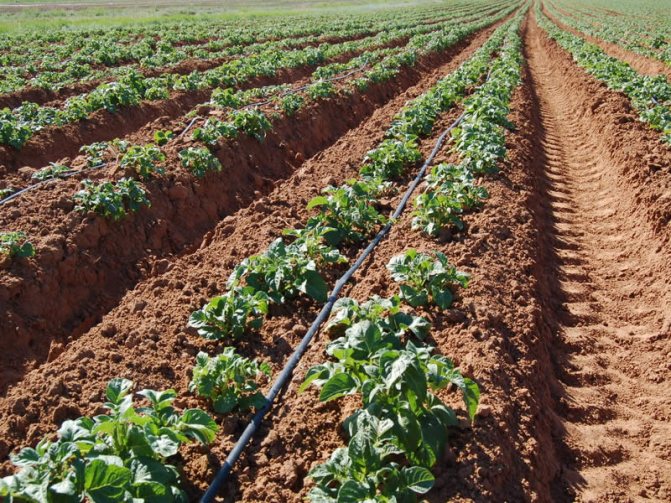
Potatoes are planted in the ground only after making sure that the soil has warmed up to + 6-7 ° C 10 cm deep. Planting at lower temperatures, up to + 3-5 ° C degrees, is used only for germinated tubers.Early and super-early varieties of potatoes are also planted in cold ground, the result will be better than with a later planting.
In addition to the temperature, it is important to consider the arable suitability. The soil is considered ready if it crumbles well and its density is low, this provides good oxygen access to the germinating tubers.
Depending on the composition of the soil and the location of the site, the timing of planting potatoes may vary. More fertile lands need to be sown earlier, since tubers with high nutrient content develop more slowly and take longer to ripen. It is also advisable to start planting potatoes earlier on light soils, southern slopes and on higher ground.
The process of planting potatoes is a sequence of stages:
- Prepare the soil according to the chosen method of planting potatoes.
- Pre-planting preparation of tubers (sorting, germination, processing of seed material).
- Planting potatoes, taking into account the maturity of the soil and the degree of its warming.
In the future, it is only necessary to provide the plants with adequate watering, regular loosening of the soil and the destruction of weeds.

Preplanting tubers
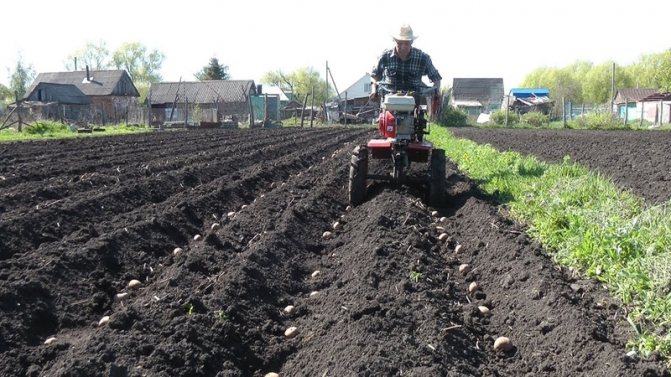
The pre-planting preparation of the root crop takes time and effort. On a standard plot of 6-7 acres, you will have to plant it in a shovel all day, but by connecting the equipment to work, you can do it in three hours. For small-sized plots, motoblocks Neva, Forza, Sadko, Don, Hooter, Champion, Carver are popular.
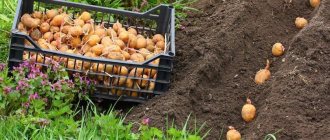
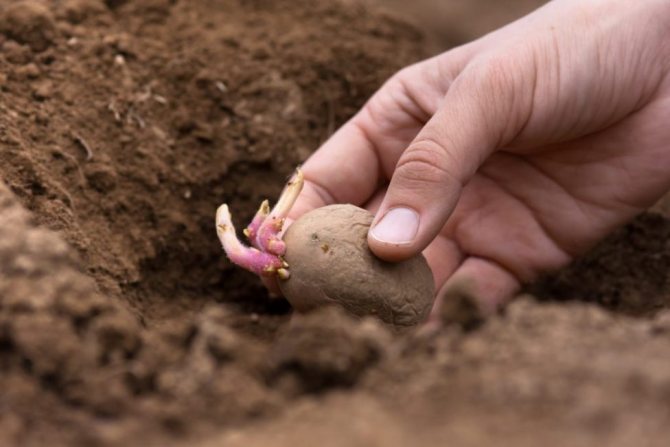
To begin with, seed is prepared. Preference is given to zoned varieties that yield good yields in certain regions. Sorting is done in order to select good raw materials. The potatoes are selected of the same size.
Small tubers give a small yield. Large ones must be cut into pieces, and this provokes various diseases and opens up direct access for pests. Germination takes about a month. For this, the seed is placed in a warm (+ 12-15 degrees), bright room.
If dark spots appear on fresh sprouts, this indicates a disease. Affected tubers are discarded. Before planting, soaking is carried out in stimulating and etching substances. It is not recommended to place tubers in the solution for a long time.
It is better to lay them out on a flat surface, spray them with preparations and let them dry. You can plant root crops when the ground warms up to +7, +8 degrees (in the planting hole).
Traditional planting methods
The usual ways of planting potatoes are quite diverse: at least five methods can be distinguished on how to do this.
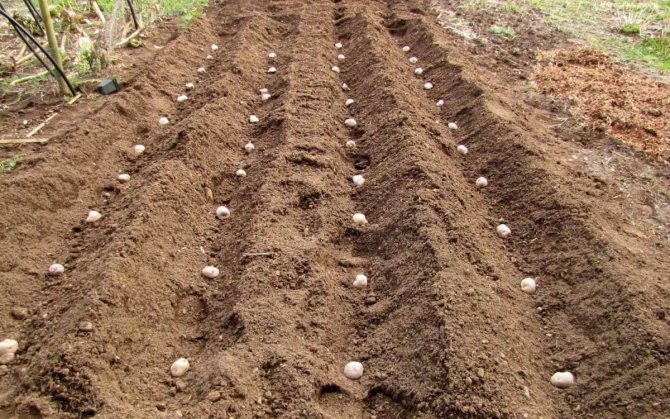
Shovel Landing in Single Rows and Double Rows
Environmental conditions, climate and soil conditions determine the choice of potato planting method: ridge or smooth. Moisture from the soil evaporates less with a smooth planting, for which:
- The site is dug up in advance, more often in the fall.
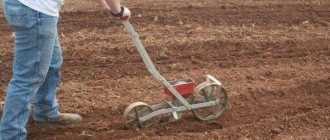
- With a thick cord or twine fixed on pegs, they indicate the direction of the rows at a distance of 70 cm from each other. By using the plow, you can do it faster.

The plow makes the work of the gardener easier and faster
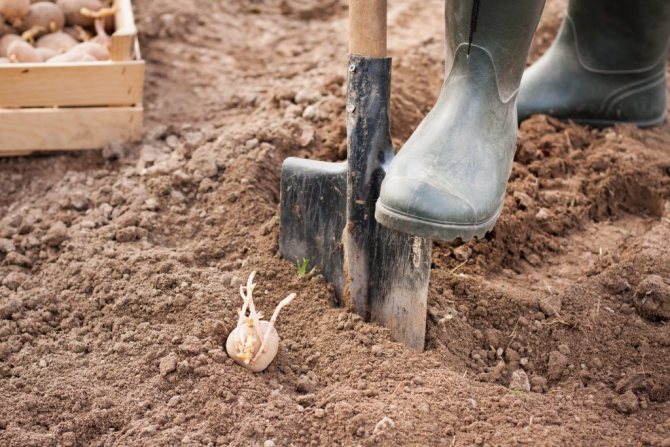
- Dig holes at a distance of 25-30 cm deep in half a shovel bayonet, lay seed material and fill the previous hole with soil from a new one.
- It is more convenient to plant potatoes together: one digs holes, the other plants tubers and adds ash if necessary, and the first one pours this hole, thereby digging a new one. Then the earth is leveled with a rake.
Solid planting of potatoes - video
As a result of the ridge planting, full air access to the soil and its warming are provided. This method is recommended for use with a high standing groundwater on heavy loam. In areas of good and excessive moisture, the ridges are cut in the fall after applying organic fertilizers.
The uneven soil surface accumulates heat, which, during a cold snap, gives off to the adjacent air layer, creating comfortable conditions for potato growth.
The optimum spacing between rows for ridge planting is 70 cm. The ridges are formed at an elevation of 12–15 cm, and the depth of the tubers is 6–8 cm. Naturally, the larger the tubers, the deeper the depth; small tubers do not need to be planted deeply. The holes are dug at a distance of 25–30 cm from the edge of the ridge, so that there is something to spud the potatoes with later. They also leave 25-30 cm between them. If the soil is not too well fertilized, the feeding area should be larger.
The original version of the ridge planting of potatoes - video
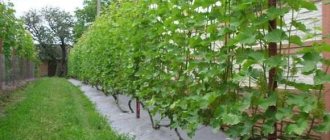
The beds can be either single or double. Recently, gardeners have given preference to growing potatoes in wide ridges (140 cm) in two lines. With this scheme, the number of tubers and their mass in the nest increases. Due to the better aeration of the plants, the plantings are either later affected by late blight, or the disease is avoided.
In the case of the formation of double rows, after the first row of holes has been dug, you need to lay the second row in a checkerboard pattern at a distance of 25-30 cm. Tubers, depending on their size, are embedded to a depth of 6–8 cm. Further, the next row of holes is spud on each side of the ridge.
For any planting method, gardeners recommend orienting the rows of potatoes from north to south in order to provide better lighting in the aisles. This arrangement contributes to an increase in the mass of the tops and leads to the formation of new side shoots.
Planting potatoes in double rows increases the yield
Trench landing method
For planting potatoes in a trench way, the soil should be prepared in the fall. It is necessary to dig deep, up to half a meter, trenches along the entire length of the garden. Plant residues, leaves, peat, compost, straw, humus are poured into them and left until spring. In the spring, the trenches can be covered with black foil to speed up the warm-up.
For planting potatoes in trenches, the soil is prepared in advance
When the soil warms up properly, you can start planting.
- Plant residues that have sagged since autumn are sprinkled with ash and soil about 3-5 cm. For the prevention of late blight, you can treat the trench with a solution of copper sulfate at the rate of 2-5 g per 10 liters of water.
- The pre-germinated tubers are carefully planted in prepared trenches at a distance of 25–30 cm, again covered with a peat mixture, compost, cut grass with a layer of 8–10 cm and covered with foil.
- After the appearance of the first shoots, the film is removed, the seedlings are covered in the same way with a compost mass to a height of up to 10 cm and again covered.
- After the appearance of new seedlings, this procedure is repeated, after which holes are cut in the film for the emerging seedlings. Thus, weed control is achieved, while the tubers are provided with heat and moisture due to the decomposition of plant residues.
With the trench planting method, you do not need to huddle the bushes and loosen the soil. According to gardeners, this method provides significantly higher yields compared to conventional ones.
Deep planting method
In general, potato growers and simply summer residents speak out against deep planting of potatoes. For normal growth and development of potatoes, heated soil is needed, and the lower the level of embedding of tubers, the lower the temperature, which means that the later the potatoes will germinate, and this, in a short summer, can ruin the harvest. The task of the gardener is to ensure friendly shoots so that in the future some bushes do not oppress others.
The standard planting depth of tubers is 6–12 cm. On the other hand, on light soils there is less moisture in the upper layers, therefore, you need to plant the potatoes deeper to provide the plant with sufficient moisture.The best advice for choosing a planting depth is experience and knowledge of the climatic characteristics of the region and the composition of the soil.
Basic planting schemes (depth and density)
In order to ensure early friendly shoots, scientists from the K.A. Timiryazeva propose to plant potatoes on medium loamy soil to a depth of 4–6 cm. This, among other things, helps to avoid certain crop diseases.
On light soils, potatoes are planted to a depth of 14–16 cm. On loamy soils in the Moscow region, with a decrease in the planting depth of tubers from 12 cm to 6 cm, the yield increases, while on sandy and sandy loam soils, on the contrary, decreases.
Planting density changes depending on the size of tubers and feeding area. Early maturing varieties with erect tops and a compact bush, as well as small seed potatoes of any other varieties, are planted denser. When used for planting tubers weighing 50–80 g, the optimum planting density is 5.5–6 pieces / m2. For small tubers, the rate is increased to 7, and for large tubers, it is reduced to 4.5–5 pieces per 1 m2.

... And five conclusions
After the first hilling in the aisles, I sow the tansy phacelia, which promotes the growth and high-quality ripening of tubers - this is the seed of the second seeding period. I will add that the thicker the phacelia is sown in moist soil, the more it will give green mass, the more luxuriant the soil will become after filling it. And I close up this green manure just before the second hilling, which I spend before the potatoes start flowering. And I use some of the stems cut with a hoe as mulch for potatoes. In the course of hilling, I slightly raise the ridges and the beds themselves to the maximum possible height. And immediately after that, I sow mustard in the aisles (already at the recommended sowing rate) - this is the third term green manure.
Before the tops of the potatoes close, I cut the green mass of mustard with a flat cutter and leave it in deep aisles for one or two days, and then lay on top of it in layers everything that is found from organic matter - freshly cut wilted grass, humus, compost, fallen leaves, sawdust. This mixture should fill the paths as high as possible to prevent the soil from sliding off the sides of the beds, and at the same time, by rotting, it increases the fertility of the soil.
In dry weather, I water the plantings moderately (abundantly only during the flowering period), and the siderates on the paths are also moderately, but more often than potatoes. To prevent lodging of bushes of such a tall variety as Aurora (at the end of its flowering), I cut off the tops of the stems with a pruner. I harvest in early September, in dry (or even better - in sunny) weather. And I dig with a shovel, not with a pitchfork. Why?
If you injure a tuber with a blade, then the cut is easy to dry, and this will hardly affect its further storage. And if a potato is pierced with a sharp narrow "tooth", then rot will definitely appear in a deep wound.
Immediately when digging from the highest-yielding bushes, I select high-quality (even, the size of a chicken egg) seed for seeds. At the same time, I dry the entire crop right in the garden, spread it out on a film, for at least 3 hours, and then put it in mesh bags and transfer it to the garage for drying. After about two or three weeks, I sort out the tubers and lower them into the cellar, where I keep them in plastic boxes, pre-installed on bricks. An important moment after the potatoes have been dug out, I sow phacelia or mustard throughout the vacated area.
Read also: House made of wooden sticks
Summing up, I will note the advantages of planting and growing potatoes in double rows:
- To huddle double rows in a garden bed, only two passes with a hoe are required instead of four, which significantly saves energy (I am 71 years old) and time.
- Tall and wide beds not only allow the soil to warm up faster and stronger, but also better retain moisture. It is clear that it is more comfortable for potatoes to grow on a warm and tasty "base", and even under the protection of green manure.
- Laying organic matter in deep aisles and repeatedly sowing green manure improves the soil, which is why potatoes are so appreciated.
- The breakdown of the site according to the 70 × 70 cm scheme allows you to alternate the planting sites of the second bread and green manure annually, thereby carrying out a crop rotation.
- The listed techniques allow me not to weed or dig up my plot, and the yield of potatoes will only increase.
I forgot to note one more nuance, which, in my opinion, despite its smallness, is of great importance. The fact is that when planting, I place the tubers in the holes not upright, but lay them on the barrel so that the sprouts look to the center of the garden. As soon as I started doing this, the seedlings began to appear more amicable.
Among the dozens of ways to cultivate potatoes, it is important to choose the optimal one for a specific site.
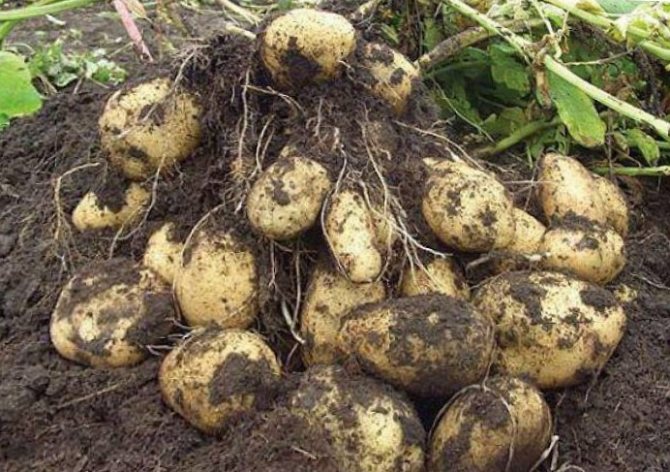
Ease of care depends on the successful choice of ridges, embankments, hills. The yield can grow by 1.5-2 times and reach 700 or more kg from 1 are.
In this article, you will find a detailed description of how to plant potatoes for a high-quality harvest in your garden plot.
New landing methods and their benefits
Recently, several new methods of planting potatoes have become known: in bags, barrels, boxes. Probably, in the absence of free areas and a great desire to get a potato crop, gardeners turn on ingenuity.
How to plant potatoes in bags, barrels and crates
In a lighted place, containers are installed in which they intend to grow potatoes: barrels, boxes. Some summer residents even use sugar bags.
Planting potatoes in bags is as follows:
- poured humus up to 30 cm high on the bottom of the bag;
- spread 4–5 sprouted potato tubers at a distance of 20–25 cm from each other;
- fall asleep from above with earth, humus, rotted compost by 8-10 cm;
- watered.
In the future, as the shoots germinate, the peat mixture is poured two or three more times. Over the summer, bags of potatoes are watered several times, especially during budding and flowering. After the potatoes have faded and the tops are withered, you can harvest. Sugar bags are capable of letting water through due to their structure; in the absence of such a property, the plants should be provided with drainage holes in the container.
Planting potatoes in bags - video
Reviews of gardeners who planted potatoes in bags vary. For some, the overall result is disappointing. A definite plus is the good quality of the land after harvest. And although everyone received little potatoes, the tubers were clean and healthy.
The bottom is removed from old wooden barrels or tubs before planting. When using plastic containers, drainage holes must be drilled in the walls and at the bottom. Further measures are similar to planting potatoes in bags.
The main thing with all these planting methods is to cover the sprouts with earth, humus, soil-compost mixture in time, so that the potatoes give strength to the formation of roots, and not to greens. Each time the sprouts reach a height of 5–6 cm, you need to add soil twice as high. This procedure must be repeated at least 3-4 times.
Harvesting after planting potatoes in a plastic box - video
In conditions of limited suburban space, plastic boxes, various containers, and improvised containers are used. The planting technique is identical, it is important to ensure good drainage of the soil, otherwise the crop may rot.
Unconventional landing methods
There are several new, unconventional methods of planting potatoes, some of which do not involve digging the earth. But those who tried it received consistently high yields.
Potatoes without digging the earth and planting in the grass
In everyday life, Galina Aleksandrovna Kizima, the author of many books and video courses on trouble-free processing of the site, is guided by simple principles: do not dig, do not weed, do not water, and a few more "do not". So she recommends putting the potatoes immediately on the ground, on a bed of herbs and covering them with straw, covered from the wind with lutrasil.
As the lawn is mowed, it is necessary to gradually increase the layer of "featherbed" on the potatoes, adding new layers of compost or fresh grass.
Method of planting potatoes under straw from Galina Kizima - video
According to gardeners, planting potatoes under straw on virgin or very neglected areas is especially beneficial. The cut grass, tightly covering the soil, inhibits the growth of weeds. In the fall, after harvesting, summer residents receive excellent quality soil as a bonus. Having dug up the remnants of rotted straw, the same area can be enriched with organic matter.
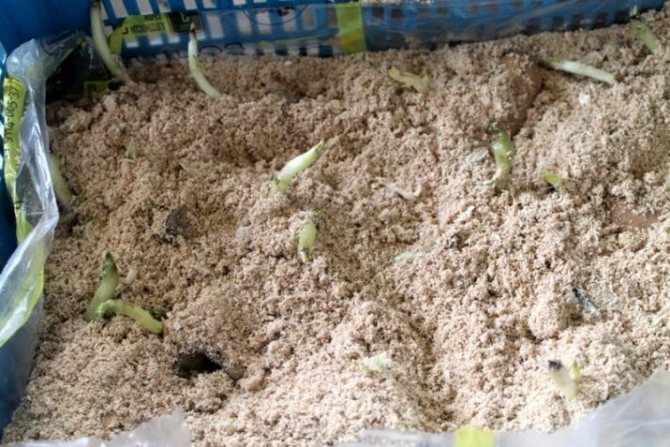
How to plant in sawdust
Many summer residents successfully use wet sawdust for sprouting potato tubers. In the city, they can be purchased at pet stores. Wet, pre-steamed and cooled sawdust is placed on the bottom of a plastic container with a layer of 2 cm. From above, the tubers are carefully laid out with their eyes downward and rather tightly, then they are again covered with a layer of sawdust and everything is repeated several times. After everything is laid, the plastic container is placed in a spacious plastic bag, the edges of which are tied, leaving a small "window". The condition of the seedlings is periodically checked. It is impossible to overdry the sawdust, therefore it is recommended to spray them from a spray bottle with water at room temperature.
Sprouting potatoes on sawdust - video
This method is especially good because it allows you to germinate potato tubers in a city apartment long before the start of the garden season. There are two fundamental points when using sawdust:
- they should be damp, but not wet;
- tubers on sawdust should be laid out only with their eyes down.
When potatoes are planted down with their eyes, the bush turns out to be wider, since during development the seedlings have to go around the mother tuber, as a result, each of them is better illuminated due to the distance from the rest. Accordingly, photosynthesis in each sprout is more intensive.
In the future, the tubers need to ensure the most careful transportation and planting. Sawdust can then be used on the site as mulch or dug into the ground.
Cascading landing
The cascade planting method is used when it is necessary to plant potatoes on the slopes. This is a time-consuming process, you have to level out plots of land on several sites, smoothing the relief. At the same time, intense rains can negate the results of work in a short time.
For planting potatoes, the plots are prepared in the fall. The soil is loosened and formed by furrows and ridges with a height of 12–15 cm. The distance between the rows is 60–70 cm, the location of the furrows is strictly across the slope. Winter grasses (rapeseed, mustard) are sown in the ridges, which have time to grow before the first frost.
In winter, these grooves and ridges, located across the slope, contribute to snow retention over the entire surface of the site. Due to the ridges and furrows, the height of the cultivated area is 12–15 cm higher than that of the untreated one, there is less depth of soil freezing and its water permeability is preserved. In spring, snow melts on prepared slopes gradually. Water is retained in furrows, slopes lose less fertile layer during thawing.
After warming up the soil in the spring, potatoes are planted in the furrows. They fall asleep from two ridges, digging in the remnants of winter grasses. As a result, instead of ridges, there are ditches in which water is retained. The use of winter grasses promotes water retention, reduces soil washout and enriches its composition with organic compounds.
How to plant potatoes under cardboard
This method resembles the method of planting under straw, but here, in addition to potatoes, cardboard is needed. After the snow melts and the earth warms up, you can begin to prepare the site. The area allotted for planting is covered with thick cardboard. No need to pre-dig, weed or mow the grass.
If there is a snowless winter or the soil under the proposed plantings is too dry, you need to water the ground before laying the cardboard.
With a large planting area, several sheets of cardboard are overlapped with a decent margin - up to 30 cm, so that weeds do not break out of the joints.At a distance of 25-30 cm, X-shaped cuts are made, where the sprouted potatoes are placed and the edges of the cardboard are closed so as not to injure the eyes. The potatoes remain in the house, as it were.
As the tops germinate, it should be mulched with straw in a layer of 10–15 cm several times over the summer. To prevent it from flying off the cardboard, you can use lutrasil. If the summer is not too dry, the potatoes, according to gardeners, will not even need to be watered. And in the fall, you don't have to dig the land to harvest All potatoes will lie under the cardboard, you just need to rake off the remains of haulm and straw, and then remove the cardboard itself.

To prepare for planting potatoes, it is enough to cover the area with cardboard
The method of planting under cardboard, as well as under straw, significantly improves the condition of the soil.
Features of planting under film and agrofibre
To get an early harvest, planting under the film is used. The potatoes are planted in a smooth manner. After planting, the soil is leveled with a rake and the film is stretched. A wide piece of polyethylene can be used to cover two or three rows of potatoes at once. The film spreads freely, boards, heavy objects are laid on the edges so that it is not blown away by the wind. Often gardeners use dark plastic water bottles as oppression. During the day, the water in them heats up, and at night it gives off heat. Plastic wrap helps to warm the ground, retains moisture and protects potato sprouts from frost.
The disadvantage of this method is that the covering layer does not allow oxygen to pass through. In this case, the seedlings will not be able to consume oxygen, so there is a high risk of overheating of the plants. Therefore, it is recommended to monitor the temperature under the film and air the plantings in time. With the threat of frost, in cases where the potato sprouts are high enough, you can stretch the film over the arcs. The greenhouse also needs to be ventilated periodically.
Similarly, potatoes are grown using modern agrofibre, spandbond, white and black. Light cover plantings of early potatoes. The material protects the sprouts, retaining heat, but allows air to pass through, unlike the film. White agrofibre also fits freely, the edges are fixed or covered with earth. As the potato grows, arcs are used if necessary.
Black spunbond is used differently. It is spread on the ground, in places where potatoes are planted, cuts are made crosswise and potatoes are embedded in them. Dark spandbond does not protect potatoes from frost after sprouting. But in good weather, this method is very effective. Spandbond, without interfering with aeration and water ingress during irrigation, suppresses weeds as the bushes grow. Dark agrofibre acts as a mulch for potatoes.
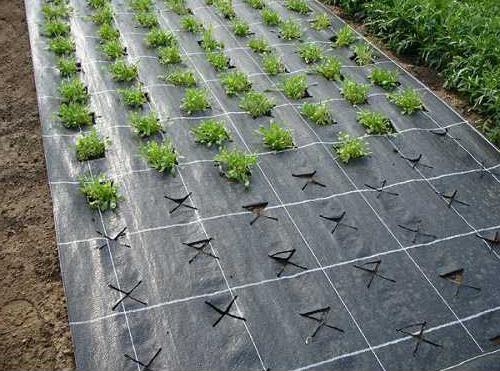
Black Spundbond Suppresses Weed Growth Around Potato Planting
Why determine the distance between rows
Root crops are easy to plant, which allows them to be grown both on large farms and in small summer cottages. Farmers are trying to get the most out of every square meter.
The distance between potatoes when planting is a criterion that affects the volume and quality of the finished product. Subject to the rules, it turns out to wisely distribute the useful area of the site. A well-thought-out bed provides easy access to each bush and does not make it difficult to maintain.
Increasing or decreasing the category negatively affects the yield. Excessive planting density leads to the fact that each plant does not receive nutrients, so the bushes grow weak and do not please with an abundance of fruits. An excess of free space is also dangerous: the culture goes to the tops, and the potatoes become huge and few in number.
Planting potatoes in a greenhouse
This method requires a lot of preparatory work. Greenhouses for potatoes need to be prepared in the fall. It is important to have healthy seed, stock up on peat, humus, compost, ash. To get a good harvest, you need to heat the greenhouse and monitor the temperature.
The work consists of successive stages:
- First, completely remove the entire fertile soil layer from the greenhouse.
- At the bottom of the greenhouse, a warm drainage mat is laid in layers: peat, humus to a height of 10 cm.
- A fertile layer of earth with additives (humus, ash, compost) up to 20 cm high is poured again.
They begin to heat the greenhouse. Within 3-4 days, the soil will warm up enough to plant potatoes. Seed material is germinated in advance (in boxes) at a temperature of about + 20-25 ° C.
Potatoes are harvested in the greenhouse 10-14 days after the end of flowering
After the appearance of the eyes, the potatoes are transferred to a lighted place with a lower temperature until the skin on the tubers turns green. After all these procedures, the tubers ready for planting are sealed into holes at a distance of 25 cm. The planting depth is 8–10 cm, the distance between the rows is 60–65 cm. At this stage, the potatoes are not watered, planting needs to ensure a constant air temperature within + 20 ° C. At this time, they strictly ensure that the soil surface does not dry out and water the plantings after sprouting with water at room temperature no more than 1-2 liters per bush. Gradually, as the potatoes grow, the watering rate is brought to 10 liters per bush.
Further planting care is reduced to moisture, inter-row cultivation and weed control. During the sprouting period, the temperature in the greenhouse is lowered to + 18–20 ° C, as the buds form and during the entire flowering period, the temperature is maintained at + 20–23 ° C, later it can be lowered again.
What methods are there?
Standard
| Variants | Distance between rows, cm | Distance in a row, cm | Depth including soil, cm |
| Smooth | 60 | 25-30 |
|
| Ridge | 65-70 | 30-35 | |
| Trenches | 65-70 | 30-35 |
Fancy
Suitable for growing potatoes, when there is a small area, a lot of grass or a heavy substrate. This is a planting for mulch, straw, cardboard, as well as options for Gülich and Meatlider.
Original planting methods for a high yield
Gardeners are constantly improving their tools and methods in search of more efficient ways to cultivate the land.
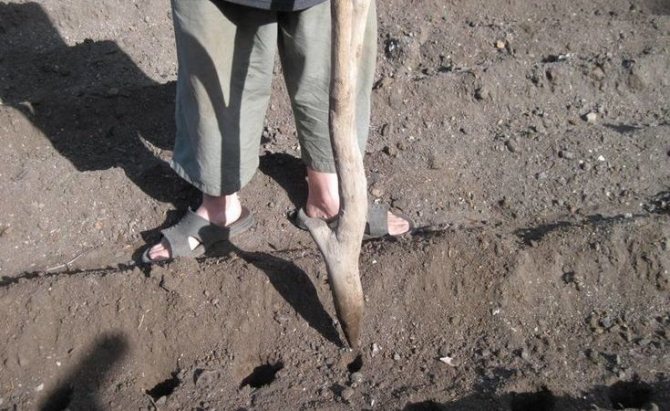
Planting potatoes using the Fokin method
Inventor engineer V.V. Fokin came up with a tool for planting potatoes in an unconventional way. In appearance, the device resembles a cane with a round knob with a diameter of 55 mm. Two planks are cut in at a distance of 120 mm from the top of the knob.
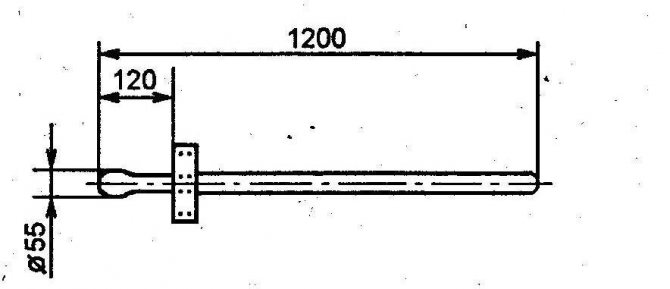
Fokin's potato planting tool allows you to make identical holes quickly and accurately
Fokin proposes, pressing on the board support, to make holes in the ground in rows at a distance of 25–30 cm from the edge of the garden bed and the same distance between the holes. The depth of the holes can be changed by applying pressure to the stop, depending on the size of the seed potatoes. The second row of holes must be made with an offset so that they are staggered. 1 tablespoon of ash is added to the resulting grooves with a diameter of 55 mm and a depth of 120 mm, seed potatoes are laid. After that, the holes are covered with humus.
According to Fokine, his method has a number of advantages. You can plant potatoes alone, dose fertilizers. Filling potatoes does not require a lot of land, just a handful. As a result, the air reaches the roots, and the compacted soil contributes to the capillary flow of moisture from the lower layers of the soil. As the seedlings germinate, they huddle, taking the soil from the edges of the garden and from the very border.
Joint planting of potatoes with legumes
Some gardeners, when planting potatoes, throw a couple of pea beans into the hole. The bottom line is that sprouting peas enrich the soil with nitrogenous compounds. Another method suggested by Sally Cunningham is close to this.
In the depths of the trench, potatoes are planted and mulched with straw, and bush beans are planted next to them, to the right and left. First, the earth is harvested on one side. Potatoes are planted in the trench itself, bush beans are planted on a land-free site. As the potatoes germinate from the non-planted edge of the trench, the soil is poured onto the seedlings. This is done several times. By the time the trench is completely filled, on the side freed from the ground, you can plant bush beans again, since during the time that the potatoes were growing and covered with soil, beans ripened on the first bed.
When planted together with beans, potatoes constantly receive nitrogenous compounds, and summer residents consistently harvest beans, potatoes and a new crop of beans.
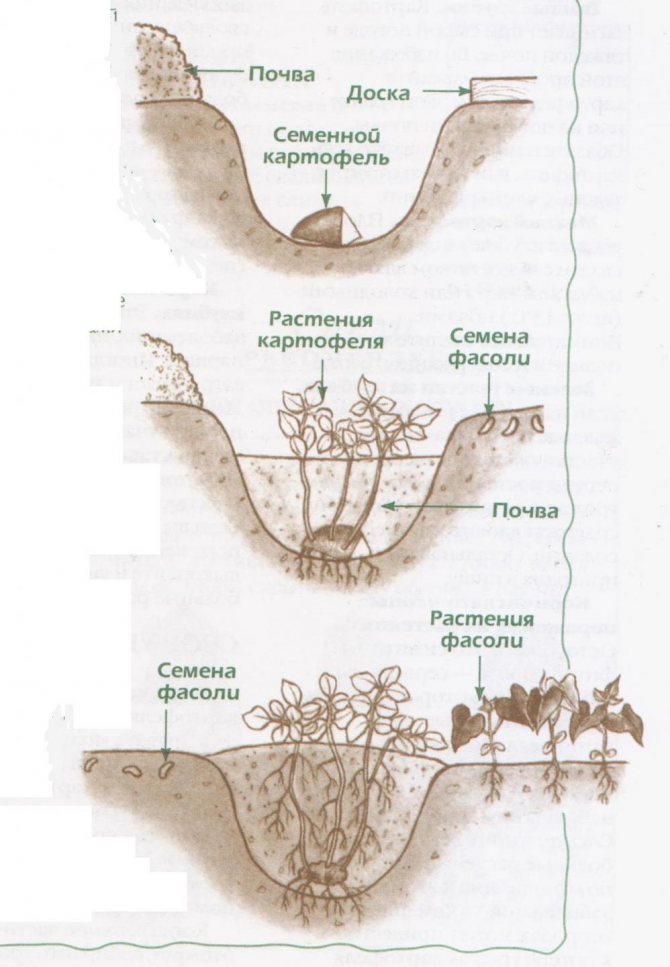
Joint planting of potatoes and beans is quite convenient: the soil is enriched with nitrogen, and the crop can be harvested several times per season
Someone grows potatoes in old-fashioned ways, while someone is constantly improving their skills, looking for modern and original ways of cultivating a culture. It is important that the potatoes continue to be planted, grown and dug.
Video
Of more than a dozen tuberous plants of the New World, only potatoes and Jerusalem artichoke have survived. But if Jerusalem artichoke remained more of an overseas delicacy, or even a vicious weed of summer cottages, then the potatoes did not just reach - they walked on a victorious march! In the Soviet comedy "Girls" Toska selflessly recalls potato dishes, but even that list is far from complete. Although what is the point of listing various delicacies when potatoes are the basis of our diet. Perhaps this is due to the variety of methods of cultivating crops in summer cottages.