
Such a phenomenon as a greenhouse private economy, in contrast to an industrial greenhouse complex, originated and became widespread in the seventies of the last century. It can be said that greenhouses on personal plots began to appear on the basis and likeness of greenhouses, where collective farms, state farms and agricultural complexes grew the first long fresh cucumbers for Soviet citizens by March 8. There were queues for cucumbers, you could buy two cucumbers per hand. Citizens did not like this state of affairs. Those who had their own plots decided not to wait for favors either from nature or from the state, but to try to get an early harvest of their own vegetables. Obviously, for this it was necessary to create certain conditions for the seedlings, in particular, the greenhouse effect.
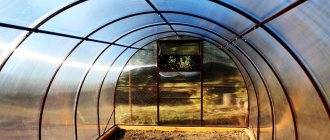
Do-it-yourself greenhouse from scrap materials

Cheap greenhouse from scrap materials
Principle of operation
Unconditional demand for all types of mini greenhouses - installation on well lit sunshine place.
They all have a common design feature hidden underground.
A trench is made under the greenhouse, filled with biofuel - fallen leaves, mowed weeds and grass, branches accumulated after pruning fruit trees. A layer of fertile soil is poured onto this green mass, and then a greenhouse is erected on top.
Rotting, the green mass releases heat, which heats up the ground and the air in the greenhouse.
After a year or two, the process ends, and the biofuel turns into humus.
To lay a new portion of green mass, it is required to dismantle the greenhouse and extract humus, which will serve to enrich the depleted soil in the garden. Then put the greenhouse back in place. He's ready to go again.
Biomass replacement can be done and without disassembling the greenhouseif a sufficiently wide access hatch is provided immediately.
Budget option from improvised means: do-it-yourself greenhouse
Having built a greenhouse with your own hands, you will not only acquire a useful structure on your site, but also save your savings by spending them on other special and necessary purchases.
A greenhouse made from improvised means, with your own hands, will help you grow an excellent harvest not only in the spring, but also in late autumn, or even in winter. An inexpensive material is suitable for their manufacture. However, it must be of high quality and practical.
The greenhouse frame can be made of polypropylene pipes, which are cut into certain pieces. Then they are bent and placed on metal pegs, which are driven into the ground. Above the arcs formed, a polyethylene coating is made. It can be fastened to the ground so that it will not be ripped off by a sharp gust of wind.
Materials from which you can build a homemade greenhouse:
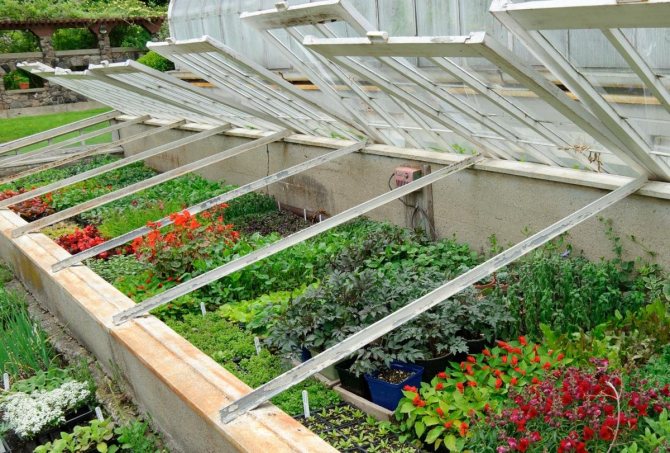
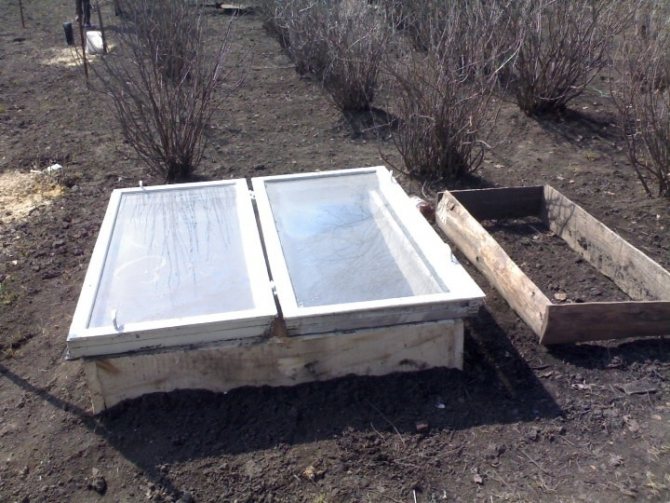
- Window frames;
- Metal mesh: welded or from a large chain-link is suitable;
- Wooden lattices.
Self-made designs have their own advantages: simplicity of design, minimum costs, they are easy to open and close. After the end of the harvest season, they are very easy to disassemble and put for storage.
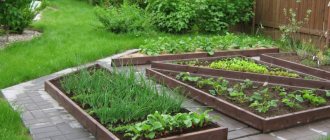
What do we grow?
The summer cottage is intended primarily for growing seedlings of early vegetables from seedplanted in insulated soil protected from the external environment. Seeds are planted in a greenhouse in late winter or early spring.
Cucumbers and tomatoes, eggplants and cauliflower, sweet and hot peppers, zucchini and squash - all heat-loving vegetable crops will delight you with a harvest not a few weeks earlier.
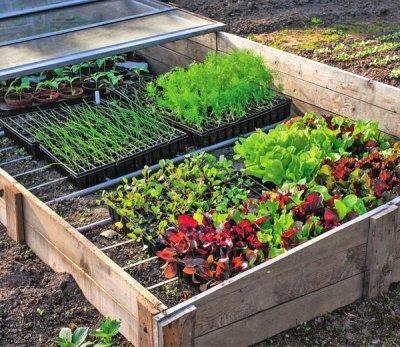
But for seedling development a full-fledged fruiting plant will need much more space... The area of the mini-greenhouse is limited, and with the onset of warm weather in May, the mature seedlings will have to be transplanted into spacious garden beds.
The low height of the greenhouse limits the growth of plants. Previously, only many years of experience suggested when exactly the seeds should be planted so that the plants would not stretch out under the vault of the greenhouse until the moment of transplantation.
Today, there are dozens of online forums for gardeners and gardeners, where you can chat with your hobby colleagues and get detailed advice.
Additional features
The mini-greenhouse will not be idle after transplanting the first batch of seedlings. All season in him can be grown more and more new cultures. For example, a radish in a greenhouse is capable of producing two or three harvests (its growing season is 18-25 days). There is always room in the greenhouse for green onions, parsley and dill, spicy herbs - mint, marjoram, thyme. Greenhouse remontant strawberry bears fruit from spring to late autumn.
The greenhouse creates all the conditions for rooting grape cuttings, raspberries, currants, yoshta (agrus).
Cuttings of roses, rose hips, ornamental shrubs and lianas also perfectly sprout roots in a greenhouse. However, for the development of a full-fledged root system, they take a long time (about a year). It's better for them to arrange separate "kindergarten"... Gardeners call greenhouses for cuttings - "baby" or "school".
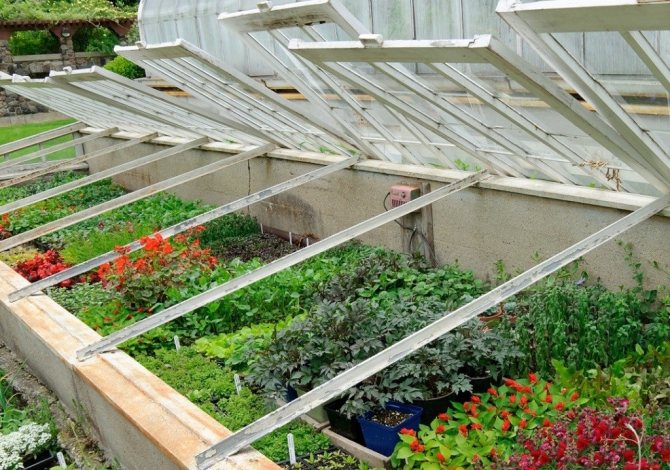
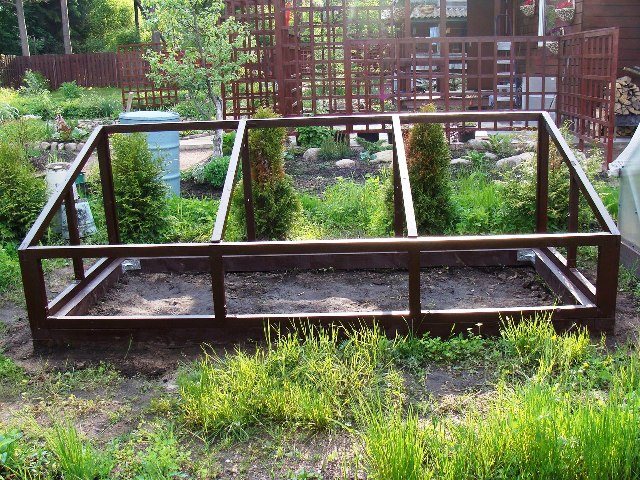
Making a greenhouse on a wooden frame
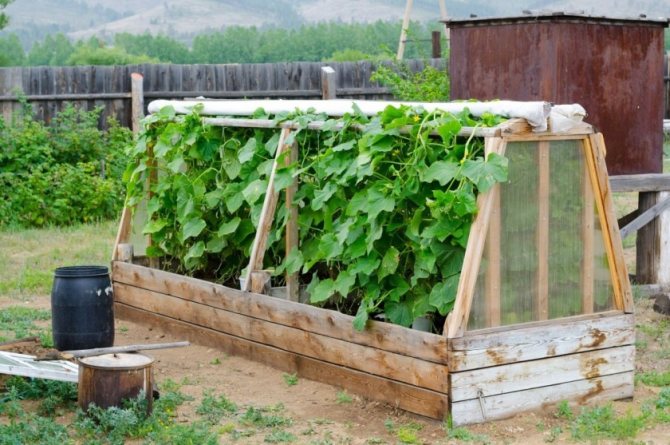
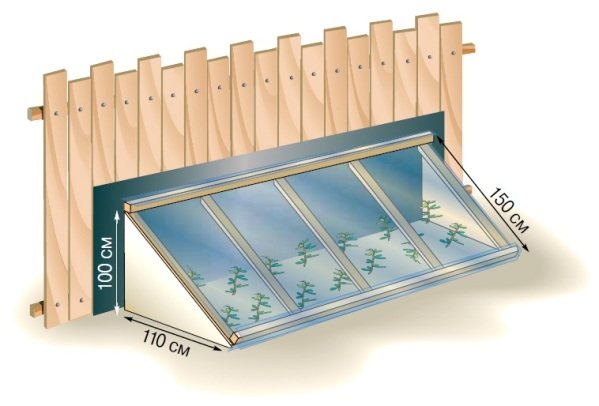
This structure is considered more solid, although it is not much more difficult to make it. Instead of a film, glass or polycarbonate can be used as a coating, and a combination of materials is widely used - polycarbonate for walls and a film covering for a slope. The frame material assumes a different, non-arched structure. The simplest is the lean-to design, which is also often used to create wall-mounted greenhouses.
How to make a greenhouse for a summer residence with your own hands
Materials and tools:
Building a greenhouse
Before starting work, you need to collect everything you need in one place so that it is at hand. Just as in the case of installing an arched greenhouse, you first need to determine the location, prepare the soil and find out the size of the future structure.

Drawing of a lean-to greenhouse
Prices for wooden beams
wooden bar
Step one: assembling the frame
The first is the lower frame, which will at the same time serve as an additional base box. It is made from a bar, fastened with self-tapping corners.
Corner posts are attached to a base made of a bar of the same section. In height, this greenhouse can be of the following sizes: the upper skate ridge - up to one measure, the lower one - half a meter. Corner posts are made to the appropriate length.
The upper frame is mounted on the racks (the same 40x50 mm beam is used). Between the upper and lower frames, intermediate posts are installed from a thin bar for better fastening of the covering material.
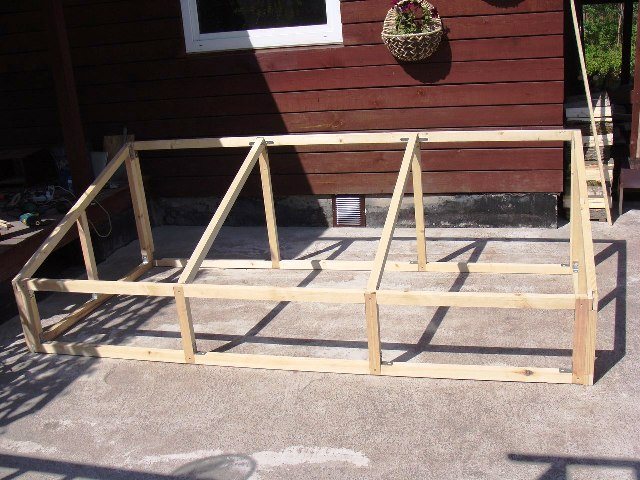
An example of a finished frame
The entire structure is impregnated with an antiseptic.
Step two: preparing the base
For a greenhouse of this type, you will need a foundation base. It can even be a concrete or brick (half brick) box, especially for wall greenhouses. But if you don't want to be engaged in pouring or building the foundation, it is enough to build a box from a bar - exactly the same as in the version of an arched greenhouse.
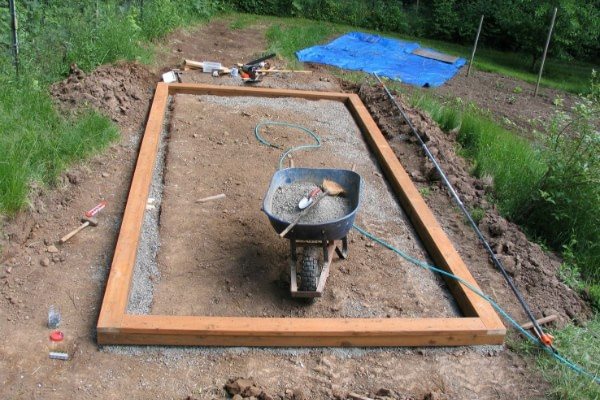
An example of a base for a greenhouse
A ten-centimeter bar is fastened with self-tapping screws and covered with antiseptic impregnation.
Advice! If no antiseptic is available, the frame and base can be painted with waterproof exterior paint, several coats of stain or varnish. You cannot leave the wood without processing - the service life will in this case be no more than two seasons.
The finished base fits tightly on the ridge. A frame is installed on it, fastened with screws and corners.
Frame after processing and installation on the base
Step three: installation of polycarbonate walls
The material is cut into panels of the desired size. The ends are pasted over with tape. The panels are attached to a frame mounted on a base. If there are no self-tapping screws with a thermal washer, you can use the usual ones by placing a thin metal plate under them.
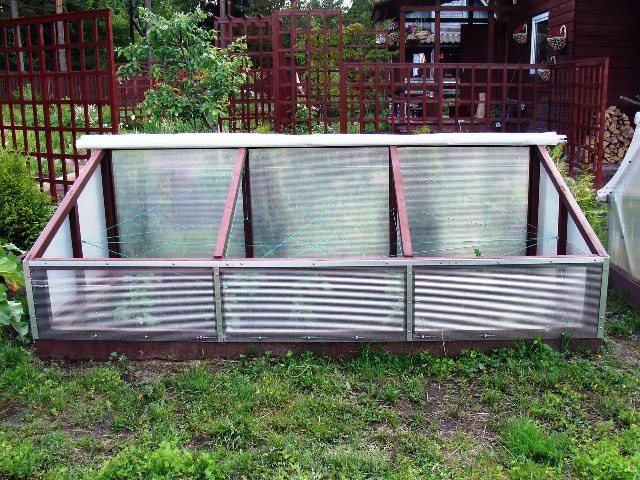
The frame is sheathed with polycarbonate
Step four: attaching the film
It is better to use a reinforced film. The roof slope with a film covering will provide better ventilation and easier access to the contents of the greenhouse. It can be spunbond or any soft roll covering material.
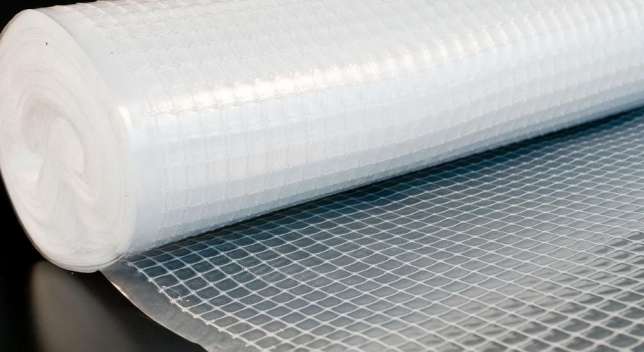
Reinforced double layer film
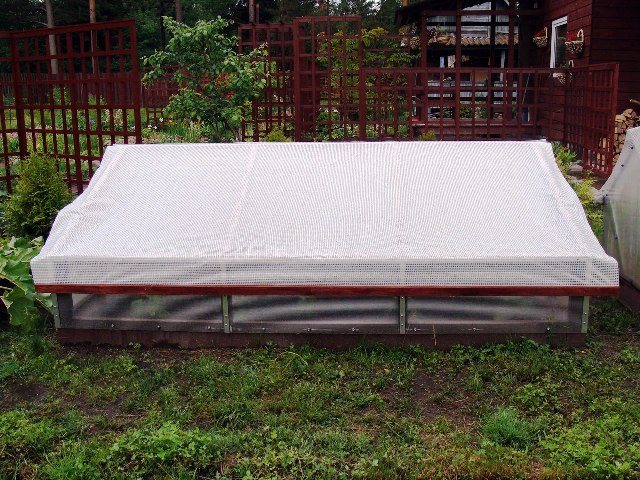
Fastening the covering material
First, the cover is measured with a margin of 30 cm for each sidewall and 50 cm for the front and back sides. The cover covers the upper frame. The main fastening of the film is on the upper slope. It is carried out by fixing with a bar attached to the bar of the upper frame with self-tapping screws. The film is between two beams.
The other three sides of the cover are freely lowered onto the structure. Two thin beams are attached to the front (the cover is clamped between them) using self-tapping screws. Thus, in order to open or close the greenhouse, you just need to roll the film into a roll, winding it on the bars.
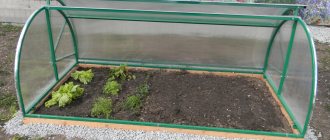
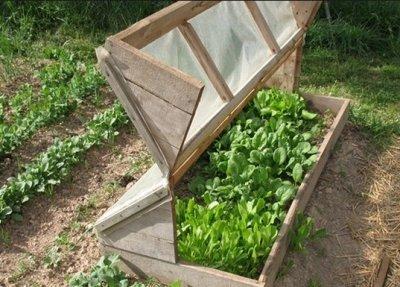
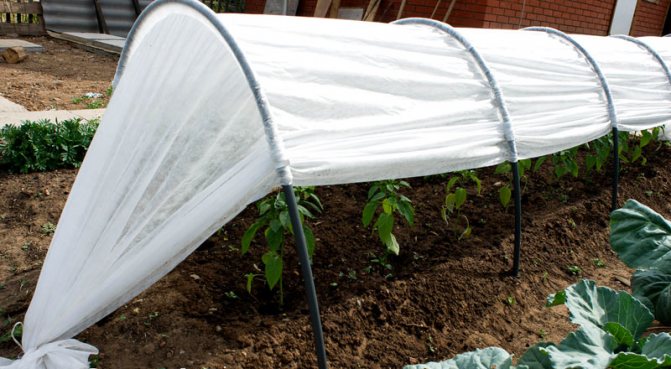
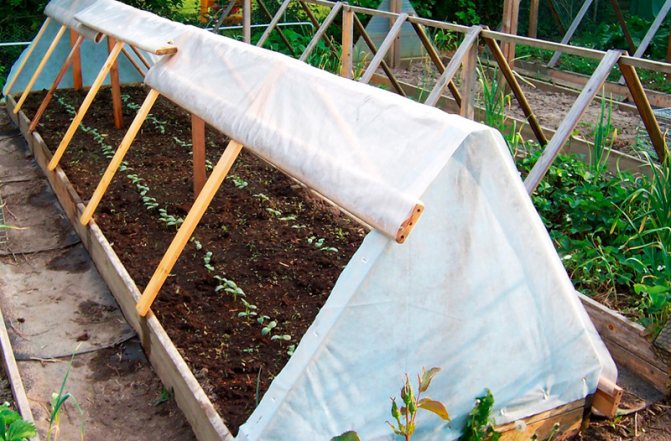
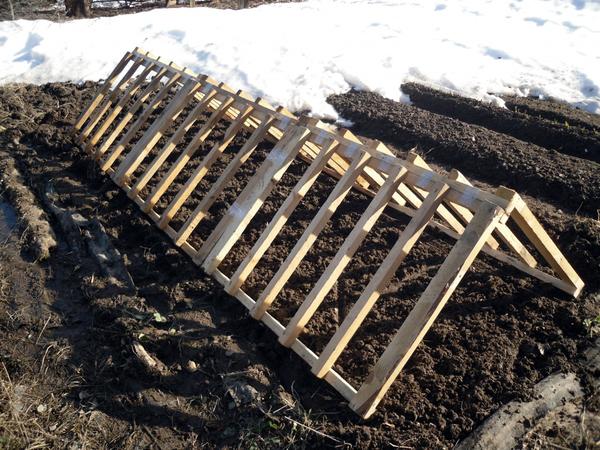
Consider another option - an express greenhouse made of scrap materials.
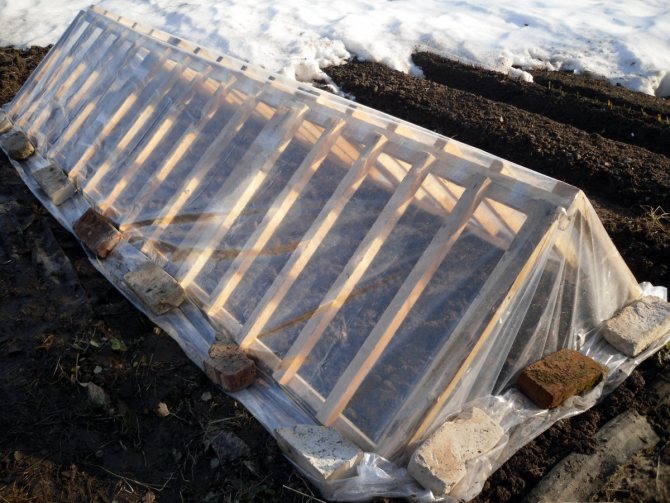
Express greenhouse from scrap materials

For this, such wooden lattices are useful.
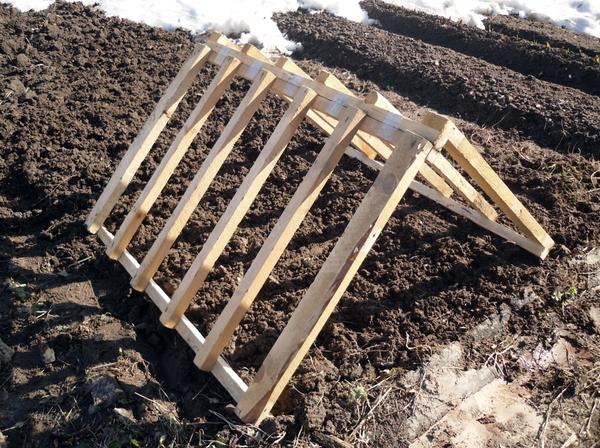
Collect them this way
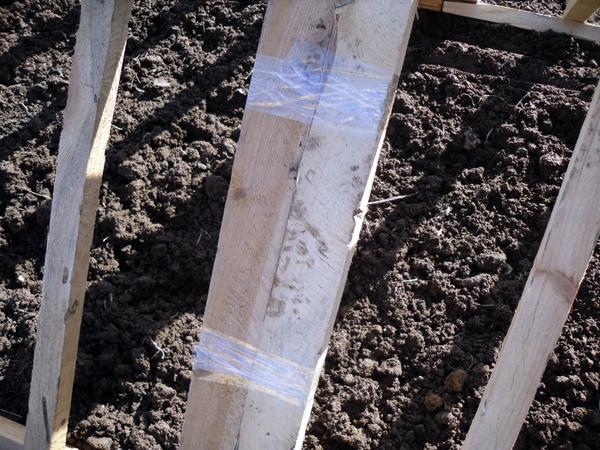
You can assemble several sections by connecting them with ordinary tape.
Homemade greenhouse from several sections. All is ready! Can be covered with foil
Single-pitched greenhouse scheme
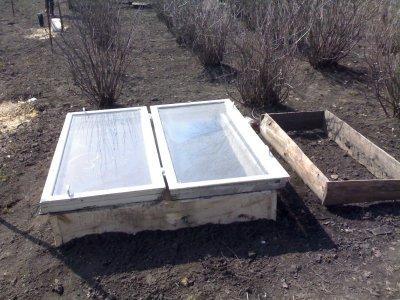
A simple greenhouse made of frames: a wooden case to which an old window frame is hinged
So, within a short time and using inexpensive materials, you can independently build a summer cottage that will help you grow high-quality seedlings that can turn into full-fledged developed plants and bring a rich harvest.
Glazing
There are a lot of materials for the walls of a mini-greenhouse: glass (with the exception of decorative colored glass), plexiglass, transparent acrylic, polycarbonate (honeycomb or monolithic), PVC film.
Unlike flexible polycarbonate, it is problematic to bring a large sheet of glass to the dacha for self-cutting, and you must be able to cut glass. Much more rational order glass cutting to the desired size in the workshop.
Small glazing units are easier to deliver. You just need pack them carefully. Straightened corrugated cardboard boxes are perfect for this. They are easy to get at your local grocery store. We shift the glass sheets with cardboard, then tighten them with tape. We place no more than four to five sheets in one package - the glass is heavy.
Glass and rigid monolithic transparent plastics limit the shape of the greenhouse to rectangular structures. Beautiful arched surfaces glazing allows you to create cellular polycarbonate and film. Getting Started
The construction of a mini-greenhouse should be taken at the end of summer, because the biofuel laid in the trench does not begin to heat up immediately. "Bioreactor" will warm up just in time for planting seeds in the greenhouse - at the end of the coming winter.
Mini greenhouse sizes
There is no single standard here. Each summer resident chooses the dimensions of the protective shelter, based on his needs.
However, two circumstances must always be taken into account:
- ease of maintenance;
- type of cultivated crop.
The first factor requires that the height of the greenhouse in the aisle zone be no less than human height. You will not be able to work productively in a bent position.
The second requirement is fulfilled automatically if the first is met. When growing cucumbers, the height of the room must be sufficient to accommodate the trellises. Tomatoes, peppers, early cabbage and flowers are not so demanding in height, so in a two-meter greenhouse you can compactly place them on several levels.
The minimum width of the structure is determined by the size of the entrance door (70 cm) and twice the width of the box with soil (50 cm). Adding these values together, we get: 70+ (50x2) = 170 cm. Add 30 cm to this figure for comfortable work, we see that our compact greenhouse will have a width of 2 meters.
The length can be selected based on the number of boxes with seedlings and the planned length of the beds with soil (from 3 to 4 meters).
Projects
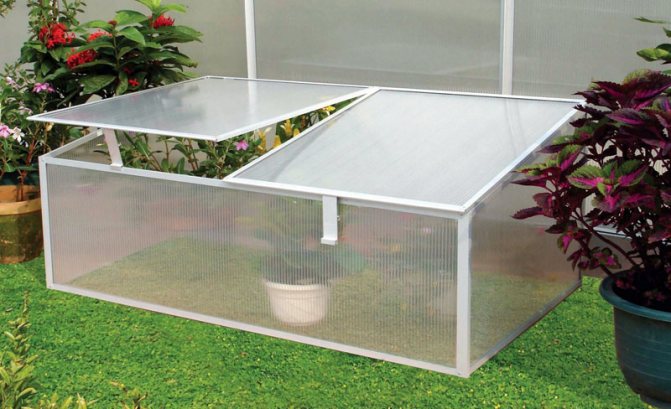
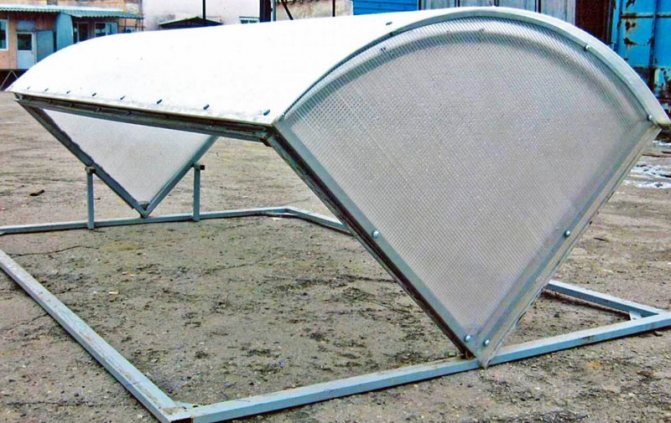
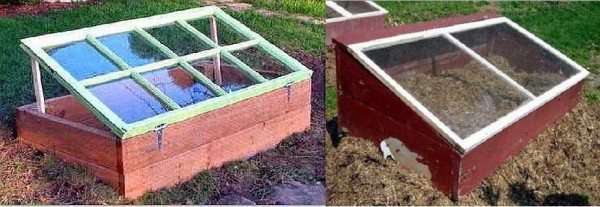
Let's add another function to the greenhouse and make it an element of garden design.
A nice greenhouse resembling a transparent chest with a hinged lid will decorate the lawn. Rectangular walls can be made of glass (it is more durable than polycarbonate), a semi-arch-shaped lid is made of cellular polycarbonate.
The frame is made of a steel corner, it is more convenient to fix the glass in it. We will make the arched structure of the cover from a rectangular steel thin-walled pipe.
We make a template for precise bending of the pipe. Draw an arch line of the required size on the brick wall. We drill holes along the line and hammer in the pointed cuts of steel reinforcement in increments of 15-20 cm. Gradually bend the pipe according to the template using a lever from the reinforcement rod. This work is easier to do with an assistant.
To prevent the pipe from deforming when bending, we fill it with dry sifted sand.
From the semi-arches and straight pipe sections, we weld the cover frame, connect it to the frame from the corner with hinges. We bend a sheet of cellular polycarbonate along the frame, fix the part with self-tapping screws with wide washers. It is recommended to lay polycarbonate on some kind of sealant.
A rectangular greenhouse near the sunny side of the fence will take up very little space. In this design, the fence will serve as the back wall of the greenhouse and support for the hinges of the hinged lid.
If the fence is made of thin corrugated board or mesh, you will have to make the back wall. It is better to insulate a brick or concrete fence in the area of the greenhouse with foam plastic or a slab of mineral wool, and sew it up with plastic clapboard.
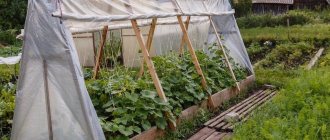
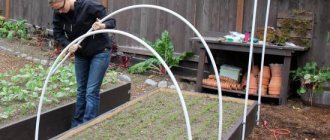
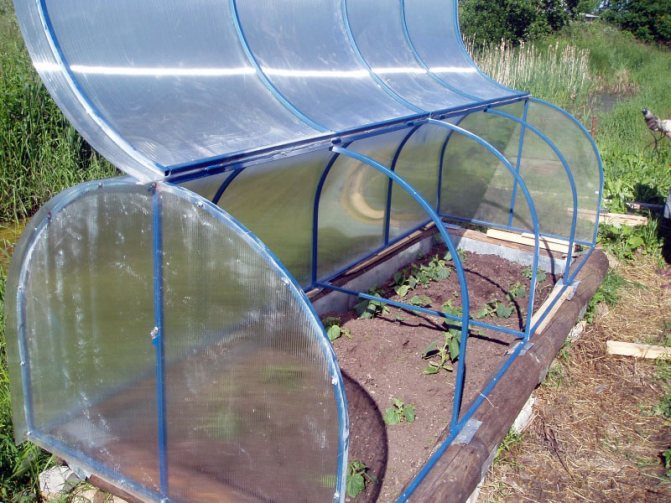
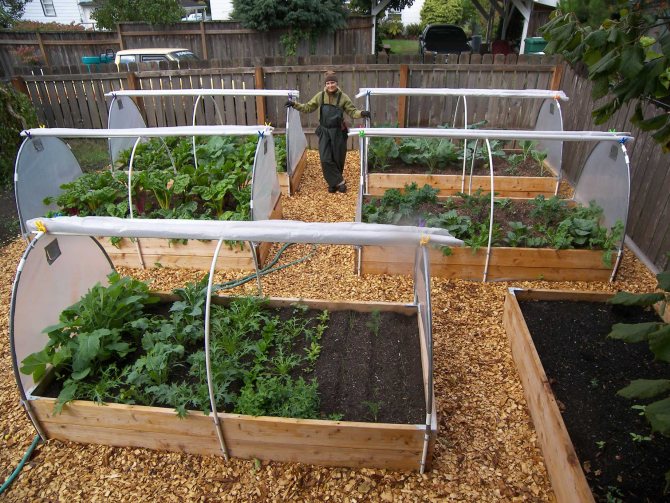
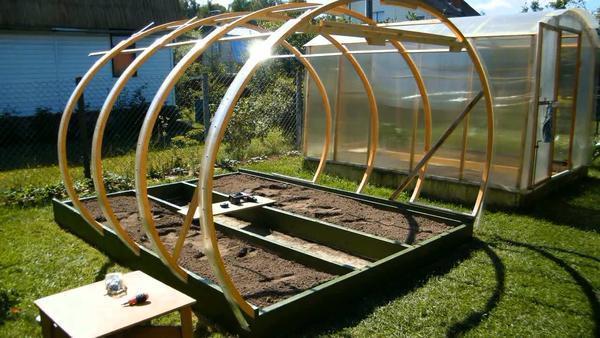
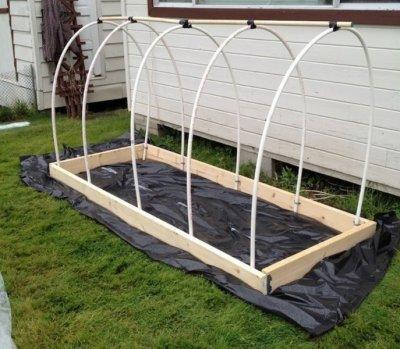
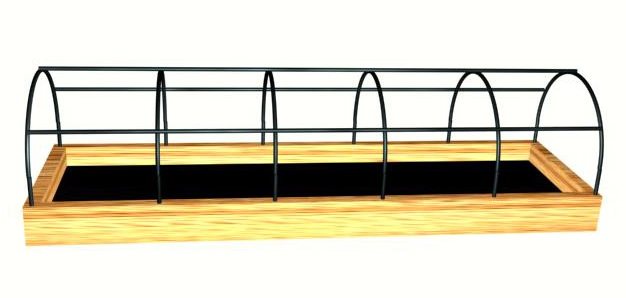
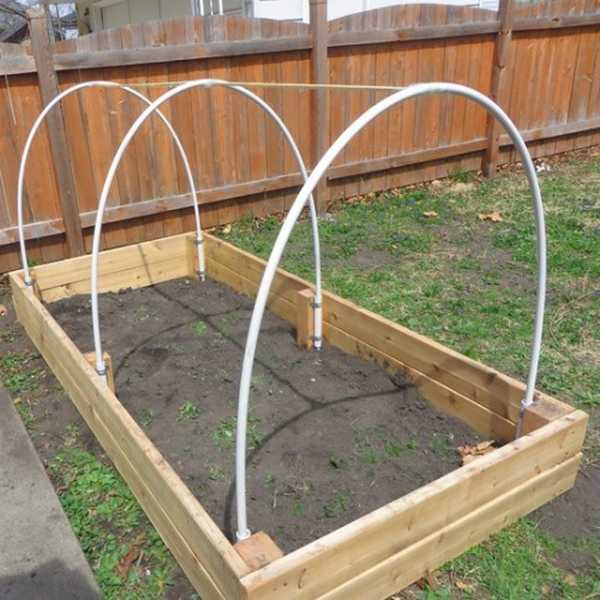
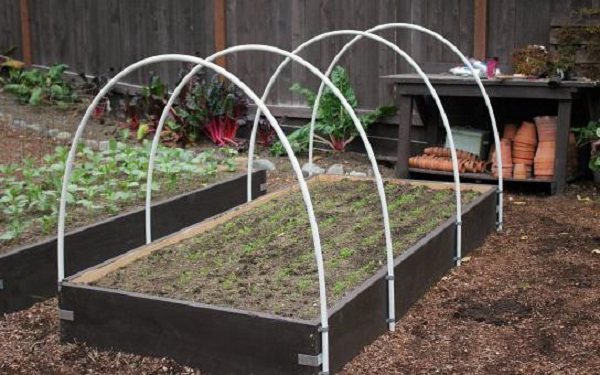
Creating a collapsible arched greenhouse
In order to build the simplest arched greenhouse on the site, you will need two pairs of hands, a free sunny day and the following materials and tools:
- wooden boards 4 cm thick, 15 cm wide, and length - depending on the length of the structure (or a bar with a section of 100x100 mm);
- PVC pipes - diameter not less than 25 mm;
- insulated wire for longitudinal ties;
- pieces of reinforcement about half a meter long;
- a film, better than double density or reinforced (or lutrasil, spunbond, other);
- corners.
- nails, or better self-tapping screws;
- screwdrivers, screwdriver, hammers, axes, hacksaws (including for metal), knife, scissors;
- antiseptic composition for processing boards, brushes, gloves;
- perforated tape;
- tape measure, marker;
- old garden hose.

Pros and cons of an arched greenhouse
Prices for PVC pipes
pvc pipes
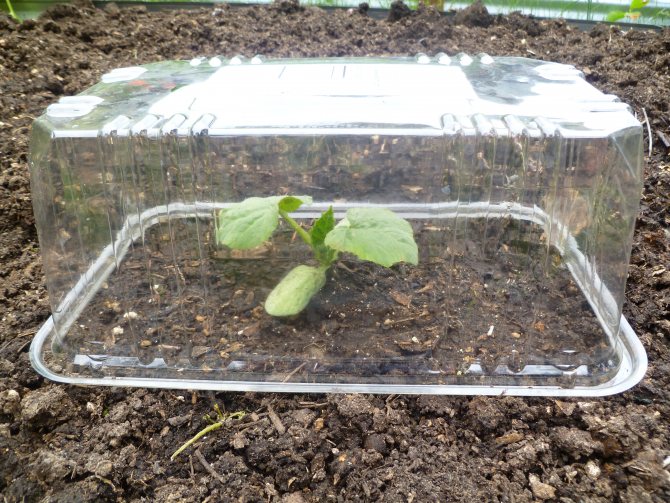
Mini greenhouse
The advantage of using mini garden greenhouses is that their miniature size allows them to be installed in a small garden area. However, when the seedlings grow up, they will have to be moved to a greenhouse or open ground.
Greenhouse building rules
The construction is done according to certain rules. First of all, you need to determine the place where it will be installed, as well as the size.
- The greenhouse is placed so that it "looks" to the south, and the end wall faces to the north. Thus, the maximum lateral surface will be illuminated and warmed from the east in the morning and from the west in the evening.

Greenhouse orientation
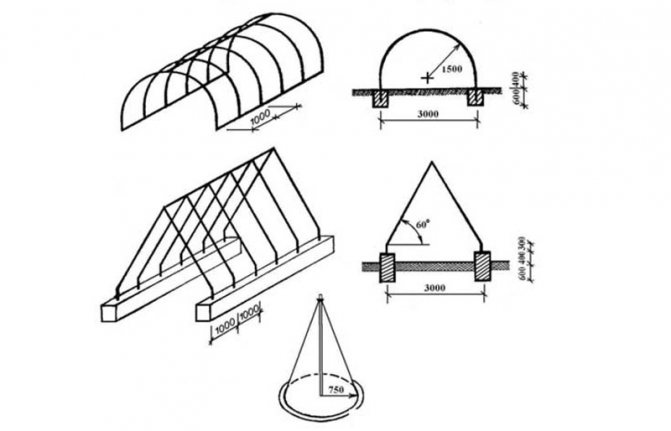
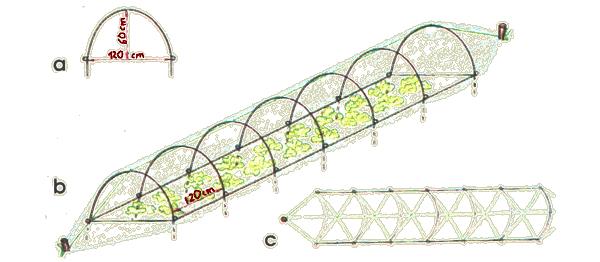
- The standard construction height is usually about a meter. To achieve this height, with an optimal width of 1.2 meters, three-meter PVC pipes will be needed.
- The greenhouse can be anything in length, but given the insignificant height of the structure, you should not make it longer than 4 meters.
- Traditionally, the distance between the arcs is maintained at half a meter, but it is permissible to increase it to 0.8 or even up to 1 m if necessary or with a lack of materials. Arcs cannot be installed less often than after one meter.
Construction diagram
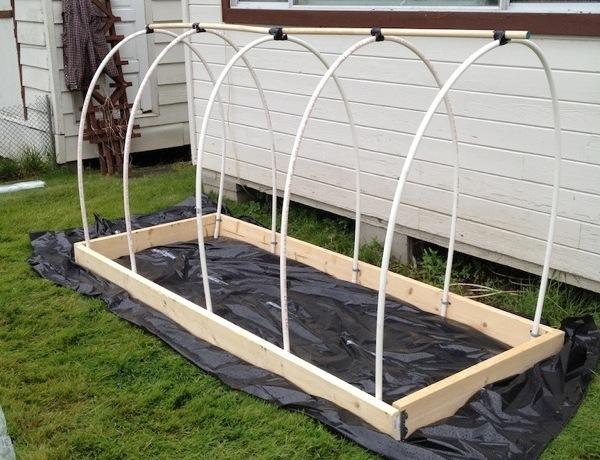
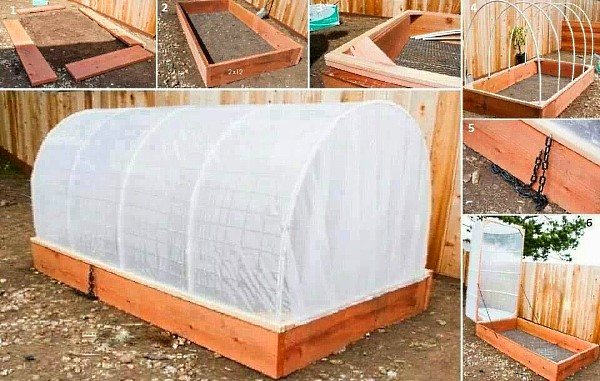
Step one: making the base
The reason should not be neglected. And although wood is not the most durable material and requires treatment with an antiseptic, the frame on the base will be able to stand more confidently, smoother, and the greenhouse will look much more attractive. In addition, the soil will not slide off the ridge during watering.
The base is made in the form of a box of a given size. Boards or beams are connected by corners using self-tapping screws or nails. The assembled box is covered with an antiseptic according to the instructions and left to dry completely. Then it is installed on the hail, previously leveled.
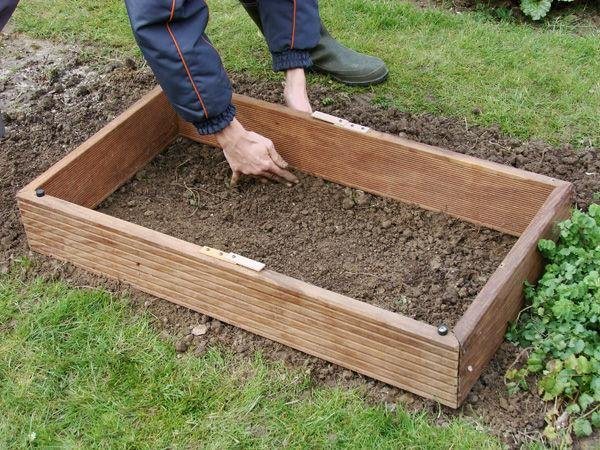
Assembled box
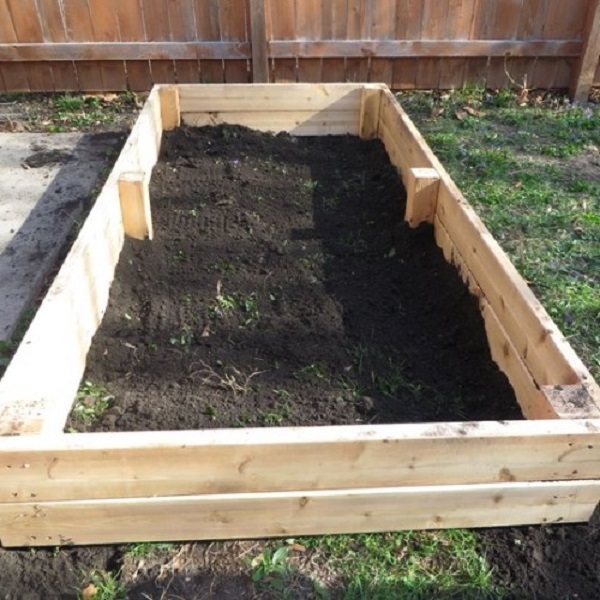
Another example of a box for a greenhouse
Step two: setting arcs
If there are no pieces of reinforcement of the required length (50 cm), they must be cut. PVC pipes are also cut into three-meter pieces. Further, inside the wooden box-base, on two long sides, the reinforcement pieces are firmly buried into the soil. In order to maintain an equal distance between the arcs, you must first make marks on the box.

Preparation of PVC pipes and fittings
The reinforcement is driven into the ground with a hammer 25 cm.Then pipes are tightly put on it and fixed with a perforated tape.
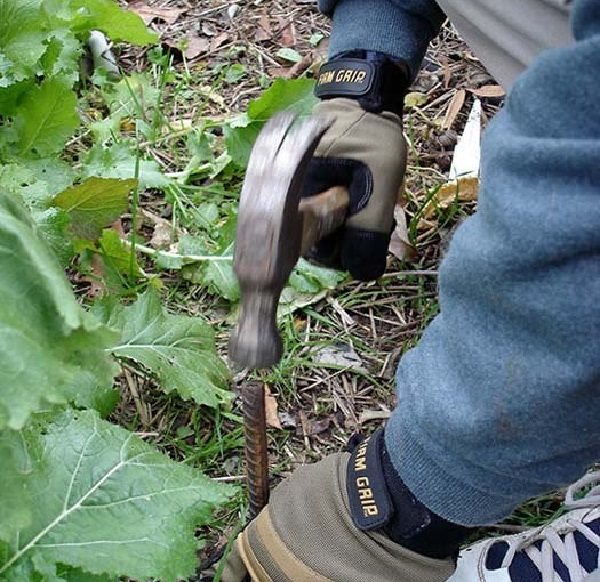
A piece of reinforcement is driven into the ground
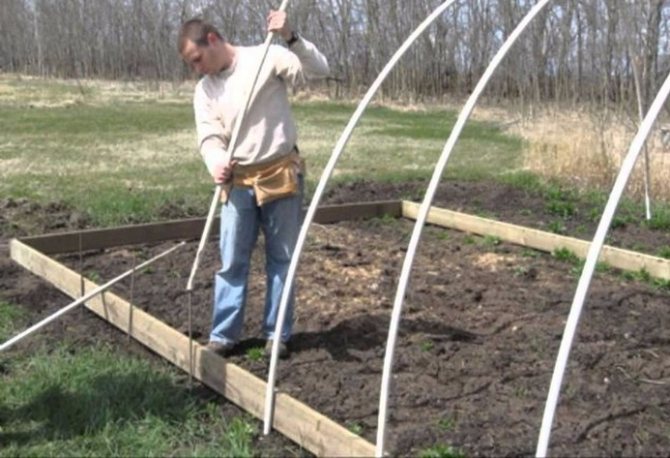
Installing arcs
Another mounting method. Greenhouse arcs are fixed inside the frame
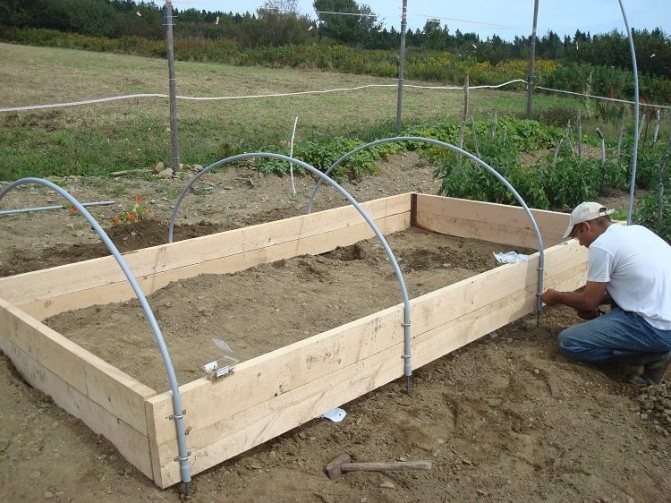
Pipes must be well secured to the base so that the structure is resistant to wind gusts

To strengthen the structure, the arc can be pulled to the base with perforated tape
An example of a finished frame
Step three: screed
It is necessary to make a screed, otherwise the arcs will deform over time and under the influence of temperatures, distorting the entire greenhouse. To make a screed, pipes are screwed with wire to the central part of the arches (the ridge of the greenhouse). Optimally - one along the entire length, but you can make a tie by connecting several short pipes.
Reinforcement of arcs
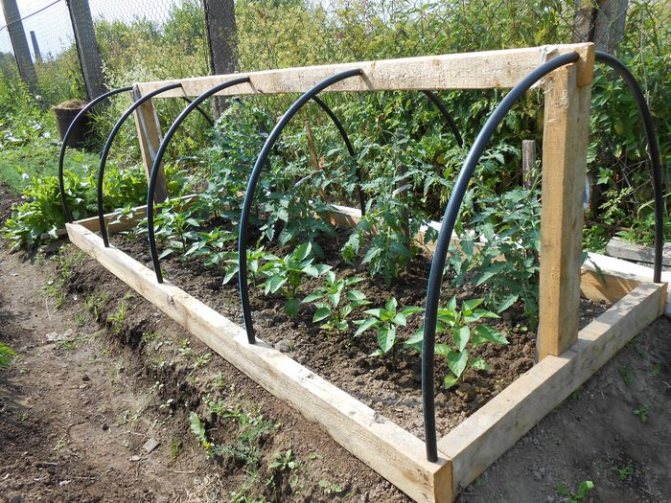
Another way to strengthen the greenhouse frame
Step four: cover
The film or other soft covering material that will be used is measured with a margin. The material will not only need to be fixed on the sides, but also close the ends with it, unless otherwise provided (you can make the ends of glass or polycarbonate).
It is convenient to attach the film to the arcs with an old garden hose. Pieces of 15 cm are cut, cut lengthwise and put on a pipe wrapped in film.
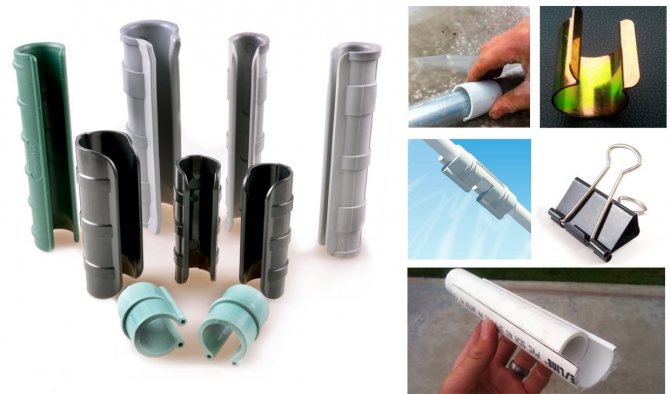
Clamp options for attaching the covering material
Advice! To make the coating easier to manipulate, it is best to fix the film along the ridge.In this case, if necessary, you can fully open one or another side of the greenhouse so that the plants are warmed up in the sun.
For convenient ventilation, the ends are also recommended to be made of film. The excess covering material is hung on the end to the base and fixed at the bottom (with an elastic band or simply the ends of the film are tied in a knot).
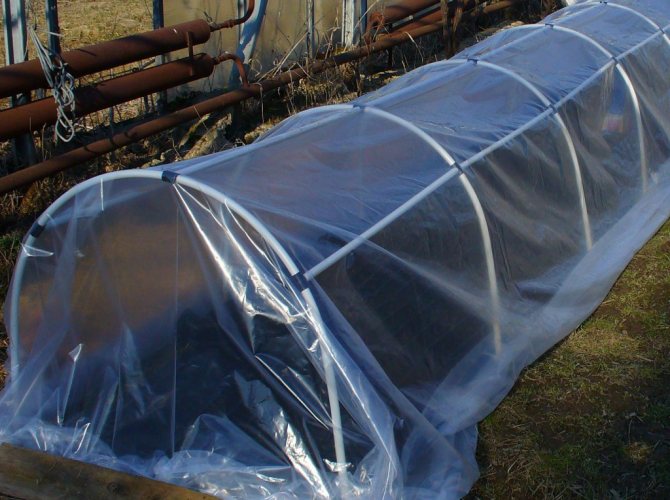
Example of a finished greenhouse
An alternative option is an opening greenhouse made of plastic pipes
Here is another option for making a greenhouse from arcs, but without a foundation.
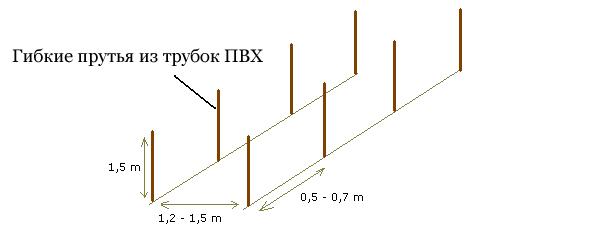
We drive flexible rods or PVC pipes into the ground. Before that, you should draw the planned location of the tunnel on a piece of land, due to which the pegs will be driven in exactly
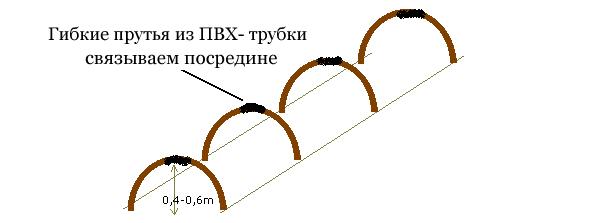
We tilt the rods or tubes in the middle and tie them with a cord. The edges of the film are covered with earth. A cord is tied to the pegs first, and then the film
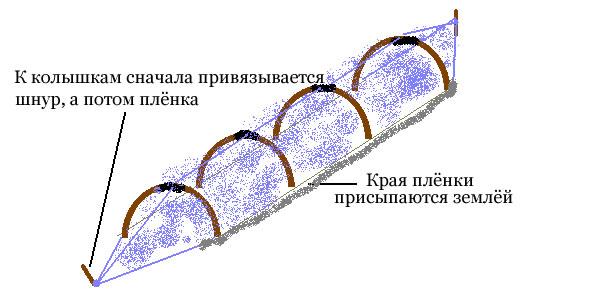
We strengthen the structure by connecting the following arcs with a cord, which will be tied to the pegs at the ends of the tunnel. After that, we stretch the film, which we sprinkle with earth on the sides, and at the ends we also tie it to the pegs.
The construction of a low tunnel made of film: a - an arc for creating a tunnel; b - tunnel after covering with a film; c - method of attaching the cord in the tunnel
Prices for plastic wrap
polyethylene film
Photo
Small greenhouses for giving further:
Calculation of the required amount of plastic containers
- For a greenhouse, we need about 500-600 plastic bottles of 1.5 or 2 liters, depending on the thickness of the walls.
- Wooden board or timber - two pieces of 3 meters and two pieces of 4 meters (section 10x7 cm). Railway sleepers can also be used for the foundation.
- Timber - 4 pieces, 2 meters each.
- Mounting rail.
Instruments
- Construction knife and cutter;
- Thin awl;
- A hammer;
- Electric or cordless screwdriver;
- Screwdriver Set;
- Nails and screws;
- Thick line, strong nylon thread and reinforcement;
- Any sewing machine (you can use a manual one);
- Building level, corner and 10 meter tape measure.